'87 TII Ovehaul - from bouncing idle to engine refurbishment
 12-04-07, 10:09 PM
#126
Well I have a good idea of the process of adjusting the maps, given that I'll finally be able to run stock boost levels we should be fine to start, then we'll go up 1psi at a time with the EBC and adjust the maps 1% at a time. Little steps, we'll take it real slow. I was just looking to see what air fuel ratios you guys suggest for the various loads on the engine.
I guessing some wheres around 10.0 or 11.0 under boost and maybe 13.5 cruising??? Like I said I'm gonna have to look into it, I saw a good thread a couple weeks ago that had some guidelines so I'm off to search now....
I guessing some wheres around 10.0 or 11.0 under boost and maybe 13.5 cruising???
Like I said I'm gonna have to look into it, I saw a good thread a couple weeks ago that had some guidelines so I'm off to search now....


 12-14-07, 01:24 PM
#129
Yeah I like it.
Thanks man. I was originally going to leave it that flat black but I decided that it didn't look right and ended up spraying right over it with the "Iron" colored Duplicolor Ceramic Engine Paint. The Iron over the black ended up looking great, it has a metallic tint to it that just drives me crazy. I was pleased overall with how it turned out considering this was the first time I attempted any large scale project, and especially considering that this was all done with spray cans.
I might very well do it all over with a paint gun when I spray the body in the future but I was primarily trying to remove the rust on the frame rails and give it a cleaner look. This build is more for function than looks.
At this point I am considering leave the TMIC in for now, as I plan on running 10lbs of boost at the most and I do have intentions of putting this through inspection soon enough, obviously I will have to reinstall the smog components but it will have to pass the visual end as well. So I might very well end up selling the FMIC, we'll have to see how it goes.
01-05-08, 03:59 PM
#131
Well today I finished the vacuum hoses, the charcoal canister, throttle body hoses and wires, I hooked up the purge valve and got my vac source for the boost gauge.
I ran a hose from the big nipple on the bottom of the purge valve to the nipple at the base of the oil neck:
Then I ran a hose from the other nipple on the bottom of the purge valve to the bottom vac nipple on the front of the throttle body. The top nipple on the purge valve was connected to the middle vac nipple on the front of the throttle body:

Should be good to go right?
I ran a hose from the big nipple on the bottom of the purge valve to the nipple at the base of the oil neck:
Then I ran a hose from the other nipple on the bottom of the purge valve to the bottom vac nipple on the front of the throttle body. The top nipple on the purge valve was connected to the middle vac nipple on the front of the throttle body:
Should be good to go right?
01-06-08, 08:18 PM
#132
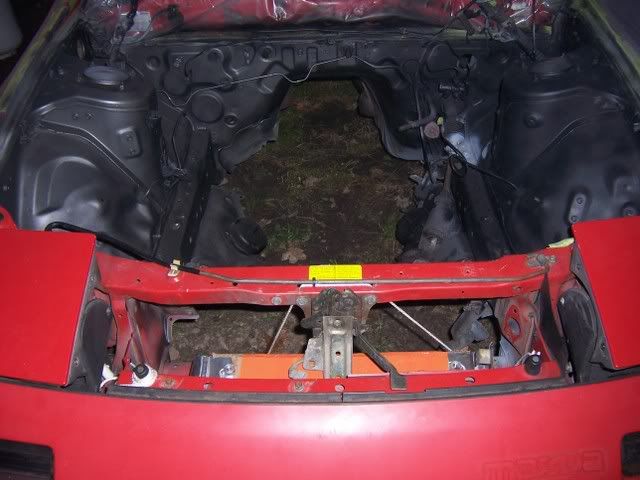
Today I got a chance to put the oil cooler back in, as well as the radiator and lines, the ignition coils are in and the harness is done. The crankcase ventilation is done and so is the BOV, just need a new coupler for the turbo to BOV pipe.
Oh I guess I should mention that I have decided to retain the TMIC for now. I plan on running only the stock boost for now until I have time to tune with the Rtek 2.0 and get the greddy boost controller and up it to 10psi max. I'm hoping that it'll be okay at 10psi with the stock TMIC.
So all I have left to do is :
install the clutch master and slave cylinders
the brake master cylinder
spark plug wires
tighten pressure plate to flywheel bolts
put in the heater hoses
put a t split in the crankcase vent line
wire the starter and transmission
install drive shaft
wire alternator
install main pulley
install short shift kit
install battery
fit a -4AN to M12 x 1.5 oil feed on housing
fit the exhaust and o2 sensor
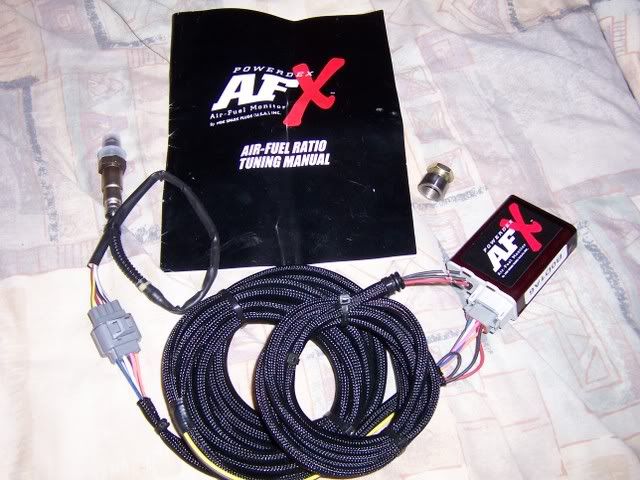
install NGK A/Fx wideband meter
probably some other things I forgot but that should pretty much get us running. Gotta fill all of the fluids w new juice first though.
Oh I guess I should mention that I have decided to retain the TMIC for now. I plan on running only the stock boost for now until I have time to tune with the Rtek 2.0 and get the greddy boost controller and up it to 10psi max. I'm hoping that it'll be okay at 10psi with the stock TMIC.
So all I have left to do is :
install the clutch master and slave cylinders
the brake master cylinder
spark plug wires
tighten pressure plate to flywheel bolts
put in the heater hoses
put a t split in the crankcase vent line
wire the starter and transmission
install drive shaft
wire alternator
install main pulley
install short shift kit
install battery
fit a -4AN to M12 x 1.5 oil feed on housing
fit the exhaust and o2 sensor
install NGK A/Fx wideband meter
probably some other things I forgot but that should pretty much get us running. Gotta fill all of the fluids w new juice first though.
01-07-08, 01:40 PM
#134
Yeah I have read a bit on here about ways to increase the boost capabilities of the stock TMIC but I am just looking to run 10psi MAX in the near future. I like the idea of the stock TMIC, it is much cleaner than a FMIC, doesn't block any cooling to the radiator or oil cooler and is out of the way of debris, not to mention how much shorter the plumbing is and that it still makes use of the hood scoop.
I might very well look into some form of water or alcohol injection in the future if I want to run more boost with the TMIC or maybe go FMIC then, but for now, for my needs, the TMIC will suffice.
I have a few questions though, first is about when I installed the solid oil pellet, I had the engine standing on it's back so that the main pulley was facing the ski when I pulled it off to change the pellet, is there any reason to be concerned about those washers slipping behind it, I have heard stories of people ruining their engines because of some washer slipping when they were messing with something up by the main pulley. I had the engine on its back and the flywheel was blocked so the shaft didn't rotate, i just took the old pellet out and put the new one in and tightened it back up.
Second, by taking the main pulley off, did I mess up my timing? Aren't there timing marks on there? I have yet to reinstall the pulley due to two broken bolts that I need to replace, did you know where I could find these? I imagine just take a unbroken one to NAPA or something.
Also, I am missing the nut on the tranny bell housing where the bolts comes through the housing from the engine side, its on the top on the passanger's side, I need to find that nut or get a new one but can I drive it around the driveway in the meantime with out it?
Minor details I hope but thanks for the help as always. I'll take some pics of the progress when I get home today for you guys, it's really coming along.
This also means I have a FMIC setup for sale if anyone knows anyone interested, keep me in mind.
01-07-08, 02:58 PM
#135
Full Member
Join Date: Nov 2007
Location: Gloucester, VA
Posts: 71
Likes: 0
Received 0 Likes
on
0 Posts
where did u get the peice to hook the after market intake to the stock MAS...i bought a hks intake and it was just the intake and no piping and i dont know what to do i have a TII.
01-07-08, 10:33 PM
#136
Are you talking about the silver adapter circled in red?

They come with the air filters when you buy them, I think I have a few laying around here, I could send one to you if you wanted. You pay the shipping and it's yours pal. cool?
Now does anyone have any input on my above questions about the thrush washer /torrington bearing things, or does that only apply to removing the front cover? All I did was replace the front oil seal under the eccentric shaft hub.
And then do I have to do anything to set the timing with the pulley or am I okay to bolt it on and start up the car?
This might be retarded but I'm really tired and ......
I just trailed off and searched a bit, found this from mazdatrix.com:
**********
Front Pulley / Thrust Bearings
ANYONE changing a front pulley, or loosening the front eccentric shaft bolt for ANY reason!, needs to be aware of what can go wrong with the torrington thrust bearings inside the front cover/front of engine!!
Before we wade through this FAQ, the way to prevent the problem from happening in the first place is to, (BEFORE! you loosen the bolt):
1) If the engine is in the car (this DOES NOT APPLY for 93-95's) do something to wedge the clutch pedal down -- meaning a 2x4 or something like it, holding the pedal down and wedged against steering wheel or front of the seat.
2) If the engine is out of the car, set it with the flywheel down, front pulley up, the whole time you are working on the front of the engine. Do not roll the engine horizontal until the front bolt is tightened.
3) For 93-95's you need to do something to wedge the flywheel forward - easiest we have done is a small piece of wood up through the inspection plate on the bottom of the bellhousing. With the wood between the pressure plate and the bellhousing. Do something to hold it there, because if you rotate the engine while trying to get the bolt loose, the wood will fall out.
What any of the above steps will do is to hold the rear torrington bearing in place against the thrust plate - keeping it from dropping out of place if the spacer moves forward.*********
So hopefully I'm good with the bearings, Iwe'll find out huh?
And the pully only goes on one way I guess so we're all set. Thanks RX7 Club!!!(and mazdatrix)
Some parts are on their way and I think I'll try to weld the bung for the wideband into my RB downpipe this weekend. Sounds like fun to me.
Pics soon to come of progress.
01-11-08, 04:08 PM
#137
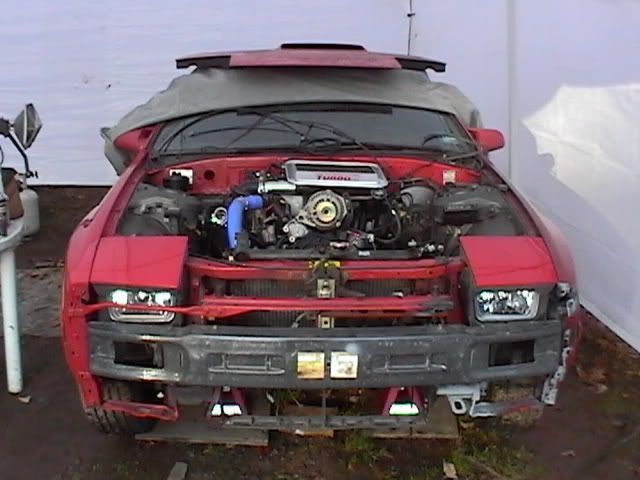
Pics finally and electrical connector ID
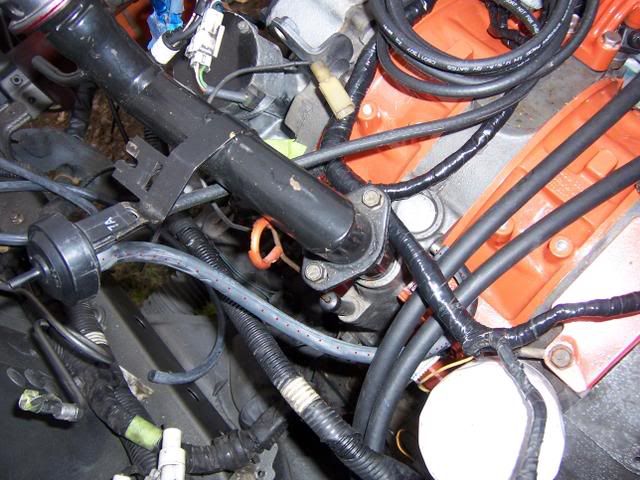
Ok so we are getting closer. I had off today so i had a chance to T the vac lines for the pressure sensor and BOV so that they both feed from the vac nipple right below the BAC Valve. I also hooked up the crankcase ventilation system to the charcoal canister and the intake piping with the restrictor pill or whatever it is inline just like it was.
I have a few wires I'm not sure where they go could you guys help me out here:
Looks like a ground-
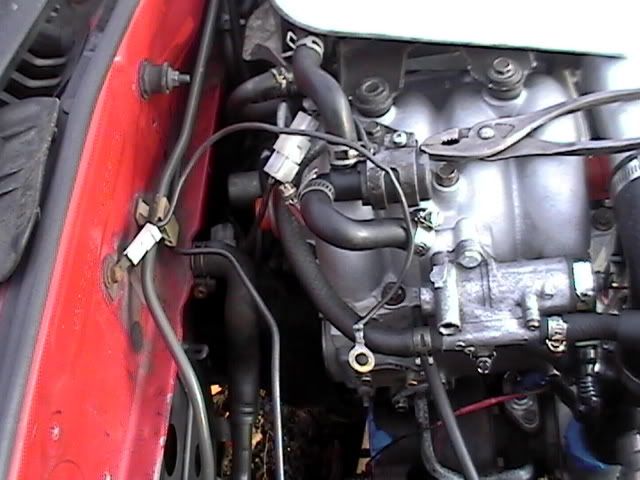
by the clutch master cylinder-
the white ones under the fuses-
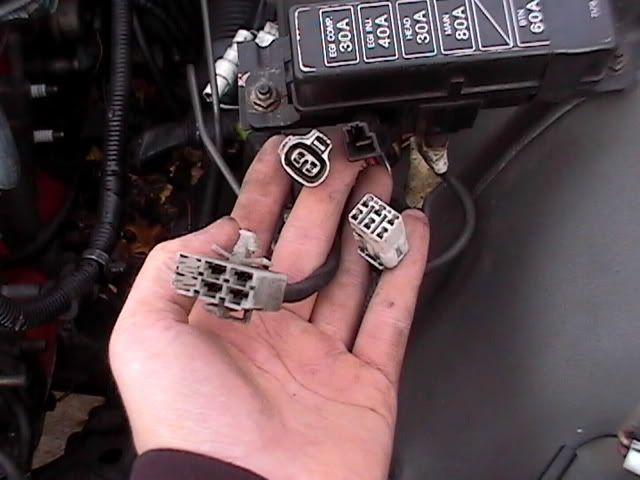
by the ac compressor location-

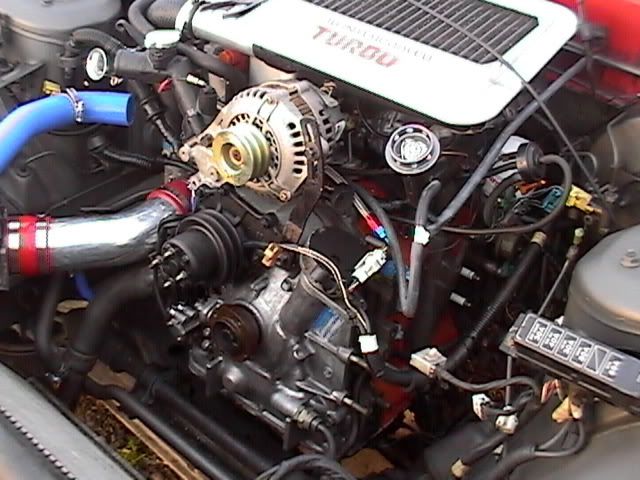
As of today this is what she looks like-
Thanks for your help.
I have a few wires I'm not sure where they go could you guys help me out here:
Looks like a ground-
by the clutch master cylinder-
the white ones under the fuses-
by the ac compressor location-
As of today this is what she looks like-
Thanks for your help.
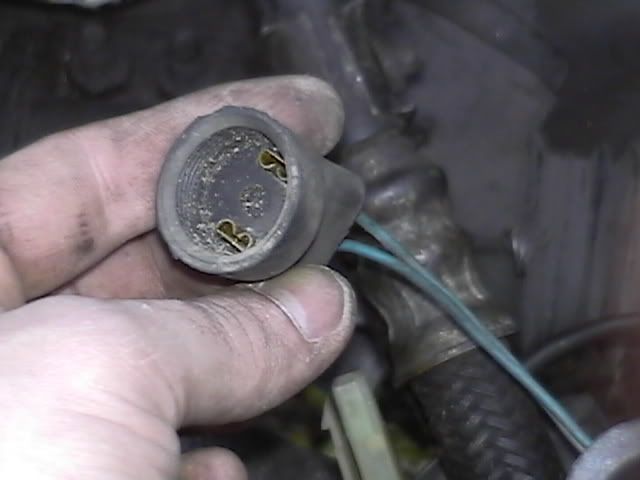
01-11-08, 04:34 PM
#138
Pic 1, the other end straps to your tranny
Pic 2, I thyink these are both untouched on my car as well.
Pic 3, the two white ones are used for the Power Steering, and the larger 6 plug I believe is for the GTU that has the built in Shock thnagy.
Pic 4, not sure. Mine is unpluged right now.
Good job there!
Pic 2, I thyink these are both untouched on my car as well.
Pic 3, the two white ones are used for the Power Steering, and the larger 6 plug I believe is for the GTU that has the built in Shock thnagy.
Pic 4, not sure. Mine is unpluged right now.
Good job there!
01-11-08, 07:41 PM
#139
Thanks so much Wankler, thats good to know.
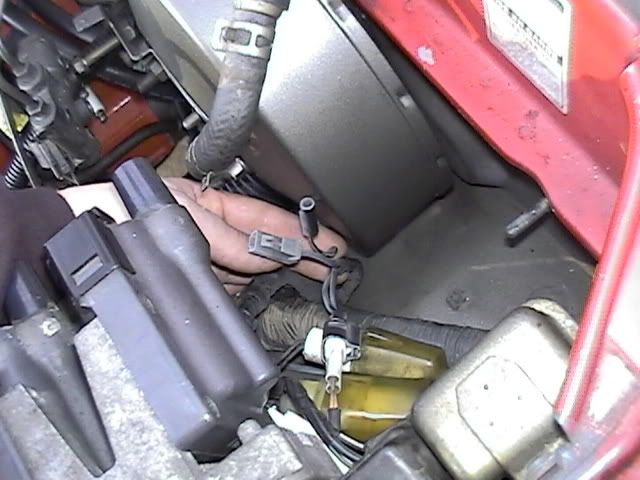
One more, and I don't have clue where this one goes:

I also installed the Metric to AN adapter on the block for the turbo oil feed.

The clutch master and slave cylinders were installed too.

Also put hose clamps on everything that still needed them, installed the heater hose and oil metering pump connecting rod,
As of right now, all I need to do is:
Then fill all new fluids and start her up.
One more, and I don't have clue where this one goes:
I also installed the Metric to AN adapter on the block for the turbo oil feed.
The clutch master and slave cylinders were installed too.
Also put hose clamps on everything that still needed them, installed the heater hose and oil metering pump connecting rod,
As of right now, all I need to do is:
- get my pulley and belts on
- tighten the pressure plate to flywheel bolts
- install driveshaft
- wire the trans and the starter
- get a battery
- install brake master cylinder
- install the exhaust
- short shift kit install
- NGK A/Fx wideband
- Strut Brace
- Springs
- lower ball joints
Then fill all new fluids and start her up.
Last edited by NJGreenBudd; 01-11-08 at 07:53 PM.
01-12-08, 02:36 PM
#140
Senior Member
That wire in pic one with the white end above is also a ground it plugs into the gray end hanging there in your second pic of your previous post above then the loop end bolts to your wheel well using the outside bolt holding your coil pack on to the wheel well . I am pretty sure its a negative battery ground . I have messed with all those ground under the hood I knew what that one was right away . And the other ground in pic one of the previous post like wankler said does bolt to the top of the tranny pretty much right where it meets the engine .
01-13-08, 03:58 PM
#141
Thanks for the help with those wires.

I managed to weld in the fitting for the NGK A/Fx wideband into the Racing Beat downpipe. It came out good, except it;s a little closer to the engine than the recommended 12". I didn't read the instructions enough i guess, and it seemed to fit well where I put it. They say the sensors life might be shorter when placed closer to the engine, but the stock one is even closer and it lasts, though I know there different, this one has it's own heat and doesn't need to be so close to keep hot.
I don't think it really matters because I won't leave it in there long, I'm not going to use it 24/7, just to tune initially and then every so often for additional tuning when needed. I could always get another fitting and just weld it back in further down the tube if needed though. What do you guys think?
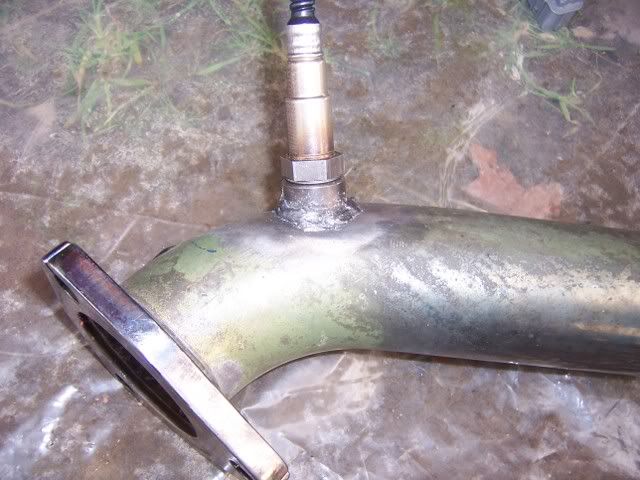
Oh, I'm also planning on getting a new downpipe shortly with the full Rev II system from racing beat. Might do it over when I get that.
I managed to weld in the fitting for the NGK A/Fx wideband into the Racing Beat downpipe. It came out good, except it;s a little closer to the engine than the recommended 12". I didn't read the instructions enough i guess, and it seemed to fit well where I put it. They say the sensors life might be shorter when placed closer to the engine, but the stock one is even closer and it lasts, though I know there different, this one has it's own heat and doesn't need to be so close to keep hot.
I don't think it really matters because I won't leave it in there long, I'm not going to use it 24/7, just to tune initially and then every so often for additional tuning when needed. I could always get another fitting and just weld it back in further down the tube if needed though. What do you guys think?
Oh, I'm also planning on getting a new downpipe shortly with the full Rev II system from racing beat. Might do it over when I get that.
01-20-08, 11:16 PM
#142
Well I got the pulley and belts on, mounted the wide band monitor and boost gauge in the car. I just order the new brake master cylinder and the Deka Intimidator battery.
I plan on picking up the Racing Beat Suspension Kit with the sway bars and their Rev II exhaust in the next week or so.
I have been itching to get all this wrapped up but it's been hectic lately with the holidays and the weather. Hopefully it will happen next weekend.
I plan on picking up the Racing Beat Suspension Kit with the sway bars and their Rev II exhaust in the next week or so.
I have been itching to get all this wrapped up but it's been hectic lately with the holidays and the weather. Hopefully it will happen next weekend.

 01-23-08, 09:34 AM
#144
Thanks for the help with those wires.
I managed to weld in the fitting for the NGK A/Fx wideband into the Racing Beat downpipe. It came out good, except it;s a little closer to the engine than the recommended 12". I didn't read the instructions enough i guess, and it seemed to fit well where I put it. They say the sensors life might be shorter when placed closer to the engine, but the stock one is even closer and it lasts, though I know there different, this one has it's own heat and doesn't need to be so close to keep hot.
I don't think it really matters because I won't leave it in there long, I'm not going to use it 24/7, just to tune initially and then every so often for additional tuning when needed. I could always get another fitting and just weld it back in further down the tube if needed though. What do you guys think?
Oh, I'm also planning on getting a new downpipe shortly with the full Rev II system from racing beat. Might do it over when I get that.
01-24-08, 02:28 PM
#145
Wideband controller location.....
The NGK A/Fx is nice because the controller is built into the display unit, it's all in one. So the controller/display will actually be mounted on the dash right near the clock.
I'll post pics when it's all wired up but I think we'll be okay as far as that stuff goes. I've never seen anyone mount the controller in the exact location that I am gonna try so we'll see how that goes.....
Thanks for checking in Scrip
I'll post pics when it's all wired up but I think we'll be okay as far as that stuff goes. I've never seen anyone mount the controller in the exact location that I am gonna try so we'll see how that goes.....
Thanks for checking in Scrip
02-03-08, 06:16 PM
#147
Progress
So today I -
* Got my pulley and belts on and tight
* Fan and Radiator Shroud
* Tightened the pressure plate to flywheel bolts
* Installed driveshaft
Still need to -
* Install Battery
* wire the trans and the starter
* install brake master cylinder
* install the exhaust
* short shift kit install
* Wire in NGK A/Fx wideband
* Strut Brace
* Springs
* lower ball joints
 02-03-08, 11:53 PM
#149
Banned. I got OWNED!!!

Join Date: Dec 2007
Location: paradise Florida
Posts: 946
Likes: 0
Received 0 Likes
on
0 Posts
i like it

good luck with your engine!