'87 TII Ovehaul - from bouncing idle to engine refurbishment
 08-13-07, 10:43 PM
#51
rambling update
Scrip, that sounds like a great idea, my lil bro wanted to get me this thing: http://www.autogeek.net/mo5140.html so that should work great...it'll look great with the fresh paint.
So my FMIC and piping just came in:

It came with a big bag of heavy duty t-clamps as well. I'm gonna test fit and see what i can do with some piping this weekend.
I'm gonna see how much more surface area of the FMIC is exposed with the GP Sports front bumper on. I want it to get airflow but not exposed to damaged. I am thinking about making some sheilding or ducting to redirect as much air flow to the FMIC, oil cooler and radiator. like this sort of but for a front mount:
Just something to work in conjunction with the stock air shields to make the most of the cold air. Any ideas?
Oh yeah i just tried to weld for the first time ever yesterday, and I am pleased to say that it's ALOT harder than it looks!! Hahaha me and my dad were laughing at each other, but it's alot of fun, he used to know how to weld w/ sticks so this automatic wire feed stuff isn't too bad for him but i'm just learning.
I was able to start making some decent beads after an hour or so of playing with it, was able to weld 2 plates of 12ga steel together so that the plates bent instead of the weld breaking.. I found that it helped to slow down the movement of the gun and let it melt more, and I also had the wire speed too low in the begining...,, I'm really trying to keep the arc length just right and move slow...Any advice for a beginner welder?
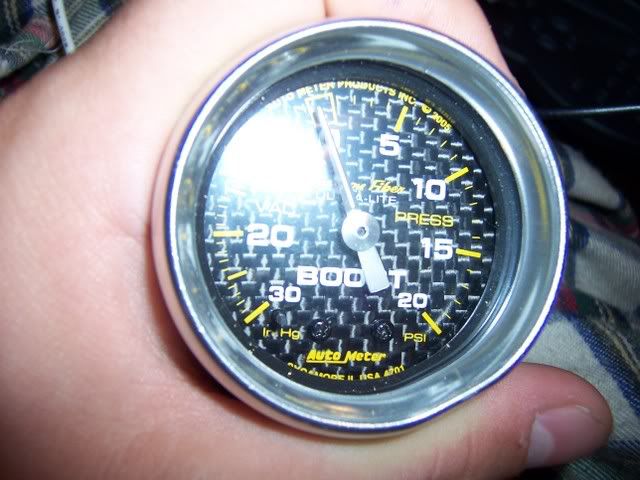
one more, just a score on the side, I just bought this autometer gauge for a few bucks the other day, just a small dent in the metal ring, it was probably dropped or something at one point, it's supposed to e brand new but we'll see if it works or if it's accurate.
So my FMIC and piping just came in:
It came with a big bag of heavy duty t-clamps as well. I'm gonna test fit and see what i can do with some piping this weekend.
I'm gonna see how much more surface area of the FMIC is exposed with the GP Sports front bumper on. I want it to get airflow but not exposed to damaged. I am thinking about making some sheilding or ducting to redirect as much air flow to the FMIC, oil cooler and radiator. like this sort of but for a front mount:
Just something to work in conjunction with the stock air shields to make the most of the cold air. Any ideas?
Oh yeah i just tried to weld for the first time ever yesterday, and I am pleased to say that it's ALOT harder than it looks!! Hahaha me and my dad were laughing at each other, but it's alot of fun, he used to know how to weld w/ sticks so this automatic wire feed stuff isn't too bad for him but i'm just learning.
I was able to start making some decent beads after an hour or so of playing with it, was able to weld 2 plates of 12ga steel together so that the plates bent instead of the weld breaking.. I found that it helped to slow down the movement of the gun and let it melt more, and I also had the wire speed too low in the begining...,, I'm really trying to keep the arc length just right and move slow...Any advice for a beginner welder?
one more, just a score on the side, I just bought this autometer gauge for a few bucks the other day, just a small dent in the metal ring, it was probably dropped or something at one point, it's supposed to e brand new but we'll see if it works or if it's accurate.
 08-25-07, 03:07 PM
#52
So I got the new trans here, some new radiator hoses, the ball joints came in, the tanabe gf210's are on their way in the mail.
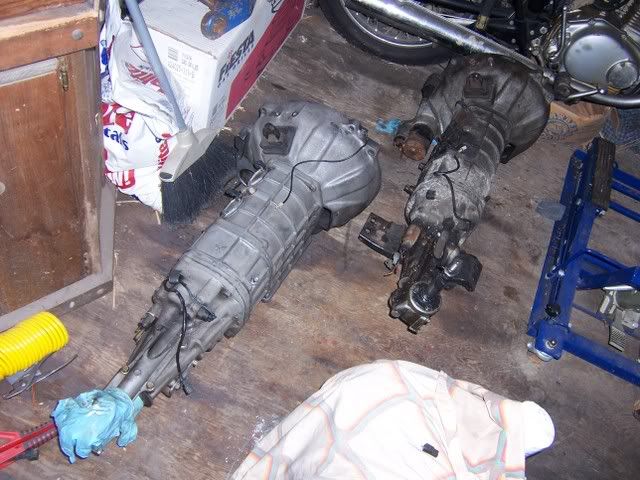
For the trans, it's a "j-spec" one from a forum member, looks to be in good shape but the wiring is slightly different than the one I pulled out of my car.
Here's a side by side:
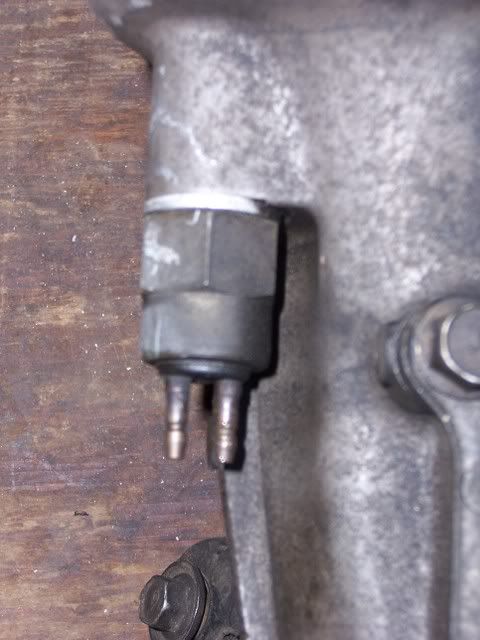
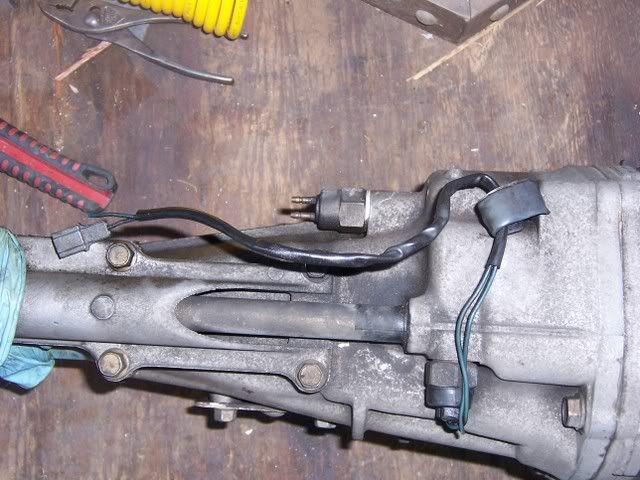
On the old one, the rear plug on the left side of the tranny, has four plugs. i think their the "back up light and fifth gear switch":

The new one only has two on that spot:
What do you suggest here???
The other plug on the back, on other side of the trans has two wires on each tranny but the old one is round two pin and the new one is sqaure:
Old-
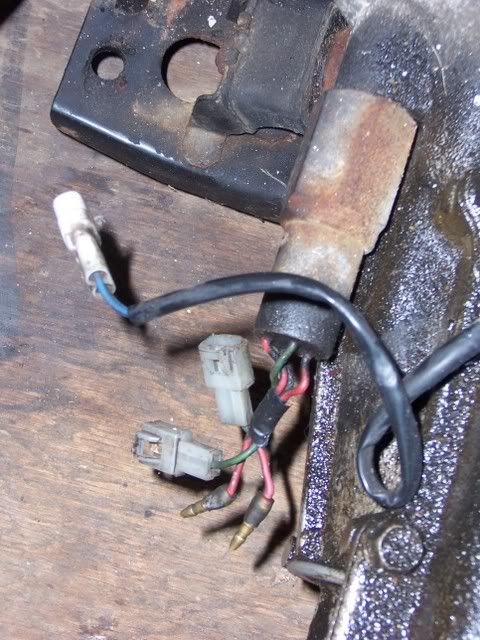
New-
I think this long, two wired connector is the neutral safety switch. I'll just rewire it with the right connector and be done with it.
So my question really is why does this trans only have two wires instead of 4 where the fifth gear switch and back up lights are?
For the trans, it's a "j-spec" one from a forum member, looks to be in good shape but the wiring is slightly different than the one I pulled out of my car.
Here's a side by side:
On the old one, the rear plug on the left side of the tranny, has four plugs. i think their the "back up light and fifth gear switch":
The new one only has two on that spot:
What do you suggest here???
The other plug on the back, on other side of the trans has two wires on each tranny but the old one is round two pin and the new one is sqaure:
Old-
New-
I think this long, two wired connector is the neutral safety switch. I'll just rewire it with the right connector and be done with it.
So my question really is why does this trans only have two wires instead of 4 where the fifth gear switch and back up lights are?
08-25-07, 03:55 PM
#53
Answer to Wiring Question
hailers explained it, the jspecs don't have the 5th gear switch and it doesn't affect anything other than emissions, I don't have any emissions anyway. So I'll just hook up the reverse lights. Thanks guys.
hailers explained it, the jspecs don't have the 5th gear switch and it doesn't affect anything other than emissions, I don't have any emissions anyway. So I'll just hook up the reverse lights. Thanks guys.
08-25-07, 05:00 PM
#54
Update:
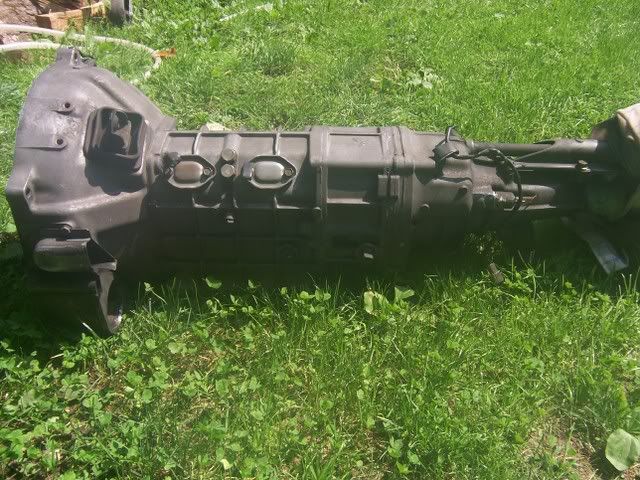
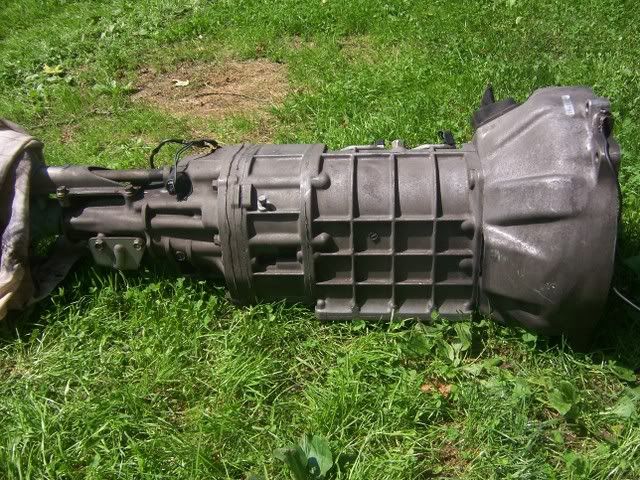
So here are so more pics of the new trans, not bad at all:
And here's the latest progress on the motor:
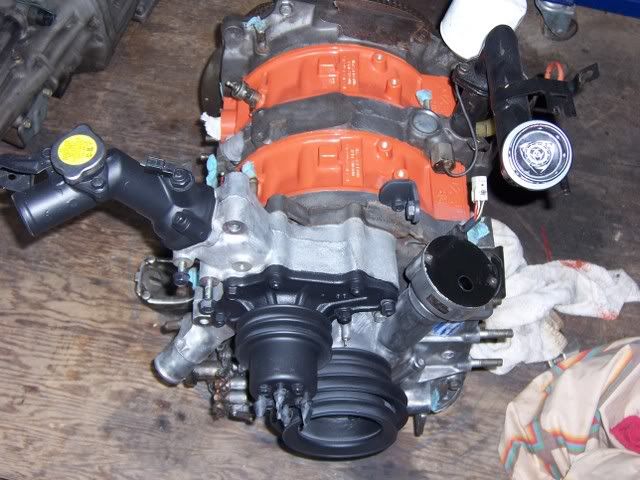
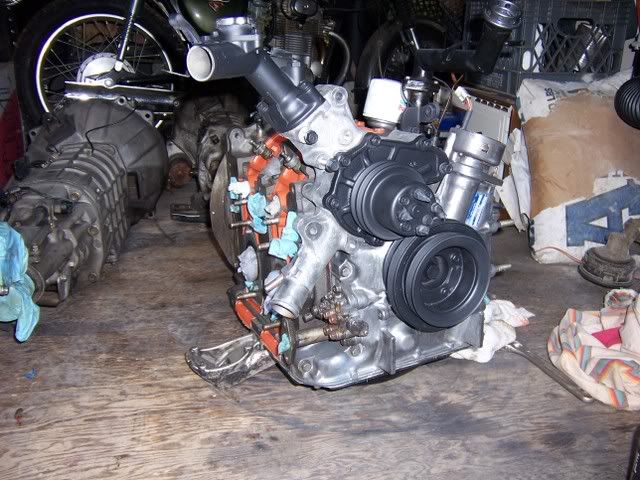
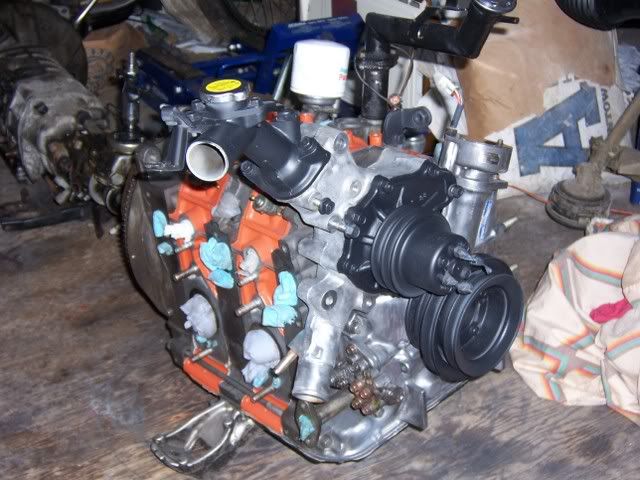
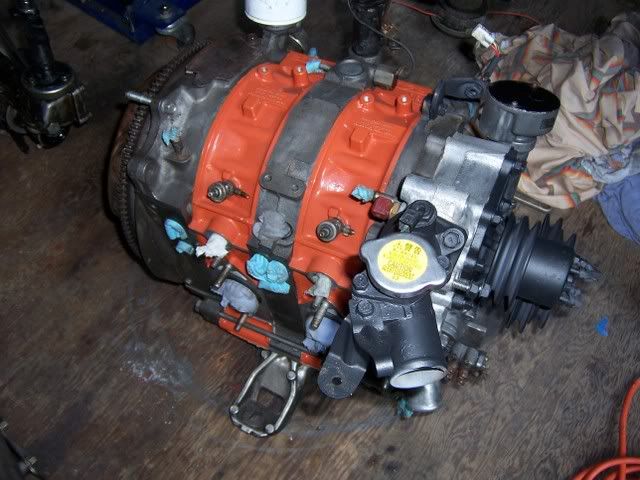
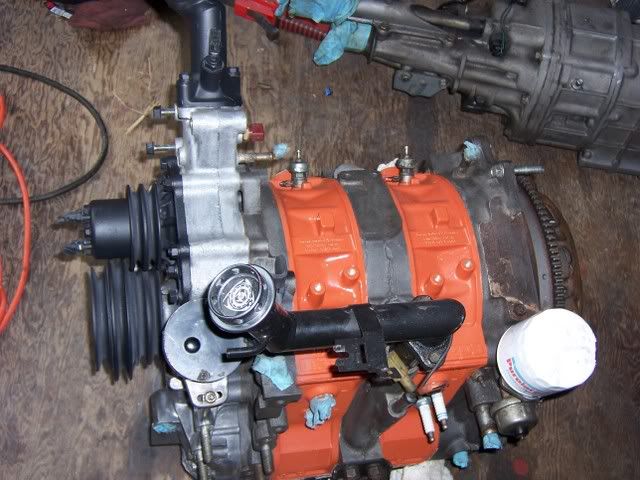
I am not sure if I'm gonna paint the front cover, I was going to paint it orange like the housings, but now I think that might be too much orange. IDK, it doesn't look bad cleaned like it is now, but it does look kind of incomplete. What do you guys think?
And here's the latest progress on the motor:
I am not sure if I'm gonna paint the front cover, I was going to paint it orange like the housings, but now I think that might be too much orange. IDK, it doesn't look bad cleaned like it is now, but it does look kind of incomplete. What do you guys think?
09-01-07, 03:47 PM
#55
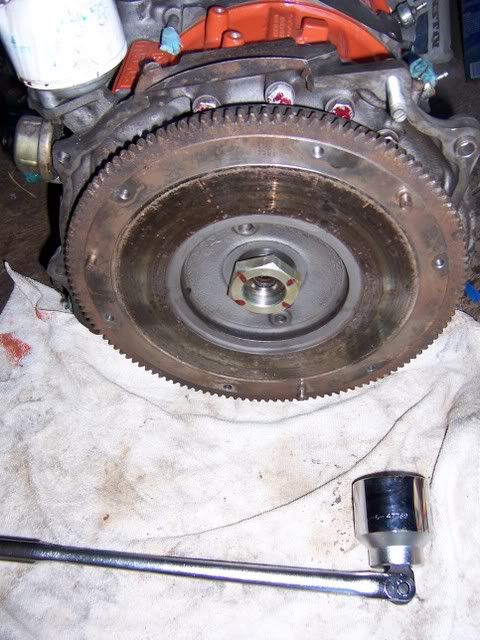
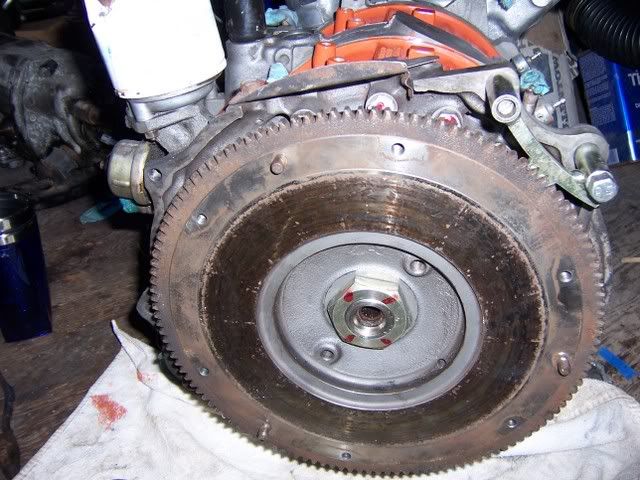
Ok so today I removed the clutch from the motor in preparation for th F1 Stage 2 Kit I just bought. I also decided to replace the front main seal and replace the Oil Pellet w/ the Atkin's Solid Pellet.
Old Seal and Pellet:

New Seal and Pellet:
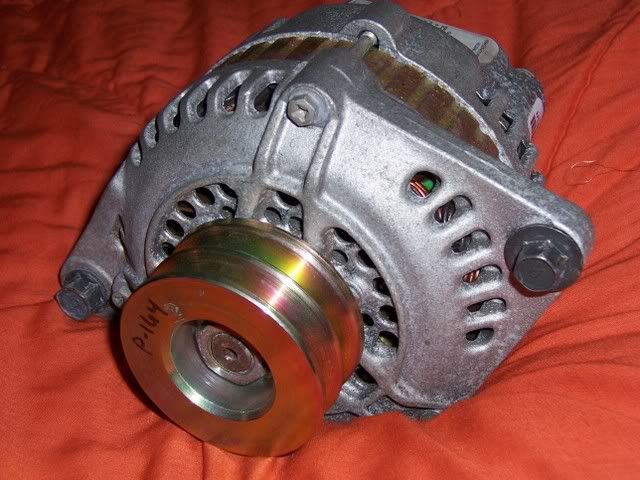
Everything went great until I went to torque the pulley to hub bolts down to 8ft-lbs, look at this:

They just snapped when tightening down,I got lucky and was able to get both bolts back out but not cool at all.
I will replace the rear main tomorrow I gotta get the socket at Sears first though.
I also got some Tanabe GF210's:
Short shift kit is in the mail w/ the stage 2 clutch, once all that gets here it will go together and back in the car.
Old Seal and Pellet:
New Seal and Pellet:
Everything went great until I went to torque the pulley to hub bolts down to 8ft-lbs, look at this:
They just snapped when tightening down,I got lucky and was able to get both bolts back out but not cool at all.
I will replace the rear main tomorrow I gotta get the socket at Sears first though.
I also got some Tanabe GF210's:
Short shift kit is in the mail w/ the stage 2 clutch, once all that gets here it will go together and back in the car.


 09-03-07, 05:25 PM
#60
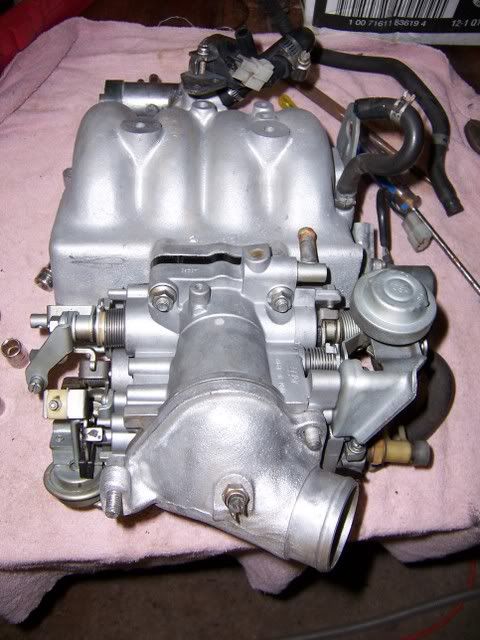
Today i swapped the stuff over to the new UIM and TB:


We're getting there, just gotta install the clutch and then the trans and motor goes back in. I started to check and cleanup the harness yesterday and so far it actually looks to be in really good shape.
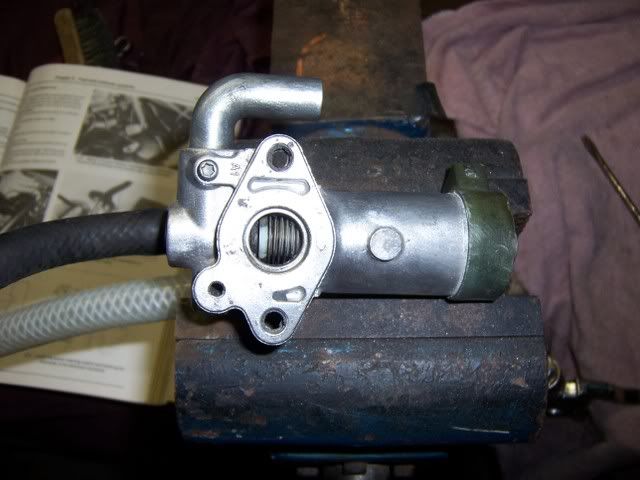
Oh yeah, when i was swapping the BAC valve I came across this crap that was inside of it, I can't imagine this is good for the air flow:
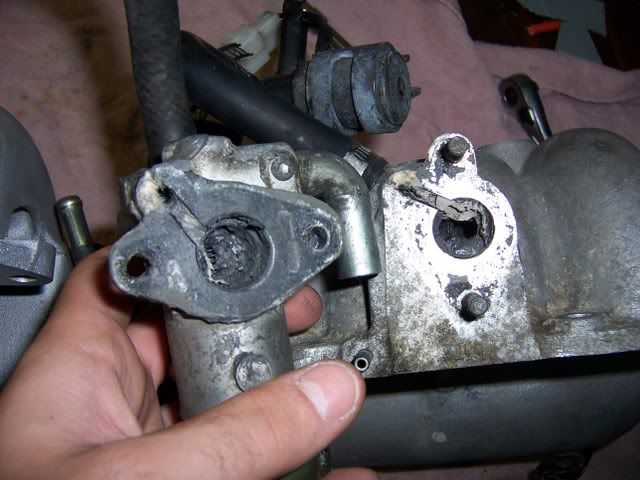
I cleaned it up, and this is what the port looks like on the new UIM:
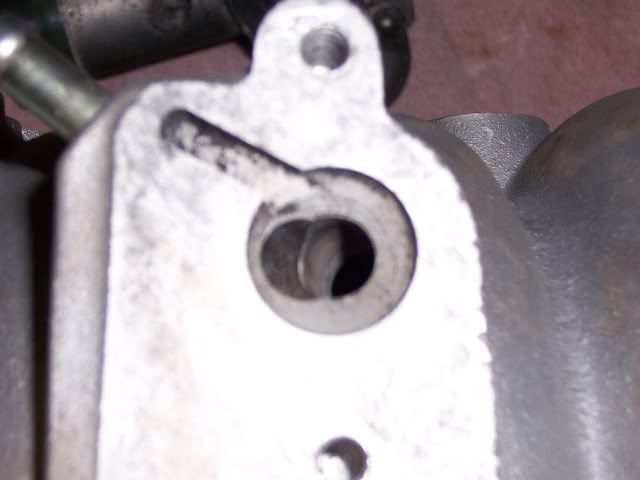
Is there supposed to be a diaphragm or something in the BAC valve or is this okay like it is?
We're getting there, just gotta install the clutch and then the trans and motor goes back in. I started to check and cleanup the harness yesterday and so far it actually looks to be in really good shape.
Oh yeah, when i was swapping the BAC valve I came across this crap that was inside of it, I can't imagine this is good for the air flow:
I cleaned it up, and this is what the port looks like on the new UIM:
Is there supposed to be a diaphragm or something in the BAC valve or is this okay like it is?
Last edited by NJGreenBudd; 09-03-07 at 05:33 PM.
09-04-07, 05:36 PM
#63
Thanks guys, I do appreciate the support.
The BAC Valve was like the only thing that didn't get a new gasket, I used black rtv sealant though, we'll see if it holds up okay. It's easy enough to get at if it needs to be replaced later on, but I'm sure it's in better shape now than before this.
I'm really waiting on the clutch to arrive and then I need to send the turbo out to get rebuilt. I wanna get it done before winter for at least a drive.
The BAC Valve was like the only thing that didn't get a new gasket, I used black rtv sealant though, we'll see if it holds up okay.
It's easy enough to get at if it needs to be replaced later on, but I'm sure it's in better shape now than before this.I'm really waiting on the clutch to arrive and then I need to send the turbo out to get rebuilt. I wanna get it done before winter for at least a drive.
10-21-07, 06:06 AM
#64
Rotary Freak

Join Date: Dec 2006
Location: New Hampshire
Posts: 1,791
Likes: 0
Received 0 Likes
on
0 Posts
Sorry for bringing up an old thread but I forgot about the question I asked and didn't get the answer I wanted.
Im going to ask mazdatrix but I wasn't looking for the grommets, only the new electrical plugs.
Originally Posted by RotaMan99
where did you get the injector plugs?
where did you get the injector plugs?
Fuel Injector Parts @ Mazdatrix.com
Scroll down to Grommets, there are two different ones needed for each injector - upper and lower, you might want to get the o-rings too, I already had new ones.
Scroll down to Grommets, there are two different ones needed for each injector - upper and lower, you might want to get the o-rings too, I already had new ones.
10-21-07, 10:13 AM
#65
oh ebay. the injector connectors were bought on ebay for cheap. came with heat shrink tubing, and dielcectric grease too.
http://cgi.ebay.com/ebaymotors/injec...spagenameZWDVW
quite the deal if you ask me.
http://cgi.ebay.com/ebaymotors/injec...spagenameZWDVW
quite the deal if you ask me.
10-21-07, 10:31 AM
#66
so here's a question for you.
I just went to pull my pilot bearing w/ a crappy puller from the local parts store, w/ only two jaws, and couldn't get it out. The puller has already been ground on and kept slipping when I tried to pull it out.
I'm guessing the mazdatrix one is the best bet. Anyone have one they want to "rent" me??
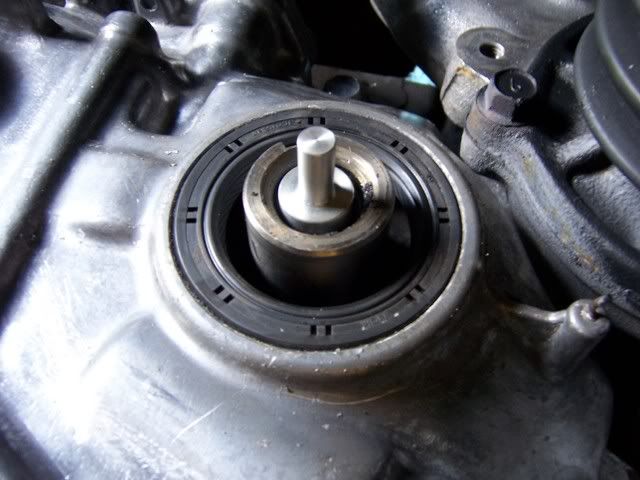
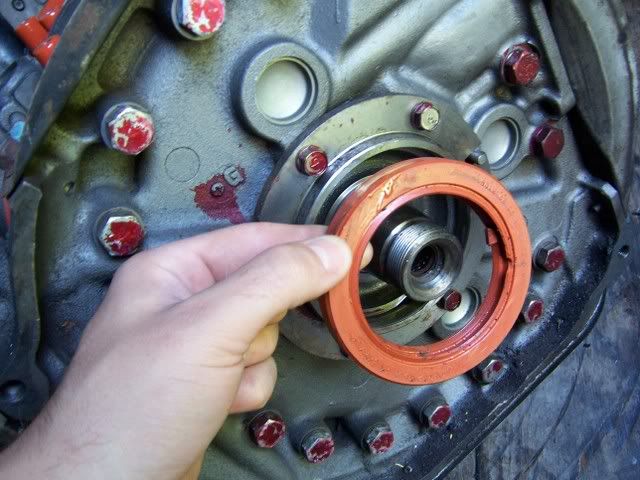
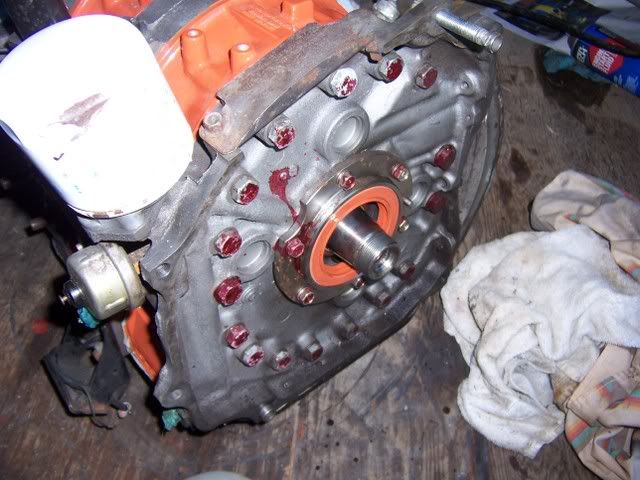
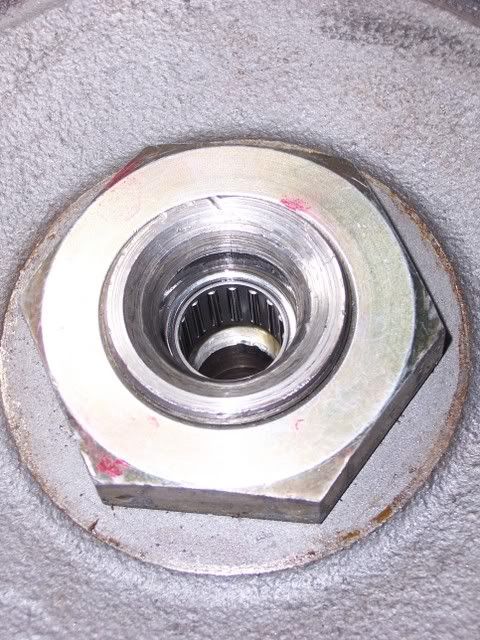
Also, and this is my main question, I noticed that there is a rubber and metal seal in front of the bearing. I didn't get a new one of these though. Is this essential?It doesn't say anything about the rubber seal in the manual.
here's a pic so you can see what I am talking about:

When the puller slipped, this rubber got all f'd up.
I just went to pull my pilot bearing w/ a crappy puller from the local parts store, w/ only two jaws, and couldn't get it out. The puller has already been ground on and kept slipping when I tried to pull it out.
I'm guessing the mazdatrix one is the best bet. Anyone have one they want to "rent" me??
Also, and this is my main question, I noticed that there is a rubber and metal seal in front of the bearing. I didn't get a new one of these though. Is this essential?It doesn't say anything about the rubber seal in the manual.
here's a pic so you can see what I am talking about:
When the puller slipped, this rubber got all f'd up.
10-21-07, 12:21 PM
#67
try going to a different autoparts store and get a better puller. Pepboys usually stocks nice tools. The cap is to keep debris out of the pilot bearing. Its not essential. If the alternator pulley is the only pulley you're bolting back on, use new, shorter bolts. Your old ones look like they were over stressed and elongated. They're trash.
10-21-07, 03:30 PM
#68
I was just getting ready to ship the turbo off to BNR when I found these cracks in the Turbine Housing:
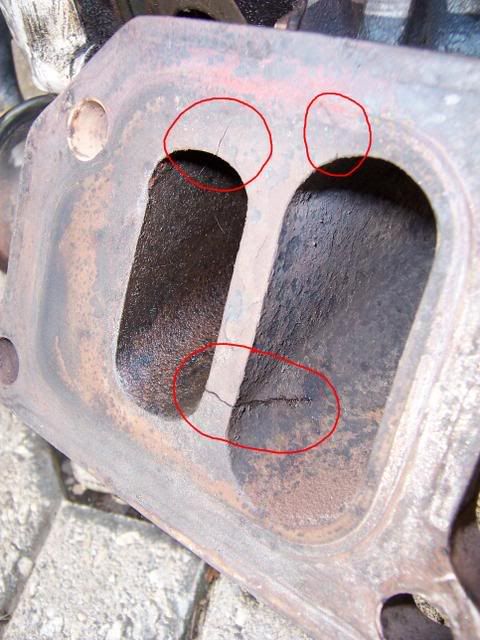
This doesn't look good, I'm gonna email BNR about the condition of the housing and see what my options are.
On a side note, I just bought a 20' x 20' Car port/ garage thing for my two rx7's. Yay!!! It'll be better than just sitting out in the yard. Somewhere to work in them in the winter out of the elements.
Last edited by NJGreenBudd; 10-21-07 at 03:35 PM.
10-22-07, 01:14 PM
#69
Update
ok.
The pilot bearing was removed with a dremel and a lot of patience, I notched the outer rim in two places on the front and back of the bearing and then gently preyed it apart with a cheap soft screw driver. It came right out and the e shaft wasn't even scraped.
The new bearing is installed and I ordered the pilot bearing seal as well.
Bryan @ BNR said the turbo housing would be okay for the upgrade. So I guess we're back on track.
I also just bought new competition motor mounts and a new front strut brace. I'll post pics of the new stuff as it arrives.
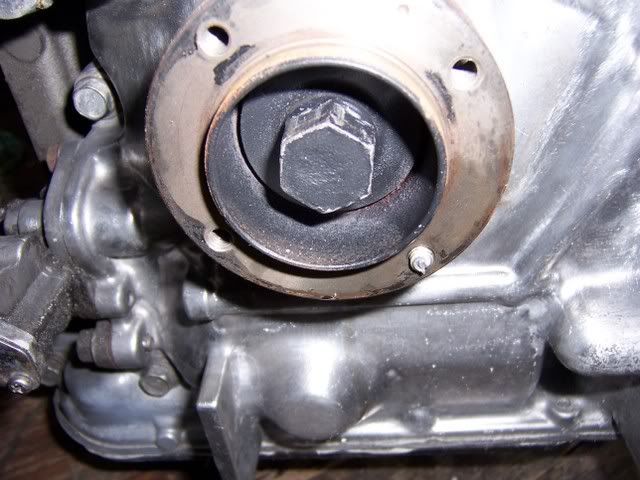
here's the new bearing installed:
The pilot bearing was removed with a dremel and a lot of patience, I notched the outer rim in two places on the front and back of the bearing and then gently preyed it apart with a cheap soft screw driver. It came right out and the e shaft wasn't even scraped.
The new bearing is installed and I ordered the pilot bearing seal as well.
Bryan @ BNR said the turbo housing would be okay for the upgrade. So I guess we're back on track.
I also just bought new competition motor mounts and a new front strut brace. I'll post pics of the new stuff as it arrives.
here's the new bearing installed:
 10-22-07, 04:32 PM
#71
Rotary Enthusiast
iTrader: (22)
Join Date: Sep 2007
Location: mass
Posts: 756
Likes: 0
Received 0 Likes
on
0 Posts
Looks good man, Im in the same boat, your a bit ahead of me as im still in the porting/building stage of the motor. Its ALOT of work, time, and money, the little things nickel and dime you to death, gaskets, paint, dynamat, little this and that.
Keep up the good work, its lookin good.
Your intercooler kit, is it a bolt in or are you fabbin your own pipes?I wanna see how that turns out.
Keep up the good work, its lookin good.
Your intercooler kit, is it a bolt in or are you fabbin your own pipes?I wanna see how that turns out.
10-22-07, 07:30 PM
#72
Thanks
I appreciate the input.
The intercooler setup will be designed by me. The HKS and GReddy kits out there didn't seem worth $1,400 and I didn't like the Cork Sport one for some reason that i couldn't pinpoint. I took a chance and picked a core that i thought would fit and bought some piping, t-bolt clamps and a bunch of good multi-ply silicone connectors.
I am gathering lots of info before I start hacking into the pipes and/or my car.
Here are two things I'm still working on: the stock TMIC connects to both the Air Supply Valve ( Hose 1) and the Air Bypass Solenoid Valve ( Hose 2):
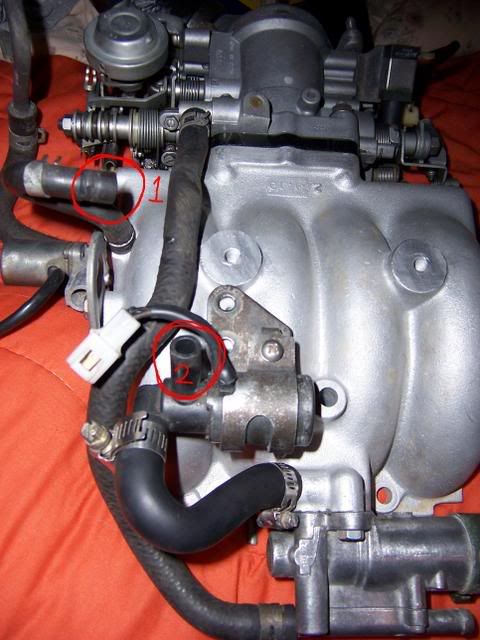
I plan on keeping both of these, but am not sure how to do so with the FMIC. Can I just plumb them to a source of metered air or what? How has anyone else done this?
I'll be sure to post my progress on here. Thanks.
The intercooler setup will be designed by me. The HKS and GReddy kits out there didn't seem worth $1,400 and I didn't like the Cork Sport one for some reason that i couldn't pinpoint. I took a chance and picked a core that i thought would fit and bought some piping, t-bolt clamps and a bunch of good multi-ply silicone connectors.
I am gathering lots of info before I start hacking into the pipes and/or my car.
Here are two things I'm still working on: the stock TMIC connects to both the Air Supply Valve ( Hose 1) and the Air Bypass Solenoid Valve ( Hose 2):
I plan on keeping both of these, but am not sure how to do so with the FMIC. Can I just plumb them to a source of metered air or what? How has anyone else done this?
I'll be sure to post my progress on here. Thanks.
10-24-07, 10:48 PM
#73
It's a good thing you replaced the pilot bearing seal. Mazda put it there for good reason...to keep grease where it belongs and not all over the clutch facings. And yes the turbo manifold is useable. It is quite common to see cracks there. The rule of thumb is that you can have cracks between the entry ports and as long as any other cracks don't go all the way to the outside of the flange, you're all good. I also thought you weren't going to use the warmup assist valve (the one on top of the UIM, that gives you the 4 million rpm idle at startup). If you don't want to use it, cap off the nipple at the manifold. If you want to use it, the #2 port that you circled originally went to the TMIC, so you could add a fitting or bung to your piping between the FMIC and throttle body.
10-29-07, 09:39 PM
#74
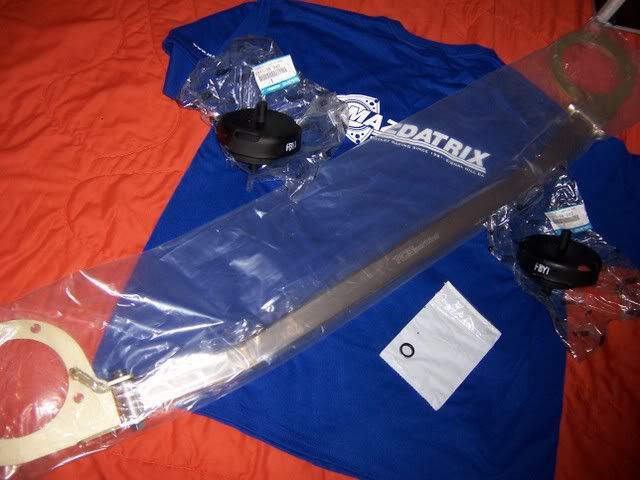
I just got the pilot bearing seal today, along with some other goodies. There's there new competition motor mounts, TCSportline Front Strut Brace and a new Mazdatrix T-Shirt....I'm growing my collection of Rotary T-Shirts as well as parts.
"I also thought you weren't going to use the warmup assist valve (the one on top of the UIM, that gives you the 4 million rpm idle at startup). If you don't want to use it, cap off the nipple at the manifold. If you want to use it, the #2 port that you circled originally went to the TMIC, so you could add a fitting or bung to your piping between the FMIC and throttle body."
Scrip, for some reason I was thinking we came to the conclusion to keep the Air Bypass Solenoid Valve but now I am not sure. I know I want to keep the T-wax and BAC valves, but I don't really know if I need either the Air Supply Valve ( Hose 1) or the the Air Bypass Solenoid Valve ( Hose 2).
#1 - Air Supply Valve - This valve controls the flow of additional air at idle to compensate for the power requirements of the power steering pump when the wheels are being turned.
-- But I don't have air conditioning or powersteering.
#2 - Air Bypass Solenoid Valve - As far as I can tell, this valve provides the extra air required to create the extremely high idle speed when the car is started while cold. From what I have been able to gather from various literature, the purpose of this high idle speed is to speedily warm up the catalytic converters to operating temperature.
--But I don't have catalytic converters or want my engine to start at 4 million rpms.
I am assuming we'll just leave the Air Bypass Solenoid Valve off then. But what about the Air Supply Valve?
Also I was wondering the other day about what parts of the rats nest I am gonna to have to keep or rebuild. Any hekp there would be greatly appreciated. As of now, I plan on keeping the crankcase ventilation and twin scroll, as well as the FPR solenoid.
10-29-07, 10:38 PM
#75
The air supply valve is used for power steering and for hot restarts. You could keep it even though you don't have ps if you want. And right on the nose with the vent, scroll and fpr solenoids. Keep those, trash the rest, in my opinion. Nice parts and shirt. I got a nice shirt from the rotary BBQ here in OKC last weekend.