Classicauto's S4 TII


 07-17-08, 11:18 AM
#152
haha, funny you say that, first thing I checked was the windshield, because they're getting more and more scarce. But yeah, glass is OK.
And yes, I planned on modding my front bumper yet again for better quality lights and to undo those strange bluges on the outer edges of the the brake ducts seen here:
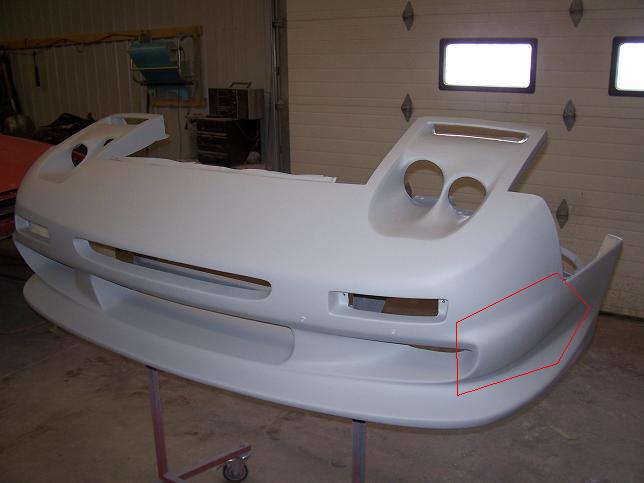
Also, the staggering of the lights will probably be taken out so both inner and outer lights are flush with each other, and the bugle/line that divdes them will be removed/shortened. Trying to get rid of the 3 or 4 angles where the cover looks strange on the car, I think these mods will be nice.
And yes, I planned on modding my front bumper yet again for better quality lights and to undo those strange bluges on the outer edges of the the brake ducts seen here:
Also, the staggering of the lights will probably be taken out so both inner and outer lights are flush with each other, and the bugle/line that divdes them will be removed/shortened. Trying to get rid of the 3 or 4 angles where the cover looks strange on the car, I think these mods will be nice.
 07-17-08, 02:21 PM
#154
tom port.. AKA streetport
iTrader: (6)
Join Date: Jan 2005
Location: ludlow, pa
Posts: 4,659
Likes: 0
Received 0 Likes
on
0 Posts
holy ****. you do have the worst luck with FCs!!!
about as bad as i do.....just when i think im ready to get it on the road i find a new problem...this all comes with tearing a car to the shell and rebuilding it though....well worth it IMO!!
about as bad as i do.....just when i think im ready to get it on the road i find a new problem...this all comes with tearing a car to the shell and rebuilding it though....well worth it IMO!!
07-18-08, 09:29 AM
#155
Yup, part and parcel of modding I guess - finding problems 
Insurance adjuster is stopping by today to go over the damage. Couldn't make it appear well in any pictures so we couldn't do the traditional online photo-imaging. My estimate came to $34XX.XX.........
Insurance adjuster is stopping by today to go over the damage. Couldn't make it appear well in any pictures so we couldn't do the traditional online photo-imaging. My estimate came to $34XX.XX.........
07-18-08, 11:57 AM
#157
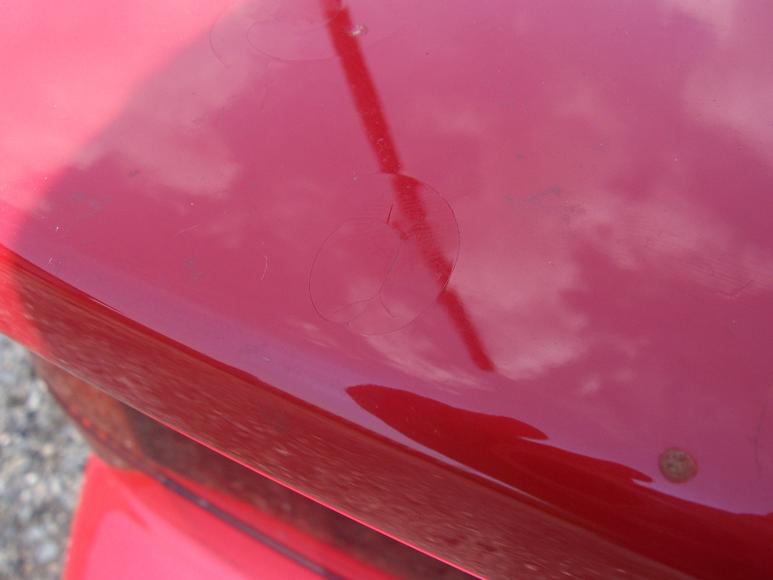
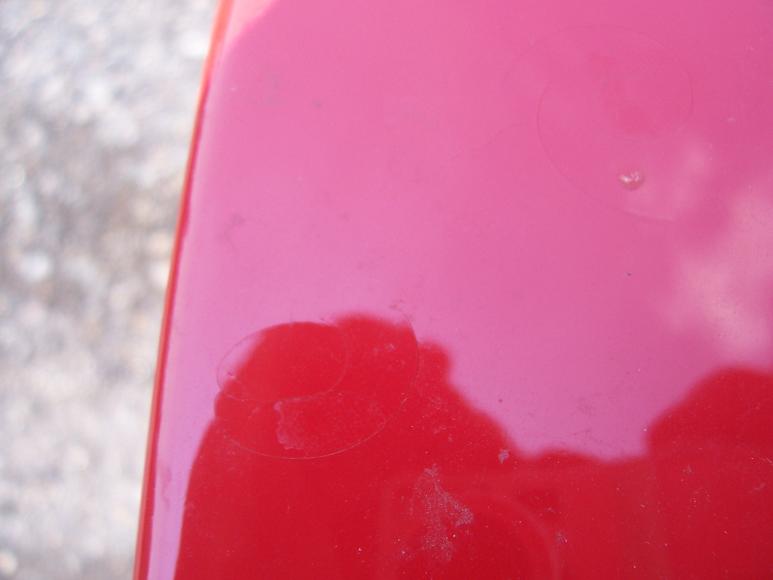
Here's the "best" pics I have of the damage. Its really tough to try to capture them because their so small. The first two pics are whats all over the spoiler...no dents because its foam, just cracked paint. But the third pic here you can clearly see one on the sunroof, despite the fact that 8-10 dents are in the area I photographed The hood has about 25-30 dents in total.....I just ordered an OEM hood for it, pricey!! $851 list!!! Good thing my insurance is picking up the tab on that one

Awesome! I'm convinced its the way to do it. I'll be doing the Electromotive tuning on my own also!
The hood has about 25-30 dents in total.....I just ordered an OEM hood for it, pricey!! $851 list!!! Good thing my insurance is picking up the tab on that one Awesome! I'm convinced its the way to do it. I'll be doing the Electromotive tuning on my own also!
07-18-08, 12:18 PM
#158
Lives on the Forum

Well some testing has determined that *gasp* somethings not right!! lol
With the timing gun on L1, and timing locked, I can sit there and rev the motor everythign will be cool no timing scatter when all of a sudden the timing mark will go mysteriously missing - and you'll find it about 50 degrees retarded on the side of the pulley...................then it'll come back to its home.
With the timing gun on L1, and timing locked, I can sit there and rev the motor everythign will be cool no timing scatter when all of a sudden the timing mark will go mysteriously missing - and you'll find it about 50 degrees retarded on the side of the pulley...................then it'll come back to its home.
I've read the problems you ran into prior to blowing up and this above reply...
It sounds like the polarity for the trigger wires were flipped.
Specifically, the HOME wires were backwards.
I've ran into this problem once, and the problem was the HOME wires were installed backwards.
The timing light would show an initial advance and then back down - in our case all the way up to about 40-degrees and then fall back to TDC.
Yes, we even blew up the motor with very little load.
It took a while to let go, but it did blow with very little warning.
Even with the EGT gauge, it showed no sign that something was wrong.
The only hint was the car made poor power.
Side note on the E6X...
I've done E6K's and jumped to the E8 and totally skipped over the E6X.
The above problem was done with an E11V1.
If there were problems with glitches with the HOME trigger signal being clean, then all that noise would also cause the CAS to "reset" randomly.

-Ted
07-18-08, 01:14 PM
#159
I know this is a little bit late, but I just wanted to comment on this...
I've read the problems you ran into prior to blowing up and this above reply...
It sounds like the polarity for the trigger wires were flipped.
Specifically, the HOME wires were backwards.
I've ran into this problem once, and the problem was the HOME wires were installed backwards.
The timing light would show an initial advance and then back down - in our case all the way up to about 40-degrees and then fall back to TDC.
Yes, we even blew up the motor with very little load.
It took a while to let go, but it did blow with very little warning.
Even with the EGT gauge, it showed no sign that something was wrong.
The only hint was the car made poor power.
Side note on the E6X...
I've done E6K's and jumped to the E8 and totally skipped over the E6X.
The above problem was done with an E11V1.
If there were problems with glitches with the HOME trigger signal being clean, then all that noise would also cause the CAS to "reset" randomly.
-Ted
I'll post how its wired when I tear it apart, I'd be surprised if it was backwards (but we're all human.........) however I'd also be relieved somewhat because then I'd at least have a more concrete answer aside from "the EMS is doing weird stuff"
Thanks for the info.
07-18-08, 02:22 PM
#160
Visual Kei
iTrader: (16)
Join Date: Nov 2005
Location: Mtns of NC/SC
Posts: 2,480
Likes: 0
Received 0 Likes
on
0 Posts
Love your car... was behind you guys when your battery terminals came lose on Hwy 129 @ DGRR this year. Very nice car man. Found this picture that I shot of your car and jazzed it up a bit for you. Take care.

-Allen G.
-Allen G.
07-18-08, 03:06 PM
#161
YOOOO!!!
*VERY* awesome picture man! Me likey!
Yeah that was hilairious, and a sweet run through the dragon too. So you were the guy who informed me about the large glowing red chunks of cat flying out my tailpipes? hehe That night was one I won't soon forget, and a heck of an introduction for Masin to the way's of Joe's car....wires flying off, **** blowing out the exhaust.....pure awesomeness
I'm saving that pic BTW - thanks for dressing it up!
07-18-08, 03:14 PM
#162
Visual Kei
iTrader: (16)
Join Date: Nov 2005
Location: Mtns of NC/SC
Posts: 2,480
Likes: 0
Received 0 Likes
on
0 Posts
No problem man! I was driving and riding w/ a friend that night. Masin is one of my good friends and he got me into Rx-7's. Yeah I remember the glowing pieces of cat coming from your exhaust. haha.
I wasn't driving my TII that night tho, but was enjoying a friends on the way back. That night was great. All the guys in full leathers carving the turns @ 12am w/ no lights on the mini bikes was so funny. lol.
I wasn't driving my TII that night tho, but was enjoying a friends on the way back. That night was great. All the guys in full leathers carving the turns @ 12am w/ no lights on the mini bikes was so funny. lol.
10-21-08, 09:20 AM
#163
Well its been a while since I updated this thread.
I've been busy with other things in life lately and for the last couple months so I haven't done a tonne to the car.
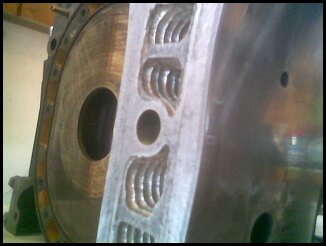
I've built another engine (my first entirely solo rebuild) for it that will be going in this week. I've attached a shot of the water jacket mods I did to the housings. Used a dremel engraving bit and with the housings on the drill press simply ground some grooves into the jackets.
I did a few other little mods to the engine as well. I'll attach a pic of some of these later. I welded shut the EGR ports in the exhaust sleeves and did some minor porting. If you look at the cavity in the housings that gets filled with exhaust gas, you'll realize that closing these holes up should provide a marginally cooler exhaust area on the housing which will in turn mean less load on the cooling system. not sure how much of an effect it will have - but I'm trying it nonetheless.
The porting was extremely minor. I simply kept the intake open a little later (4mm on the secondaries, 2-3mm on the primaries) and opened the exhaust a little sooner (3mm) My goal for it was to increase flow a little but not increase overlap at all vs. stock. My first thoughts on the power it will produce are that it may provide less torque then a higher overlap setup, but should still be pretty powerful given the turbo its running.
I'm installing this engine in the car with the Haltech. Over the last couple months I've buggered around with that thing driving on the blown engine trying to solve the strange trigger/ignition advance issues and have reached numerous dead ends. As it sits now it seems to be running well (minus a blown rear rotor) with no hiccups and I'd rather install this engine, run and break it in, then go to all the trouble of installing another EMS only to find out in the spring before DGRR that my rebuild is no good. So I'll find that out now
So next week I should have some info/pics on the fresh rebuild and how its running, and after that it'll be torn down again and all the fancy schmancy stuff can happen
(camera phone pic)
I've been busy with other things in life lately and for the last couple months so I haven't done a tonne to the car.
I've built another engine (my first entirely solo rebuild) for it that will be going in this week. I've attached a shot of the water jacket mods I did to the housings. Used a dremel engraving bit and with the housings on the drill press simply ground some grooves into the jackets.
I did a few other little mods to the engine as well. I'll attach a pic of some of these later. I welded shut the EGR ports in the exhaust sleeves and did some minor porting. If you look at the cavity in the housings that gets filled with exhaust gas, you'll realize that closing these holes up should provide a marginally cooler exhaust area on the housing which will in turn mean less load on the cooling system. not sure how much of an effect it will have - but I'm trying it nonetheless.
The porting was extremely minor. I simply kept the intake open a little later (4mm on the secondaries, 2-3mm on the primaries) and opened the exhaust a little sooner (3mm) My goal for it was to increase flow a little but not increase overlap at all vs. stock. My first thoughts on the power it will produce are that it may provide less torque then a higher overlap setup, but should still be pretty powerful given the turbo its running.
I'm installing this engine in the car with the Haltech. Over the last couple months I've buggered around with that thing driving on the blown engine trying to solve the strange trigger/ignition advance issues and have reached numerous dead ends. As it sits now it seems to be running well (minus a blown rear rotor) with no hiccups and I'd rather install this engine, run and break it in, then go to all the trouble of installing another EMS only to find out in the spring before DGRR that my rebuild is no good. So I'll find that out now
So next week I should have some info/pics on the fresh rebuild and how its running, and after that it'll be torn down again and all the fancy schmancy stuff can happen
(camera phone pic)
 10-21-08, 06:43 PM
#167
Originally Posted by El Nene 7
sweet bro man sorry to hear about the set backs again
keep up the updates bro housings look sick
keep up the updates bro housings look sick
Originally Posted by IAN
Awesome Joe. Glad to see your one step closer.........
Cool coolant mod!
Cool coolant mod!
10-22-08, 07:52 AM
#169
Nah - thats all me
I used one of these I found in a local hardware store on the rack of Dremel bits:
http://www.dremel.com/en-us/Attachme...l.aspx?pid=100
Then I put it in the drill press with the housing laying flat and ground the bit around a passage for one pass. Then I would raise the table on the drill press and make another pass. Repeat until you're all the way down to the plug bore, repeat for each passage.
Took about 2.5hours in total just to do the jacket mod. But really was pretty easy/repetitive you just had to pay attention to keep the housing totally flat on the table, and not to move the housing too quickly (or you'd end up with shallow grooves). But the bit worked excellent you could actually grind the head right into the housing until it bottomed out on the shank so its like a depth control.
Last edited by classicauto; 10-22-08 at 07:56 AM.
10-24-08, 08:25 AM
#172
Yeah terrh, do the turbo vert that would be sick!!
Well, the car runs!!!!!!! First solo rebuild runs like a top. Yesterday and wednesday local rotorhead Mark (theory on the forum) and I installed the rebuild and got it running.
My 5 year old optima yellow top has shat the bed though (Dregg, Ian and Terrh know the crap I put that battery through ) so we had to bump start the car, then I kept it running checked over for leaks and gave it a deecent drive.
I'll be dumping the oil on it, changing the battery and checking out under neath for loose bolts/etc then begin a slight retune since its a tad richer on these smaller ports.
Soon though I'll be posting some video's of my EGT gauge while doing some pulls....."youtube datalogging" FTW hahaha
Well, the car runs!!!!!!! First solo rebuild runs like a top. Yesterday and wednesday local rotorhead Mark (theory on the forum) and I installed the rebuild and got it running.
My 5 year old optima yellow top has shat the bed though (Dregg, Ian and Terrh know the crap I put that battery through
) so we had to bump start the car, then I kept it running checked over for leaks and gave it a deecent drive.I'll be dumping the oil on it, changing the battery and checking out under neath for loose bolts/etc then begin a slight retune since its a tad richer on these smaller ports.
Soon though I'll be posting some video's of my EGT gauge while doing some pulls....."youtube datalogging" FTW
hahaha
10-24-08, 06:41 PM
#174
Nah - thats all me
I used one of these I found in a local hardware store on the rack of Dremel bits:
http://www.dremel.com/en-us/Attachme...l.aspx?pid=100
Then I put it in the drill press with the housing laying flat and ground the bit around a passage for one pass. Then I would raise the table on the drill press and make another pass. Repeat until you're all the way down to the plug bore, repeat for each passage.
Took about 2.5hours in total just to do the jacket mod. But really was pretty easy/repetitive you just had to pay attention to keep the housing totally flat on the table, and not to move the housing too quickly (or you'd end up with shallow grooves). But the bit worked excellent you could actually grind the head right into the housing until it bottomed out on the shank so its like a depth control.
I used one of these I found in a local hardware store on the rack of Dremel bits:
http://www.dremel.com/en-us/Attachme...l.aspx?pid=100
Then I put it in the drill press with the housing laying flat and ground the bit around a passage for one pass. Then I would raise the table on the drill press and make another pass. Repeat until you're all the way down to the plug bore, repeat for each passage.
Took about 2.5hours in total just to do the jacket mod. But really was pretty easy/repetitive you just had to pay attention to keep the housing totally flat on the table, and not to move the housing too quickly (or you'd end up with shallow grooves). But the bit worked excellent you could actually grind the head right into the housing until it bottomed out on the shank so its like a depth control.
11-01-08, 09:51 AM
#175
Rotary Dynamics
iTrader: (5)
Join Date: Aug 2005
Location: Stoney Creek,Ontario
Posts: 610
Likes: 0
Received 0 Likes
on
0 Posts
Some highlights: coolant/oil mud, oil hair gel, and the best part: forgetting to turn the boost controller down for the first 1 km, made for a fun time!
Yeah terrh, do the turbo vert that would be sick!!
Well, the car runs!!!!!!! First solo rebuild runs like a top. Yesterday and wednesday local rotorhead Mark (theory on the forum) and I installed the rebuild and got it running.
My 5 year old optima yellow top has shat the bed though (Dregg, Ian and Terrh know the crap I put that battery through ) so we had to bump start the car, then I kept it running checked over for leaks and gave it a deecent drive.
I'll be dumping the oil on it, changing the battery and checking out under neath for loose bolts/etc then begin a slight retune since its a tad richer on these smaller ports.
Soon though I'll be posting some video's of my EGT gauge while doing some pulls....."youtube datalogging" FTW hahaha
Well, the car runs!!!!!!! First solo rebuild runs like a top. Yesterday and wednesday local rotorhead Mark (theory on the forum) and I installed the rebuild and got it running.
My 5 year old optima yellow top has shat the bed though (Dregg, Ian and Terrh know the crap I put that battery through
) so we had to bump start the car, then I kept it running checked over for leaks and gave it a deecent drive.I'll be dumping the oil on it, changing the battery and checking out under neath for loose bolts/etc then begin a slight retune since its a tad richer on these smaller ports.
Soon though I'll be posting some video's of my EGT gauge while doing some pulls....."youtube datalogging" FTW
hahaha