
My 20B FC roadrace car is underway...

Thread Starter
Joined: Aug 2001
Posts: 1,115
Likes: 0
From: Santa Monica, CA
My 20B FC roadrace car is underway...
Progress will be posted here:
http://surx7.blogspot.com/
Hope to have it bolted in next weekend and will begin the wiring process with the Haltech.
http://surx7.blogspot.com/
Hope to have it bolted in next weekend and will begin the wiring process with the Haltech.
Thread Starter
Joined: Aug 2001
Posts: 1,115
Likes: 0
From: Santa Monica, CA
Today I began the process of removing everything from the car to prepare for the installation of the 20B. As I mentioned in my last post, my intention is to run the engine as-is given the very good compression on it. The stock exhaust ports are really tiny, but hopefully I can get to at least 500rwhp with alot of torque attached.
Excavating the RX7 took a little longer than I had planned, mostly because I can't seem to find any of my tools anymore! My engine bay was looking a little worse for wear after I had a little offroad excursion when coolant sprayed all over my tires.

A couple of NA transmissions surrounding the to-be-installed Turbo transmission in the middle. You can visually see the difference, this is the first of the 'ribcase' transmissions that Mazda made.

This is the Setrab oil cooler I bought at Buttonwillow the weekend the engine blew. It's huge and should provide sufficient cooling for the 20B, assuming I can figure out how to get appropriate airflow to it !

The 13B Waterpump and housing fit on the front of the 20B without modification. Luckily I can use my existing housing as it has a GM water temperature sensor already threaded in the back (which the Haltech supports) and all other ports blocked off. There's a little bit of corrosion on the inside but overall it's in great shape. My waterpump however didn't look so great. A new one is on order!

The MegaSquirt isn't going to make it into the new project and will be replaced with the Haltech E11v2 I ordered last week. Unfortunately you can't control the leading/trailing split on a 3-rotor application with the current software. The only other way to do it using the MS would have been to fire the leading and trailing plugs at the same time, which is risky on a turbo application!

The engine bay pretty much stripped of everything. All that's left is to retrieve my hoist from my buddies shop and hoist this thing out of there! I may use the Mazdaspeed main pulley on the 20B as well. I'm going to be pretty glad to get rid of distributor based ignition and switch to a computer controlled setup. Additionally I'll be upgrading all the fuel lines to -8 all the way to accommodate the increased power, and using two Walbro 255lph fuel pumps in series instead of the single pump I have now.

The new intercooler arrived. This thing is massive! 31x12x3". Usually I'm an intercooler snob and buy only Spearco or one of the 'name' Japanese brands like HKS, Greddy or Blitz. Not this time! This one is straight off eBay at a whopping $89.99. It looks pretty much like any other intercooler I've used, so I'm pretty curious to see how it performs.

The stock 20B fuel rails use annoying side-feed injectors. For some reason I have a built-in hatred for side-feed injectors, so was lucky enough to find these rails from KGParts.com. I used the KGParts 13B primary rail on my RX8 with no problems so was thrilled that they had a 20B application as well. With these rails I can use any Bosch-type top-feed fuel injector.

I found these cleaned, balanced and flow-checked 550cc top-feed injectors from an '88 turbo. The 2nd-gen RX7's all have top-feed injectors of different varieties and these are perfect for the primary injectors on the 20B. I ordered some Bosch 1600cc injectors for the secondaries which should be arriving shortly. This setup should be good for 700 or so horsepower.

I'm using this ACT Prolite flywheel. The 20B uses the same flywheel as any 86-95 RX7 Turbo, and this one only weighs 9.7lbs! I'd like to use a multi-disc clutch in the future, but for now I'm going to use this flywheel with the ACT 4-puck clutch. The pressure plate is rated for 443lb/ft of torque, which should be sufficient for my application.
That's all the parts for now! The 20B engine arrived safely at my friend Ian's shop and I'll hopefully be picking it up this coming week along with my hoist. Assuming all the other parts arrive within the next few days I hope to have the engine bolted in along with the flywheel, clutch and transmission next weekend. I also ordered a bunch of new gaskets, seals, new thermostat, and other maintenance stuff from Mazdaspeed. The Haltech should be here which will probably be the most time consuming part of the install, but it actually looks pretty straightforward having studied the manual and wiring diagrams.
Excavating the RX7 took a little longer than I had planned, mostly because I can't seem to find any of my tools anymore! My engine bay was looking a little worse for wear after I had a little offroad excursion when coolant sprayed all over my tires.
A couple of NA transmissions surrounding the to-be-installed Turbo transmission in the middle. You can visually see the difference, this is the first of the 'ribcase' transmissions that Mazda made.
This is the Setrab oil cooler I bought at Buttonwillow the weekend the engine blew. It's huge and should provide sufficient cooling for the 20B, assuming I can figure out how to get appropriate airflow to it !
The 13B Waterpump and housing fit on the front of the 20B without modification. Luckily I can use my existing housing as it has a GM water temperature sensor already threaded in the back (which the Haltech supports) and all other ports blocked off. There's a little bit of corrosion on the inside but overall it's in great shape. My waterpump however didn't look so great. A new one is on order!
The MegaSquirt isn't going to make it into the new project and will be replaced with the Haltech E11v2 I ordered last week. Unfortunately you can't control the leading/trailing split on a 3-rotor application with the current software. The only other way to do it using the MS would have been to fire the leading and trailing plugs at the same time, which is risky on a turbo application!
The engine bay pretty much stripped of everything. All that's left is to retrieve my hoist from my buddies shop and hoist this thing out of there! I may use the Mazdaspeed main pulley on the 20B as well. I'm going to be pretty glad to get rid of distributor based ignition and switch to a computer controlled setup. Additionally I'll be upgrading all the fuel lines to -8 all the way to accommodate the increased power, and using two Walbro 255lph fuel pumps in series instead of the single pump I have now.
The new intercooler arrived. This thing is massive! 31x12x3". Usually I'm an intercooler snob and buy only Spearco or one of the 'name' Japanese brands like HKS, Greddy or Blitz. Not this time! This one is straight off eBay at a whopping $89.99. It looks pretty much like any other intercooler I've used, so I'm pretty curious to see how it performs.
The stock 20B fuel rails use annoying side-feed injectors. For some reason I have a built-in hatred for side-feed injectors, so was lucky enough to find these rails from KGParts.com. I used the KGParts 13B primary rail on my RX8 with no problems so was thrilled that they had a 20B application as well. With these rails I can use any Bosch-type top-feed fuel injector.
I found these cleaned, balanced and flow-checked 550cc top-feed injectors from an '88 turbo. The 2nd-gen RX7's all have top-feed injectors of different varieties and these are perfect for the primary injectors on the 20B. I ordered some Bosch 1600cc injectors for the secondaries which should be arriving shortly. This setup should be good for 700 or so horsepower.
I'm using this ACT Prolite flywheel. The 20B uses the same flywheel as any 86-95 RX7 Turbo, and this one only weighs 9.7lbs! I'd like to use a multi-disc clutch in the future, but for now I'm going to use this flywheel with the ACT 4-puck clutch. The pressure plate is rated for 443lb/ft of torque, which should be sufficient for my application.
That's all the parts for now! The 20B engine arrived safely at my friend Ian's shop and I'll hopefully be picking it up this coming week along with my hoist. Assuming all the other parts arrive within the next few days I hope to have the engine bolted in along with the flywheel, clutch and transmission next weekend. I also ordered a bunch of new gaskets, seals, new thermostat, and other maintenance stuff from Mazdaspeed. The Haltech should be here which will probably be the most time consuming part of the install, but it actually looks pretty straightforward having studied the manual and wiring diagrams.
Thread Starter
Joined: Aug 2001
Posts: 1,115
Likes: 0
From: Santa Monica, CA
Today more parts came, always fun!

First the 20B engine mounts from Banzai Racing. Unfortunately they come powder coated Red, which will probably look pretty horrible, but other than that they seem of a good quality. There's a mystical spacer that comes with the mounts - I'm hoping that it will be obvious what to do with this spacer come the time because right now I have no clue what it's for.

Genuine Mazda intake manifold gaskets! There are all sorts of home-made gaskets on eBay these days but I went luxury on these; $30!

The Haltech E11v2. Thanks to Ludwig Motorsports for getting this to me so quickly! For the past few days I've been looking at the wiring diagram and was getting concerned about how I would handle the relays and little fuse blocks that come with the ECU, built-in to the main harness. Unlike most cars, I already have multiple discreet fused and relayed circuits available for things like the injectors, ignition power, main unit power, etc. I'm guessing Haltech includes these relays and fuseblocks because finding individual circuits for these things would be pretty difficult on a factory-wired vehicle. I decided I was going to cut out all the relays and fuses and rely on my original fuses and relays to do the job.

15 minutes later and I had cut out all the relays and fuses. This should make life alot easier for me wiring the car and positioning the ECU. I'm picking up the 20B engine tomorrow evening so am on track for getting it installed this coming weekend. Excitement is building!!
First the 20B engine mounts from Banzai Racing. Unfortunately they come powder coated Red, which will probably look pretty horrible, but other than that they seem of a good quality. There's a mystical spacer that comes with the mounts - I'm hoping that it will be obvious what to do with this spacer come the time because right now I have no clue what it's for.
Genuine Mazda intake manifold gaskets! There are all sorts of home-made gaskets on eBay these days but I went luxury on these; $30!
The Haltech E11v2. Thanks to Ludwig Motorsports for getting this to me so quickly! For the past few days I've been looking at the wiring diagram and was getting concerned about how I would handle the relays and little fuse blocks that come with the ECU, built-in to the main harness. Unlike most cars, I already have multiple discreet fused and relayed circuits available for things like the injectors, ignition power, main unit power, etc. I'm guessing Haltech includes these relays and fuseblocks because finding individual circuits for these things would be pretty difficult on a factory-wired vehicle. I decided I was going to cut out all the relays and fuses and rely on my original fuses and relays to do the job.
15 minutes later and I had cut out all the relays and fuses. This should make life alot easier for me wiring the car and positioning the ECU. I'm picking up the 20B engine tomorrow evening so am on track for getting it installed this coming weekend. Excitement is building!!
Thread Starter
Joined: Aug 2001
Posts: 1,115
Likes: 0
From: Santa Monica, CA
There's a Time Attack event towards the end of September that I'm shooting for, disasters aside (I usually plan for at least two per project) I think I should have the car up and running by then. The only unknown in my head right now is who or where I'm going to get the manifold from, as I'm pretty loathe to spend $1300+ on the thing!
Trending Topics
Thread Starter
Joined: Aug 2001
Posts: 1,115
Likes: 0
From: Santa Monica, CA
Parts continue to arrive, which is always a good sign!

I went with the Fluidyne radiator for the cooling. A few friends of mine had these on their Supras back when we were the Supra posse and had good results. Additionally, this thing is SUPER light. Like 'wow' light. It's interestingly quite alot thinner than the Griffin radiator I'm replacing it with, but the fin density appears to be alot higher.

For whatever reason I was never able to get the temperatures in a good place on the NA setup using the Griffin radiator, so hopefully I'll have no such problems with this thing. Luckily, given that I'm running a pure racecar with no AC etc, I can run straight distilled water + water wetter which should give the maximum cooling. I've been reading and contemplating using the Evans waterless setup, but probably won't risk it for now. Too many variables in play!

And lastly for the day, I picked up the 20B from my good friend THETECH's shop. Thankfully it was very well packaged (thanks Mergatroyd) and arrived in great condition. It's a little dusty, but some degreaser and a toothbrush should make this thing look great in no time. Unfortunately I wasn't able to fit my hoist into my truck, so I'm going to have to borrow my buddies for the weekend and get this underway.

I was stunned, and thrilled, to find out that this is one of the very last 20B engines ever made - a D series! I had actually totally forgotten to ask which series it was when I bought it because the compression was so good, but this was a very nice surprise. So far so good!
I went with the Fluidyne radiator for the cooling. A few friends of mine had these on their Supras back when we were the Supra posse and had good results. Additionally, this thing is SUPER light. Like 'wow' light. It's interestingly quite alot thinner than the Griffin radiator I'm replacing it with, but the fin density appears to be alot higher.
For whatever reason I was never able to get the temperatures in a good place on the NA setup using the Griffin radiator, so hopefully I'll have no such problems with this thing. Luckily, given that I'm running a pure racecar with no AC etc, I can run straight distilled water + water wetter which should give the maximum cooling. I've been reading and contemplating using the Evans waterless setup, but probably won't risk it for now. Too many variables in play!
And lastly for the day, I picked up the 20B from my good friend THETECH's shop. Thankfully it was very well packaged (thanks Mergatroyd) and arrived in great condition. It's a little dusty, but some degreaser and a toothbrush should make this thing look great in no time. Unfortunately I wasn't able to fit my hoist into my truck, so I'm going to have to borrow my buddies for the weekend and get this underway.
I was stunned, and thrilled, to find out that this is one of the very last 20B engines ever made - a D series! I had actually totally forgotten to ask which series it was when I bought it because the compression was so good, but this was a very nice surprise. So far so good!
looking pretty good dude!
i got your IM, I didnt blow the car up, so im still not sure whether I will have the manifold off in time for you or not. I will let you know.
the spacer for the mount is for one bolt that is spaced back a little bit...you'll see when you go to install them
i got your IM, I didnt blow the car up, so im still not sure whether I will have the manifold off in time for you or not. I will let you know.
the spacer for the mount is for one bolt that is spaced back a little bit...you'll see when you go to install them
Thread Starter
Joined: Aug 2001
Posts: 1,115
Likes: 0
From: Santa Monica, CA
Today I began the task of prepping the 20B to be installed in the car. First order of business was the front cover area of the engine.

Here's the engine with the waterpump housing removed. As I mentioned in a previous post, my intention is to use the 13B NA waterpump housing from my old engine. After some research, it turns out the NA and T2 waterpump housings are identical other than the coolant return for the stock turbo (which I don't need). The T2 and NA waterpumps are also identical (same part #). Annoyingly the main pulley has to be removed in order to get the waterpump housing off on the 20B.

One thing I hadn't seen mentioned before is that the studs on the front of the engine need to be re-arranged in order for the 13B waterpump housing to fit. Here you can see the stock position of the stud, which does not fit on the 13B housing. Right below it is another hole which lines up perfectly. A quick stud-pull later and the stud is lined up correctly.

There's also an additional 5th stud shown here which needs to be removed - the 13B only has 4 studs on the front and this one interferes with the housing slightly. Again, quite simple to remove using 2 nuts.

On the left you can see the bizarre 20B stock waterpump housing - it has a very unusual double thermostat design at the top and the waterpump outlet is in a very unusual spot and faces the wrong direction. On the right is my 13B housing.

Finally, here's the 13B housing bolted up with the new waterpump installed. It's amazing how easily it all fits together, and the 13B alternator bracket fits perfectly too. The front of the engine is practically indiscernible from the original 13B!

I was also able to retain my Mazdaspeed competition main pulley. Luckily the 20B main pulley has the exact same timing marks as the stock FC pulley with marks at 5* and 20* ATDC. This competition pulley also has marks at 0, 10 and 20* BTDC primarily for setting timing with a distributor. Using this pulley I will be able to retain my existing waterpump and alternator pulleys as well as use the stock 13B v-belt.

With the help of my friend Cory, the big front mount intercooler is installed. It fits perfectly in the opening behind my front bumper and sits just about the front splitter. I love how menacing cars look with intercoolers sitting at the front; hopefully I will be able to duct enough air over the intercooler to keep the radiator cool as well.
That's all for now, I was hoping to get the engine bolted in this weekend, but I'm not sure if I'll be able to or not - the oil pan which came on the engine has a fairly large dent in the front sump, and the replacement I ordered hasn't arrived yet. It's not possible to replace the oil pan once the engine is in the car so I may have to wait for this one. Unfortunately, the Banzai racing engine mounts don't quite fit correctly and I'll have to grind a little piece out in order to get them to line up correctly. I still have plenty to do over the weekend besides putting the engine in the car which should be a fairly quick process.
Here's the engine with the waterpump housing removed. As I mentioned in a previous post, my intention is to use the 13B NA waterpump housing from my old engine. After some research, it turns out the NA and T2 waterpump housings are identical other than the coolant return for the stock turbo (which I don't need). The T2 and NA waterpumps are also identical (same part #). Annoyingly the main pulley has to be removed in order to get the waterpump housing off on the 20B.
One thing I hadn't seen mentioned before is that the studs on the front of the engine need to be re-arranged in order for the 13B waterpump housing to fit. Here you can see the stock position of the stud, which does not fit on the 13B housing. Right below it is another hole which lines up perfectly. A quick stud-pull later and the stud is lined up correctly.
There's also an additional 5th stud shown here which needs to be removed - the 13B only has 4 studs on the front and this one interferes with the housing slightly. Again, quite simple to remove using 2 nuts.
On the left you can see the bizarre 20B stock waterpump housing - it has a very unusual double thermostat design at the top and the waterpump outlet is in a very unusual spot and faces the wrong direction. On the right is my 13B housing.
Finally, here's the 13B housing bolted up with the new waterpump installed. It's amazing how easily it all fits together, and the 13B alternator bracket fits perfectly too. The front of the engine is practically indiscernible from the original 13B!
I was also able to retain my Mazdaspeed competition main pulley. Luckily the 20B main pulley has the exact same timing marks as the stock FC pulley with marks at 5* and 20* ATDC. This competition pulley also has marks at 0, 10 and 20* BTDC primarily for setting timing with a distributor. Using this pulley I will be able to retain my existing waterpump and alternator pulleys as well as use the stock 13B v-belt.
With the help of my friend Cory, the big front mount intercooler is installed. It fits perfectly in the opening behind my front bumper and sits just about the front splitter. I love how menacing cars look with intercoolers sitting at the front; hopefully I will be able to duct enough air over the intercooler to keep the radiator cool as well.
That's all for now, I was hoping to get the engine bolted in this weekend, but I'm not sure if I'll be able to or not - the oil pan which came on the engine has a fairly large dent in the front sump, and the replacement I ordered hasn't arrived yet. It's not possible to replace the oil pan once the engine is in the car so I may have to wait for this one. Unfortunately, the Banzai racing engine mounts don't quite fit correctly and I'll have to grind a little piece out in order to get them to line up correctly. I still have plenty to do over the weekend besides putting the engine in the car which should be a fairly quick process.
Very nice, The one thing though , is most of the track Turbo cars HAve a nice V mount setup.
So you can get lots of air to your oil cooler and Raditor.
It might be tight for you to fit it in there.
But an idea.
So you can get lots of air to your oil cooler and Raditor.
It might be tight for you to fit it in there.
But an idea.

Lives on the Forum
Joined: Feb 2001
Posts: 26,664
Likes: 23
From: n
Thread Starter
Joined: Aug 2001
Posts: 1,115
Likes: 0
From: Santa Monica, CA
I've actually never seen a 'serious' roadrace car using this v-mount setup. I don't of course count the drift cars and the like.
If I have cooling problems with this setup I will have to look into alternatives!
If I have cooling problems with this setup I will have to look into alternatives!

Thread Starter
Joined: Aug 2001
Posts: 1,115
Likes: 0
From: Santa Monica, CA
Thanks! Unfortunately a lack of metric bolts and waiting for a replacement oil pan means I didn't get a whole lot accomplished this weekend other than installing the clutch, replacing the rear main seal, etc.
I'm definitely planning on having the engine in the car this week though!
I'm definitely planning on having the engine in the car this week though!
Thread Starter
Joined: Aug 2001
Posts: 1,115
Likes: 0
From: Santa Monica, CA
Today, with the help of my buddy Cory, the 20B is in the car!

After some quick work with the dremel the Banzai Racing motor mounts successfully fit on the engine. Per the suggestion of Chris @ Banzai, I replaced the existing studs with 12mm x 1.5 bolts as the metal on the new mounts was not thick enough that the nuts on the studs would tighten. Chris was nice enough to contact me and apologized for the mounts not fitting correctly first time - good customer service!

Speedmachine Performance makes a nice set of blockoff plates for the 20B. Things like this ACV blockoff are not the same as the 13B and would have been annoying to have to cut myself. I also found various other plates and flanges for the 20B which should be arriving shortly.

The ACT clutch and flywheel installed. I had a little incident with one of the bolts which snapped off as I was tightening it. Evidently my torque wrench is not particularly accurate these days. Luckily the thread was easily removed and replaced with the shiny gold bolt on the right.

I don't usually like trying to install the engine and transmission at once, but went for it this time. The balancer on the hoist certainly helps keep it level and adjust the angle of it all going in. We ended up having to remove the hood as the hoist would not clear it on the way in.

After much maneuvering and pushing and pulling, it's in and mounted. We had to use a small spacer on the drivers side mount in order to clear the steering rack. Currently there is only a tiny amount of clearance between the front oilpan sump and the rack, maybe 1/2". I'm going to have to keep an eye on it and may have to modify accordingly.

I was worried for a moment that the sections of my rollcage which come through the firewall would interfere with the intake manifold. It looked like it would be close as we were dropping the engine in, but eventually it all fit fine.

I test fit the KG Parts fuel rails and they seem to fit very nicely. Unfortunately they won't work with the T2 550cc injectors I had previously purchased. I've since sold them and will be using some 1000cc primary injectors instead.

Two problems occurred simultaneously; 1) there's no chance in hell that the Fluidyne is going to fit in the stock location. I haven't actually tried to mount it, but just eyeballing it I don't see any way it's going to fit. 2) we broke part of the iron while tightening the top engine mount bolt on the drivers side. I have no idea how this happened as the bolt was not over tightened. You can see it if you look closely; I'm hoping this isn't going to be a problem as the other two bolts are attached firmly and the top of the mount can still act as a support if the engine rotates in that direction. Certainly not optimal and will probably just replace the iron when the engine is rebuilt eventually.
That's it for now, next up will be to start attaching all the small stuff and beginning to lay out the wiring for the Haltech. I have no idea what to do about a radiator yet - I was hoping to use one of the giant Nascar radiator's that are always available as used take-offs on eBay. They are about 31 x 18 x 4 which is going to be a little too wide for the FC's frame rails (27.5"). I'll figure it out and report back later!
After some quick work with the dremel the Banzai Racing motor mounts successfully fit on the engine. Per the suggestion of Chris @ Banzai, I replaced the existing studs with 12mm x 1.5 bolts as the metal on the new mounts was not thick enough that the nuts on the studs would tighten. Chris was nice enough to contact me and apologized for the mounts not fitting correctly first time - good customer service!
Speedmachine Performance makes a nice set of blockoff plates for the 20B. Things like this ACV blockoff are not the same as the 13B and would have been annoying to have to cut myself. I also found various other plates and flanges for the 20B which should be arriving shortly.
The ACT clutch and flywheel installed. I had a little incident with one of the bolts which snapped off as I was tightening it. Evidently my torque wrench is not particularly accurate these days. Luckily the thread was easily removed and replaced with the shiny gold bolt on the right.
I don't usually like trying to install the engine and transmission at once, but went for it this time. The balancer on the hoist certainly helps keep it level and adjust the angle of it all going in. We ended up having to remove the hood as the hoist would not clear it on the way in.
After much maneuvering and pushing and pulling, it's in and mounted. We had to use a small spacer on the drivers side mount in order to clear the steering rack. Currently there is only a tiny amount of clearance between the front oilpan sump and the rack, maybe 1/2". I'm going to have to keep an eye on it and may have to modify accordingly.
I was worried for a moment that the sections of my rollcage which come through the firewall would interfere with the intake manifold. It looked like it would be close as we were dropping the engine in, but eventually it all fit fine.
I test fit the KG Parts fuel rails and they seem to fit very nicely. Unfortunately they won't work with the T2 550cc injectors I had previously purchased. I've since sold them and will be using some 1000cc primary injectors instead.
Two problems occurred simultaneously; 1) there's no chance in hell that the Fluidyne is going to fit in the stock location. I haven't actually tried to mount it, but just eyeballing it I don't see any way it's going to fit. 2) we broke part of the iron while tightening the top engine mount bolt on the drivers side. I have no idea how this happened as the bolt was not over tightened. You can see it if you look closely; I'm hoping this isn't going to be a problem as the other two bolts are attached firmly and the top of the mount can still act as a support if the engine rotates in that direction. Certainly not optimal and will probably just replace the iron when the engine is rebuilt eventually.
That's it for now, next up will be to start attaching all the small stuff and beginning to lay out the wiring for the Haltech. I have no idea what to do about a radiator yet - I was hoping to use one of the giant Nascar radiator's that are always available as used take-offs on eBay. They are about 31 x 18 x 4 which is going to be a little too wide for the FC's frame rails (27.5"). I'll figure it out and report back later!
Lives on the Forum
Joined: Feb 2001
Posts: 26,664
Likes: 23
From: n
I have no idea what to do about a radiator yet - I was hoping to use one of the giant Nascar radiator's that are always available as used take-offs on eBay. They are about 31 x 18 x 4 which is going to be a little too wide for the FC's frame rails (27.5"). I'll figure it out and report back later!
We run these on all our FC's including our 20B FC.
It's about the biggest thing you can fit without cutting major metal.
You'd need to move the stock battery, but I'm sure this is not a problem for you.

I think the dimensions are 26" x 19" x 3"...
http://www.afabcorp.com/AFCO_Dynatec...p_dbl-pass-rad
For the price, you can't beat it.
-Ted
Thread Starter
Joined: Aug 2001
Posts: 1,115
Likes: 0
From: Santa Monica, CA
Thanks Ted. I actually tried test fitting the Fluidyne last night and by some luck of the gods it actually fits with about an inch to spare between the radiator and the front cover!
My battery is already located behind where the stock passenger seat would be so I'll definitely go this route if I change my mind on the Fluidyne!
My battery is already located behind where the stock passenger seat would be so I'll definitely go this route if I change my mind on the Fluidyne!
Ted, I use the same part number, but its NDP, are you using the double pass version also, or are you plumbing water to the other side?
oops sorry, clicked the link and saw it. I also recommend this radiator, it keeps mine cool even in the 9x* temps we've been having here lately, and thats with a water cooled turbo as well
also i still have the stock battery location, i just trimmed the tray a little
oops sorry, clicked the link and saw it. I also recommend this radiator, it keeps mine cool even in the 9x* temps we've been having here lately, and thats with a water cooled turbo as well
also i still have the stock battery location, i just trimmed the tray a little
Last edited by patman; Jun 28, 2007 at 04:02 PM.
Lives on the Forum
Joined: Feb 2001
Posts: 26,664
Likes: 23
From: n
Yeah, double pass.
It's 1.5" top and 1.75" bottom rad hose fittings.
The stock FC (well, 20B engine) is 1.5" for both top and bottom.
We typically use those "universal", corrugated rad hoses that you can align better.
You should be able to get a ~11.5" (1.5" to 1.75") hose for the lower rad hose with very little fuss from the local auto parts store.
-Ted
Thread Starter
Joined: Aug 2001
Posts: 1,115
Likes: 0
From: Santa Monica, CA
The process begins...
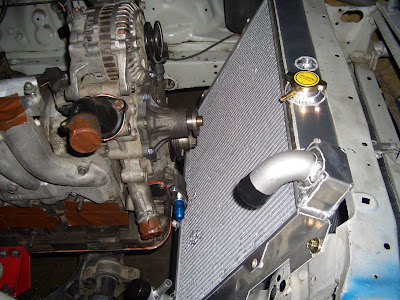
Incredibly, the Fluidyne radiator fits quite nicely. It looked from my eyeballing that there was no way in hell this was going to fit. I guess I need to get my eyes checked asap. There's about an inch to spare and I will probably bend the lower mounting tabs a little to get some additional clearance. I also replaced the stock turbo oil-drain fitting with a -10 fitting which gave me some additional clearance. Getting some fans in there is going to be a tight fit, but should be doable. Worst case I'll scrap this radiator and use the double-pass AFCO radiator that patman and RETed suggested from the RX7 forum. By the way, does anyone know what size the fitting on top of the radiator is? I'm assuming it's for some stock sensor which I don't have, and can't find any bolts that match up!

The Haltech E11v2 in its new home. One of the nice things about having a serious rollcage is that there are plenty of spots and surfaces for mounting stuff. This plastic shelf is where I had the Megasquirt sitting and the Haltech fits nicely. You can see the relays and fuses that I mentioned in a previous post below - there are 8 individual circuits all of which have a relay and a fuse, which is why I was able to get rid of the fuseblock that comes with the Haltech harness.

Another view of the mounting and the interior of the car. It can get a little annoying working inside the car with all the bars in the way, but I'm sure (or, hopefully not) someday I'll be thankful that they are all there!

One of the most important things for me when I'm installing a standalone ECU is to quickly figure out which sections of the harness will roughly go where, and which are unnecessary. For example, I'm controlling my fuel pump and electric fan manually via a switch-panel inside the car so I don't need any of the PWM, Digital, and other outputs that might typically be used for these functions. I prefer controlling the fan manually as you don't really want the fan coming on while at speed on a racetrack as it can actually impede airflow!

30 minutes later and I've identified the required sections and bundled them up. It's fairly straightforward - the big grey wires are for the trigger and home signal which will go to the CAS. The blue bundle is for the 6 injectors, the yellow bundle are for the ignition coils (I'll need to use 2 of the injector outputs for ignition), and the rest are for the TPS, MAP, CLT and IAT sensors. The red and black wires near the firewall go to power and ground. I'm missing some pieces but don't anticipate the wiring to take me more than a day once I have all the connectors and pigtails I need.

Here's the unused chunk of the harness ziptied neatly under the ECU inside the car. I may need to use one of these for the tachometer output, but not sure on this yet. Overall, the wiring seems quite straightforward and I'm not concerned about it at all (yet). The E11v2 software however seems quite complicated and I'm probably going to need some level of assistance in getting it all going. Annoyingly, Haltech uses completely different (and more complicated) Windows software for the E11v2 than the E6X which I'm familiar with from my RX8.
Incredibly, the Fluidyne radiator fits quite nicely. It looked from my eyeballing that there was no way in hell this was going to fit. I guess I need to get my eyes checked asap. There's about an inch to spare and I will probably bend the lower mounting tabs a little to get some additional clearance. I also replaced the stock turbo oil-drain fitting with a -10 fitting which gave me some additional clearance. Getting some fans in there is going to be a tight fit, but should be doable. Worst case I'll scrap this radiator and use the double-pass AFCO radiator that patman and RETed suggested from the RX7 forum. By the way, does anyone know what size the fitting on top of the radiator is? I'm assuming it's for some stock sensor which I don't have, and can't find any bolts that match up!
The Haltech E11v2 in its new home. One of the nice things about having a serious rollcage is that there are plenty of spots and surfaces for mounting stuff. This plastic shelf is where I had the Megasquirt sitting and the Haltech fits nicely. You can see the relays and fuses that I mentioned in a previous post below - there are 8 individual circuits all of which have a relay and a fuse, which is why I was able to get rid of the fuseblock that comes with the Haltech harness.
Another view of the mounting and the interior of the car. It can get a little annoying working inside the car with all the bars in the way, but I'm sure (or, hopefully not) someday I'll be thankful that they are all there!
One of the most important things for me when I'm installing a standalone ECU is to quickly figure out which sections of the harness will roughly go where, and which are unnecessary. For example, I'm controlling my fuel pump and electric fan manually via a switch-panel inside the car so I don't need any of the PWM, Digital, and other outputs that might typically be used for these functions. I prefer controlling the fan manually as you don't really want the fan coming on while at speed on a racetrack as it can actually impede airflow!
30 minutes later and I've identified the required sections and bundled them up. It's fairly straightforward - the big grey wires are for the trigger and home signal which will go to the CAS. The blue bundle is for the 6 injectors, the yellow bundle are for the ignition coils (I'll need to use 2 of the injector outputs for ignition), and the rest are for the TPS, MAP, CLT and IAT sensors. The red and black wires near the firewall go to power and ground. I'm missing some pieces but don't anticipate the wiring to take me more than a day once I have all the connectors and pigtails I need.
Here's the unused chunk of the harness ziptied neatly under the ECU inside the car. I may need to use one of these for the tachometer output, but not sure on this yet. Overall, the wiring seems quite straightforward and I'm not concerned about it at all (yet). The E11v2 software however seems quite complicated and I'm probably going to need some level of assistance in getting it all going. Annoyingly, Haltech uses completely different (and more complicated) Windows software for the E11v2 than the E6X which I'm familiar with from my RX8.
Lives on the Forum
Joined: Feb 2001
Posts: 26,664
Likes: 23
From: n
IIRC, I *think* it's 10mm x 1.00 - fine thread for a 10mm diameter thread.
-Ted
Thread Starter
Joined: Aug 2001
Posts: 1,115
Likes: 0
From: Santa Monica, CA
Thanks Ted, but it appears to be bigger than that. I tried a 12mm x 1.50 and it *almost* fits but still seems a little loose, and the thread seems quite coarse. I may just grab a stock clt sensor and lob it in there.
Last edited by thetech; Jul 3, 2007 at 10:14 PM.
