1000 HP 20B Street Car Project

 05-22-05, 05:15 AM
#478
Senior Member
Thread Starter

Join Date: Aug 2003
Location: Moon Twp. Pennsylvania
Posts: 703
Likes: 0
Received 0 Likes
on
0 Posts
worked all night
If anyone is interested, I will go ahead and post my newest part i fabed up tonight or should i say this morning. 12+ hours later and here it is!
Made completely from chromoly.
I had to notch the bottom for the 4" exhaust.
I welded 1/8" chromoly plate into the floor on the top side for strength.
The curved piece is a heat shield for the trans mount near the exhaust!
Now i have to find the right size bolts!
Made completely from chromoly.
I had to notch the bottom for the 4" exhaust.
I welded 1/8" chromoly plate into the floor on the top side for strength.
The curved piece is a heat shield for the trans mount near the exhaust!
Now i have to find the right size bolts!
Last edited by Auto Illusions; 05-22-05 at 05:17 AM.
05-22-05, 12:01 PM
#479
Super Snuggles
Right through the floor? The reason I ask is because someone did the same thing with a Buick GN conversion and had... issues. Did you or will you reinforce the floor pan in the area which the transmission mount bolts to?
Very nice work, as always.
Very nice work, as always.
Last edited by jimlab; 05-22-05 at 12:03 PM.
05-24-05, 02:13 AM
#480
Senior Member
Thread Starter
Join Date: Aug 2003
Location: Moon Twp. Pennsylvania
Posts: 703
Likes: 0
Received 0 Likes
on
0 Posts
Originally Posted by jimlab
Right through the floor? The reason I ask is because someone did the same thing with a Buick GN conversion and had... issues. Did you or will you reinforce the floor pan in the area which the transmission mount bolts to?
Very nice work, as always.
Very nice work, as always.
Pictures of both sides. Their is only one bolt in each side as of now, i have to drill the second hole and tack the bolts in to they do not spin under the carpeting when installing or removing trans crossmember!
05-24-05, 02:17 AM
#481
Senior Member
Thread Starter
Join Date: Aug 2003
Location: Moon Twp. Pennsylvania
Posts: 703
Likes: 0
Received 0 Likes
on
0 Posts
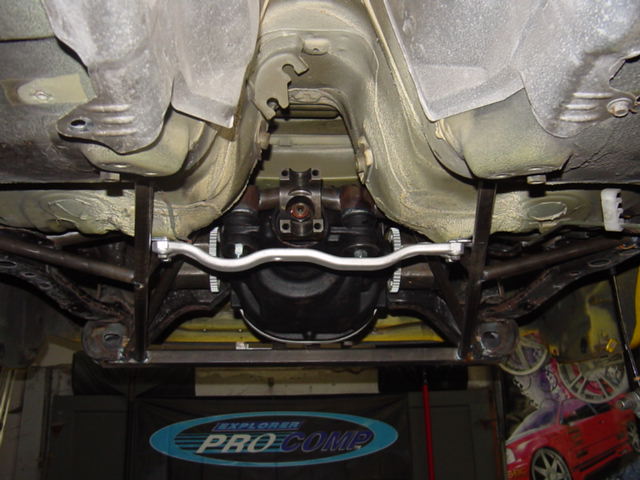
rear sub frame
How about it, i almost finished up the differential mounts! The only thing left is weld the second rear square mount but i am waiting on a differential brace to come in from Steeda. If it is to large, i will end up not using it anyway but need it for the spacing before welding the second brace.
I still have to add a brace or two to go from the subframe to extra mounting points on the body similar to 95 up subframes.
I still have to add a brace or two to go from the subframe to extra mounting points on the body similar to 95 up subframes.
05-24-05, 02:22 AM
#482
Senior Member
Thread Starter
Join Date: Aug 2003
Location: Moon Twp. Pennsylvania
Posts: 703
Likes: 0
Received 0 Likes
on
0 Posts
rear subframe in car
Here is a couple pics of the rear subframe and differential in the car.
Hopefully finish up the subframe mounts tommorrow night and pray that diff brace and urethane bushings arrive. Also waiting for stainless to start the new header and exhaust.
Jim, hurry up with the headlight kit. I am trying to get this thing on the road in 3-4 months!
Hopefully finish up the subframe mounts tommorrow night and pray that diff brace and urethane bushings arrive. Also waiting for stainless to start the new header and exhaust.
Jim, hurry up with the headlight kit. I am trying to get this thing on the road in 3-4 months!
05-24-05, 11:12 AM
#483
Super Snuggles
Originally Posted by Auto Illusions
I used metal fuser to install 1/8" chromoly plate to the floor boards and welded the edges along tight to the 2-channels in the floor. I think it will be strong enough!
Pictures of both sides. Their is only one bolt in each side as of now, i have to drill the second hole and tack the bolts in to they do not spin under the carpeting when installing or removing trans crossmember!
Pictures of both sides. Their is only one bolt in each side as of now, i have to drill the second hole and tack the bolts in to they do not spin under the carpeting when installing or removing trans crossmember!
One thing I'd probably do with the brace hanging down below the floor pan is make the front "wedge" shaped, sloping up to the floor pan (sort of like a skid plate). If you ever catch it on anything, hopefully you'll go up and over instead of tearing it loose or buckling the floor pan. That may not be an issue with a purpose-built drag car, but for a street car, you never know.
 05-24-05, 11:25 AM
#484
Super Snuggles
Originally Posted by Auto Illusions
Jim, hurry up with the headlight kit. I am trying to get this thing on the road in 3-4 months!
BTW, add a drain plug to your differential while you still have the chance. The "approved" method of changing the fluid in the 8.8" is to separate the back cover from the differential. I will probably just use my Griot's oil extractor and make some sort of "hook" shaped tube to fit in through the fill hole to get to the bottom of the housing or just buy this, because my diff sure as hell isn't coming back out of my car again.
 05-25-05, 03:22 AM
#485
Senior Member
Thread Starter
Join Date: Aug 2003
Location: Moon Twp. Pennsylvania
Posts: 703
Likes: 0
Received 0 Likes
on
0 Posts
final rear subframe modifications
Well, its done except for the steeda diff brace did not show up yet. I think it is lost and will have to track it.
Here is the final modifications to the rear subframe to hold the 8.8 ford diff. I added the brace similar to 95 models except continued it forward and strengthened the corner of the floor for an extra mounting point. Along with a couple of other braces, i believe it is now officially over enginered! Ready for some hard launches to put it through the real test!
Here is the final modifications to the rear subframe to hold the 8.8 ford diff. I added the brace similar to 95 models except continued it forward and strengthened the corner of the floor for an extra mounting point. Along with a couple of other braces, i believe it is now officially over enginered! Ready for some hard launches to put it through the real test!
05-25-05, 03:48 AM
#488
Rotary Enthusiast

Join Date: Jun 2004
Location: Gallatin, TN
Posts: 1,457
Likes: 0
Received 0 Likes
on
0 Posts
Originally Posted by t-von
Where did you get the bends from?
-Alex
05-25-05, 12:54 PM
#490
Senior Member
Thread Starter
Join Date: Aug 2003
Location: Moon Twp. Pennsylvania
Posts: 703
Likes: 0
Received 0 Likes
on
0 Posts
Originally Posted by t-von
Nice work! Where did you get the bends from?
www.spdexhaust.com is another good one!
 05-25-05, 04:07 PM
#492
Senior Member
Thread Starter
Join Date: Aug 2003
Location: Moon Twp. Pennsylvania
Posts: 703
Likes: 0
Received 0 Likes
on
0 Posts
Really, upside down? Its getting replaced with chromoly tube anyway. I need it to be higher for 3" exhaust clearance! Just through it in for the picture.
Thanks for the diff drain tip. I never would have thought of that but makes complete sense. I an going to drill and tap it out for a drain plug before installing it for the final.
Thanks for the diff drain tip. I never would have thought of that but makes complete sense. I an going to drill and tap it out for a drain plug before installing it for the final.
05-25-05, 05:40 PM
#493
Super Snuggles
Originally Posted by Auto Illusions
Really, upside down?
Don't worry, I threw my suspension arms on my rear subframe when it was off my car for a quick mock-up and someone pointed out that I had the upper control arms upside down. It's the same distance from inner to outer bushing, it just wouldn't have worked on the car.
05-25-05, 07:56 PM
#494
Rotary Enthusiast
Join Date: Mar 2001
Location: Southern Cali
Posts: 1,414
Likes: 0
Received 0 Likes
on
0 Posts
Guys,
I've been following this thread with great interest and admire all of the work Auto Illusions has put into this project; truly first rate.
I also wanted to let you all know that Flaco Racing (Abel Ibarra) has now opened up the Flaco Racing shop for high-end performance work to the public. The shop can handle custom rotary and turbo set-ups... again, high-end stuff.
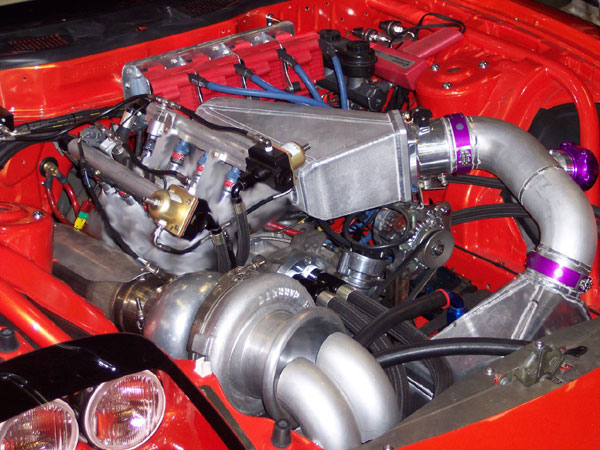
Abel is actually in the process of building a 1000hp 20B street FD for Mike over at G-Force transmissions. This car, interestingly enough, is using a Flaco Racing modified (totally reworked) OEM 20B manifold.
Auto Illusions if you or anyone would like some high-end rotary or turbo work done by Flaco Racing, just PM or e-mail me.
-Bern
brhslm@earthlink.net
Auto Illusions, the original intake manifold you got done was not the same as Abel's piece, and from my understanding, was not done by the same gentlemen, or if it was, it's a different set-up. Abel has spent countless hours of R&D on his current manifold set-up, and is not ready to offer this piece out yet. see pics...
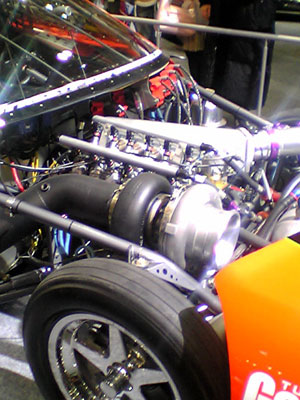
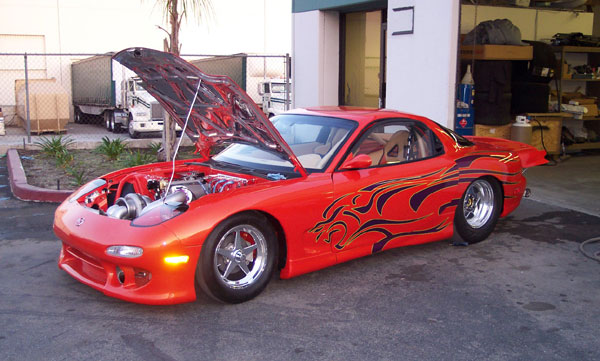
Mike's (G-Force Trannys) 20B FD
I've been following this thread with great interest and admire all of the work Auto Illusions has put into this project; truly first rate.
I also wanted to let you all know that Flaco Racing (Abel Ibarra) has now opened up the Flaco Racing shop for high-end performance work to the public. The shop can handle custom rotary and turbo set-ups... again, high-end stuff.
Abel is actually in the process of building a 1000hp 20B street FD for Mike over at G-Force transmissions. This car, interestingly enough, is using a Flaco Racing modified (totally reworked) OEM 20B manifold.
Auto Illusions if you or anyone would like some high-end rotary or turbo work done by Flaco Racing, just PM or e-mail me.
-Bern
brhslm@earthlink.net
Auto Illusions, the original intake manifold you got done was not the same as Abel's piece, and from my understanding, was not done by the same gentlemen, or if it was, it's a different set-up. Abel has spent countless hours of R&D on his current manifold set-up, and is not ready to offer this piece out yet. see pics...
Mike's (G-Force Trannys) 20B FD
Last edited by Bern; 05-25-05 at 08:12 PM.
05-25-05, 08:05 PM
#495
Rotary Enthusiast
Join Date: Mar 2001
Location: Southern Cali
Posts: 1,414
Likes: 0
Received 0 Likes
on
0 Posts
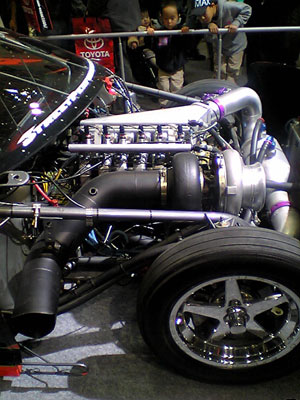
A few pics of Abel's brother Chato's 800+hp 13B FD. This 13B is close to the set-up Abel used to run in his FD, with updates to turbo and a few other technological updates.... The FD is basically set-up as an NHRA Modified class car, but with full show details. Including leather and suede interior.... this car has only been seen once in public and hopefully should be getting some magazine work soon.
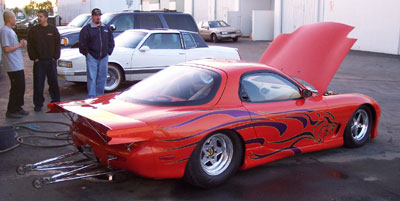
sorry for blanking manifold, Flaco Racing didn't want this experiment shown yet.
Again Auto Illusions, great work and effort on your ride, truly outstanding!
Looking forward to updates!
-Bern
brhslm@earthlink.net
The FD is basically set-up as an NHRA Modified class car, but with full show details. Including leather and suede interior.... this car has only been seen once in public and hopefully should be getting some magazine work soon.sorry for blanking manifold, Flaco Racing didn't want this experiment shown yet.
Again Auto Illusions, great work and effort on your ride, truly outstanding!
Looking forward to updates!
-Bern
brhslm@earthlink.net
Last edited by Bern; 05-25-05 at 08:09 PM.
 05-26-05, 11:37 AM
#498
Hey man, cant find anywhere where that Diff is from? Will you tell me? I'm in the middle of my own 20B-project but in an FC and don't know what differential to use... My gearbox has 1:1 on 5th...
05-26-05, 12:19 PM
#499
Senior Member
Thread Starter
Join Date: Aug 2003
Location: Moon Twp. Pennsylvania
Posts: 703
Likes: 0
Received 0 Likes
on
0 Posts
Originally Posted by Bern
Guys,
I've been following this thread with great interest and admire all of the work Auto Illusions has put into this project; truly first rate.
I've been following this thread with great interest and admire all of the work Auto Illusions has put into this project; truly first rate.
Originally Posted by Bern
Auto Illusions, the original intake manifold you got done was not the same as Abel's piece, and from my understanding, was not done by the same gentlemen, or if it was, it's a different set-up. Abel has spent countless hours of R&D on his current manifold set-up, and is not ready to offer this piece out yet. see pics...
05-26-05, 02:51 PM
#500
Originally Posted by Bern
Abel is actually in the process of building a 1000hp 20B street FD for Mike over at G-Force transmissions. This car, interestingly enough, is using a Flaco Racing modified (totally reworked) OEM 20B manifold.
Mike's (G-Force Trannys) 20B FD
Mike's (G-Force Trannys) 20B FD
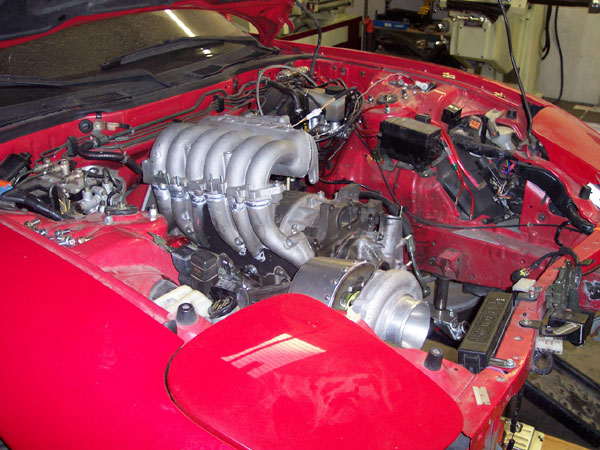
I see what he did! He cut open the UIM and removed the internal runners so that all 6 are exposed evenly in the manifold. I saw someone else on this forum do the same thing but can't remember who it was. Hell I want the manifold that he uses for the drag car.