
Tank removal tutorial? Can't seem to find it.

Thread Starter
Joined: Jun 2008
Posts: 8,376
Likes: 28
From: Chino Hills, CA
Tank removal tutorial? Can't seem to find it.
Someone (Dave? Trochoid? Stu?) not too long ago had put up a good "How To" thread on removing the fuel tank with minimum work. Decent pix and the whole deal.
Try as I might, I can't seem to coax search into coughing it up, now that I need it.
Can anyone provide a link? Think I'll be needing it tonight.
Thanks!
Try as I might, I can't seem to coax search into coughing it up, now that I need it.
Can anyone provide a link? Think I'll be needing it tonight.
Thanks!


Joined: Mar 2001
Posts: 31,833
Likes: 3,232
From: https://www2.mazda.com/en/100th/
lol, its so easy i never thought to even look..
1. find car
2. drain fuel, skipping this step makes life hard, when you have the tank supported you MUST make sure the fuel can't slosh around, or the tank will jump
3. put rear of car on jackstands
4. support gas tank with jack.
5. unplug sender, left wheel well.
6. open fuel door and remove the 3 or 4 8mm bolts holding the fuel filler to the body (you can loosen the big hose by the tank too, but i think its easier to take it off out of the car, where there is plenty of room)
7. the gas tank straps are bolted in the rear, remove bolts.
8. lower tank a little, mark and remove the 3 hoses. there is a fuel feed, return, and a vent line
9. tank is now free, so you can do whatever you need to do, pull it all the way out
10. replacement is the opposite of removal, it does help if you use the jack to position the tank in the car before bolting the straps up
Lives on the Forum
Joined: Jun 2004
Posts: 11,359
Likes: 14
From: Grand Rapids Michigan
Its very simple DD, and jdf3s just laid it right out for you. I just did this last week, and it only took about an hour.
Can't think of anything he missed, other than removing the shields around the tank (plan on breaking some bolts there).
.
Can't think of anything he missed, other than removing the shields around the tank (plan on breaking some bolts there).
.
Thread Starter
Joined: Jun 2008
Posts: 8,376
Likes: 28
From: Chino Hills, CA
I had the shields off a couple weeks ago, when I replaced the V&C valve. No bustage, luckily.
I hope I have no issues with the top gasket at the filler neck - - they are NLA.
OK, guys - - I'll let you know how it goes. Thanks!
I hope I have no issues with the top gasket at the filler neck - - they are NLA.
OK, guys - - I'll let you know how it goes. Thanks!

Trending Topics
Glen-
-drain as much fuel as you can!! tank is a bastid to handle with even small amount of fuel!! Recommend pulling sender unit (gaskets still available) and draining from there.
-you being the engineering type, might want to thread in a drain plug for future efforts...
-as you lower tank KEEP TRACK OF WHERE THE FOUR LINES HOOK UP TO - pix reference will be your friend!!
-recommend POR-15 Fuel tank Treatment kit for cleaning, re-sealing the tank. bound to be loose/flakeys in there after all these years! Visit to good rad shop first for a chemical/boil-out is $$ well spent.
happlily is easier to install than remove...
'luck!
Stu Aull
80GS
Alaska
Who, me?
Don't recall doing a write up on tank removal. I strongly recommend PB Blaster and a 1/2"X 14 mm impact wrench with a long extension to remove the tank strap bolts. Section 4A, Page 3 of the 85 FSM shows the hose diagram. This would be a good time to replace all the fuel hose and clamps. Use the band clamps, not the worm drive ones as they tend to chew up the hose.
If you plan on removing the fuel sender, more PB Blaster and an impact screw driver. I always replace the Phillips screws with allen heads. While the tank is out, now is the time to refurbish it inside and out. Have the inside boiled and sealed, the outside stripped and sealed. (Straps too). No point in having to go back and do it all over again in a few months. Most any radiator shop can boil out the tank, I've had good luck with Red Coat tank sealer. To remove the undercoating from the outside of the tank, cover it with heavy blue paper shop towels and soak with paint thinner or mineral spirits, the scrape. The leftovers can be scrubbed off with spirits and a scotch brite. Clean up with brake cleaner and blow dry.
I you want your work to last a long time, shoot the tank with an epoxy primer/sealer, after treating the rust and before a topcoat of undercoating or truck bed liner.
Hadn't planned on getting so long winded but contribute quite a bit to the forum so I thought I'd return the favor.
As far as the gaskets at the filler neck and sending unit, you can make new ones out of cork.
If your engine is an SE, use FI rated hose.

Glen, here's my writeup on the tank removal:
here's some info and my writeup on dropping the tank should you need to do that. others may do it differently, but this is what i've found works. dropping the tank is no big feat. just make sure you drain all of the gas first. it makes a big difference when removing and reinstalling the tank. pop open the filler door and remove the three 8mm bolts holding the filler neck on. push the filler neck through the opening. it may be a little tough at first but the seal will unstick and it will push through.
next, get under the car and remove the three lines ahead of the fuel tank. eaiser to do this now rather than when the tank is coming down. then you'll want to remove the small plastic splash guard in the left wheel well. this will give you access to the sending unit. unplug it. chances are the connector will fight you a bit coming off and will be stiff. be patient with it.
you will then want to remove the two 14mm bolts holding the tank up, move the straps down, and work the tank down. get the tank on the ground and remove the pickup lines and the fuel level sender. you may find the screws for the fuel level sender very rusty and difficult to remove. you can now look in the tank and make a determination of where you want to go from there. when the tank is clean you will want to replace the gasket for the fuel level sender and the gasket for the pickup lines. you may also want to replace the pickup screen that attatches to the pickup lines. this can be clogged or ripped or otherwise in poor condition. the part numbers for replacement parts from mazda are as follows:
pickup/return line gasket: FA54-42-182
fuel level sender gasket: 8871-60-962A
pickp screen: GA97-42-113-this is for the GSL-SE. the 12A screen is different
fuel tank pad: 8871-42-761
fuel level sender(if yours is bad. new sender comes with gasket): FA54-60-960
i have recently purchased most of these parts for my project and the prices are pretty reasonable from the dealer.
pics to follow with explanations.
Last edited by mazdaverx713b; Mar 24, 2010 at 04:51 AM.
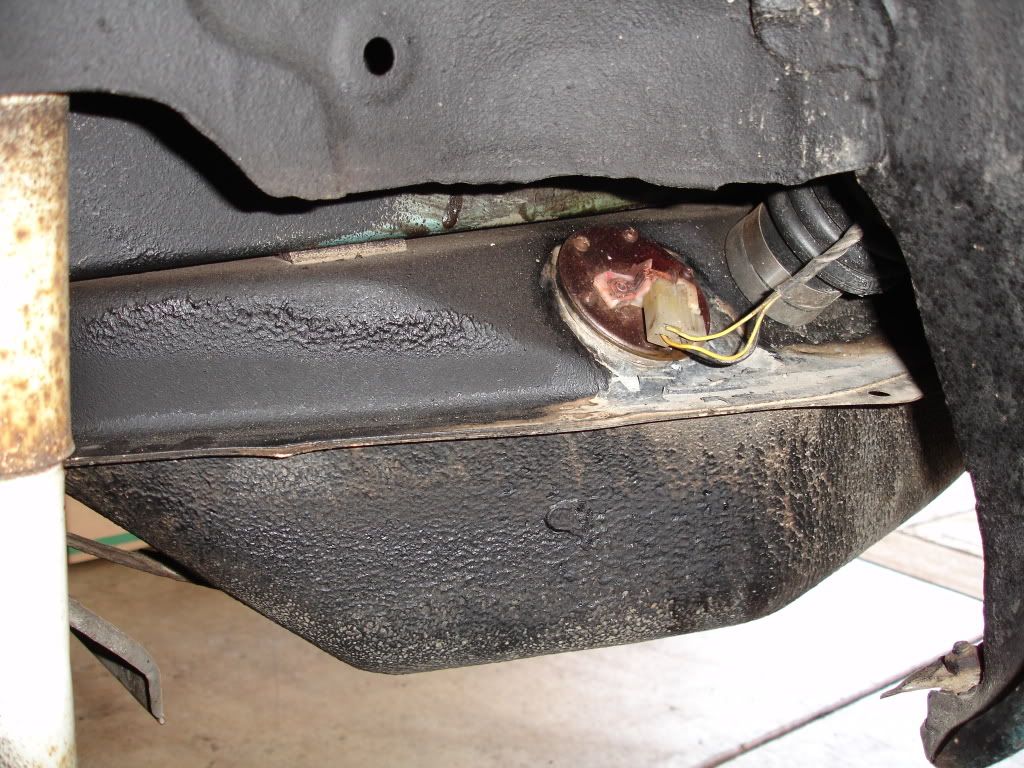
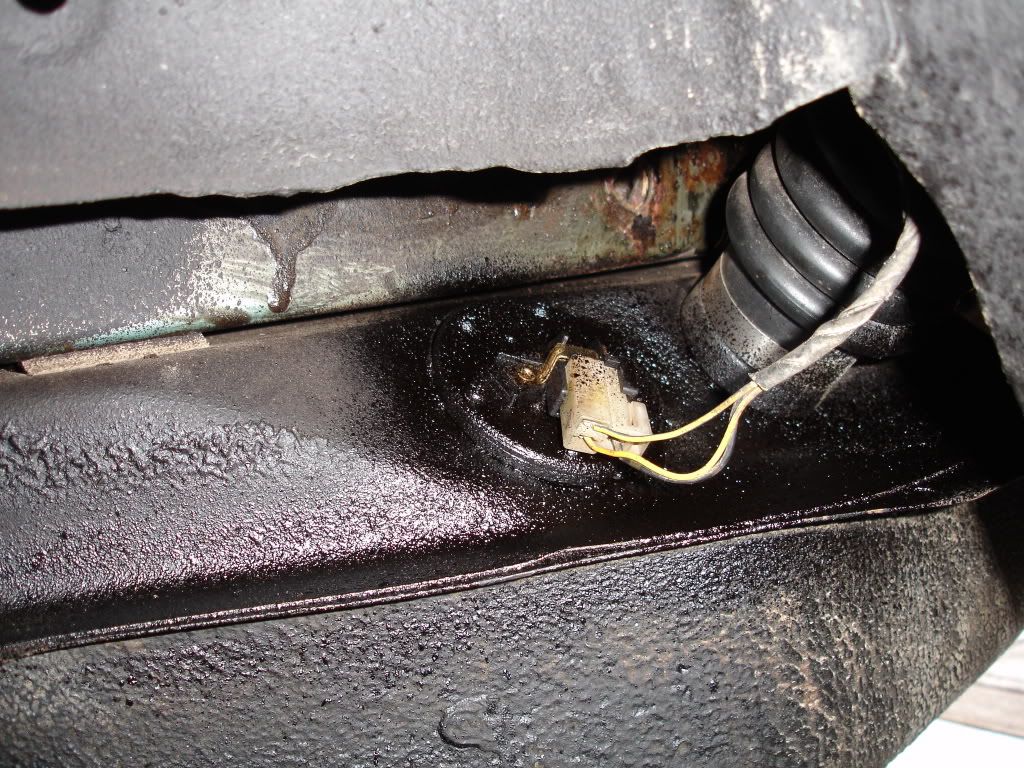
first, jack the car up, put it on stands, remove the left rear wheel, remove the plastic splash shield in the left wheel well. it is held on by two 10mm bolts and a 10mm nut. this will expose the fuel level sender which needs to be unplugged at this step:
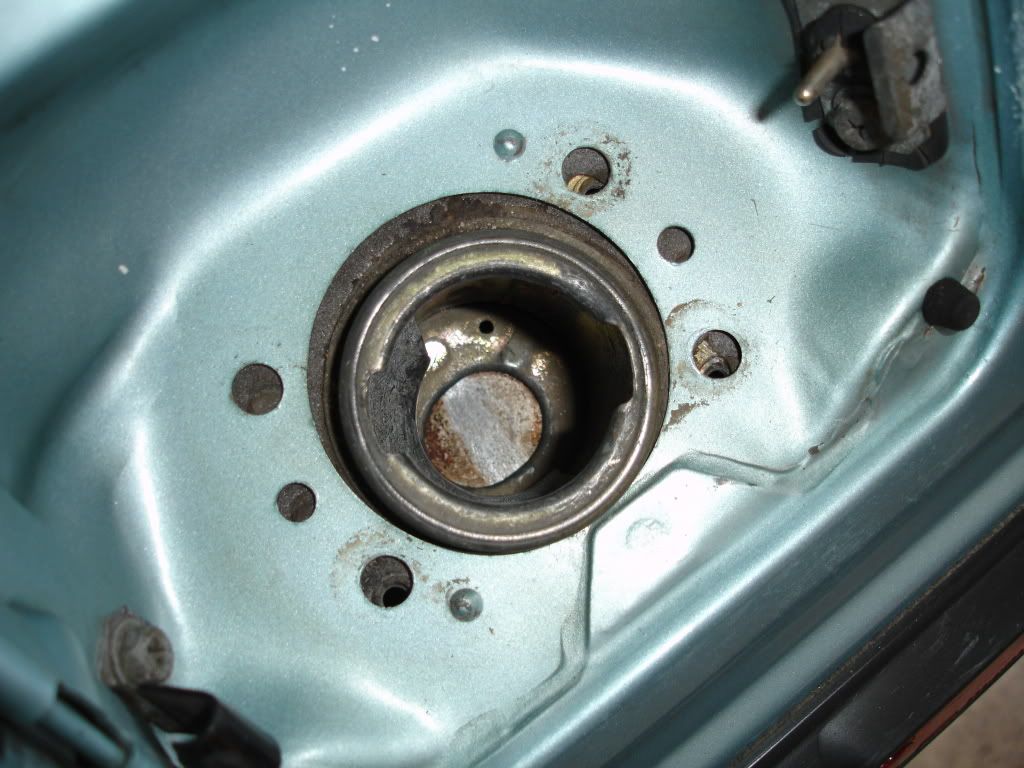
next, open the filler door, remove the gas cap and the three 8mm bolts, lift off the plate and push the neck down until it breaks away from the body:
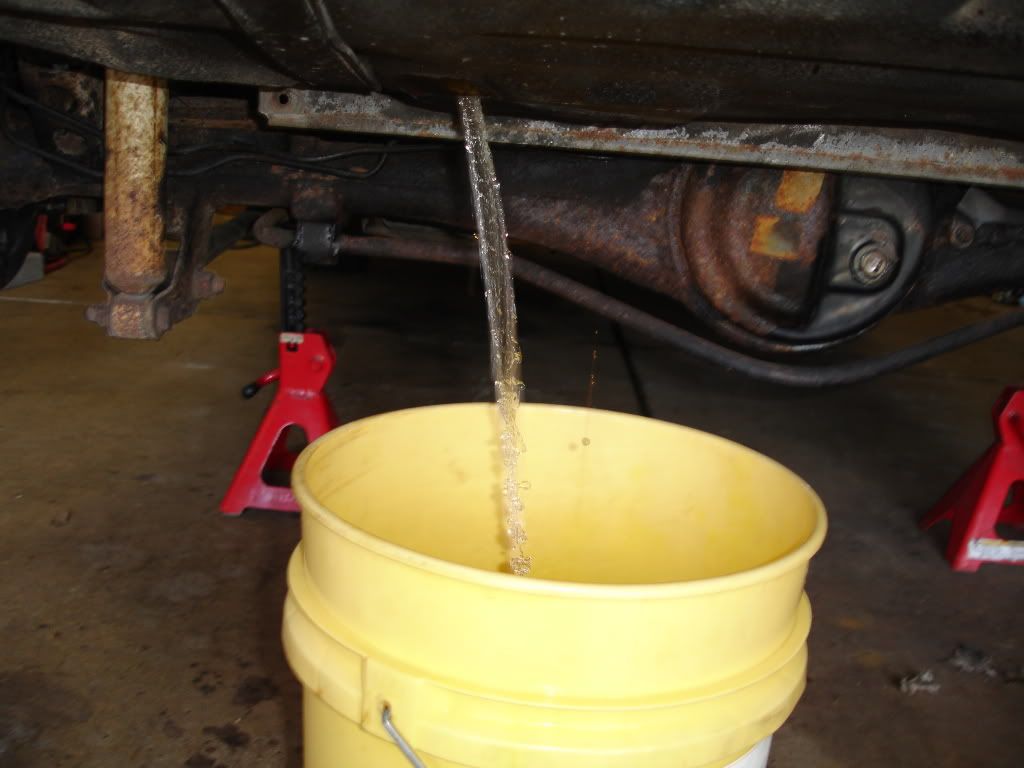
now is a good time to drain the gas. place a suitable bucket under the drain plug and remove the drain plug. a clean 5 gallon bucket works great and you can empty the bucket into a 5 gallon gas can or cans:
after the tank is drained, reinstall the drain plug and remove the clamps from the feed, return, and vent lines and slide the hoses off:

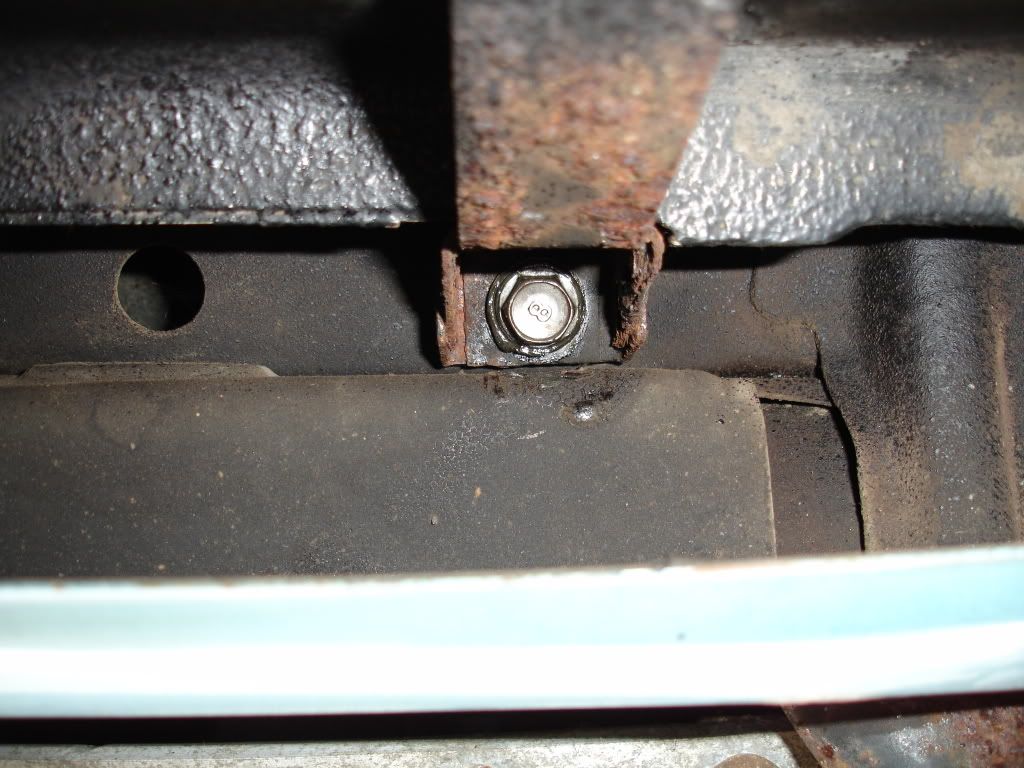
once thats done, remove the 14mm bolt from from each tank strap, they'll be in the front of the straps towards the rear bumper and you'll want to swing the straps down:
when the tank starts coming down, wiggle the filler neck out of its opening. once you do this, the tank will finish coming down(all the while you are supporting the tank with your leg or suitable support i hope)

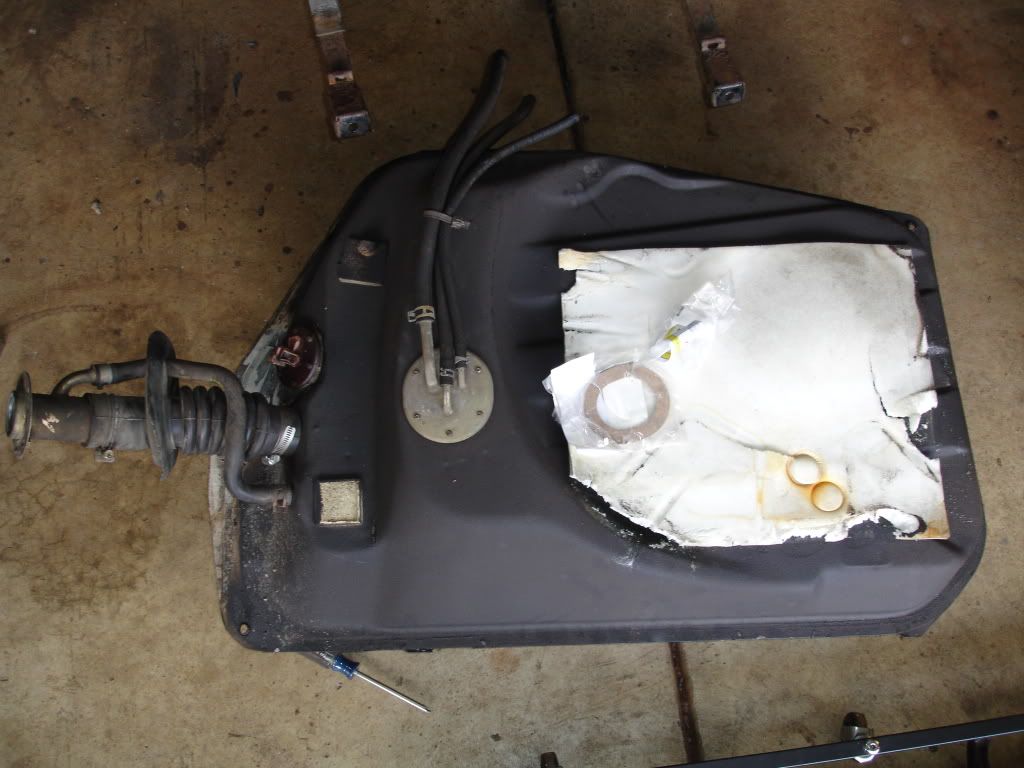
and the tank will be down and ready for service:
once you are satisfied with the tank, install is the reverse of removal. wiggling the filler neck into its opening while installing the tank at an angle is the toughest part. once everything is set in place, you'll bolt the straps up, install the lines, install the filler hose and cap, connect the sender connector, install the splash shield, install the tire, lower the car down, fill the tank with gas, start, and check for leaks.
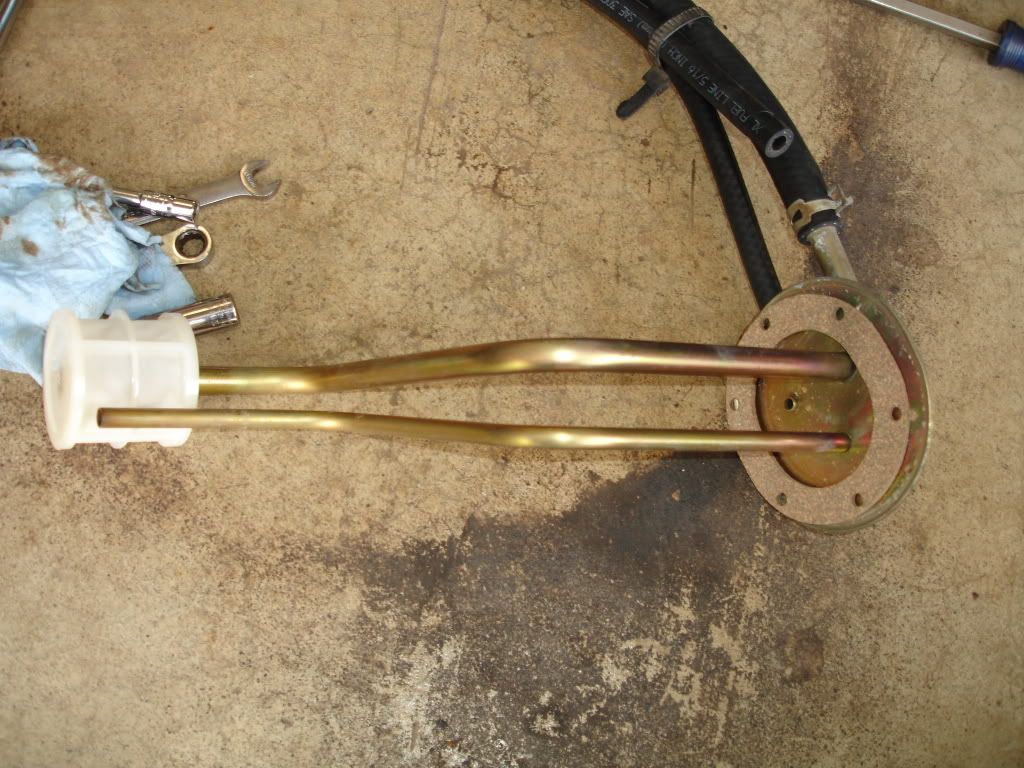
here is the new pickup gasket and fuel level sender with screws installed
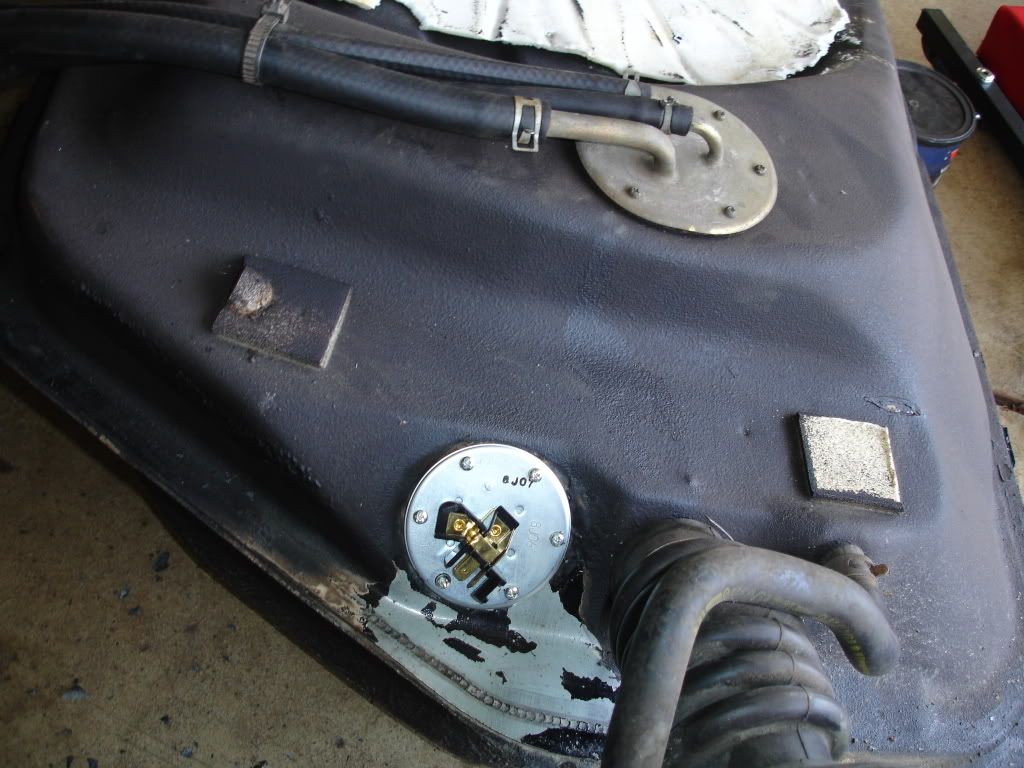
reinstall the tank and add a coat of undercoating to preserve the sender and protect it and the screws from rust. you may also want to clean and undercoat the entire top of the tank while it out to preserve it:
next, open the filler door, remove the gas cap and the three 8mm bolts, lift off the plate and push the neck down until it breaks away from the body:
now is a good time to drain the gas. place a suitable bucket under the drain plug and remove the drain plug. a clean 5 gallon bucket works great and you can empty the bucket into a 5 gallon gas can or cans:
after the tank is drained, reinstall the drain plug and remove the clamps from the feed, return, and vent lines and slide the hoses off:
once thats done, remove the 14mm bolt from from each tank strap, they'll be in the front of the straps towards the rear bumper and you'll want to swing the straps down:
when the tank starts coming down, wiggle the filler neck out of its opening. once you do this, the tank will finish coming down(all the while you are supporting the tank with your leg or suitable support i hope)
and the tank will be down and ready for service:
once you are satisfied with the tank, install is the reverse of removal. wiggling the filler neck into its opening while installing the tank at an angle is the toughest part. once everything is set in place, you'll bolt the straps up, install the lines, install the filler hose and cap, connect the sender connector, install the splash shield, install the tire, lower the car down, fill the tank with gas, start, and check for leaks.
here is the new pickup gasket and fuel level sender with screws installed
reinstall the tank and add a coat of undercoating to preserve the sender and protect it and the screws from rust. you may also want to clean and undercoat the entire top of the tank while it out to preserve it:
Thread Starter
Joined: Jun 2008
Posts: 8,376
Likes: 28
From: Chino Hills, CA
Thanks, Dave; that was the photo-sequence I'd remembered seeing.
Sadly, I only got as far as jacking and taking the shields off last night before the phone rang & my priorities took a sudden realignment.
My 83-year-old dad, who lives in Iowa, was diagnosed with stage-4 cancer & the outlook is not good. I'll be hopping a plane in the next couple of days most likely, so car stuff had to get tossed back together and tabled for now.
Thanks for the help, though, gents. I'll pick this back up sometime in the future.
 thats what Glen wanted
 I hope for the best for everyone!
Thread Starter
Joined: Jun 2008
Posts: 8,376
Likes: 28
From: Chino Hills, CA
Thank you all for the well-wishes. Much appreciated, & I'll pass them on to Dad.
I'll still be hanging around even while I've no opportunity to work on my car; thinking about other people's car problems & achievements is a wonderful way to get away from your own mental situation for a span.
I'll still be hanging around even while I've no opportunity to work on my car; thinking about other people's car problems & achievements is a wonderful way to get away from your own mental situation for a span.
Hats of to Dave for great photo-tutorial. Your RX looks NEW under there! Ahhh, to have a DRAIN plug in the SAs...! *sigh*
My one recommendation is to disconnect the main/big filler hose at the TANK end, thus leaving the filler hose mounted to the body (so you don't have to/shouldn't remove the screws in the filler cap area that hold the main hose pipe to the car). I found it MUCH easier to remove/re-attach the hose right at the tank, rather than try to muscle it back into place with the complex weather seal that needs to be re-fitted into the inner fender panel - esp with the tank in the way!!!
Stu Aull
80GS
Alaska
Joined: Mar 2001
Posts: 31,833
Likes: 3,232
From: https://www2.mazda.com/en/100th/
Hats of to Dave for great photo-tutorial. Your RX looks NEW under there! Ahhh, to have a DRAIN plug in the SAs...! *sigh*
My one recommendation is to disconnect the main/big filler hose at the TANK end, thus leaving the filler hose mounted to the body (so you don't have to/shouldn't remove the screws in the filler cap area that hold the main hose pipe to the car). I found it MUCH easier to remove/re-attach the hose right at the tank, rather than try to muscle it back into place with the complex weather seal that needs to be re-fitted into the inner fender panel - esp with the tank in the way!!!
Stu Aull
80GS
Alaska
My one recommendation is to disconnect the main/big filler hose at the TANK end, thus leaving the filler hose mounted to the body (so you don't have to/shouldn't remove the screws in the filler cap area that hold the main hose pipe to the car). I found it MUCH easier to remove/re-attach the hose right at the tank, rather than try to muscle it back into place with the complex weather seal that needs to be re-fitted into the inner fender panel - esp with the tank in the way!!!
Stu Aull
80GS
Alaska
i think that's the easiest way, and like we say, if you want to find the easiest way to do something ask the laziest guy...
lol, this is true..laziness is an art if done properly, lol. i remove the filler neck so that i can inspect if for cracks or damage and so that i can inspect the filler body for rust or corrosion.

It can be as easy as Dave makes it look (I've been lucky so far on the two or three I've done) or it can be a real pain if you have just one rusted bolt that breaks off, like they did on that parts car I had that spent one too many winters in Ohio. But all that is nothing compared to your dad taking sick. Our thoughts are with you DD.

Thread
Thread Starter
Forum
Replies
Last Post
alphawolff
1st Generation Specific (1979-1985)
17
Nov 17, 2015 05:57 PM