When you click on links to various merchants on this site and make a purchase, this can result in this site earning a commission. Affiliate programs and affiliations include, but are not limited to, the eBay Partner Network.
The OE oil cooler has a built in pressure relief valve AND thermostat. Aftermarket do not and you can end up with massive pressure levels when cold and blow oil cooler lines. The OE oil coolers are also very well made and effective. The only major flaw is that the hose connector bosses are located on the front of the end tank and tend to flex and crack when removing overtightened or stuck hoses. The FC design has the connections on the top and side, with a bar to lock the banjo bolt when undoing the bolts. This prevents flexing of the bosses and avoids cracking. If you were going to "upgrade", the FC oil cooler is a good choice.
I agree with 7aull. Keep the OE cooler and get it reconditioned if required.
Mines not broken but I'm worried it might be damaged since BOTH hangers are broken .
Ok guys, I just removed the radiator/oil cooler. The oil cooler is fine, but the radiator has THREE broken bolts where the hangers sit. I broke on removing the driver side one but one on the other side was already broke and the other one was broken internally because it came out just fine but the end nib never came out. I can't seem to find a new radiator anywhere but Atkins who wanst 300 dollars for a radiator ( they price gouge, Mazda dealer parts are cheaper by at least 15%, let that sink in ) . All the aftermarket ones don't include the transmission lines . Anyone have any tips or should I try to remove the stuck bolt shafts wit ha drill and pray i don't blow my old raggedy radiator
Presume you mean the Oil Cooler mount points on the Water rad are futzed? Or do you mean the water radiator's mount points?
Regardless, some options for a replacement water rad:
-go chinese via ebay: aluminum, 3 row "made to fit" SA 79-81 RX7s: $100-130 for the same rad, multiple suppliers offer these.
BUT: my experience (others PLEASE chime in!!) - the hard mount points for the water rad-to-frame were not accurate. Not a huge deal but means holes will need to be re-drilled to match correctly (by just enlarging them usually) prior to install.
AND
Mine (Chinese) leaked! So I ended up chucking it and proceeded to:
-buy a US-supplier brand (sorry, no name recalled) in black, 2-core with standard metal core. Better fit, no leaks, DOES have the
(weird) transmission lines at the bottom (most aftermarkets seem to), but these are "dumb", ie do not link into the main water core. So you can ignore them or chop them off. Paid about $220. Try RockAuto.
If you do use the old rad, strongly urge you drop it off at a rad shop and get it rodded and cleaned! Can get pretty mucky inside after years of use, and rotaries in particular are VERY fussy about proper cooling.
Stu A
80GS
AZ
Last edited by 7aull; 06-25-19 at 04:37 PM.
Reason: misspelling
Presume you mean the Oil Cooler mount points on the Water rad are futzed? Or do you mean the water radiator's mount points?
Regardless, some options for a replacement water rad:
-go chinese via ebay: aluminum, 3 row "made to fit" SA 79-81 RX7s: $100-130 for the same rad, multiple suppliers offer these.
BUT: my experience (others PLEASE chime in!!) - the hard mount points for the water rad-to-frame were not accurate. Not a huge deal but means holes will need to be re-drilled to match correctly (by just enlarging them usually) prior to install.
AND
Mine (Chinese) leaked! So I ended up chucking it and proceeded to:
-buy a US-supplier brand (sorry, no name recalled) in black, 2-core with standard metal core. Better fit, no leaks, DOES have the
(weird) transmission lines at the bottom (most aftermarkets seem to), but these are "dumb", ie do not link into the main water core. So you can ignore them or chop them off. Paid about $220. Try RockAuto.
If you do use the old rad, strongly urge you drop it off at a rad shop and get it rodded and cleaned! Can get pretty mucky inside after years of use, and rotaries in particular are VERY fussy about proper cooling.
Stu A
80GS
AZ
I have an auto so any aftermarket radiators NEED the bottom lines, which none seem to have. MazdaTrix sells a knock-off non-aluminum one for 200$ but I'm looking to pay no more than 150$ . what's odd is they don't even show up on the Mazda website which DOES list list NLA parts but greyed out .
My 2�
-don't think the 79,80 SA 12A kits are avai. Period. But - FB 12A same except you will need to buy the diff intake mani (including 'O' rings!) and exhaust (reactor) gaskets, the rear reactor-to-mini-muffler gasket and the 2ndary air pipe gasket that attaches to the back of the intake.
These are avai separately, if not from Mazda, they are all over ebay quite cheep. Mazdatrix is a good source for Mazda OE engine bits.
-both Atkins and Pineappleracing.com offer there own 'improved' water seals, I chose the Pineapple's. Obv Mazda kits come with these already, but for me, the extra $75-ish at this point in a build is good piece-of-mind, esp considering these water seals seem to be a weak point.
-check your OMP lines and their rubber attachments for failure. I think only the LONG line is still avai new.
-Videos:
Atkins, mazdatrix and an outfit in New Zealand have great DVD videos on builds. I bought all THREE to be sure I got the max info.
;D
They deal with the 13B but diffs are minor. If I had to buy one it would be the Mazdatrix one. $30 well spent.
Stu Aull
80GS
AZ
I got an email from Atkins, they will replace the gaskets for the 12A free of cost , I listed all the "wrong" gaskets and the owner himself emailed me saying they would swap the right gaskets free of cost / I guess they know I can order them all from Mazda for less ( their kit plus the extra gaskets come at 370$ more than ordering gall the right parts from Mazda ) and would rather not lose a 1200$ sale
Ok, these are the last three things I need to get the engine out, how do I remove the acceleration/choke cables? do I need to mark them so I thread them back in place right and #2 how the hell do I remove the fan? and lastly what are the bolt sizes for the oil cooler via the engine side ?
The accelerator cable has two nuts on it that hold it to its support arm. Sometimes it's a weird angle to get them loose - go for the top nut (12mm) - but they will get there with some patience. The choke cable just has a clip. Remove the clip by hand and then pull the cable straight back out of the support arm until it's clear. I think it'll be pretty straight forward once you see it. Put that clip back on the cable though, it's easy to lose. Don't adjust the choke cable nut and I wouldn't worry about marking the cables either.
The fan comes off with four bolts that attach the clutch portion to the 'standoff' that bolts to the water pump. It's easiest with the belts still installed and tight to keep things from spinning, but if you're past that, there are of course other ways. Not sure the size. Certainly between 10 and 13mm.
I don't recall the oil bolt sizes - sad since I just installed my engine not a week ago. If no one replies by tomorrow morning(ish) my time, I'll go out and check.
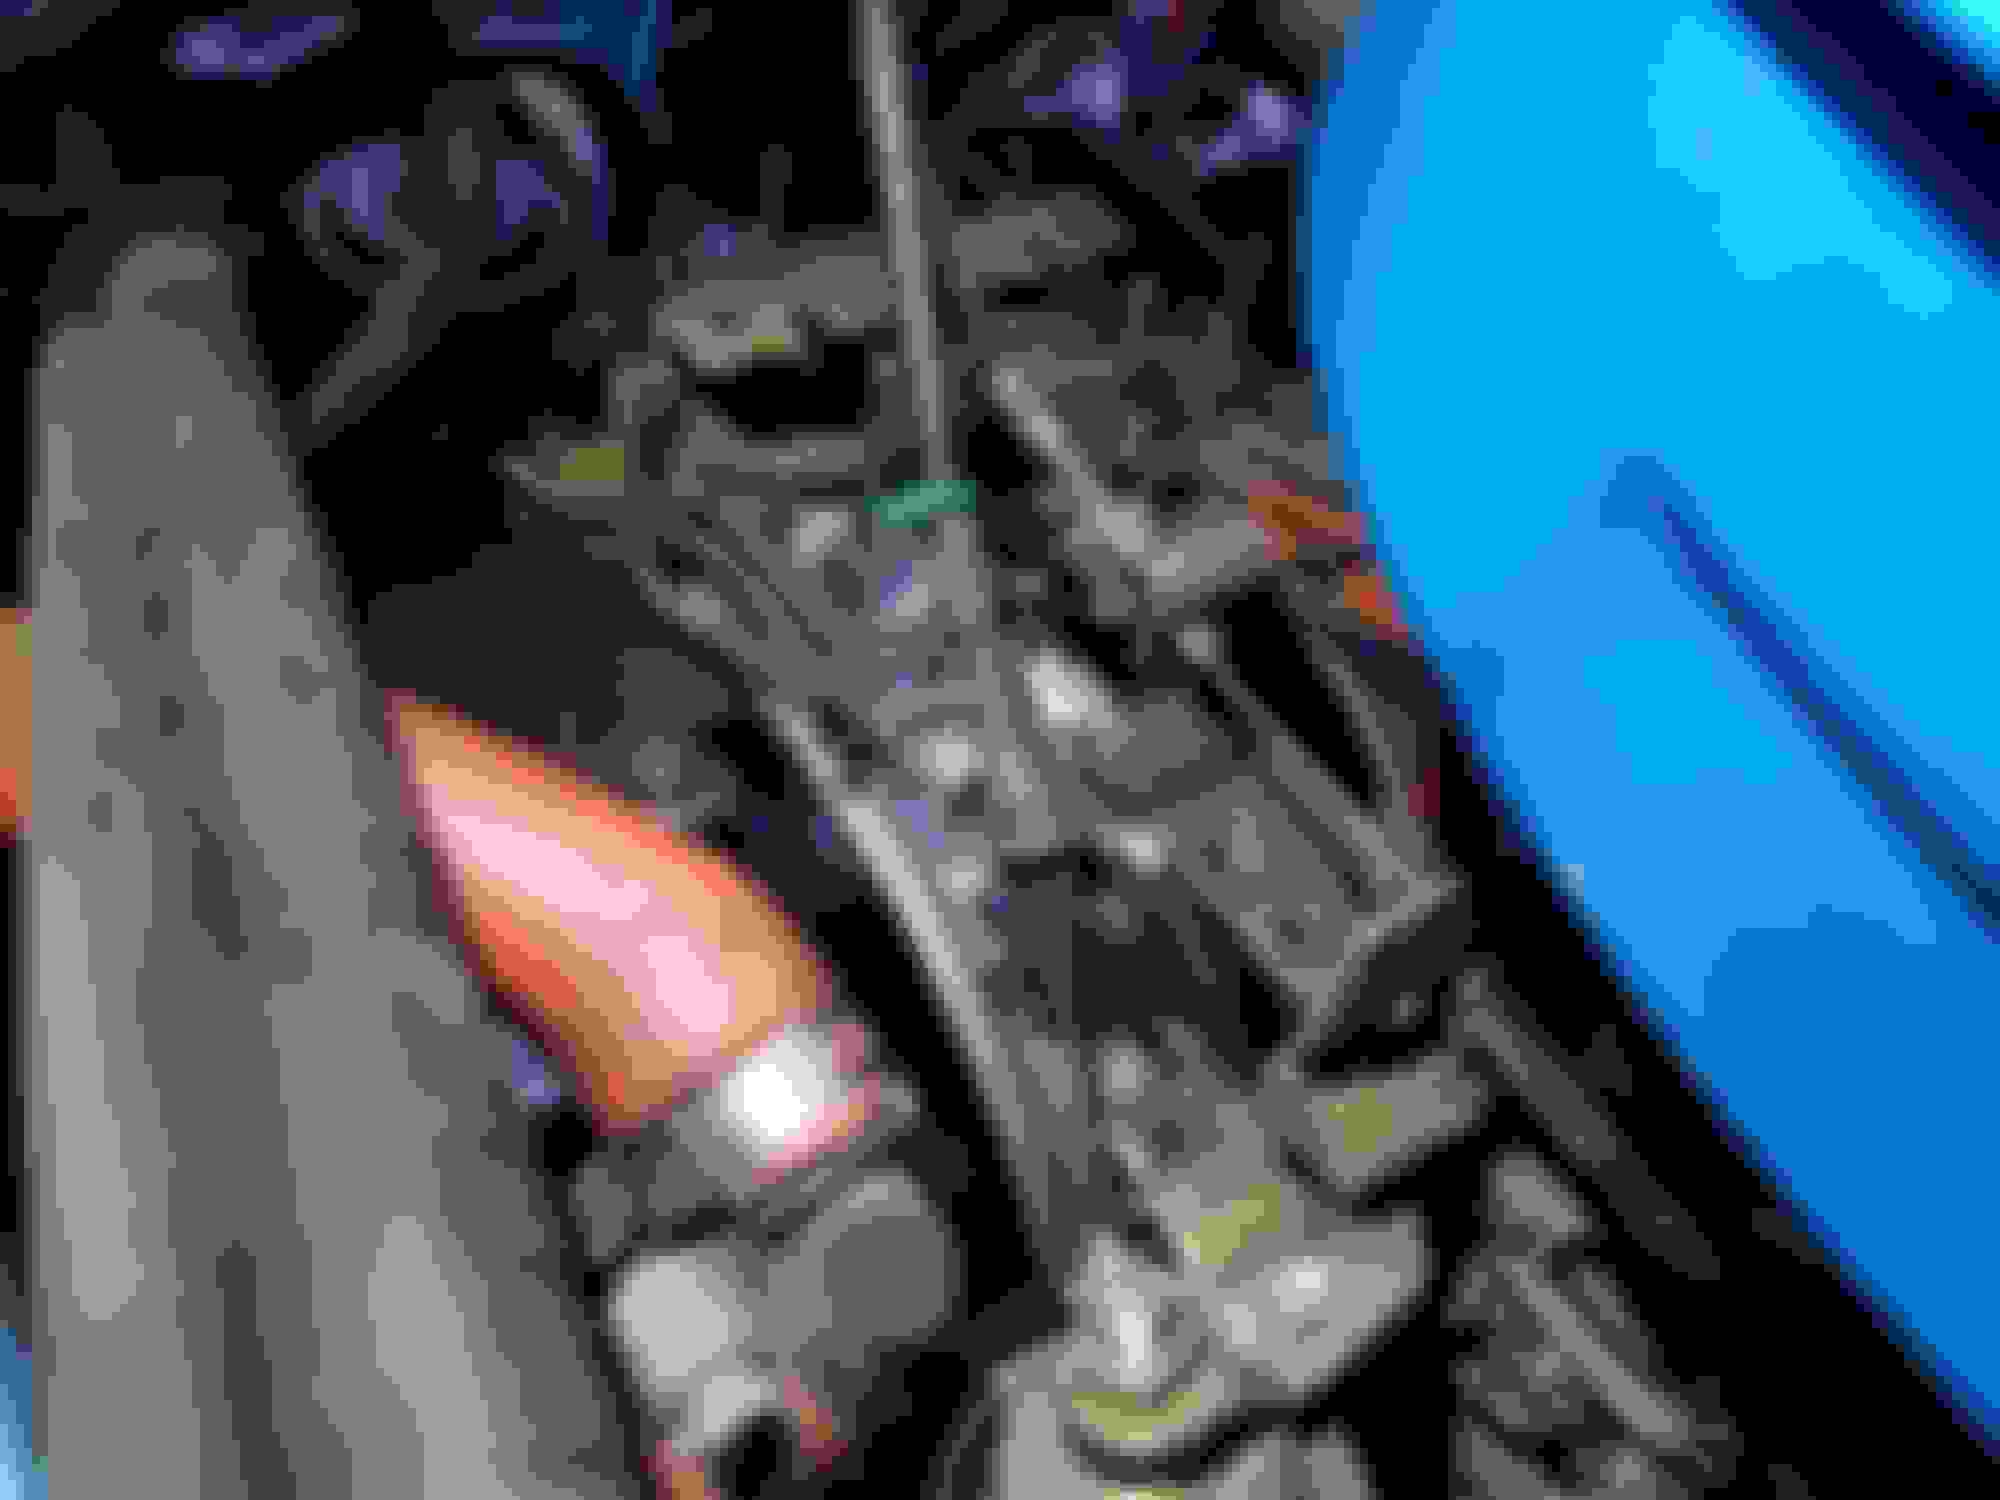
If you could get me a picture of the nuts for the cables id appreciate it . dont wanna move the wrong ones !
Sure. Circled in blue are the nuts for the throttle cable. I find the top one is easiest to access. The green squiggle is the clip you need to pull off (by hand) to remove the choke cable. It is removed to the side. Circled in red is the nut to not adjust, at least for now and probably forever (in other words you don't need to touch it for removal).
There's someone on this forum, can't remember who, that switches out their entire Racing Beat exhaust to factory to pass smog.
Here in AZ, if I want to keep conventional registration with the state vs. Heritage (Classic Car plates which limit the number of miles you're supposed to be driving to less than 5k/yr), I have to pass emissions testing which involves a tail sniffer, a dyno run for 3 shifts, and a pressure test of the gas tank and charcoal cannister and fuel cap. Obviously the RB system has no Catalytic Converters, so I just swap the exhaust system every 2yrs when the Emissions Test is required for me to register it. It only takes about an hour, and once the test is passed, another hour to swap it back to RB performance. This also means my stock Cats will last almost forever, because they're only on for the test and getting back and forth. This is on an 84SE, 13b...
To the OP, I had an 80LS (SA22), and while it was a little more rudimentary all around, there's not much you can do to those engines to increase reliability without negatively affecting your ability to pass emissions testing. Even the Air Pump and Thermal Reactor have to be in place for the system to pass. Any other reliability mods would be plugs, belts, hoses, brake pads, and take a close look at your driveshaft and wheel bearings. My 80LS original engine went to 212k miles before it was leaking pretty much everything from everywhere and lost compression.
Sure. Circled in blue are the nuts for the throttle cable. I find the top one is easiest to access. The green squiggle is the clip you need to pull off (by hand) to remove the choke cable. It is removed to the side. Circled in red is the nut to not adjust, at least for now and probably forever (in other words you don't need to touch it for removal).
Hope that helps.
Sorry to bother you again,, but my car has THREE cables . I got the top two off
The third is for cruise control I believe. I have not dealt with a car equipped with one before, but I'd think it attaches in much the same way as either the throttle or choke. What exactly is your concern about it?
Oh wait, I forgot something. You're probably looking at the hot start assist cable, not cruise control. The question above still stands of course.
Last edited by Benjamin4456; 07-19-19 at 11:22 PM.
The third is for cruise control I believe. I have not dealt with a car equipped with one before, but I'd think it attaches in much the same way as either the throttle or choke. What exactly is your concern about it?
Oh wait, I forgot something. You're probably looking at the hot start assist cable. The question above still stands of course.
My car has cruise control 0.0 , and I didn't know what the heck it was
 06-23-19, 08:45 PM