
Rebuilding hte nikki carb...


Thread Starter
Senior Member
Joined: Jul 2013
Posts: 303
Likes: 0
From: South Beach
Rebuilding hte nikki carb...
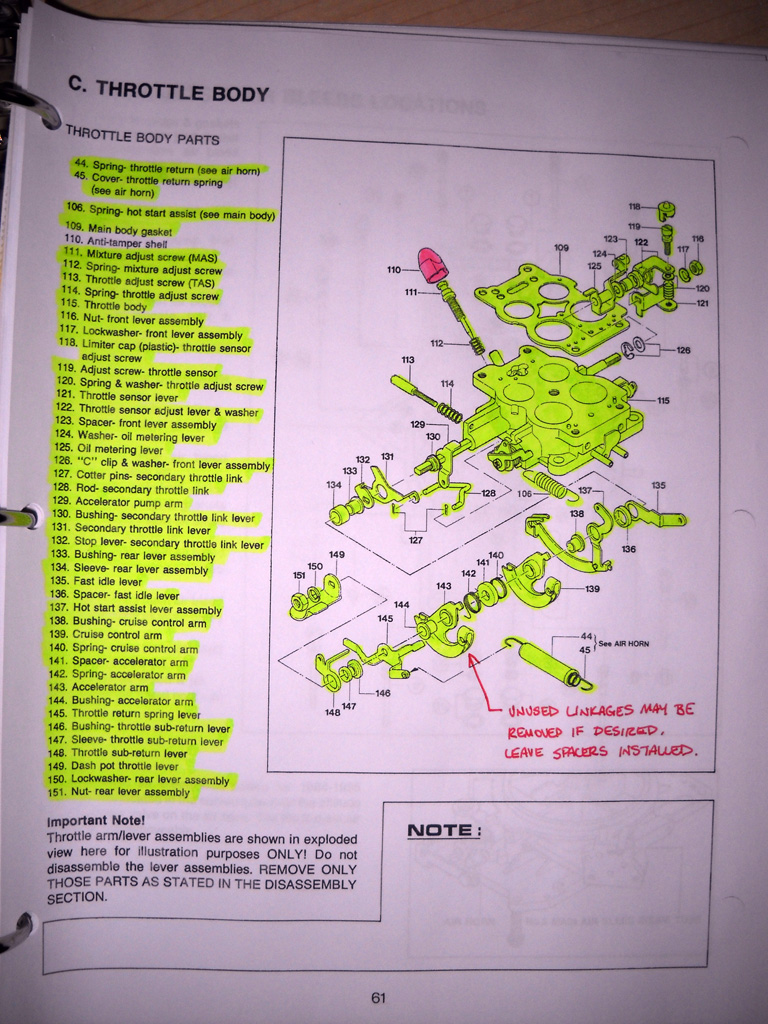
nearly finished, it's already bolted on, I followed this guide to strip it off:
http://foxed.ca/rx-7/Carb%20Stripping%20Draft%201.pdf
just curious, is the throttle position sensor necessary?
The area where the balloons rest (where you can see it through the two glass containers) always gets clogged. Trying to figure out what might be the cause?
http://foxed.ca/rx-7/Carb%20Stripping%20Draft%201.pdf
just curious, is the throttle position sensor necessary?
The area where the balloons rest (where you can see it through the two glass containers) always gets clogged. Trying to figure out what might be the cause?
Thread Starter
Senior Member
Joined: Jul 2013
Posts: 303
Likes: 0
From: South Beach
figured as much, carburetor is stripped, everything seems fine. Engine cranks but floods very easily, going to learn how to control that in the long run.
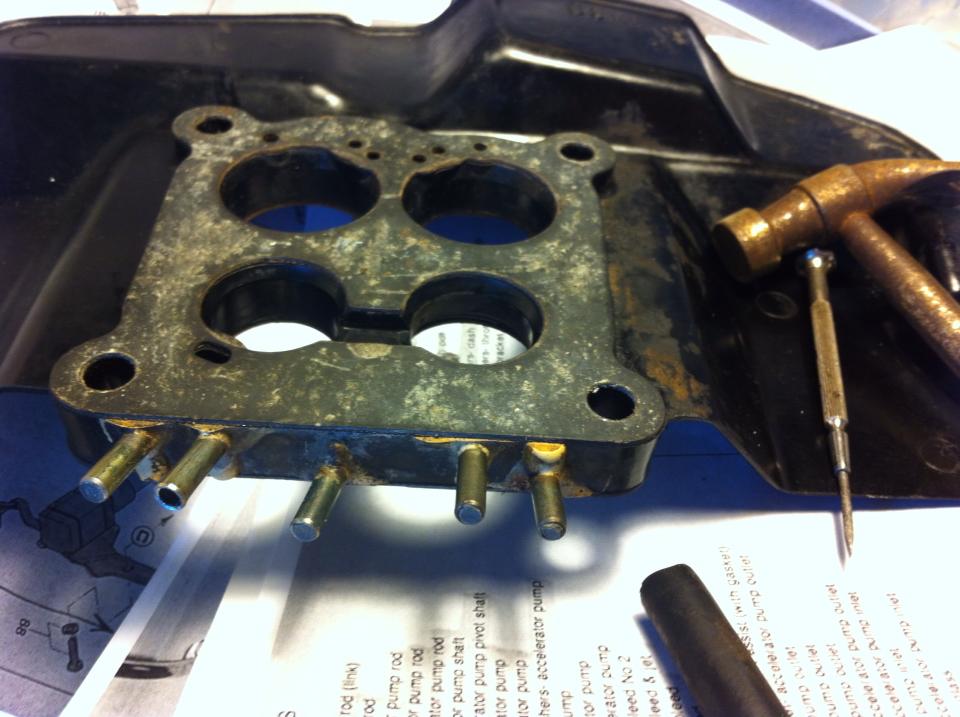
trying to figure out if these are all alright, and nothing is missing


Thread Starter
Senior Member
Joined: Jul 2013
Posts: 303
Likes: 0
From: South Beach
carb whisperer
Joined: Jan 2008
Posts: 1,485
Likes: 4
From: Greenfield, Ohio
Trending Topics
Thread Starter
Senior Member
Joined: Jul 2013
Posts: 303
Likes: 0
From: South Beach
this is starting to look grim
Thread Starter
Senior Member
Joined: Jul 2013
Posts: 303
Likes: 0
From: South Beach
also how do I check if the Mixture Adjust Screw and Throttle Adjust Screw is screwed correctly?
fixed that accelerator pump...kinda derpy how I missed that

as for the top end, does it look alright?

couldn't find oil pump actuator rod.
Last edited by Arcolithe; Sep 26, 2013 at 07:41 PM.
carb whisperer
Joined: Jan 2008
Posts: 1,485
Likes: 4
From: Greenfield, Ohio
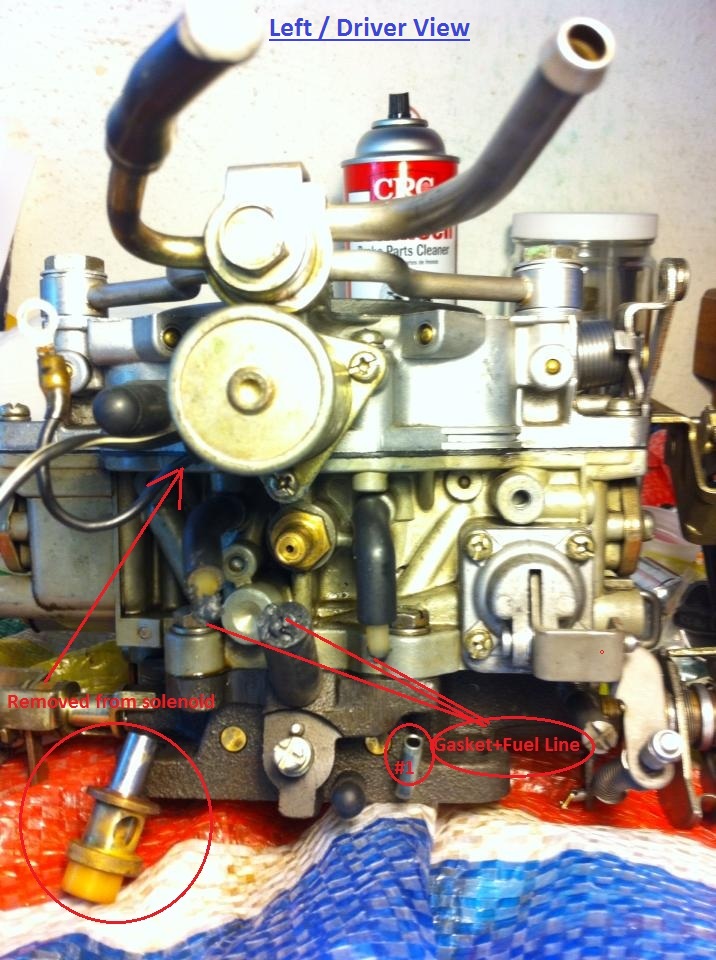
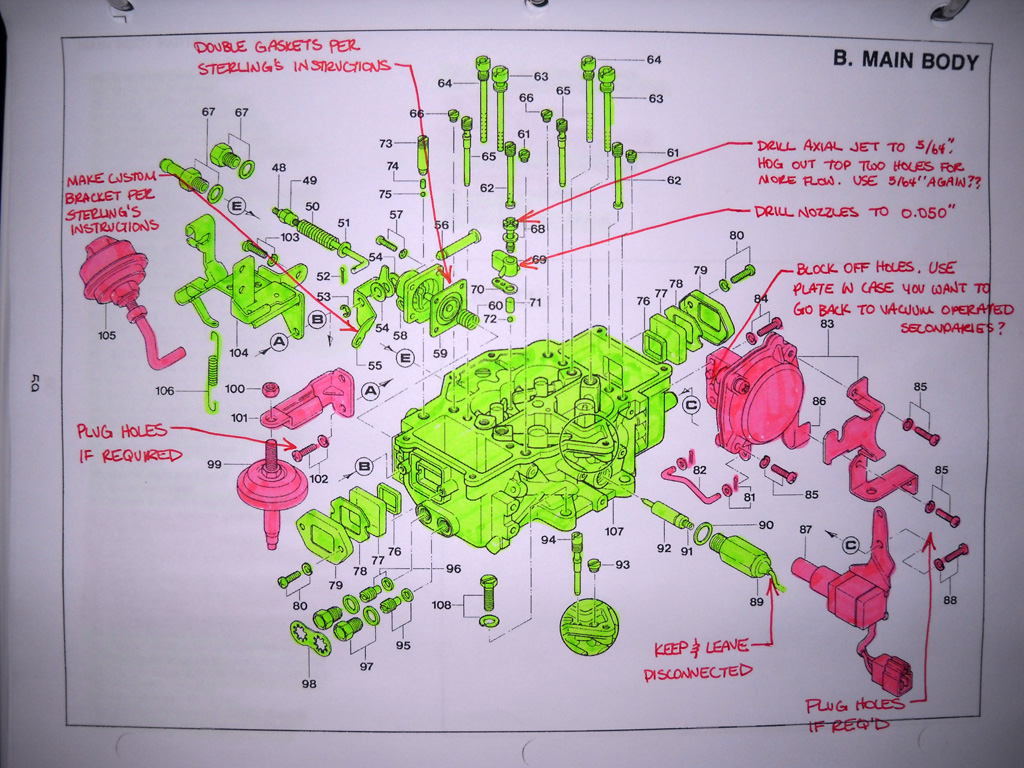
Alright, progress. You need to hook that altitude compensator back up, as its a large vacuum leak unhooked like that. (Its the pod on the side of the carb, hope to god you didnt weld that up) If you dont want it, you can remove it altogether and fill the remaining restrictions with epoxy.
Its handy tho, it leans your mixture out at higher altitudes, making your engine run at its best even when rapidly changing your altitude.
NOW, seeing as you have an older style (spherical plunger head) FBVS (Fuel Bowl Vent Solenoid), you need to show me from the top of the airhorn if that is clogged or not. It also needs hooked up to a switched 12v source unless you totally remove it. ( I dont recommend) Its that large thingy under the fuel inlet banjos that is held in with 3 screws. Get me a picture facing it, too.
Now get me pictures of the linkage from both sides, so we can be sure they are correct too.
I see it also still has its OMP fittings, (the brass nipples sticking out of either primary barrel) and the Sub Zero Start Assist fitting, which is directly under them. Did you have these plugged with rubber vacuum plugs? The SZAF shouldnt leak, but the OMP nipples will.
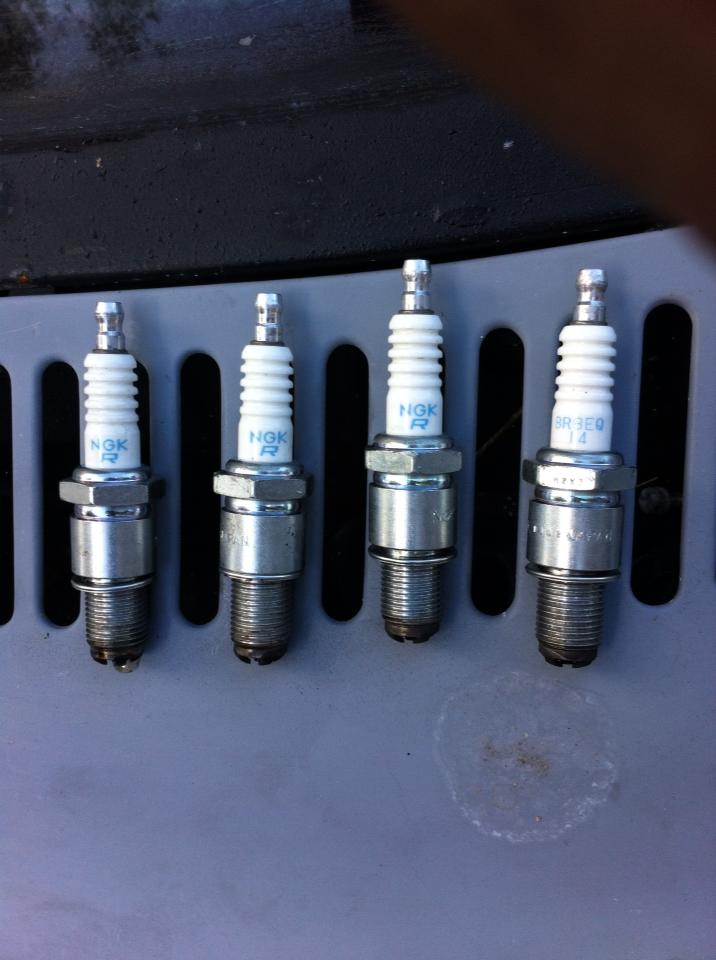
Also after youve done all of this pull your spark plugs and get some pictures of those too, Im curious.
Its handy tho, it leans your mixture out at higher altitudes, making your engine run at its best even when rapidly changing your altitude.
NOW, seeing as you have an older style (spherical plunger head) FBVS (Fuel Bowl Vent Solenoid), you need to show me from the top of the airhorn if that is clogged or not. It also needs hooked up to a switched 12v source unless you totally remove it. ( I dont recommend) Its that large thingy under the fuel inlet banjos that is held in with 3 screws. Get me a picture facing it, too.
Now get me pictures of the linkage from both sides, so we can be sure they are correct too.
I see it also still has its OMP fittings, (the brass nipples sticking out of either primary barrel) and the Sub Zero Start Assist fitting, which is directly under them. Did you have these plugged with rubber vacuum plugs? The SZAF shouldnt leak, but the OMP nipples will.
Also after youve done all of this pull your spark plugs and get some pictures of those too, Im curious.
Thread Starter
Senior Member
Joined: Jul 2013
Posts: 303
Likes: 0
From: South Beach
Alright, progress. You need to hook that altitude compensator back up, as its a large vacuum leak unhooked like that. (Its the pod on the side of the carb, hope to god you didnt weld that up) If you dont want it, you can remove it altogether and fill the remaining restrictions with epoxy.
Its handy tho, it leans your mixture out at higher altitudes, making your engine run at its best even when rapidly changing your altitude.
NOW, seeing as you have an older style (spherical plunger head) FBVS (Fuel Bowl Vent Solenoid), you need to show me from the top of the airhorn if that is clogged or not. It also needs hooked up to a switched 12v source unless you totally remove it. ( I dont recommend) Its that large thingy under the fuel inlet banjos that is held in with 3 screws. Get me a picture facing it, too.
Now get me pictures of the linkage from both sides, so we can be sure they are correct too.
I see it also still has its OMP fittings, (the brass nipples sticking out of either primary barrel) and the Sub Zero Start Assist fitting, which is directly under them. Did you have these plugged with rubber vacuum plugs? The SZAF shouldnt leak, but the OMP nipples will.
Also after youve done all of this pull your spark plugs and get some pictures of those too, Im curious.
The fuel line I will shorten eventually, or remove the PSI gauge overall once I see that the regulator is shooting fine.
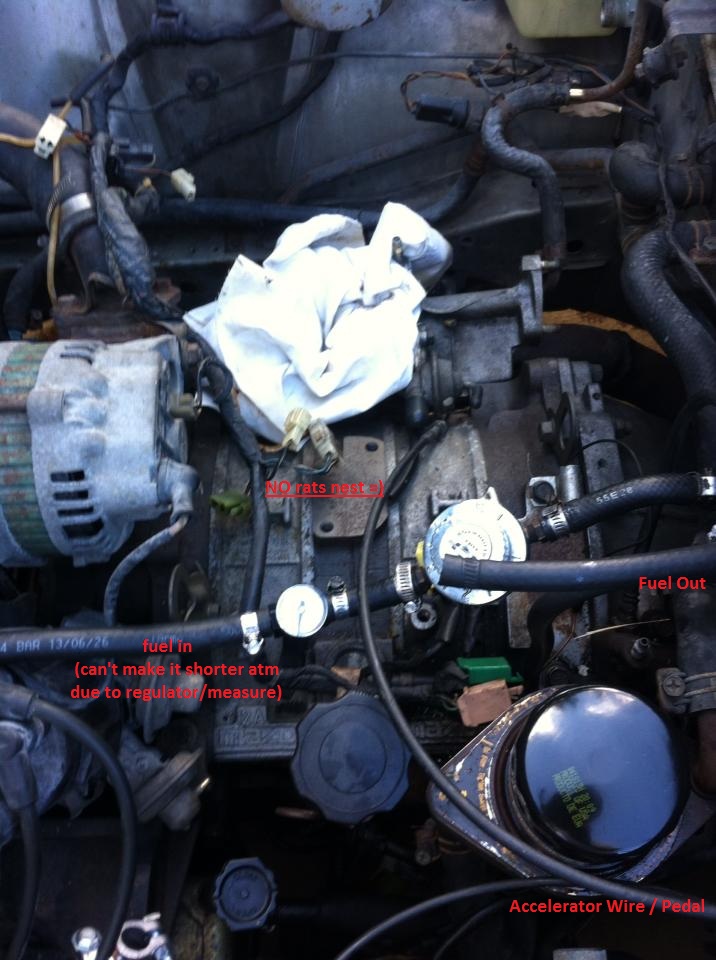
1. The plunger was removed, so the solenoid is just walling that part off.
2. Used instant gasket + old fuel line to close off (instead of jbwelding it like my friend did) what I believe to be the OMP fittings.
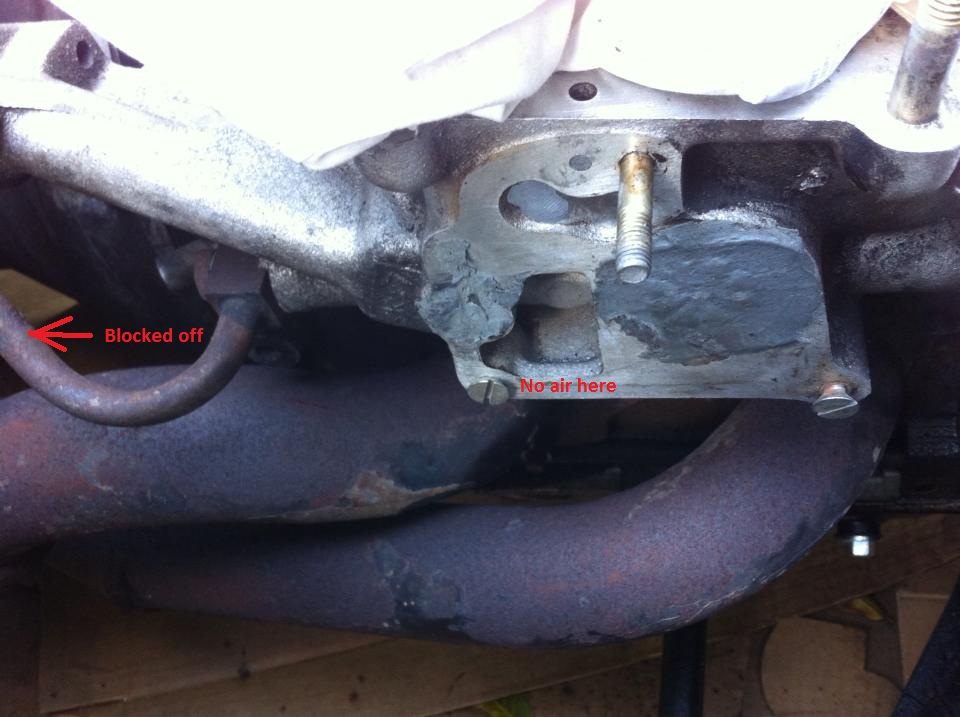
3. #1, not sure if I should plug it up or if it goes somewhere, it leaks down to the intake manifold
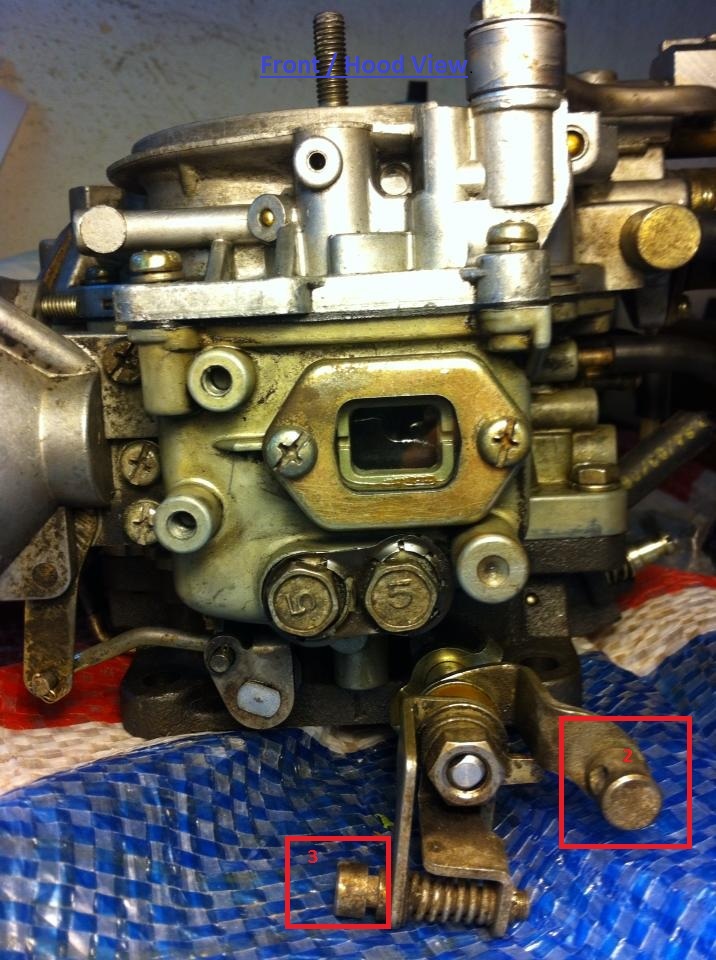
4. #2 and #3, not sure if I should leave thse linkages unhooked, the far left one seems to do nothing bad, it's recommended to be stripped, but honestly don't want to have the fear of accidently jbwelding off another part.
5. all those holes (going to plug the " T " fuel line as well) should be plugged, but most don't even let compressed air through it (just hits a wall and backs out)
6. altitude is closed off since I'm in miami, and have a spare in case I decide to take it off from my sea level homeland (which I've never left).
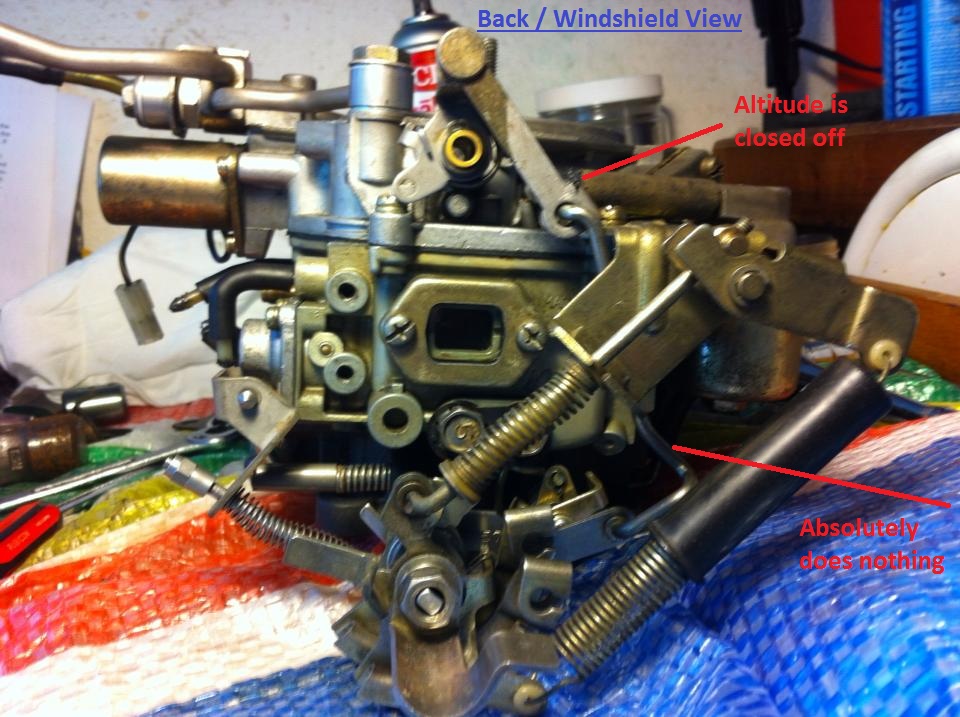
7. that top butterfly was removed as per foxed's stripping guide, and the lever attached to it essential does nothing. Probably should remove it completely unless you suggest otherwise.
Thread Starter
Senior Member
Joined: Jul 2013
Posts: 303
Likes: 0
From: South Beach
Also, learning how to use the forum properly as not to spam MBs of pixels into everyones computer.
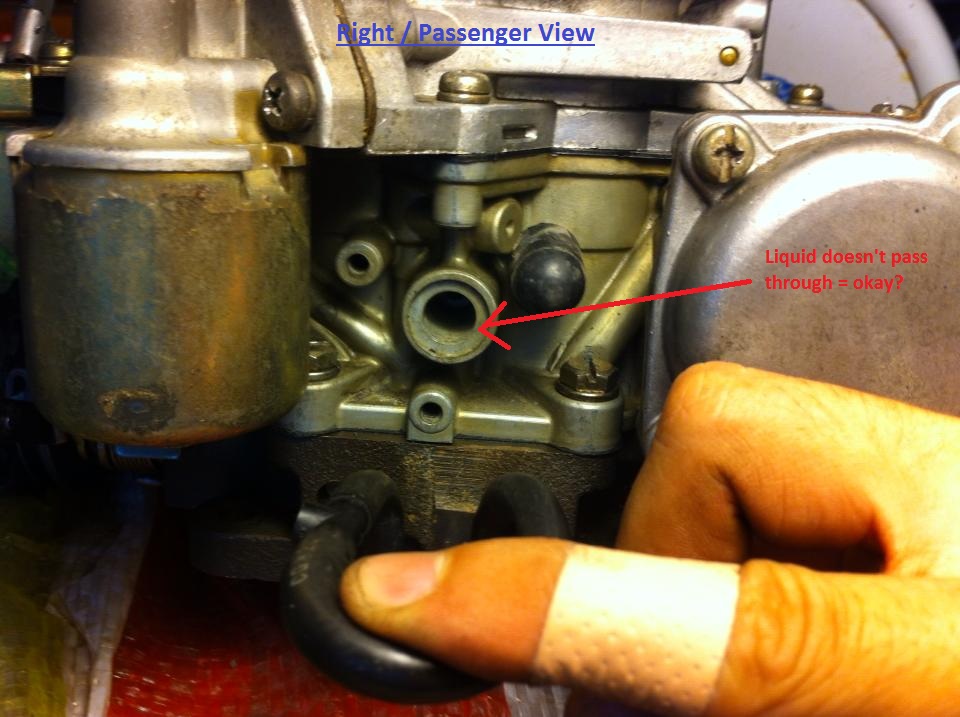
8. The throttle mount weld was mostly removed with tools, checked with the fuel line (blowing it in)
there's a little bit of air that can go through, how much air should go through? Not sure if I should either find a completely another one, or cut this one open and bore it out, then try to seal it shut again.

9. this is my friend's handiwork, we tested it with no air around it (I think he used a loose newspaper to test the theory, saying it would ruffle with noise if there were any air)
and again, thanks for spending time looking over my rx7 =) pretty sure at this point it's just matching the air lines on the carb.
8. The throttle mount weld was mostly removed with tools, checked with the fuel line (blowing it in)
there's a little bit of air that can go through, how much air should go through? Not sure if I should either find a completely another one, or cut this one open and bore it out, then try to seal it shut again.
9. this is my friend's handiwork, we tested it with no air around it (I think he used a loose newspaper to test the theory, saying it would ruffle with noise if there were any air)
and again, thanks for spending time looking over my rx7 =) pretty sure at this point it's just matching the air lines on the carb.
carb whisperer
Joined: Jan 2008
Posts: 1,485
Likes: 4
From: Greenfield, Ohio
Alright I see one reason its flooding, the tube on that 3 screw flange thingy under your fuel banjos (the FBVS i talked about earlier, CANT BE PLUGGED. Leave that open, I mean the tube coming out right next to it. Put the plunger back in if it works, lol its nice when your fuel doesnt evaporate over night! Take the rubber top off of it! Also, hook it up to a 12v switched source!)
As for that intake mani, it looks like you said you plugged the brake booster line?
And the expoxy/JB weld stuff will probably leak : / Its best to get a block off plate and RTV it. They can be had on racing beats website, atkins, rx7world, mazdatrix,...etc.
It looks like it also had the EGR tube leading to the back, is it plugged aswell?
The plugs are soaked too, you might need a new set.
Thread Starter
Senior Member
Joined: Jul 2013
Posts: 303
Likes: 0
From: South Beach
Alright I see one reason its flooding, the tube on that 3 screw flange thingy under your fuel banjos (the FBVS i talked about earlier, CANT BE PLUGGED. Leave that open, I mean the tube coming out right next to it. Put the plunger back in if it works, lol its nice when your fuel doesnt evaporate over night! Take the rubber top off of it! Also, hook it up to a 12v switched source!)
As for that intake mani, it looks like you said you plugged the brake booster line?
And the expoxy/JB weld stuff will probably leak : / Its best to get a block off plate and RTV it. They can be had on racing beats website, atkins, rx7world, mazdatrix,...etc.
It looks like it also had the EGR tube leading to the back, is it plugged aswell?
The plugs are soaked too, you might need a new set.
As for that intake mani, it looks like you said you plugged the brake booster line?
And the expoxy/JB weld stuff will probably leak : / Its best to get a block off plate and RTV it. They can be had on racing beats website, atkins, rx7world, mazdatrix,...etc.
It looks like it also had the EGR tube leading to the back, is it plugged aswell?
The plugs are soaked too, you might need a new set.
as for the EGR, what is that?
and the FBVS I thought I knew what you were talking about, but I don't anymore. do you mind circling it for me?.
if it's the richer solenoid, I do believe the de-emission guide has it circled to be disconnected, which is the same as taken off and plugged correct?
Joined: Jun 2006
Posts: 4,815
Likes: 24
From: Columbia, Tennessee
The FBVS is the one on the left with the large vacuum cap. It does need to be uncapped. It normally runs through the same lines as the crank case vent and charcoal canister. If capped or non functional it will boil the fuel in your float bowls which will usually overflow through the venturis and flood the engine.
A couple things to look into that cause flooding while driving or idling...
-Verify that the return line is not vapor locked (this just happened to me actually, due to a failed PCV valve which would not allow the fuel tank vent line to equalize pressure). Take the return line off and blow through it AFTER the valve. Then the soft line removed, test te valve itself. Air should only pass in one direction.
-What fuel pump are you running? Stock?
-Verify that the needle seats are not jammed. Tap the banjo bolt fitting near the fuel inlet/ outlet with a screw driver handle or VERY lightly with a hammer. It will loosen them. They may need to be burnished and check that the springs are installed correctly.
-Verify operation of the PCV valve. If no valve is present verify that your vent line is not capped. You may also want to drill a very small hole in your gas cap.
The spark plugs can be saved as long as there is no cracking. Spray them with a little starting fluid or carb cleaner and wire brush them. Blow them out and let them dry before using again.
Joined: Jun 2006
Posts: 4,815
Likes: 24
From: Columbia, Tennessee
Please buy some vacuum caps and block off plates. This needs to be done properly or you will never get it running right. Back yard mechanic skills dont apply here.
Thread Starter
Senior Member
Joined: Jul 2013
Posts: 303
Likes: 0
From: South Beach
The FBVS is the one on the left with the large vacuum cap. It does need to be uncapped. It normally runs through the same lines as the crank case vent and charcoal canister. If capped or non functional it will boil the fuel in your float bowls which will usually overflow through the venturis and flood the engine.
A couple things to look into that cause flooding while driving or idling...
-Verify that the return line is not vapor locked (this just happened to me actually, due to a failed PCV valve which would not allow the fuel tank vent line to equalize pressure). Take the return line off and blow through it AFTER the valve. Then the soft line removed, test te valve itself. Air should only pass in one direction.
-What fuel pump are you running? Stock?
-Verify that the needle seats are not jammed. Tap the banjo bolt fitting near the fuel inlet/ outlet with a screw driver handle or VERY lightly with a hammer. It will loosen them. They may need to be burnished and check that the springs are installed correctly.
-Verify operation of the PCV valve. If no valve is present verify that your vent line is not capped. You may also want to drill a very small hole in your gas cap.
The spark plugs can be saved as long as there is no cracking. Spray them with a little starting fluid or carb cleaner and wire brush them. Blow them out and let them dry before using again.
A couple things to look into that cause flooding while driving or idling...
-Verify that the return line is not vapor locked (this just happened to me actually, due to a failed PCV valve which would not allow the fuel tank vent line to equalize pressure). Take the return line off and blow through it AFTER the valve. Then the soft line removed, test te valve itself. Air should only pass in one direction.
-What fuel pump are you running? Stock?
-Verify that the needle seats are not jammed. Tap the banjo bolt fitting near the fuel inlet/ outlet with a screw driver handle or VERY lightly with a hammer. It will loosen them. They may need to be burnished and check that the springs are installed correctly.
-Verify operation of the PCV valve. If no valve is present verify that your vent line is not capped. You may also want to drill a very small hole in your gas cap.
The spark plugs can be saved as long as there is no cracking. Spray them with a little starting fluid or carb cleaner and wire brush them. Blow them out and let them dry before using again.
About to quicksteel the blue air intake as per ( http://maz_tutorials.ten15.net/Tutorial_2_CAI.pdf ) Page#16
Aftermarket fuel pump, pumps 2 - 5 PSI, with the regular set to 2.5 and the gauge reading 2.5-3 usually.
- what do you mean blow through it after the valve? blow through the air return line ?
- By needle sets, do you mean the first jets from the banjo with the mesh around the screw?
AS per news, the car turned! hasn't flooded yet, going to wait for a friend so I can adjust the idle screw
Joined: Jun 2006
Posts: 4,815
Likes: 24
From: Columbia, Tennessee
3 PSI is a tad high for a Nikki. I mean literally blow through with compressed air (or your mouth if you like the taste of gasoline) You may free up some vapor locked fuel in the lines. The check valve could be faulty as well. If the return line isnt flowing properly the excess fuel pressure will have nowhere else to go but bleed its way through the venturis.
The needle seats are the springy jets that connect to the floats.
The needle seats are the springy jets that connect to the floats.
carb whisperer
Joined: Jan 2008
Posts: 1,485
Likes: 4
From: Greenfield, Ohio
good to hear it started for you, set that idle mixture screw about 3.5 turns out from closed to start with, then ease it out until the idle speed peaks. One of my 219k original 12a's runs perfectly at 5 complete turns out, so methinks it depends on the engine.
Thread Starter
Senior Member
Joined: Jul 2013
Posts: 303
Likes: 0
From: South Beach
was trying to figure out the idle, but after about 40 minutes of trying to play with it we ran out of gas (we took turns after 25 minutes and then he kinda just restarted the whole process)
I wish there was a way to actually see the tunnel inside so we can start from it slightly open
Anti piston
Joined: Feb 2013
Posts: 318
Likes: 0
From: Iowa
So what do we gain by stripping down the nikki carb. The kid down the street from me just baught a 84 rx7 gl 12a N\A and it has the carb stripped down but it seems my stock nikki will accelorate at a faster rate than his. So I guess I am wondering if something was done wrong and the gain is more power via more fuel and a mechanical secondary sinc'd to open early for more HP?
carb whisperer
Joined: Jan 2008
Posts: 1,485
Likes: 4
From: Greenfield, Ohio
So what do we gain by stripping down the nikki carb. The kid down the street from me just baught a 84 rx7 gl 12a N\A and it has the carb stripped down but it seems my stock nikki will accelorate at a faster rate than his. So I guess I am wondering if something was done wrong and the gain is more power via more fuel and a mechanical secondary sinc'd to open early for more HP?
Thread Starter
Senior Member
Joined: Jul 2013
Posts: 303
Likes: 0
From: South Beach