
Purchasing first SA tomorrow


Thread Starter
Full Member
Joined: Jul 2008
Posts: 151
Likes: 9
From: Savannah

DGRR is a weekend of rotary fumes, cigar smoke and rotor heads.
The Meeting of the Minds in the Mountains.
Wankel Wonderland.
SA Heaven.
http://www.dealsgaprotaryrally.com/
And then there's the Gap itself:
https://vimeo.com/93132982
The Meeting of the Minds in the Mountains.
Wankel Wonderland.
SA Heaven.
http://www.dealsgaprotaryrally.com/
And then there's the Gap itself:
https://vimeo.com/93132982
Last edited by ray green; Feb 29, 2016 at 05:21 PM.

DGRR is a weekend of rotary fumes, cigar smoke and rotor heads.
The Meeting of the Minds in the Mountains.
Wankel Wonderland.
SA Heaven.
http://www.dealsgaprotaryrally.com/
And then there's the Gap itself:
https://vimeo.com/93132982
The Meeting of the Minds in the Mountains.
Wankel Wonderland.
SA Heaven.
http://www.dealsgaprotaryrally.com/
And then there's the Gap itself:
https://vimeo.com/93132982
i'll be there this year
 hopefully in the '85
Thread Starter
Full Member
Joined: Jul 2008
Posts: 151
Likes: 9
From: Savannah
Been to the Gap many times though I cringe to think I would ever go up on 4 wheels! Who knows, maybe this car will force me to alternate trips.
I highly doubt I will be able to make this year's unfortunately as I will be getting married the following week but I am very excited for next year and various local meets between now and then.
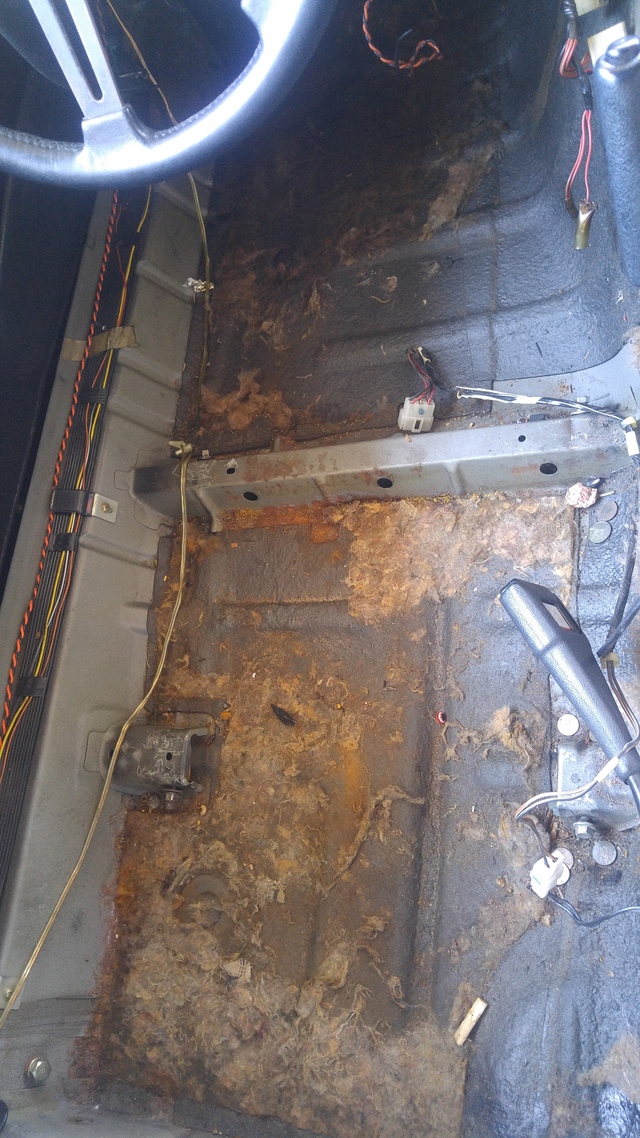
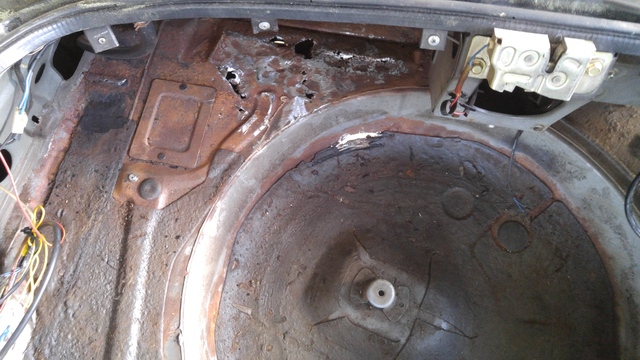
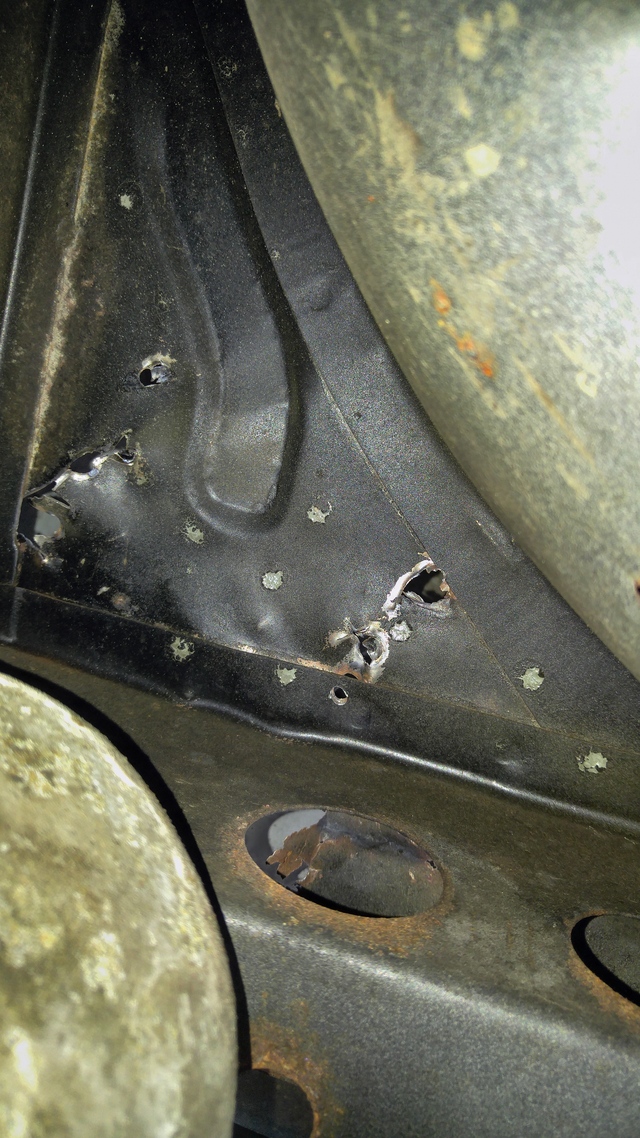
I also found what I knew would be inevitable though I was holding out hope that I may be in the clear.....
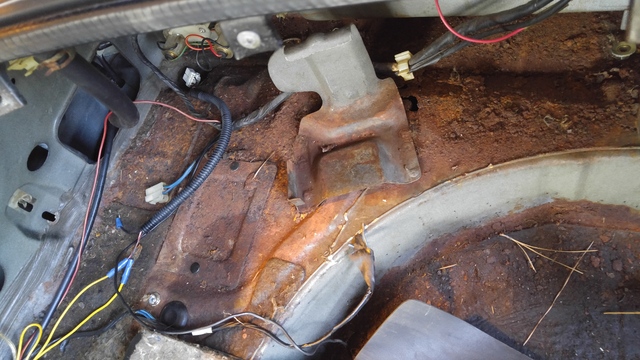
After finding that last night, the interior is now completely stripped and the clean up is just beginning. I still have yet to check on the other issues underneath as a buddy of mine is still borrowing my jack and stands but hopefully it will all be sorted soon.
Does anyone know if that plate to the left (of what I can only assume is the jack bracket) is factory? Or is it someone's attempt as repairing rust in the past? There is one on both sides which leads me to think its factory but what would I know?
I highly doubt I will be able to make this year's unfortunately as I will be getting married the following week but I am very excited for next year and various local meets between now and then.
I also found what I knew would be inevitable though I was holding out hope that I may be in the clear.....


After finding that last night, the interior is now completely stripped and the clean up is just beginning. I still have yet to check on the other issues underneath as a buddy of mine is still borrowing my jack and stands but hopefully it will all be sorted soon.
Does anyone know if that plate to the left (of what I can only assume is the jack bracket) is factory? Or is it someone's attempt as repairing rust in the past? There is one on both sides which leads me to think its factory but what would I know?
^ that is factory. what more than likely happened is the oem rubber hose that drains water from the hatch area either tears or falls apart and water hangs out until it eventually rusts.
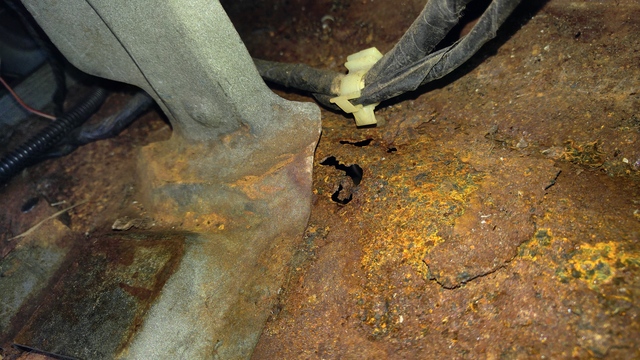
i'd say cut and patch, unless your hard up about keeping the oem jack bracket. i took mine out... weight reduction lol
but with it in there it would be pretty hard to fix that rust correctly
i'd say cut and patch, unless your hard up about keeping the oem jack bracket. i took mine out... weight reduction lol
but with it in there it would be pretty hard to fix that rust correctly
Thread Starter
Full Member
Joined: Jul 2008
Posts: 151
Likes: 9
From: Savannah


I've never seen a 7 rust thee like that. Always something new to discover though. Check the area under the hatch seal and see if there is any rust perforation there s well. It appears as if water had been sitting there for some time. That area is however painted, so the metal would have had to have been scratched pretty badly to allow rust to form where it did.. Maybe it got nicked when someone was removing the jack at some point early in the car's life.
Thread Starter
Full Member
Joined: Jul 2008
Posts: 151
Likes: 9
From: Savannah
The drain lines from the hatch appear to be completely intact and in great shape. I have yet to spray down the hatch itself to check for leaks as the rubber gasket also look new (and the po claimed the car had no leaks at all). I'm wondering if it didnt all come in from the janky antenna which is very loose and not even remotely close to being able to keep water out.
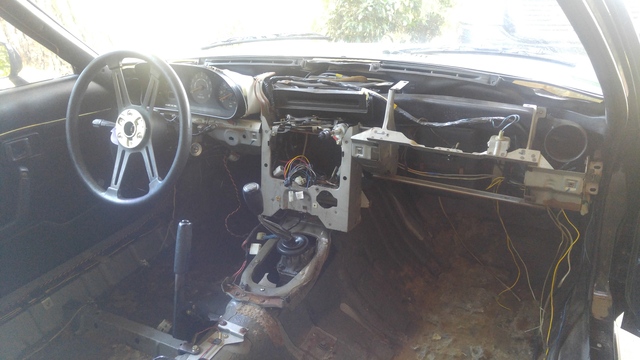
After looking at it though I don't know how water would have gotten on the hatch side of the fender well. Oh well. Hopefully I'll start grinding it out tonight, we'll see though as I am also working on the in-laws car at the same time.
.....havent even had this car 4 days and its already completely gutted lol
I've seen rust like that when the hatch leaks or the car had been left sitting with the water
standing in it for years. Was this car in a flood by any chance? Anyway, it is what it is and its
your now. Fun fun.
standing in it for years. Was this car in a flood by any chance? Anyway, it is what it is and its
your now. Fun fun.
Thread Starter
Full Member
Joined: Jul 2008
Posts: 151
Likes: 9
From: Savannah
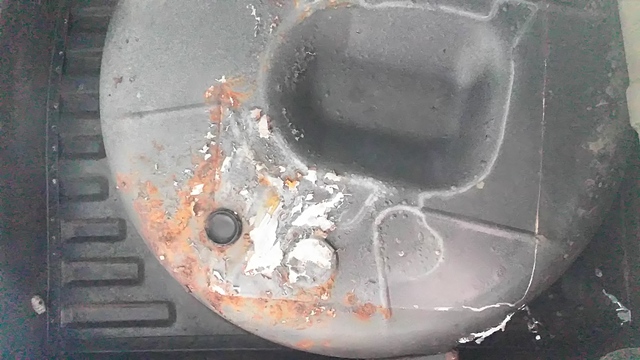
There are no signs of it being a flood car and the bin area is spotless as can be seen below.... btw, did the 79 models have bins? Mine has a heat(like) shield over that area.
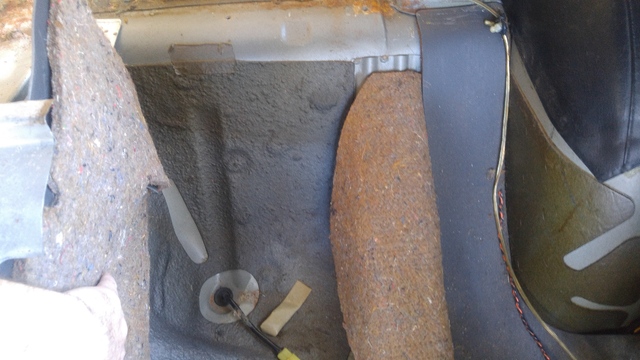
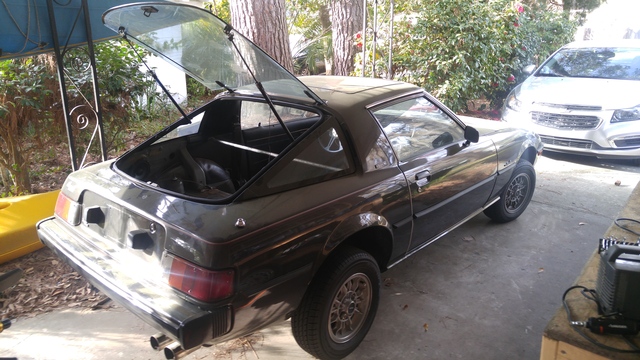
Here is what the rest of the car looks like now. The rust is only evident in that one spot (thank God) although there is some surface rust by the drain holes up front. Hopefully I am going to get after it with a wire wheel tonight and begin the process of putting down a fresh coat of primer and sound/heat deadening material. I've been mulling this over in my head all week.....Do you guys think it is necessary to drop the fuel tank before I patch that hole or is it possible I won't go KABOOM? I don't know how reliable these fuel systems are in retaining the fumes lol
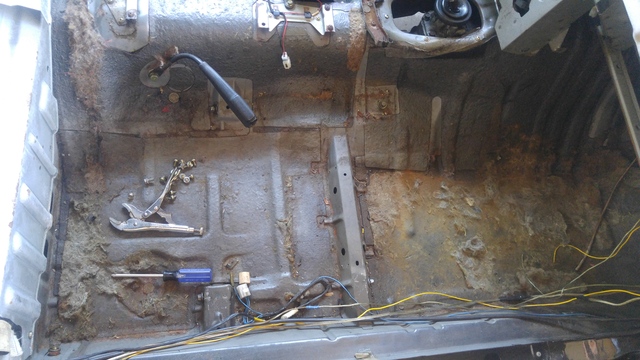
Also, any idea where I can get a replacement drain plug? One is missing and searches render only oil/transmission etc.....then again I think a few guys are parting some out on Facebook. I can ask away there.

Here is what the rest of the car looks like now. The rust is only evident in that one spot (thank God) although there is some surface rust by the drain holes up front. Hopefully I am going to get after it with a wire wheel tonight and begin the process of putting down a fresh coat of primer and sound/heat deadening material. I've been mulling this over in my head all week.....Do you guys think it is necessary to drop the fuel tank before I patch that hole or is it possible I won't go KABOOM? I don't know how reliable these fuel systems are in retaining the fumes lol


Also, any idea where I can get a replacement drain plug? One is missing and searches render only oil/transmission etc.....then again I think a few guys are parting some out on Facebook. I can ask away there.
If it's the black rubber plugs for the floor drain holes you need, I should be able to send you what you need. Please send a photo with dimensions for the ones you need and a shipping address to my pm and I'll check the parts shed, I have a bunch of these.
I second this suggestion!! Stuff is incredible for sealing/fighting rust. Just about nuke-proof finish.
You mentioned you thought the antenna was responsible for this rust. Since the antenna drains into the passenger fender (and out a hole, if the little drain line is correctly seated), it would "only" damage that inner fender. Pull the taillights and inspect both sides. This is a very rust-prone area and will at least need cleaning and I would then follow up with a seal of POR 15. Bear in mind the original taillight seals are going to be pretty fragile (and if failed, might also be a source of water leakage, tho I doubt they could fail to the point of your Epic rust issues). New taillight gaskets (unique to the 79-80SAs) still available!
You obv have no fear in taking your SA apart, good for you. If that one rear rust spot is the worst of it you have a mighty fine example.
Good luck
Stu Aull
80 GS
Alaska
Thread Starter
Full Member
Joined: Jul 2008
Posts: 151
Likes: 9
From: Savannah
Anyway, I've been working on the inlaws car for the past two days so haven't had any time with the 7. I will also be out of town all next week for work and then gone for the next two weekends as well so she may be sitting for a little while.
As soon as I begin tackling that hatch I will post some more pictures. Thanks for the heads up as well on checking the tail light seals!
Thread Starter
Full Member
Joined: Jul 2008
Posts: 151
Likes: 9
From: Savannah
Well I got a little bit done this afternoon though not entirely with the rust. I cleaned up the surface rust in the front of the cabin, hit it with some rubberized undercoating and lined the floor/tranny tunnel with some peel n seal....(Ive read every online forum I could find about the stuff both good and bad so I figured I would give it a shot.)
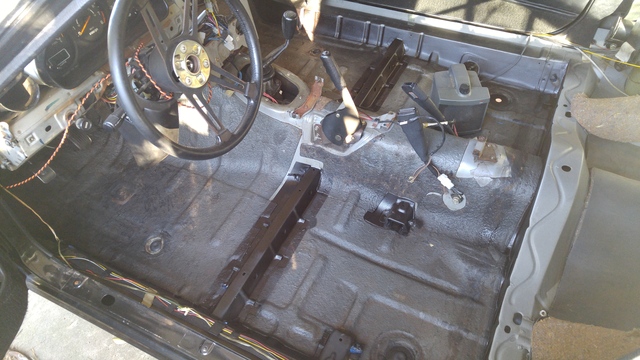
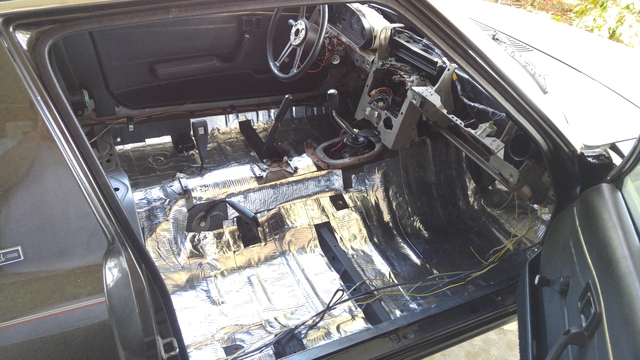
Also installed a new set of rear struts. Went with the amazon Strongarm struts that I have seen both here and on the facebook group. These things were very easy to replace and seem very strong. They lift the glass so high I was a little nervous at first that it may be a bit too much. Otherwise A-OK!
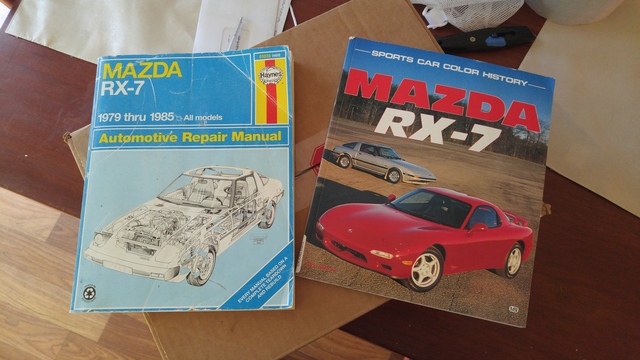
And for a bit of light reading....... I was extremely excited to find these in the mail this week!

Looks like fun and excellent work! I'd like to have the link to those Amazon struts if you have it.
You should be getting that drain plug in the mail any day now. I see you made sure to keep the drain holes open after adding the liner, these come in handy when you forget to role the window up and it rains, or if, as often happens, your sun roof drains get plugged and water build up inside.
You should be getting that drain plug in the mail any day now. I see you made sure to keep the drain holes open after adding the liner, these come in handy when you forget to role the window up and it rains, or if, as often happens, your sun roof drains get plugged and water build up inside.
Thread Starter
Full Member
Joined: Jul 2008
Posts: 151
Likes: 9
From: Savannah
Looks like fun and excellent work! I'd like to have the link to those Amazon struts if you have it.
You should be getting that drain plug in the mail any day now. I see you made sure to keep the drain holes open after adding the liner, these come in handy when you forget to role the window up and it rains, or if, as often happens, your sun roof drains get plugged and water build up inside.
You should be getting that drain plug in the mail any day now. I see you made sure to keep the drain holes open after adding the liner, these come in handy when you forget to role the window up and it rains, or if, as often happens, your sun roof drains get plugged and water build up inside.
Here you go! Thank you again for shooting me that drain plug! Hopefully I can tackle the rust this week and get this thing back on the road soon.
Thread Starter
Full Member
Joined: Jul 2008
Posts: 151
Likes: 9
From: Savannah
So I dont know if I need to start a new thread asking about rust repair but Im in a bit of a conundrum as to where to go from here....
I have never treated rust or cut up body panels like this before and only have limited welding experience.
My understanding was that it is best to grind the rust down first, see whats left and needs to be cut out, then replace.
I figured when I was grinding that the "bad rust" would almost flake right off but this doesn't seem to be the case even in the couple places with holes....in fact as it is being ground you see fresh metal as if it was not rusted all the way through.
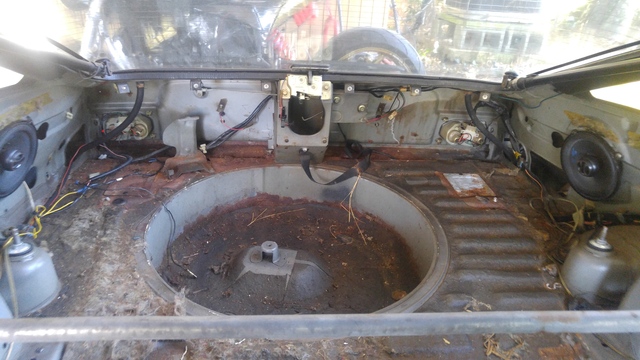
Now as I continue looking at other areas and start tapping things with a hammer another easily punctured hole occurs in the spare tire well
It looks like some of that will need to be replaced as well. Here is the other side of the story. When I get under the car (once the tank was removed of course) the underside looks perfectly fine.
Any help or ideas as to the best way to tackle this would be great!
I have never treated rust or cut up body panels like this before and only have limited welding experience.
My understanding was that it is best to grind the rust down first, see whats left and needs to be cut out, then replace.
I figured when I was grinding that the "bad rust" would almost flake right off but this doesn't seem to be the case even in the couple places with holes....in fact as it is being ground you see fresh metal as if it was not rusted all the way through.
Now as I continue looking at other areas and start tapping things with a hammer another easily punctured hole occurs in the spare tire well
It looks like some of that will need to be replaced as well. Here is the other side of the story. When I get under the car (once the tank was removed of course) the underside looks perfectly fine.
Any help or ideas as to the best way to tackle this would be great!


Unless you plan on doing to welding yourself, as a temp fix I would use a wire wheel and get the big stuff off and then treat with POR15 . POR15 will convert rust to metal. This will stop the rust that gets treated.
Search for Arron Cakes Cosmos rehab. He has some good stuff about rust repair and some cool videos.
Search for Arron Cakes Cosmos rehab. He has some good stuff about rust repair and some cool videos.


Looks mostly like surface rust to me with some places where it ate completely through. Media blast or wire wheel the surface rust to get to clean metal. Unless you want to tear it more completely down, the wire wheel might be a better choice currently. It will however also produce its share of dust and mess.
Anyway get it down to bare metal and then patch the holes. They look big enough to where it probably is better to just cut out and replace the entire area where the holes are, in one piece and weld / bond a new patch in. Then cover it all with something like POR 15 to protect it from re rust attack.
Anyway get it down to bare metal and then patch the holes. They look big enough to where it probably is better to just cut out and replace the entire area where the holes are, in one piece and weld / bond a new patch in. Then cover it all with something like POR 15 to protect it from re rust attack.
Thread Starter
Full Member
Joined: Jul 2008
Posts: 151
Likes: 9
From: Savannah
Looks mostly like surface rust to me with some places where it ate completely through. Media blast or wire wheel the surface rust to get to clean metal. Unless you want to tear it more completely down, the wire wheel might be a better choice currently. It will however also produce its share of dust and mess.
Anyway get it down to bare metal and then patch the holes. They look big enough to where it probably is better to just cut out and replace the entire area where the holes are, in one piece and weld / bond a new patch in. Then cover it all with something like POR 15 to protect it from re rust attack.
Anyway get it down to bare metal and then patch the holes. They look big enough to where it probably is better to just cut out and replace the entire area where the holes are, in one piece and weld / bond a new patch in. Then cover it all with something like POR 15 to protect it from re rust attack.
I'm kind of on the same page as you, just wanted some more eyes on it to confirm.
Thank you everyone else for the response and help as well! I have been watching the Cosmo videos as well as some others on youtube and the resounding feeling I get is to just tackle this thing and see what happens lol.
I will be welding small pieces in for sure but hoping to salvage most of it. POR-15 will most definitely be utilized in the hatch!
My only other concern is trying to figure out how to clean up the panel inside the middle of the trunk release frame and if possible the inner fender antenna side so we'll see.