
Project Fat Nikki

Thread Starter

Joined: Jul 2004
Posts: 9,250
Likes: 464
From: Lake Wylie, N.C.
Project Fat Nikki
Preface to this thread. This is a writeup I did somewhere else on my own version
of a hogged out nikki. This project spanned 2 years on the calendar because I
wasn't in a hurry and swapping carbs required planned downtime for me and my
7 to do the tuning etc. I hope you all enjoy this thread as much as I did when I
was working on the carb.
Shout outs to Jeff20B who helped me with some pointers Rich@SR if he still lurks on here.
Extra special shoutout to Ray Green! Looky Ray I gots me a nikki carb on my car now!
I've procured an 85 nikki and intake manifold from pullapart for some fun.
My goal is to hog out this nikki to the best of my abilities so that it can be used in
place of my current Dellorto setup. I have no compelling reason to do this, the
Dell works great. I just thought it would be fun to do. It will initially go on my
stock port 12A.
I'm cleaning and disassembling right now and will get pictures up as I go along
making the various mods. I know I could get a sterling (maybe) or from SR
Motorsports but I want to do it myself.
So I'll post my detailed plan for the modifications to be done. Please feel free
to post up anything I may be missing or can do better or have first hand
knowledge about that can help me out. In return I promise to deliver lots
of details and pictures as I go along.
Heres the plan. I've numbered each step uniquely and grouped then logically
by component to make discussions easier. If nothing else I hope this helps
anyone else contemplating hogging out their nikki.
AIR HORN mods
done A1. remove choke plates and rod and seal up holes
done A2. remove choke diaphram and brackets, plug holes
done A3. dead head fuel inlet for now. Just cap with bolt and gasket. Keep return and other gasket just in case.
kept A4. remove air vent solenoid, plug with bolt
But disconnected
done A4. remove alt. compensator, plug holes
MAIN BODY mods
done M1. remove dashpot and bracket, plug holes
done M2. remove secondary diaphram, plug holes
done M3. remove TPS
done M4. Drill out AP jet, top center and top 2 holes to .5mm
skipped M5. Drill out AP nozzle to 0.050 "
done M6. Double up gaskets on AP diaphram
done M7. Add extension to AP pump arm.
done M8. Pull primary and secondary booster venturis and cut extra arm off and smooth remainng arm
also polish up inside each venturi to clean up and smooth it out.
done M9. Mill down primary and secondary venturis a little bit
done M10. Drill out fuel and air jets. Or buy holley air bleeds for fuel and only drill air jets.
- only drilled the primary fuel about 1mm or so.
THROTTLE BODY mods.
done T1. Hook up mech secondaries
done T2. strip down linkages to bare minimum
done T3. cut half of secondary shaft away, use shorter small cap hex bolts to attach butterflys
skipped T4. use small cap hex bolts to attach primary butterflys.
INTAKE MANIFOLD mods
done I1. remove butterfly and rod, fill holes
done I2. cut channel between rear primary and seconday opening
I3. install ACV blockoff plate
I4. cut or plug pipe off of the back of the intake
done I5. plug or cutoff extension off rear of intake
Plugged with JBWeld
Thread Starter
Joined: Jul 2004
Posts: 9,250
Likes: 464
From: Lake Wylie, N.C.
Well the carb cleaner I had sucked. It was from advancezone etc and it was
so safe you could water your plants with it. I did some research on the net
and I found that what I wanted was lacquer thinner. It has all the best
ingredients like toluene, acetone, etc.
So I soaked the carb and intake in this yesterday while I was doing some yard
work and they cleaned up pretty good with no real scrubbing. I still want to
take a brass wheel to it all for final clean up, plus I'll reuse the thinner when I
pull the jets as well. No pics yet. I'll post them after I wire brush it all and
before I pull off any jets or venturis.
Got the rebuild kit in and it looks complete. Now I just have to drop by HF
tp pick up some indexed drills and a few other odds and ends for my dremel
supplies.
Thread Starter
Joined: Jul 2004
Posts: 9,250
Likes: 464
From: Lake Wylie, N.C.
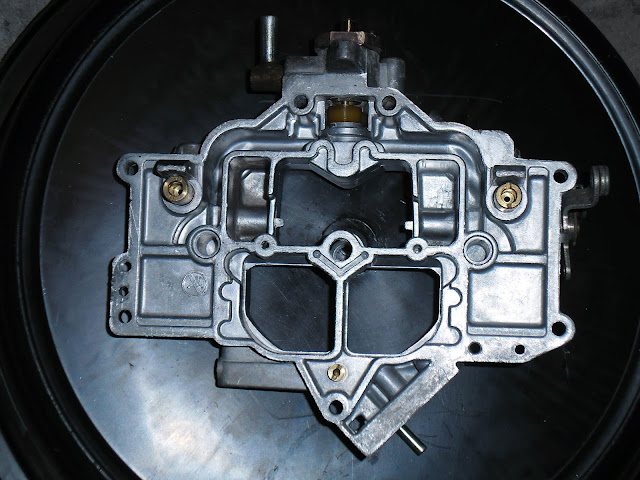
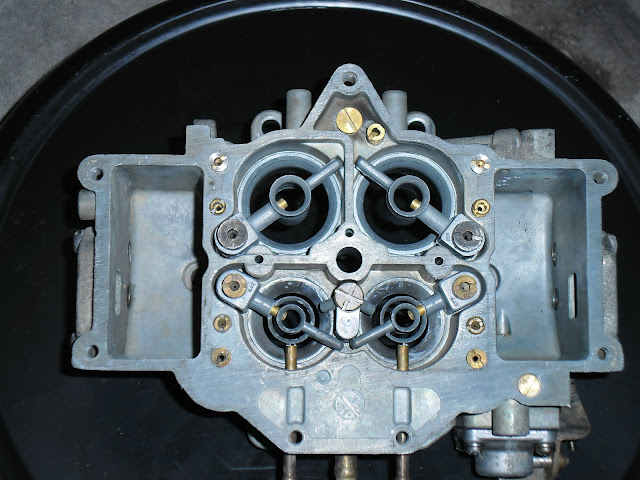
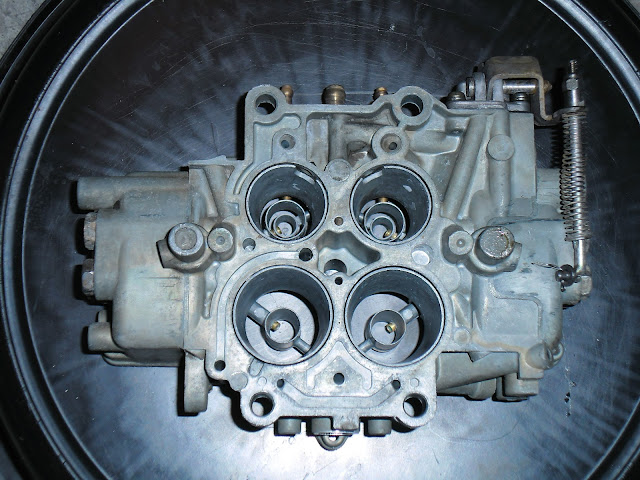
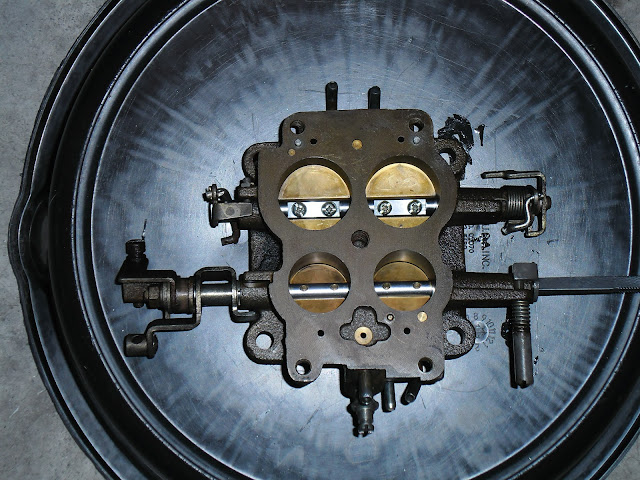
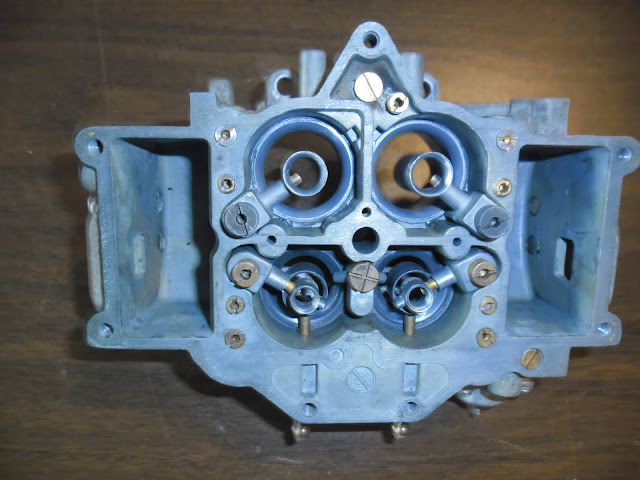
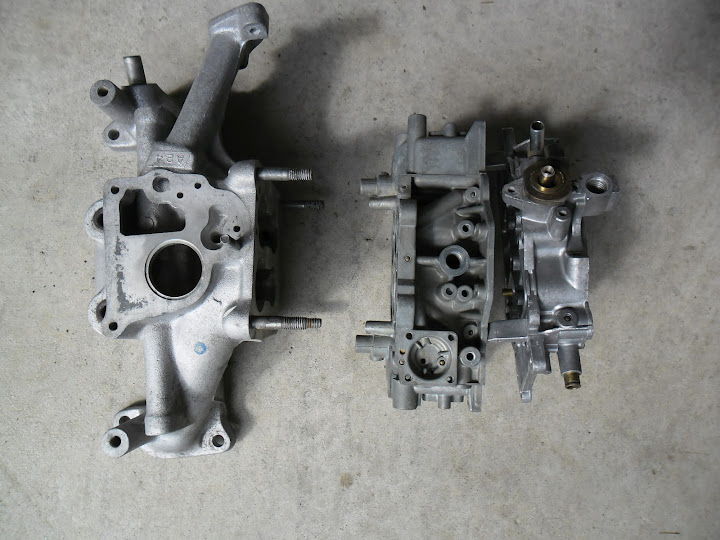
Heres some pics of the carb partially dissassembled and after hitting it with some lacquer
thinner to clean it up. I haven't done any other cleaning yet. I plan on using a home
made soda blaster with my compressor to do the final cleanup. That will be a lot of
fun! This carb was really easy to pull apart. Can't tell if its ever been opened before
but it seems pretty unmolested. I'd call it a good buy from pull-a-part so far.
So heres the pictures, top and bottom view of each component from the top of
the carb down to the intake manifold.
Already remove the choke assembly and few other bits.
Thread Starter
Joined: Jul 2004
Posts: 9,250
Likes: 464
From: Lake Wylie, N.C.
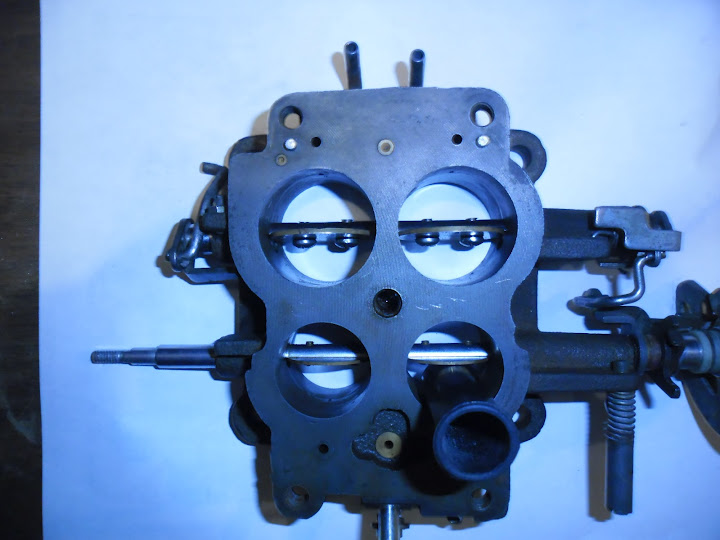
I channeled the intake manifold and just have to plug up a hole where the
rod for the butterfly come through. I also clean up the intake a bit but I want
to media blast it before final assemply. I may clear coat it to keep it nice looking.

Did some work on the throttle cable bracket and removed some things to simplify
it a lot. No pic of that yet.
Worked on the throttle body but had a hard time getting the secondary butterfly
screws out. I tried heat and that didn't help, so I'm soaking in PB blaster and
will give it a go later this week. Any tips on removing those screws would be
great. Hate to have to drill em out.
Also worked on the carb body some. I trimmed the arms off of the primary and
secondary venturis and polished them a bit. Also ground down and polished
the chokes as well. Didn't ream them too much but I may do some more later.
I haven't shortened the oil inject tubes but I did pull them out a bit as they
were almost right up against the small center venturis in the primaries.
rod for the butterfly come through. I also clean up the intake a bit but I want
to media blast it before final assemply. I may clear coat it to keep it nice looking.
Did some work on the throttle cable bracket and removed some things to simplify
it a lot. No pic of that yet.
Worked on the throttle body but had a hard time getting the secondary butterfly
screws out. I tried heat and that didn't help, so I'm soaking in PB blaster and
will give it a go later this week. Any tips on removing those screws would be
great. Hate to have to drill em out.
Also worked on the carb body some. I trimmed the arms off of the primary and
secondary venturis and polished them a bit. Also ground down and polished
the chokes as well. Didn't ream them too much but I may do some more later.
I haven't shortened the oil inject tubes but I did pull them out a bit as they
were almost right up against the small center venturis in the primaries.
Thread Starter
Joined: Jul 2004
Posts: 9,250
Likes: 464
From: Lake Wylie, N.C.
Got the throttle body 90% done. Cut the secondary shaft in half,
hooked up the mechanical secondaries, and simplified the throttle linkage.
I may do more on the throttle linkage once I have the rest of the carb stacked up.
I want to try and not have to use the existing return spring and teeter totter so
the top is easier to get off (ala Sterling).
I also still have to fully adjust the mech. sec. too. They're close but it will have to
go on the car to get it just right.
I also updated the first post as I've complete tasks if anyone wants to follow along.
Top view of fully opened butterflys using mech. sec. linked up.
Overview of throttle body with simplified linkages and mech. sec. setup.
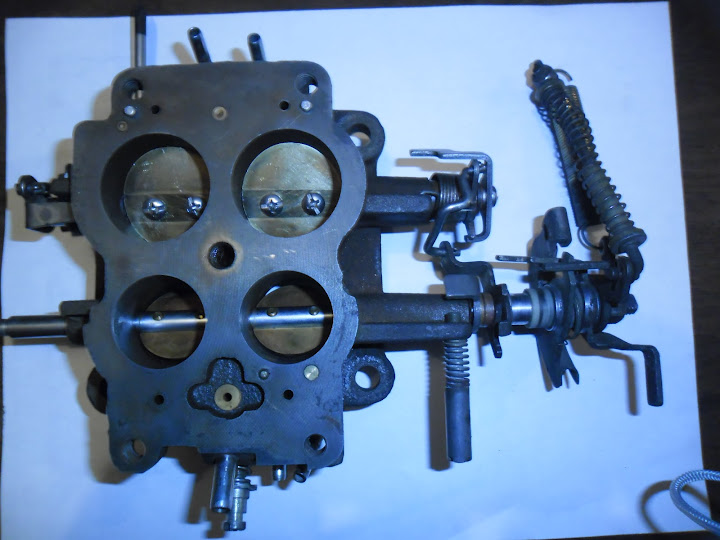
Close up of simplified linkage.
hooked up the mechanical secondaries, and simplified the throttle linkage.
I may do more on the throttle linkage once I have the rest of the carb stacked up.
I want to try and not have to use the existing return spring and teeter totter so
the top is easier to get off (ala Sterling).
I also still have to fully adjust the mech. sec. too. They're close but it will have to
go on the car to get it just right.
I also updated the first post as I've complete tasks if anyone wants to follow along.
Top view of fully opened butterflys using mech. sec. linked up.
Overview of throttle body with simplified linkages and mech. sec. setup.
Close up of simplified linkage.
Thread Starter
Joined: Jul 2004
Posts: 9,250
Likes: 464
From: Lake Wylie, N.C.
Drilled the primary fuel jets, AP jet and milled the primary venturis down a bit
more as well as the secondaries. Also cut down the length of the tubes for the
oil injection. Updated the status of these items on the first post.
Put the carb body into soak in cleaner last night. Next up is the homemade
soda blaster to really make it all clean.
AircooledTech's Tools-On-The-Cheap - DIY Soda Blaster
I need to plug some holes on the intake and carb. I was going to use JBWeld
but was concerned about gasoline interactions. It definitley has issues with
E85 gas from what I've read. I think I'll just tap and plug with some set plugs.
Thread Starter
Joined: Jul 2004
Posts: 9,250
Likes: 464
From: Lake Wylie, N.C.
I soda blasted the intake, throttle body, main body, air horn assembly and the
base plate. Looks really good. Soda blasting really works well on this stuff, got
most of the old scale off and cleaned up real good. I'll post pics on Saturday when
I reassemble the carb.
base plate. Looks really good. Soda blasting really works well on this stuff, got
most of the old scale off and cleaned up real good. I'll post pics on Saturday when
I reassemble the carb.
Trending Topics
Thread Starter
Joined: Jul 2004
Posts: 9,250
Likes: 464
From: Lake Wylie, N.C.
Heres some pics of the intake, main body and air horn after cleaning it up
using the homemade soda blaster.
And these are all the small parts cleaned and ready for assembly.
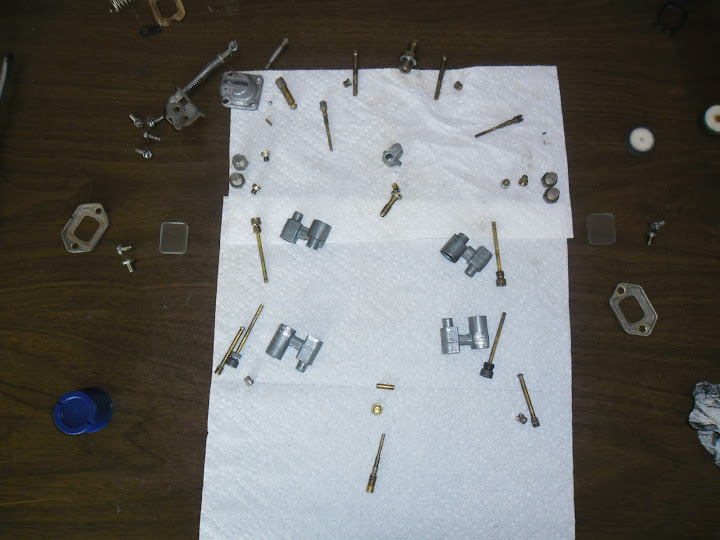
using the homemade soda blaster.
And these are all the small parts cleaned and ready for assembly.
Thread Starter
Joined: Jul 2004
Posts: 9,250
Likes: 464
From: Lake Wylie, N.C.
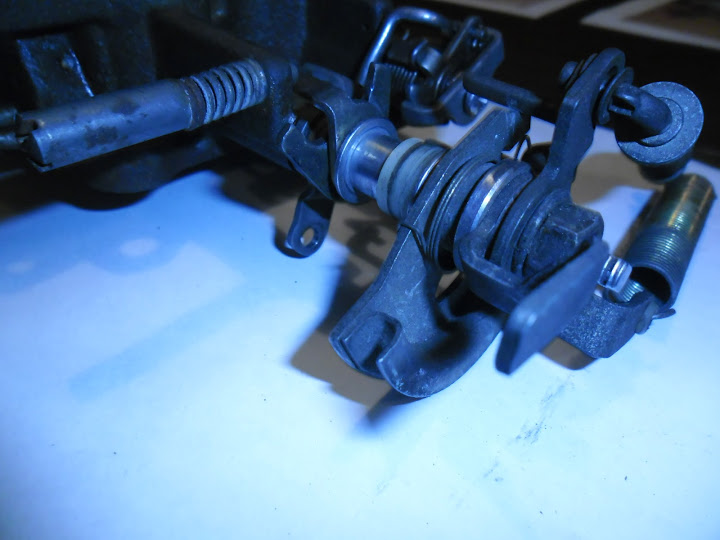
Got the carb all back together. Redid the throttle linkage to put the fast idle
linkage in. Also add the extra gaskets to the AP diaphram and extended the
AP lever arm. Bench adjusted everything as well.
Heres the front view (drivers side) of the assembled carb.
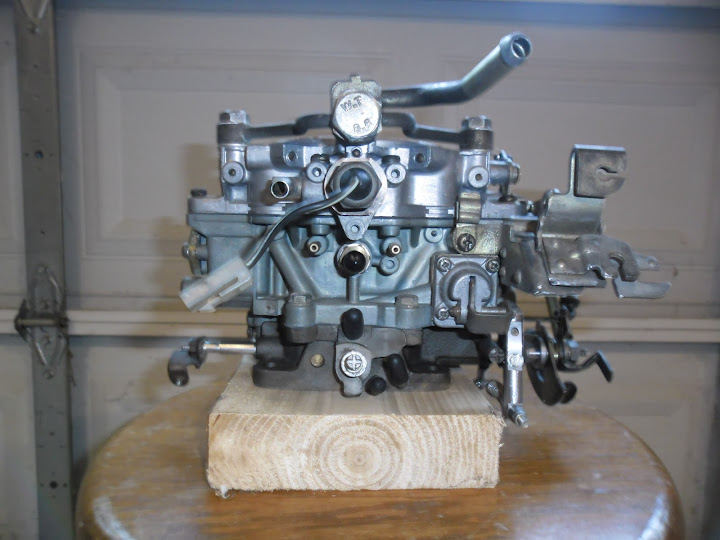
Some detail on the linkage. Pics like this helped me when I was trying to get
this setup correcly.

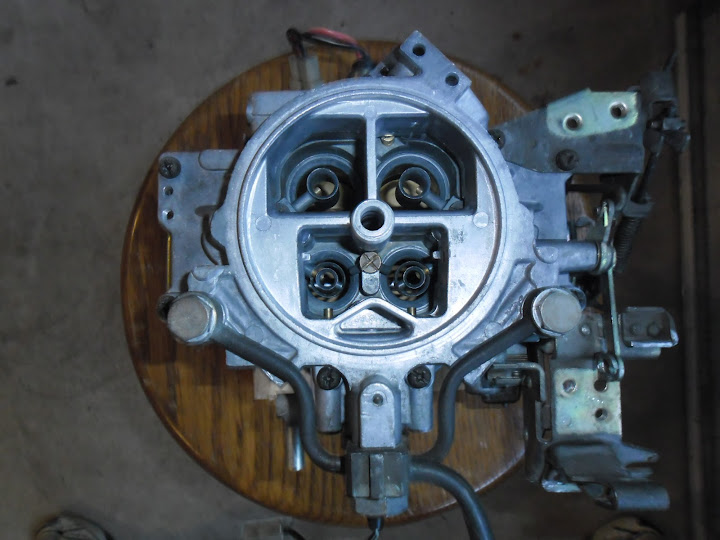
A top view showing the steamlined booster venturis and all.
linkage in. Also add the extra gaskets to the AP diaphram and extended the
AP lever arm. Bench adjusted everything as well.
Heres the front view (drivers side) of the assembled carb.
Some detail on the linkage. Pics like this helped me when I was trying to get
this setup correcly.
A top view showing the steamlined booster venturis and all.
Thread Starter
Joined: Jul 2004
Posts: 9,250
Likes: 464
From: Lake Wylie, N.C.
I put the nikki on tonight. It runs but has a high idle 1500 or so. Other than
that it seems to work pretty well. I will have to test drive it tomorrow.
The high idle may be due to the primary fuel jets being drilled out but I
didn't touch the primary air jets on top. That may make it overly rich at
idle. The idle fuel adjust seemed to have very little affect. When I looked
down the primaries during idle I can see fuel dripping fairly constantly in
both barrels but it doesn't look very well atomized. Could be just the low
air flow or is it a symptom of not drilling those primary air jets to match.
I also need to hook up the FBVS as that may be causing me some headaches
as well.
I don't think I have any vacuum leaks. I put a vacuum guage on the second
nipple from the front of the carb base gasket and it read a steady 10 and when
I blipped the throttle shot up to 15 or 20 and steadily returned to 10 as it
settled back to idling (at 1500 rpm). I expect if I could get it to idle at 750 rpm
that initial vacuum signal would be zero since thats the one for the advance on
the dizzy ( to my understanding anyway).
Thread Starter
Joined: Jul 2004
Posts: 9,250
Likes: 464
From: Lake Wylie, N.C.
I hooked up the FBSV and drilled the primary air bleeds to match the fuel jets.
No big difference. Also realized I forgot to plug the banjo bolt hole on the intake
manifold. Can you say vacuum leak. Plugged it with a bolt. Still has a high idle.
Took it for a test drive and it pulls pretty well and smacks you when you hit
the secondaries big time. Those need adjusted to come on a bit earlier but
thats minor. Won't hold idle and easily floods. Pretty sure its a vacuum leak
probably around the throttle body and/or spacer.
Thread Starter
Joined: Jul 2004
Posts: 9,250
Likes: 464
From: Lake Wylie, N.C.
Oh well, a year later or more and I'm playing with this again. Put it on yesterday after
going through it again. I smoothed down the spacer gaskets on both sides and I think it
wasn't sealing well and causing vacuum leakage. I was able to get it to idle down around
1100 or so but it wasn't always stable. I wish I could remove the old gaskets on the spacer
and use the new ones that come in the rebuild kit, but those things seem to be glued on
and the space is plastic, so no bueno.
My float bowls are sticking and after shutoff and restart a lot of times it just pours gas
down the intake until I get them to settle down. So I need to pull the top and doctor
the float needles a bit or reuse the old needles and seats which I kept. When the floats
are working the level is on both bowls, so floats are adjusted good.
Also, I have the fuel inlet dead headed into the carb. I'm going to run the lines for the
return and hook up the return line and see if that helps. I think with the inlet dead headed
it is bouncing the float needles and sometimes sticking causing issues as well. Anyway,
it was a lot of fun playing with it. Had to stop when the engine started to overheat
cause I turned off my electric fans as I was trying to conserve battery. DOH!
I will say its very smooth on accel compared to a big 2 barrel like my Dell. I should be able
to just smash the go pedal without thinking once I get it idling good.
Thread Starter
Joined: Jul 2004
Posts: 9,250
Likes: 464
From: Lake Wylie, N.C.
Added the return to the carb and ran a return line to the tank. Also pulled the top and
massaged the new needle valves to fix the sticking. Noticed the new needles have a much stiffer
internal spring that the old ones. Anyway, turned the key the first time and my bowls
runneth over. Tap tap on the top fixed it for now. I may go back to the original valve or
needles anyway to see if that fixes it.
Also when adjusting the floats it seemed like they would settle differently every time I
measured them when the top was upside down. The drop was always consistent. I think
I'm seeing the needles bind. I'll try the old needles next if it continues to flood. Don't
trust the new ones much now.
Thread Starter
Joined: Jul 2004
Posts: 9,250
Likes: 464
From: Lake Wylie, N.C.
Put the old needles and seats with the mesh filters attached. Put the top back on the carb
and the first time it ran over as before. I then started it up and looked at the float levels.
Front was 3/4 and the rear was like 5/8. Adjusted the floats until the meniscus of the gas
level was at the half way mark on both bowls. Then I proceeded to adjust the idle and the
air mix. The air mix has very little impact and I could only get the idle to be stable at
around 1100 - 1200 rpm.
I can tell its running rich by the smell and the temp. So I think my main jets are drilled
out too far. Not surprised by this so I'll have to drop something in there the right size.
Didn't take it out for a test run yet and it still sometimes drops through the idle and
wants to die after coming off of a sudden throttle input.
Tomorrow I'll see if it still wants to run over after sitting when the pump runs. Thats
annoying at best.
Thread Starter
Joined: Jul 2004
Posts: 9,250
Likes: 464
From: Lake Wylie, N.C.
Turned the key this am to start the fuel pump and it still ran over. Something is sticking
after sitting a long time. The float levels before I did this were fine. So the floats should
have been closed anyway. Unless they are filling or absorbing gas somehow. They are old
but look ok except for some bubbling on the surface (no breaks).
I also now think my idle circuit is basically not working, perhaps due to air issues caused by
my changes. Its a puzzle right now.
I may have to get another carb and start swapping things like jets and tubes in and out
one at a time to see what happens.
Thread Starter
Joined: Jul 2004
Posts: 9,250
Likes: 464
From: Lake Wylie, N.C.
I'm going to put the stock primary jets and some of the other bits I drilled back to stock
and see how it goes then move forward again with the changes. Just to many unknowns
at this point to nail it down. I'll have to source another used carb, pullapart time!
and see how it goes then move forward again with the changes. Just to many unknowns
at this point to nail it down. I'll have to source another used carb, pullapart time!
Thread Starter
Joined: Jul 2004
Posts: 9,250
Likes: 464
From: Lake Wylie, N.C.
Ok, finally got the carb on and running perfect. Had the following issues to resolve:
1. Flooding on startup - had to find a true 12V ignition source for the FBVS so it would
click on when the key was engaged.
2. Vaccum leaks - Found a big tube above the MAS I forgot to plug and the hot start
assist port needed to plugged.
3. Idle circuit not working - Original carb had the air bleeds swappped on the
primaries and secondaries. I'm sure I didn't do this because I am pretty careful when I disassemble a
carb to not swap things around. BTW this is an 84 carb.
So addressed all those issues and replaced my drilled out primaries with 95 jets I got
from Mazdatrix. Set the MAS to 3.5 turns out and the idle to barely open the primaries.
Put it back on and fired it up. Ran but needed adjustments.
Had to adjust the choke cable to the fast idle linkage and had to relax the throttle cable
a bit. Then proceeded to play with the MAS and the idle until it was down to 800 rpm
and idling as good or better than the Dell.
Took it out for a test drive and boy is this thing a blast. Rips to redline as soon as the
secondaries kick it. Did I tell you the secondaries kicked in, lLIKE A MULE! Tons of fun
and have to kind of learn to drive with it since I've been using the Dell for over 20 years
now.
Heres the interesting bit. I took it to the gas stationed, filled it up and then proceeded to
drive my 55 mile mileage check loop on the interstate. Its all interstate with one exit
to loop around and come back home. 27.5 miles each way. I cruised at 75 mph 80% of
the way and then had to kick down to 65 as it goes down to 55 right about where I
make the turn around. Returned to the same pump at the same station, filled it up again.
It took 1.787 gallons and I was careful to fill up to the same measure as before. Basically
held it until it kicked off and the topped it up by 3 cents to the next 5 cent
mark. Did it this way on both fillups.
And the final numbers were 55/1.78 = 30 mpg. Thirty freaking miles to the gallon. I think
its safe to say I'm running lean. I have jets now to make it richer. Interesting the engine
didn't seem to run really hot or anything but at that mpg its got to be lean. This is with
stock jets for everything but the primaries. Stock would be 92 and I have 95 in there.
I bet I can go up to 100 or 105 without a problem.
Big shout out to Jeff20B for some IM discussions we had over the last few months.
Hmm I better fix that signature now ...
Thread Starter
Joined: Jul 2004
Posts: 9,250
Likes: 464
From: Lake Wylie, N.C.
Put the larger jets in and big difference. Still haven't looked at the plugs yet. Did retune
the MAS adjustment and that worked much better now. I tuned it out rich and then back
in some so I know its a slightly richer mixture. Put my idle right at 750 or so.
The throttle seems to stick a bit and not fully return after its been used. I'll have to see
whats making it stick or bind. Makes my idle jump up to about 900 or so as I drive
around.
The secondaries kick in with a vengeance and little late maybe. I'll play with that some
more as well. When pushing the pedal you can feel a stop when you get to the
secondary activation and you have to push through it. No real hesitation just extra
effort to push down the pedal. Makes it really easy to stay out of the secondaries but
can be a bit jarring when you mash the pedal. Also a lot of fun!!
Can you tell I'm having fun with this finally?
I'll do a mileage run again and see how bad I've made it now. I'm pretty sure it won't be
30 mpg this time.
Thread Starter
Joined: Jul 2004
Posts: 9,250
Likes: 464
From: Lake Wylie, N.C.
Made run to RTP yesterday to go to my office. On the way there I did a fillup at the end
and I saw 23mpg cruising 70 to 80mph for about 150 miles of interstate. I check before I
left and when I filled up it looks like around town I'm seeing ~20mpg.
So the new jets have definitely richen the mixture and I think its tuned about right.
The secondaries still kick like mule and will break traction easily in most gears except
5th. I may work on those at some point but its a lot of fun at the moment.
I'd like to get an air cleaner that fits the carb (4 1/4" seems about right). Right now I
have the stock air cleaner with the snorkel pulled off. Looks kind of rigged if you know
what I mean. I'd like to find an air cleaner base that will work with the stock top diameter
and then just drill a hole thru the stock top to bolt it on instead of using the clips.

My goodness Tim, you've been busy!
Good stuff, I'll be one to benefit from your tutorial for sure.
And I've got about 10 stock Nikki's and manifolds in the parts shed, so if these catch on we should think about going into business.
We can call them Red Neck Nikki's, or something like that.
Good stuff, I'll be one to benefit from your tutorial for sure.
And I've got about 10 stock Nikki's and manifolds in the parts shed, so if these catch on we should think about going into business.
We can call them Red Neck Nikki's, or something like that.
 Another time for sure. Ask Mike how the ride was.


my God, man ... this is incredible stuff! cheers to you, TGF. 
the timing on this thread couldn't have been more perfect either because while i was at work last night (wishing i were anywhere else) i started thinking that i should get my hands on a few more Nikkis just to play around with them.
the timing on this thread couldn't have been more perfect either because while i was at work last night (wishing i were anywhere else) i started thinking that i should get my hands on a few more Nikkis just to play around with them.
air bleeds
TG, just a quick note about air bleeds. I see above where you mentioned drilling yours out to be larger than stock. Assuming yours were 70, as most FB carbs were, with some 60 and a few 80, you might have made them too big.
I've found the stock 70 primary air bleeds are excellent on a hogged out Nikki like the ones I've done and tested on a 74 ported 13B with an RB long primary exhaust. The fuel jets like to be around 130 and I'll be ordering some 125, more 130 (for my other carbs), and 135 soon for tuning. I don't need 120 as I already have a set and my .045" drill bit (the 118 I refer to a lot) is actually too large to fit the 120 so I'm wondering just how big it really is, or whether the factory sizes jets conservatively, or my ability to drill them without a pin vice might be making them too big. Moving on...
The problem with drilling out the air bleeds is it leans the primary circuit out quite a bit and hurts low end tip in. You're like what? I understand air bleeds affect high end fuel trim while the fuel jets affect low end. Or to put it another way, you tune the fuel jets first to get your afr right for best power or econemy depending on your goals (get a wideband!), then tune the air bleeds to trim off the tendency to go rich at high RPM as Nikkis have been said to do - my mileage has varied from this commonly accepted carb behaviour, so that's why I'm mentioning it here. Of course I just got the long primary in there and just added an O2 bung so I'm just beginning the NA tuning adventure myself.
So the best option is to either have the four common air bleed sizes available: 60, 70, 80, 90 or see if you can do the Yaw and Sterling mod where you purchase some Holley air bleeds with the 10-32 NF thread pitch, which apparently threads in the Nikki fuel jet holes pretty well and can be used as fuel jets, and drill/tap a spare set of Nikki air bleeds and there you go. Of course you'd have to think in terms of imperial measurement rather than metric, but I never said tuning was easy.
But you really need to get a wideband to get better than about 60% tuned. I've gotten my carbs up to 80% without having the right jets and air bleeds available using the wideband. It gets nuts when you open the secondaries. Every 2bbl owner should drive one one these to see what they're missing.
I've found the stock 70 primary air bleeds are excellent on a hogged out Nikki like the ones I've done and tested on a 74 ported 13B with an RB long primary exhaust. The fuel jets like to be around 130 and I'll be ordering some 125, more 130 (for my other carbs), and 135 soon for tuning. I don't need 120 as I already have a set and my .045" drill bit (the 118 I refer to a lot) is actually too large to fit the 120 so I'm wondering just how big it really is, or whether the factory sizes jets conservatively, or my ability to drill them without a pin vice might be making them too big. Moving on...
The problem with drilling out the air bleeds is it leans the primary circuit out quite a bit and hurts low end tip in. You're like what? I understand air bleeds affect high end fuel trim while the fuel jets affect low end. Or to put it another way, you tune the fuel jets first to get your afr right for best power or econemy depending on your goals (get a wideband!), then tune the air bleeds to trim off the tendency to go rich at high RPM as Nikkis have been said to do - my mileage has varied from this commonly accepted carb behaviour, so that's why I'm mentioning it here. Of course I just got the long primary in there and just added an O2 bung so I'm just beginning the NA tuning adventure myself.
So the best option is to either have the four common air bleed sizes available: 60, 70, 80, 90 or see if you can do the Yaw and Sterling mod where you purchase some Holley air bleeds with the 10-32 NF thread pitch, which apparently threads in the Nikki fuel jet holes pretty well and can be used as fuel jets, and drill/tap a spare set of Nikki air bleeds and there you go. Of course you'd have to think in terms of imperial measurement rather than metric, but I never said tuning was easy.
But you really need to get a wideband to get better than about 60% tuned. I've gotten my carbs up to 80% without having the right jets and air bleeds available using the wideband. It gets nuts when you open the secondaries.
Every 2bbl owner should drive one one these to see what they're missing.
air filter
Get the white spun aluminum RB air cleaner from Mazdatrix or RB and some kind of paper filter element. The foam doesn't flow all that well according to some. Also the stock replacement Fram that fits the blue air cleaners won't fit the RB.
I have an old school black one from the 80s and an old dirty K&N (it's literally the same color as the black powdercoating they used back then lol) that I'm sure isn't letting very much air in, but it still seems to manage breaking them loose in 1st gear on dry road when the secondaries are opened. This is on a carb that's only 60% tuned due to lack of proper jets and air bleeds. I can't wait to try the new jets and get it 100% tuned for this engine and a new, clean air filter.
The carb, for those of you that are Nikki-curious:
84-85
primaries hogged out to 24.5mm
60 air bleeds
118 drilled primary jets
Sterling accel pump mod
AP banjo bolt and nozzle drilled to 118 (.045")
boosters trimmed with aero mod
secondaries stock
relavant nipples blocked as required for boost prepping
It's too lean for NA but was a tad rich with a turbo and required 90 air bleeds. The NA solution is to up the jets to 125 or 130 and up the air bleeds to 70. It might correct the tendency to go lean at higher RPM while on the primary circuit. Yeah, seems backwards. Secondaries are A-OK though.
I have an old school black one from the 80s and an old dirty K&N (it's literally the same color as the black powdercoating they used back then lol) that I'm sure isn't letting very much air in, but it still seems to manage breaking them loose in 1st gear on dry road when the secondaries are opened. This is on a carb that's only 60% tuned due to lack of proper jets and air bleeds.
I can't wait to try the new jets and get it 100% tuned for this engine and a new, clean air filter.The carb, for those of you that are Nikki-curious:
84-85
primaries hogged out to 24.5mm
60 air bleeds
118 drilled primary jets
Sterling accel pump mod
AP banjo bolt and nozzle drilled to 118 (.045")
boosters trimmed with aero mod
secondaries stock
relavant nipples blocked as required for boost prepping
It's too lean for NA but was a tad rich with a turbo and required 90 air bleeds. The NA solution is to up the jets to 125 or 130 and up the air bleeds to 70. It might correct the tendency to go lean at higher RPM while on the primary circuit. Yeah, seems backwards. Secondaries are A-OK though.