
Power Window Relay Conversion Project

Thread Starter
Go Hawks!
iTrader: (1)
Joined: May 2004
Posts: 1,952
Likes: 3
From: Cedar Rapids, Iowa
Power Window Relay Conversion Project
I am nearly complete with a power window relay conversion project and thought I'd share. I used several sources for reference...most notably this site:
http://www.wankel.net/~krwright/cars...r_windows.html
If I could find a source for the connectors that Mazda uses between the front harness and the handbrake harness (under the driver's seat) I could make this thing plug and play. But as it is, if I were to produce these a user would need to make 10 wire-to wire splices. But then, if they wanted to remove it for some reason (maybe a relay goes bad), they'd just have to disconnect connectors HM/BF and HF/BM and connect HM to HF (see attached schematic) and the switches would control the windows directly again.
I haven't tested it yet...I'll probably test it in the donor SE since it'll be a long time before I get the car back from paint and start putting it back together (I STILL haven't been able to get it in because they are so busy doing collision work because of our crappy weather this winter).
I got all my electrical supplies from Waytek ( http://www.waytekwire.com/ ). They carry some pretty coole automotive wiring supplies, and have very quick service. The only quirk is that they require each line item to total at least $5...so I had to buy more than I needed for some stuff.
I still need to find a piece of aluminum to make a cover, and I'd like to find a shorter box...this one is 6" x 4" x 2" and I'd like to find one that's 1.25" or 1.5" high. Otherwise it's nearly complete.
Rich


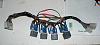
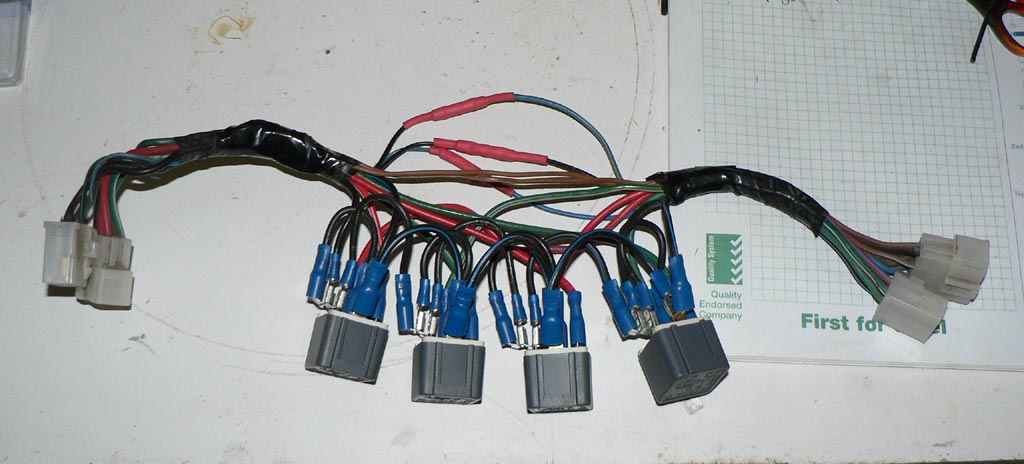
OK, here is my version of this mod. I don't have a fancy box, but I did use the wiring harness from a spare 82 RX-7, to make it directly plug and play. For now I've tucked the relay cluster behind the dash.
I wanted to avoid soldering and ended up with more doubled-up connections than I would have liked. This is my first attempt at anything electrical.
I've attached a picture I took of the monstrosity when I was done.
I wanted to avoid soldering and ended up with more doubled-up connections than I would have liked. This is my first attempt at anything electrical.
I've attached a picture I took of the monstrosity when I was done.
Thread Starter
Go Hawks!
iTrader: (1)
Joined: May 2004
Posts: 1,952
Likes: 3
From: Cedar Rapids, Iowa
OK, here is my version of this mod. I don't have a fancy box, but I did use the wiring harness from a spare 82 RX-7, to make it directly plug and play. For now I've tucked the relay cluster behind the dash.
I wanted to avoid soldering and ended up with more doubled-up connections than I would have liked. This is my first attempt at anything electrical.
I've attached a picture I took of the monstrosity when I was done.
Attachment 297193
I wanted to avoid soldering and ended up with more doubled-up connections than I would have liked. This is my first attempt at anything electrical.
I've attached a picture I took of the monstrosity when I was done.
Attachment 297193
Rich

Trending Topics
Well it made no difference to the speed of the windows in my case. My windows are all jammed up, I need to figure out why they are so slow... the drivers window comes out of its track every time too. Passenger is lined up ok but it gets stuck sometimes.
64mgb, if you look at the '82 wiring diagram, the harness for the power window switches goes forward of the switches, up behind the stereo and into the dash. The X-11 connector is to the left of the center console behind the stereo.
64mgb, if you look at the '82 wiring diagram, the harness for the power window switches goes forward of the switches, up behind the stereo and into the dash. The X-11 connector is to the left of the center console behind the stereo.
Thread Starter
Go Hawks!
iTrader: (1)
Joined: May 2004
Posts: 1,952
Likes: 3
From: Cedar Rapids, Iowa
Well it made no difference to the speed of the windows in my case. My windows are all jammed up, I need to figure out why they are so slow... the drivers window comes out of its track every time too. Passenger is lined up ok but it gets stuck sometimes.
64mgb, if you look at the '82 wiring diagram, the harness for the power window switches goes forward of the switches, up behind the stereo and into the dash. The X-11 connector is to the left of the center console behind the stereo.
64mgb, if you look at the '82 wiring diagram, the harness for the power window switches goes forward of the switches, up behind the stereo and into the dash. The X-11 connector is to the left of the center console behind the stereo.
Rich
Thread Starter
Go Hawks!
iTrader: (1)
Joined: May 2004
Posts: 1,952
Likes: 3
From: Cedar Rapids, Iowa
Same old same old...but I did finally get the car in for paint a couple of weeks ago. They thought they'd probably have it until sometime in June, so then I will be able to start putting it back together. It'll probably take the rest of the summer for that. That's when I'll be able to finish my power window conversion. I did swap the manual regulators into the SE parts car, then completely restored the power regulators, as well as the motors...took them completely apart, cleaned them up, cleaned the commutators, lubed them up, and put them back together. They work like a champ, at least on the garage floor  I thought about doing a how-to on restoring the motors, but didn't figure there would be that much interest.
Rich
I thought about doing a how-to on restoring the motors, but didn't figure there would be that much interest.Rich
Can't catch Me....
Joined: May 2008
Posts: 51
Likes: 0
From: Whitehorse, Yukon, Canada
I have a 1982 Rx7 GX, now I just purchased this and will need to take a look at all the interior elec.... is this model even supposed to have power windows? and the pass side went down a bit, and wont go up or down now.. and the drivers side will only go down about 4 inches and goes back up, but no further down... There is alot of random switches and wiring in this car, like hook ups for more switches too..(stock lookin) any help would be appreciated, with the windows that is...

I strongly urge to use relay sockets, instead of the spade connectors. That way you can easily replace the relay.
http://cgi.ebay.com/10-Pack-of-12V-3...QQcmdZViewItem
or
http://cgi.ebay.com/ebaymotors/10-PA...spagenameZWDVW
If you are so inclined, you can get the sockets and the crimp pins for the the sockets at Newark.com
http://cgi.ebay.com/10-Pack-of-12V-3...QQcmdZViewItem
or
http://cgi.ebay.com/ebaymotors/10-PA...spagenameZWDVW
If you are so inclined, you can get the sockets and the crimp pins for the the sockets at Newark.com
I actually thought about using connectors, but I couldn't find any... The brand of relays I used, Narva, don't produce them so I gave up looking for them after I couldn't find them at the auto parts store. I didn't know they made such a connector.
Soopitup, maybe your switches need cleaning. After 25 years of switching high current they die, thats why we do this mod
Soopitup, maybe your switches need cleaning. After 25 years of switching high current they die, thats why we do this mod
Thread Starter
Go Hawks!
iTrader: (1)
Joined: May 2004
Posts: 1,952
Likes: 3
From: Cedar Rapids, Iowa
I strongly urge to use relay sockets, instead of the spade connectors. That way you can easily replace the relay.
http://cgi.ebay.com/10-Pack-of-12V-3...QQcmdZViewItem
or
http://cgi.ebay.com/ebaymotors/10-PA...spagenameZWDVW
If you are so inclined, you can get the sockets and the crimp pins for the the sockets at Newark.com
http://cgi.ebay.com/10-Pack-of-12V-3...QQcmdZViewItem
or
http://cgi.ebay.com/ebaymotors/10-PA...spagenameZWDVW
If you are so inclined, you can get the sockets and the crimp pins for the the sockets at Newark.com
Rich
Same old same old...but I did finally get the car in for paint a couple of weeks ago. They thought they'd probably have it until sometime in June, so then I will be able to start putting it back together. It'll probably take the rest of the summer for that. That's when I'll be able to finish my power window conversion. I did swap the manual regulators into the SE parts car, then completely restored the power regulators, as well as the motors...took them completely apart, cleaned them up, cleaned the commutators, lubed them up, and put them back together. They work like a champ, at least on the garage floor I thought about doing a how-to on restoring the motors, but didn't figure there would be that much interest.
Rich
I thought about doing a how-to on restoring the motors, but didn't figure there would be that much interest.Rich
Thread Starter
Go Hawks!
iTrader: (1)
Joined: May 2004
Posts: 1,952
Likes: 3
From: Cedar Rapids, Iowa
Rich
Joined: Feb 2006
Posts: 3,162
Likes: 1
From: London, Ontario, Canada
+1 on the how-to's. My windows are slow AND don't go up or down straight. They get a little wonky near the top as they go up. Would be greatly appreciated.
Thread Starter
Go Hawks!
iTrader: (1)
Joined: May 2004
Posts: 1,952
Likes: 3
From: Cedar Rapids, Iowa
More than likely, what's tired are the switches...they get corroded due to the high current they are carrying which results in arcing. I also took those apart and cleaned them up real good and put some dielectric grease on the contacts. But I'll try to put something together about the motors. One thing I can tell you now is to be VERY careful pulling the armature out of the gear casing, because there is a VERY small ball on the end of it...don't lose it! If there is grease in there it will probably want to stick in grease, so make sure you look for it. There is also one on the other end of the armature, but it's much larger and easier to keep track of.
Rich
Rich
Rich
Thanks for the pic.
so you pulled the 3 screws separating the motor from the gear housing. and you are able to remove the armature, clean it all up, regrease and assemble without loosing the two *****. Is that about it or is there anything I missed.
I plan on doing this as well as the relay conversion.
so you pulled the 3 screws separating the motor from the gear housing. and you are able to remove the armature, clean it all up, regrease and assemble without loosing the two *****. Is that about it or is there anything I missed.
I plan on doing this as well as the relay conversion.
Thread Starter
Go Hawks!
iTrader: (1)
Joined: May 2004
Posts: 1,952
Likes: 3
From: Cedar Rapids, Iowa
Thanks for the pic.
so you pulled the 3 screws separating the motor from the gear housing. and you are able to remove the armature, clean it all up, regrease and assemble without loosing the two *****. Is that about it or is there anything I missed.
I plan on doing this as well as the relay conversion.
so you pulled the 3 screws separating the motor from the gear housing. and you are able to remove the armature, clean it all up, regrease and assemble without loosing the two *****. Is that about it or is there anything I missed.
I plan on doing this as well as the relay conversion.
Rich
Thread Starter
Go Hawks!
iTrader: (1)
Joined: May 2004
Posts: 1,952
Likes: 3
From: Cedar Rapids, Iowa
That's pretty much it, but I also removed the cover from the gear box and cleaned up the gear and re-greased it. The armature has a neat device for making it easier to slide the armature in past the brushes...you'll see what I mean when you get it apart. I actually unsoldered the wires also so I could do a thorough job of cleaning.
Rich
Rich
Rich