When you click on links to various merchants on this site and make a purchase, this can result in this site earning a commission. Affiliate programs and affiliations include, but are not limited to, the eBay Partner Network.
Anybody know where the drain end of the power antenna drain tube is supposed to go? Removing the broken OEM one, the tube seemed to just drop into the passenger rear quarter area where there appear to be no weep holes or outlet fitting.
I see the rear hatch drain tube that runs out of the back of the bumper, but nothing else obvious.
Here's a photo of the tube going from the bottom of the new antenna, just resting in that area.
Like the hatch drain, it should bend a little back to the rear and go out a hole behind the rear
bumper. This is a known manufacturing defect from new, this is why a lot of passenger side
rear quarters have rust and the lowest spot closest to the wheel and eventually rust through.
Both of mine have rust there and the passenger is the worst. Doesn't help they plugged the
only hole to drain it with a rubber plug on each side. DOH!
Thanks t_g. I'll pop the tail light out again and have a feel around. I was all over that lower area where the tube sits now and did not even think of there being another penetration through the bumper.
Thanks! Maybe I can save you a crick in the lower back...I just snapped this and can't see any holes other than the one occupied b the drain hatch. Certainly nothing within reach of the oem antenna drain tube. The orange bit is the end of my trouble light.
Hello Toruki, I have 83 FB also, and am in middle of replacing antenna mast. I found the same thing, drain tube just ends inside quarter panel. One could drill another hole for it, though tight quarters in there. OTOH, the only time water should get in there is when the antenna is wet when it is retracted, right? If so, pretty minimal.
BTW, did you happen to be in there because you were replacing the antenna mast also? If so, do you know if the masts for 86 work in the 83? I find 86 mast parts listed, but nothing earlier.
On my 80 SA the antenna drain hole exits into the UNDERCARRIAGE on the LEFT side of the inner compartment the antenna is in (as you face to the front of the car). So if you are under the car and look up between the muffler and the inside fender, the antenna drain goes thru a rubber grommet on the inside wall of the fender, not the rear of the car where the HATCH drains are. You can NOT see this hole from inside the fender, because (as in your first photo) the inner fender horizontal support beam - the one with the holes in it - hides it. The drain hole is below that...
Another option would be to put the antenna drain into a bottle. of course, you would need to check it periodically to empty.
That's a really good idea if I still can't find the drain looking where Stu says. Could prob put something in there big enough to capture the relatively small amount, and let it evaporate.
Originally Posted by 7aull
On my 80 SA the antenna drain hole exits into the UNDERCARRIAGE on the LEFT side of the inner compartment the antenna is in (as you face to the front of the car).
Hello Toruki, I have 83 FB also, and am in middle of replacing antenna mast. I found the same thing, drain tube just ends inside quarter panel. One could drill another hole for it, though tight quarters in there. OTOH, the only time water should get in there is when the antenna is wet when it is retracted, right? If so, pretty minimal.
BTW, did you happen to be in there because you were replacing the antenna mast also? If so, do you know if the masts for 86 work in the 83? I find 86 mast parts listed, but nothing earlier.
Ye, I was replacing the whole assembly. I wish I had it to do over again because I made a pretty stupid decision...the mast was stuck in the up position and I could not get the whole assembly out of the fender well. Here comes the stupid part...I cut the mast (after trying for a very long time to get it to retract but still). Anyway, after removing the tail light I bet I could have removed it intact.
TL,DR I am betting you could refurb the OEM unit if the OEM mast is intact except for the plastic actuator. It's pretty deep into the mechanism, but a fun teardown. If that does not appeal at all then the Metra is totally doable and comes out really nice. Just not OEM.
If you are using that Metra unit, this guide Antenna Replacement is still spot on, and the wiring is perfect. Black to ground, red to +12V constant, blue wire on the Metra to the blue wire from the factory connector in the car. Pro tip, use the OEM swivel adjuster and internal clamp with the Metra screw cap. And adjust your OEM bracket placement on new unit to match the height that the swivel ball requires...
BUT
If you have good mast but just broken plastic retractor bits? I would have done all of the following had I not been stupid.
The OEM unit works by "counting" steps on an internal cog...not sensing strain and terminating up or down as new ones do. It uses a solid plastic actuator, not the serrated edge type in modern units like the Metra. It is bonded to the spool on the inside of the unit. All of this means the length of the plastic actuator is crucial.
You can disassemble the OEM unit, remove the metal antenna, and all of the plastic bits. Keep the plastic to get a rough measurement of its original length. I am thinking one could replace the old plastic with very heavy duty weed whacker line, thick stuff.
I would attach the new actuator to the top segment of the OEM mast using a bunch shoe goop. That s%*t is tenacious, durable, and sticky as hell. I bet a long slug of it into the proper area would hold just fine.
I would "calibrate" the length of the new actuator by trimming it at the cinched spool end. Trail and error.
Some photos...I have only the bare OEM unit (I reused the bracket with the new Metra and that's all mounted, no pix).
Scrape off all of the old silicone at the antenna signal cable and at the base of the metal tube connected to the drive unit:
Loosen the screw noted above, slide the clamp up, and twist the tube up and off the drive unit. The antenna mast is removable from the bottom of the tube.
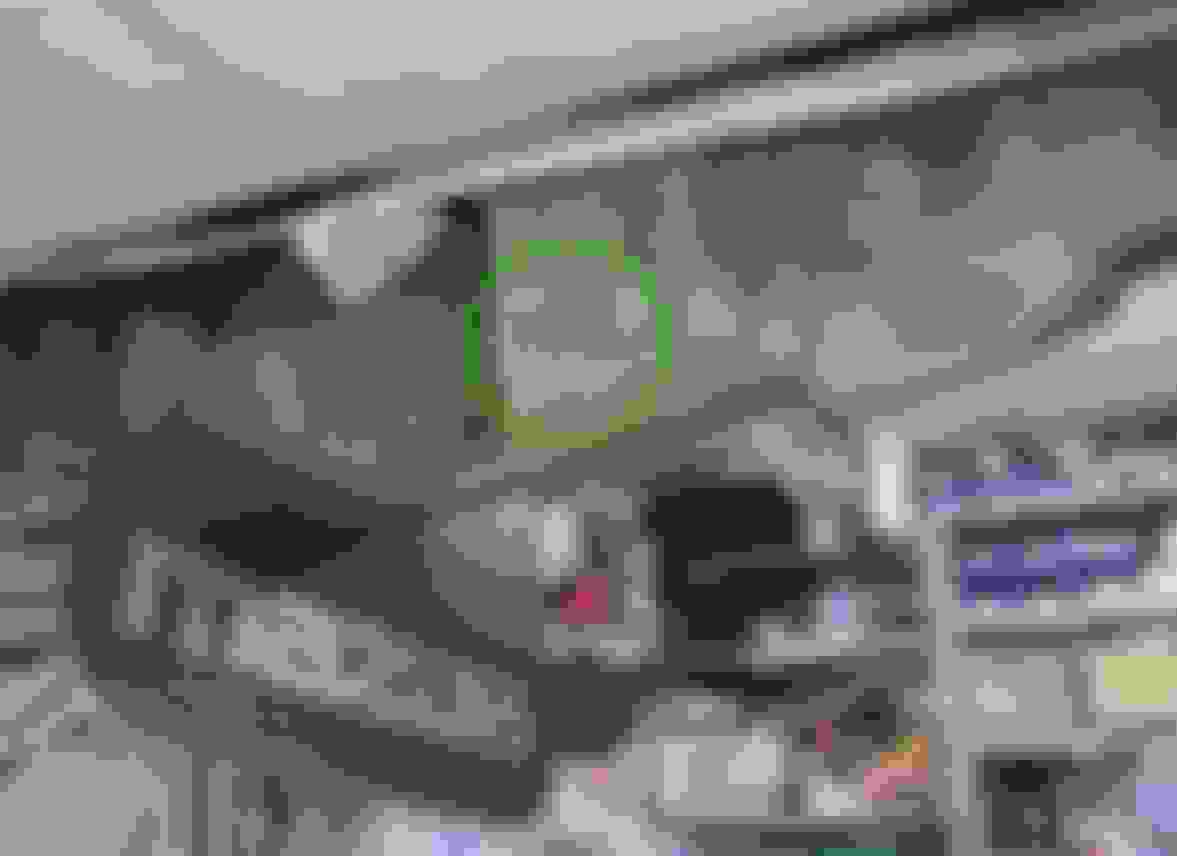
The open up the drive housing and follow your nose to remove/inspect all of the other actuator bits and how the mechanism works. Remove the Philips and the bolt, green circles. Do not remove the screws that are red circled (they hold the wiring and switch in place inside the unit).
And here are a series of shot of the inside. It's a greasy mess in there, although I've cleaned this one up.
Does anyone else think "no, this grommet never had a drain tube poking out of it."?
Makes me wonder if someone at the antenna install just forgot, or if anyone's antenna drain ever actually drained. You guys ever see a tube exiting there?
I just looked at my 1979 and 1985, both with electric antennas, and that grommet looks just like yours. No hole in the grommet.
I wonder if Mazda decided that there wasn't enough water coming from the drain and just let it drain inside the fender. I need to check mine now inside the rear fender. If it drains inside, I'm going to make it drain to the outside. Probably via that grommet.
Last edited by KansasCityREPU; Mar 12, 2017 at 03:52 PM.
I just looked at my 1979 and 1985, both with electric antennas, and that grommet looks just like yours. No hole in the grommet.
I wonder if Mazda decided that there wasn't enough water coming from the drain and just let it drain inside the fender. I need to check mine now inside the rear fender. If it drains inside, I'm going to make it drain to the outside. Probably via that grommet.
The replacement inner fender I used on my build had (and still has) the solid grommet in that same location.
That grommet is not the place for the drain to come out. It comes out in a
hole on the passenger side behind the bumper on my SA. Its a mirror to
the hole you are seeing on the driver side for the hatch drain tube.
Maybe an FB is different in this regard?
Last edited by t_g_farrell; Mar 16, 2017 at 08:23 AM.
To follow up on my earlier note - I now recall I PUT A HOLE in the rubber grommet to run the drain line into it. So I cannot (or shouldn't) leave the impression this is the "factory" application. But at least on my (SA) RX, with rear bumper removed, I have NO hole/outlet where I could have run the drain hose. would love to see a photo of this.
Just a thought, Perhaps You can attach the two drain hoses together, with a 3-way (T) connector. take the hatch drain hose, cut it & insert the (T) fitting, attach the antenna drain hose to the 'T' & then attach the other end to the drain hose leading to below the bumper... IDK, just my .02...
Good luck!