
Lets install an A/C system! (Help me not ruin everything)

Thread Starter

Joined: Feb 2004
Posts: 2,109
Likes: 32
From: Canada
Lets install an A/C system! (Help me not ruin everything)
EDIT:
Figured I'd use this thread to document things as they went and then clean it up later.
__________________________________________________ ______________________
I am trying to source a full set of a/c parts for my 85 non a/c model. Is the A/c from an 83 swapable into an 85? The 85 has never had A/C, so I am assuming I will need all the wiring and whatnot. I also have access to an FC a/c setup. Judging by part numbers, this is also not a direct swap either, is it?
That being said, is there anyone with all the bits and pieces to convert a 84/85 car?
Thanks guys.
Last edited by Sgt Fox; Aug 20, 2011 at 04:29 PM.
Sin City Rotary
Joined: Sep 2009
Posts: 1,707
Likes: 2
From: Las Vegas
The bigest diff I have seen is the mounting of the evap box, may need to fab as the studs were in different places but do'able and no one would know the differance
Get the whole setup compressor, evap box, the lines, condensor and if at all possiable the wiring as well as the dash surround
Get the whole setup compressor, evap box, the lines, condensor and if at all possiable the wiring as well as the dash surround
You may alreay know this, but i recommend using a new compressor, drier, condensor, and expansion valve. It will work using all old stuff (except the drier) but it will not cool well. At the very least a new drier and condensor will really enhance the cooling capability.
I recently did the same project and regret trying to reuse some of the old components.
2 cents.
I recently did the same project and regret trying to reuse some of the old components.
2 cents.

Thread Starter
Joined: Feb 2004
Posts: 2,109
Likes: 32
From: Canada
I've been trying to research upgraded condensers. Which did you choose?
I have been trying to find a full setup, including the wire harnesses and the a/c box and ducting inside the car, just so I at least have the parts or brackets.
I have been trying to find a full setup, including the wire harnesses and the a/c box and ducting inside the car, just so I at least have the parts or brackets.
I've been trying to research upgraded condensers. Which did you choose?
Anyway, they have several sizes. I got one that was about 25% larger than stock and it is the more efficient parallel type (as opposed to the older serpentine type), Much better than the stock one. Does require some very simple fabrication to adapt the stock mounts to the new condensor, however.
Classic Air Part # 11-1044 which is 15 5/8 X 20 1/2 X 1. It is a bit larger than original and took some shoehorning to get it to mount, but it will fit. Here is the link:
http://www.classicautoair.com/Catalo...alog_Final.pdf
page 93
This cataloge is also a good source of info about ac. Explained alot about differents types of components such as paralell vs serpentine condensers etc....
The larger the condensor the cooler the air will be, so it is worth the work.
http://www.classicautoair.com/Catalo...alog_Final.pdf
page 93
This cataloge is also a good source of info about ac. Explained alot about differents types of components such as paralell vs serpentine condensers etc....
The larger the condensor the cooler the air will be, so it is worth the work.
Trending Topics
This weekend I want to get under the dash of my FB and I want to see if I can remove some of the AC stuff - if i can i'll let you know. I'll pull as much of it as I can that relates to it.I know the evap box and some of the stuff connecting to it are in the car still. I also have a pump with some mounting brackets, i think. It also has two belts. I don't however have an AC condenser. I should have some of the wiring as well - if there's any left in my car I'll rip it out for you.
I'll also look in my pile of parts, i think there's some more stuff relating to it too.
It's all extra weight to me, anyhow. if you want what I got cover shipping and a coupla' bux and its yours.
On a side note, I only have Friday off this week due to the parade in Portland. But I'll try to get it all set aside for you.
Thread Starter
Joined: Feb 2004
Posts: 2,109
Likes: 32
From: Canada
Classic Air Part # 11-1044 which is 15 5/8 X 20 1/2 X 1. It is a bit larger than original and took some shoehorning to get it to mount, but it will fit. Here is the link:
http://www.classicautoair.com/Catalo...alog_Final.pdf
page 93
This cataloge is also a good source of info about ac. Explained alot about differents types of components such as paralell vs serpentine condensers etc....
The larger the condensor the cooler the air will be, so it is worth the work.
http://www.classicautoair.com/Catalo...alog_Final.pdf
page 93
This cataloge is also a good source of info about ac. Explained alot about differents types of components such as paralell vs serpentine condensers etc....
The larger the condensor the cooler the air will be, so it is worth the work.
It will work with the stock lines IF you use the later system that uses the oring connectors. Early systems, and some later systems that were dealer installed used compression fittings so if you had that system you would have to have "hybrid"lines made up with the oring fittings on one end to hook up to condenser. That is what I had to do. There were three different hose configurations used. The early years used compressors with the compression fittings. Next came the compressor with two seperate oring connectors and the later units had a siameesed setup that had oring connectors on the compressor that were hooked together. The one you want is the middle one so you can replace one line if needed without replacing the other. It is also more user friendly in running the lines in the engine compartment. You can change the routing to look better.
The bigger, more efficient condensor really made a big difference in my ac, it gets much coolerthan before and helps keep the high side pressure down, which greatly lessens the load on the motor. before I could really tell when the ac would cycle on and it was obviously soaking up much power, now much less so.

Thread Starter
Joined: Feb 2004
Posts: 2,109
Likes: 32
From: Canada

that reminds me! i have that condenser box you were lookin' for sitting in my living room, lol. let me know if you still need it. i can find out the shippin for you monday, if you like. got a coupla' things packed that i need to see the prices on so i can bring that, too.
Thread Starter
Joined: Feb 2004
Posts: 2,109
Likes: 32
From: Canada


Thread Starter
Joined: Feb 2004
Posts: 2,109
Likes: 32
From: Canada
I have a feeling that the compressor mount in that before picture is for the Wynns system. Could someone confirm, as well as take a picture of how the nippon mounts please?
This bracket is from a car with PS. I haven't gotten to the one I have without PS yet. I believe it is the same shape without the PS pump holes and the idler pulley.
Front

Top

Front
Top

Thread Starter
Joined: Feb 2004
Posts: 2,109
Likes: 32
From: Canada
Going back to this diagram:
http://imgur.com/Rj9Sj (click for big)
G-13, the air cond cut relay seems to only be needed for a PS car. Looks like it must cut the AC when the power steering is engaged, probably to reduce load on the motor. Main power for the compressor flows though the AC relay on G05, through the BY and then BW(12A) wire to G13. After the ac cut relay (G13) it flows down GB, back into the main loom and I assume will become the GB wire in G10, thus passing back through the AC harness loom to the compressor.
Instead of dealing with the G13 relay, since G13 is a 2x3 connector and the relay you included for it is just a standard bosch style automotive relay, I should just be able to jumper G13's BW and GB together. I wonder what Mazda does for the non power steering cars. Do they just have an adapter harness from the 2x3 to bosch and since G15 is never closed, as there is no power steering switch, the relay remains in its normally closed position? Or do they make a jumper plug that just shorts those two wires together?
EDIT:
Duuur, just realized the G13 dust cover is actually a shorting block. So Mazda did short those two wires when not using a relay.
Last edited by Sgt Fox; Aug 27, 2011 at 10:45 PM.
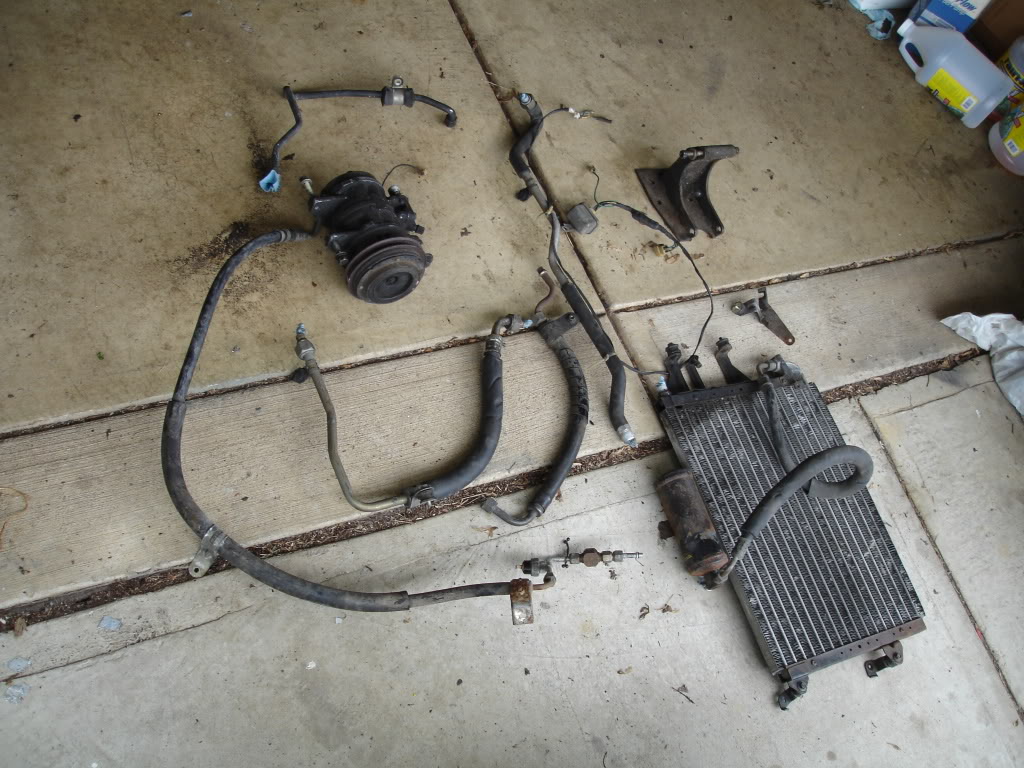
Here are the AC pictures I've taken for Sgt Fox. I'll post them here so everyone can see what we find.
You can see all the pictures by going to this directory. http://intertron.com/ron/ac
This is the Nippondenso AC page (Body section page 79) from the 84-85 parts diagram. Parts are marked in blue. Hose/pipe connection locations are shown with red lines.

This is my car, showing the routing of the low pressure hose (green). It connects to the top air box pipe coming through the firewall on one end and the compressor fitting nearest to the fender (low pressure fitting) on the other. If you look closely you can see the long wire (blue) which runs along the firewall from the left side of the car to the right side. This wire is part of the AC harness #20. Harness #20 plugs into connector G-10, in the engine compartment under the Master cylinder. It is a 3 pin connector inside a 3" wide rubber shroud along with another connector. Blue/black, Green/black and Black/yellow wires. SF's plug was not inside the shroud. This is the connection between the "Front" harness and the "AC" harness.

I have two 84 GSLSEs, an 85, 84 and 83 GSL, an 84 GS and an 85 S. The GSLSE harness #20 is different than the GSLs and the GS and S models have yet a third harness. I don't know if this is true with all cars, but all of my GSLSEs and GSLs have the pressure switch in the hard line on the right side of the engine near the fire wall. The GS and S have the pressure switch threaded into the drier, in front of the evaporator. Since one of the long wires in #20 are connected to the pressure switch the harnesses are different. GSLSE AC electrics are different than 12A. It has more relays so more terminals.
Harness #22 is another AC harness. It is wrapped around the air box and connected to the Frost Temperature Warning Switch (blue circle) inside the car. G-03 is the connector between the "AC" harness #22 and the "Instrument" harness. Should be an empty connector on a non-AC car. It should be behind the lower edge of the dash near the right side of the glove compartment. 4 terminal, female spade. Blue, Blue/red, Blue/white and Blue/green. Two wires run behind the air box and out through the firewall (left side of picture).

You can see all the pictures by going to this directory. http://intertron.com/ron/ac
This is the Nippondenso AC page (Body section page 79) from the 84-85 parts diagram. Parts are marked in blue. Hose/pipe connection locations are shown with red lines.
This is my car, showing the routing of the low pressure hose (green). It connects to the top air box pipe coming through the firewall on one end and the compressor fitting nearest to the fender (low pressure fitting) on the other. If you look closely you can see the long wire (blue) which runs along the firewall from the left side of the car to the right side. This wire is part of the AC harness #20. Harness #20 plugs into connector G-10, in the engine compartment under the Master cylinder. It is a 3 pin connector inside a 3" wide rubber shroud along with another connector. Blue/black, Green/black and Black/yellow wires. SF's plug was not inside the shroud. This is the connection between the "Front" harness and the "AC" harness.
I have two 84 GSLSEs, an 85, 84 and 83 GSL, an 84 GS and an 85 S. The GSLSE harness #20 is different than the GSLs and the GS and S models have yet a third harness. I don't know if this is true with all cars, but all of my GSLSEs and GSLs have the pressure switch in the hard line on the right side of the engine near the fire wall. The GS and S have the pressure switch threaded into the drier, in front of the evaporator. Since one of the long wires in #20 are connected to the pressure switch the harnesses are different. GSLSE AC electrics are different than 12A. It has more relays so more terminals.
Harness #22 is another AC harness. It is wrapped around the air box and connected to the Frost Temperature Warning Switch (blue circle) inside the car. G-03 is the connector between the "AC" harness #22 and the "Instrument" harness. Should be an empty connector on a non-AC car. It should be behind the lower edge of the dash near the right side of the glove compartment. 4 terminal, female spade. Blue, Blue/red, Blue/white and Blue/green. Two wires run behind the air box and out through the firewall (left side of picture).