Installing a Ford Taurus E-Fan
 02-10-10, 10:14 PM
#1
Installing a Ford Taurus E-Fan
**Please, no Electric vs clutch discussion!**
Ok guys, figured I would make a write up on how I installed my fan, in case
anyone else would like to install one. This can can be used as a pusher or a
puller.
First things first, head to your local junkyard, pick n pull, etc and look for a second
generation Ford Taurus (92-95). They look like this:

You are looking for one with the big 3.8l V6. That is the fan I got, not sure how
the 3.0l V6 fan looks or fits, so just get the bigger engined radiator fan. There are
plenty out there It only cost me $15, and that was with a warranty.
Do yourself a favor, and when you go to pull
the fan, cut the wires BEFORE the connector. I didn't do that, and now when I
need to pull the fan out, I have to undo all the wiring instead of just unclipping
the connector. Doh! My mistake, don't make it yours.
Here is what it looks like (I cut the bottom corner, so just imagine that it is still
there, also I don't have the connector):

Puller Style
Tools:
*Optional (more on this later)
To use the fan as a puller is the easiest way to install it. We will start with the
above picture. Notice how the bottom right corner is cut? That is so it will clear the
lower radiator hose. I do not have an exact measurement of the cut corner, but it
is best to make it small and have to enlarge it, than make it too big. Cut the
corner off and mock it up on the engine. Shouldn't take much cutting.
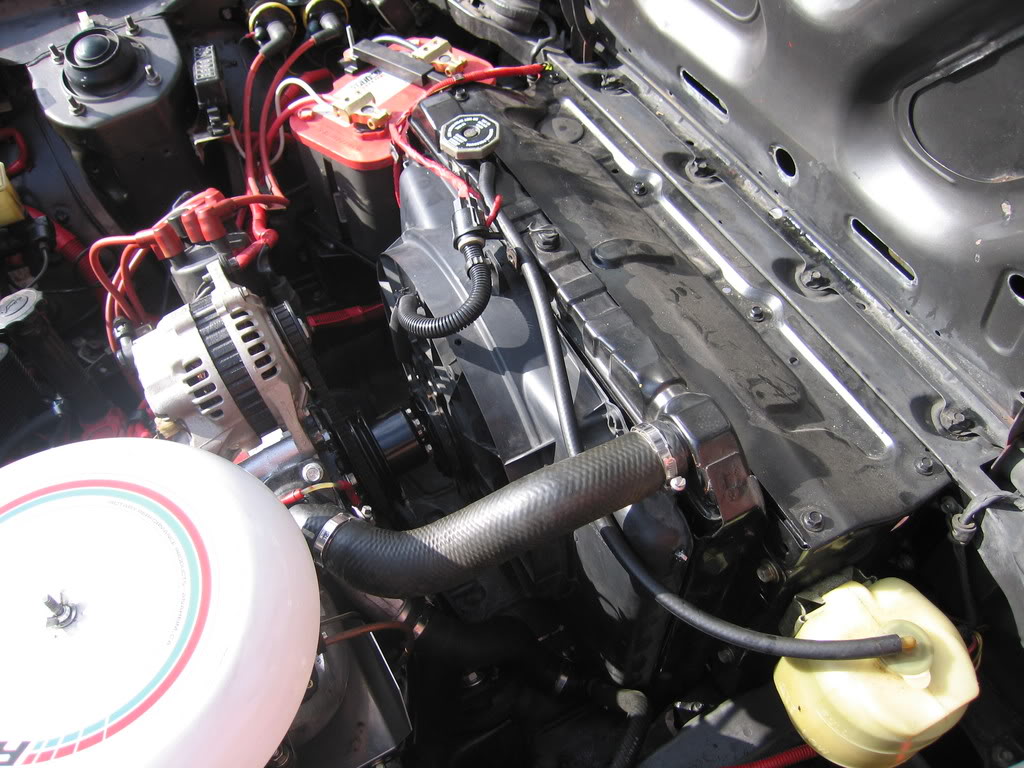
After mocking it up on the radiator, and making sure it fits around the lower
radiator hose, you need to drill 2 holes. I used the left side of the radiator (drivers
side) for this. Line up the fan so it covers the metal shroud's bolt holes. This is
where you will be drilling your 5/16th holes. Drill away, and mock it up to see if it
lines up. If you are awesome, it will. Use the stock fan shroud bolts and a small
washer to bolt it down. The fan should now support itself.
For the other side, this is where the optional washers come in. I jury rigged it
using the other 2 stock shroud bolts and a small washer/big washer combo. I
tightened it down so it "pinched" the fan to the metal shroud.

This setup basically keeps the right side flush against the metal shroud. I have
driven it on the street and on the track and never had a problem with it. You
might come up with a more "elegant" solution, but this is what worked for me.
Now you can use the 2 zip strips to tie down the wiring loom down to the fan. I
did one strip on the loom to the shroud arm and another to the top tab.

There you have it, mounted and ready for wiring!
Pusher Style
Tools:
Ah, the Pusher! I like the pusher style, it cleans up the engine bay and looks very
nice (the space; the fan is hidden!). The downside, is more cutting will need to be
done. No biggie, if you are setting aside the time to install the fan, you can spend
the 10 extra minutes of cutting
Let's begin with the U-Bolts and the 2" metal pieces you have. Use the U-bolt's
metal plate as a template for the metal pieces. You want to drill 2- 3/8ths holes in
the same spot the plate's holes are, essentially making 2 plates per U-bolt.
The stock puller fan will cut a lot of free flowing air off when on the highway. Let's
do something about that and pull out that angle grinder (or dremel) and begin to
cut the fan shroud up. You want to make nice big openings for air to go through,
but not too big to where the fan cannot support itself. I made a few openings
that average about 5" long. The "bridges" are about 3/4" wide. You want these
kind of on the large side, since you will be taking a lot of structural rigidity out of
the fan.
Here is my fan after about 15 minutes of cutting holes into it:

Remember how I said I had a puller setup first? Just imagine not having the
corner gone. Your pattern will differ from mine because of it.
Something I learned:To make it easier on you, do something more along these lines:

Notice the size of the top hole. The top of the fan's hole should be smaller than
the rest, I would say from the top and down 2 inches, then have your bridge,
then the bigger holes after that. This will make sense later on in the mounting.
You will only want to cut the backing of the shroud, don't wrap the cutting around
to the side! You will need that rim/edge. Go ahead and cut off the tab on the top
as well, you won't need that. Right where the first top bridge (the small holed
bridge) notch yourself about a 1 1/4" notch long, and about an inch deep. Do the
same on the other side of the fan at the same distances. You only want to notch
the perpendicular section of the fan in relation to the radiator. The notch should
not wrap around in any way, that would be too much. The green arrows show
where to notch at. Next to the left arrow you can sort of see the notch I made:

Now when you mock the fan up in front of the radiator, you will see a small bar in
front of the rad/oil cooler assembly. Guess what those notches are for! Flip
Flip
the fan upside downStick the fan on with the notches resting comfortably on the
bar. You should be about 2-3" below the top of the radiator, but the bottom will
cover most of the oil cooler. This is where you want it for good cooling, also so the
top of the metal shroud will not interfere with the fan. If all is dandy, take the fan
out and grab the u-bolts.
The U-bolts go on the bar, with the threadings facing the front bumper, parallel to
the ground. Go ahead and screw the bar down using the 7/16th wrench. Tighten
it a little past flush, so the small metal flange bends around the bar a bit. Slap
your fan back on there, notice how the bridge goes in between the 2 ends of the
U-bolt? Boo yeah, there is how you mount the lower part of the radiator!
Grab your U-bolt plates you made, and use one of the plates on the outside of
the bridge, and screw her down with 2 of the 3/8ths nuts and washer, one on
each. Tighten it down to where the plate's make contact with the bridge, then 1
turn more. This will apply some pressure to keep the fan from getting knocked off
the notched-bar area. DO NOT OVERTIGHTEN! This is an old plastic part, it can
snap off! The bar will not be flush with the bridge, that is how you want it. You
just want some pressure to keep it stuck on. Do the same for the other side, and
you have finished the lower radiator mounting!
Ignore the crummy plate I made, I will probably end up making it look pretty, but
you get the picture. The plate holds the bridge down, and you can see the notch
in the fan doing its job:

Now for the top mounting!. What I did was take off the passenger side radiator
shroud and drilled a 3/8ths hole in it. It doesn't really matter where, as it is for
the L bracket you will end up bending. If it makes it easier, here is where I drilled
it (this is the inside view of the bracket):

Run your 1/4"x3/4" bolt through there, with a washer on the outside. Grab your L
bracket, and see where you are with it. The hole I drilled, with the bracket I was
using, moved the bracket too far away from the fan. I bent the bracket so it
pushed the fan shroud against the radiator. You will only want slight pressure on
it, as not to bend the fins. I used just enough where I can pat the fan motor and
it will not bounce back. Do the same for the other side, and viola! Mounted fan!

Mmm, delicious BMW horns as well.
Sure, you can get fancy with the top and find another way to keep it stable, but
this works for me and I am pretty sure it will not budge anywhere!
Ok guys, figured I would make a write up on how I installed my fan, in case
anyone else would like to install one. This can can be used as a pusher or a
puller.
- The puller is easier to mount, since you do not have to do as much cutting.
- The downside to the puller is that cars with I believe AC, cannot have it as a
puller as the motor will hit the pulley.
- This install is with an S2 car. It will be virtually the same for S1's, but S3's have
a taller radiator and no oil cooler, so I am not sure how this will work with you
guys.
First things first, head to your local junkyard, pick n pull, etc and look for a second
generation Ford Taurus (92-95). They look like this:
You are looking for one with the big 3.8l V6. That is the fan I got, not sure how
the 3.0l V6 fan looks or fits, so just get the bigger engined radiator fan. There are
plenty out there It only cost me $15, and that was with a warranty.
Do yourself a favor, and when you go to pull
the fan, cut the wires BEFORE the connector. I didn't do that, and now when I
need to pull the fan out, I have to undo all the wiring instead of just unclipping
the connector. Doh! My mistake, don't make it yours.
Here is what it looks like (I cut the bottom corner, so just imagine that it is still
there, also I don't have the connector):
Puller Style
Tools:
- 10mm Wrench/ratchet
- Angle Grinder w/ Cutoff Disc (Dremels work too, but take forever)
- 4 10mm bolts (stock fan shroud attachment bolts)
- 2 Zip Strips (small ones work fine)
- Electric Drill
- 5/16 Drill Bit
- 4 Small Washers*
- 2 Large Washers*
*Optional (more on this later)
To use the fan as a puller is the easiest way to install it. We will start with the
above picture. Notice how the bottom right corner is cut? That is so it will clear the
lower radiator hose. I do not have an exact measurement of the cut corner, but it
is best to make it small and have to enlarge it, than make it too big. Cut the
corner off and mock it up on the engine. Shouldn't take much cutting.
After mocking it up on the radiator, and making sure it fits around the lower
radiator hose, you need to drill 2 holes. I used the left side of the radiator (drivers
side) for this. Line up the fan so it covers the metal shroud's bolt holes. This is
where you will be drilling your 5/16th holes. Drill away, and mock it up to see if it
lines up. If you are awesome, it will. Use the stock fan shroud bolts and a small
washer to bolt it down. The fan should now support itself.
For the other side, this is where the optional washers come in. I jury rigged it
using the other 2 stock shroud bolts and a small washer/big washer combo. I
tightened it down so it "pinched" the fan to the metal shroud.
This setup basically keeps the right side flush against the metal shroud. I have
driven it on the street and on the track and never had a problem with it. You
might come up with a more "elegant" solution, but this is what worked for me.
Now you can use the 2 zip strips to tie down the wiring loom down to the fan. I
did one strip on the loom to the shroud arm and another to the top tab.
There you have it, mounted and ready for wiring!
Pusher Style
Tools:
- 2- 1" U-bolts
- 4- 3/8ths Nuts (same threading as U-Bolt)
- 2 Small Strips of Metal about 2" long
- 2- 1/4"x3/4" bolt
- 1- 1/4" nut for above bolt
- 8 small washers
- 2 L-brackets (about 3" on each side)
- Drill
- 3/8ths Drill Bit
- Angle Grinder w/ Cutoff Wheel (or Dremel)
- 7/16th Wrench
- 7/16th Ratchet
Ah, the Pusher! I like the pusher style, it cleans up the engine bay and looks very
nice (the space; the fan is hidden!). The downside, is more cutting will need to be
done. No biggie, if you are setting aside the time to install the fan, you can spend
the 10 extra minutes of cutting
Let's begin with the U-Bolts and the 2" metal pieces you have. Use the U-bolt's
metal plate as a template for the metal pieces. You want to drill 2- 3/8ths holes in
the same spot the plate's holes are, essentially making 2 plates per U-bolt.
The stock puller fan will cut a lot of free flowing air off when on the highway. Let's
do something about that and pull out that angle grinder (or dremel) and begin to
cut the fan shroud up. You want to make nice big openings for air to go through,
but not too big to where the fan cannot support itself. I made a few openings
that average about 5" long. The "bridges" are about 3/4" wide. You want these
kind of on the large side, since you will be taking a lot of structural rigidity out of
the fan.
Here is my fan after about 15 minutes of cutting holes into it:
Remember how I said I had a puller setup first? Just imagine not having the
corner gone. Your pattern will differ from mine because of it.
Something I learned:To make it easier on you, do something more along these lines:
Notice the size of the top hole. The top of the fan's hole should be smaller than
the rest, I would say from the top and down 2 inches, then have your bridge,
then the bigger holes after that. This will make sense later on in the mounting.
You will only want to cut the backing of the shroud, don't wrap the cutting around
to the side! You will need that rim/edge. Go ahead and cut off the tab on the top
as well, you won't need that. Right where the first top bridge (the small holed
bridge) notch yourself about a 1 1/4" notch long, and about an inch deep. Do the
same on the other side of the fan at the same distances. You only want to notch
the perpendicular section of the fan in relation to the radiator. The notch should
not wrap around in any way, that would be too much. The green arrows show
where to notch at. Next to the left arrow you can sort of see the notch I made:
Now when you mock the fan up in front of the radiator, you will see a small bar in
front of the rad/oil cooler assembly. Guess what those notches are for!
Flip the fan upside downStick the fan on with the notches resting comfortably on the
bar. You should be about 2-3" below the top of the radiator, but the bottom will
cover most of the oil cooler. This is where you want it for good cooling, also so the
top of the metal shroud will not interfere with the fan. If all is dandy, take the fan
out and grab the u-bolts.
The U-bolts go on the bar, with the threadings facing the front bumper, parallel to
the ground. Go ahead and screw the bar down using the 7/16th wrench. Tighten
it a little past flush, so the small metal flange bends around the bar a bit. Slap
your fan back on there, notice how the bridge goes in between the 2 ends of the
U-bolt? Boo yeah, there is how you mount the lower part of the radiator!
Grab your U-bolt plates you made, and use one of the plates on the outside of
the bridge, and screw her down with 2 of the 3/8ths nuts and washer, one on
each. Tighten it down to where the plate's make contact with the bridge, then 1
turn more. This will apply some pressure to keep the fan from getting knocked off
the notched-bar area. DO NOT OVERTIGHTEN! This is an old plastic part, it can
snap off! The bar will not be flush with the bridge, that is how you want it. You
just want some pressure to keep it stuck on. Do the same for the other side, and
you have finished the lower radiator mounting!
Ignore the crummy plate I made, I will probably end up making it look pretty, but
you get the picture. The plate holds the bridge down, and you can see the notch
in the fan doing its job:
Now for the top mounting!. What I did was take off the passenger side radiator
shroud and drilled a 3/8ths hole in it. It doesn't really matter where, as it is for
the L bracket you will end up bending. If it makes it easier, here is where I drilled
it (this is the inside view of the bracket):
Run your 1/4"x3/4" bolt through there, with a washer on the outside. Grab your L
bracket, and see where you are with it. The hole I drilled, with the bracket I was
using, moved the bracket too far away from the fan. I bent the bracket so it
pushed the fan shroud against the radiator. You will only want slight pressure on
it, as not to bend the fins. I used just enough where I can pat the fan motor and
it will not bounce back. Do the same for the other side, and viola! Mounted fan!
Mmm, delicious BMW horns as well.
Sure, you can get fancy with the top and find another way to keep it stable, but
this works for me and I am pretty sure it will not budge anywhere!
 02-10-10, 10:15 PM
#2
Wiring in your Taurus Fan:
Ok guys, this part will cover my way of wiring this in:
With that out of the way, let's get to it!
Tools/Parts:
Ok, we will start with the Relay first. The relay is 30A rated, and will be used to
run the LOW power fan setting. High power setting on the fan is unnecessary on
the puller setup, and I would believe to be the same for the pusher, although I
have not ran the car with the pusher since install. If you do, for any reason, want
to use the HIGH setting, PLEASE USE A 50A RELAY! The 30A on high power will
melt, then smoke, then catch on fire, lightyour engine bay on fire, and you will
begin screaming until you stop the car. You might also cry. So please, low power
only, ok?
Here is your typical relay, and the diagram on the bottom:

As you can see, it will be pretty easy to wire up. Lets look at the wiring on the
fan. You should see a black wire, a black with red stripe wire, and a black with
yellow stripe wire. For me, the black wire was the ground, and the red stripe was
low power, with the yellow obviously being high power. Leave the yellow alone,
you won't need it! Test them before you go about with the wiring in case yours is
different. I am pretty sure it will be the same, but better safe than sorry!

First, find out where you want to attach the relay. I have mine attached to the
fusable link bolt on the shock tower. Easy to get to, and keeps wiring tidy.
Starting from the fan, solder on some 12g wiring to the black wire (or crimp a
male connect to the black wire and female connect the 12g wire), enough to get
to the negative post. When you have enough, cut the wire, strip it, and add an
O-ring connect. This will connect to the negative post on the battery.
The Black with red wire is the same deal. Solder on some 12g wiring (or crimp the
male, then crimp a female to 12g wire) and measure out enough to get to your
relay. When you have enough, strip the end and add a female spade connect to
post #87 on the relay. When you flick your switch, this will send power to this
post.
Now, on the relay, you want to add a male connect to some more 12g wire, and
run that from post #30 on the relay. Put a ring connect on the other end, and
that will go to your battery. Do not hook it up yet, keep power out of it until it is
finished.
Post #85 on the relay is the same deal, male connect to post #85, add some 12g
wiring and end it with a ring connect. This will go to your battery's negative
terminal, or to a bolt on the body. I would rather go to the terminal, as it is more
direct, but if you wish to ground to the body, make sure the ground is free of
paint and debris.
Finally, post #86 is your signal wire. You can get your signal from different places,
with different results:
I had my car wired up with the first option, as it was simple. I then wired it up to
the second option, because I like the control. Strip the end of your 12g wire
and add a female connect to it. This will go to your post #86 on the relay. Then
pick an option and run with it!
I mounted the switch in the cabin, where the choke used to be. Fits perfectly, and
I have it to where the LED (Yes, I have a ricey LED switch) is ON when the fan is
OFF. That way I know to turn the annoying red light OFF turns the fan on. This is
a safety for me. If I didn't have the light there would probably be a few times I
would forget about turning it on.
In order of engine safety, I would go:
Hope this helps people whom wish to do the electric fan conversions!
Ok guys, this part will cover my way of wiring this in:
- Using a 30a relay
- Does not use a thermo switch
- I have a switch to control on/off of the fan, where the choke used to be
With that out of the way, let's get to it!
Tools/Parts:
- 1- 30amp Relay
- 3 Ring terminal connects
- 1 Male Spade Connect
- 7 Female Spade Connect
- 1 Switch
- Couple feet of 12g Wiring
- Crimpers
If you want to solder: - 1- 30amp Relay
- 3 Ring terminal connects
- 7 Female Spade Connect
- 1 Switch
- Soldering Iron
- Soldering wire
- Couple feet of 12g Wiring
Ok, we will start with the Relay first. The relay is 30A rated, and will be used to
run the LOW power fan setting. High power setting on the fan is unnecessary on
the puller setup, and I would believe to be the same for the pusher, although I
have not ran the car with the pusher since install. If you do, for any reason, want
to use the HIGH setting, PLEASE USE A 50A RELAY! The 30A on high power will
melt, then smoke, then catch on fire, lightyour engine bay on fire, and you will
begin screaming until you stop the car. You might also cry. So please, low power
only, ok?
Here is your typical relay, and the diagram on the bottom:
As you can see, it will be pretty easy to wire up. Lets look at the wiring on the
fan. You should see a black wire, a black with red stripe wire, and a black with
yellow stripe wire. For me, the black wire was the ground, and the red stripe was
low power, with the yellow obviously being high power. Leave the yellow alone,
you won't need it! Test them before you go about with the wiring in case yours is
different. I am pretty sure it will be the same, but better safe than sorry!
First, find out where you want to attach the relay. I have mine attached to the
fusable link bolt on the shock tower. Easy to get to, and keeps wiring tidy.
Starting from the fan, solder on some 12g wiring to the black wire (or crimp a
male connect to the black wire and female connect the 12g wire), enough to get
to the negative post. When you have enough, cut the wire, strip it, and add an
O-ring connect. This will connect to the negative post on the battery.
The Black with red wire is the same deal. Solder on some 12g wiring (or crimp the
male, then crimp a female to 12g wire) and measure out enough to get to your
relay. When you have enough, strip the end and add a female spade connect to
post #87 on the relay. When you flick your switch, this will send power to this
post.
Now, on the relay, you want to add a male connect to some more 12g wire, and
run that from post #30 on the relay. Put a ring connect on the other end, and
that will go to your battery. Do not hook it up yet, keep power out of it until it is
finished.
Post #85 on the relay is the same deal, male connect to post #85, add some 12g
wiring and end it with a ring connect. This will go to your battery's negative
terminal, or to a bolt on the body. I would rather go to the terminal, as it is more
direct, but if you wish to ground to the body, make sure the ground is free of
paint and debris.
Finally, post #86 is your signal wire. You can get your signal from different places,
with different results:
- Positive terminal on coils (fan will be on when IGN is on)
- Switch inside of the car (Fan will turn on/off when you wish)
- Back of water pump housing sensor (will turn on after car begins to warm up)
- Electric thermostat for radiator (turns on/off at set temps)
I had my car wired up with the first option, as it was simple. I then wired it up to
the second option, because I like the control
. Strip the end of your 12g wire and add a female connect to it. This will go to your post #86 on the relay. Then
pick an option and run with it!
- Option 1 - End wire with a female connect, and slip on the + tab of one of the
coils. Your fan will now switch on when there is power to the coils, ie IGN or ON. - Option 2 - End your wire with a female spade connect, and run that into the
switch. Make another 12g wire with female connects on both end, and run that
from the other male connect on the switch, to either the + of the coils or the
battery. - Option 3 - On the back of the water pump is a sensor used to control the auto
choke. Tap into that and the fan will turn on when the choke pops out (no
experience on this) - Option 4 - Run an electric thermostat in the radiator. Not sure how to wire this
in, no experience on this either.
I mounted the switch in the cabin, where the choke used to be. Fits perfectly, and
I have it to where the LED (Yes, I have a ricey LED switch) is ON when the fan is
OFF. That way I know to turn the annoying red light OFF turns the fan on. This is
a safety for me. If I didn't have the light there would probably be a few times I
would forget about turning it on.
In order of engine safety, I would go:
- Option 1
- Option 4
- Option 3
- Option 2
Hope this helps people whom wish to do the electric fan conversions!
 Directions for installation. This is a "Hayden" but imagine all are mostly the same.
Trending Topics
02-11-10, 11:42 AM
#9
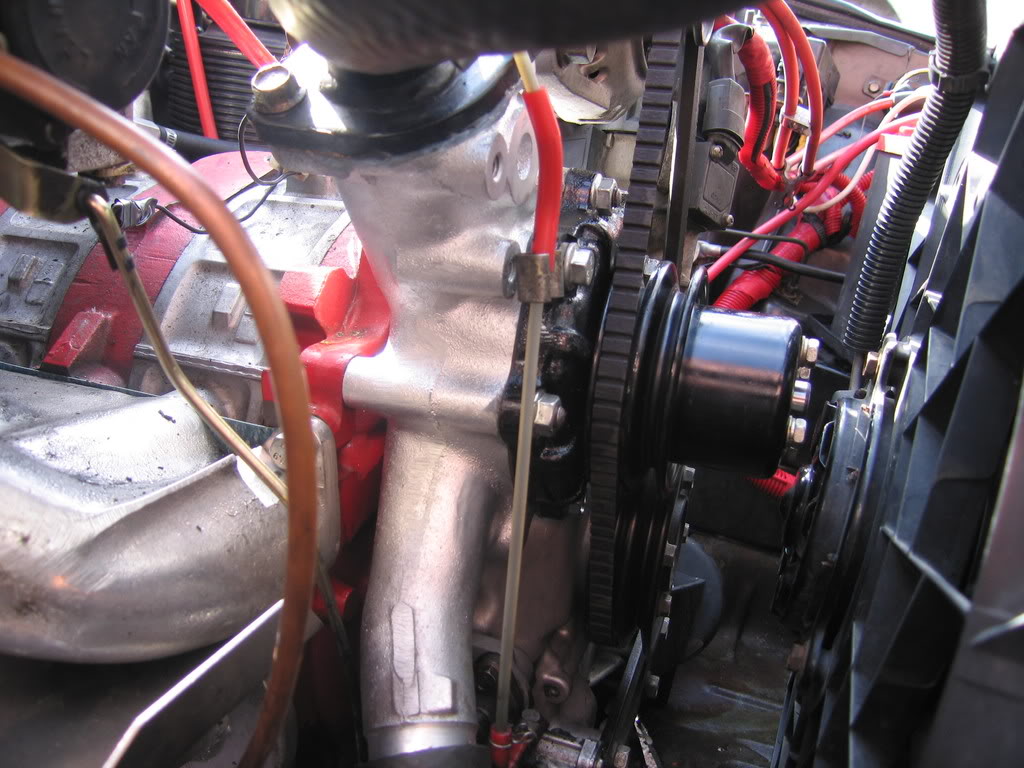
Can you post a picture? I always wondered how they looked with the bigger radiator. I took off the extra pulleys on mine, and I mistook the E-shaft pullys for the water pump pulley. That is where the puller fan was close at.

 02-11-10, 08:09 PM
#11
Senior Member

Join Date: Sep 2008
Location: Seattle, WA
Posts: 622
Likes: 0
Received 0 Likes
on
0 Posts
Also it's possible the 13B motor I have is longer...?
02-12-10, 04:25 PM
#13
I think there are two different fans. One is more narrow. Notice the fan motor Jeezuz has and the one you have. His is longer and mounts on the outside of the shroud. It will fit, but have a lot less clearance and will not fit with A/C. I have one just like that and on my car with a 13B it has like a millimeter of clearance, so I'd have to mount it lower so it clears the water pump. I think these are the earlier fan models.
Also it's possible the 13B motor I have is longer...?
Also it's possible the 13B motor I have is longer...?
You can see how close the fan is in this video. Look about 24 seconds in:
http://www.youtube.com/watch?v=cON1DU_5oDU
02-12-10, 05:16 PM
#14
Could be different types. I ordered mine, while Stu pulled his from a Taurus.
Option #3 for turning the fan on will not work. The sensor has power (to the electro-magnet in the choke switch) until the car warms up, power flow stops and the choke pops in. No power when then car is warm, so fan would only run when the car is cold. Not good
If I understand correctly you flipped the fan around and attached it in front of the radiator with the shroud facing towards the radiator. Doesn't that make the fan push air towards the front of the car instead of the normal direction? Maybe I missed something?
02-12-10, 10:19 PM
#18
Senior Member
Join Date: Sep 2008
Location: Seattle, WA
Posts: 622
Likes: 0
Received 0 Likes
on
0 Posts
Well, both fans are from the 3.8 Taurus and work the same. Maybe newer design is slimmer...?
02-16-10, 04:15 PM
#20
Been here since dirt...
Join Date: Jan 2009
Location: AZ
Posts: 327
Likes: 0
Received 0 Likes
on
0 Posts
Some wiring tips. 85 and 86 don't need the 12GA wire. They only control the coil. Also, did I miss where teh circuit breaker goes in teh system? As close to the battery as possible in the "30" circuit. Also, we have used the 86 and 30 on the battery and then swiched he ground from the cab, eliminating another hot wire going through the dash. Or is you are using a thermal switch, or being driven from an ECM.
One last item, are the spade terminals you're using rated at 30 amps? Been in the business for a while and never saw a 30 amp rated spade push on.
gd
One last item, are the spade terminals you're using rated at 30 amps? Been in the business for a while and never saw a 30 amp rated spade push on.
gd
02-16-10, 07:00 PM
#21
No distributor? No thanks
iTrader: (6)
Join Date: Oct 2003
Location: Outskirts of Road Atlanta
Posts: 3,438
Likes: 0
Received 6 Likes
on
4 Posts
3.0L Taurus engine wasn't as wide, and Ford didn't have to be careful with the packaging. With the 3.8 (transverse) engine, the valve covers crept forward, so the fan had to get thinner. They both have the same footprint. 3.8 fan will just barely clear a GSL-SE engine's front pulley with no AC - JUST BARELY - as a puller.
 02-26-10, 08:36 PM
#23
quick question for you guys, i have been running mine to a toggle switch inside, however there have been a couple of times were i'd forgot to turn it on, and almost overheated my car. so i'm wanting to get a thermostat switch,.
i know some of you recommend the cheap 20 dollar one for autozone/advance but what temperature should i run it at? i've done some reading and its never really been clear some of you run it at about 190 others at 200, what would be a good setting for a car that is a DD and doesn't get much abuse, just occasionally.
i know some of you recommend the cheap 20 dollar one for autozone/advance but what temperature should i run it at? i've done some reading and its never really been clear some of you run it at about 190 others at 200, what would be a good setting for a car that is a DD and doesn't get much abuse, just occasionally.
02-26-10, 08:45 PM
#24
Almost not rotarded
iTrader: (6)
Join Date: Oct 2005
Location: Troy, Missouri
Posts: 961
Likes: 0
Received 0 Likes
on
0 Posts
quick question for you guys, i have been running mine to a toggle switch inside, however there have been a couple of times were i'd forgot to turn it on, and almost overheated my car. so i'm wanting to get a thermostat switch,.
i know some of you recommend the cheap 20 dollar one for autozone/advance but what temperature should i run it at? i've done some reading and its never really been clear some of you run it at about 190 others at 200, what would be a good setting for a car that is a DD and doesn't get much abuse, just occasionally.
i know some of you recommend the cheap 20 dollar one for autozone/advance but what temperature should i run it at? i've done some reading and its never really been clear some of you run it at about 190 others at 200, what would be a good setting for a car that is a DD and doesn't get much abuse, just occasionally.
