
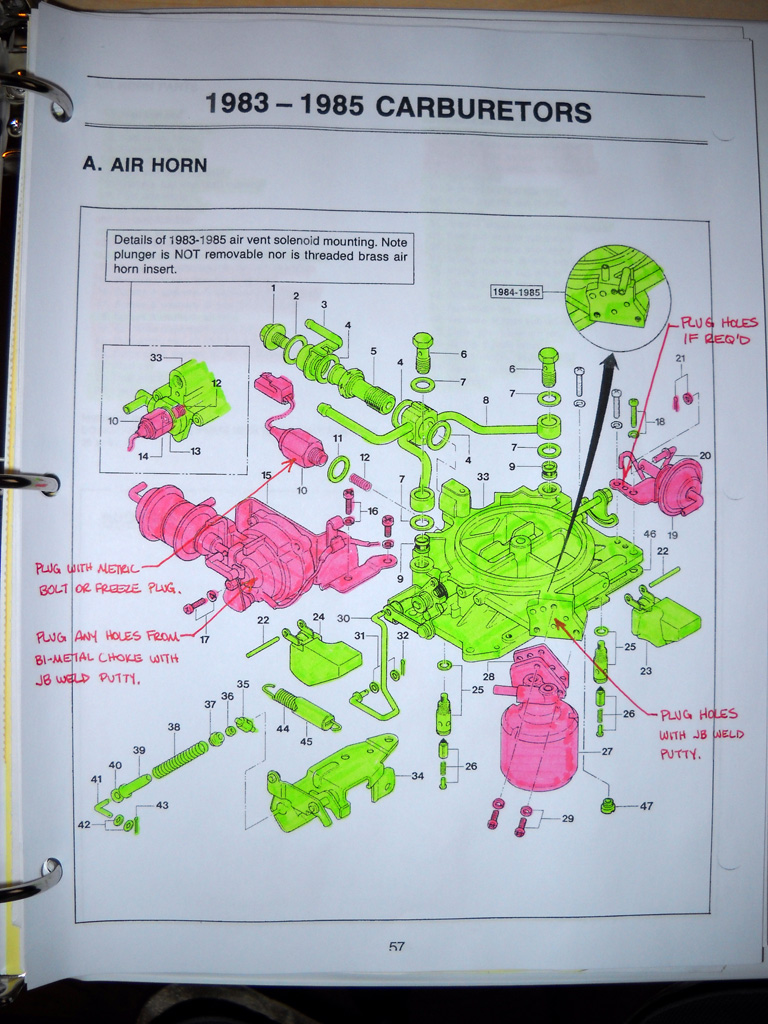
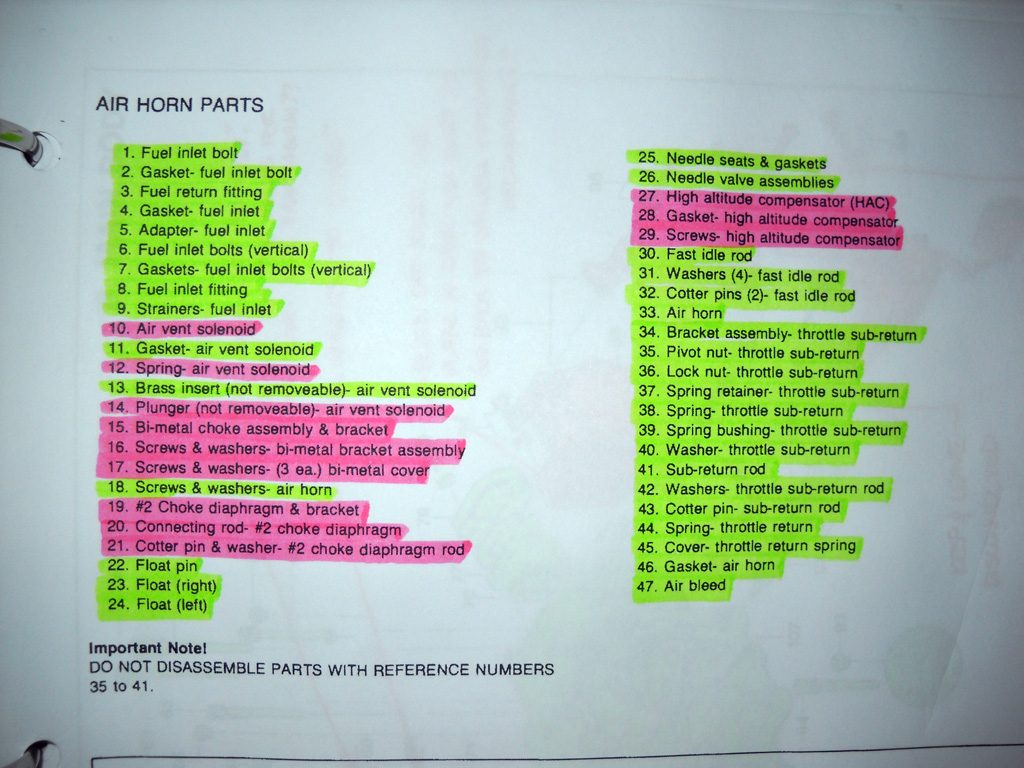
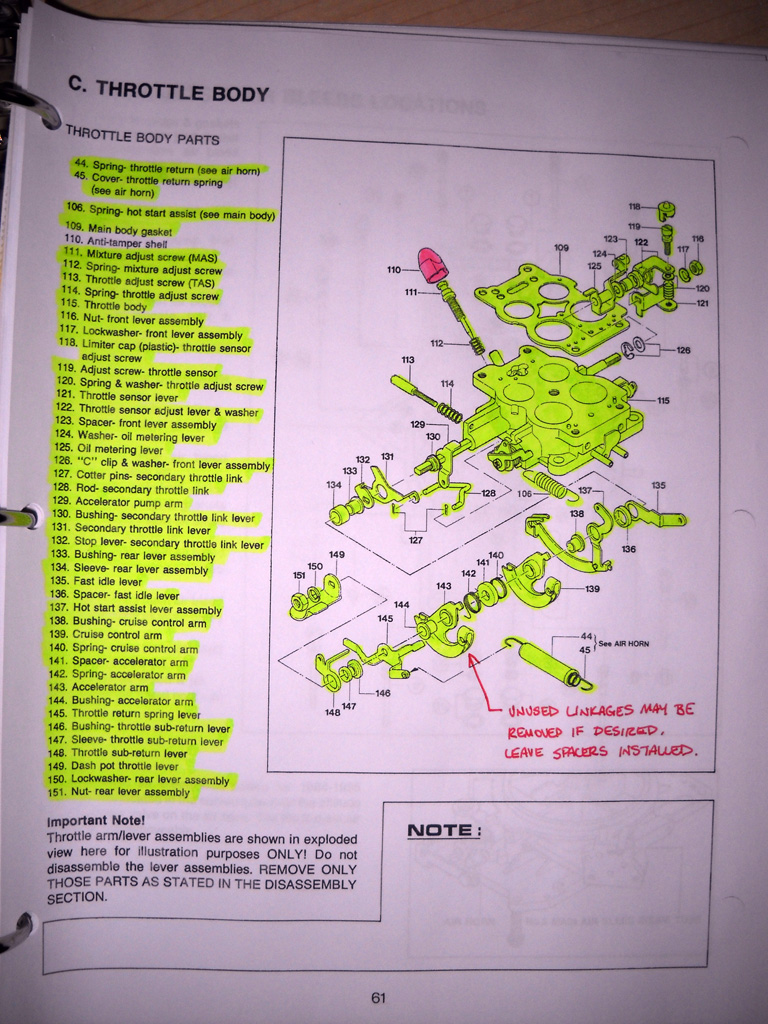
How To: Strip Down A Nikki Carb

How To: Strip Down A Nikki Carb
Hey guys,
I noticed that the diagrams I uploaded a long time ago are now missing from the archives. Several people have been asking me for them, so I thought it would be best to upload them again. I think I cleaned out my Flickr account and they got lost in the process.

Good luck fellas!
Jamie
I noticed that the diagrams I uploaded a long time ago are now missing from the archives. Several people have been asking me for them, so I thought it would be best to upload them again. I think I cleaned out my Flickr account and they got lost in the process.
Good luck fellas!
Jamie
By the way, for those of you guys wanting to go to mechanical secondaries, I believe that you want to wire together linkage parts #131 and #132. It has been a while, so if I am mistaken someone please correct me, but I believe that is what you need to wire together. I always take a couple of bread twist-ties and burn the paper off them with a lighter. After the paper is burnt off of them, twist 2-4 of them together for added strength. Then use it to wire up the linkages for the mechanical secondaries. Make sure you get the wire VERY tight. You don't want any slop in it. I recommend using two pairs of needle nose pliers to keep the wire pulled tight.
Jamie
Jamie

Senior Member
Joined: Nov 2009
Posts: 346
Likes: 3
From: Australia
Looks good. There are a few other things I would remove.
- Bracket #104
- Remove the screws on the choke butterfly and pull it out along with the shaft. Then plug up the holes in the air horn. If you want to retain the fast idle, the rod #30 needs to be bent so that it rests in the correct position. Perhaps a pic is easiest.

The two tabs that need to be wired together for mech secondaries are not numbered but the rod #128 threads through one of them. They are on the secondary throttle shaft side of things.
I would also bend lever #131 so that it is straight, and re-drill the hole for rod #128 closer to the throttle shaft. I'll try and get a better pic, you can sort of see it in the one above. The rod then needs to be bent to time the progression properly so that both throttles are fully open at the same time. The effect of this is to open the secondaries earlier.
P.S. I haven't seen the AP nozzles modded like that, I might have to give it a try. End result being a richer acceleration mixture I'm guessing. Would be useful when extending the AP arm like with Sterling's mod.
- Bracket #104
- Remove the screws on the choke butterfly and pull it out along with the shaft. Then plug up the holes in the air horn. If you want to retain the fast idle, the rod #30 needs to be bent so that it rests in the correct position. Perhaps a pic is easiest.
By the way, for those of you guys wanting to go to mechanical secondaries, I believe that you want to wire together linkage parts #131 and #132. It has been a while, so if I am mistaken someone please correct me, but I believe that is what you need to wire together. I always take a couple of bread twist-ties and burn the paper off them with a lighter. After the paper is burnt off of them, twist 2-4 of them together for added strength. Then use it to wire up the linkages for the mechanical secondaries. Make sure you get the wire VERY tight. You don't want any slop in it. I recommend using two pairs of needle nose pliers to keep the wire pulled tight.
Jamie
Jamie
I would also bend lever #131 so that it is straight, and re-drill the hole for rod #128 closer to the throttle shaft. I'll try and get a better pic, you can sort of see it in the one above. The rod then needs to be bent to time the progression properly so that both throttles are fully open at the same time. The effect of this is to open the secondaries earlier.
P.S. I haven't seen the AP nozzles modded like that, I might have to give it a try. End result being a richer acceleration mixture I'm guessing. Would be useful when extending the AP arm like with Sterling's mod.
Hey guys,
Instead of making a new thread I thought I would just ask a few questions in here. I currently have a Yaw Modified carb on my 79. It is an 83 carb from my 83 LE that I had years ago. It was working great up until a month or so ago. I thought initially it was a vacuum leak that was causing the car not to idle. I messed around with looking for this vacuum leak,and found nothing. This past weekend I took the carb off,and popped the top off of it to find a bunch of whiteish/tan debris in the bottom of the float bowls. It was completely clogging up the hole in the bottom that I believe runs the idle circuit. I have cleaned everything up real well,but I plan to do more today before trying to get it back on the car.
Where do those holes in the bottom of the bowls lead to? Are they routed to under the throttle plates in the lower cast iron part of the carb. How can I be sure I have that part all cleaned up as the holes in the bowl were pretty nasty looking,and I can only imagine it was deeper than I can see. Also Why does Sterling reccomend two gaskets on the accelerator pump? Could I do this on my Yaw carb? Also way back when I bought the carb Yaw had instructions online for tuning the carb with the provided jets. I never did do this as the car ran really well with the carb right out of the box. Also I had misplaced the spare jets for a long time,but a few months ago I found them again.
Can you guys tell me the proper way to go about tuning the engine with the different jets(Yaw's site is down for repairs)? I was looking at them last night,and they have 60,58,56,and 54 stamped on them(maybe I am wrong about a few of those numbers,but I know the 60 is right for sure). I don't know what they mean but it would seem the larger the number the bigger the jet size. The jet sizes in the carb now are 59 primary,and 57 secondary.
The engine is a recenly rebuilt(500 miles ago) stock port 79 12A with a full racing beat streetport exhaust system,83 ignition,and the stock 79 intake manifold. No vacuum advance right now,but I plan on hooking it back up in the enar future.Would you reccomend me playing with the jet size on only the primary side first,or both sides? Is there an easy way to change the jets with the carb on the engine still? Is mechanical secondaries really the best way to go,as my Yaw still uses vacuum actuated secondaries? Where is a good starting point with regard to the idle mixture screw? I ask because when trying to figure out why It wasn't idling my brother-in-law messed with that screw some,and the throttle plate stop screw,so they settings may be off(likely).
Thanks in advance,
Chris
Senior Member
Joined: Nov 2009
Posts: 346
Likes: 3
From: Australia
Hey guys,
Instead of making a new thread I thought I would just ask a few questions in here. I currently have a Yaw Modified carb on my 79. It is an 83 carb from my 83 LE that I had years ago. It was working great up until a month or so ago. I thought initially it was a vacuum leak that was causing the car not to idle. I messed around with looking for this vacuum leak,and found nothing. This past weekend I took the carb off,and popped the top off of it to find a bunch of whiteish/tan debris in the bottom of the float bowls. It was completely clogging up the hole in the bottom that I believe runs the idle circuit. I have cleaned everything up real well,but I plan to do more today before trying to get it back on the car.
Where do those holes in the bottom of the bowls lead to? Are they routed to under the throttle plates in the lower cast iron part of the carb. How can I be sure I have that part all cleaned up as the holes in the bowl were pretty nasty looking,and I can only imagine it was deeper than I can see. Also Why does Sterling reccomend two gaskets on the accelerator pump? Could I do this on my Yaw carb? Also way back when I bought the carb Yaw had instructions online for tuning the carb with the provided jets. I never did do this as the car ran really well with the carb right out of the box. Also I had misplaced the spare jets for a long time,but a few months ago I found them again.
Can you guys tell me the proper way to go about tuning the engine with the different jets(Yaw's site is down for repairs)? I was looking at them last night,and they have 60,58,56,and 54 stamped on them(maybe I am wrong about a few of those numbers,but I know the 60 is right for sure). I don't know what they mean but it would seem the larger the number the bigger the jet size. The jet sizes in the carb now are 59 primary,and 57 secondary.
The engine is a recenly rebuilt(500 miles ago) stock port 79 12A with a full racing beat streetport exhaust system,83 ignition,and the stock 79 intake manifold. No vacuum advance right now,but I plan on hooking it back up in the enar future.Would you reccomend me playing with the jet size on only the primary side first,or both sides? Is there an easy way to change the jets with the carb on the engine still? Is mechanical secondaries really the best way to go,as my Yaw still uses vacuum actuated secondaries? Where is a good starting point with regard to the idle mixture screw? I ask because when trying to figure out why It wasn't idling my brother-in-law messed with that screw some,and the throttle plate stop screw,so they settings may be off(likely).
Thanks in advance,
Chris
Instead of making a new thread I thought I would just ask a few questions in here. I currently have a Yaw Modified carb on my 79. It is an 83 carb from my 83 LE that I had years ago. It was working great up until a month or so ago. I thought initially it was a vacuum leak that was causing the car not to idle. I messed around with looking for this vacuum leak,and found nothing. This past weekend I took the carb off,and popped the top off of it to find a bunch of whiteish/tan debris in the bottom of the float bowls. It was completely clogging up the hole in the bottom that I believe runs the idle circuit. I have cleaned everything up real well,but I plan to do more today before trying to get it back on the car.
Where do those holes in the bottom of the bowls lead to? Are they routed to under the throttle plates in the lower cast iron part of the carb. How can I be sure I have that part all cleaned up as the holes in the bowl were pretty nasty looking,and I can only imagine it was deeper than I can see. Also Why does Sterling reccomend two gaskets on the accelerator pump? Could I do this on my Yaw carb? Also way back when I bought the carb Yaw had instructions online for tuning the carb with the provided jets. I never did do this as the car ran really well with the carb right out of the box. Also I had misplaced the spare jets for a long time,but a few months ago I found them again.
Can you guys tell me the proper way to go about tuning the engine with the different jets(Yaw's site is down for repairs)? I was looking at them last night,and they have 60,58,56,and 54 stamped on them(maybe I am wrong about a few of those numbers,but I know the 60 is right for sure). I don't know what they mean but it would seem the larger the number the bigger the jet size. The jet sizes in the carb now are 59 primary,and 57 secondary.
The engine is a recenly rebuilt(500 miles ago) stock port 79 12A with a full racing beat streetport exhaust system,83 ignition,and the stock 79 intake manifold. No vacuum advance right now,but I plan on hooking it back up in the enar future.Would you reccomend me playing with the jet size on only the primary side first,or both sides? Is there an easy way to change the jets with the carb on the engine still? Is mechanical secondaries really the best way to go,as my Yaw still uses vacuum actuated secondaries? Where is a good starting point with regard to the idle mixture screw? I ask because when trying to figure out why It wasn't idling my brother-in-law messed with that screw some,and the throttle plate stop screw,so they settings may be off(likely).
Thanks in advance,
Chris
 hehe
heheAt the bottom of the float bowls are the two jets for primary and secondary. Below the jets is the passage for the power valve circuit. Not all models of Nikki used a power valve, so it is usually just a blank little hole that goes nowhere. On some models, the hole is threaded and includes a small orifice on the side for fuel to go through into the primary fuel circuit. If this is the case it needs to be blocked off, which may be what the gunk you are referring to is for.
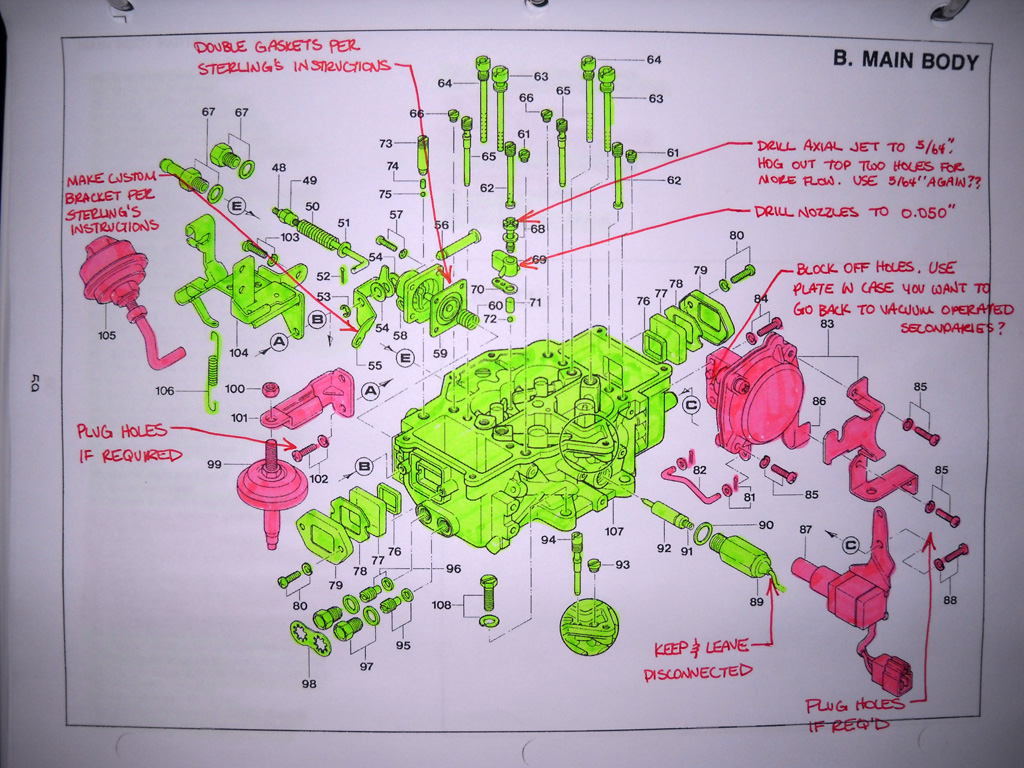
The gaskets on the Accelerator Pump are to increase the stroke of the diaphragm, as the metal on both sides restricts it. This gives you a longer pump shot, e.g. more fuel. The metal that restricts the diaphragm can also be removed as an alternative way of increasing the AP stroke (this may be already done on the Yaw carb in which case it would be useless to add gaskets). Personally I wouldn't bother unless you are converting to mech secondaries.
Those jets sound massive for the primaries but I don't know much about those carbs so it might work well. The numbers would be 100ths of an inch. Sterling's site should be helpful with tuning http://www.sterlingmetalworks.com/tuning_the_nikki.htm
There is good info on Sterling's site about idle tuning as well.
As for mechanical secondaries it's a matter of personal preference. Vac secondaries are easier to drive, since you can just floor it and get a smooth transition with no bog. Mechanical secondaries require a bit more fine footwork to get the car accelerating smoothly to WOT.

Well if these holes down at the base of the bowl are not for the idle circuit then why do you think the car wouldn't idle. There was a significant amount of crud built up in them,and no it was meant to be there I am sure of it.
The car ran rather well aside from the no idel problem,but I am sure it coule run better. I may do the mechanical secondaries. It looks like it is pretty simple,but maybe I am missing something. Is it as easy as wiring the linkages together? If so what do you reccomend to use for the wire to do this?
Thanks for your help so far.
Trending Topics
Wrkn Toyota, Rootn Wankel
Joined: Sep 2007
Posts: 1,642
Likes: 1
From: "Haystack" Hayward, CA
Damn good job there GlazedHam! Loving the go no go colors... but I have to admit that I was a bit disappointed, I thought we were talking about stripping Nikki... was expecting talk of tequila and limes. Still, brilliant write-up!
Well if these holes down at the base of the bowl are not for the idle circuit then why do you think the car wouldn't idle. There was a significant amount of crud built up in them,and no it was meant to be there I am sure of it.
The car ran rather well aside from the no idel problem,but I am sure it coule run better. I may do the mechanical secondaries. It looks like it is pretty simple,but maybe I am missing something. Is it as easy as wiring the linkages together? If so what do you reccomend to use for the wire to do this?
Thanks for your help so far.
The car ran rather well aside from the no idel problem,but I am sure it coule run better. I may do the mechanical secondaries. It looks like it is pretty simple,but maybe I am missing something. Is it as easy as wiring the linkages together? If so what do you reccomend to use for the wire to do this?
Thanks for your help so far.
2) If you do the mechanical secondaries you need to do the accelerator pump (AP) modification too. Otherwise, when you stomp on the pedal the car is going to bog down. By doing the AP mod, you are giving the car an extra shot of fuel when you stomp the pedal and open up the secondaries. This greatly reduces the bogging of the carb.
Jamie
Also, I forgot to mention one other thing about the mechanical secondaries mod. The best wire that I have found to use is garbage bag wire ties, or bread wire ties. Take 3-4 of them and burn the paper off with a lighter. Then braid/twist them together for added strength. One wire tie won't be strong enough to do the job, so that is why I twist 3-4 of them together. If you do that it's PERFECT. It is strong, yet small and bendable, so you can really get the wire on TIGHT. The key to the wiring up the secondaries is making sure that you get all the slop out of the wire when you wire the linkages together. Use two pairs of needle nose pliers to keep the wire tight. Then after you get it twisted together, clip off the excess with some wire cutters.
Jamie
Jamie
I am rebuilding the whole carb. I have pulled out all the emulsion tubes,jets etc one ata time,and cleaned them,and their passages with carb cleaner.Actually I am 90% done with it now. I have used one,and a half cans of carb cleaner so far,with more to come I bet. I was asking about that crud,and the idle circuit just because I was to make sure it get it plenty clean while I have it all apart. Where do the holes on the bottom of the bowls go to circuit wise? How much air pressure should I use when cleaning the carb up? I ask because I don't want to use too much and blow something out. I have rebuilt carbs in teh past,but never with air pressure,just carb cleaner sparying,and soaking of small parts.
Thansk for your help so far.
Thansk for your help so far.
Also, I forgot to mention one other thing about the mechanical secondaries mod. The best wire that I have found to use is garbage bag wire ties, or bread wire ties. Take 3-4 of them and burn the paper off with a lighter. Then braid/twist them together for added strength. One wire tie won't be strong enough to do the job, so that is why I twist 3-4 of them together. If you do that it's PERFECT. It is strong, yet small and bendable, so you can really get the wire on TIGHT. The key to the wiring up the secondaries is making sure that you get all the slop out of the wire when you wire the linkages together. Use two pairs of needle nose pliers to keep the wire tight. Then after you get it twisted together, clip off the excess with some wire cutters.
Jamie
Jamie
I took a picture of it and upped it to this forum a few years ago. You'll probably be able to find it if you search.
Lives on the Forum
Joined: Jun 2004
Posts: 11,359
Likes: 14
From: Grand Rapids Michigan
Nice work Hammy!
Just a quick note on the mech secondaries:
1. I used a paperclip when I did this with my old carb. Worked great.
2. You have to make sure that it is adjusted properly when you install the wire.
You do this by watching how it operates while you work the throttle.
You want to make sure that the secondaries are fully open at wide
open throttle, so adjust the tightness of the wire accordingly.
.
Senior Member
Joined: Nov 2009
Posts: 346
Likes: 3
From: Australia
If you have a blower nozzle and an air compressor, stick then end of the nozzle in the hole and let it rip. You'll feel the air coming out of wherever the circuit leads terminates. That's how I troubleshoot the endless ports and holes on the Nikki carb. If you don't feel air coming out, then there's a possibility that they are just blank holes that don't lead anywhere, like Oneiros said above. Hit it with 40-50 psi of compressed air and see what you get...
Senior Member
Joined: Nov 2009
Posts: 346
Likes: 3
From: Australia
A diagram is going to be more help than any description, download the carby manual on foxed.ca which has illustrations


Junior Member
Joined: Aug 2013
Posts: 23
Likes: 0
From: Arcata, CA
82 gsl carb
I have pulled a spare carb and intake from an 82 gsl automatic. I would like to rebuild this and port match the intake and drop this all on my daily driver, an 84 gs stick. Does anyone know if there are any differences in the intake or carb between the two years and transmission types??
Senior Member
Joined: Apr 2007
Posts: 308
Likes: 4
From: WA state
I have pulled a spare carb and intake from an 82 gsl automatic. I would like to rebuild this and port match the intake and drop this all on my daily driver, an 84 gs stick. Does anyone know if there are any differences in the intake or carb between the two years and transmission types??