
How To: RX8 seats into FB

How To: RX8 seats into FB
OK rotorheads - a detailed account of how I adapted RX8 seats into my 1980 RX7 SA. I know this will be valid info for any FBs, and I understand FCs also have the FB seat mounting pattern, but confirm this yourself.
Basically, RX8 seats are the same size and shape as the 7, but the mounting brackets are totally different, not the least of which the -8 brackets mount points make the seat sit way too high in a -7. A sample pix attached show the RX8 bracketry, which is complex to say the least. In contrast, the -7 seat brackets are about as simple a design as you could want, so why screw with simplicity? To me the obvious course was: attach the -7 brackets to the -8 seat rails.
My approach includes completely disassembling the RX8 seat to have the adapters welded on. I had a shop do this and there was NO way I was going to risk the seat cushions getting damaged. So I have gone into some detail about disassembling the seat. In a nutshell, what I did was shave off the RX-8 brackets off the RX8 seat rails and weld an adapter plate to the bottom of each rail, then welded the -7 brackets - at the correct spacing - onto the adapter plates. This means you still have complete slide adjustment of the RX8 seat on it own rails. (And since rails and frame are assembled as a unit, there is no option of removing the rails from the RX8 frame anyway). See the diagram of the basic layout.
NOTE: while I include measurements, I strongly urge you to DOUBLE check these yourself!! If you intend to farm the welding out, you will want a very accurate drawing of just what you want them to do - or they WILL screw it up!
Okee-doke.
Lets get going:
RX8 Seat Disassembly: (note this is the BASE, none-powered seat type)
I recommend that some steps be photographed so you remember how things re-attach later!
(This is for the DRIVER seat, but most instructions apply to the passenger side too)
1) remove (cut) the various underseat wire harnesses and the seat belt assy. This will NOT work with your -7 belt.
2) 3 of the 4 RX8 rails have plastic end caps on them. These need to be removed unless you want the welding to do it for you . Reattach on seat reassembling.
3) Inner (transmission side) seat frame plastic trim panel. These are 2 piece, sandwiched together. There is one small phillips screw, the rest being held together by the damndest plastic clips I have ever run into. There are about 5 of these little bastids and I cannot honestly tell you the best method of detaching them. I tried using a small flat-blade screwdriver and finally I just gritted my teeth and pulled the 2 halves apart! NOTE you cannot fully remove the INNER halves until the seat cushions are removed
4) Outer (door-side) trim panels. The seat tilt lever cover comes off first. More or less a press-fit onto the shaft. For the Driver�s seat you also have a lever for height-adjustment. The outer cover must first be pried off the center, round part of the cover and then the whole cover slides FORWARD off the adjustment arm. It looks like the INside of the cover on the arm portion comes off - IT DOESN�T. It stays on the arm.
The outer frame cover is held by TWO phillips as well as TWO push-in clips, and the usual @#$% clips I described above. You cannot see the two push-in style clips, they are inside the panel and plug directly into the frame, but a firm tug seems to pull these out clean. They are towards the front of the seat and if you can reach up under the rail on the INside of the frame, you should get an idea where they are so you can apply pulling pressure right near them and not stress the panel.
NOTE: all these trim pieces have the PART NUMBER inside them, so if you really bugger one up, you can easily (though I doubt cheaply!) replace them.
5) Seat back:
Note the hand zippers on each side of the rear. undo these. You�ll see that the rear fabric panel is attached to the FRONT panel with an interlocking clip on each panel that runs the width of the rear bottom. These separate easily BUT NOTE HOW THEY CONNECT! or you�ll be scratching your head later trying to figure it out.
With the fabric panels disconnected you can flip the rear panel up to the headrest, out of the way. Now the back itself. Cut the zip tie that holds the 2 horizontal bars (one is attached to the seat back, one is the seat frame cross-rail) together inside the bottom of the seat back. The back is held on by 2 14mm nuts on each side. Just lift the side panels and padding. Its a tight fit so I recommend a 14mm geared box wrench as the best tool.
Then feed the front panel flap under the horizontal frame rail. The seat back is free.
6) Seat Bottom: 4 12mm bolts.
7) Inner rail trim panels can now be removed
8) the REAR of the seat frames are now �free� from each side and the horizontal bar will just fall out because the rear rails aren�t bound together. I used zip ties daisy-chained together to hold the rear of the frames. Also, you have now exposed a LOT of gears and springs that require lubrication to operate for the life of the seat. If these mechanized areas of the rails are not protected, you will have a nightmare of metal shavings and grit all over them from the bracket-cutting and welding process. I wrapped them in zip-lock freezer bags and heavy packing tape.
RX-7 rails:
This is important. What you want to use is the LOWER part of the rail assemblies to be welded to the RX8 seats. As the RX7 rails are configured after you unbolt them from your old SA/FB seats, they are comprised of TWO components crimped together, the upper assy (part that bolts to the RX7 seat) and the LOWER assy, the part that bolts to the FLOOR. So the upper assy must be cut off the lower assy. Your weld shop can do it in seconds BUT THEY NEED TO ABSOLUTELY KNOW WHICH ONE CAN BE CUT. Ask me how I know this.... ;p This is especially important with the passenger INNER rail because it is unique and its configuration can be confusing. I marked an �X� on the sections to be CUT when I took them to the welder (and they still messed one up!).
Once disassembled, I took the bottom rails to a shop to get them beadblasted clean, since I painted the whole adapter assembly once everything was welded together. You will NEVER get them clean enough to paint once they have been welded to the RX8 frame. In hindsite I would have then (after the beadblast) painted the INSIDES of the RX7 rails because these are all but inaccessible once welded to the RX8 frame. Bear in mind with any painting you do prior to welding, contact areas of paint will be cooked off with the welding. Plus, those parts of the RX7 rails that mate to the adapter shouldn�t have paint on them anyway for a clean weld.
Final Note: I suggest you get the driver seat welding job done at a separate TIME from the passenger side - why? so there is no chance the welder will MIX UP THE RX7 RAILS as to which set goes to which seat!!!!!
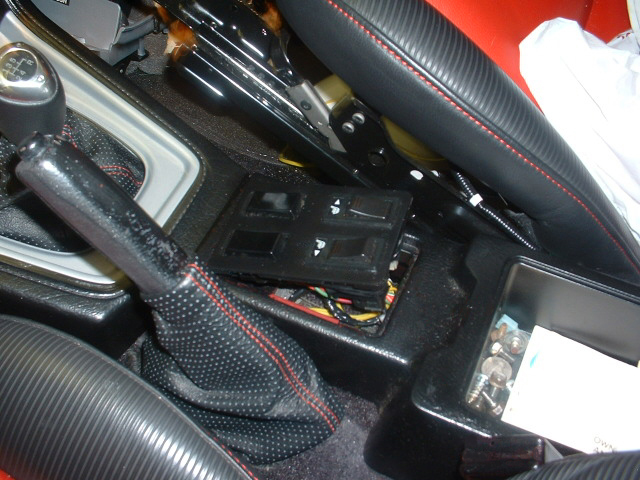
CUTTING THE RX8 FRAME:
In addition to the plastic wrap of the lubed parts, I wrapped the entire frame in that 2� or 3�-wide blue paint masking tape so it wouldn�t get all chipped and scratched up in the shop. Just don't mask too close down tot he weld areas, since the baked tape is tough to remove...
My first thought was to have the weld shop grind off the various brackets right down FLUSH to the bottoms of the RX8 rails. Logic said this would give me a nice flat platform to mount the adapter plate to. The weld shop pointed out that grinding is (a) very messy and (b) not an exact science. The easier thing was CUT off the brackets at THEIR base, leaving the flat base still attached to the rail. To go the extra step of grinding the thin base down to the rail would generate a LOT of fine grit (that would get into all the nice, lubed gears of the frame�s adjustment systems), and likely it would mean grinding thru the bracket base AND thru the rail underneath at some points (see (b) above). And there is enough surface area of bracket bases to mount the adapter plate on without going right down to the rail. And its cheaper �cause its less work...
THE ADAPTER PLATE:
Bone simple. Flat piece of 1/4� steel on each rail.
NOTE: the RX8 rails are about 1� wider apart than the RX7. I mounted the INNER (transmission-side) rail DIRECTLY under the RX8 rail, doing the width correction on the OUTSIDE rail (door side)! Why? Because centering the RX7 rails relative to the RX8 rails forces the INNER RX8 rail too close (like INto the carpet) against the TX tunnel. Again, ask me how I found this out....
I was concerned this would throw the seat center off 1� relative to the steering wheel while I am sitting; reality: no noticeable difference!
Length: The adapters need only to be as long as the RX7 rail: 13+ inches.
Width: The INNER rail can be 1+� wide (enough to accommodate the width of the RX7 rail), while the OUTER adapter needs to be 2+� wide, since the RX7 rail is offset to the INSIDE of the RX8 rail. Follow? (see photos)
NOTE: the adapter plates -and then the RX7 rails - should be welded to the FORWARD ends of the RX8 rails (unless your really height-challenged) so you have maximum legroom!
THE WELDING:
-Measurements:
THE critical measurement is the SIDE-to-SIDE SPACE BETWEEN THE HOLES of the RX7 Rails (ie distance across, between the front rails holes, ditto the rear). The BEST place to measure this distance (15 3/8� but DON�T take my word for it!) is the MOUNTING HOLES on the FLOOR of the RX7!!!!!!! Hole center-to-hole center
-Again, make sure the welder is clear about which RX7 rails go where, and in the case of the passenger INNER rail, which end is FRONT!!!!!! Simple clear diagrams are a must unless you are going to be there!
I state the obvious but: the welder needs to understand that the position of the RX7 rail pairs need to match, side-to-side (ie the leading edges are in the same forward position relative to each other). This is trickier with the passenger seat because of its funky front mount point!!
-when you take the RX8 frame to the shop, MAKE SURE THE RX8 SEAT RAILS ARE POSITIONED ALL THE WAY TO THE FRONT OF THE FRAME!! (This would be the position for maximum leg room) Why? Because in the welding process, the heat will likely cook off some/all of the lube in the rail channels, or worse even bind up the slides a bit. When I got mine back there was only about 3� of slide motion in the rails. They would NOT slide all the way up to the original �short-legs� position. No problem for 6 foot me. (I did try to re-lube them, but it�s pretty well sealed up and you can only access the very front and back of the slide channels.)
Back from the shop? Now is the time to mount the empty frame into the RX7 to check for fit. Because the rails are tied together in so flimsy a fashion, don�t try to hard to slide them back and forth on the rails. Too much play. You may note at this point that it will be a bit of a grunt to get at the rear mount bolts...
Paint Frame and rails (adapter and exposed welds will rust otherwise). I used hand-applied POR15 gloss black followed by a spray of Black gloss metal paint.
Re-assemble seat. You took pictures, right?
Enjoy...
Basically, RX8 seats are the same size and shape as the 7, but the mounting brackets are totally different, not the least of which the -8 brackets mount points make the seat sit way too high in a -7. A sample pix attached show the RX8 bracketry, which is complex to say the least. In contrast, the -7 seat brackets are about as simple a design as you could want, so why screw with simplicity? To me the obvious course was: attach the -7 brackets to the -8 seat rails.
My approach includes completely disassembling the RX8 seat to have the adapters welded on. I had a shop do this and there was NO way I was going to risk the seat cushions getting damaged. So I have gone into some detail about disassembling the seat. In a nutshell, what I did was shave off the RX-8 brackets off the RX8 seat rails and weld an adapter plate to the bottom of each rail, then welded the -7 brackets - at the correct spacing - onto the adapter plates. This means you still have complete slide adjustment of the RX8 seat on it own rails. (And since rails and frame are assembled as a unit, there is no option of removing the rails from the RX8 frame anyway). See the diagram of the basic layout.
NOTE: while I include measurements, I strongly urge you to DOUBLE check these yourself!! If you intend to farm the welding out, you will want a very accurate drawing of just what you want them to do - or they WILL screw it up!
Okee-doke.
Lets get going:
RX8 Seat Disassembly: (note this is the BASE, none-powered seat type)
I recommend that some steps be photographed so you remember how things re-attach later!
(This is for the DRIVER seat, but most instructions apply to the passenger side too)
1) remove (cut) the various underseat wire harnesses and the seat belt assy. This will NOT work with your -7 belt.
2) 3 of the 4 RX8 rails have plastic end caps on them. These need to be removed unless you want the welding to do it for you
. Reattach on seat reassembling.3) Inner (transmission side) seat frame plastic trim panel. These are 2 piece, sandwiched together. There is one small phillips screw, the rest being held together by the damndest plastic clips I have ever run into. There are about 5 of these little bastids and I cannot honestly tell you the best method of detaching them. I tried using a small flat-blade screwdriver and finally I just gritted my teeth and pulled the 2 halves apart! NOTE you cannot fully remove the INNER halves until the seat cushions are removed
4) Outer (door-side) trim panels. The seat tilt lever cover comes off first. More or less a press-fit onto the shaft. For the Driver�s seat you also have a lever for height-adjustment. The outer cover must first be pried off the center, round part of the cover and then the whole cover slides FORWARD off the adjustment arm. It looks like the INside of the cover on the arm portion comes off - IT DOESN�T. It stays on the arm.
The outer frame cover is held by TWO phillips as well as TWO push-in clips, and the usual @#$% clips I described above. You cannot see the two push-in style clips, they are inside the panel and plug directly into the frame, but a firm tug seems to pull these out clean. They are towards the front of the seat and if you can reach up under the rail on the INside of the frame, you should get an idea where they are so you can apply pulling pressure right near them and not stress the panel.
NOTE: all these trim pieces have the PART NUMBER inside them, so if you really bugger one up, you can easily (though I doubt cheaply!) replace them.
5) Seat back:
Note the hand zippers on each side of the rear. undo these. You�ll see that the rear fabric panel is attached to the FRONT panel with an interlocking clip on each panel that runs the width of the rear bottom. These separate easily BUT NOTE HOW THEY CONNECT! or you�ll be scratching your head later trying to figure it out.
With the fabric panels disconnected you can flip the rear panel up to the headrest, out of the way. Now the back itself. Cut the zip tie that holds the 2 horizontal bars (one is attached to the seat back, one is the seat frame cross-rail) together inside the bottom of the seat back. The back is held on by 2 14mm nuts on each side. Just lift the side panels and padding. Its a tight fit so I recommend a 14mm geared box wrench as the best tool.
Then feed the front panel flap under the horizontal frame rail. The seat back is free.
6) Seat Bottom: 4 12mm bolts.
7) Inner rail trim panels can now be removed
8) the REAR of the seat frames are now �free� from each side and the horizontal bar will just fall out because the rear rails aren�t bound together. I used zip ties daisy-chained together to hold the rear of the frames. Also, you have now exposed a LOT of gears and springs that require lubrication to operate for the life of the seat. If these mechanized areas of the rails are not protected, you will have a nightmare of metal shavings and grit all over them from the bracket-cutting and welding process. I wrapped them in zip-lock freezer bags and heavy packing tape.
RX-7 rails:
This is important. What you want to use is the LOWER part of the rail assemblies to be welded to the RX8 seats. As the RX7 rails are configured after you unbolt them from your old SA/FB seats, they are comprised of TWO components crimped together, the upper assy (part that bolts to the RX7 seat) and the LOWER assy, the part that bolts to the FLOOR. So the upper assy must be cut off the lower assy. Your weld shop can do it in seconds BUT THEY NEED TO ABSOLUTELY KNOW WHICH ONE CAN BE CUT. Ask me how I know this.... ;p This is especially important with the passenger INNER rail because it is unique and its configuration can be confusing. I marked an �X� on the sections to be CUT when I took them to the welder (and they still messed one up!).
Once disassembled, I took the bottom rails to a shop to get them beadblasted clean, since I painted the whole adapter assembly once everything was welded together. You will NEVER get them clean enough to paint once they have been welded to the RX8 frame. In hindsite I would have then (after the beadblast) painted the INSIDES of the RX7 rails because these are all but inaccessible once welded to the RX8 frame. Bear in mind with any painting you do prior to welding, contact areas of paint will be cooked off with the welding. Plus, those parts of the RX7 rails that mate to the adapter shouldn�t have paint on them anyway for a clean weld.
Final Note: I suggest you get the driver seat welding job done at a separate TIME from the passenger side - why? so there is no chance the welder will MIX UP THE RX7 RAILS as to which set goes to which seat!!!!!
CUTTING THE RX8 FRAME:
In addition to the plastic wrap of the lubed parts, I wrapped the entire frame in that 2� or 3�-wide blue paint masking tape so it wouldn�t get all chipped and scratched up in the shop. Just don't mask too close down tot he weld areas, since the baked tape is tough to remove...
My first thought was to have the weld shop grind off the various brackets right down FLUSH to the bottoms of the RX8 rails. Logic said this would give me a nice flat platform to mount the adapter plate to. The weld shop pointed out that grinding is (a) very messy and (b) not an exact science. The easier thing was CUT off the brackets at THEIR base, leaving the flat base still attached to the rail. To go the extra step of grinding the thin base down to the rail would generate a LOT of fine grit (that would get into all the nice, lubed gears of the frame�s adjustment systems), and likely it would mean grinding thru the bracket base AND thru the rail underneath at some points (see (b) above). And there is enough surface area of bracket bases to mount the adapter plate on without going right down to the rail. And its cheaper �cause its less work...
THE ADAPTER PLATE:
Bone simple. Flat piece of 1/4� steel on each rail.
NOTE: the RX8 rails are about 1� wider apart than the RX7. I mounted the INNER (transmission-side) rail DIRECTLY under the RX8 rail, doing the width correction on the OUTSIDE rail (door side)! Why? Because centering the RX7 rails relative to the RX8 rails forces the INNER RX8 rail too close (like INto the carpet) against the TX tunnel. Again, ask me how I found this out....
I was concerned this would throw the seat center off 1� relative to the steering wheel while I am sitting; reality: no noticeable difference!
Length: The adapters need only to be as long as the RX7 rail: 13+ inches.
Width: The INNER rail can be 1+� wide (enough to accommodate the width of the RX7 rail), while the OUTER adapter needs to be 2+� wide, since the RX7 rail is offset to the INSIDE of the RX8 rail. Follow? (see photos)
NOTE: the adapter plates -and then the RX7 rails - should be welded to the FORWARD ends of the RX8 rails (unless your really height-challenged) so you have maximum legroom!
THE WELDING:
-Measurements:
THE critical measurement is the SIDE-to-SIDE SPACE BETWEEN THE HOLES of the RX7 Rails (ie distance across, between the front rails holes, ditto the rear). The BEST place to measure this distance (15 3/8� but DON�T take my word for it!) is the MOUNTING HOLES on the FLOOR of the RX7!!!!!!! Hole center-to-hole center
-Again, make sure the welder is clear about which RX7 rails go where, and in the case of the passenger INNER rail, which end is FRONT!!!!!! Simple clear diagrams are a must unless you are going to be there!
I state the obvious but: the welder needs to understand that the position of the RX7 rail pairs need to match, side-to-side (ie the leading edges are in the same forward position relative to each other). This is trickier with the passenger seat because of its funky front mount point!!
-when you take the RX8 frame to the shop, MAKE SURE THE RX8 SEAT RAILS ARE POSITIONED ALL THE WAY TO THE FRONT OF THE FRAME!! (This would be the position for maximum leg room) Why? Because in the welding process, the heat will likely cook off some/all of the lube in the rail channels, or worse even bind up the slides a bit. When I got mine back there was only about 3� of slide motion in the rails. They would NOT slide all the way up to the original �short-legs� position. No problem for 6 foot me. (I did try to re-lube them, but it�s pretty well sealed up and you can only access the very front and back of the slide channels.)
Back from the shop? Now is the time to mount the empty frame into the RX7 to check for fit. Because the rails are tied together in so flimsy a fashion, don�t try to hard to slide them back and forth on the rails. Too much play. You may note at this point that it will be a bit of a grunt to get at the rear mount bolts...
Paint Frame and rails (adapter and exposed welds will rust otherwise). I used hand-applied POR15 gloss black followed by a spray of Black gloss metal paint.
Re-assemble seat. You took pictures, right?
Enjoy...
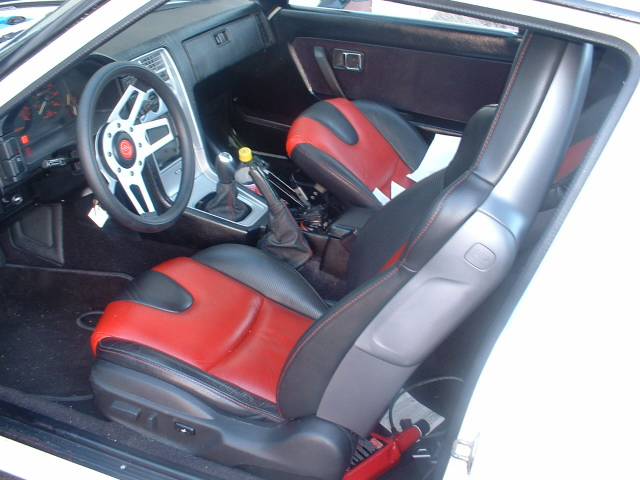
 Looks real nice.
Senior Member
Joined: Mar 2004
Posts: 589
Likes: 3
From: Coastal
Nice write-up! Thanks for sharing the details. The photos are excellent, too.
Did you notice if the seat was lower than stock? I am curious as the drivers side seat does have the up/down height adjustment; whereas the passenger side doesn't. Although I have yet to mount the passenger side RX8 seat in my first gen project, I've noticed that it does sit higher; making the seat-back headrest noticeably higher and closer to the headliner. (I just have my passenger seat sitting in the car for now; not mounted with any fasteners.) My concern is that we'll have to cut away more of the underrails to get the passenger to sit at the same height as the driver's side. Please post your findings as you move forward on your project.
Did you notice if the seat was lower than stock? I am curious as the drivers side seat does have the up/down height adjustment; whereas the passenger side doesn't. Although I have yet to mount the passenger side RX8 seat in my first gen project, I've noticed that it does sit higher; making the seat-back headrest noticeably higher and closer to the headliner. (I just have my passenger seat sitting in the car for now; not mounted with any fasteners.) My concern is that we'll have to cut away more of the underrails to get the passenger to sit at the same height as the driver's side. Please post your findings as you move forward on your project.
Trending Topics


Thanks guys- nice to be able to give back to the community...
Chuck- the RX8 seats are slightly taller, even after I chopped all the crap off the RX8 rails; nothing a couple more notches in the recliner doesn't solve BUT if you jack up the Drivers seat (it has a height adjustment), my bald spot is brushing the sunroof glass. Could NOT raise this seat in a non-sunroof RX! Don't think the passenger side will be a problem for you.
Hammmy, as soon as I saw the Rotor-cut-outs in the headrest, I knew I had to have them!
$350 for the pair - brand new - on ebay, helped!
Stu Aull
80GS
Alaska
Senior Member
Joined: Mar 2004
Posts: 589
Likes: 3
From: Coastal
Nice leather seats! I installed the grey cloth RX8 seats. The passenger seat required some 80/20 aluminum T-slot machinery hardware for my installation. I'm sure someone can come up with a different mount, too. One of these days I'll have to put my CAD skills on display and show how I approached it. You can see the T-slot hardware that I used on my cardomain page (click on sig).
Function > Form
Joined: Nov 2002
Posts: 10,890
Likes: 3
From: Catonsville MD (baltimore suburb)
That looks great... my only problem is that you puriest would hackel me for having a rotor shape (the one in the seat) in my V8 FB. But if I can find a pair I'll take my chances.


that's because the way I mounted it jacks the seat up 2", meaning only a REALLY short person will be comfy in it. I need to rethink the bracket design. So I didn't post it since I don't think I am doing anyone any favors...
Anyone else have a proper install method for the passenger seat??
Stu Aull
80GS
RX8 seats
Alaska
Anyone else have a proper install method for the passenger seat??
Stu Aull
80GS
RX8 seats
Alaska
