
How to get Duck Tape to stick to oily surfaces


How to get Duck Tape to stick to oily surfaces
We've all been there, Duck Tape will fix the problem but the damn tape won't stick to the oily parts that need to be fixed.
You could go get some solvent, if you have some, but here's an easier, faster, cheaper solution.
1) Wipe the part clean with an absorbent cloth or paper towel.
2) Take a piece of Duck Tape and wrap it inside out, so the sticky part is outside.
3) Wipe and dab the surface you want your Duck Tape to stick to. It will slime at first, but then it'll get sticky as the oil dissolves the Duck Tape adhesive. Repeat if necessary.
4) Now you've got a rubber cement situation, two sticky surfaces that really want to be together.
5) Apply Duck Tape.
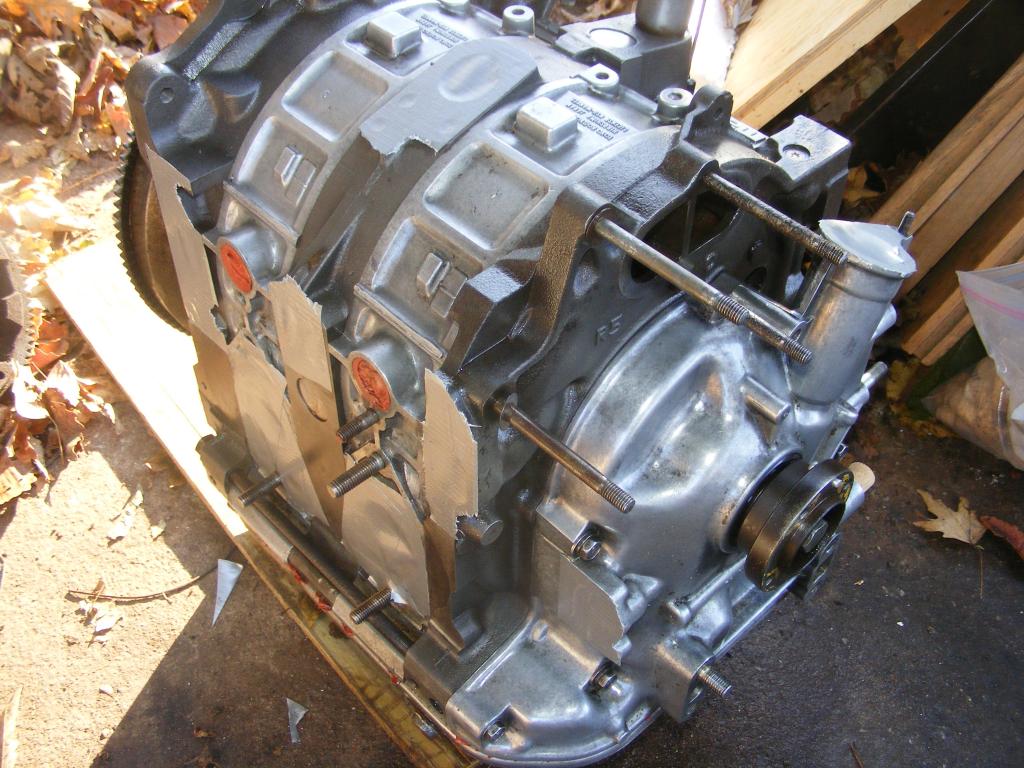
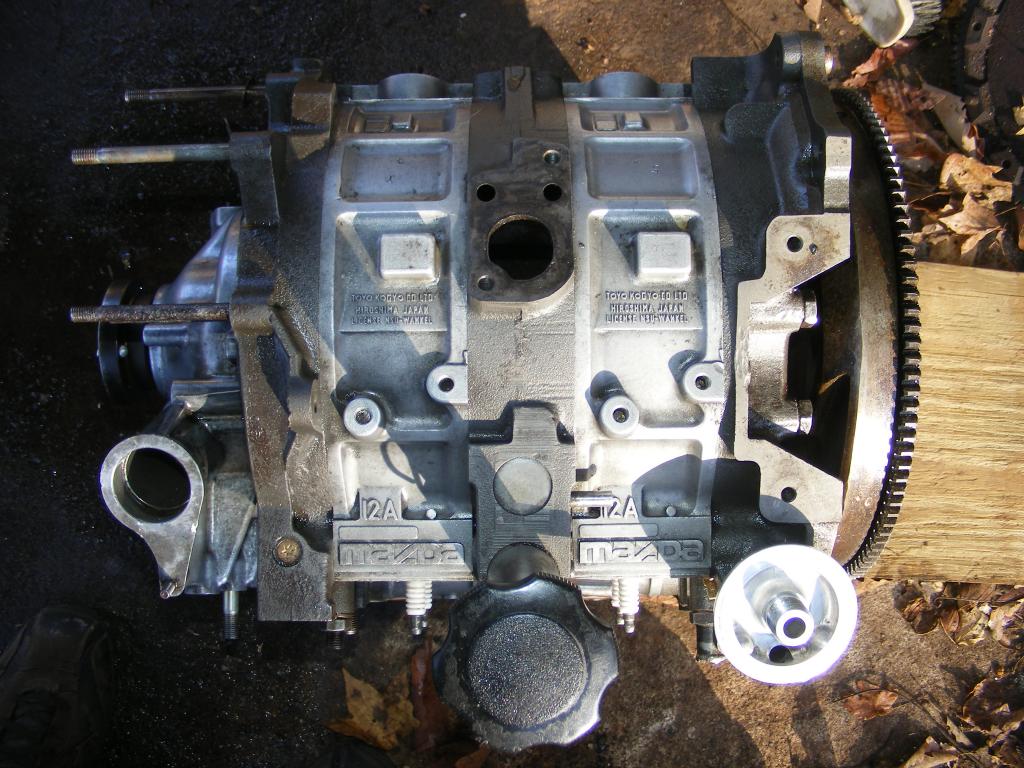
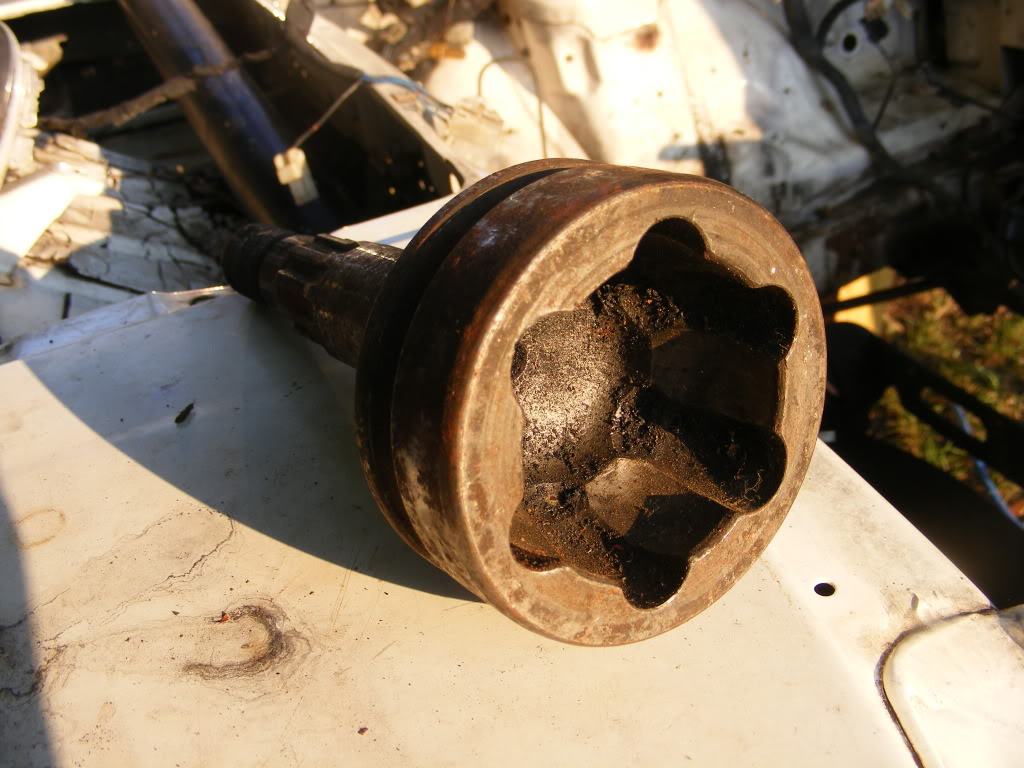
Here's my recent application, a 12A I just cleaned up and sprayed with oil.
You could go get some solvent, if you have some, but here's an easier, faster, cheaper solution.
1) Wipe the part clean with an absorbent cloth or paper towel.
2) Take a piece of Duck Tape and wrap it inside out, so the sticky part is outside.
3) Wipe and dab the surface you want your Duck Tape to stick to. It will slime at first, but then it'll get sticky as the oil dissolves the Duck Tape adhesive. Repeat if necessary.
4) Now you've got a rubber cement situation, two sticky surfaces that really want to be together.
5) Apply Duck Tape.
Here's my recent application, a 12A I just cleaned up and sprayed with oil.


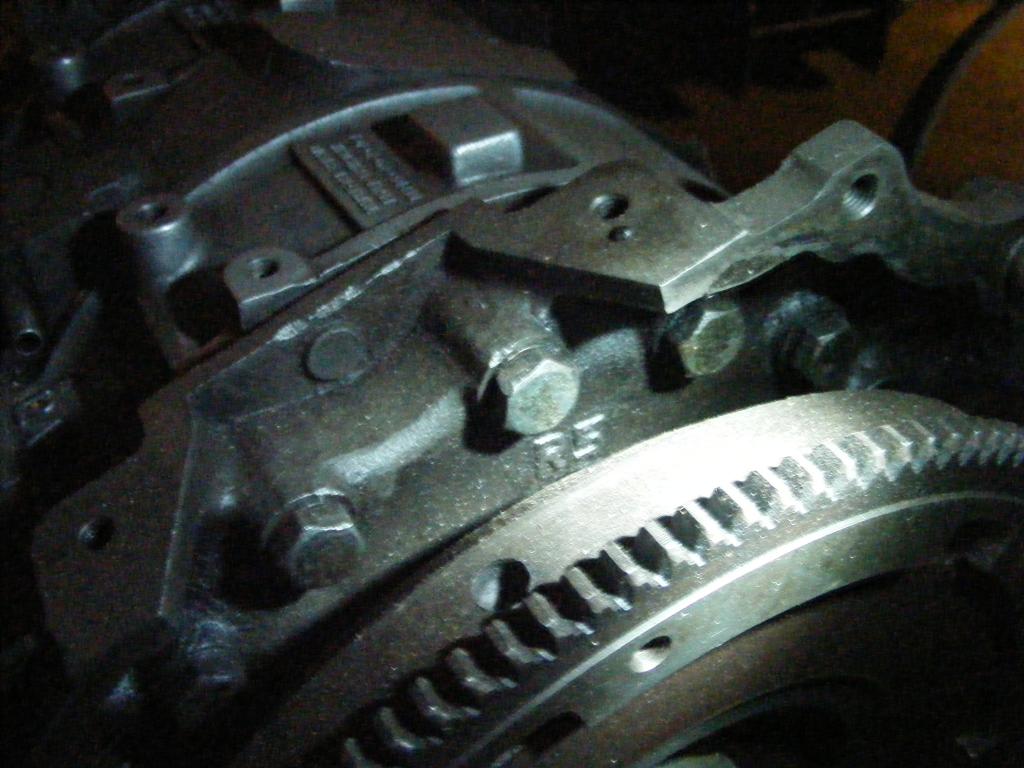
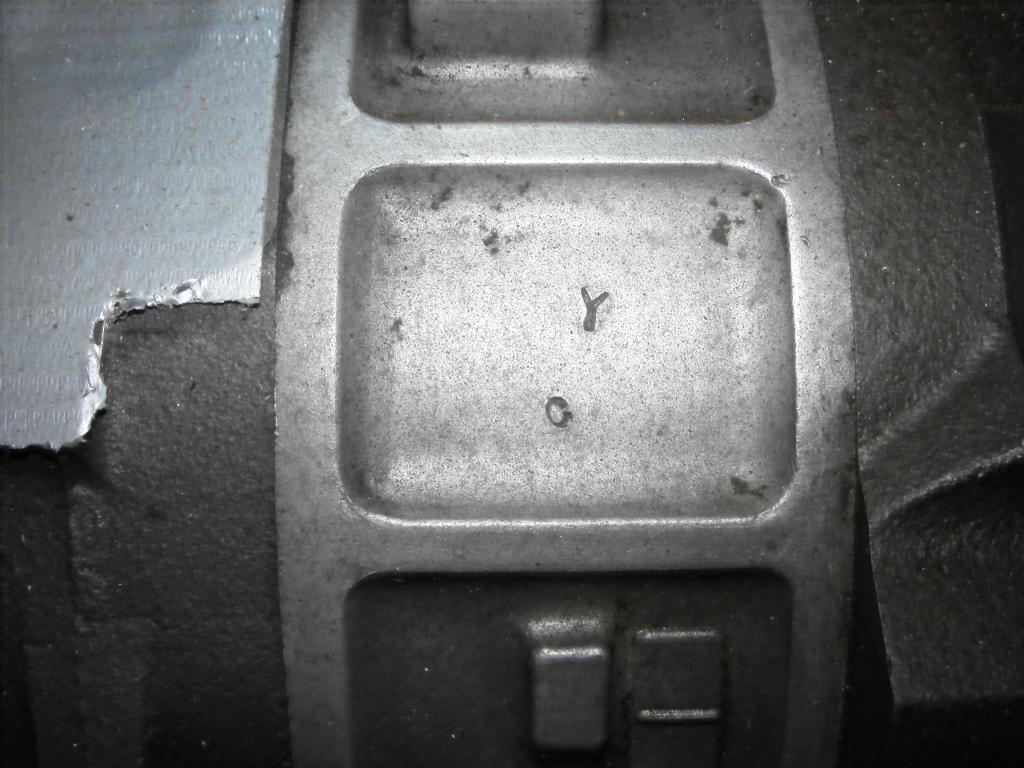
Looks like you've got an NO intermediate plate there. May it come out with low wear and go to one of the few denisons left in CA who still has an unmolested 80 SA and is masochistic enough to keep playing the game. That divin' drive-in guy.
Yep James, that's the 12A you dropped off. Once I realized it had 6 apex seals that were still floating I decided to give it the respect a 32 year old still functioning12A deserves.
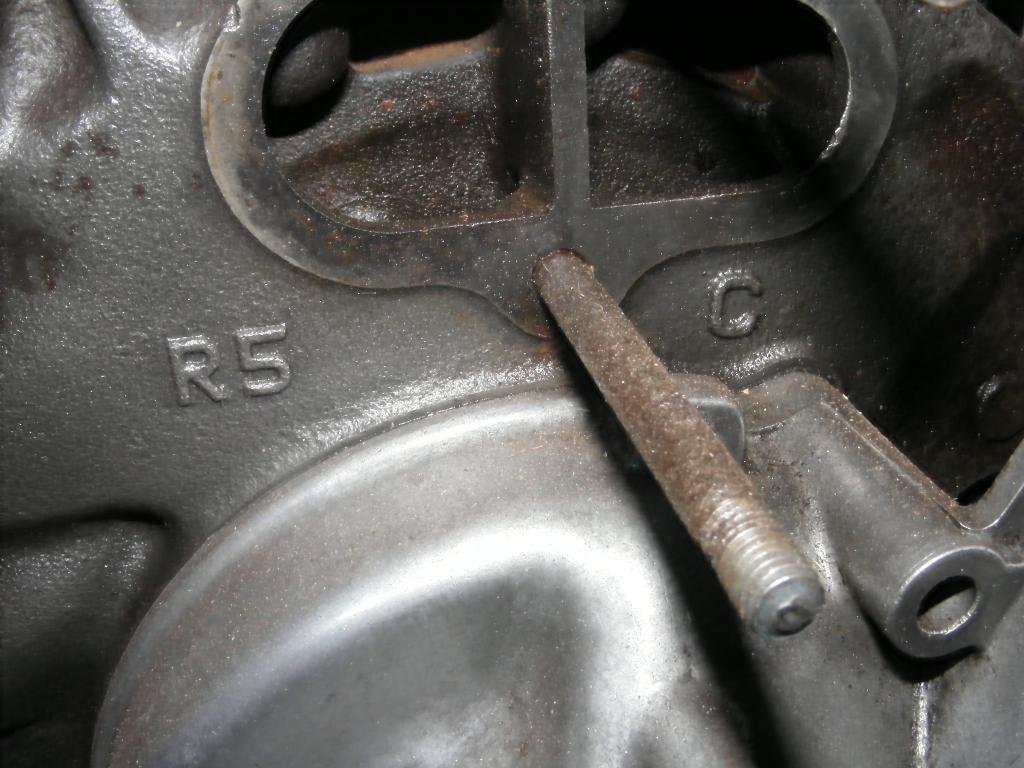
It's from an SA, right? What's that coolant hole on top of the midplate for, anyway?
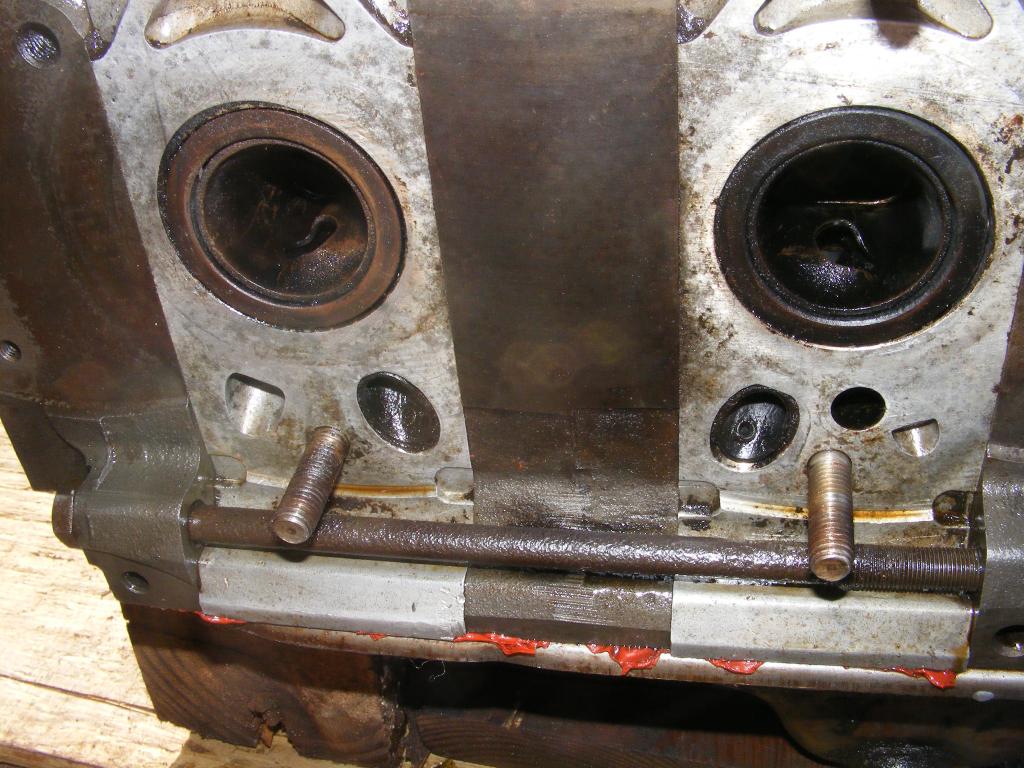
And what's the deal with these extra channels in the exhaust ports, can all that stuff be gotten rid of?
I matched it up with my RB header, seems to fit without any problem.
It's from an SA, right? What's that coolant hole on top of the midplate for, anyway?
And what's the deal with these extra channels in the exhaust ports, can all that stuff be gotten rid of?
I matched it up with my RB header, seems to fit without any problem.
That's actually a J-spec R5 12A you've got there. Probably a 1980, but the models over there varied a bit compared with when we got them.
Notice the weird exhaust sleeve inserts within the sleeves? That's J-spec only. Check them for looseness.
Those holes next to the exhaust pors are for a thermal reactor. Normal from 76 to 80. The holes on top are for an EGR valve. The S4 NA has something similar. Ever messed with an FC? I try to steer clear myself, but I'm quite aware of these things.
The extra hole on the front rotor housing is an oddity found in the US only in the 1980 CA emissions models, like DivinDriver and anyone else unlucky enough to have chosen that particular model to pour all their love into. As for what year that extra hole was found in Japan, I don't know, but within a year or two I'd say.
Also notice above next to where is says 12A mazDa you see a raised section. This used to include the word Automobiles there, but Mazda changed it to a blank casting to differentiate the housings that had the weird sleeves and the extra hole in the front rotor housing from the other more common and normal sleeved housings (easier to turbo). I've built engines with both styles, well the 13B versions, and I prefer the "Automobiles" type. Both "Automobiles" engines are getting turbos for example.
They come stock at GSL-SE exhaust port timing. Well, the 13B versions did. I ported one set out to t2 spec by going down only. The close timing was already at T2 spec from the factory. Not sure what thyew did with 12A timing as I've only ever seen 12AT spec and standard US-spec -both which open at T2 spec but close earlier.
To answer your questions. The extra exhaust holes will be sealed and blocked
off by the RB header flange and gasket. My SA has those holes as well.
That top hole would just need to be blocked off. Get you some thick AL plate
and cut it to shape, drill holes, use silly cone and slap it on there.
So Ray will we see the white one on the road sooner now that you have what
looks like a good engine?
Trending Topics
Thanks Jeff and Tim for the info, I'm a real novice when it comes to anything SA (or SE, FC or Old School, for that matter).
Those sleeves in the exhaust ports are nice and tight, but do they really need to be there? They seem awfully obstructive. Can they be removed?
Tim, if this engine works, it certainly will move up the release date for the White One II project. I'm already moving on from the engine to doing the body work - I'll update the build thread soon. But James says his SA 12A engine may (or may not) have some issues with compression on the front rotor, so I'm still not sure it'll work. If not, I'll be going back to Plan A, which is to do a 12A rebuild with FB engine parts, with the added time and immediate expense ($900 for the 12A master rebuild kit).
Maybe I can get DD to buy the SA 12A from me and sink the profits into some more 12A rotor housings. Those California 12A housings are rare as hen's teeth, must be worth a lot of money.
That hole in the top came with a block off plate already attached (steel; I'll replace it with aluminum), I just took it off to clean things up. So what's the hole for? Coolant for the carb or cabin heater???

Yeah Ray its just the EGR (Exhaust Gas Recirulation) port. Puts exhaust gasses back in the block
for more burning. Not sure how well that really works with a rotary but, hey, its a CALI thing.
I bet those housings are in pretty good shape. You might want to tear it down and reuse them.
You should put some oil in it and attach the starter and crank it some and see what kind of
compression it shows. Might be worth running as is in the white one while you rebuild the other.
EGR port? Is that anything like hyperbaric oxygen? Those CA folks sure are strange.
Definitely a good suggestion to check the compression, that's probably the only way to know whether to use it or tear it down hoping it still has some good stuff in there. I'll hook up a transmission and starter and start looking for something to test the compression with.
Can those sleeves in the exhaust ports come out?
I still think that is a J-spec engine, not a CA model. Divindriver will know.
Your intermediate plate is an NO casting. It has tiny intake ports. You will never like the lack of power. I'm telling you to tear that thing down and swap in a normal Y plate. Sell the NO plate to Divindriver for a super low price. Make him happy, make you happy.
Do something pony related on this engine. You said white? Time to do a Rarity. Or Celestia.
Why spend 900 on a rebuild kit? That's some serious wasted money there. Just get a gasket set from Mazdatrix (114), all the springs for the rotors (around 100), front and rear seals plus pilot seal (around 30 or 40). Get your apex seals and oil o-rings from Atkins (220 for apex, 40 or 50ish for o-rings). I'm sure your side seals, corner seals and oil seals are still good. Just change the springs behind them. Don't even bother cleaning the rotors - they're just gonna get dirty again.
The bearings may be ok to reuse. But I'm not sure whether this R5/NO thing has full flow oil squirters in the shaft or the checkball type. I know all nitrided fully R5 engines from Japan had full flow squirters and the big 17mm oil pump found in our GSL-SE and all beehive engines. So usually no need to buy another oil pump, unless worn or scored.
Stay away from full squirters on the street. They only make 15psi or less at idle and take a long time to pressurise during startup - leads to lots of stationary bearing wear. You'll notice the rear plate lacks an oil pressure sender hole. This was to keep you from knowing. Not sure if intentional, just that's how it is on these things. So check the shaft once torn down for the squirter type.
You can steal a set of checkball type squirters from a spare shaft if you have any lying around. Or simply swap shafts, however I like to keep bearings with the shaft they broke in with. So if the rotor bearings are good, which they should be, try to keep the stock shaft and swap the squirters.
Also check you oil pump size. Again not sure whether the R5 NO hybrid got the large oil pump.
Check your thrust assembly. All 83-85 12As usually had very little wear here. However usually all 82 and older have some wear due to their smaller oil pump and lack of volume. The bearings may or may not have a lot of wear as the oil pressurr on these older engines was usually fine because they did have checkball squirters, but the smaller type. Note all 83 and later had the big ball type. I'm inclucing all FC and FD engines.
Cliff notes:
Tear down that engine! Swap out the crappy NO plate! Learn a thing or three about these engines in general! Specifically find out your oil pump size, checkball squirter size (or lack there of), over all wear of everything, spend less on a rebuild kit by shopping smart! And paint it a pony color! Can you do all that? You'll earn at least a 12A point at your old guys with 12A meets.
Hey one last thing. Are you any good at operating a hand drill? How about a drill press? Could you drill and tap your rear plate for an oil pressure sender hole? Are you the type who uses a stock sender and an aftermaket gauge in like an RB adaptor or something? Or just the stock sender in the stock hole? You have a choice between cutting BSP threads (Stock) or NPT threads (Aftermarket). I've done both on these R5 rear plates and I prefer a drill press and NPT threads.
EGR port? Is that anything like hyperbaric oxygen? Those CA folks sure are strange.
Definitely a good suggestion to check the compression, that's probably the only way to know whether to use it or tear it down hoping it still has some good stuff in there. I'll hook up a transmission and starter and start looking for something to test the compression with.
Can those sleeves in the exhaust ports come out?
Definitely a good suggestion to check the compression, that's probably the only way to know whether to use it or tear it down hoping it still has some good stuff in there. I'll hook up a transmission and starter and start looking for something to test the compression with.
Can those sleeves in the exhaust ports come out?
FB housings I have sitting on my shelves and they're not obstructive at all. Normally
they are there mainly to protect the AL housings from the extreme exhaust temps
but folks have pulled them in the past (only heard of this on 13Bs myself).
As for your specifica quesiton about the weird sleeves, on one of my sets of 13B housings with those sleeves, the whole thing is loose in the housing. I don't have any spare normal sleeves in that size at this time, so not sure what to do.
It seems the weird sleeves could possibly be driven out with a slide hammer, but you gotta be more careful than you've ever been before. Good idea to have the housings out of the engien for this. Weld a bolt or nut to the inner sleeve. Thread in your slide hammer. Start slapping away. Thisd will only work if the sleeve is pressed into the outer sleeve. IF they've been welded, you gotta pull the whole sleeve.
I got an old non roll pin sleeve out of an early 74 housing this way (to match its mate which had a sleeve fall out). It was just an interference fit in the aluminum. All later housings, including 75 had roll pins which require you to pull them from the sides - obviously requires a tear down.
There are various ways to remove the roll pins. Judge Ito uses a welder to build up a bead. Then vice grips. Others use a diamond dremel bit and then a sheet metal screw. I had to use a drywall screw as the sheet metal type was too soft. Drywall screws are hardened.
I think a GSL-SE sleeve will fit in these housings, but not 100% on this.
t g, you can only get away with removed sleeves on 74 housings. The size and shape make this possible. All 76 and later must keep the sleeves. Otherwise flow is severly hampered and I suspect more heat would enter the housings.
Joined: Mar 2001
Posts: 31,857
Likes: 3,243
From: https://www2.mazda.com/en/100th/
How obstructive are they? Got a full on pic of em? Theres sleeves in both my SA and
FB housings I have sitting on my shelves and they're not obstructive at all. Normally
they are there mainly to protect the AL housings from the extreme exhaust temps
but folks have pulled them in the past (only heard of this on 13Bs myself).
FB housings I have sitting on my shelves and they're not obstructive at all. Normally
they are there mainly to protect the AL housings from the extreme exhaust temps
but folks have pulled them in the past (only heard of this on 13Bs myself).
Hey Jeff, can I copyright this?:
"I still think that is a J-spec engine, not a CA model. Divindriver will know.
Your intermediate plate is an NO casting. It has tiny intake ports. You will never like the lack of power. I'm telling you to tear that thing down and swap in a normal Y plate. Sell the NO plate to Divindriver for a super low price. Make him happy, make you happy.
Do something pony related on this engine. You said white? Time to do a Rarity. Or Celestia.
Why spend 900 on a rebuild kit? That's some serious wasted money there. Just get a gasket set from Mazdatrix (114), all the springs for the rotors (around 100), front and rear seals plus pilot seal (around 30 or 40). Get your apex seals and oil o-rings from Atkins (220 for apex, 40 or 50ish for o-rings). I'm sure your side seals, corner seals and oil seals are still good. Just change the springs behind them. Don't even bother cleaning the rotors - they're just gonna get dirty again.
The bearings may be ok to reuse. But I'm not sure whether this R5/NO thing has full flow oil squirters in the shaft or the checkball type. I know all nitrided fully R5 engines from Japan had full flow squirters and the big 17mm oil pump found in our GSL-SE and all beehive engines. So usually no need to buy another oil pump, unless worn or scored.
Stay away from full squirters on the street. They only make 15psi or less at idle and take a long time to pressurise during startup - leads to lots of stationary bearing wear. You'll notice the rear plate lacks an oil pressure sender hole. This was to keep you from knowing. Not sure if intentional, just that's how it is on these things. So check the shaft once torn down for the squirter type.
You can steal a set of checkball type squirters from a spare shaft if you have any lying around. Or simply swap shafts, however I like to keep bearings with the shaft they broke in with. So if the rotor bearings are good, which they should be, try to keep the stock shaft and swap the squirters.
Also check you oil pump size. Again not sure whether the R5 NO hybrid got the large oil pump.
Check your thrust assembly. All 83-85 12As usually had very little wear here. However usually all 82 and older have some wear due to their smaller oil pump and lack of volume. The bearings may or may not have a lot of wear as the oil pressurr on these older engines was usually fine because they did have checkball squirters, but the smaller type. Note all 83 and later had the big ball type. I'm inclucing all FC and FD engines.
Cliff notes:
Tear down that engine! Swap out the crappy NO plate! Learn a thing or three about these engines in general! Specifically find out your oil pump size, checkball squirter size (or lack there of), over all wear of everything, spend less on a rebuild kit by shopping smart! And paint it a pony color! Can you do all that? You'll earn at least a 12A point at your old guys with 12A meets.
Hey one last thing. Are you any good at operating a hand drill? How about a drill press? Could you drill and tap your rear plate for an oil pressure sender hole? Are you the type who uses a stock sender and an aftermaket gauge in like an RB adaptor or something? Or just the stock sender in the stock hole? You have a choice between cutting BSP threads (Stock) or NPT threads (Aftermarket). I've done both on these R5 rear plates and I prefer a drill press and NPT threads."
Sounds like a plan, thanks. I'm definitely going Pony. I still like the Rainbow Dash colors, but I'm open to opinions.
If you see DD, tell him I have a Christmas present for him, but don't tell him what it is.
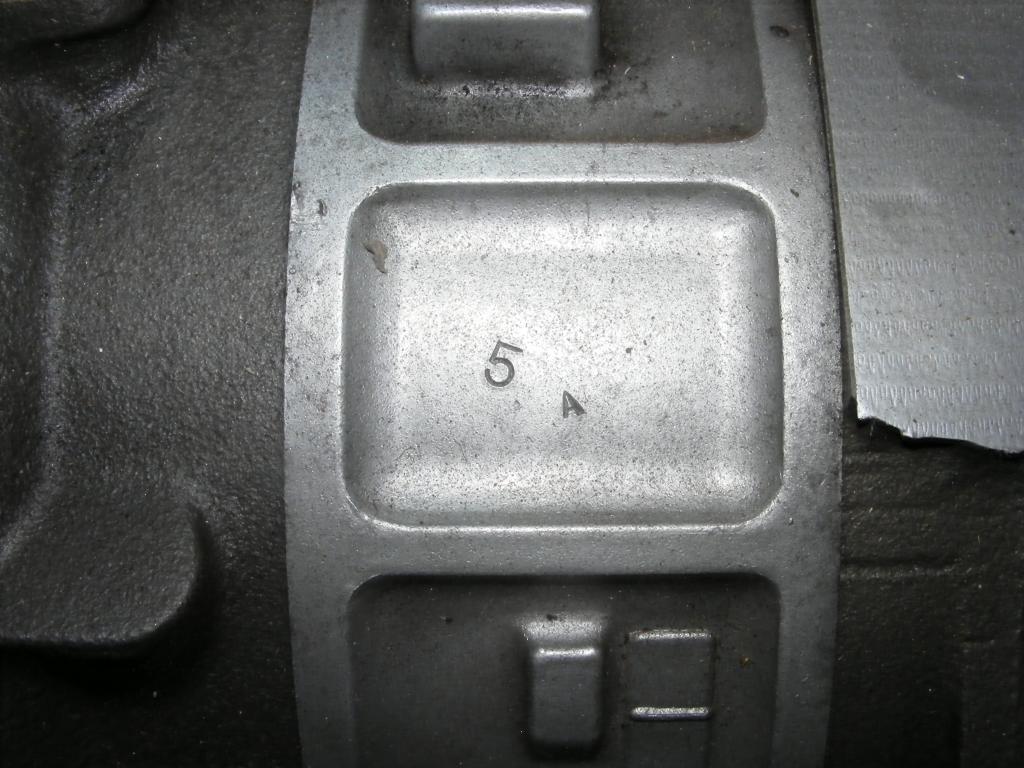
More pics of James' SA 12A, soon to be torn down. It'll be easier to punch those damn sleeves out that way. Check out the cryptic stamps on the rotor housings, must mean something:

"I still think that is a J-spec engine, not a CA model. Divindriver will know.
Your intermediate plate is an NO casting. It has tiny intake ports. You will never like the lack of power. I'm telling you to tear that thing down and swap in a normal Y plate. Sell the NO plate to Divindriver for a super low price. Make him happy, make you happy.
Do something pony related on this engine. You said white? Time to do a Rarity. Or Celestia.
Why spend 900 on a rebuild kit? That's some serious wasted money there. Just get a gasket set from Mazdatrix (114), all the springs for the rotors (around 100), front and rear seals plus pilot seal (around 30 or 40). Get your apex seals and oil o-rings from Atkins (220 for apex, 40 or 50ish for o-rings). I'm sure your side seals, corner seals and oil seals are still good. Just change the springs behind them. Don't even bother cleaning the rotors - they're just gonna get dirty again.
The bearings may be ok to reuse. But I'm not sure whether this R5/NO thing has full flow oil squirters in the shaft or the checkball type. I know all nitrided fully R5 engines from Japan had full flow squirters and the big 17mm oil pump found in our GSL-SE and all beehive engines. So usually no need to buy another oil pump, unless worn or scored.
Stay away from full squirters on the street. They only make 15psi or less at idle and take a long time to pressurise during startup - leads to lots of stationary bearing wear. You'll notice the rear plate lacks an oil pressure sender hole. This was to keep you from knowing. Not sure if intentional, just that's how it is on these things. So check the shaft once torn down for the squirter type.
You can steal a set of checkball type squirters from a spare shaft if you have any lying around. Or simply swap shafts, however I like to keep bearings with the shaft they broke in with. So if the rotor bearings are good, which they should be, try to keep the stock shaft and swap the squirters.
Also check you oil pump size. Again not sure whether the R5 NO hybrid got the large oil pump.
Check your thrust assembly. All 83-85 12As usually had very little wear here. However usually all 82 and older have some wear due to their smaller oil pump and lack of volume. The bearings may or may not have a lot of wear as the oil pressurr on these older engines was usually fine because they did have checkball squirters, but the smaller type. Note all 83 and later had the big ball type. I'm inclucing all FC and FD engines.
Cliff notes:
Tear down that engine! Swap out the crappy NO plate! Learn a thing or three about these engines in general! Specifically find out your oil pump size, checkball squirter size (or lack there of), over all wear of everything, spend less on a rebuild kit by shopping smart! And paint it a pony color! Can you do all that? You'll earn at least a 12A point at your old guys with 12A meets.
Hey one last thing. Are you any good at operating a hand drill? How about a drill press? Could you drill and tap your rear plate for an oil pressure sender hole? Are you the type who uses a stock sender and an aftermaket gauge in like an RB adaptor or something? Or just the stock sender in the stock hole? You have a choice between cutting BSP threads (Stock) or NPT threads (Aftermarket). I've done both on these R5 rear plates and I prefer a drill press and NPT threads."
Sounds like a plan, thanks. I'm definitely going Pony. I still like the Rainbow Dash colors, but I'm open to opinions.
If you see DD, tell him I have a Christmas present for him, but don't tell him what it is.
More pics of James' SA 12A, soon to be torn down. It'll be easier to punch those damn sleeves out that way. Check out the cryptic stamps on the rotor housings, must mean something:
Copyright? What are you talking about? I'm the one who typed it up so technically it's copyrighted already, by me. I don't think it's physically possible for you to copyright something written by somebody else. Is it? You can certainly plagerize though.
Oh, I think I see what you did there. You didn't use the quote function of the forum and instead did a copy and paste. Well, whatever it's no big deal to me. I know and you know that I know about as much about these R5 engines as anyone ever could. Heh that was a strange sentence to type.
So will this be your first actual teardown? Have fun with the 54mm nut and the often stubborn 19mm front bolt. I've found R5s are usually pretty decent to deal with though, so you're in luck.
As for pony colors, of course do what makes sense to you. I forgot you were looking forward to doing a Rainbow Dash color scheme. So do that if you can make it work. I tried twice and it never quite came together for me.
Any porting plans? These R5 plates take very well to porting. 74 spec is probably the best choice because it's stock on some years and is the best balance between performance and street. Don't bother streetporting because A) it's a 12A so its low end isn't nice like a 13B, and more sensitive ie weaker in the low end and B) it's got the heaviest rotors Mazda ever made for the 12A and comes stock with a 30 pound flywheel. So no easy revs for you! But there is hope! Do like I and others have done, swap out the front CW and flywheel for an 81-82 style! They are 23 pounds! (I just looked it up again on Mazdatrix to refresh my memory). Not 30! So stick with a 74 spec port job and you're golden.
Or heck knowing you you'll choose to keep the ports stock and reuse the rat's nest (gross) but do me a favor: at least clean up the sharp 90 degree edges and casting flash inside the ports. Make them smooth without changing timing. It makes the engine happier at all RPMs because it raises the effeciency. But please leave some roughness behind and absolutely do not polish the ports in any way. Infact go back over them with the roughest stone you can find and only touch up the parts you previously smoothed. Or even take a stone and grind it down on one side so it's off balance, then go back over the ports. Leave the untouched original sand casting alone. This is how I did it in my rotary baja engine and it made all the difference in the world (I actually fired it up on starting fluid even with my baja's painfully slow and old/tired VW starter).
If you'd like another testimonial about port smoothing, the GLC's engine fired up in half a crank for its first time. It was 74 ported but I did all the smoothing and roughening that I always do. My jaw hit the floor and I had to pinch myself back to reality and shut it off as it was only a test fire without coolant. Don't let them run for more than a minute without coolant. Lots of people test fresh rebuilds this way as it's less messy if you have to get back into the engine to fix a problem.
By the way both of these engines are R5 13Bs from various years during their run. One is a 76 Cosmo core with swapped nitrided Y side plates and the other is a J-spec that originally came with either "Automobiles" housings are the blanked type like yours. Can't remember, but I ended up using a set of 75 housings instead, since I had them available and they needed to be compatible with an exhaust manifold (there are no thermal reactor ports on 74-75 housings so they're compatible with R5 and GSL-SE plus FC NA and T2 exhaust manifolds). But then I went with an RB header and a full 2.5" exhaust so it's moot, but it sure came out nice. I also swapped in some Y plates and gave the original NO plate to Atkins in exhange for a Y intermediate plate. The original R5 plates are going into my REPU because they're thicker castings and will handle more boost than a Y ever could.
Someone said a Y rear iron will split at 300HP. But I suspect an R5 will hold together at 300 and above.
Hey I've got a special request. Show me the rib next to your oil filter pedestal. Also count the tension bolts. If 17 bolts and a thin curved rib, it will be a later R5 (with the full flow squirters, large oil pump, tall intermediate runners, normal 12A size primary ports etc). But I suspect yours has the thicker rib and 18 tension bolts as evidenced by what I've seen so far ie the NO plate etc.
The thick dowel pin rib is the same size as a JC Cosmo 13BRE or 20B or the S5 engines NA and T2. Only the FD has a thicker casting there.
I'm actually doing a rebuild on my REPU for some reasons that you may find amusing, well two at least, and you'll see why I'm so close to this subject.
1) to swap out the stupid full flow squirters for the checkball type so I have some oil pressure at idle
2) to swap out the rear thin rib 17 tension bolt R5 plate to the thicker rib 18 bolt plate
3) to swap out the S4 NA assembly and 24 pound flywheel for an FD assembly and an S5 NA flywheel which weighs in at 21 pounds. The lower compression rotors will be safer for boost and the lighter flywheel will spin the engine up a little sooner to help spool the turbo faster and shouldn't be as detrimental to low RPM driveability as it would be if I was keeping the engine naturally aspirated.
4) to update the color. That's very important as you know.
Oh, I think I see what you did there. You didn't use the quote function of the forum and instead did a copy and paste. Well, whatever it's no big deal to me. I know and you know that I know about as much about these R5 engines as anyone ever could. Heh that was a strange sentence to type.
So will this be your first actual teardown? Have fun with the 54mm nut and the often stubborn 19mm front bolt. I've found R5s are usually pretty decent to deal with though, so you're in luck.
As for pony colors, of course do what makes sense to you. I forgot you were looking forward to doing a Rainbow Dash color scheme. So do that if you can make it work. I tried twice and it never quite came together for me.
Any porting plans? These R5 plates take very well to porting. 74 spec is probably the best choice because it's stock on some years and is the best balance between performance and street. Don't bother streetporting because A) it's a 12A so its low end isn't nice like a 13B, and more sensitive ie weaker in the low end and B) it's got the heaviest rotors Mazda ever made for the 12A and comes stock with a 30 pound flywheel. So no easy revs for you! But there is hope! Do like I and others have done, swap out the front CW and flywheel for an 81-82 style! They are 23 pounds! (I just looked it up again on Mazdatrix to refresh my memory). Not 30! So stick with a 74 spec port job and you're golden.
Or heck knowing you you'll choose to keep the ports stock and reuse the rat's nest (gross) but do me a favor: at least clean up the sharp 90 degree edges and casting flash inside the ports. Make them smooth without changing timing. It makes the engine happier at all RPMs because it raises the effeciency. But please leave some roughness behind and absolutely do not polish the ports in any way. Infact go back over them with the roughest stone you can find and only touch up the parts you previously smoothed. Or even take a stone and grind it down on one side so it's off balance, then go back over the ports. Leave the untouched original sand casting alone. This is how I did it in my rotary baja engine and it made all the difference in the world (I actually fired it up on starting fluid even with my baja's painfully slow and old/tired VW starter).
If you'd like another testimonial about port smoothing, the GLC's engine fired up in half a crank for its first time. It was 74 ported but I did all the smoothing and roughening that I always do. My jaw hit the floor and I had to pinch myself back to reality and shut it off as it was only a test fire without coolant. Don't let them run for more than a minute without coolant. Lots of people test fresh rebuilds this way as it's less messy if you have to get back into the engine to fix a problem.
By the way both of these engines are R5 13Bs from various years during their run. One is a 76 Cosmo core with swapped nitrided Y side plates and the other is a J-spec that originally came with either "Automobiles" housings are the blanked type like yours. Can't remember, but I ended up using a set of 75 housings instead, since I had them available and they needed to be compatible with an exhaust manifold (there are no thermal reactor ports on 74-75 housings so they're compatible with R5 and GSL-SE plus FC NA and T2 exhaust manifolds). But then I went with an RB header and a full 2.5" exhaust so it's moot, but it sure came out nice. I also swapped in some Y plates and gave the original NO plate to Atkins in exhange for a Y intermediate plate.
The original R5 plates are going into my REPU because they're thicker castings and will handle more boost than a Y ever could.Someone said a Y rear iron will split at 300HP. But I suspect an R5 will hold together at 300 and above.
Hey I've got a special request. Show me the rib next to your oil filter pedestal. Also count the tension bolts. If 17 bolts and a thin curved rib, it will be a later R5 (with the full flow squirters, large oil pump, tall intermediate runners, normal 12A size primary ports etc). But I suspect yours has the thicker rib and 18 tension bolts as evidenced by what I've seen so far ie the NO plate etc.
The thick dowel pin rib is the same size as a JC Cosmo 13BRE or 20B or the S5 engines NA and T2. Only the FD has a thicker casting there.
I'm actually doing a rebuild on my REPU for some reasons that you may find amusing, well two at least, and you'll see why I'm so close to this subject.
1) to swap out the stupid full flow squirters for the checkball type so I have some oil pressure at idle
2) to swap out the rear thin rib 17 tension bolt R5 plate to the thicker rib 18 bolt plate
3) to swap out the S4 NA assembly and 24 pound flywheel for an FD assembly and an S5 NA flywheel which weighs in at 21 pounds.
The lower compression rotors will be safer for boost and the lighter flywheel will spin the engine up a little sooner to help spool the turbo faster and shouldn't be as detrimental to low RPM driveability as it would be if I was keeping the engine naturally aspirated.4) to update the color. That's very important as you know.
Joined: Jun 2008
Posts: 8,376
Likes: 30
From: Chino Hills, CA
My ears have been burning all day; somebody trying to conjure me up?
R5 front and rear with a nitrided NO midplate matches my original (at least as far as I know it was) 80 SA CA 12A; but I don't know anything wrt j-spec parts or how they'd differ from US Cali parts.
All my rotor housings have had inserts in them that look like this (very grotty one full of MTBE deposits):
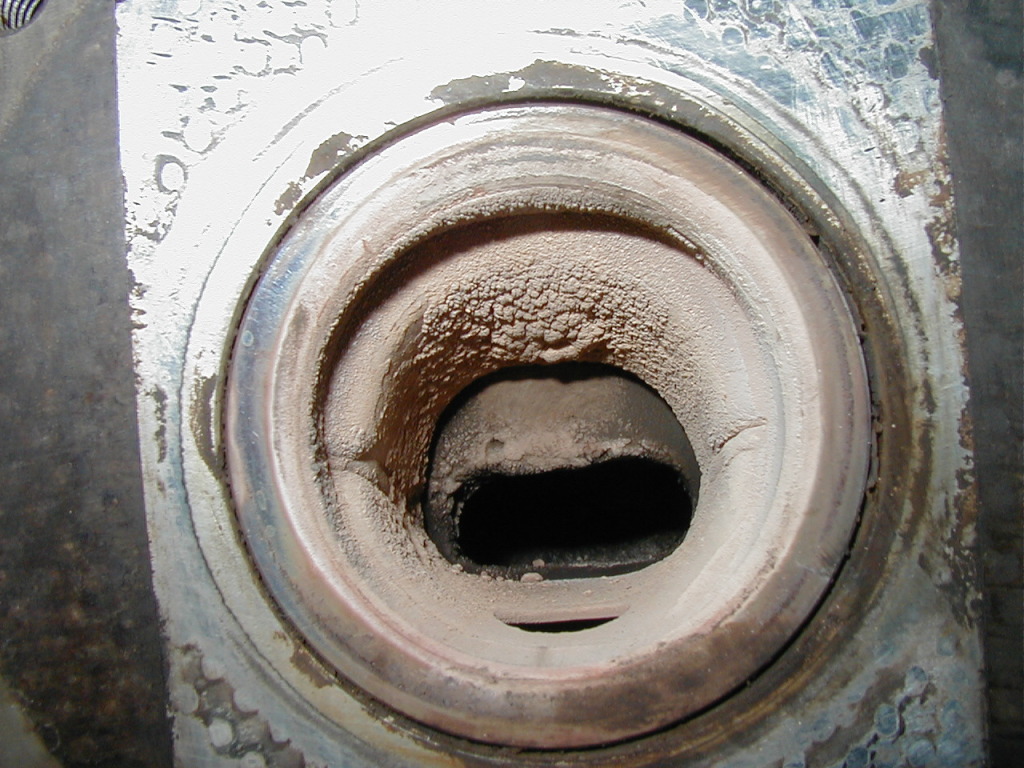
Looks superficially the same, except the holes in the bottom of the sleeves are not "angled" away from the air injection ports.
Those on your engine Ray almost look like there was detonation taking place in the air injection passages, which warped the inserts - - I've heard that can happen when the TR's got a split in it, but I've never seen it myself. Hard to tell from the pix if that is intentional shape or deformity, though.
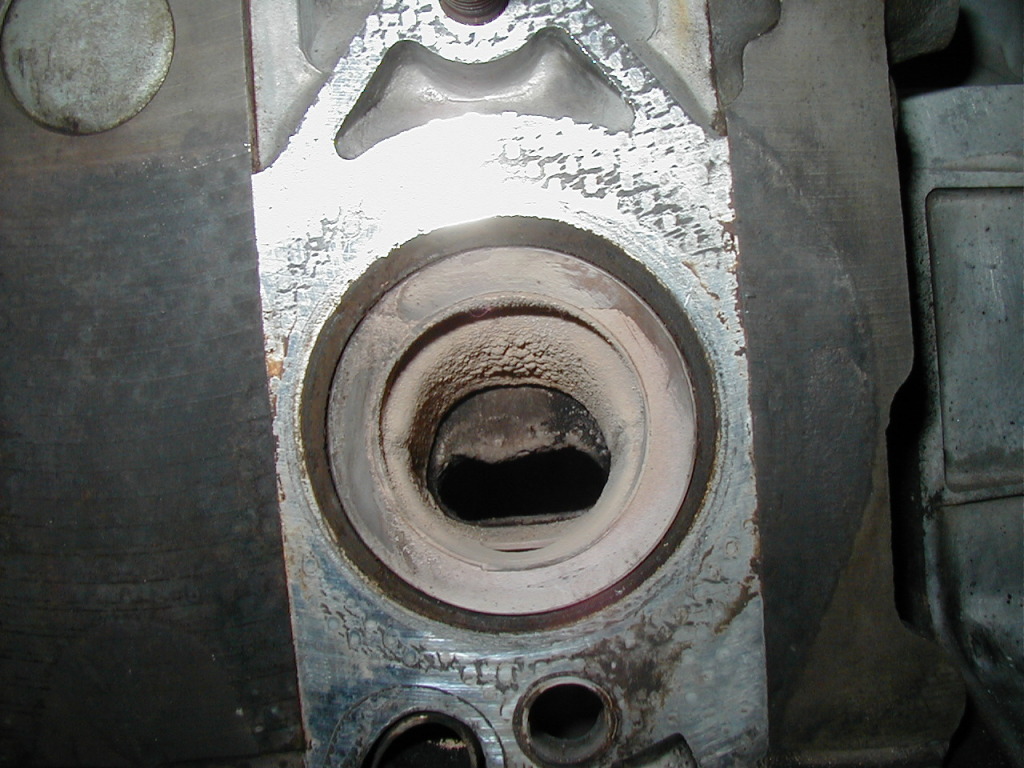
As to what the extra holes are for: the two angled ones below the exhaust ports are the hot-air injection ports (they bring in air from the bottom of the TR that was pre-heated through the heat exchanger, after being pumped by the air pump) and the small round one on the front rotor housing is the EGR source passage; it leads from a matched port on the TR up to that EGR flange on top the center housing, and then down two small round holes in the tops of the center-housing intake runners.
R5 front and rear with a nitrided NO midplate matches my original (at least as far as I know it was) 80 SA CA 12A; but I don't know anything wrt j-spec parts or how they'd differ from US Cali parts.
All my rotor housings have had inserts in them that look like this (very grotty one full of MTBE deposits):
Looks superficially the same, except the holes in the bottom of the sleeves are not "angled" away from the air injection ports.
Those on your engine Ray almost look like there was detonation taking place in the air injection passages, which warped the inserts - - I've heard that can happen when the TR's got a split in it, but I've never seen it myself. Hard to tell from the pix if that is intentional shape or deformity, though.
As to what the extra holes are for: the two angled ones below the exhaust ports are the hot-air injection ports (they bring in air from the bottom of the TR that was pre-heated through the heat exchanger, after being pumped by the air pump) and the small round one on the front rotor housing is the EGR source passage; it leads from a matched port on the TR up to that EGR flange on top the center housing, and then down two small round holes in the tops of the center-housing intake runners.
Hey Jeff, here's my 54 mm unit, neighbor made it and hasn't used it for 20 years so he gave it to me. It's worked great 4 times so far, James' SA 12A will be next.
Thanks for the ideas on the engines, I'm going to do everything you suggested.
If you don't mind, I'm also going to copyright this too, could come in handy some time!
"Copyright? What are you talking about? I'm the one who typed it up so technically it's copyrighted already, by me. I don't think it's physically possible for you to copyright something written by somebody else. Is it? You can certainly plagerize though.
Oh, I think I see what you did there. You didn't use the quote function of the forum and instead did a copy and paste. Well, whatever it's no big deal to me. I know and you know that I know about as much about these R5 engines as anyone ever could. Heh that was a strange sentence to type.
So will this be your first actual teardown? Have fun with the 54mm nut and the often stubborn 19mm front bolt. I've found R5s are usually pretty decent to deal with though, so you're in luck.
As for pony colors, of course do what makes sense to you. I forgot you were looking forward to doing a Rainbow Dash color scheme. So do that if you can make it work. I tried twice and it never quite came together for me.
Any porting plans? These R5 plates take very well to porting. 74 spec is probably the best choice because it's stock on some years and is the best balance between performance and street. Don't bother streetporting because A) it's a 12A so its low end isn't nice like a 13B, and more sensitive ie weaker in the low end and B) it's got the heaviest rotors Mazda ever made for the 12A and comes stock with a 30 pound flywheel. So no easy revs for you! But there is hope! Do like I and others have done, swap out the front CW and flywheel for an 81-82 style! They are 23 pounds! (I just looked it up again on Mazdatrix to refresh my memory). Not 30! So stick with a 74 spec port job and you're golden.
Or heck knowing you you'll choose to keep the ports stock and reuse the rat's nest (gross) but do me a favor: at least clean up the sharp 90 degree edges and casting flash inside the ports. Make them smooth without changing timing. It makes the engine happier at all RPMs because it raises the effeciency. But please leave some roughness behind and absolutely do not polish the ports in any way. Infact go back over them with the roughest stone you can find and only touch up the parts you previously smoothed. Or even take a stone and grind it down on one side so it's off balance, then go back over the ports. Leave the untouched original sand casting alone. This is how I did it in my rotary baja engine and it made all the difference in the world (I actually fired it up on starting fluid even with my baja's painfully slow and old/tired VW starter).
If you'd like another testimonial about port smoothing, the GLC's engine fired up in half a crank for its first time. It was 74 ported but I did all the smoothing and roughening that I always do. My jaw hit the floor and I had to pinch myself back to reality and shut it off as it was only a test fire without coolant. Don't let them run for more than a minute without coolant. Lots of people test fresh rebuilds this way as it's less messy if you have to get back into the engine to fix a problem.
By the way both of these engines are R5 13Bs from various years during their run. One is a 76 Cosmo core with swapped nitrided Y side plates and the other is a J-spec that originally came with either "Automobiles" housings are the blanked type like yours. Can't remember, but I ended up using a set of 75 housings instead, since I had them available and they needed to be compatible with an exhaust manifold (there are no thermal reactor ports on 74-75 housings so they're compatible with R5 and GSL-SE plus FC NA and T2 exhaust manifolds). But then I went with an RB header and a full 2.5" exhaust so it's moot, but it sure came out nice. I also swapped in some Y plates and gave the original NO plate to Atkins in exhange for a Y intermediate plate. The original R5 plates are going into my REPU because they're thicker castings and will handle more boost than a Y ever could.
Someone said a Y rear iron will split at 300HP. But I suspect an R5 will hold together at 300 and above.
Hey I've got a special request. Show me the rib next to your oil filter pedestal. Also count the tension bolts. If 17 bolts and a thin curved rib, it will be a later R5 (with the full flow squirters, large oil pump, tall intermediate runners, normal 12A size primary ports etc). But I suspect yours has the thicker rib and 18 tension bolts as evidenced by what I've seen so far ie the NO plate etc.
The thick dowel pin rib is the same size as a JC Cosmo 13BRE or 20B or the S5 engines NA and T2. Only the FD has a thicker casting there.
I'm actually doing a rebuild on my REPU for some reasons that you may find amusing, well two at least, and you'll see why I'm so close to this subject.
1) to swap out the stupid full flow squirters for the checkball type so I have some oil pressure at idle
2) to swap out the rear thin rib 17 tension bolt R5 plate to the thicker rib 18 bolt plate
3) to swap out the S4 NA assembly and 24 pound flywheel for an FD assembly and an S5 NA flywheel which weighs in at 21 pounds. The lower compression rotors will be safer for boost and the lighter flywheel will spin the engine up a little sooner to help spool the turbo faster and shouldn't be as detrimental to low RPM driveability as it would be if I was keeping the engine naturally aspirated.
4) to update the color. That's very important as you know. "
DD, those exhaust ports are gross

Looks like a squid on a carbon diet.
Thanks for the ideas on the engines, I'm going to do everything you suggested.
If you don't mind, I'm also going to copyright this too, could come in handy some time!
"Copyright? What are you talking about? I'm the one who typed it up so technically it's copyrighted already, by me. I don't think it's physically possible for you to copyright something written by somebody else. Is it? You can certainly plagerize though.
Oh, I think I see what you did there. You didn't use the quote function of the forum and instead did a copy and paste. Well, whatever it's no big deal to me. I know and you know that I know about as much about these R5 engines as anyone ever could. Heh that was a strange sentence to type.
So will this be your first actual teardown? Have fun with the 54mm nut and the often stubborn 19mm front bolt. I've found R5s are usually pretty decent to deal with though, so you're in luck.
As for pony colors, of course do what makes sense to you. I forgot you were looking forward to doing a Rainbow Dash color scheme. So do that if you can make it work. I tried twice and it never quite came together for me.
Any porting plans? These R5 plates take very well to porting. 74 spec is probably the best choice because it's stock on some years and is the best balance between performance and street. Don't bother streetporting because A) it's a 12A so its low end isn't nice like a 13B, and more sensitive ie weaker in the low end and B) it's got the heaviest rotors Mazda ever made for the 12A and comes stock with a 30 pound flywheel. So no easy revs for you! But there is hope! Do like I and others have done, swap out the front CW and flywheel for an 81-82 style! They are 23 pounds! (I just looked it up again on Mazdatrix to refresh my memory). Not 30! So stick with a 74 spec port job and you're golden.
Or heck knowing you you'll choose to keep the ports stock and reuse the rat's nest (gross) but do me a favor: at least clean up the sharp 90 degree edges and casting flash inside the ports. Make them smooth without changing timing. It makes the engine happier at all RPMs because it raises the effeciency. But please leave some roughness behind and absolutely do not polish the ports in any way. Infact go back over them with the roughest stone you can find and only touch up the parts you previously smoothed. Or even take a stone and grind it down on one side so it's off balance, then go back over the ports. Leave the untouched original sand casting alone. This is how I did it in my rotary baja engine and it made all the difference in the world (I actually fired it up on starting fluid even with my baja's painfully slow and old/tired VW starter).
If you'd like another testimonial about port smoothing, the GLC's engine fired up in half a crank for its first time. It was 74 ported but I did all the smoothing and roughening that I always do. My jaw hit the floor and I had to pinch myself back to reality and shut it off as it was only a test fire without coolant. Don't let them run for more than a minute without coolant. Lots of people test fresh rebuilds this way as it's less messy if you have to get back into the engine to fix a problem.
By the way both of these engines are R5 13Bs from various years during their run. One is a 76 Cosmo core with swapped nitrided Y side plates and the other is a J-spec that originally came with either "Automobiles" housings are the blanked type like yours. Can't remember, but I ended up using a set of 75 housings instead, since I had them available and they needed to be compatible with an exhaust manifold (there are no thermal reactor ports on 74-75 housings so they're compatible with R5 and GSL-SE plus FC NA and T2 exhaust manifolds). But then I went with an RB header and a full 2.5" exhaust so it's moot, but it sure came out nice. I also swapped in some Y plates and gave the original NO plate to Atkins in exhange for a Y intermediate plate. The original R5 plates are going into my REPU because they're thicker castings and will handle more boost than a Y ever could.
Someone said a Y rear iron will split at 300HP. But I suspect an R5 will hold together at 300 and above.
Hey I've got a special request. Show me the rib next to your oil filter pedestal. Also count the tension bolts. If 17 bolts and a thin curved rib, it will be a later R5 (with the full flow squirters, large oil pump, tall intermediate runners, normal 12A size primary ports etc). But I suspect yours has the thicker rib and 18 tension bolts as evidenced by what I've seen so far ie the NO plate etc.
The thick dowel pin rib is the same size as a JC Cosmo 13BRE or 20B or the S5 engines NA and T2. Only the FD has a thicker casting there.
I'm actually doing a rebuild on my REPU for some reasons that you may find amusing, well two at least, and you'll see why I'm so close to this subject.
1) to swap out the stupid full flow squirters for the checkball type so I have some oil pressure at idle
2) to swap out the rear thin rib 17 tension bolt R5 plate to the thicker rib 18 bolt plate
3) to swap out the S4 NA assembly and 24 pound flywheel for an FD assembly and an S5 NA flywheel which weighs in at 21 pounds. The lower compression rotors will be safer for boost and the lighter flywheel will spin the engine up a little sooner to help spool the turbo faster and shouldn't be as detrimental to low RPM driveability as it would be if I was keeping the engine naturally aspirated.
4) to update the color. That's very important as you know. "
DD, those exhaust ports are gross
Looks like a squid on a carbon diet.
Joined: Jun 2008
Posts: 8,376
Likes: 30
From: Chino Hills, CA
That was thanks to Cali's first attempt at oxygenated fuel plus failing smog pump return that let the exhaust get too hot.
In Cali, they used an additive called MTBE (Methyl Tetra-Butyl Ether) in higher concentrations than other states as an oxygenate to make a lower-emission fuel without lowering the octane too much. It worked... but the excess MTBE led to heavy deposits on plugs & other parts (ruining efficiency and thus ironically creating more smog) and it also started turning up in the groundwater supply, which made the water taste bad, leave pink stains on plumbing fixtures, and generally scared the bejeezus out of the populace.
So they banned it here and switched to ethanol instead, around 2003 or so I think. Still used some places but only in lower quantities. Lotta lawsuits involved about it.
EGR port? Is that anything like hyperbaric oxygen? Those CA folks sure are strange.
Definitely a good suggestion to check the compression, that's probably the only way to know whether to use it or tear it down hoping it still has some good stuff in there. I'll hook up a transmission and starter and start looking for something to test the compression with.
Can those sleeves in the exhaust ports come out?
Definitely a good suggestion to check the compression, that's probably the only way to know whether to use it or tear it down hoping it still has some good stuff in there. I'll hook up a transmission and starter and start looking for something to test the compression with.
Can those sleeves in the exhaust ports come out?

catchy title and LOTS of GREAT info here!!
Ray, instead of rebuilding a 12A, are you just going to install this one and run it until you do in fact rebuild a current 12A?
Ray, instead of rebuilding a 12A, are you just going to install this one and run it until you do in fact rebuild a current 12A?
Well Dave, that was my plan until I tried to educate the populace about how to make Duck Tape stick to oily surfaces, which was my intent with this post.
But as you can see, Jeff, James and others, while totally ignoring my insights about Duck Tape, have presented pretty compelling arguments for tearing it down.
(Especially if I can sell that midhousing to DD for big bucks; according to Jeff, its just what he needs, but he doesn't know it yet).
So none of my plans worked out, but you're right, the post has been a treasure trove of arcane but very useful information.
Jeff's comments alone should keep me busy for the next two years.
And now I'm thinking I really do need a Rainbow Dash 12A after all, which of course means rebuild so I can paint the rotor housings chartreuse.
I still want to know what those cryptic stampings on the R5 12A rotor housings are, though.