
How to disassemble a 12a???

How to disassemble a 12a???
So I am working on pulling apart a 12a that had compression numbers of 45/45/45 on each rotor, and it was puking oil out of the filler neck, and I am having some issues. I have removed the flywheel, back plate, rotor and housing #2, however, I cannot seem to get the motor the rest of the way apart. Here are my questions:
1. Can you remove the center iron without removing the front cover and housing #1?
2. How do you remove the bolt that holds on the flange for the main accessory drive pulley?
Once I get it pulled apart, I'll post pictures of the failure of a port job that the builder did.
1. Can you remove the center iron without removing the front cover and housing #1?
2. How do you remove the bolt that holds on the flange for the main accessory drive pulley?
Once I get it pulled apart, I'll post pictures of the failure of a port job that the builder did.
The issue is that you need to remove the bolt in the front the of eccentric shaft before removing the flywheel. I'm speaking from experience. I did exactly what you did and it took three of use to hold the engine down. The easiest way I have found is to use a flywheel brake and then loosen the front bolt. Then loosen the flywheel nut.
Forgot to ask, is the front bolt standard (left loose, right tight) or reverse thread (left tight, right loose)?

Joined: Mar 2009
Posts: 983
Likes: 0
From: Minneapolis, Minnesota
you have to take the front pulley off. In order to get the intermediate plate off you MUST lift the e-shaft straight up a couple inches so you can get the intermediate plate to angle enough to clear the lobe for the rear rotor. keep a close eye out for the triangle peices of the apex seals, they might stick to the intermediate plate and fall off into the coolant passages.
Ive pulled my 12a 3 times this summer so if you got any questions let me know. Im like an expert now =P
Where exactly was it leaking oil again? Out of the filler tube? Thats not a good sign. Could be MAJORLY over filled
Ive pulled my 12a 3 times this summer so if you got any questions let me know. Im like an expert now =P
Where exactly was it leaking oil again? Out of the filler tube? Thats not a good sign. Could be MAJORLY over filled
Some seasoned rebuilders may want to comment, but my idea:
put the flywheel nut back on tight, and have a guy with the wrench/socket holding it while you unbolt the front hub. Once the front hub is off, the e-shaft can be lifted.
Since they are bolted at opposite ends, one side will hold tight while the other loosens.
I don't think the sleeves/dowel tubes extend far enough (iron has to be lifted a little over an inch), but it will make it easier to lift off the iron if they're out.
Front bolt is standard/clockwise tightened, 19mm. It's a tough cookie to get off.
Take your engine (the unassembled part) to a mechanic with an impact wrench (ie any mechanic) - he should be able to buzz it off in seconds. Make sure you take a 19mm (?) nut with you in case he doesn't have one (can't imagine him NOT, but...)
Pulling the sleeves "should" make the intermediate easier to pull. mazda sez you need a special tool but mine came out no prob...
Good for you taking on a rebuild - there are numerous DVD videos out there that can be a lot of help!!
Stu Aull
80GS
Alaska
Pulling the sleeves "should" make the intermediate easier to pull. mazda sez you need a special tool but mine came out no prob...
Good for you taking on a rebuild - there are numerous DVD videos out there that can be a lot of help!!
Stu Aull
80GS
Alaska
Trending Topics
Power = Cubic Dollars
Joined: Jan 2006
Posts: 347
Likes: 0
From: Olathe, KS
Here is what I think you should do. PUT THE TOOLS DOWN!!!! Get online, or pick up a pone. Call Atkins Rotary, and order up one of their rebuild videos. I promise you that it is worth the $15, in the amount of knowledge that they share with you on a rebuild. Also, you can pause it, go to work, start it again, then pause it.
IT SAVED ME ON MY FIRST BUILD!!!!
GL with your rebuild, and I hope the yahoo didn't totally screw those irons up with shotty portwork.
IT SAVED ME ON MY FIRST BUILD!!!!
GL with your rebuild, and I hope the yahoo didn't totally screw those irons up with shotty portwork.
Joined: Jun 2008
Posts: 8,376
Likes: 28
From: Chino Hills, CA
If your problem is primarily how to snub the pulley so you can turn the front e-shaft bolt... using a drive belt, an apropriate length of 2x4, and a bench vice, you can cinch the belt tightly enough to snub the pulley. You might damage the belt in the process, but belts are cheap.
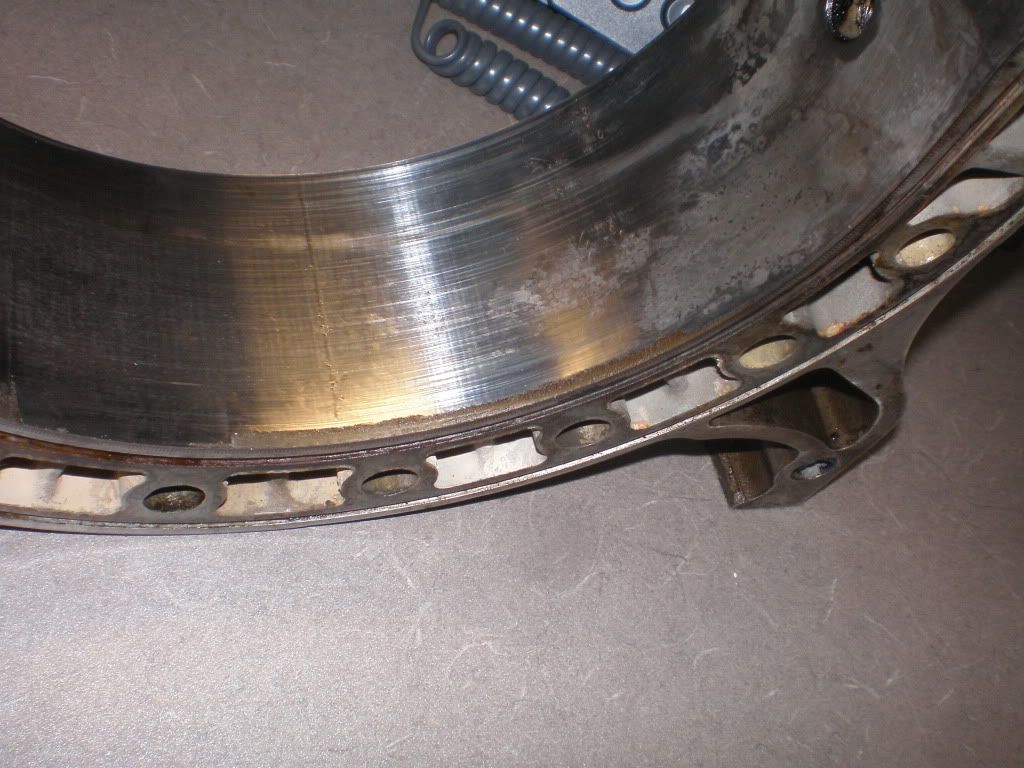
The thing is, the motor, from what I've seen pulling it apart, is completely non-salvageable. Major chrome flaking on housing #2, it was run low on oil in part of it's life (e-shaft is blued on the rear rotor lobe), and the port job is a complete hack job. I'll snap pics and post them quickly before I head to work. The only part so far that has been salvageable so far has been rotor #2, which was in phenomenal shape, and some of the hard seals.
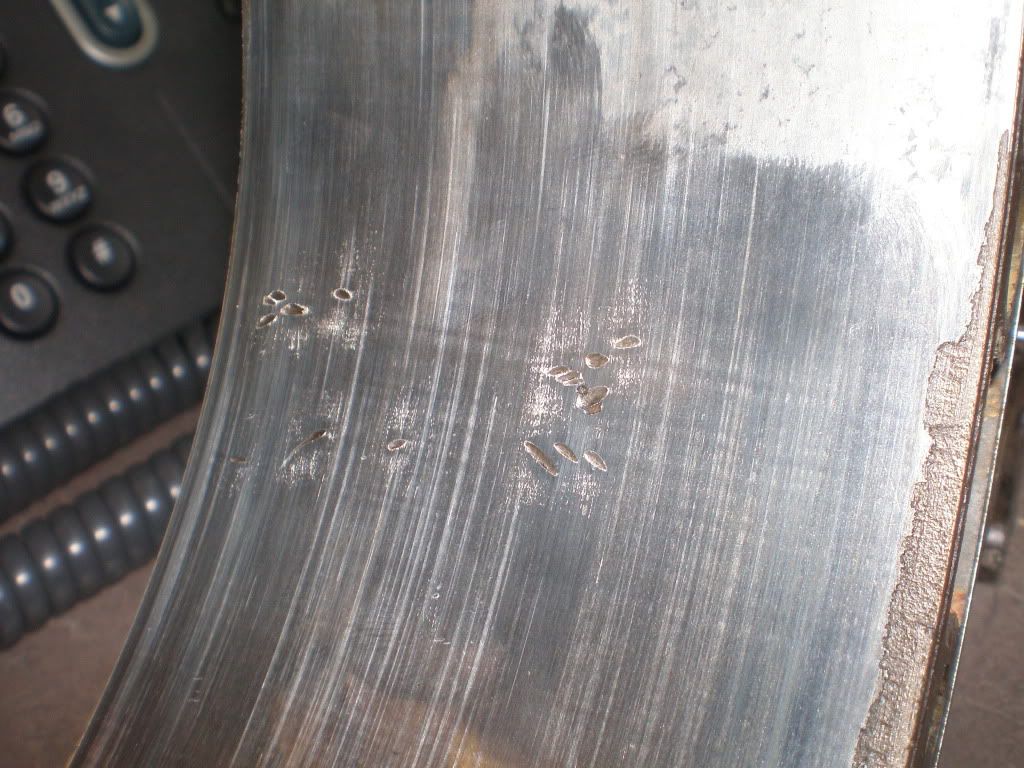
Forgot to add, 3 of the corner seals on rotor #2 were missing their springs when I pulled it apart...
Ran out of time before work, will post them tonight.
Forgot to add, 3 of the corner seals on rotor #2 were missing their springs when I pulled it apart...
Ran out of time before work, will post them tonight.
Joined: Jun 2008
Posts: 8,376
Likes: 28
From: Chino Hills, CA
IIRC, bluing on the sides of the e-shaft lobes is not unusual. Been a long while since I looked at one, though. Luckily.
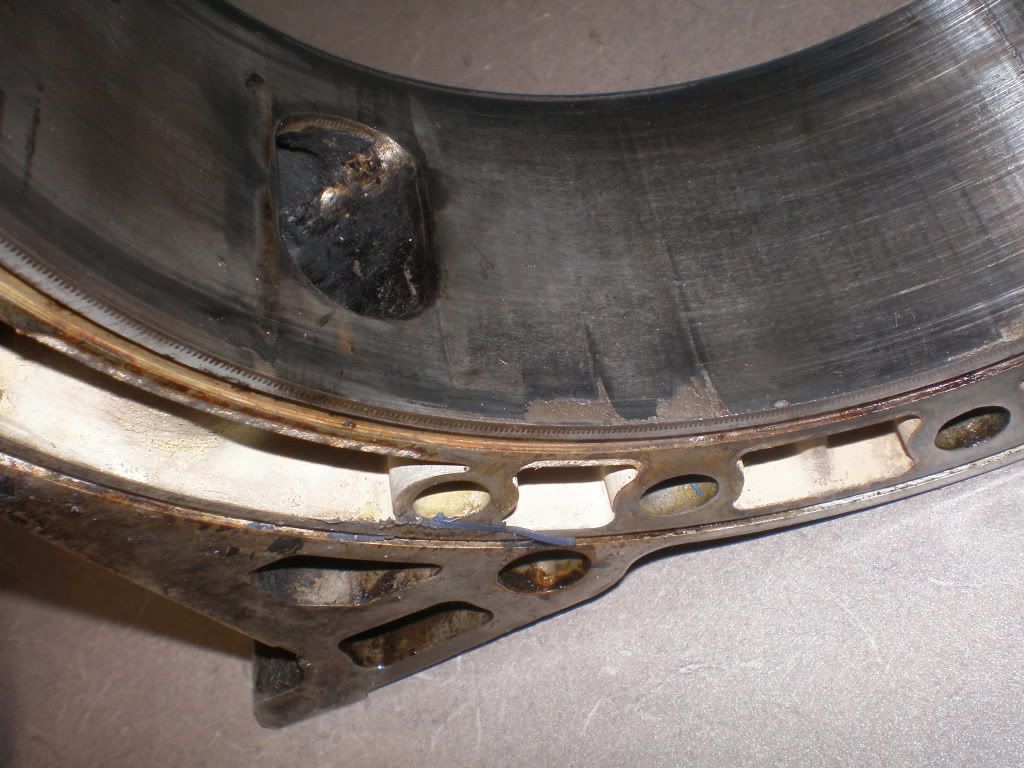
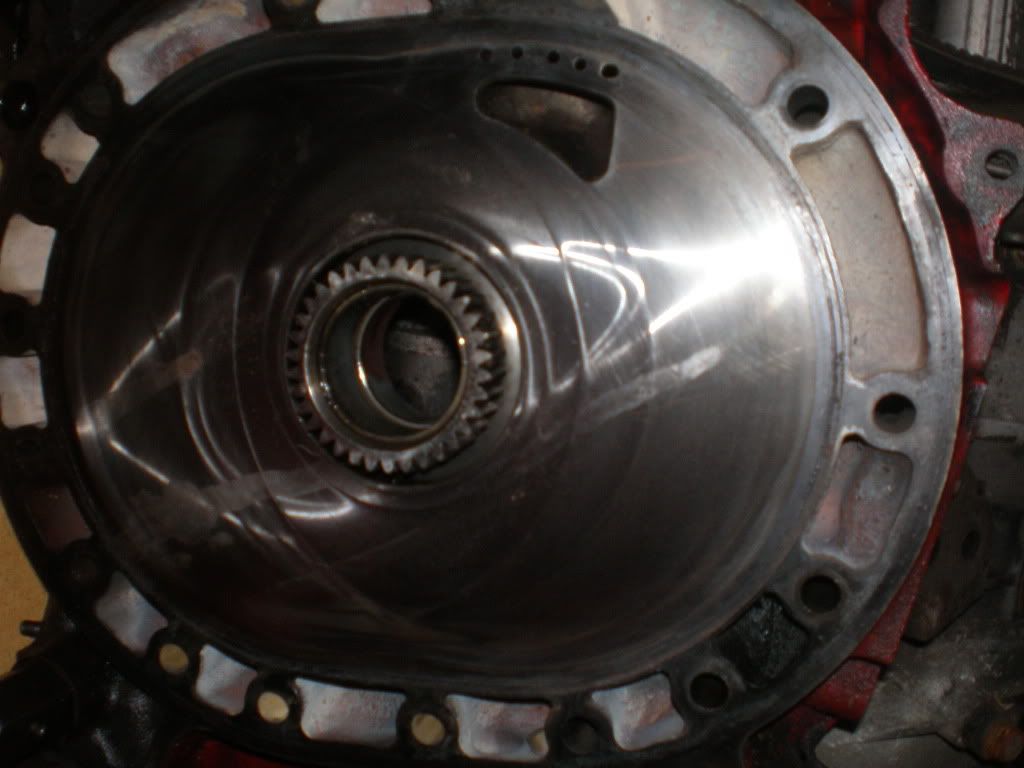
both the back plate and the center iron have evidence of rotor #2 contacting them. I'll get pictures tonight of it.
Joined: Jun 2006
Posts: 4,815
Likes: 24
From: Columbia, Tennessee
I guess I didn't read enough... You will need to remove the front cover and front bolts and pulley. You may need to do a bit of tapping or prying to separate the sections. The way I have broken down 13bs in the past was by impact wrenching the flywheel nut off and removing the rear bolts. Then I flipped the motor over and disassembled it from the front.


Joined: Mar 2009
Posts: 983
Likes: 0
From: Minneapolis, Minnesota
Wow.. if i was you, screw the motor and try to find a post-rebuild short block. That thing is beat up BAD. Its amazing that even ran at all. Im thinking those dings in the housing might be your corner springs lol
The story behind the motor is this:
I purchased a S2 from a Vietnam Vet in Ann Arbor, Mi. He had purchased the car in FL and drove it back up so he would have a car that he could work on with his daughter's then fiance (He had a FB as well). Well his daughter and her fiance called it quits, and he needed some money, so he put it up for sale. I got the car for $1000, with a set of 15x7 4x110 Enkei 92's w/ 0 offset, a RB Holley setup, RB 1-piece strut brace, MSD Blaster 2's, full RB SP exhaust, etc. etc. I sold the RB setup with lines and everything for $700, sold the shell when it rusted out to the junk yard for $100, got a rear end, tokico blue's and illumina's, RB springs, and rebuilt calipers that went onto my current S3, so it paid for itself.
So the guy said that the motor was rebuild just before he bought the car, and he had put ~5k on it before I purchased it. The hard seals were in excellent shape when I pulled the rear plate and rotor, so couple that with the hack job port job, and I don't doubt that it was rebuilt recently, however it was beat on, run low on oil (I'll have to dig out the rear rotor bearing, and take a picture of it. SHOT), and apparently was missing the corner seal springs. I did the screw trick, and the secondaries worked reliably for 5 miles before it started smoking profusely. I could barely keep the motor running, even at full throttle. I pulled into the driveway, and my parents yelled at me to shut it down because I was puking massive amounts of oil out onto their driveway. Oil had forced the filler cap up and I was pushing the contents of my sump out through the filler neck.
I had a terrible time getting it to start the entire time I owned the car, so I think that I bought the car with a bunk motor.
I agree that the hand drilled holes are epically terrible. I'll get more pictures tomorrow when I get greasy again of the gouges in the irons.

 . But atleast you have tons of aftermarket parts to make up for the bunk motor.
Here's what you do. Put the engine back together, skip the rear rotor, it's not needed. Throw in at least 4 tension bolts and the flywheel. You will need to tie the flywheel down, the adjusting bracket from the alt works well. One bolt in the flywheel, the other where the tranny bolts went. Heat the e-shaft bolt, preferably with acetylene and zip if off with an impact. E-shaft bolt is held by a killer thread lock and it takes high heat or a 3/4" impact wrench to break it loose. That threadlock and 90 lb/ft of torque is tougher to break loose than the 260+ lb/ft of torque that holds the flywheel nut.
Once the rear iron and housing are off, again, lift the e-shaft up a couple inches to remove the center iron. Iron will need to be rotated slightly to slide over the e-shaft. Dowel pins need to be removed first. If they're stuck, take a wheel bolt and box wrench that the threads just fit through. Screw the bolt with the wrench into a dowel pin, then use a hammer to tap up on the wrench and draw the pin out.
I find it very hard to believe that that engine ran for 5k w/o corner seal springs. More than likely they popped out or are still there and quite flattened. E-shafts do have a bit of blueing on the edge due to the factory heat treatment. I was unaware of this with the first couple of engines I tore down and threw away several perfectly good e-shafts. Live and learn.
Fwiw, looking at the dents in the housing face, don't count on salvaging any good apex seals from that rotor.
Thanks for that rundown. That's exactly what I was looking for. It looks like pulling it the rest of the way apart is a no-go right now because I left the flywheel at my grandpa's place with all my spare parts.
I'll also get some shots of the apex seals sometime. They looked really good.
Joined: Jun 2008
Posts: 8,376
Likes: 28
From: Chino Hills, CA
Looking at those pics just makes me shake my head at just how destructive ignorant people can be.
Especially when they are unable to admit to themselves that they don't know what they are doing.
Especially when they are unable to admit to themselves that they don't know what they are doing.