When you click on links to various merchants on this site and make a purchase, this can result in this site earning a commission. Affiliate programs and affiliations include, but are not limited to, the eBay Partner Network.
A recent thread inspired me to make my own so we can compare notes (actually it's so I can visually fill you guys in on what it takes to do this work because as you know a picture speaks a thousand words). https://www.rx7club.com/1st-generati...nikki-1108584/
The carb I'm working on is an 84-85 style. It needs to be naked (rawr rawr). If it doesn't make it go faster, it gets deleted. I'd normally keep the fast idle but not this time.
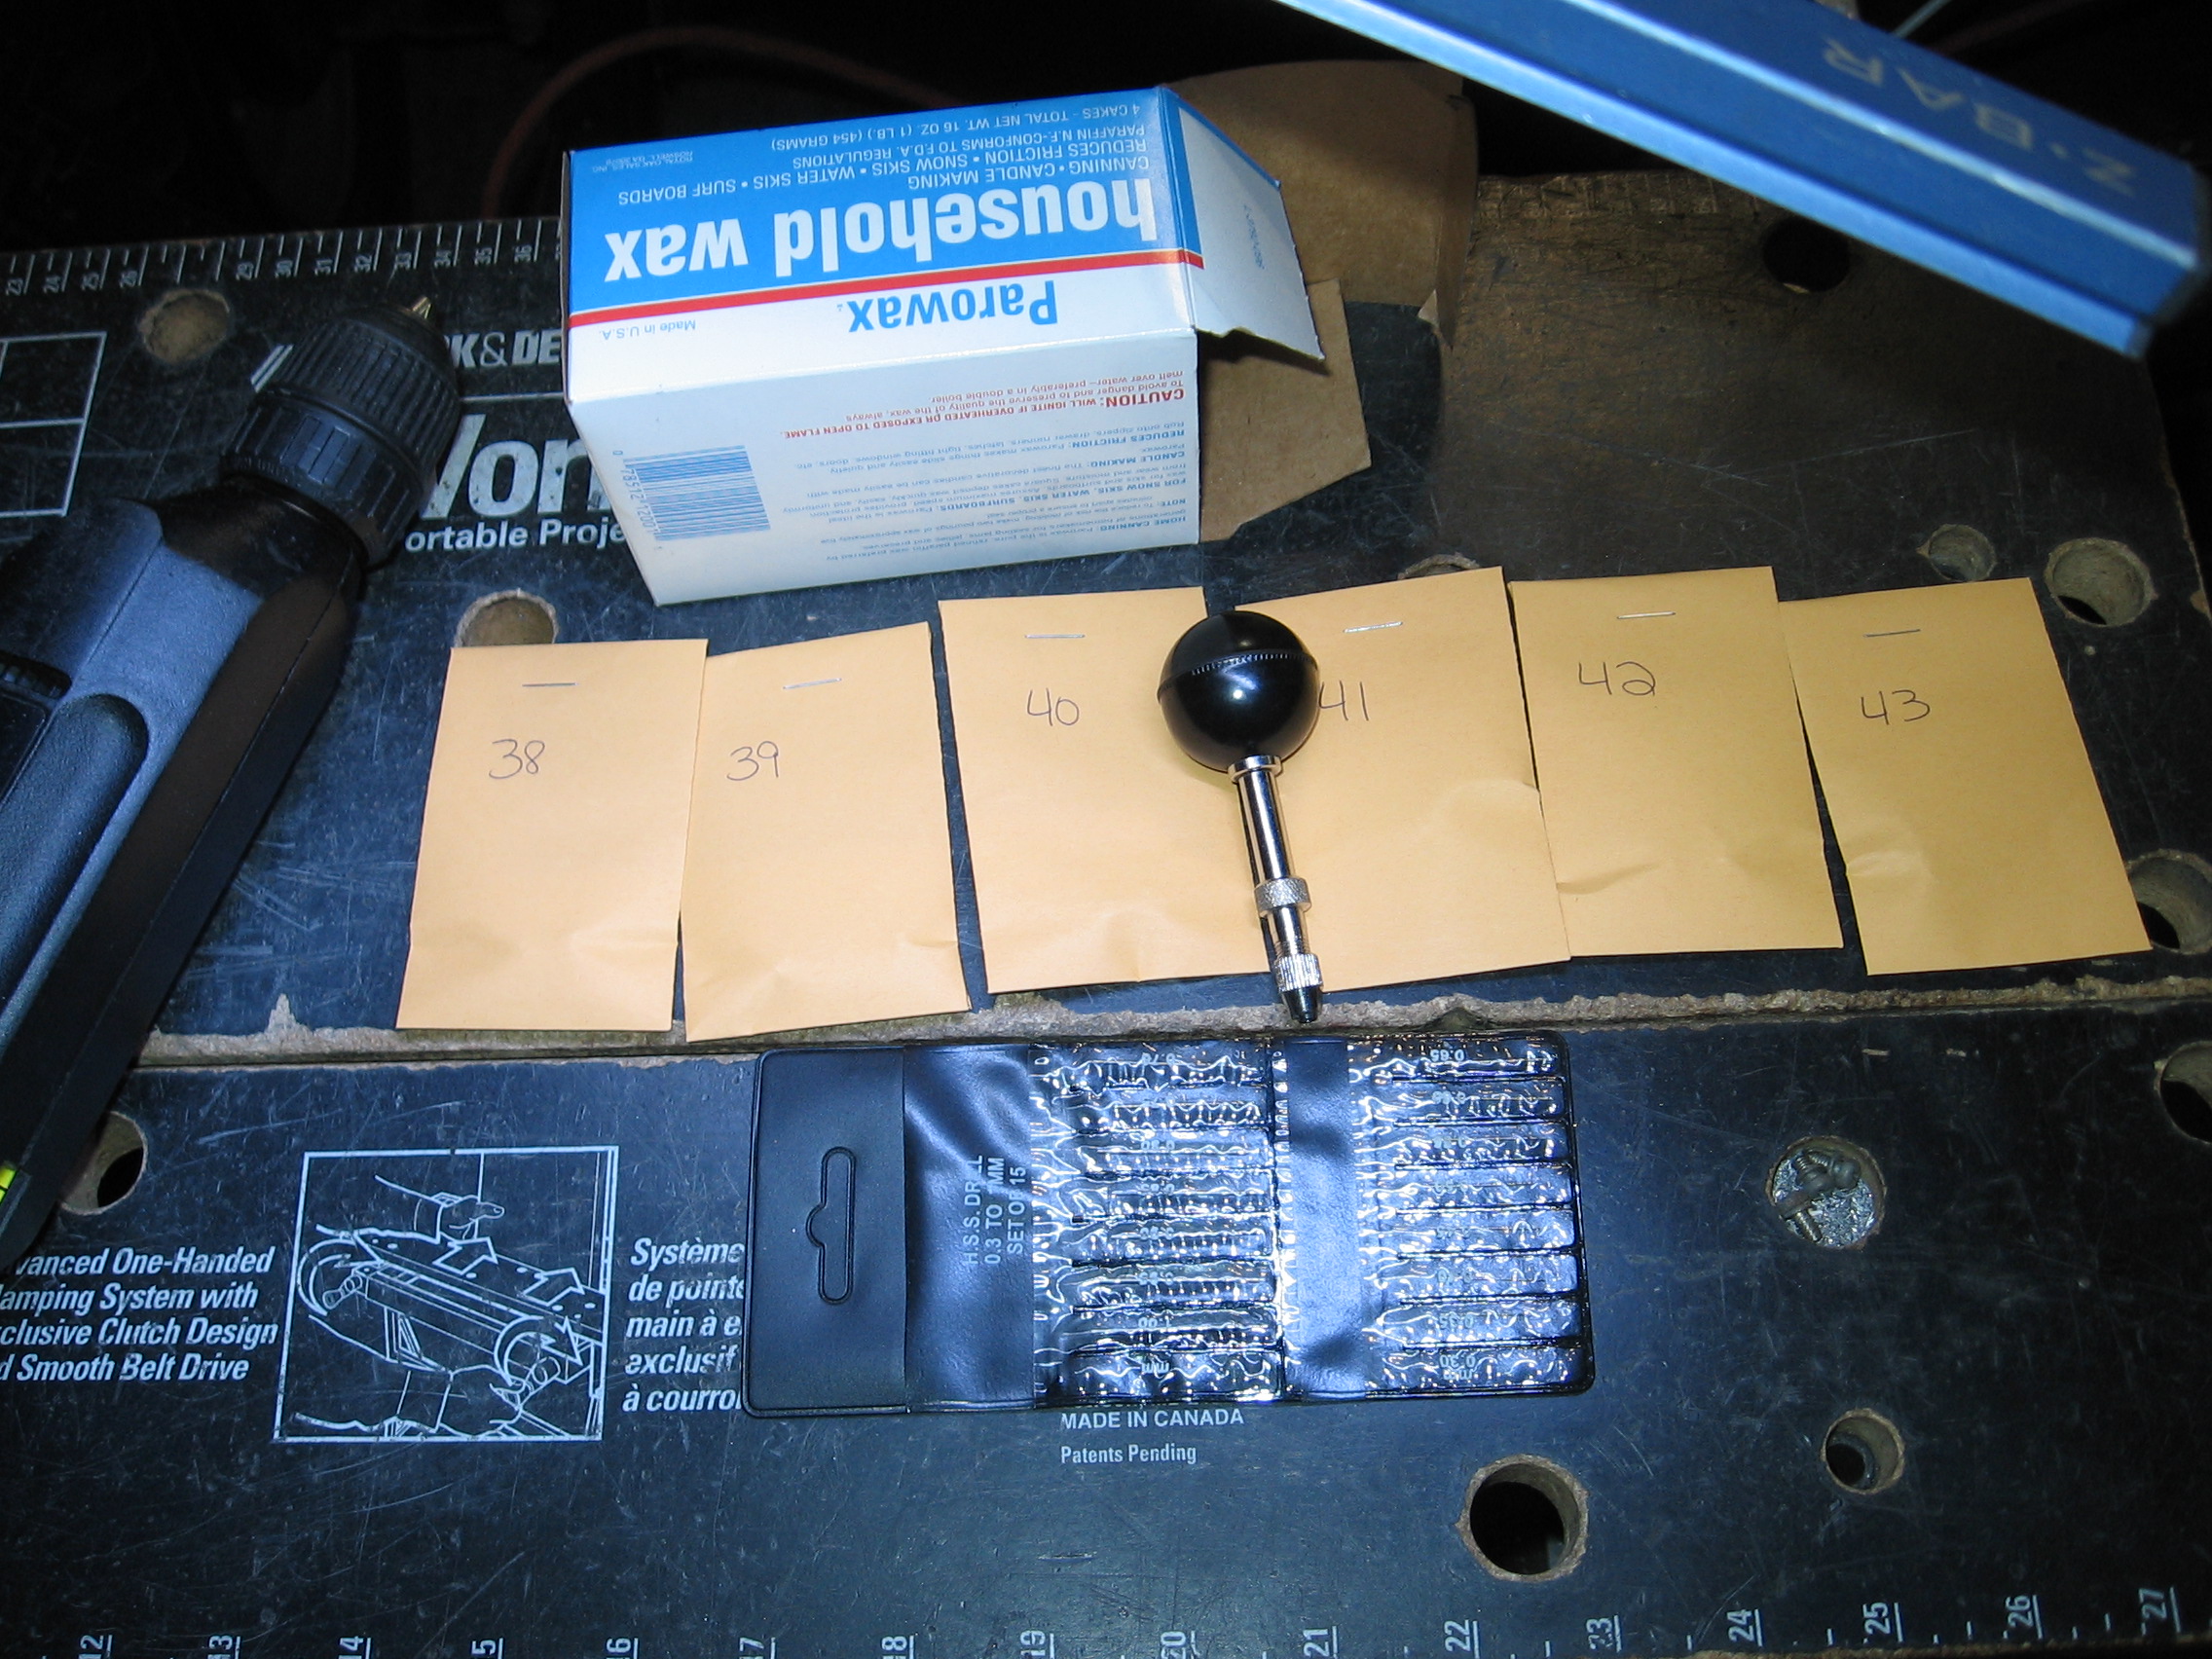
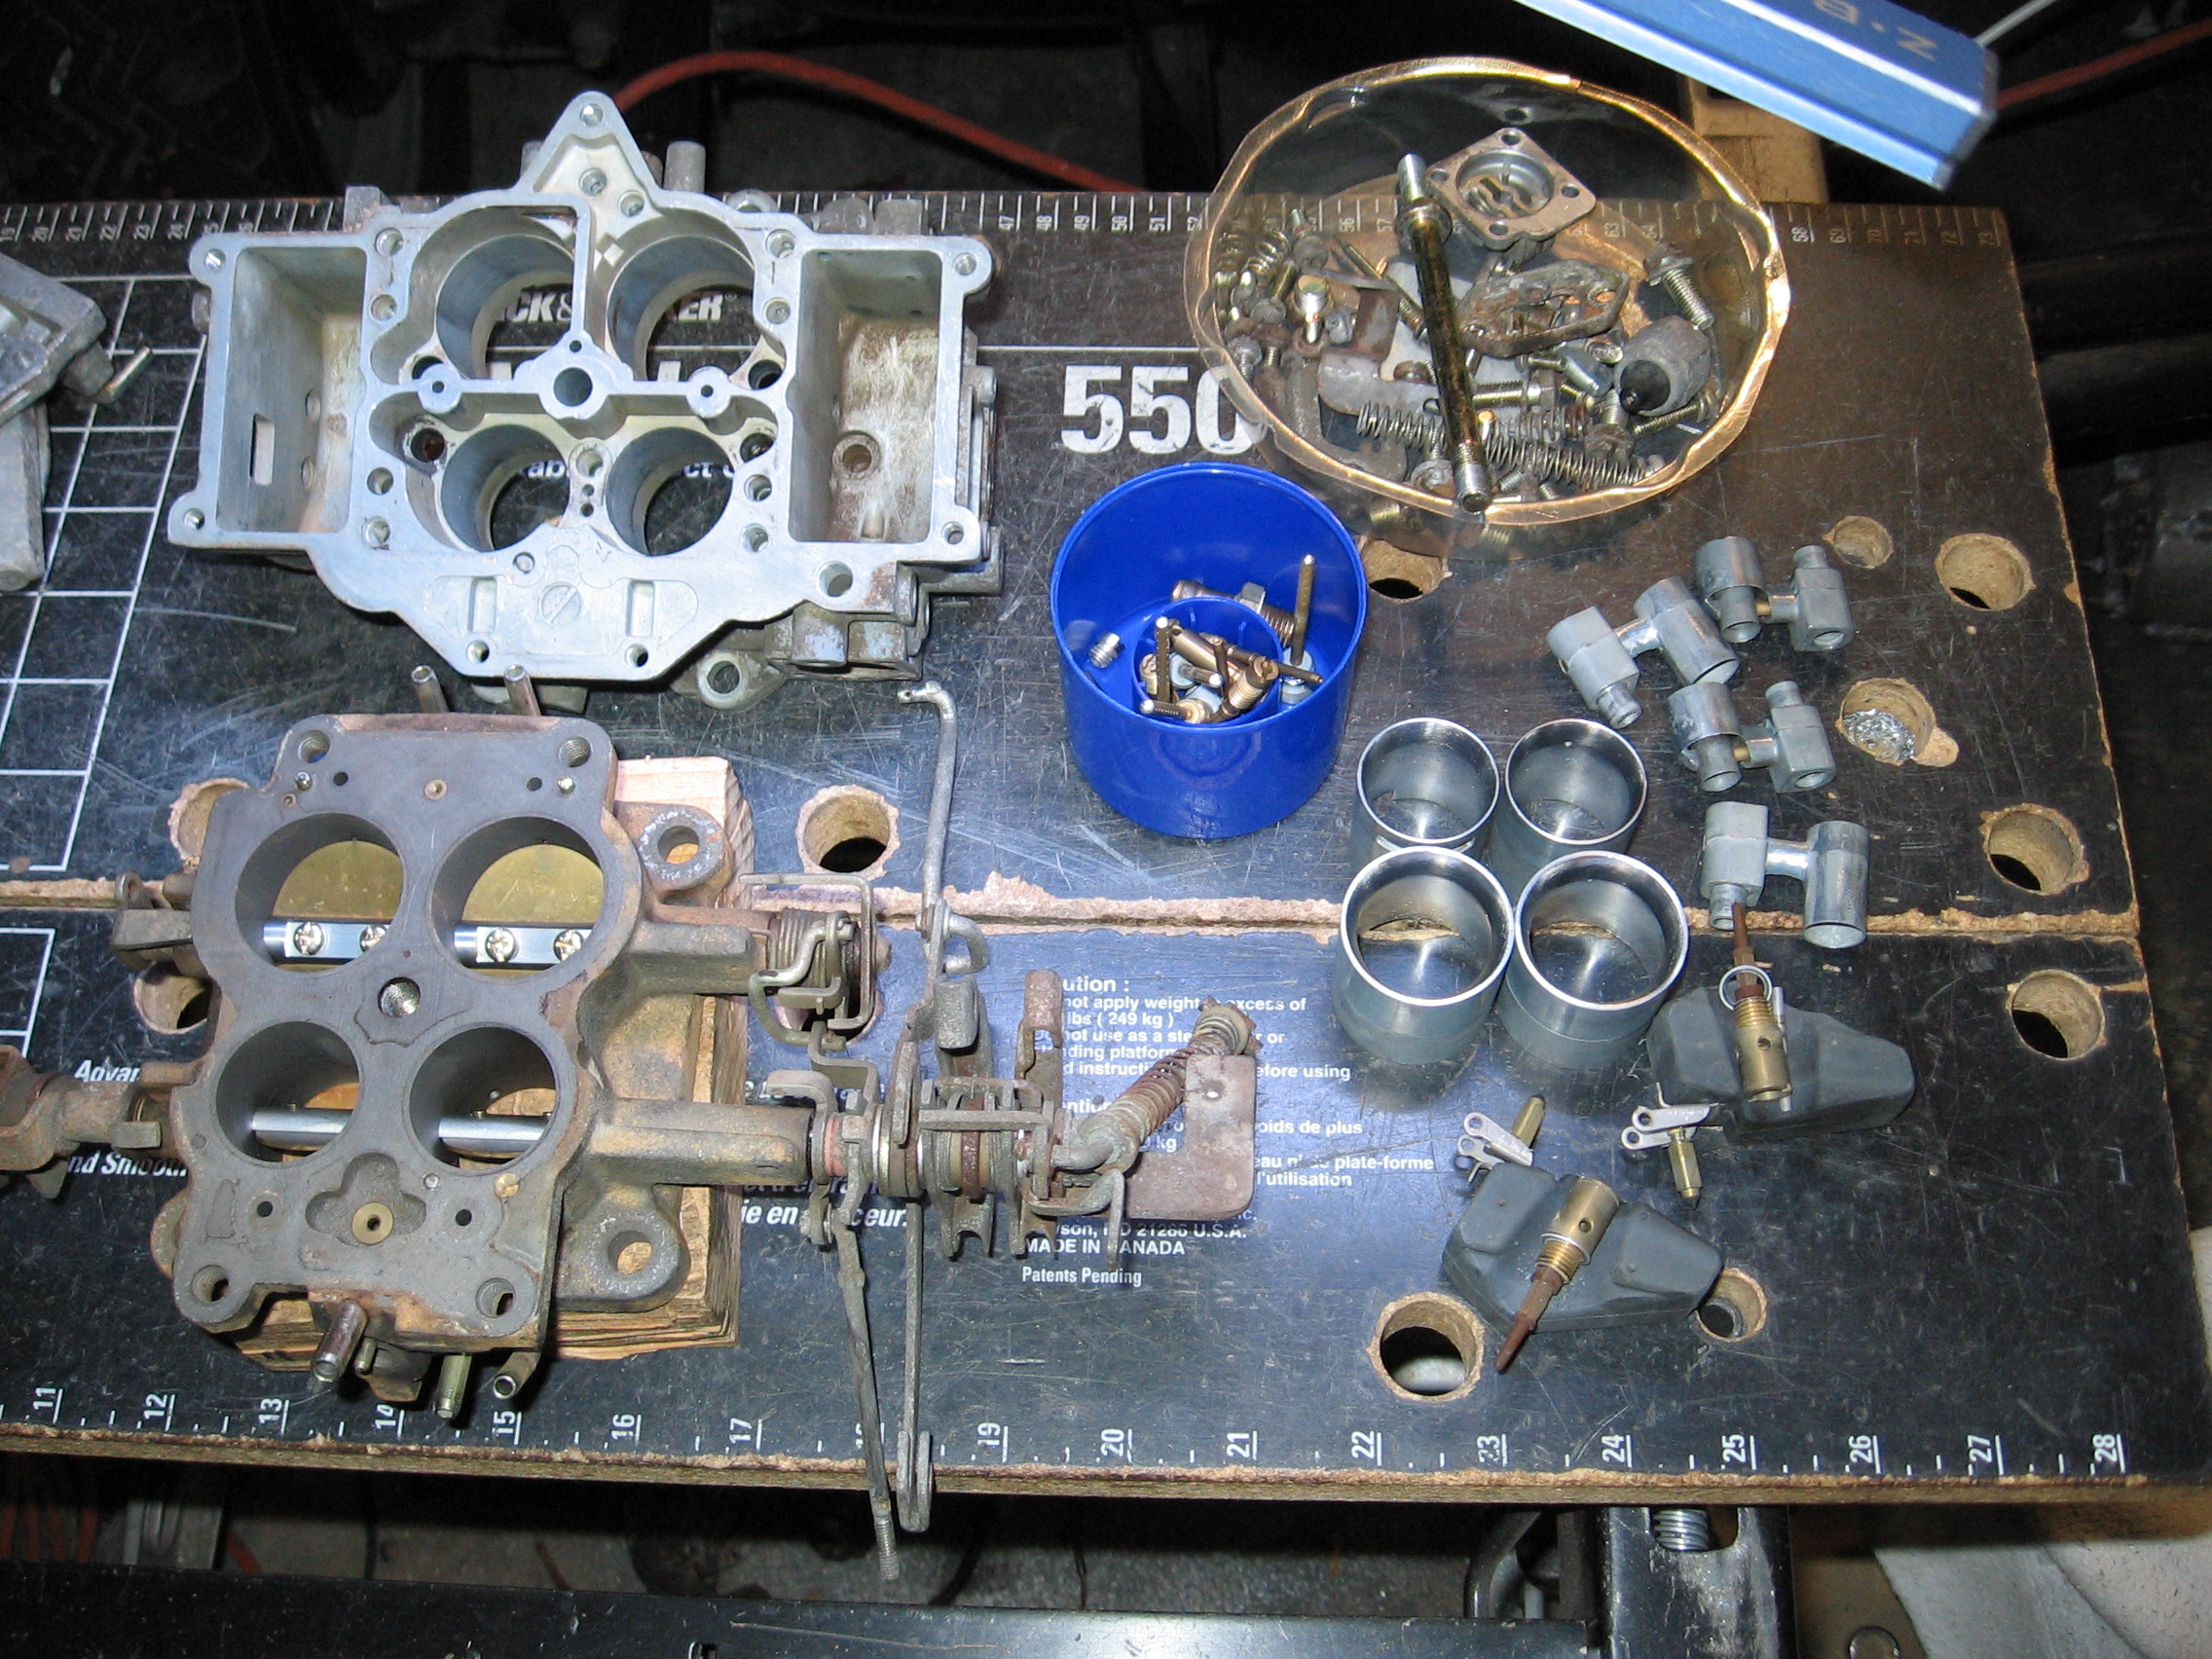
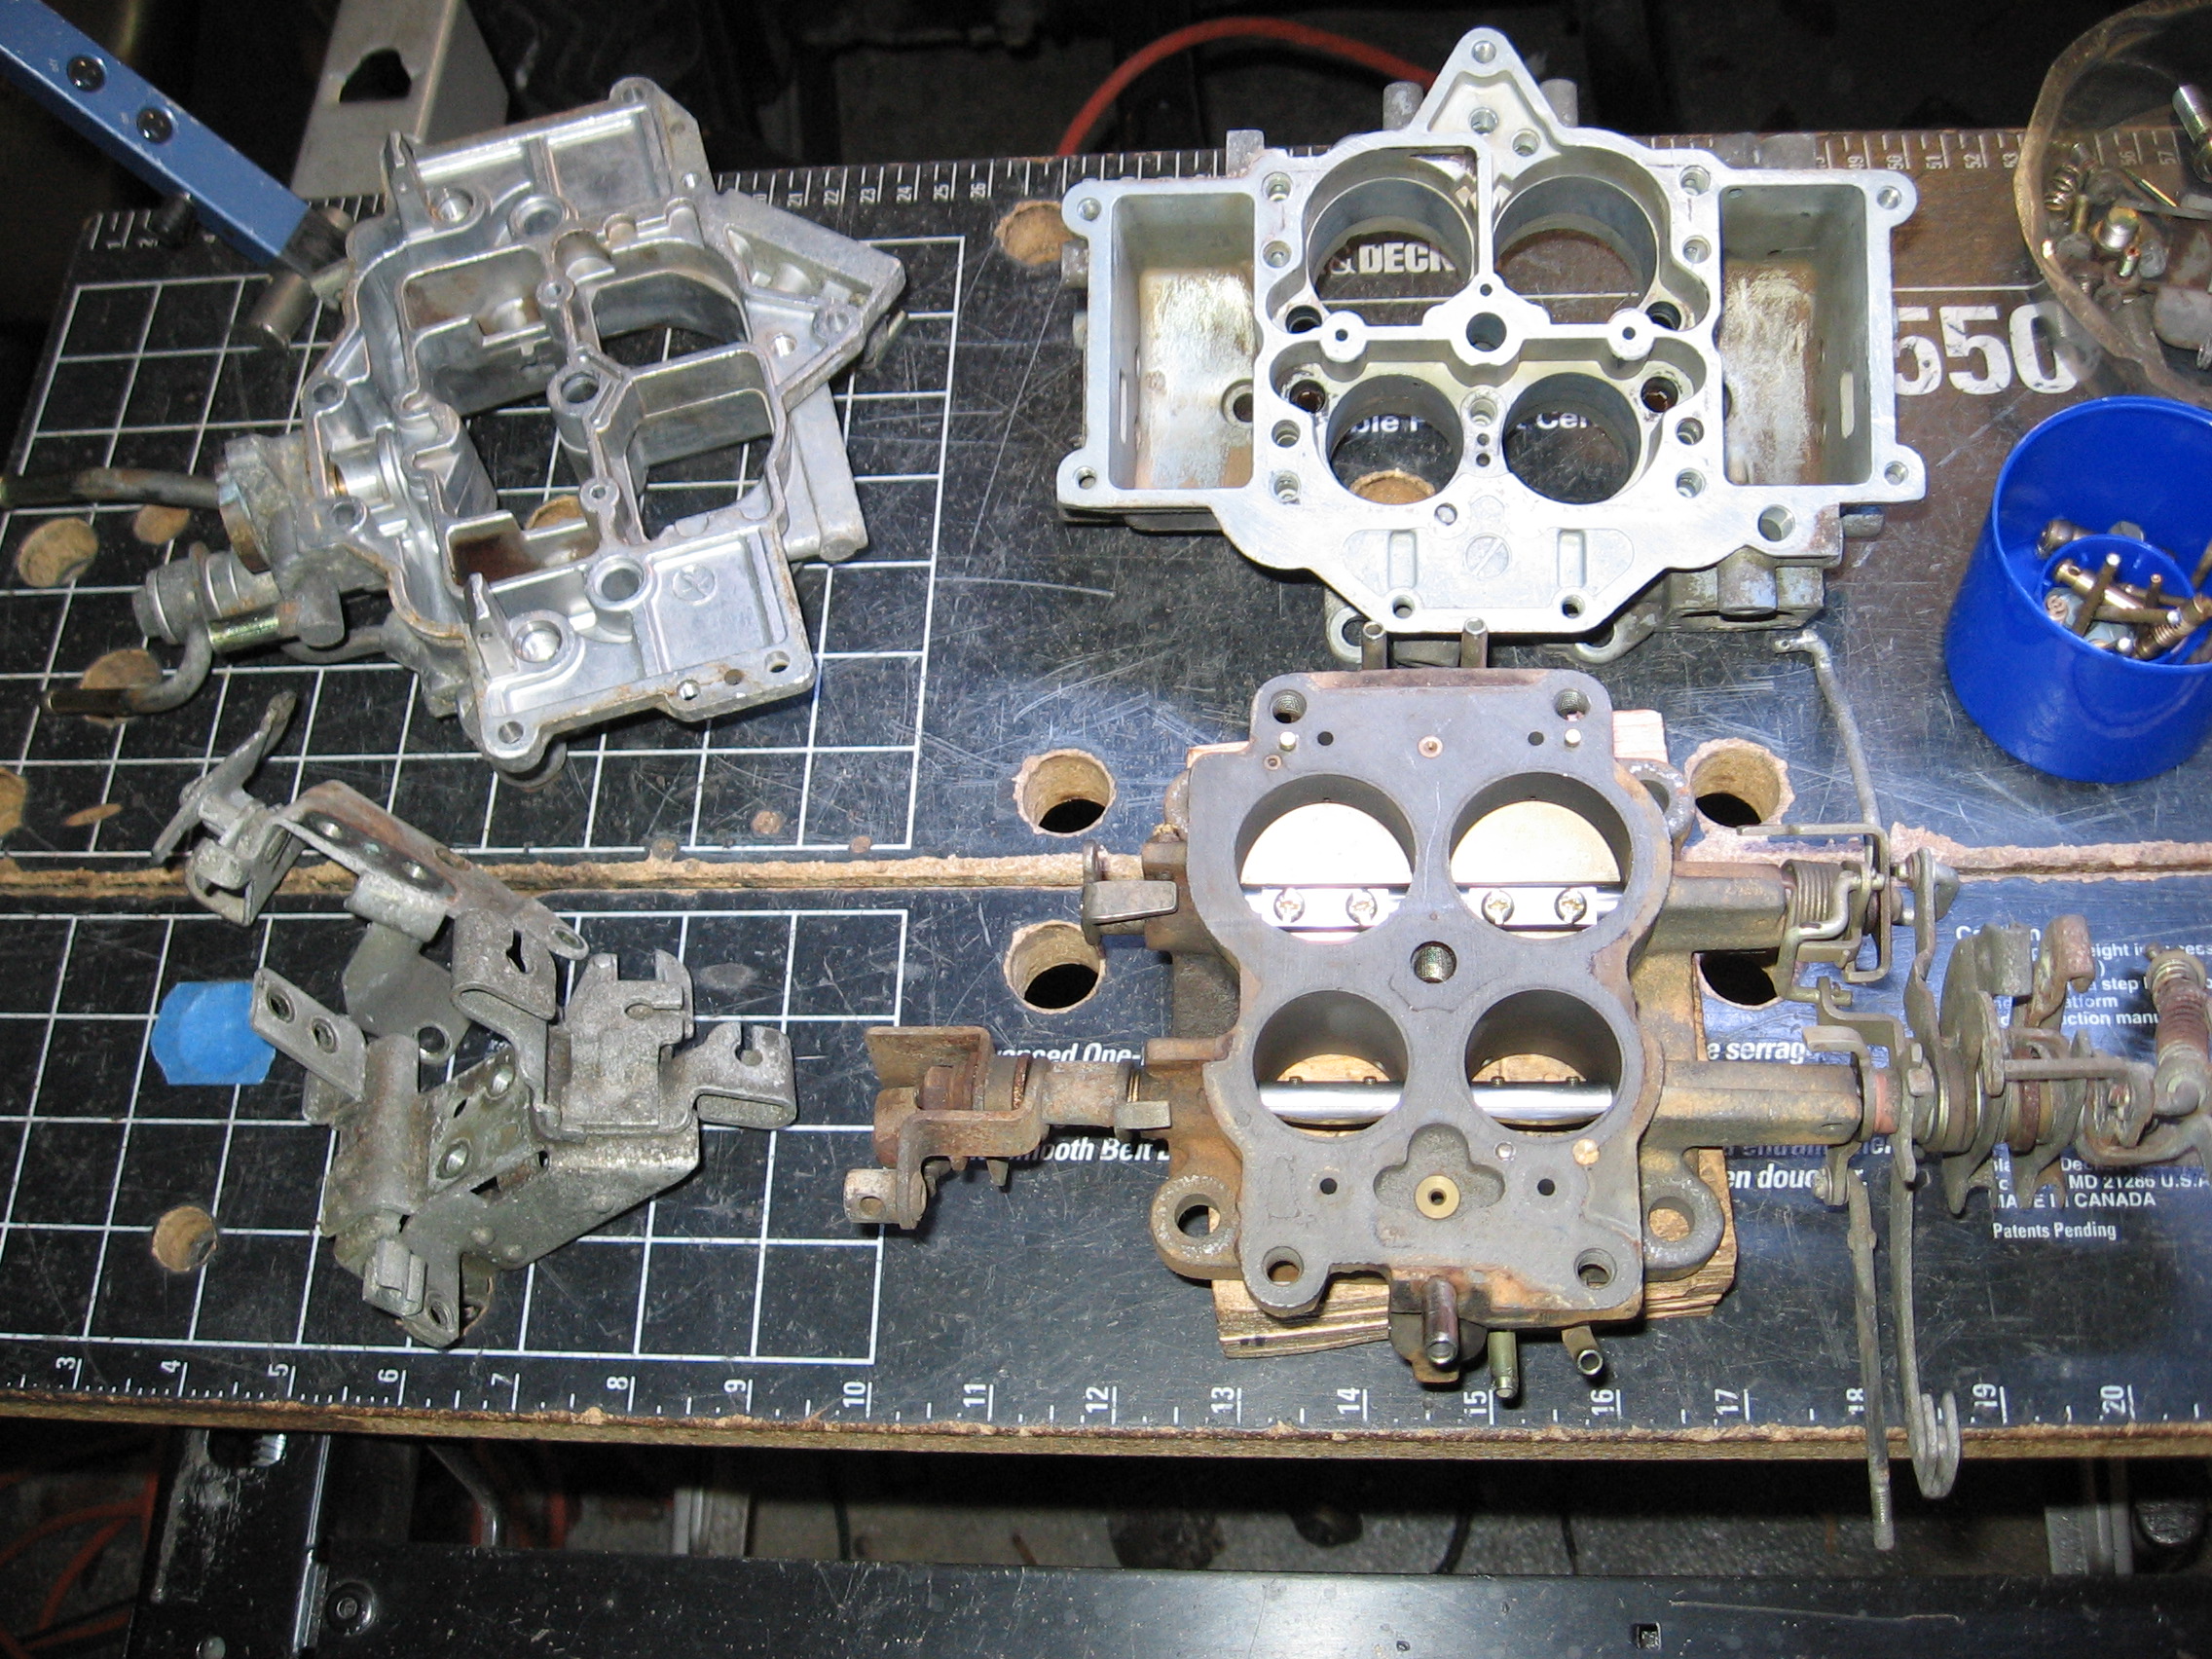
I've only just torn this carb down. The parts have not been fully cleaned yet, just degreased so they can be handled. The secondary linkage has not even been tacked yet.
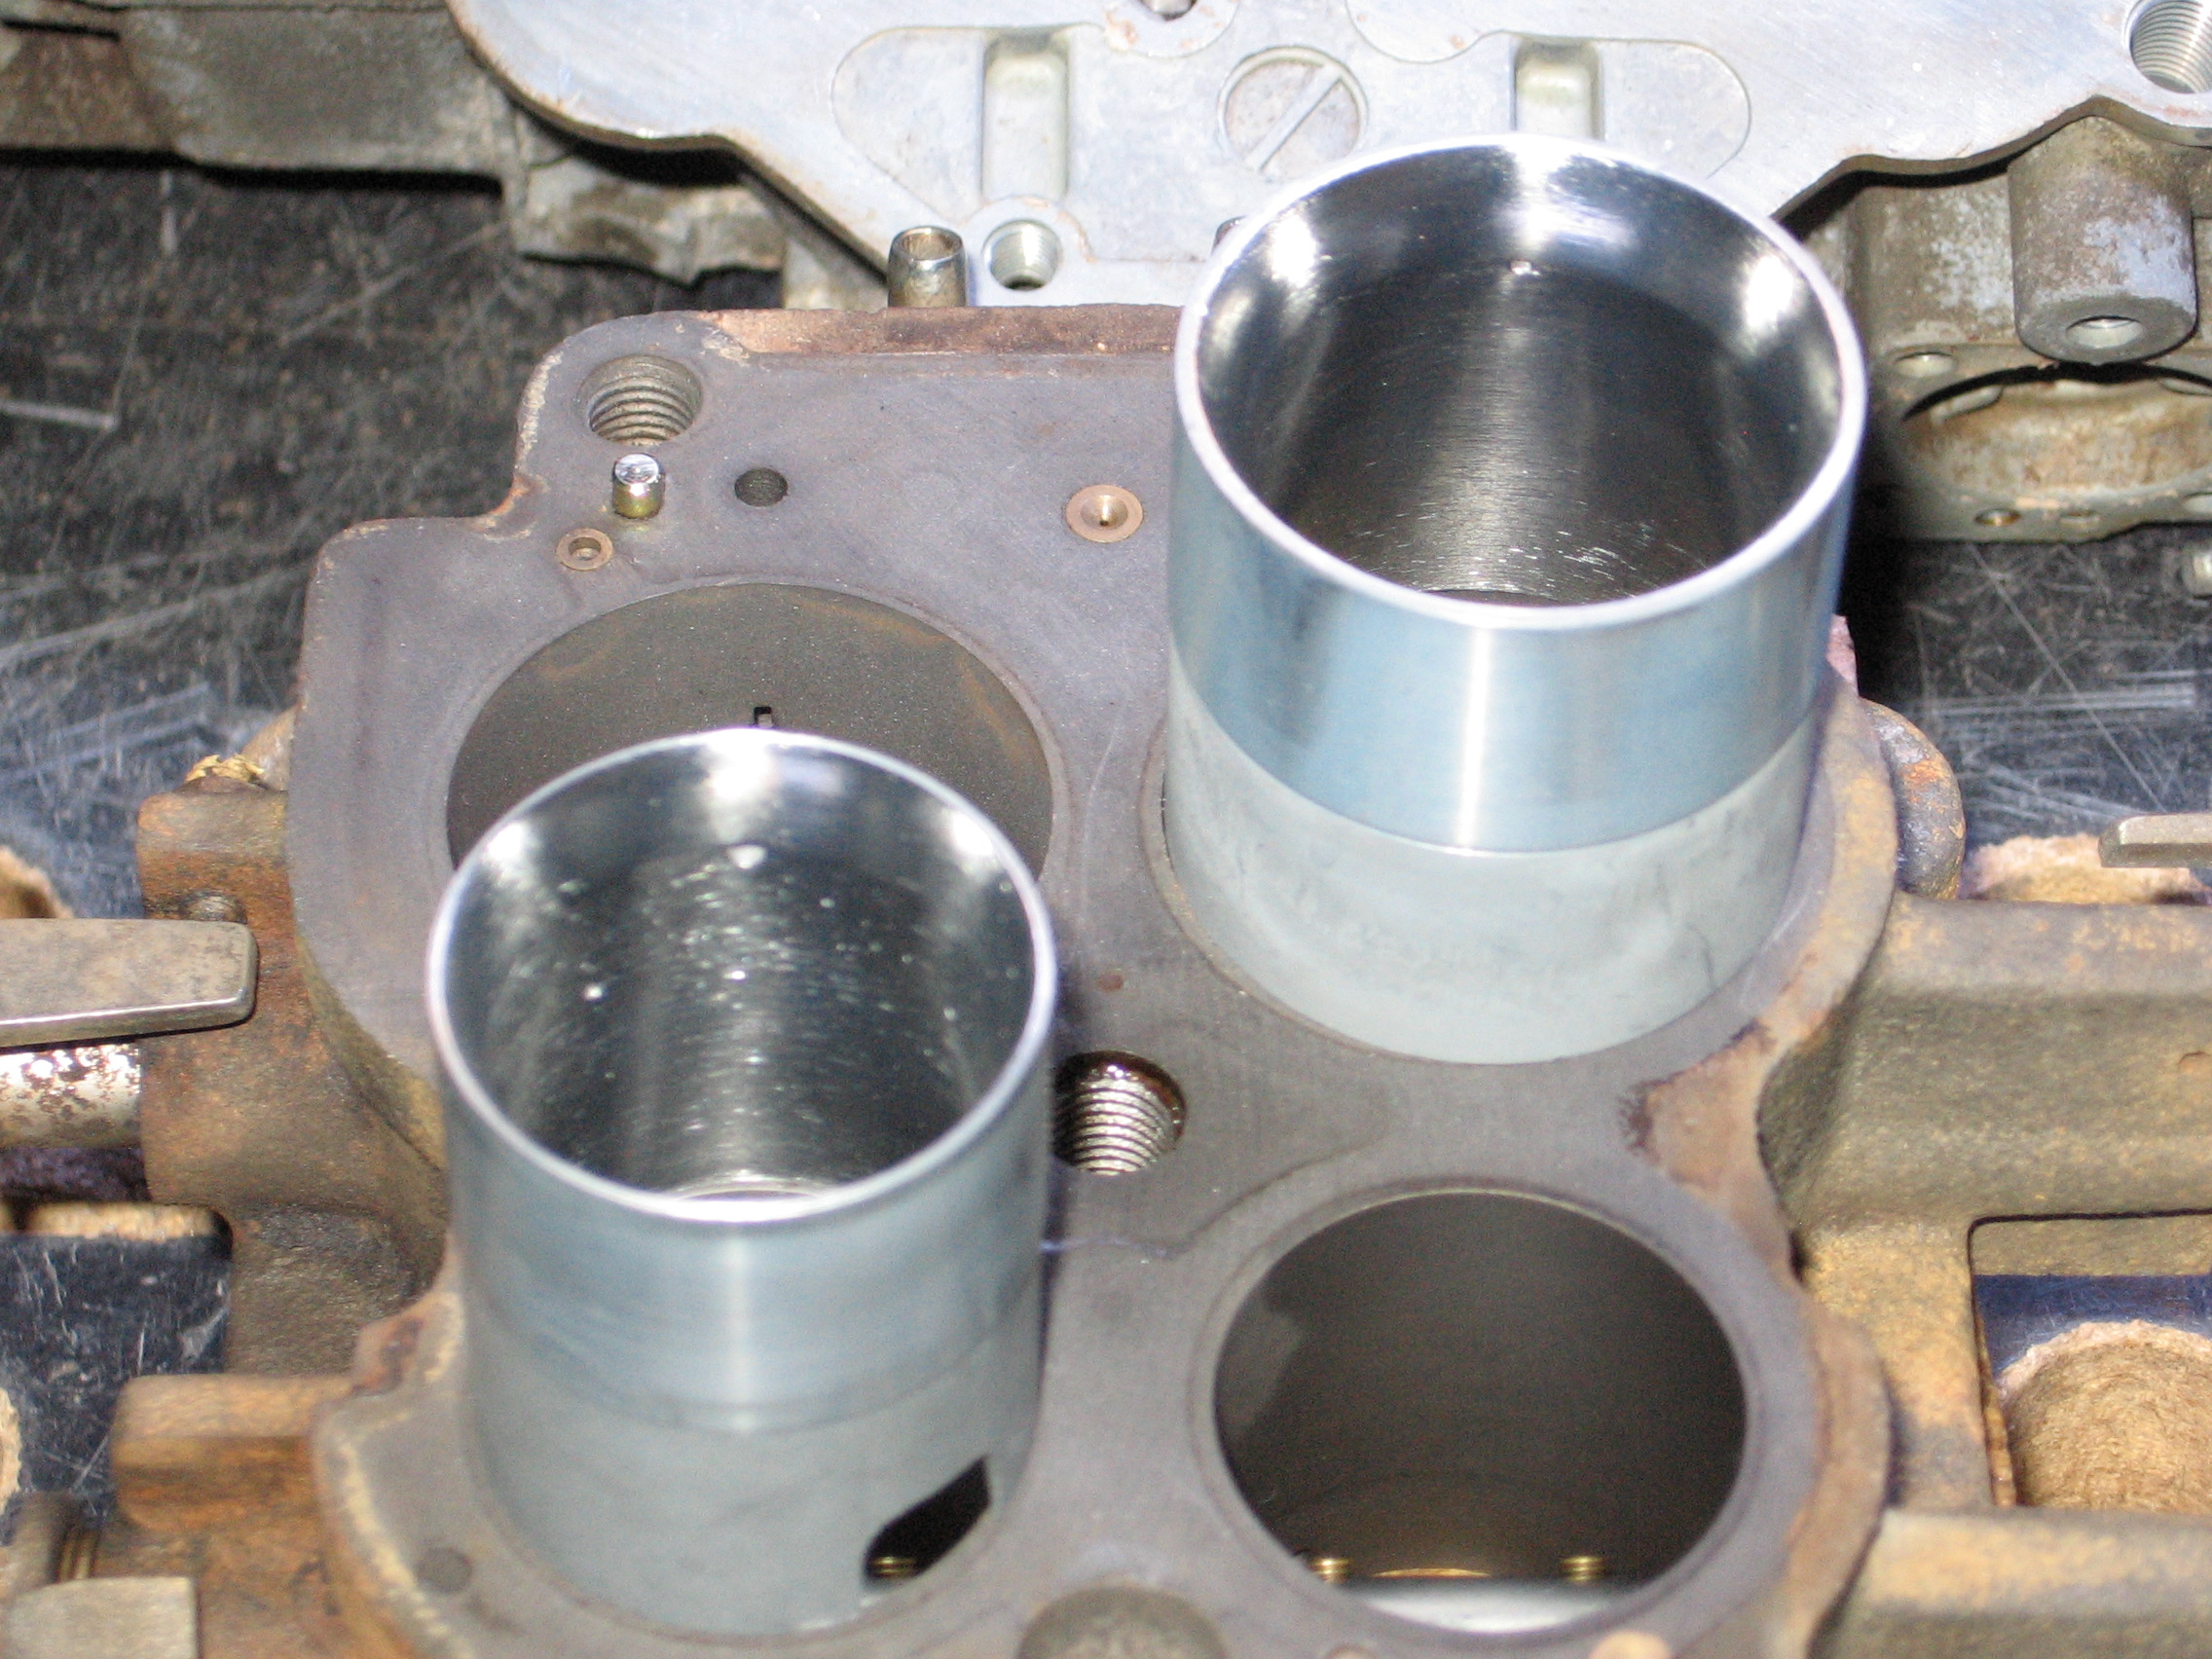
The venturis were hogged out yesterday. The sizes ended up at 24.75mm to 24.8mm primary and 28.16mm to 28.23mm secondary. Why did I not stick to the recommended 24.5mm and 28.0mm? Because this carb is supposed to be compatible on stockports up to streetports. And I figured I'm good enough that a couple more tenths of a mm isn't going to hurt anything, kinda like a gift (hey, it's Christmas time!). Actually the truth is the factory secondaries in this carb were undersized at only 27.85ish mm. What a bunch of Grinches they were!
For now, here are some pics of my progress with more pics to come.
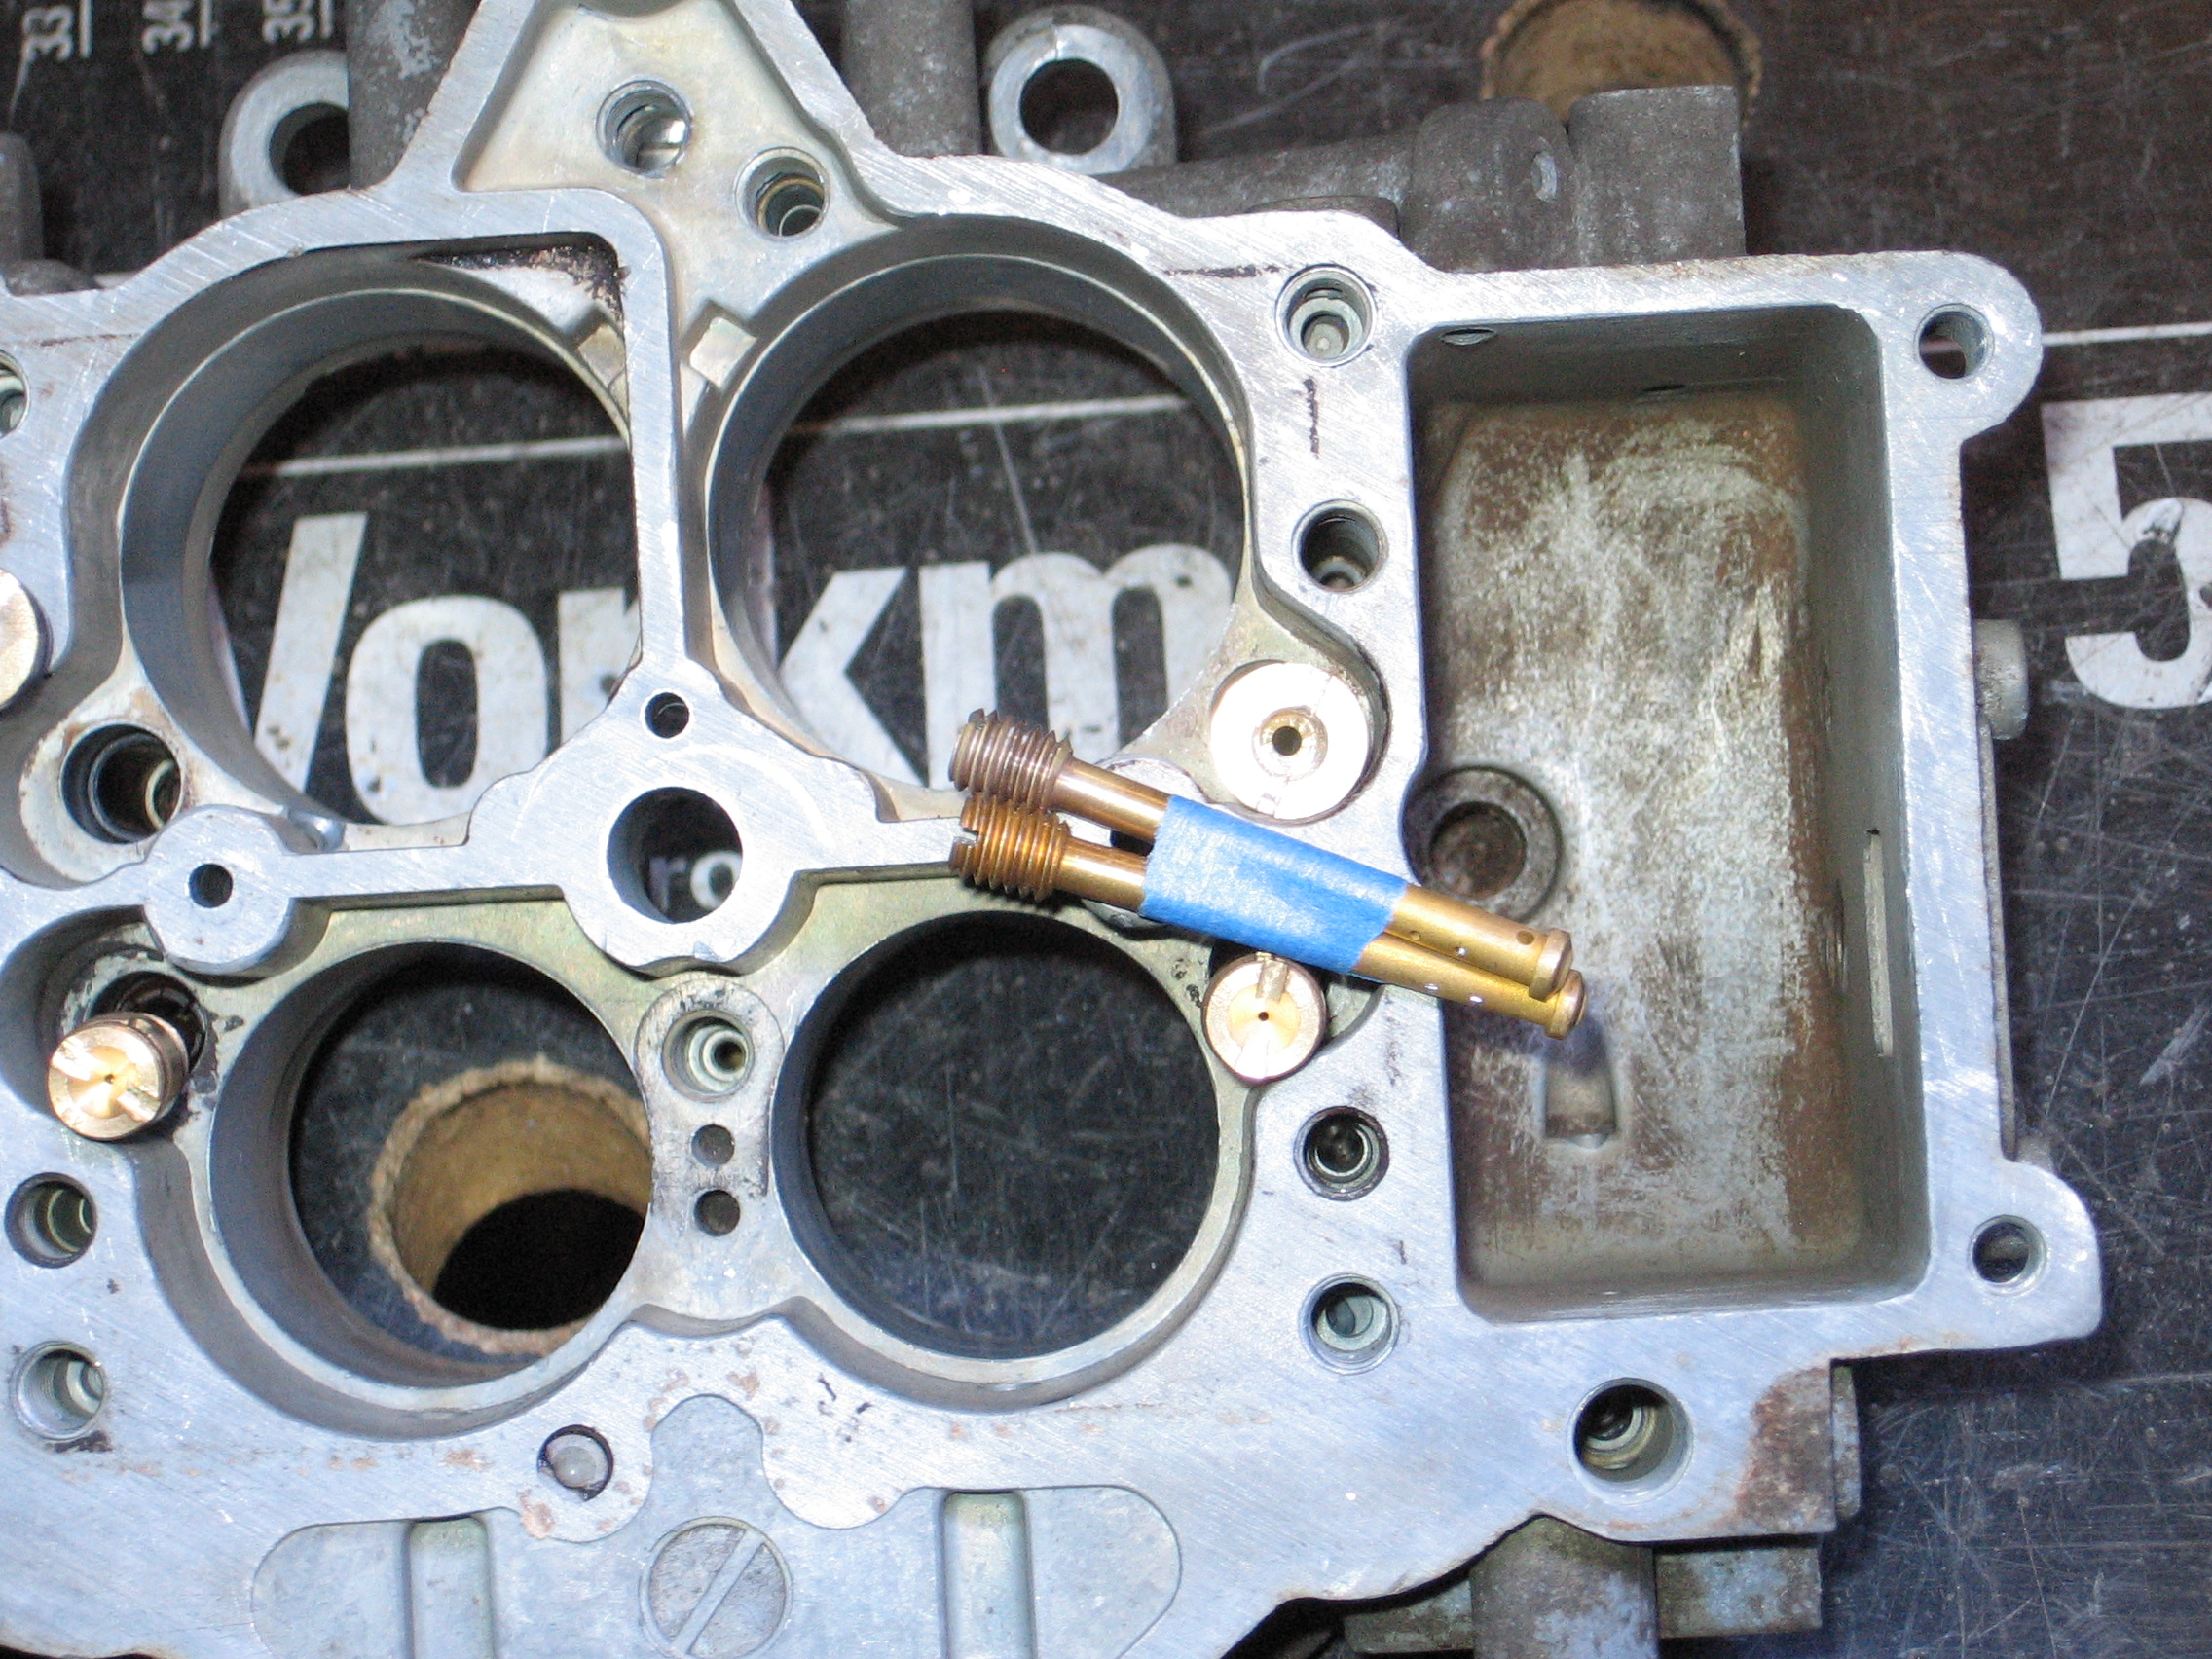
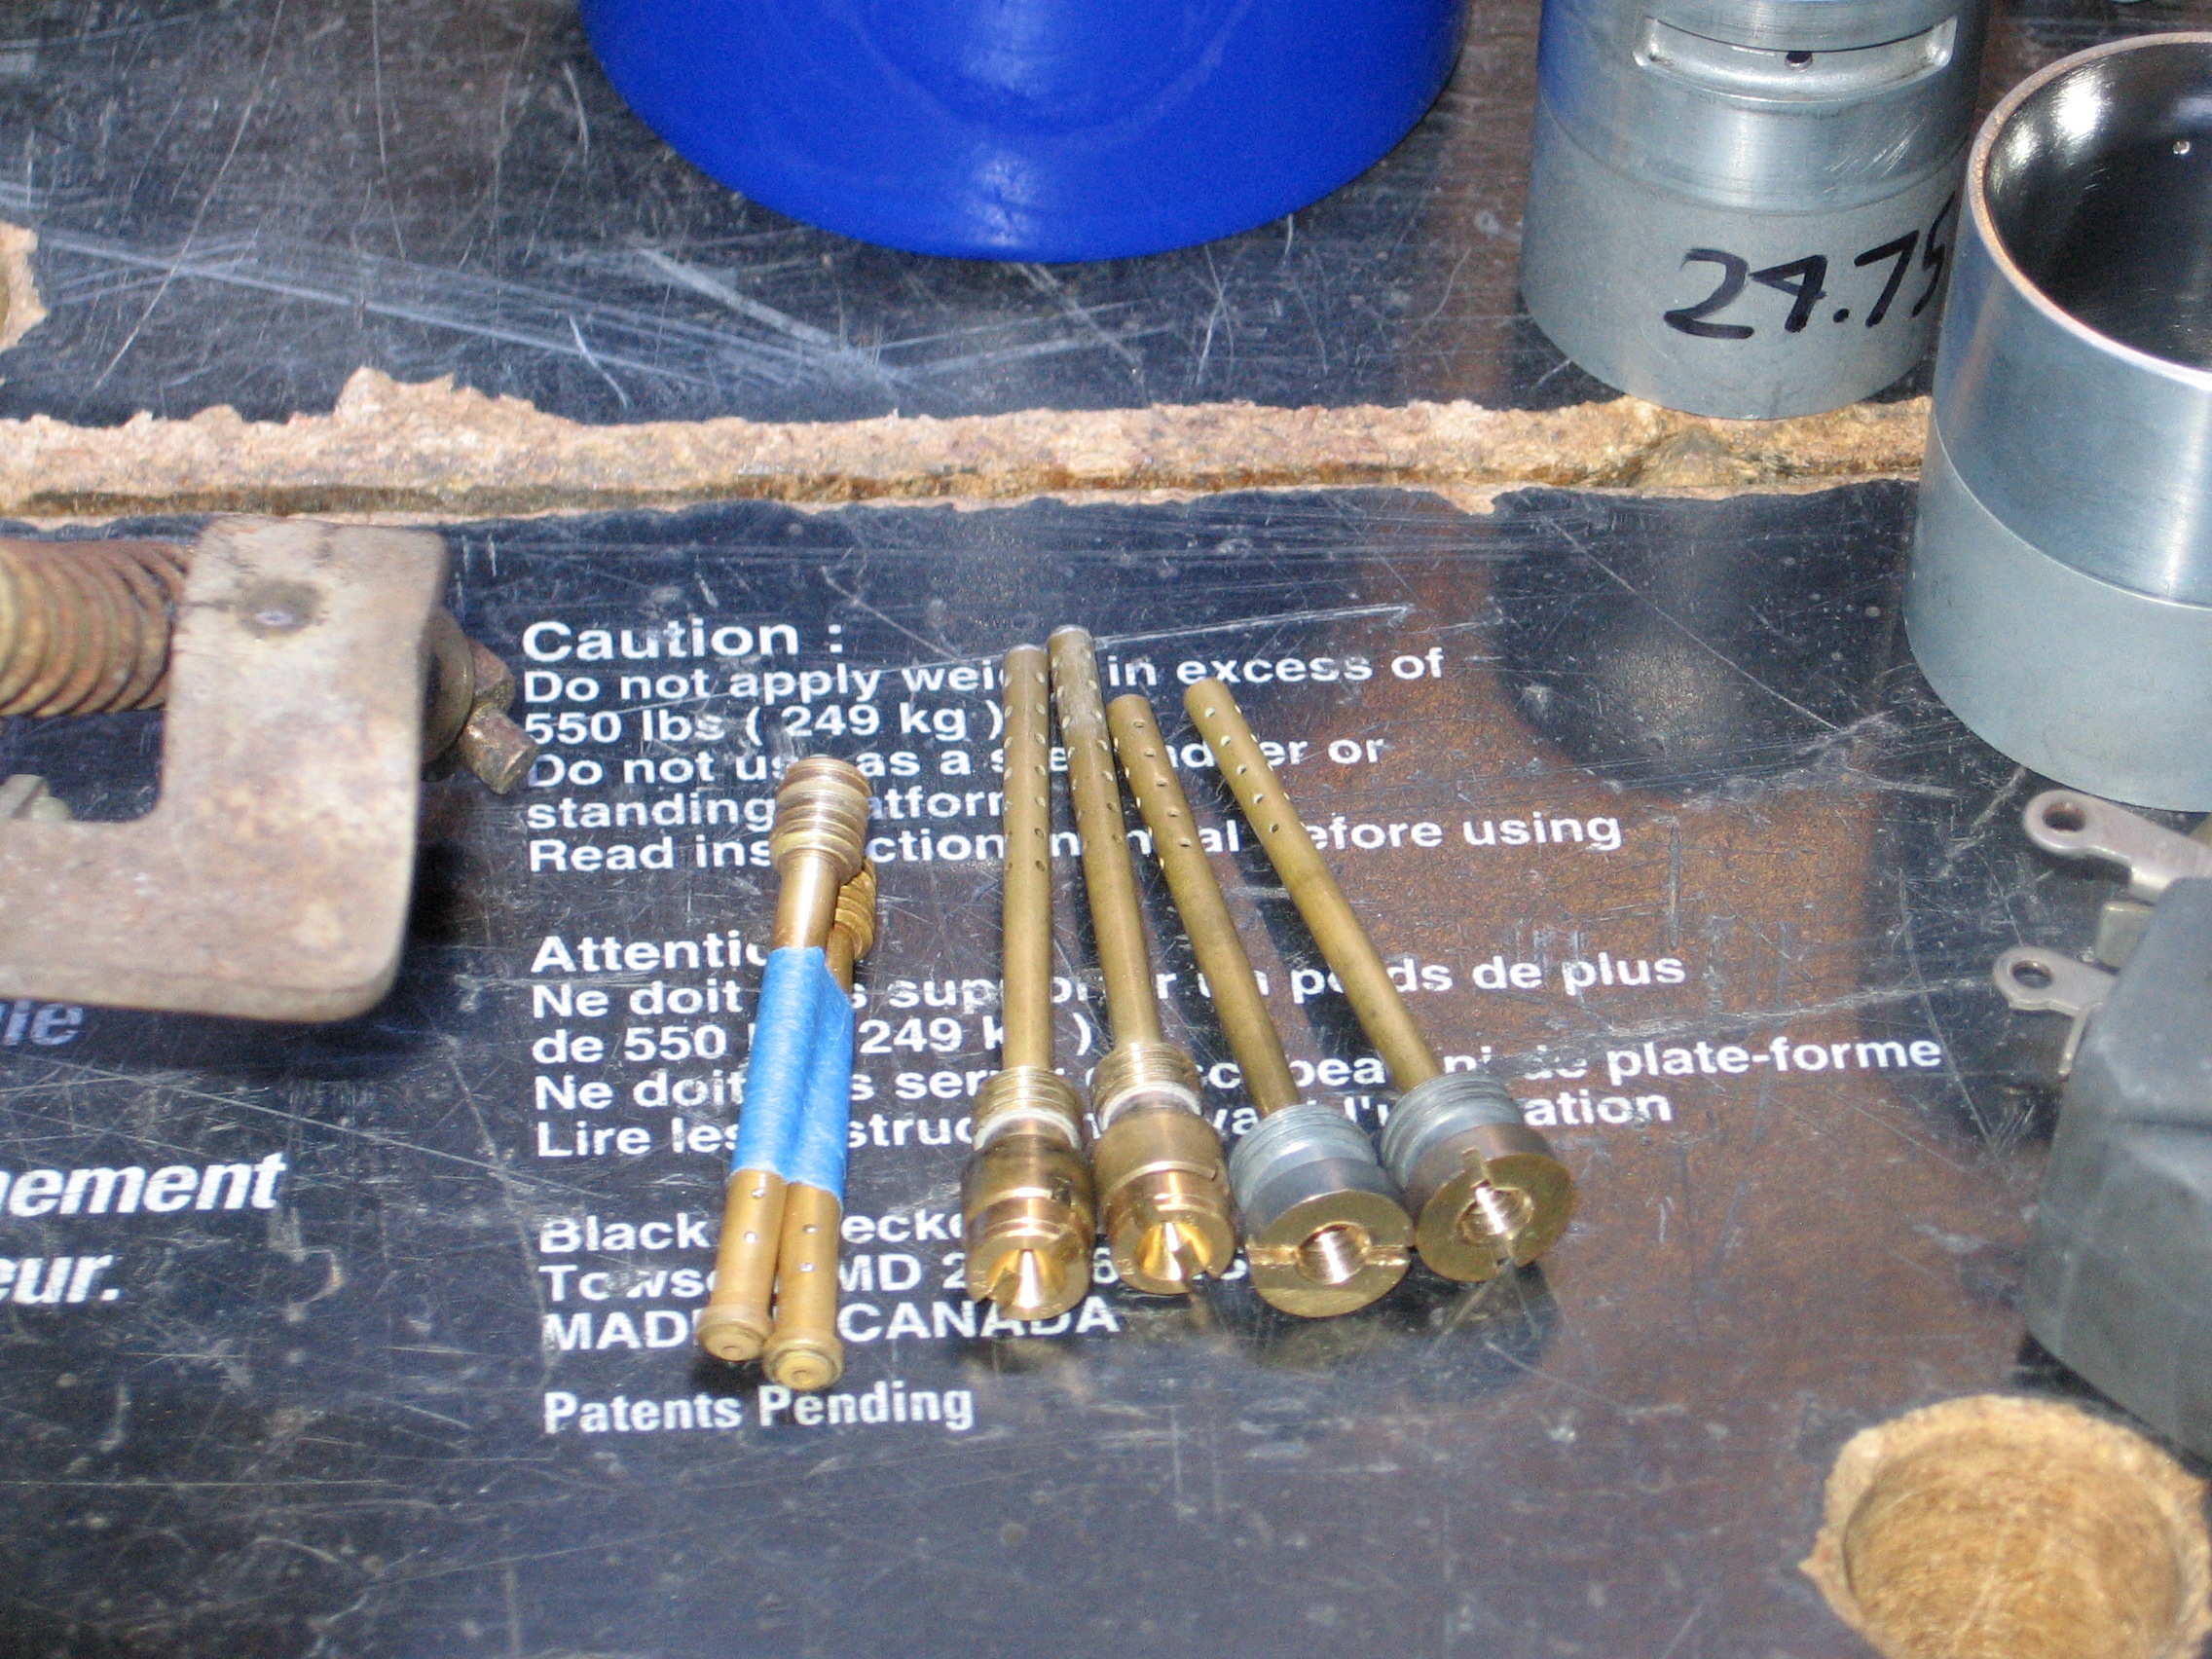
Here in this picture you see several pilot jets from JetsRus getting ready to be drilled out to 80. It's too bad they don't just sell that size.
Here you can see the venturis and boosters have already been worked on. Note the plastic filter strainers on the OEM SEATS will be removed to reduce incoming fuel restrictions. No need to worry about rust particles coming in as they settle down well below the jets and won't clog them (you should employ a nice filter in front of your fuel pump anyway, right?).
And just panning to the left
I tried to get a good clear shot of the landmark hole (as I like to call it) in both venturis, and how I definitely kept it narrowest there. Not sure my camera captured it very well. At least you can see all the wonderful bubbles in the zinc castings. lol
Ok here is a good shot of the solder filled sec long slows. You can plainly see only the upper dual holes have solder while the larger lower single hole is empty. That's how you do it.
And one final shot of some modded air bleeds to accept pilot jets. The primaries here are 70. The secondaries have not been drilled to 80 and installed yet.
Note: if you already have stock 70 air bleeds, you do not need to perform this step of modding them for pilot jets. However, if you feel you must have primary tunability, or just want bragging rights, or only have 90 air bleeds such as from an SA carb or something, then by all means go for it. But be careful. These primaries are small and harder to machine this way compared to secondaries.
A recent thread inspired me to make my own so we can compare notes (actually it's so I can visually fill you guys in on what it takes to do this work because as you know a picture speaks a thousand words). https://www.rx7club.com/1st-generati...nikki-1108584/
The carb I'm working on is an 84-85 style. It needs to be naked (rawr rawr). If it doesn't make it go faster, it gets deleted. I'd normally keep the fast idle but not this time.
I've only just torn this carb down. The parts have not been fully cleaned yet, just degreased so they can be handled. The secondary linkage has not even been tacked yet.
The venturis were hogged out yesterday. The sizes ended up at 24.75mm to 24.8mm primary and 28.16mm to 28.23mm secondary. Why did I not stick to the recommended 24.5mm and 28.0mm? Because this carb is supposed to be compatible on stockports up to streetports. And I figured I'm good enough that a couple more tenths of a mm isn't going to hurt anything, kinda like a gift (hey, it's Christmas time!). Actually the truth is the factory secondaries in this carb were undersized at only 27.85ish mm. What a bunch of Grinches they were!
For now, here are some pics of my progress with more pics to come.
Here in this picture you see several pilot jets from JetsRus getting ready to be drilled out to 80. It's too bad they don't just sell that size.
Here you can see the venturis and boosters have already been worked on. Note the plastic filter strainers on the OEM SEATS will be removed to reduce incoming fuel restrictions. No need to worry about rust particles coming in as they settle down well below the jets and won't clog them (you should employ a nice filter in front of your fuel pump anyway, right?).
And just panning to the left
I tried to get a good clear shot of the landmark hole (as I like to call it) in both venturis, and how I definitely kept it narrowest there. Not sure my camera captured it very well. At least you can see all the wonderful bubbles in the zinc castings. lol
Ok here is a good shot of the solder filled sec long slows. You can plainly see only the upper dual holes have solder while the larger lower single hole is empty. That's how you do it.
And one final shot of some modded air bleeds to accept pilot jets. The primaries here are 70. The secondaries have not been drilled to 80 and installed yet.
Note: if you already have stock 70 air bleeds, you do not need to perform this step of modding them for pilot jets. However, if you feel you must have primary tunability, or just want bragging rights, or only have 90 air bleeds such as from an SA carb or something, then by all means go for it. But be careful. These primaries are small and harder to machine this way compared to secondaries.
Need a little help with a stock Nikki rebuild on an 83 Rx7. Having flooding issues, noticed your comment about the replacement needles and seats not being machined correctly. I compared them to the original equipment but don't see the difference. Could you elaborate on the fault machining? Second question, I had a timing light hooked up while running and noticed it went dark when decelerating hard. Is that normal?
Great post Jeff! I'm a glutton for punishment and want to do another one a bit more advanced than the one I have now. Didn't hog it out as much as I wanted and didn't modify the air jets either.
TG, great gains can be made with well-cut venturis and definitely air bleed mods. What I'm saying tongue in cheek here is the pictures I posted of those venturis are way out of date and really don't work as well as my later efforts where I keep the inlet angle as straight as possible (no bellmouth), the upper edge is as thin and sharp as possible (like a box cutter blade), and the narrowests "choke" point inside the venturi is as sharp and pointed as possible (no dull shapes please). Also it must be as precisely on the 'landmark' hole as possible. Aim for at least 24mm primary ID with a straight taper in and out, and maybe try for 30mm secondary with the same attention to detail. Oh and drill a tiny hole through the landmark starter cast divot that all early Nikkis had, but later was deleted on FB carbs. If you have your SA carb, it might already have a tiny hole. Center the narrowest point on this hole. It aligns with the bottom of the booster and pulls the best vacuum here. What you want is a turbulent high vacuum area here, not a lazy easy bellmouth.
Kdo58, They're all about the same. But it depends on what you want to use the carb for. If boosting, it is best to use an 81-85 carb as they are better for it, but NA use is ok with any year.
Hey Jeff, since this thread got brought back up and you mentioned the "at least 24mm" primary ID bit, I'm curious for your opinion on if there's much benefit for a street car to go over 24mm on the primaries - without introducing notable drawbacks for a year-round driven car that is. Same question for the secondaries (currently working on a set of 30mm's myself). If I recall correctly, some of your older posts mentioned that once you got up to 25mm or so you started getting some sort of glitchy response - is that still true with whatever further improvements or experience you've compiled since then? Again, how about the secondaires on the same subject? Main reason I ask is because I just picked up another carb and I have little reason to keep it stock, so I figured some larger venturi experimentation might be in order if it made sense to try.
For reference, it would be going on something that was at least a 74 spec port job (supporting mods included of course), NA 12A for now. My current engine's porting is a little beyond a typical 74 style port, but not by much. And now I've got another engine to play with so... who knows what the future may hold.
Just for kicks, say the carb wasn't to go on a daily; perhaps a track only or weekend car. Does that change the max venturi size much in your mind? What is the furthest you would go for various setups/scenarios? Another question would be does it change much NA vs boosted?
Hope you don't mind me asking all this in your modding thread. Not trying to clutter things up or whatnot.
The "glitchy response" can be caused by the carb itself. Sometimes the factory drilled and machined circuits in the carb main body play a part in how well the carb can handle big venturis larger than 24mm. Your mileage and results may vary. Further improvement can tame an unruly carb, but only so far.
If track only or weekend, you can go nuts. Heck I've gone up to 27mm+ but you have to try it with smaller venturis first to see how well it handles them. It is all part of getting to know your carb. They have personalities like anything important to you. Might sound weird, but get to know them.
Boosted needs small venturis because a) the fuel gets into the engine faster which is important to prevent a lean condition while boosting, and b) if it isn't powerful enough for you, turn up the boost. All within reason of course. I'd go with 24mm and maybe 30mm, but pay 100% attention to your air bleeds as they take on a new level of importance on boosted carbs. You are trying to cheat nature here (by adding an additional atmosphere into the air horn) so you kinda have to be on top of things, so to speak. Very little room for error with boost compared to just running NA. Chasing the unicorn horn of boost can be rewarding though. It could be worth the additional level of attention boost requires... It depends on what you want to do.
Neat, thanks for that info. Answers some questions I've had for a while now. At this point I'm just recapping, but it sounds like a 24mm/30mm setup is a good, safe NA street setup that will likely work on just about anything. Much beyond 24 (on the primaries at least - have you gone further than 30 on the secondaries with appreciable results?) different carbs react in different ways and one would just have to get to know the carb, as you would say. It sounds like the key is simply experimentation based on what others - like yourself - have already discovered and documented, yeah? That makes me wonder, have you ever considered doing machined venturis - out of round bar, not modifying factory ones? Now that the conclusion is that straight/sharp angle venturis are best, I feel like that would be easy to machine (although I'm not a machinist so I really can't say), perhaps a with a slightly smaller outside dia. so they can be easily swapped for testing. Just a thought.
Boost on any of my 12A's is a ways off, but I do plan to go there at some point. Thanks for the info on that as well.
Thanks for your generous sharing the results of what has been a tremendous amount of work - even if it is a labor of love.
Like Jeff Thomas and I suspect lots of others, I'm having a flooding problem with my '79 Nikki (actually 2 of them). The original seats are long gone and I've gone through 2 ea. rebuild kits but have not yet found a set of seats and needles that will not flood the carburetor profusely. I've tried burnishing the brass surface of the parts as someone suggested. Nothing helps.
I have a new Mazda fuel pump, new filter, clean fresh fuel and lots of frustration.
Any recommendations to solve the flooding issue?
You'll have more luck getting responses if you make a new thread, which I would suggest. I'm curious about your question too though, I've never dealt with it - as I've always used the old parts - but I'm interested.
Thanks for your generous sharing the results of what has been a tremendous amount of work - even if it is a labor of love.
Like Jeff Thomas and I suspect lots of others, I'm having a flooding problem with my '79 Nikki (actually 2 of them). The original seats are long gone and I've gone through 2 ea. rebuild kits but have not yet found a set of seats and needles that will not flood the carburetor profusely. I've tried burnishing the brass surface of the parts as someone suggested. Nothing helps.
I have a new Mazda fuel pump, new filter, clean fresh fuel and lots of frustration.
Any recommendations to solve the flooding issue?
Pull the carb top off and flip it over. Then use compressed air to gently exercise the needles by blowing air into the fuel inlet pipe. Do this until they stop sticking. If memory serves, I had to do this on my carb when I was building my hogged out nikki.
I have two questions for you Nikki guys. Any recommendations for venturi sizing for a street port (let's say moderate) 12A that is race-only? Also, does anyone know how to eliminate the power valve stuff (see pics) on an early Nikki? Is there a benefit to removing it, since there is nothing to activate the solenoid.