
79SA to 87EFI. Not nearly as simple as it looked.

Thread Starter
Joined: Dec 2010
Posts: 642
Likes: 189
From: Stafford, Ks.
I've been around for a little while picking people's brains for my little project. Finally decided to show what I've been up to. I know it's not as pretty as a lot of the projects on here, but my cashflow is rather limited.
This is a mostly an after the fact build thread for those that are interested. I didn't want to clutter up the forum with something, until I knew I could actually complete it ( I hate build threads that go nowhere). This is rather lengthy since it took most of a year to get to this point, and it's all coming in one big lump. So here goes..
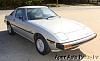
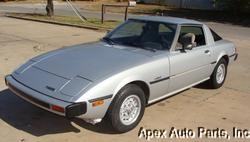
I was looking for a small second car to get around in and would hopefully get better mileage than my pickup. I was looking on line when I found this 79SA for sale in Oklahoma by Apex Auto Parts. I remembered how much fun my 75 REPU was that I had during the late 70s- early 80s. I decided then and there I had to get another rotary.
They had bought it from a local kid, who drove it until it died. It didn't look like he'd caused too much damage, so I investigated. Supposedly it had been garaged for ten years before they bought it. They were planning to use it as a shop project. When money got tight they decided to sell it instead. This seems to happen to all of us at some time. The car was completely stock. The only modifications were a lame equalizer and hacked radio wires. The front and rear valance panels had been modified ala off road driving (bent all to h***). The rear rotor had no compression, but it did run, sort of. The good part was that the interior was complete and in really nice shape. The body had only some surface rust, normal usage dings, and a little hail damage (this was from Oklahoma after all). I can live with fixing dents, but rust is a bugger to fix, (expensive too).
Sooo... after a quick trip down to Oklahoma City, and more money than I should have spent of course, it was mine.

I looked on the forums to see what options I had for fixing the engine and exactly what I had let myself in for. I've rebuilt quite a few different vehicles over the years, but never messed with a rotary. My old REPU was dead reliable, so I never had to tear into it. I pulled the 12A and tore it down. The front housing was gouged and needed replacement, (this was the rotor with compession, huh?). After searching for a while I found that it is becoming quite hard to find decent 12A housings and parts (at least anything I'd want to use). The 13B FC parts are still relatively plentiful so I looked into going that route. After all, how hard can it be to replace a 12A with a 13B right? Shows how much I know!
Well I located a rusty rear ended 87 GXL from Dukes770, in Olathe, Ks. He needed some of the body and interior parts for his TII. He didn't need the NA drivetrain. This sounded good to me and a good running NA 13B would have about half again as much power as the stock 12A had. So, more money and a trip to KC, and I now had a running, stripped out FC sitting in the yard. Sorry no Pics, you wouldn't want to have seen it anyway, as it was pretty ugly.
I started stripping down the 87 and decided to keep the EFI for the better economy. Originally I was going to just put a carburetor on it, it would have been MUCH easier. I needed to get my feet wet with computer controls anyway. I've mostly only messed with carbureted setups. I've been pretty impressed with what some of you guys have been doing with the programmable engine computers. Well one thing led to another...
I swapped the complete FC wiring harness, engine, transmission, fuel tank, and radiator. Yeah, I'm a glutton for punishment. I decided to keep the stock computer for now. I had it, and a standalone is out of my price range at this time. Time I have, money's a little harder to come by. Later I'll get a good computer and commence playing.
I also decided to do a custom dual exhaust, since I don't really care for the look of the big single exhaust out the back. From reading up on performance mods on the forums, most people say that a free flowing exhaust is one of the most important mods you can make on a rotary. So I ended up spending a lot of time and money on this part of the build. I figured it was a good starting place. If I go forced induction later, (maybe), I'm going to need all the exhaust capacity I can get.
Well, I bought an FB 13B cover and pan from Fong, and fitted the engine and transmission to the SA. Everything went in without too much hassle. The 79 driveshaft even fit. The front mounts were a little off, but not a hard modification to make. I kept the shifter in the FC position as I'm short and the SA position was too far forward. Needless to say I had to modify the trans tunnel. Cut it out of the 87 and weld into the 79. I'm not the world's greatest welder. It all stuck good and I tried to always weld both sides just in case. I have a variable feed MIG welder. It varies the feed speed to whatever it feels like, which makes pretty welds rather difficult. I used more wire on my MIG than really necessary but I didn't want parts falling off going down the road, that's always embarassing.
http://www.flickr.com/photos/gysgtfrank/7021807631/http://www.flickr.com/photos/gysgtfrank/7021807631/ by http://www.flickr.com/people/gysgtfrank/, on Flickr
Next problem was the radiator and oil cooler. I wanted to keep the stock clutch fan and fan shroud (I've had problems with electric fans in the past and found that mechanicals are more reliable). I also wanted it to look like it was made that way. The fan and shroud weren't going to work in the space I had though. I had to move the top of the radiator about an inch+ further forward in the opening after removing the SA shrouding. So, cut the front radiator support from the 87, fit and weld into the 79 and seal it all up. I remounted the oil cooler where most people put an intercooler. It should have good airflow down there. I had to build a custom airdam for it of course, but mine was trashed anyway (even if it would have fit). I also had to lower the front lip on the belly pan. Cut, Fit, weld, hack, slash, blood flying, oops getting carried away.
http://www.flickr.com/photos/gysgtfrank/7021806531/http://www.flickr.com/photos/gysgtfrank/7021806531/ by http://www.flickr.com/people/gysgtfrank/, on Flickr
http://www.flickr.com/photos/gysgtfrank/6875704612/http://www.flickr.com/photos/gysgtfrank/6875704612/ by http://www.flickr.com/people/gysgtfrank/, on Flickr
http://www.flickr.com/photos/gysgtfrank/6875705746/http://www.flickr.com/photos/gysgtfrank/6875705746/ by http://www.flickr.com/people/gysgtfrank/, on Flickr
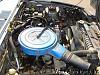
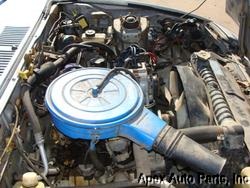
Intake was the next problem. No matter how I looked at it, the stock filter was not going to fit. The 79 headlight door motors are right in the way, and I didn't want to open up that can of worms trying to reengineer that. So, break out the welder, plasma cutter, and cut-off wheel. I opened the lower passenger side fender bulkhead beside the headlight motor, modified the airbox, and mounted the stock filter box (with modifications of course) underneath in all that nice space in the front nose section. We now have cold air intake. The filter is going to be a bit more of a pain to change than before though. What we won't do in the name of beauty. I just couldn't waste that new K&N air filter. I fabricated a box to connect the filter airbox to the MAF and used the stock plumbing to connect the two. I'd like to keep it looking like Mazda might have done it if the EFI had been available in 79. I think I came pretty close. Engine bay is rather cluttered right now, but will clean it up a little when I get around to paint.
http://www.flickr.com/photos/gysgtfrank/6875698852/http://www.flickr.com/photos/gysgtfrank/6875698852/ by http://www.flickr.com/people/gysgtfrank/, on Flickr
I remounted all the peripherals to the 79 chassis. A/C was next, and noo, I'm not driving around in a Kansas summer without A/C. I used the 87 condensor in front of the radiator in the same position as it was on the 87. I had new lines made, mine were shot, and routed them on the drivers side to the 79 compressor, and remounted the accumulator by the battery so I can actually see the sight window. No P/S so I kept the 79 setup for now. Hooked it all up and it fits, I don't know if it works yet as I need to get a new compressor, found out my compressor is seized , and then I need to recharge the system.
http://www.flickr.com/photos/gysgtfrank/6875704314/http://www.flickr.com/photos/gysgtfrank/6875704314/ by http://www.flickr.com/people/gysgtfrank/, on Flickr
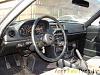
Now for wiring the harness. I spent a lot of time with this. I was dreaming SA and FC wiring diagrams in my sleep for a while there. I had to figure out where to run everything in very limited space and make room for the extra relays and stuff needed. I also found that I was missing a lot of the little parts and the dash harness. I bought most everything I needed from BrettLinton7. He was a lifesaver. He had plenty of patience to answer lots of stupid questions. I had to modify some of the wiring as the 79 ignition switch works differently than the 87 switch. Also some of the accessories were positive actuated on the 79 and negative actuated on the 87. A few relays and it works. I kept the 79 headlight and turn signal switches as well as the heater A/C controls and the center panel switches. Much better than the electronic stuff. I did keep the idiot light panel and the gauge cluster. This was easier than rewiring the gauges, it also had more gauges and the higher speedometer. As if I'm going to make it to 140 mph, Hah! I had to modify the bezel and make new dash mounts to mate the two, but it looks pretty much stock if you don't know what it's supposed to look like. I liked the white gauge numbers on the 79 better, but you can't have everything. I also installed a cutoff switch for the clutch safety switch in place of the choke, so I can shut the darn thing off when I'm working on it and on if someone else drives the car. It should keep anyone used to an automatic from crunching the frontend. Lots more time fiddling to get everything hooked up and working. And the wiring is done, mostly. The center console still needs to be fabricated, but I cleaned it up a little bit until I get around to doing it. I extended the wires and remounted the FC cruise control switch to the center ashtray area for the 79. I don't smoke anyway. Eventually I plan to install power windows and mirrors and hook up the switches in the FC panel.
http://www.flickr.com/photos/gysgtfrank/7021806937/http://www.flickr.com/photos/gysgtfrank/7021806937/ by http://www.flickr.com/people/gysgtfrank/, on Flickr
http://www.flickr.com/photos/gysgtfrank/6875702936/http://www.flickr.com/photos/gysgtfrank/6875702936/ by http://www.flickr.com/people/gysgtfrank/, on Flickr
http://www.flickr.com/photos/gysgtfrank/7021804281/http://www.flickr.com/photos/gysgtfrank/7021804281/ by http://www.flickr.com/people/gysgtfrank/, on Flickr
This is a mostly an after the fact build thread for those that are interested. I didn't want to clutter up the forum with something, until I knew I could actually complete it ( I hate build threads that go nowhere). This is rather lengthy since it took most of a year to get to this point, and it's all coming in one big lump. So here goes..
I was looking for a small second car to get around in and would hopefully get better mileage than my pickup. I was looking on line when I found this 79SA for sale in Oklahoma by Apex Auto Parts. I remembered how much fun my 75 REPU was that I had during the late 70s- early 80s. I decided then and there I had to get another rotary.
They had bought it from a local kid, who drove it until it died. It didn't look like he'd caused too much damage, so I investigated. Supposedly it had been garaged for ten years before they bought it. They were planning to use it as a shop project. When money got tight they decided to sell it instead. This seems to happen to all of us at some time. The car was completely stock. The only modifications were a lame equalizer and hacked radio wires. The front and rear valance panels had been modified ala off road driving (bent all to h***). The rear rotor had no compression, but it did run, sort of. The good part was that the interior was complete and in really nice shape. The body had only some surface rust, normal usage dings, and a little hail damage (this was from Oklahoma after all). I can live with fixing dents, but rust is a bugger to fix, (expensive too).
Sooo... after a quick trip down to Oklahoma City, and more money than I should have spent of course, it was mine.


I looked on the forums to see what options I had for fixing the engine and exactly what I had let myself in for. I've rebuilt quite a few different vehicles over the years, but never messed with a rotary. My old REPU was dead reliable, so I never had to tear into it. I pulled the 12A and tore it down. The front housing was gouged and needed replacement, (this was the rotor with compession, huh?). After searching for a while I found that it is becoming quite hard to find decent 12A housings and parts (at least anything I'd want to use). The 13B FC parts are still relatively plentiful so I looked into going that route. After all, how hard can it be to replace a 12A with a 13B right? Shows how much I know!
Well I located a rusty rear ended 87 GXL from Dukes770, in Olathe, Ks. He needed some of the body and interior parts for his TII. He didn't need the NA drivetrain. This sounded good to me and a good running NA 13B would have about half again as much power as the stock 12A had. So, more money and a trip to KC, and I now had a running, stripped out FC sitting in the yard. Sorry no Pics, you wouldn't want to have seen it anyway, as it was pretty ugly.
I started stripping down the 87 and decided to keep the EFI for the better economy. Originally I was going to just put a carburetor on it, it would have been MUCH easier. I needed to get my feet wet with computer controls anyway. I've mostly only messed with carbureted setups. I've been pretty impressed with what some of you guys have been doing with the programmable engine computers. Well one thing led to another...
I swapped the complete FC wiring harness, engine, transmission, fuel tank, and radiator. Yeah, I'm a glutton for punishment. I decided to keep the stock computer for now. I had it, and a standalone is out of my price range at this time. Time I have, money's a little harder to come by. Later I'll get a good computer and commence playing.
I also decided to do a custom dual exhaust, since I don't really care for the look of the big single exhaust out the back. From reading up on performance mods on the forums, most people say that a free flowing exhaust is one of the most important mods you can make on a rotary. So I ended up spending a lot of time and money on this part of the build. I figured it was a good starting place. If I go forced induction later, (maybe), I'm going to need all the exhaust capacity I can get.
Well, I bought an FB 13B cover and pan from Fong, and fitted the engine and transmission to the SA. Everything went in without too much hassle. The 79 driveshaft even fit. The front mounts were a little off, but not a hard modification to make. I kept the shifter in the FC position as I'm short and the SA position was too far forward. Needless to say I had to modify the trans tunnel. Cut it out of the 87 and weld into the 79. I'm not the world's greatest welder. It all stuck good and I tried to always weld both sides just in case. I have a variable feed MIG welder. It varies the feed speed to whatever it feels like, which makes pretty welds rather difficult. I used more wire on my MIG than really necessary but I didn't want parts falling off going down the road, that's always embarassing.
http://www.flickr.com/photos/gysgtfrank/7021807631/http://www.flickr.com/photos/gysgtfrank/7021807631/ by http://www.flickr.com/people/gysgtfrank/, on Flickr
Next problem was the radiator and oil cooler. I wanted to keep the stock clutch fan and fan shroud (I've had problems with electric fans in the past and found that mechanicals are more reliable). I also wanted it to look like it was made that way. The fan and shroud weren't going to work in the space I had though. I had to move the top of the radiator about an inch+ further forward in the opening after removing the SA shrouding. So, cut the front radiator support from the 87, fit and weld into the 79 and seal it all up. I remounted the oil cooler where most people put an intercooler. It should have good airflow down there. I had to build a custom airdam for it of course, but mine was trashed anyway (even if it would have fit). I also had to lower the front lip on the belly pan. Cut, Fit, weld, hack, slash, blood flying, oops getting carried away.
http://www.flickr.com/photos/gysgtfrank/7021806531/http://www.flickr.com/photos/gysgtfrank/7021806531/ by http://www.flickr.com/people/gysgtfrank/, on Flickr
http://www.flickr.com/photos/gysgtfrank/6875704612/http://www.flickr.com/photos/gysgtfrank/6875704612/ by http://www.flickr.com/people/gysgtfrank/, on Flickr
http://www.flickr.com/photos/gysgtfrank/6875705746/http://www.flickr.com/photos/gysgtfrank/6875705746/ by http://www.flickr.com/people/gysgtfrank/, on Flickr
Intake was the next problem. No matter how I looked at it, the stock filter was not going to fit. The 79 headlight door motors are right in the way, and I didn't want to open up that can of worms trying to reengineer that. So, break out the welder, plasma cutter, and cut-off wheel. I opened the lower passenger side fender bulkhead beside the headlight motor, modified the airbox, and mounted the stock filter box (with modifications of course) underneath in all that nice space in the front nose section. We now have cold air intake. The filter is going to be a bit more of a pain to change than before though. What we won't do in the name of beauty. I just couldn't waste that new K&N air filter. I fabricated a box to connect the filter airbox to the MAF and used the stock plumbing to connect the two. I'd like to keep it looking like Mazda might have done it if the EFI had been available in 79. I think I came pretty close. Engine bay is rather cluttered right now, but will clean it up a little when I get around to paint.
http://www.flickr.com/photos/gysgtfrank/6875698852/http://www.flickr.com/photos/gysgtfrank/6875698852/ by http://www.flickr.com/people/gysgtfrank/, on Flickr
I remounted all the peripherals to the 79 chassis. A/C was next, and noo, I'm not driving around in a Kansas summer without A/C. I used the 87 condensor in front of the radiator in the same position as it was on the 87. I had new lines made, mine were shot, and routed them on the drivers side to the 79 compressor, and remounted the accumulator by the battery so I can actually see the sight window. No P/S so I kept the 79 setup for now. Hooked it all up and it fits, I don't know if it works yet as I need to get a new compressor, found out my compressor is seized
, and then I need to recharge the system.http://www.flickr.com/photos/gysgtfrank/6875704314/http://www.flickr.com/photos/gysgtfrank/6875704314/ by http://www.flickr.com/people/gysgtfrank/, on Flickr
Now for wiring the harness. I spent a lot of time with this. I was dreaming SA and FC wiring diagrams in my sleep for a while there. I had to figure out where to run everything in very limited space and make room for the extra relays and stuff needed. I also found that I was missing a lot of the little parts and the dash harness. I bought most everything I needed from BrettLinton7. He was a lifesaver. He had plenty of patience to answer lots of stupid questions. I had to modify some of the wiring as the 79 ignition switch works differently than the 87 switch. Also some of the accessories were positive actuated on the 79 and negative actuated on the 87. A few relays and it works. I kept the 79 headlight and turn signal switches as well as the heater A/C controls and the center panel switches. Much better than the electronic stuff. I did keep the idiot light panel and the gauge cluster. This was easier than rewiring the gauges, it also had more gauges and the higher speedometer. As if I'm going to make it to 140 mph, Hah! I had to modify the bezel and make new dash mounts to mate the two, but it looks pretty much stock if you don't know what it's supposed to look like. I liked the white gauge numbers on the 79 better, but you can't have everything. I also installed a cutoff switch for the clutch safety switch in place of the choke, so I can shut the darn thing off when I'm working on it and on if someone else drives the car. It should keep anyone used to an automatic from crunching the frontend. Lots more time fiddling to get everything hooked up and working. And the wiring is done, mostly. The center console still needs to be fabricated, but I cleaned it up a little bit until I get around to doing it. I extended the wires and remounted the FC cruise control switch to the center ashtray area for the 79. I don't smoke anyway. Eventually I plan to install power windows and mirrors and hook up the switches in the FC panel.
http://www.flickr.com/photos/gysgtfrank/7021806937/http://www.flickr.com/photos/gysgtfrank/7021806937/ by http://www.flickr.com/people/gysgtfrank/, on Flickr
http://www.flickr.com/photos/gysgtfrank/6875702936/http://www.flickr.com/photos/gysgtfrank/6875702936/ by http://www.flickr.com/people/gysgtfrank/, on Flickr
http://www.flickr.com/photos/gysgtfrank/7021804281/http://www.flickr.com/photos/gysgtfrank/7021804281/ by http://www.flickr.com/people/gysgtfrank/, on Flickr
Thread Starter
Joined: Dec 2010
Posts: 642
Likes: 189
From: Stafford, Ks.
cont'd
Next major hurdle was fuel. I needed the EFI pump w/sump in the 87 tank. After lots of head scratching, I decided to swap in the entire 87 tank and lines. I wanted the pump and setup that matched the engine and induction I was using. I wanted to head off the headaches of mismatched components. This also allowed me to free up the room on the driver's side for a muffler. Of course, Mazda had to go and change the fuel filler from the driver's side to the passenger's side between the two generations. Being a masochist, I therefore had to center mount a new fuel fill opening behind the license plate. I used a leftover hinged plate holder I had from a 68 AMC AMX project. The 87 fuel tank is taller so the spare tire well had to come out. Here we go again, cut out the well, cut the rear floor from the 87, trim to fit, but in bolts and seals, and we have a new floor with a fuel pump access hole. Not the prettiest thing in the world but it's hidden under the carpet and more importantly, it works. I also have a larger tank to boot. After getting new pipe bent to connect to the passenger side and some cutting and fitting, Voila'. I had to install a way to bolt down my spare in the back hatch area as I no longer had room for it. It bolts down with the original spare tie down from the 79 well and a fabricated center cap holder, so I don't end up with it in the back of my head during a panic stop, besides, it kind of reminds me of the old Ferrari look with it mounted visible under the glass this way.
http://www.flickr.com/photos/gysgtfrank/6875703372/http://www.flickr.com/photos/gysgtfrank/6875703372/ by http://www.flickr.com/people/gysgtfrank/, on Flickr
http://www.flickr.com/photos/gysgtfrank/7021807977/http://www.flickr.com/photos/gysgtfrank/7021807977/ by http://www.flickr.com/people/gysgtfrank/, on Flickr
http://www.flickr.com/photos/gysgtfrank/6875708326/http://www.flickr.com/photos/gysgtfrank/6875708326/ by http://www.flickr.com/people/gysgtfrank/, on Flickr
Back to exhaust. Now that I had room for a second muffler, (not much but enough). I started looking at mufflers and routing. I then realized what they meant about putting 10 lbs. into the proverbial 5 lb. bag. I went with the Spin Tech XL plus mufflers (no packing) in the back. They went in with lots of fussing for clearance. I used the Stainless Works smooth tubes (stainless packing) in the middle, in a 32" length. The driver's side didn't really have enough clearance for much air gap in the center of the floor tub so, more cutting, more welding, and generous application of the BFH. I now had room. Next problem was that blankedy, blank Watts link right in the way! From reading up in the posts I found it didn't work all that well anyway. So, contact G-Force Engineering for a panhard bar, more welding, no cutting this time, thank God, and I had just enough room for a snake to squeeze over the top of the axle. I puchased the Racing Beat FC six port road race header which went right on with no hassles at all. Now that was nice for a change. I then had the exhaust shop connect the sections together, I do believe they thought I had lost a few marbles. They didn't have room for an H-pipe with the road road race header flange. It has the two exiting pipes side by side onlt inches away from each other. They ran the two pipes back and connected them to the center mufflers. I didn't want to run without a collector of some sort and there wasn't enough room from the header to the center mufflers for a traditional collector, so I cut the center portions from the two pipes at closest approach by the header flange and joined them into a homemade collector. Again, not especially pretty, but it works. The collector changed the exhaust tone to a deeper, smoother, (and slightly quieter), sound, a plus in my book Hopefully this helps performance as well. The exhaust did come out a little louder than I was really trying for though, but it sure sounds good.
http://www.flickr.com/photos/gysgtfrank/7021808565/http://www.flickr.com/photos/gysgtfrank/7021808565/ by http://www.flickr.com/people/gysgtfrank/, on Flickr
http://www.flickr.com/photos/gysgtfrank/7021804829/http://www.flickr.com/photos/gysgtfrank/7021804829/ by http://www.flickr.com/people/gysgtfrank/, on Flickr
http://www.flickr.com/photos/gysgtfrank/7021808263/http://www.flickr.com/photos/gysgtfrank/7021808263/ by http://www.flickr.com/people/gysgtfrank/, on Flickr
I replaced the brake master cylinder with the 87 unit, which necessitated making some new lines as the outlets are a little different and the 79 uses coarse thread instead of everyone else's fine thread. My 79 master cylinder was shot and I plan to put the 87 front subframe and braking system under it eventually anyway, so it seemed like a good idea at the time.
http://www.flickr.com/photos/gysgtfrank/7021834351/http://www.flickr.com/photos/gysgtfrank/7021834351/ by http://www.flickr.com/people/gysgtfrank/, on Flickr
I got everything hooked up and tried to start it. Once I figured out that I wasn't getting fuel because I had reversed the fuel feed and return lines at the tank, it started right up. I was finally able to take it for a drive. I was starting to think it was a permanent garage ornament. Everything looks to be working good. Except that I need to re-bleed the brakes again. The shift up light comes on at the strangest times though. When is it supposed to come on in the FC? My horn relay doesn't seem to be working and the flash to pass function (probably my strange idea of wiring caused this) is a bit disconcerting when it bounces my headlight doors up whenever I accidently bump the turn signal stalk. But, I've got to have something to do I guess. Overall I'm pretty happy with how it turned out so far. Here's some pics as it sits now.
http://www.flickr.com/photos/gysgtfrank/7021809521/http://www.flickr.com/photos/gysgtfrank/7021809521/ by http://www.flickr.com/people/gysgtfrank/, on Flickr
http://www.flickr.com/photos/gysgtfrank/7021801139/http://www.flickr.com/photos/gysgtfrank/7021801139/ by http://www.flickr.com/people/gysgtfrank/, on Flickr
http://www.flickr.com/photos/gysgtfrank/6875707598/http://www.flickr.com/photos/gysgtfrank/6875707598/ by http://www.flickr.com/people/gysgtfrank/, on Flickr
http://www.flickr.com/photos/gysgtfrank/7021805511/http://www.flickr.com/photos/gysgtfrank/7021805511/ by http://www.flickr.com/people/gysgtfrank/, on Flickr
Thread Starter
Joined: Dec 2010
Posts: 642
Likes: 189
From: Stafford, Ks.
cont'd
As usual more problems keep cropping up. My radiator is leaking around the plastic tanks. It looks like the next project will be to pull the radiator back out and replace it with a Koyo aluminum unit. The 87 brake master cylinder is leaking air into the system, new master cylinder time.  I'm currently working on the FC front subframe. So far, all I've got done is to depower the power steering rack. I'm going to see if I can swap in the LSD from the 87 differential and try to swap over to the big axles or find a GSL-SE rear axle. I'm not sure exactly what's involved in this yet and I'll need to find some axles with a large enough hub to accept the 5 bolt lug pattern. I'll then fabricate and weld on some mounts to accept the 87 rear discs (need to change that top link at the same time). More cutting, grinding, welding, Oh well.. I'll post more as I get to it, hopefully I didn't bore anyone to tears.
http://www.flickr.com/photos/gysgtfrank/7021810283/http://www.flickr.com/photos/gysgtfrank/7021810283/ by http://www.flickr.com/people/gysgtfrank/, on Flickr
http://www.flickr.com/photos/gysgtfrank/7024432375/http://www.flickr.com/photos/gysgtfrank/7024432375/ by http://www.flickr.com/people/gysgtfrank/, on Flickr
It's been a low budget effort so far. Except for the exhaust, which cost way too much in my estimation, (about half of the build cost), with the stainless steel mufflers, (those puppies are expensive). I've got just under 4000 dollars into the total project so far, including purchasing both cars. It's more than the car's really worth, but you can spend a lot more trying to keep yourself amused.
Future plans are to get the FC supension and brakes rebuilt and in, stiffen the chassis with a street friendly roll cage, and upgrade to an aftermarket computer system so I can play around with the maps. Then I can start seriously thinking about engine modifications.
I wanted a stock baseline to work from before I start making any more changes, too many changes at once will drive you crazy when it doesn't work right. I'm learning a lot in the process and just having fun. It'll be even more fun when I can get to some of the events and meet some of you in person.
Thanks for all the help guys.
Thread Starter
Joined: Dec 2010
Posts: 642
Likes: 189
From: Stafford, Ks.
Alex Rodriguez fixed my mix up when I hit the wrong button, sending this to the 3rd Gen section instead of the 1st Gen. Thanks.
Now that it's in the right place, this is what I've been up to for the last year.
Now that it's in the right place, this is what I've been up to for the last year.
Trending Topics
Well dang. Glad this got put in the right section. Looks pretty damn good so far. You will never regret going fuel injected. Possibly the best thing you could have done. I like what Chip Foose says. "Anyone can restore a car, but it takes a real man to cut one up." 

Full Member
Joined: Oct 2011
Posts: 220
Likes: 0
From: Wilmington, NC
WOW Great work. The exhuast turned out great. I know about the dreaming about wiring diagrams. i am replacing all of the wiring in my 944 and have been studying the diagrams so much i see them when i close my eyes.
Thread Starter
Joined: Dec 2010
Posts: 642
Likes: 189
From: Stafford, Ks.
Thanks guys.
The exhaust is kind of loud. I'll just have to keep the revs down around the neighbors. It really bellers when the RPMs come up, a truly glorious sound. I'm just happy to be back in a rotary.
.. and not the easiest way either, but nobody said I was the sharpest knife in the dishwasher.
.. but only if you can get it back together. Chip is a master. I'm only a dabbler.
Another bug with the headlight motors, they go up and down randomly going down the road. Just call me WINKY. I think it's in the combination switch where I messed with the wiring, will try that.
Also got the extra mount on the rear mufflers. The muffler shop said I didn't need them, but it turns out there's too much vibration if the mufflers aren't supported on both ends.
I've got parts on the way, trying to kill the bugs that keep cropping up. Where DID I put that can of Raid.
The exhaust is kind of loud. I'll just have to keep the revs down around the neighbors. It really bellers when the RPMs come up, a truly glorious sound. I'm just happy to be back in a rotary.
.. and not the easiest way either, but nobody said I was the sharpest knife in the dishwasher.
Another bug with the headlight motors, they go up and down randomly going down the road. Just call me WINKY.
I think it's in the combination switch where I messed with the wiring, will try that.Also got the extra mount on the rear mufflers. The muffler shop said I didn't need them, but it turns out there's too much vibration if the mufflers aren't supported on both ends.
I've got parts on the way, trying to kill the bugs that keep cropping up. Where DID I put that can of Raid.
Thread Starter
Joined: Dec 2010
Posts: 642
Likes: 189
From: Stafford, Ks.
Thanks for the kind words. The project is still kind of rough around the edges. I'm going to get as many of the mods done BEFORE I do paint this time. I'll clean it up when it's torn back down for paint, but I want to drive it in the meantime.
The cruise works perfectly and I liked that location, as it's the natural place for your hand to fall after upshifting. Not a big deal, but every little thing helps.
Oh a pic of the exhaust tips I had to go with. Trying to find something short enough necessitated using the inserts originally for glass packs.
http://www.flickr.com/photos/gysgtfrank/6901936080/http://www.flickr.com/photos/gysgtfrank/6901936080/ by http://www.flickr.com/people/gysgtfrank/, on Flickr
Thread Starter
Joined: Dec 2010
Posts: 642
Likes: 189
From: Stafford, Ks.
Thank you Adsy01, nowhere near as nice as your build, so that's quite a compliment.
A lot of people would classify this as ghetto tech, but you do what you have to, to get the job done. You can still try to build a car right without being independently wealthy. However, you'll have to put a LOT more of your own time and effort into the project than if you can afford to just buy the parts. You also have to set your sights a bit lower than the big boys and accept lengthy build times. For me that was a lot of the fun of the project.
I did get the exhaust tips on and new inside door cups, purely cosmetic stuff, but it looks pretty good. Still chasing down my bugs. Have a brake master cylinder and combination switch on the way to try and solve a few of them. The good news is that the radiator tanks seem to have resealed after a little use (driven about 150mi. on testing runs). "Yaay".
Out of discretionary funds for this month and waiting on parts so I'm trying to clean up the shop in the meantime.
A couple of pics of the nonessentials.
http://www.flickr.com/photos/gysgtfrank/7055580081/http://www.flickr.com/photos/gysgtfrank/7055580081/ by http://www.flickr.com/people/gysgtfrank/, on Flickr
The old ones were practically dust.
http://www.flickr.com/photos/gysgtfrank/7055580049/http://www.flickr.com/photos/gysgtfrank/7055580049/ by http://www.flickr.com/people/gysgtfrank/, on Flickr
ACBron Motorsport
Joined: Aug 2001
Posts: 608
Likes: 0
From: Melbourne Australia
Mines 2 1/2 years in the build now. It's been driven twice in that time, so I can relate to taking more time.
I love the thinking that's gone into yours, there's also a few parallels here and there too, don't be fooled by shiny paint :-)
A home built well thought out car is much more desirable than any cheque book racer in my eyes.
I'd thought about running a dual exhaust myself, as my LPG tank is between the chassis rails I might have to revisit the idea.
Thread Starter
Joined: Dec 2010
Posts: 642
Likes: 189
From: Stafford, Ks.
Oops...
Well, took care of a few odds and ends. I finally found the brake problem. It turns out the rear wheel cylinders were bad. They didn't leak any fluid like a bad cylinder usually does, but there was air getting past the seals. I guess it's to be expected with a car that sat for 10-20 years. I tried to make a meet in Kansas City. I burned a relay about 100 miles out. I didn't really need it anyway and just bypassed it, my mental block about the KISS principle bit me in the A@@ again. Then the car started to sputter and died along the side of the interstate about 150 miles out. I found I wasn't getting fuel. I jumpered the fuel check bypass and was only getting a little fuel spitting out from before the filter. The fuel gauge was above empty, so I figured that my fuel pump had let go. I had to have some local friends come help me out. We put fuel in it and it fired right up. I must have bumped the needle putting in the gauges and not realized it. Needless to say I didn't make the meet. Oh well, this was one of the main reasons to make the run. Trying to find all the problems before I get too far away. I came home and fixed those problems and ordered some steering arm bushings. My steering was extremely sloppy and the bushings are pretty cheap.
Adsy01 if you do put in dual mufflers, an 8 inch wide muffler is much easier to fit than my 10 inch wide ones were. But with your setup it looks as if you might have more room than I did. Mine are 10 inch wide x 16 inch long x 4 inch deep (254mm W x 406mm L x 102 mm D), which fit, but it took a lot of trimming and fiddling to do it.
I must have bumped the needle putting in the gauges and not realized it. Needless to say I didn't make the meet. Oh well, this was one of the main reasons to make the run. Trying to find all the problems before I get too far away. I came home and fixed those problems and ordered some steering arm bushings. My steering was extremely sloppy and the bushings are pretty cheap.Adsy01 if you do put in dual mufflers, an 8 inch wide muffler is much easier to fit than my 10 inch wide ones were. But with your setup it looks as if you might have more room than I did.
nice, very similar to my swap i finished last year 
as a side note, do you know that the flapper door AFM is supposed to be mounted with the rotating axis of the flapper door perpendicular to the ground(or flat sides parallel to ground), or as parallel as it can be mounted. top or bottom facing down doesnt matter as long as one flat side is. may cause erratic, unusual, or diminished performance
as a side note, do you know that the flapper door AFM is supposed to be mounted with the rotating axis of the flapper door perpendicular to the ground(or flat sides parallel to ground), or as parallel as it can be mounted. top or bottom facing down doesnt matter as long as one flat side is. may cause erratic, unusual, or diminished performance


genius! I think the idiot cluster is so well placed! I never would have thought to put it there. well I think this just inspired a build! such a nice sleeper, no one would ever expect to see what that car truly is from 15ft away!
Thread Starter
Joined: Dec 2010
Posts: 642
Likes: 189
From: Stafford, Ks.
Thanks guys, sorry I couldn't get back to you right away. Had to work and couldn't get back to the internet for a while. I like the EFI as it runs consistently well, gets relatively good mileage, and no more problems with turning my mufflers into grenades from an over-rich condition. Thanks for the heads up on the AFM placement Sgt Stinkfist. I didn't realize that might be a problem, it has been running fine so far, but I'll see what I can do on the placement and try it that way. I'll be working on suspension and brake issues soon. I've already purchase an 84 big bearing rear axle for the five lug big brake swap. Fun, fun, fun.