
HELP with stock carb!

Thread Starter
Full Member
Joined: Jan 2010
Posts: 58
Likes: 0
From: LA
HELP with stock carb!
I washed my whole engine and like a dumb a** i played with the fuel and air screws... now the car doesn't pull after 5k.. if i close both of them (turn them right) how many turn i need to go back to make her run good again? Btw the air one is the big screw on top and the fuel one the one right below the other one right?
THx!
THx!

Thread Starter
Full Member
Joined: Jan 2010
Posts: 58
Likes: 0
From: LA
Ok i did it 2.5 turns and idles at 850ish now. Not sure how it pulls cuz since i changed the shifter bearings my whole shifter is out. I will try the car when i put the shifter back.
Now.. when i rev it up and the revs go down passing 2.5k starts misfiring making the whole car to rattle/shake. Ir let's say when i live the car revving the car at 3k flat..it misfire too!!
I already got NGK plugs and wires.. any solution??
Now.. when i rev it up and the revs go down passing 2.5k starts misfiring making the whole car to rattle/shake. Ir let's say when i live the car revving the car at 3k flat..it misfire too!!
I already got NGK plugs and wires.. any solution??
Thread Starter
Full Member
Joined: Jan 2010
Posts: 58
Likes: 0
From: LA
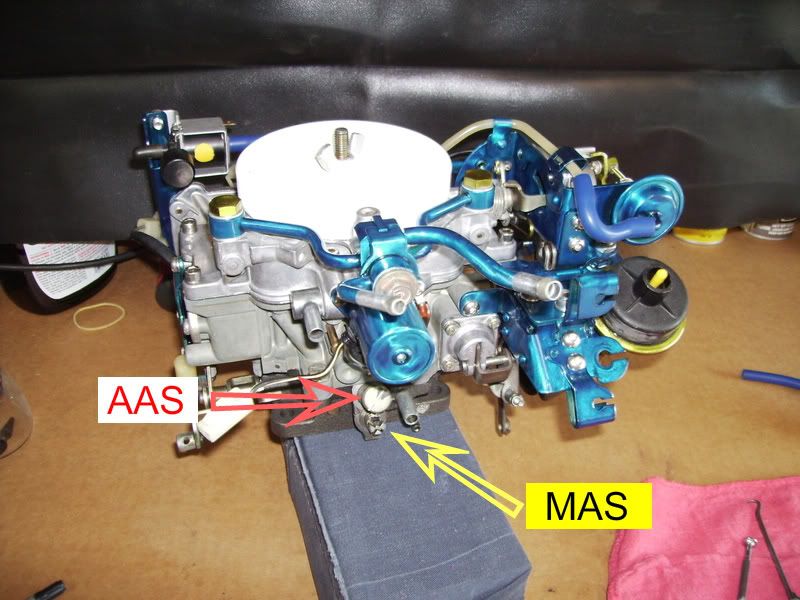
Sorry to sound noob but which one is the rotor cap?? 3-1/2 turns on which screw. Looking from the driver side, under the carb i see a big screw and right below it, a small screw..which is what?? thx!
Trending Topics

Full Member
iTrader: (3)
Joined: Mar 2006
Posts: 207
Likes: 0
From: Huntersville, NC and occasionally back in Freeport, NY
The mixture screws should not have any effect above about 2k; they're only for idle. The distributer cap is what he means by rotor cap (the rotor is the part that spins inside, so rotor cap is technically correct too). It's black, located on the front LHS (driver's side) of the engine, and has all the spark wires plugged into it.
Thread Starter
Full Member
Joined: Jan 2010
Posts: 58
Likes: 0
From: LA
The mixture screws should not have any effect above about 2k; they're only for idle. The distributer cap is what he means by rotor cap (the rotor is the part that spins inside, so rotor cap is technically correct too). It's black, located on the front LHS (driver's side) of the engine, and has all the spark wires plugged into it.
Full Member
iTrader: (3)
Joined: Mar 2006
Posts: 207
Likes: 0
From: Huntersville, NC and occasionally back in Freeport, NY
generally the best way to adjust the idle is to pull both screws out about 3 turns and adjust the air screw (the big one) first until you get the proper idle rpm (which it sounds like you've done already). Out (counterclockwise) increases the idle, in decreases. Once the speed is adjusted for, slowly screw in the mixture screw (the smaller one) clockwise until it starts to stumble a little, and then back it out half a turn. There was a post by Stirling that said basically the same thing, but I can't find it right now.
Be careful not to tighten them up too much when you bottom them out. Screw them in until they seat gently.
Be careful not to tighten them up too much when you bottom them out. Screw them in until they seat gently.
Full Member
iTrader: (3)
Joined: Mar 2006
Posts: 207
Likes: 0
From: Huntersville, NC and occasionally back in Freeport, NY
I was in the middle of writing that last post when you responded. Was it yesterday when you washed the engine bay? (I'm trying to gauge if it's already had a chance to dry out). If you've already looked over the wires, and the cap/rotor are both clean, dry, and not worn down, the next area to look at would be the points if you still have them. Don't start adjusting them if you don't have the proper feeler gauges! Just make sure they're dry.
Thread Starter
Full Member
Joined: Jan 2010
Posts: 58
Likes: 0
From: LA
generally the best way to adjust the idle is to pull both screws out about 3 turns and adjust the air screw (the big one) first until you get the proper idle rpm (which it sounds like you've done already). Out (counterclockwise) increases the idle, in decreases. Once the speed is adjusted for, slowly screw in the mixture screw (the smaller one) clockwise until it starts to stumble a little, and then back it out half a turn. There was a post by Stirling that said basically the same thing, but I can't find it right now.
Be careful not to tighten them up too much when you bottom them out. Screw them in until they seat gently.
Be careful not to tighten them up too much when you bottom them out. Screw them in until they seat gently.
The 3 diagrams from the carb i took them out to see if the idle would change but nothing happen, i wonder if they're working good. I'm thinking i may need a carb rebuild.
Lives on the Forum
Joined: Jun 2004
Posts: 11,359
Likes: 14
From: Grand Rapids Michigan
Follow Sterling's very detailed instructions to adjust the carb: http://sterlingmetalworks.com/tuning_the_nikki.htm
But I agree that it sounds like you got something wet that you shouldn't have....
.
But I agree that it sounds like you got something wet that you shouldn't have....
.
I'd get the rebuild from DD, his came out real good:

Or, you can get the sorensen rebuild kit at autozone for about $25, if you do it yourself it will be for free but the blue powder coat will cost you extra.
Or, you can get the sorensen rebuild kit at autozone for about $25, if you do it yourself it will be for free but the blue powder coat will cost you extra.
Thread Starter
Full Member
Joined: Jan 2010
Posts: 58
Likes: 0
From: LA
How much are you paying to get it rebuild? yeah that blue coat looks sick!
Joined: Jun 2008
Posts: 8,376
Likes: 28
From: Chino Hills, CA
Ray's pullin your leg; I did the rebuild myself, using the Sorensen kit and a lot of Berryman's & elbow grease. And I used the Mazda carb manual rather than the instructions that come with the kit - - much more detailed. Replaced all the factory screws with stainless Allen-head screws, too.
The blue coat is actually a specific kind of clear rattlecan paint, sprayed over stripped/buffed metal. Looks like anodizing. Stands up to fuel & heat real well, but it does scratch easy.
I'm too damn cheap for real anodizing, heh.
The blue coat is actually a specific kind of clear rattlecan paint, sprayed over stripped/buffed metal. Looks like anodizing. Stands up to fuel & heat real well, but it does scratch easy.
I'm too damn cheap for real anodizing, heh.


Thread
Thread Starter
Forum
Replies
Last Post
Jeff20B
1st Generation Specific (1979-1985)
4
Jun 26, 2016 10:21 AM