
Headlight Conversion?

Thread Starter
Junior Member
Joined: May 2005
Posts: 36
Likes: 0
From: Moberly, MO
Headlight Conversion?
Does anyone know of a company or a person who makes/sells some sort of headlight conversion for a 1st gen Rx7. What i am thinking of is something that would turn the stock pop up lights to a fixed headlight. Anyone know anything? Thanks.

7-less
Joined: Dec 2005
Posts: 2,053
Likes: 0
From: No. Virginia, USA
There are a couple people who have done different ways. One is a a sleepy eye look but I don't know the user name. The other is steve84GS TII and how he did his flushed headlight look is nothing short of badass. Keep in mind, these two ways were done with kits that do not exist anymore and these kits were meant for something else. If you're still wanting to do it, browse around. I hate putting steve's name out like this but hopefully he'll understand it is only to help guide you into what you'd like to do.
Hell, if you make a look that doesn't require cutting into your frame (CP Racing requires it for theirs), and looks really awesome, share, man, share!
Hell, if you make a look that doesn't require cutting into your frame (CP Racing requires it for theirs), and looks really awesome, share, man, share!

FB+FC=F-ME
Joined: Jul 2004
Posts: 3,353
Likes: 5
From: Rohnert Park CA
No worries,plug me all you want!!
Seriously,the flush light conversion is cool,but it can be a bit of work.It will save you some weight and make some room under the hood,but youll have to spend some money to make it DOT legal and also be able to outshine the stockers.I used Hella 90MM projectors to get the bright,legal pattern.They are big,so there was no way to get 4 in there.The squares are just high beam "floods" that are pretty much worthless.
The buckets and lids are MiddTennMiata parts,modded to fit to the FB.As stated before,the MTM kit is out of production,I did this mod years ago when my paint was done.If you search,youll find hundreds of threads about flush lights and sleepyeyes over the last couple years.They all usually end up boiling down to the same issue.......CP sucks and no one else has/makes them.
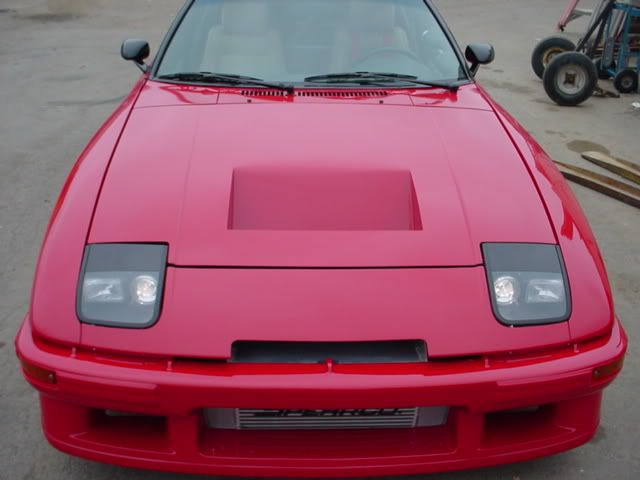
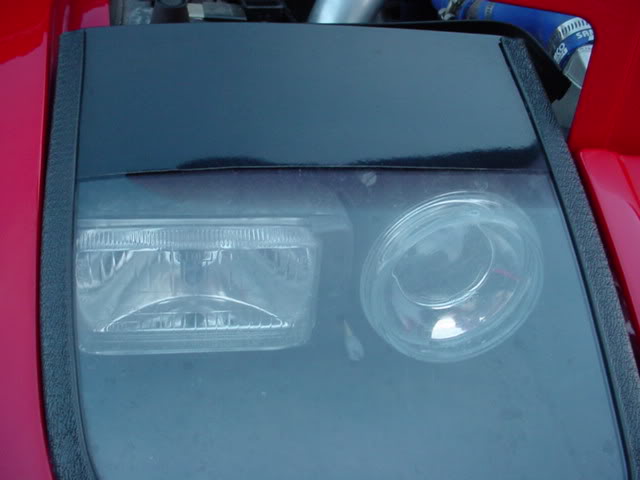
Its a damn shame that the CP racing kit is such a expensive piece of crap... I am also in the market for some awesome looking headlights and I would have purchased them if I didn't hear about the lack of quality and poor shipping times. steve84GS TII - your lights look amazing I just wish they still produced those so I could somewhat duplicate how nice yours look!
FB+FC=F-ME
Joined: Jul 2004
Posts: 3,353
Likes: 5
From: Rohnert Park CA
It really wouldnt be that hard, except for the covers.
The buckets are nothing but some bent sheetmetal,the lights are off-the-shelf units and the mounting trim for the covers is standard rubber stuff......but the lids are curved on two axis'....following the slope of the hood front to back and the curve of the hood from left to right.
Finding a Plexi/Lexan shop to duplicate those curves is tough,I tried before buying the MTM kit.I have no idea where/how they got theirs done.I even tried to heat/bend some bulk plexi beforehand,but it just ruined the stuff,crack/score marks would form as I bent the curve into it.I guess if you just went super,duper thin,you could just induce the bends/bows with the mounting hooks that are at each corner of the lids.I did that with my "thicker" covers.You can see in the first picture the left lid is a little off level at the top.I let up that corner's hook and pulled the opposite hook down,to get the gap right,a while after that pic was taken.If I can get a little bend/box with my "roughly" 1/8" thick covers,you might be able to get the full bend/bow by running some 1/16"- 1/32" thick covers.
Last edited by steve84GS TII; Mar 21, 2006 at 09:59 PM.
Trending Topics
well get some 1/8" plexi and heat it in the oven at 200 for 5mins, take it out and clamp it on to a regular headlight lid at all corners let it cool for a few hours and you have a perfect replica
FB+FC=F-ME
Joined: Jul 2004
Posts: 3,353
Likes: 5
From: Rohnert Park CA
Sounds like a plan,similar to what I tried.As long as you dont get the creases in the plastic like I got,they youll be set.Could have been the wrong material,or maybe I didnt get it hot enough.They werent really cracks,just stress marks from the bending.It was enough to make then optically, unusable.
Plexi scrap is cheap,Im sure a method exists.Just need for someone to try until they get it right.
Plexi scrap is cheap,Im sure a method exists.Just need for someone to try until they get it right.
I actually cut out the 1/8 lexan and laid it over some old headlight covers in the oven, watch them though when they droop they do so quickly and if you wait too long the lexan begins to bubble.
I purchased 2 original 4 X 6 Hella H4s off eBay and they plugged right in, used a pair of early 80's El Camino headlight trims to hold them in with 2 strips of light aluminum at the top, which are adjustable to aim the lights, then one longer screw from below to the radiator support panel.
Some metal has to be removed from the radiator support, I used a 4.5 inch grinder and trimed it with a dremel, then painted the exposed metal.
Only thing I haven't found is the right rubber/plastic material to mount the lexan with.
I didn't build a bucket as I am aiming for the lowest weight. I concealed the opening by painting the edges of the lexan.
Headlights are brighter then ever, got rid of a lot of weight and once the covers are securely mounted they're finished, total cost $25 for headlights, priceless.
Last edited by aussiesmg; Mar 22, 2006 at 09:01 AM.

7-less
Joined: Dec 2005
Posts: 2,053
Likes: 0
From: No. Virginia, USA
I wonder if you can take another car's sleeklight/flushmount and trim around it to make it fit? I'm thinking of maybe going towards the kits meant for the new Vette's. Have the dual raised bubbles for each lamp. Altho I'm not sure how WELL something like that might work out. But, it is a thought.

southernrunner
Joined: Jan 2005
Posts: 1,207
Likes: 0
From: Des Allemands, La
Well I doubt the new vettes light would work just because of the shape of them. You would have to do some major modifying to make them fit. I really don't think they would look good on a 1st imo.
7-less
Joined: Dec 2005
Posts: 2,053
Likes: 0
From: No. Virginia, USA
Yeah but it was the best I could think of.  Heh heh. I figured if one found a kit like THAT and was able to cut it just right to fit, it might look interesting. One would probably have to do like what Steve did, full-blown wide body kit and what not, to make it look decent. I might look around, hell, if I'm lucky, I could find a kit to share to everyone else. I'm sure a lot of people here wouldn't mind doing a flushmount ordeal.
Heh heh. I figured if one found a kit like THAT and was able to cut it just right to fit, it might look interesting. One would probably have to do like what Steve did, full-blown wide body kit and what not, to make it look decent. I might look around, hell, if I'm lucky, I could find a kit to share to everyone else. I'm sure a lot of people here wouldn't mind doing a flushmount ordeal.
Last edited by 85 FB; Mar 22, 2006 at 02:19 PM.
7-less
Joined: Dec 2005
Posts: 2,053
Likes: 0
From: No. Virginia, USA
Well, it wouldn't have to be a Vette's (And, I should've said that the lights are actually stock, not a kit). Any that have the bubble lights, because I don't think any other car out there has a flush look. Even the FD's have the bubbles. Or are there some that are flush with the rest of the FD's body?
Last edited by 85 FB; Mar 22, 2006 at 02:40 PM.
add to cart
Joined: Jun 2002
Posts: 4,181
Likes: 0
From: Saskatoon, SK & Montreal, PQ
biggest problem I have is cutting into the frame to make room behind the lights. If the lights came forward a bit and the plastic bubbled up over the light units, it'd still look okay (if less period 'correct') and avoid the frame cutting bit
southernrunner
Joined: Jan 2005
Posts: 1,207
Likes: 0
From: Des Allemands, La
Well I read up on the miata sleepy eyes kit. No cutting of the frame there, just a lot of replacing ****. It really only looks like the pilot rod was bent so it didnt lift the headlight up as much, has anybody ever tried just bending that? I think that's what the rod is called.
FB+FC=F-ME
Joined: Jul 2004
Posts: 3,353
Likes: 5
From: Rohnert Park CA
Heres the edge moulding I used to mount the lids,its the same setup as the MTM kit uses,I just altered it a bit...
http://www.mcmaster.com/
Just go to "fastening and sealing" and click on "seals".Its Style 2 of their edge mount seal moulding.There are many sizes,just measure your lids and mounts to find the right one.
The foam bulb on the botton can be trimmed away as needed.Thats where the mounting rods will insert to hold the lids at each corner.To make the rods,buy some 1/4" diameter aluminum or steel rod and cut them about 3-4" long.Bend in the middle so they each look like an "L",then thread one end with a 1/4-20 die.
Drill a hole at each corner (the front ones are in the light tray,the rears will be in the radiator support) and insert the threaded ends of the 4 "L" rods.Have a nut on top and one underneath.By threading the upsidedown L rod in or out of the nuts,you effectively change the height of the horizontal portion of the L.When the horizontal portion is the right height to postion the lids flush,just tighten the nuts to secure.It take a bit of finnese and fingerwork,but you can squeeze in there to get them all.The rears are easier since they are exposed in the rear with the hood open.
Last edited by steve84GS TII; Mar 22, 2006 at 11:27 PM.