
Control arm bushings


Trending Topics
Lives on the Forum
Joined: Jun 2004
Posts: 11,359
Likes: 14
From: Grand Rapids Michigan
Do you mean how do you get the control arms off of the car? Or how do you get the bushings out of the control arms after you remove the arms from the car?
If the latter, then your question has been answered.
If the former, then a 4 1/2" angle grinder with a cutoff wheel. The metal tube that runs through the bushing rusts to the bolt, and they become one. Cut them off and buy new bolts.
.
If the latter, then your question has been answered.
If the former, then a 4 1/2" angle grinder with a cutoff wheel. The metal tube that runs through the bushing rusts to the bolt, and they become one. Cut them off and buy new bolts.
.
Lives on the Forum
Joined: Jun 2004
Posts: 11,359
Likes: 14
From: Grand Rapids Michigan
Then the best way I have found is to toss them into a fire. I used a bonfire, but that was during the summer. A metal trash can lid and a pile of charcoal will do the same thing though. I tried it with a propane torch, but after 15 minutes with no discernable progress I moved on to the bonfire. After about a minute, they swell up and pop right out.
After that, I used a wire brush mounted on a drill to clean up and smooth the interior section before installing the new bushings.
After that, I used a wire brush mounted on a drill to clean up and smooth the interior section before installing the new bushings.
I hate drum brakes
Joined: Oct 2006
Posts: 638
Likes: 0
From: West Palm Beach, Florida
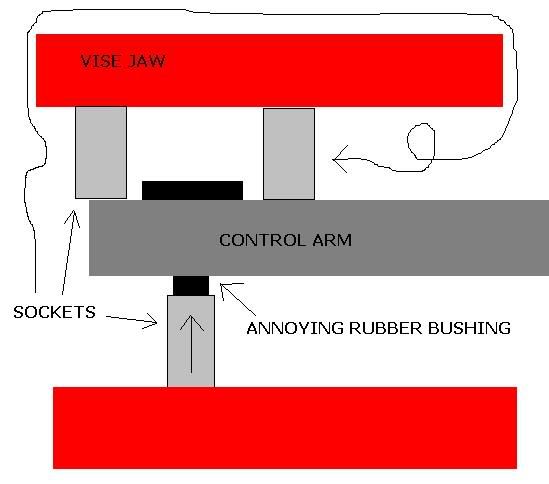
Fire stinks, and leaves behind all sorts of deposits in the hole where the bushing was. Use a vise and 3 sockets to press the rubber bushing out of the control arm.
-Open the vise up real wide
-On one side of the control arm, hold 2 of the sockets on either side of the bushing hole, and put the whole assembly up against one jaw of the vise.
-Take your other socket, which has a smaller diameter than the ID of the bushing hole, and hold it against the other end of the bushing and clamp the other jaw of the vise up against the other end of the socket.
-Start cranking the vise together and the socket will push the bushing out of the control arm.
I thought of this method after burning the bushings out of my watts linkage and rear control arms. Even after burning out the bushings on a charcoal grille that I had to make (because even a mapp gas torch wouldn't burn the bushings out, not enough BTUs) I had to bead blast the ID of the bushing holes because of all the vulcanized rubber bits coating the bore of the hole. The vise method is much cleaner, and much, MUCH less time consuming than torching everything.
EDIT: Here's a poorly done MS Paint drawing, because I suck at explaining things...

Stick the arm in a vise, find a variable speed drill and a fresh 1/8" drill bit. Start a hole the bushing meets the edge of the arm. The drill, at low speed, will walk the bit around the inside of the arm, shearing the rubber bushing. Chuck a wire wheel brush or 80 grit flap wheel wheel in the dril for final clean up. Burning out the bushing is for ***** whith no creativity. 
Joined: Feb 2006
Posts: 3,162
Likes: 1
From: London, Ontario, Canada
I used a propane torch when I changed all of mine. Once I got the technique down each one only took a couple minutes. I directed the flame right into the metal sleeve. once that got hot they just boiled out. Wire wheeled the holes as best I could and tossed the new ones in. It took me longer to get the arms off the car then to put the bushings in and reinstall.


Rockin' 1st Gen
Joined: Nov 2010
Posts: 56
Likes: 0
From: Anchorage, AK
Ok guys, I have the control arm bushings out and new ones installed. I'm having a problem getting the control arm assembly back into the front crossmember. Does anyone have any tips or suggestions on how I can get these back in the car? I have the energy suspension bushings and the the Re-Speed rack conversion kit. I'm having trouble getting the rear control arm bushings in too. Any help is appreciated.

Ok guys, I have the control arm bushings out and new ones installed. I'm having a problem getting the control arm assembly back into the front crossmember. Does anyone have any tips or suggestions on how I can get these back in the car? I have the energy suspension bushings and the the Re-Speed rack conversion kit. I'm having trouble getting the rear control arm bushings in too. Any help is appreciated.
Ok guys, I have the control arm bushings out and new ones installed. I'm having a problem getting the control arm assembly back into the front crossmember. Does anyone have any tips or suggestions on how I can get these back in the car? I have the energy suspension bushings and the the Re-Speed rack conversion kit. I'm having trouble getting the rear control arm bushings in too. Any help is appreciated.