
carb rebuild issues


Thread Starter
Junior Member
Joined: Sep 2010
Posts: 27
Likes: 0
From: Covington, LA
carb rebuild issues
So after a few days of working on rebuilding my nikki around work I have gotten most of it back together, but now have a bracket and 3 pieces that I cannot get back on.
2 of them and the bracket are simply because I have no idea where they came from or what they are called, the third piece (one in the middle of the image) had the plastic loop on it crack in half during removal, was located on the top right hand side of the carb if I am remembering correctly. I did not take nearly as many pictures as I should have, thinking the job would only take me a few hours (ha, took almost an hour to find the 4th nut holding it on)
If anyone can tell me what the pieces in the picture are, where they go, or even better, if they are related to the cold start, emission or other unnecessary system and can be cleaned and stored just in case I get stationed in California or some other state that likes their air far too clean.
Not sure if the model year matters, but it is off of a 1980 ls

tried doing a few searches for carb issues, but without knowing what my mystery pieces are I am having no luck. thanks for any light you guys can shed on my stupid mistake(s), giving me something else i've learned besides needing to let the engine cool for more than an hour before trying to remove the Carburetor.
2 of them and the bracket are simply because I have no idea where they came from or what they are called, the third piece (one in the middle of the image) had the plastic loop on it crack in half during removal, was located on the top right hand side of the carb if I am remembering correctly. I did not take nearly as many pictures as I should have, thinking the job would only take me a few hours (ha, took almost an hour to find the 4th nut holding it on)
If anyone can tell me what the pieces in the picture are, where they go, or even better, if they are related to the cold start, emission or other unnecessary system and can be cleaned and stored just in case I get stationed in California or some other state that likes their air far too clean.
Not sure if the model year matters, but it is off of a 1980 ls
tried doing a few searches for carb issues, but without knowing what my mystery pieces are I am having no luck. thanks for any light you guys can shed on my stupid mistake(s), giving me something else i've learned besides needing to let the engine cool for more than an hour before trying to remove the Carburetor.
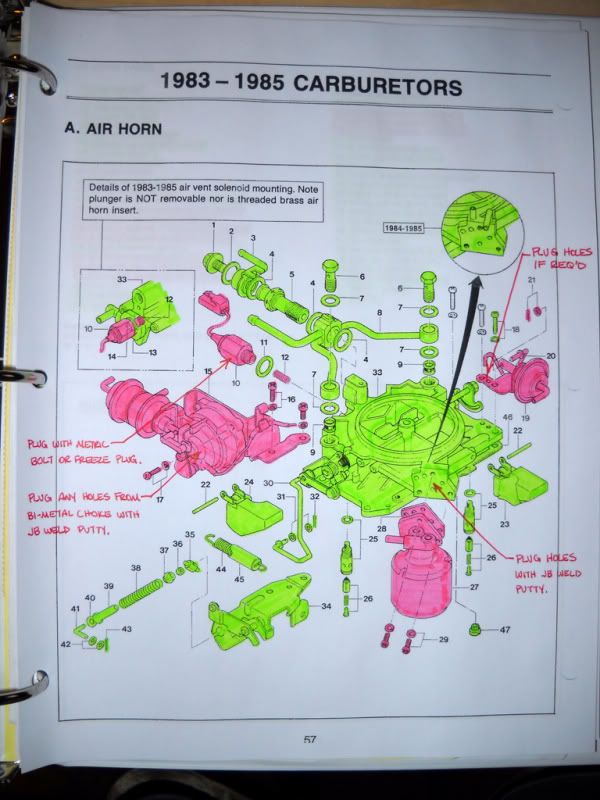
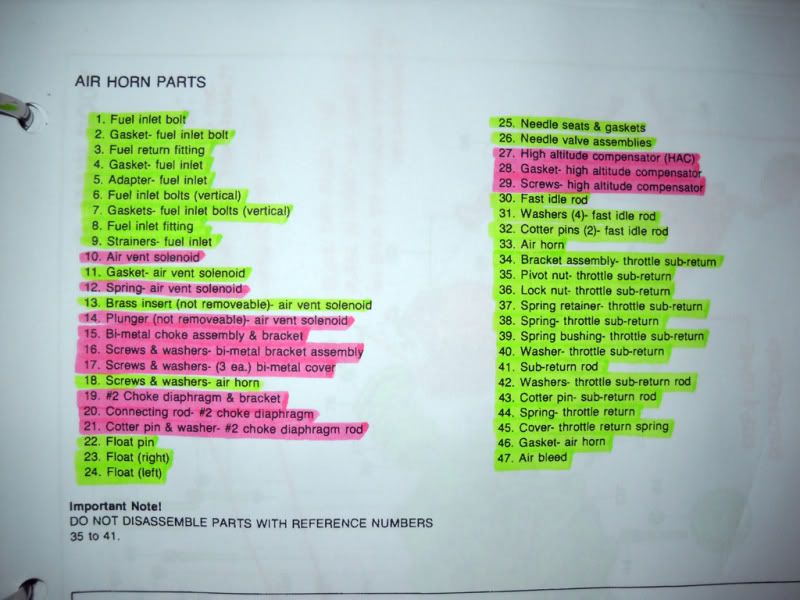
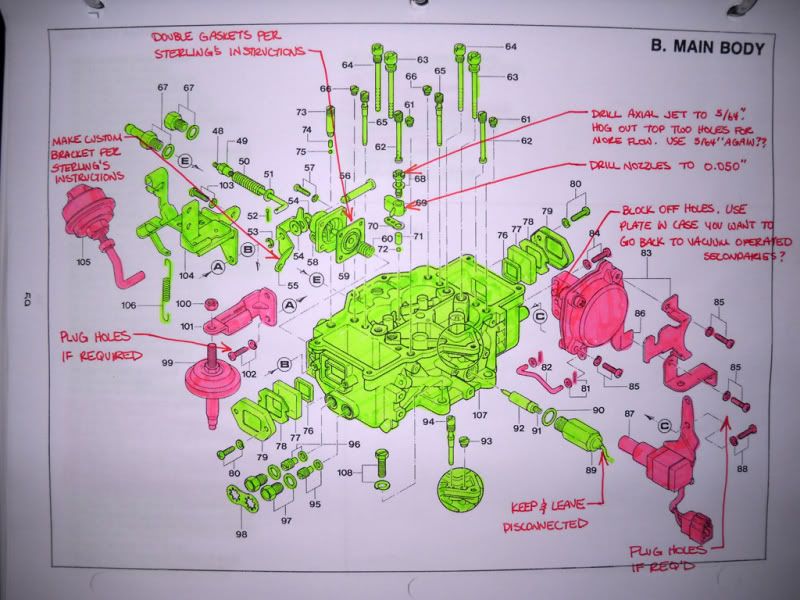
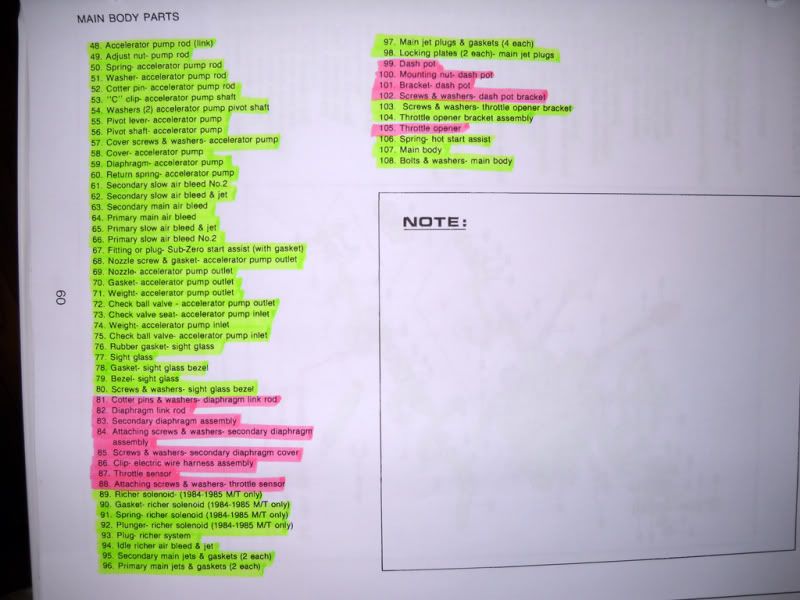
These pictures might help. They are for an 84 so it won't be exactly like yours.
http://intertron.com/ron/carb.html
http://intertron.com/ron/carb.html

Joined: Jun 2008
Posts: 8,376
Likes: 28
From: Chino Hills, CA
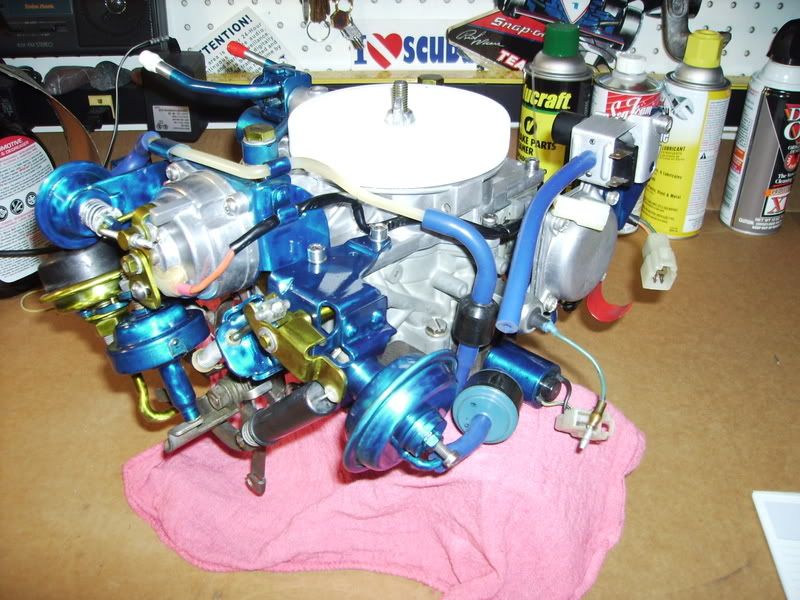
The spring looks like it came either out of the vacuum secondary servo, the accelerator pump, or off of the choke opener. The first two are pretty damned important to have in place if you want your car to run well. The third only matters if you want your auto choke to work right.
The curved bracket with the solenoid on it mounts to the side of the vacuum secondary servo. It controls your anti-afterburn valve (AAV).
The large round gizmo is your dashpot; it's bracket is the item in the lower center. It prevents your throttle from closing too abruptly, which causes bogs or stalls when you return to idle.
The smaller round gizmo is most likely your secondary choke diaphragm. Sort of hard to tell from this angle. My carb doesn't have one, being a CA build.
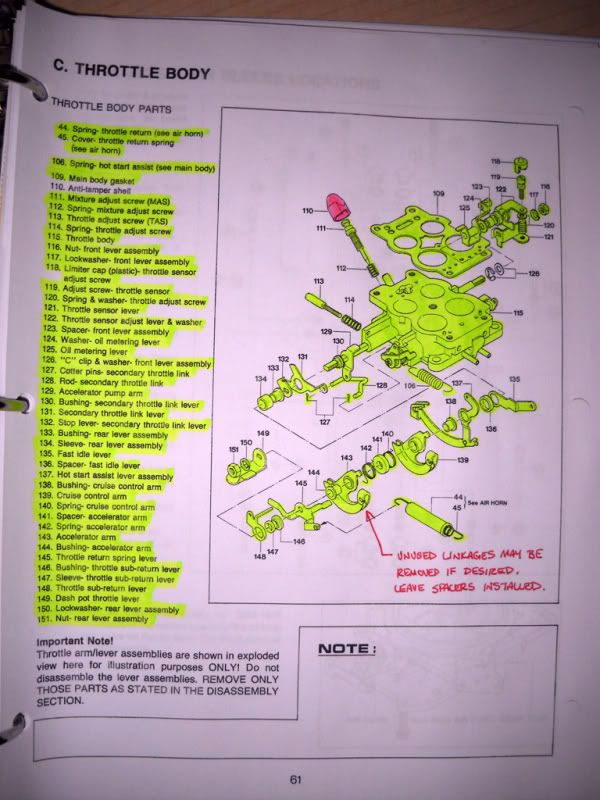
The diagrams Joe posted are for a 1983 or newer carb; the 1980 is considerably different with regard to most of the exterior parts you are asking about.
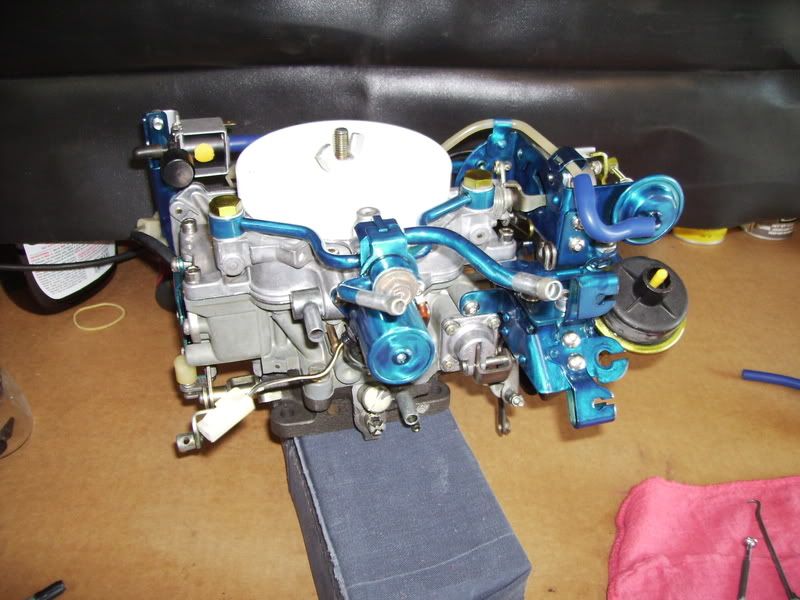
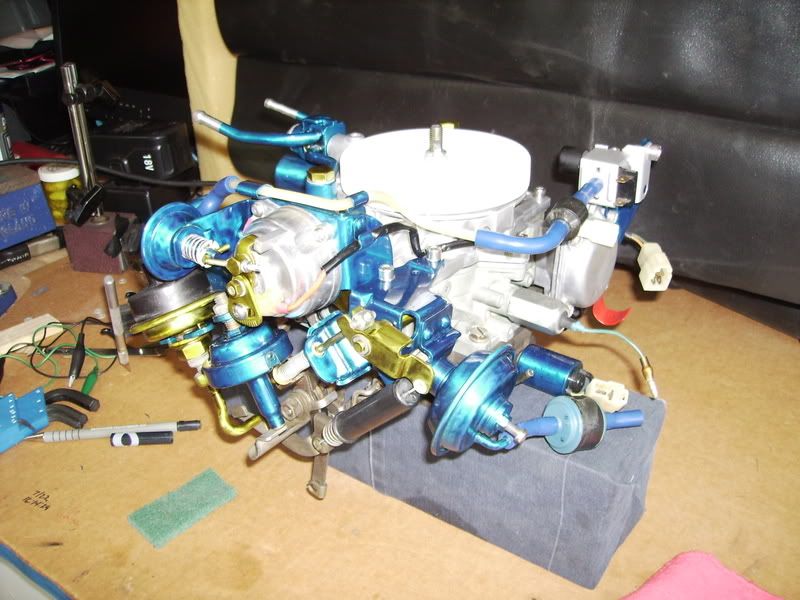
Here are some pictures of my 80 carb that may help; it's a California build so won't be exactly the same, but it will probably serve for the external parts you're asking after:

You'll also want to download the factory carb rebuild manual - - far better and more detailed than the tiny sheet that comes with the rebuild kit, and it will answer all your questions about these parts. You can get it from here:
http://foxed.ca/foxed/index.php?page=rx7manual
The curved bracket with the solenoid on it mounts to the side of the vacuum secondary servo. It controls your anti-afterburn valve (AAV).
The large round gizmo is your dashpot; it's bracket is the item in the lower center. It prevents your throttle from closing too abruptly, which causes bogs or stalls when you return to idle.
The smaller round gizmo is most likely your secondary choke diaphragm. Sort of hard to tell from this angle. My carb doesn't have one, being a CA build.
The diagrams Joe posted are for a 1983 or newer carb; the 1980 is considerably different with regard to most of the exterior parts you are asking about.
Here are some pictures of my 80 carb that may help; it's a California build so won't be exactly the same, but it will probably serve for the external parts you're asking after:
You'll also want to download the factory carb rebuild manual - - far better and more detailed than the tiny sheet that comes with the rebuild kit, and it will answer all your questions about these parts. You can get it from here:
http://foxed.ca/foxed/index.php?page=rx7manual
Thread Starter
Junior Member
Joined: Sep 2010
Posts: 27
Likes: 0
From: Covington, LA
looks like I ruined my carb trying to go too quickly, or at least messed up enough that the middle of nowhere shop I sent it to for help told me I would be better off just buying another one. thanks for the help on this though, saving it all and printing out so next time I'll be a little less likely to go from clogged jets to fubar'd carb.
also, DivinDriver that is a beautiful carb, did you use rattlecan clear coat and engine paint with that, or something else? even after a few hours of scrubbing my parts were not looking anywhere near that clean
also, DivinDriver that is a beautiful carb, did you use rattlecan clear coat and engine paint with that, or something else? even after a few hours of scrubbing my parts were not looking anywhere near that clean
Trending Topics
Joined: Jun 2008
Posts: 8,376
Likes: 28
From: Chino Hills, CA
Duplicolor "metalcast" paint. Prep included a lot of work with dremels and abrasive pads. It was necessary to combat tons of surface rust and corrosion where the original plating/passivating had failed and rust-pitting was taking place.

Thread
Thread Starter
Forum
Replies
Last Post
Jeff20B
1st Generation Specific (1979-1985)
4
Jun 26, 2016 10:21 AM