
Carb Hardware questions

Carb Hardware questions
So I've torn apart my carburetor and it has become a major pain.
All throughout the carb I've stripped and destroyed just about every screw.
Some are beyond recognition and now I have no idea the tread pitch, and everything else.
I was wondering if anybody had a screw list that they would be willing to share that shows what type, threading, size, and length, and number needed to put a carb back together. I do have some mods on the way like the AP modification that needs a new screw size and the the butterfly modification.
Also I'm going to be ordering the holley air bleed kit and I have no idea what sizes I need for a 12a stock or street port. Can anyone point me in the right direction?
Thank you
Yeah, it sucks.
Started pulling it apart and all the threads on the screws and places where fuel would be a white dust was found, like if someone dusted the whole thing with powdered sugar. Really weird.
But like I said some screws didn't make it out whole. Some I used a hammer and a wrench AFTER I soaked it in WD40 and 3 in one. So much caked on crap. I tapped it on the garage floor and I swear the carb lost half its weight just from the black crap fell off.
I'll see what I can do with what I have tomorrow while I clean the main pieces.
I wish there was a screw kit.


Trending Topics
Joined: Aug 2011
Posts: 3,078
Likes: 42
From: Cambridge, Minnesota
I'd get some B-12 Chemtool from O'Reilly Auto or Wal-Mart and dip parts of the carb at a time in the 1 gal paint bucket it comes in. That stuff worked wonders for me and you can wash it off with water.
But like I said some screws didn't make it out whole. Some I used a hammer and a wrench AFTER I soaked it in WD40 and 3 in one. So much caked on crap. I tapped it on the garage floor and I swear the carb lost half its weight just from the black crap fell off.
I'll see what I can do with what I have tomorrow while I clean the main pieces.
I wish there was a screw kit.
I'll see what I can do with what I have tomorrow while I clean the main pieces.
I wish there was a screw kit.

I hope it meets and exceeds your expectations for the awesome carb build you have going on though - I'm glad it went to a home where it's appreciated and used instead of sitting in a box in my shed for years
Joined: May 2002
Posts: 5,972
Likes: 37
From: Ottawa, Soviet Canuckistan
10/32" holley air bleeds work. To replace the existing jets, it's just a metric-to-imperial conversion.
For example, a metric jet that says "160" on it is 0.160mm, which is 0.0063" or a "63" holley jet.
Metric jets are in tenths of millimetres (or hundredths of centimetres), imperial jets are in thousanths of an inch.
For tuning, get four jets of each size, and the two sizes above and below. That should be a decently sized tuning kit. At some point though it's worth it to split a full jet kit with someone, as they're pretty damn expensive.
Jon
I believe that Sterling had something on his website about which air bleed sizes to use for different purposes, but that has been long gone now.
You want the 10-32 UNF 1/4" crown air bleeds from a Holley Dominator carb. You can buy them in packs from Summit Racing. Or buy blanks and drill your own to whatever sizes you want.
-_- I mean the size of the hole. What size hole do I need to use? What is the best size holes to use for a street/stock port 12a?
Ugh, sorry guys. I understood the whole 10-32 size, should have been way more clear.
Ugh, sorry guys. I understood the whole 10-32 size, should have been way more clear.
On top of my other question.
What is a good gasket material thickness to make my own gaskets for the Accelerator Pump Diaphragm modification? The same size paper that came in my rebuild kit?
What is a good gasket material thickness to make my own gaskets for the Accelerator Pump Diaphragm modification? The same size paper that came in my rebuild kit?
I am a man of many questions, and I would hate to start another thread. I would like to add these last questions.
1.) When I cut my throttle shafts will they rust? The ones I pulled off the carburetor were oily, was that gasoline and oil or something special?
2.)I was reading about the accelerator pump lever modification, which I believe is necessary with mechanical secondaries. Can someone please post a picture of the arm extension? I have read the DIY thread posted by Oneiros and I understand it I would just like a better picture of where it goes.
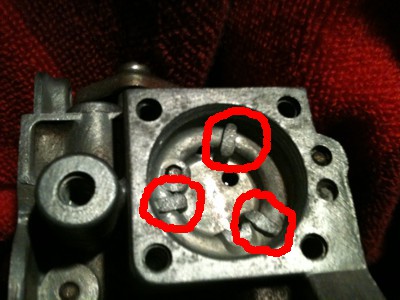
3.) Last but not least. On the double gasket accelerator pump modification, someone in a thread mentioned grinding down the bump stops. Is this necessary? What are the bump stops? Are they the things I circled in red?
Hopefully these are my last questions. Can't promise anything though.
1.) When I cut my throttle shafts will they rust? The ones I pulled off the carburetor were oily, was that gasoline and oil or something special?
2.)I was reading about the accelerator pump lever modification, which I believe is necessary with mechanical secondaries. Can someone please post a picture of the arm extension? I have read the DIY thread posted by Oneiros and I understand it I would just like a better picture of where it goes.
3.) Last but not least. On the double gasket accelerator pump modification, someone in a thread mentioned grinding down the bump stops. Is this necessary? What are the bump stops? Are they the things I circled in red?
Hopefully these are my last questions. Can't promise anything though.
I hope someone can help with my other questions though.
I am a man of many questions, and I would hate to start another thread. I would like to add these last questions.
1.) When I cut my throttle shafts will they rust? The ones I pulled off the carburetor were oily, was that gasoline and oil or something special?
2.)I was reading about the accelerator pump lever modification, which I believe is necessary with mechanical secondaries. Can someone please post a picture of the arm extension? I have read the DIY thread posted by Oneiros and I understand it I would just like a better picture of where it goes.
3.) Last but not least. On the double gasket accelerator pump modification, someone in a thread mentioned grinding down the bump stops. Is this necessary? What are the bump stops? Are they the things I circled in red?

Hopefully these are my last questions. Can't promise anything though.
1.) When I cut my throttle shafts will they rust? The ones I pulled off the carburetor were oily, was that gasoline and oil or something special?
2.)I was reading about the accelerator pump lever modification, which I believe is necessary with mechanical secondaries. Can someone please post a picture of the arm extension? I have read the DIY thread posted by Oneiros and I understand it I would just like a better picture of where it goes.
3.) Last but not least. On the double gasket accelerator pump modification, someone in a thread mentioned grinding down the bump stops. Is this necessary? What are the bump stops? Are they the things I circled in red?
Hopefully these are my last questions. Can't promise anything though.
Also. Make sure you have the butterflies aligned inside the throttle bores when you are reassembling all of the throttle shaft stuff. It take a few minutes to get everything lined back up where it's happy. It will probably bind a little bit when you first reassemble it. The throttle plates have a top and bottom, so make sure you put them back in the correct way. They only go in one way, and it is possible to put them in upside down. Look at the taper on the edge of the throttle plates and you can tell which way they are supposed to go in to provide a proper seal against the throttle bores. I usually install the throttle plates, then connect the throttle return spring to the linkage. Let the spring pull the throttle plates back to their resting spot as you feel for any binding. Once they are pulled shut by the throttle spring I like to loosen up all four of the butterfly screws enough to allow movement. Wiggle the throttle shaft slightly so that the throttle plates can nestle into the correct spot. Then tighten all four of the screws down. Finally, once you have them all tightened take them out one at a time apply red loctite and fully re-tighten. This long drawn out procedure makes sure your throttle plates don't bind before you loctite everything together. The red loctite is nearly permanent and can only be removed by extreme heat from a torch. You need to get it dialed in and operating smoothly before you loctite it together.
2)See my pictures below for AP linkage notes. You will need to sort of oval out the bottom hole so that the AP rod can slide thru easily. Move the linkage back and forth on the AP and you'll quickly see why the bottom hole needs to be ovaled. My extension is a piece of scrap steel that is 1.5" long with 1.25" between the holes. You will need to slightly bend the bottom of the extension so that it is parallel to the locknut. If you don't bend it you will probably get some crazy binding from the AP spring. So, oval out that hole and bend down the extension slightly to give smoother movement.
3) Yes, the things you have circled in red are the stops. You have two choices. You can either grind down the stops, OR do the double gasket trick. I prefer the double gasket trick. Sterling later switched from doing the double gasket trick to grinding the bump stops. He told me that he was getting problems with some of the double gasketed AP's leaking. I figured if they leak it's pretty quick and easy to change the gaskets, so I went the double gasketed route. What you are trying to do is increase the volume of the AP fuel shot. This can be accomplished by either spacing it out with more gaskets, or increasing the internal volume by grinding out the stops. Make sure you do one of them, but NOT BOTH.
4) I attached some other goodies to the bottom of my message for you. If you want to create your own jet kit using the 1/4" crown holley dominator air bleed blanks from JEGS here are the drill bit sizes you need.
I also attached a tuning guide that Sterling used to use. It is a starting point and may need some final adjusting but it should get you close depending on your desired use. You won't be able to fully tune the carburetor unless you have modified the emulsion tubes to accept the air bleeds which can be tricky.
This is the information I have been searching for!!!!!!!!!!
This is awesome!!!! Thanks Glazedham.
I have been searching for a couple weeks now and I heard Sterling using both methods for the AP modification. I looked at the dates of his posts and him grinding down the stops was his most recent method, so I didn't know what was better. Since I already have the paper I might as well just use the double gasket method.
I have done double gasket on my carbs in the past and never had any problems with it. I think it is easier too. If it leaks then you can always just change the gaskets. If you screw up grinding the stops out then you have to go and buy another parts carb. I'm really picky too and when I tried grinding out the stops on a junk carb I had it was hard to get it looking nice and smooth. The radius inside there makes it very tricky. I really took my time on the one I was practicing on and it still turned out like crap. Sterling told me that he used to take a chisel and hammer and whack them once and they would break off and come out. I tried that too, but didn't find it to be as easy as he described. I pounded the heck out of one of them and it never did break off. I destroyed the rest of the main body in the process though. So I wouldn't recommend that method.
I also wasn't able to find the AP pump screw sizes. :/ I know it has to be 1/8 inch longer than the ones that were on there originally.
Last edited by Redliner223; Mar 27, 2013 at 07:37 PM.

Thread
Thread Starter
Forum
Replies
Last Post
Jeff20B
1st Generation Specific (1979-1985)
73
Sep 16, 2018 07:16 PM
Nosferatu
2nd Generation Specific (1986-1992)
7
Sep 5, 2015 02:13 PM