When you click on links to various merchants on this site and make a purchase, this can result in this site earning a commission. Affiliate programs and affiliations include, but are not limited to, the eBay Partner Network.
WRT the OMP, I read here that one of the fundamental operating aspects of the OEM system is that the interior diameter of the tubing is designed for capillary action playing a role in keeping the circuit primed. So if using the OEM pump, that new tubing's ID might be important. Presumably the any tubing would fill up eventually on pumping, but maybe not be ready immediately at startup.
For the issue of whether a normal OMP has the heft to squirt into a higher PSI than atmosphere, can you actuate the pump independently? I wonder if you stick your finger over the outlet and see how it squirts to get a feel for it. Since you seem like a pretty thorough guy (love your build BTW!), maybe even rig up a pressure gauge on a clear vessel and see how it goes...
Won't the tube be full of oil? Unless there are air bubbles in the oil it'll just look like a clear tube with brown fluid in it.
I don't doubt that it'll deliver oil during idle, when you can watch it, but you won't be able to see at WOT. You are going to be dealing with a pressure gradient under boost.
IF you are dead set on metering oil. You could put a fuel pump on a small tank. Fill the tank with oil of your choosing (2 stroke oil or just motor oil). Then have the pump turn on. Use a jet of some sort to regulate the oil to your liking. You'd still be dealing with a positive pressure gradient, but at least now you can put more pressure on the oil side to press the oil into the charge piping.
^^^^ all this seems like a poop ton of work and adding extra unnecessary points of failure (catastrophic ones at that)
True about it being a clear line with brownish clear liquid in it, although it's the same case as the stock lines (which have discolored by this point making them harder to see through). You can still see oil in the stock lines, just barely, so it's a sort of a nice idea to be able to do the same with the new system. But then again you have a good point, it's not like I'd be able to see the lines when I'm actually in boost so does it really matter? No probably not, and it would be much simpler to just use black viton hose the whole way. Perhaps that's what I'll do, we'll see. I mean, I've looked at the stock lines a couple times, but after that you just hope it's working and rarely check again.
I thought about making a new setup with a small pump, etc. as you mentioned, although I feel like whatever I can make would have a much higher chance of failure than the stock design. That said, I've been leaning towards running an external 2-stroke tank for a while and this would be the perfect opportunity (I'll come back to this down below, I've been doing some OMP research).
Originally Posted by Toruki
WRT the OMP, I read here that one of the fundamental operating aspects of the OEM system is that the interior diameter of the tubing is designed for capillary action playing a role in keeping the circuit primed. So if using the OEM pump, that new tubing's ID might be important. Presumably the any tubing would fill up eventually on pumping, but maybe not be ready immediately at startup.
For the issue of whether a normal OMP has the heft to squirt into a higher PSI than atmosphere, can you actuate the pump independently? I wonder if you stick your finger over the outlet and see how it squirts to get a feel for it. Since you seem like a pretty thorough guy (love your build BTW!), maybe even rig up a pressure gauge on a clear vessel and see how it goes...
I've read that bit about the capillary action as well, and admittedly I'm not too convinced it plays a major role. I'm sure it does a little bit, but if you've ever pulled full OMP lines and seen what happens to the oil, it doesn't seem like the capillary action factor is a major one. Regardless, I still think the relatively small diameter of the stock lines is important to maintain, partially because the larger the diameter, the more unnecessary volume you have to fill. The OMP lines always seem to flow backwards a little bit if the car has been off for a while, and while this isn't a huge issue with the stock system (it fills back up within a couple minutes of warming up), a larger diameter line would potentially greatly increase the time without oil. For this reason, and also that's it's just simpler, I'll be staying with line close to the OEM diameter - this will probably be about 1/8" OD, leaving the ID similar to stock.
And yeah, regarding whether the oil metering pump can deliver fuel to a greater than atmospheric pressure environment, it would seem so at least to some degree. You're idea of sticking a finger over the outlet is similar to what I briefly mentioned one of the posts somewhere above about making a test rig. I've thought about it a bit more and I think the easiest way to test it would be a PVC tube with the ends capped off and two barbs for the OMP to run into with a tire valve stem up top to pressurize it. Basically a plastic pipe-bomb with nipples . Then I'd just need to feed the OMP somehow and spin it. Today my two S4 OMP's arrived so whenever I get some free time I can get going on the test. Also I'm glad your enjoying my build. Hopefully you aren't getting Richard Miller and me mixed up - he's got an awesome project going (I'm probably preaching to the choir here) and it just so happens we have the same color and year, and are both working on turbo related things right now .
Now then, I've done some research on the OMP. For one, it looks like modifying the stock S1 thru S4 OMP's to be supplied from an external tank is pretty easy. That said, I've seen a number of different thoughts regarding the process. For one, it seems like some people think a drain back hole needs to be drilled when "blocking off" the OMP. If this is the case, it must only be for S5 (and maybe S6?) since S5 went with the electric OMP and I have no clue how that works as it's not relevant here. The 79-88 (S1-S4) mechanical OMP's however do not need to worry about pressure behind a blocked OMP as far as I can tell. I've read a number of places by this point that the OMP has very little oil pressure behind it, and this would seem to be backed up by the fact that no-one mentions releasing oil pressure when installing a block off plate. Atkin's site as well doesn't mention anything, and I feel like that's something they would include in their part description like they do for some of their other offerings.
So, let's assume with some confidence that the OMP does not have significant oil pressure behind it (someone please advise me if I am incorrect). This also makes sense as to why those external OMP tanks work fine - they only provide a little head pressure and that's it. The next part of the equation is that the OMP in an S4 non-turbo system needs to overcome at least a little bit of pressure because of the check-valves in the injectors. I'm actually curious what the required pressure delta is for the valves to open as it's not a spec I see listed anywhere (probably because it's one practically nobody cares about). In the S4 turbo OMP system there is of course some additional pressure to overcome, but the same check valves are used (actually it seems all 13B housing check valves are interchangeable). It's also important to note that the seal kits for the S4 turbo and non-turbo, and even the 12A OMP's are the same, excluding the front cover to OMP gasket. This would incline me to think that a 12A OMP could handle a bit of positive pressure as well, but at this point we're going to move forward with using the S4 system since it has been previously regarded to work with boost.
From what I can find the S4 turbo and non-turbo OMP's are essentially identical other than the oil output, where the turbo pumps put out slightly more cc/min. This seems to be related to a slightly larger inner bore/piston, although I cannot confirm that. It would however, based on the fact that they use the same seals, seem that both OMP's would be able to handle the same amount of boost. I wish I had an S4 turbo OMP to look at so I could confirm this, but for now it's another fairly confident assumption.
Where we're getting to here is that the S4 OMP should be perfectly capable of withstanding some boost (up to about 10 psi based on old posts) regardless if it's the turbo or non-turbo version. They also require very little pressure to operate, unless perhaps the S4 turbo front cover changes the amount of oil pressure bled off from the OMP feed; this is something I cannot confirm as of yet. In the turbo OMP system the check valves serve two/three purposes. First, they reduce natural drain-back of the oil. Second, they prevent the compression stroke from at all causing back-pressure in the lines.*** Take point two with a gain of salt. I haven't looked at the position of the injectors in reference when the rotor enters the compression phase. Regardless if this is a non-issue, the principal remains. Third, in the S4 turbo system these check valves prevent boost pressure from creating back-flow in the OMP lines, much like in point two. This I can only assume is important to the longevity of the OMP (hardy har har, well duh. Just hold on). With the check valve, the OMP must only fight positive pressure from the turbo when a "dose" is being administered. The in between "doses" the check valves do the hard work. This significantly cuts down on the duty imposed on the OMP in exchange for a slightly higher pressure needed in the lines to overcome the check valve. Hence, if I do go through with this OMP hybrid thingy check valves will be included. I have found some suitable check valves on mc master that require only a 1psi delta and are fuel/oil rated.
So, that was all to say that I think the S4 OMP system should be entirely capable of working under boost, even in a carbureted application. It should also be able to do so whilst being fed from an external tank and operating on a 12A front cover. The addition of an external tank also requires one less modification to be done to the 12A front cover - the oil feed does not need to be channeled to a new location. This is the tentative plan moving forward, although I would love to hear some opinions for more food for thought.
I've thought about it a bit more and I think the easiest way to test it would be a PVC tube with the ends capped off and two barbs for the OMP to run into with a tire valve stem up top to pressurize it.
Also I'm glad your enjoying my build. Hopefully you aren't getting Richard Miller and me mixed up - he's got an awesome project going (I'm probably preaching to the choir here) and it just so happens we have the same color and year, and are both working on turbo related things right now
I think you might be onto somethig...in the constellation of Stardust Blue FB's with meticulous builders it's possible I've conflated them. Maybe I'll rename my color from Havana Brown to Pandemic Fog. In any case, it's the thought process and the execution laid out here that is so interesting. For your PVC work, I might be disappointed if it doesn't become a potato mortar in its next life.
As we approach summer this turbo project is getting closer and closer. There's still not a whole lot to share, but the turbo is now on route as is the wastegate, so part collection is beginning, slowly... Next up will be the OMP system and fuel system updates since those have a few less common parts involved.
One thing that is happening now though is the carb hat. I'm toying with the idea of 3D printing one. Well, actually at this point it's more than toying, I have a prototype running on the printer as I type. Material will be carbon fiber nylon. The stuff ain't cheap (cheaper than most engineering filaments though), but the nylon will provide a fuel resistant base material with the carbon fiber adding some rigidity and making it easier to print. Prototypes are being printed from PETG for fitment tests since it's 1/8 the cost. I'll also be running some pressurization tests with the CF-Nylon once it arrives to ensure layer adhesion will hold up to the task - in theory it should be completely fine, but practical testing never hurts.
Here's a quick render of the v1 carb hat for those curious:
A couple of weeks ago the show "Engine Masters" did a dyno test for carb hats to be used with a centrifugal supercharger on a small block Ford V8. They were using a holley stuff carb specifically designed for a blow through setup.
The intent of the test was to check the performance of several off the shelf blow through hat designs. Two of them were determined to be the best and they look allot like your rendering. Maybe one of them could be modified for a niki?
What was more interesting and maybe relevant to you are the issues they reported when they changed the orientation of the carb hat on the carb. The carb hats performed the best when the inlet was point straight ahead (towards the distributor on the Ford) and not as well when the carb hat was pointed at an angle. Basically having the air path hit the primaries first and then the secondaries. They related stories of having engines go from running well to barely running just because they moved the hat to a different direction. Since you are working with a rotary maybe it won't matter but I thought it was interesting anyway.
Cool stuff. Interestingly enough I posted this project on another platform last night and someone mentioned the same episode, although they didn't recall the results. I'll have to take a look at that because yeah, now I'm intrigued.
I actually had three designs and this is my third. The other two didn't work out for complexity reasons, but I'm sure someone with better surface modeling skills than I could probably make it work. At first I was trying to emulate the Holley "rounded/curved" carb hat design, but it was a bit too complicated for me, at least presently. That's what landed me on this design which seems to be fairly common as well. The interior profiles are smoothed so there are no hard edges, and I've also designed the mounting face with a slight step so that it better transitions over the mounting lip of the carb.
The issue with modifying existing hats for the Nikki is that most are designed for 5-1/8" air horns, whereas the Nikki is a 4" (100mm); or perhaps you meant modify the general design to fit a Nikki, in that case disregard what I just said. Anyway, that's why I decided to give this a go since I figure it'll look better than something I can weld up, and quite possibly perform better as well. It should also be cheaper than buying a pre-made one, if I could even find a 4" hat.
That would be a great CAI intake on a nikki as well. Sign me up for one if you make it. Its nearly impossible to find something that fits the nikki carb mouth diameter.
If you're worried about the 3D printed carb hat's durability, you could maybe try potting/impregnating it with epoxy. The epoxy will also give it the chemical resistance you're looking for. I've done something similar in the past where I used vacuum pump to pull the epoxy into all the tiny holes in an FDM printed part (with mixed results, got epoxy everywhere and the surface finish was pretty terrible....but just a thought)
I was wondering if someone would bring it up as a CAI. My only concern is that it may be a little restrictive for an NA application with just a 2.5" opening. I could make it larger, but then you're still constricting down a 4" opening to... something? I'd be curious to hear thoughts on that.
Good thought on the epoxy potting. I've seen that done a couple times with 3D printed parts, although I had forgotten about it. I have a feeling it's going to be strong enough as is now that I've printed a mock-up, but I'll keep it in mind if there's any issues in the future. Thank you.
Speaking of mock-up, here it is. Do note that it's a little rough because I wanted it done faster (it still took 27 hours) and was only concerned with fitment and strength. This also isn't the final material, so that's something to note as well.
It actually turned out really good (surface finish aside). It's strong, fits well, and overall looks like it should work pretty well. I think I'll make the base section a little taller now that I've watched that Motor Trend carb hat episode, but overall it looks promising. I'm also still debating on what to do with the bolt hole. Right now it's recessed with extra support on the other side, although I suppose that isn't really needed. I could also just make it flat. A washer should be used either way. Curious if anyone has opinions on the matter.
I also want to put out there now that - if I get it up for sale - it's likely going to be a little spendy. Unfortunately the material is expensive, it's a time intensive part to print (higher energy usage and more wear on the printer), and it requires a fair amount of post processing due to all the supports needed inside it. Of course that's down the road quite a ways yet, so I'll deal with that when the time comes. Just wanted to give a heads up to anyone who might thinking up plans.
Other news, it took me three orders (and hopefully no more) to actually get a hold of the turbo. First two sellers didn't actually have it on hand and both quoted me August for when Borg Warner's next batch will be. I finally found it in stock (in theory), so hopefully it ships today. I've also now acquired a welder. It's about as basic as it gets, but for the grand price of free who can argue. Should be enough to get me started and do the downpipe welds. I've done some MIG and stick before, but it's been a while. This machine is flux-core only.
A couple iterations later and I have the final (subject to change) carb hat. I've now printed it out of carbon fiber nylon and man, it looks good. Photos don't quite do it justice. Anyway, it's the first cf-nylon version I've done so it has a couple glitches, I'll call it a functional prototype. Only main issue is that the supports under the tube section didn't stick well enough and the walls of the tube section curled up leaving some unfortunate artifacts. Can't really see it from the top, which is good, but I'm sure it will affect it's strength. Anyway, enough talking, here's a couple photos.
The "icky" spot. I'll be working on a fix for this. I know the issue, I just need to come up with a solution. Already have a couple ideas.
Now that I've watched that Engine Masters episode, I'm wondering about what position it should ideally be in. The 45 angle is most likely a definite no, although it would make charge pipe routing the simplest. The other two I'll have to do some thinking about. Likely it will end up facing the passenger fender with a reducer elbow right off the bat - a reducer because I intend to run 2.25" charge piping and the inlet is 2.5". I don't plan on relocating the battery so both charge pipes will be running through the passenger side radiator support.
So yeah, things are slowly making progress. The wastegate arrived yesterday, the turbo should arrive today, and the fuel pump and blow-off valve should arrive sometime here. I'm holding off on all the plumbing parts until I have some more time with the car to get everything planned out, but I have a tentative list of everything else remaining. The first actual work on the car will be the OMP system and getting the new two-stroke feed with an S4 pump set-up, and then finalizing the routing for charge piping and fuel. The pace will pick up in a couple weeks I expect.
So... I've kind of forgotten to keep this thread updated, but there's been a decent amount of progress. The short is the turbo fits, the wastegate fits, a downpipe has been made, the OMP system is "in progress", the fuel system is finished, and probably a few other things. So anyway, here's the long version.
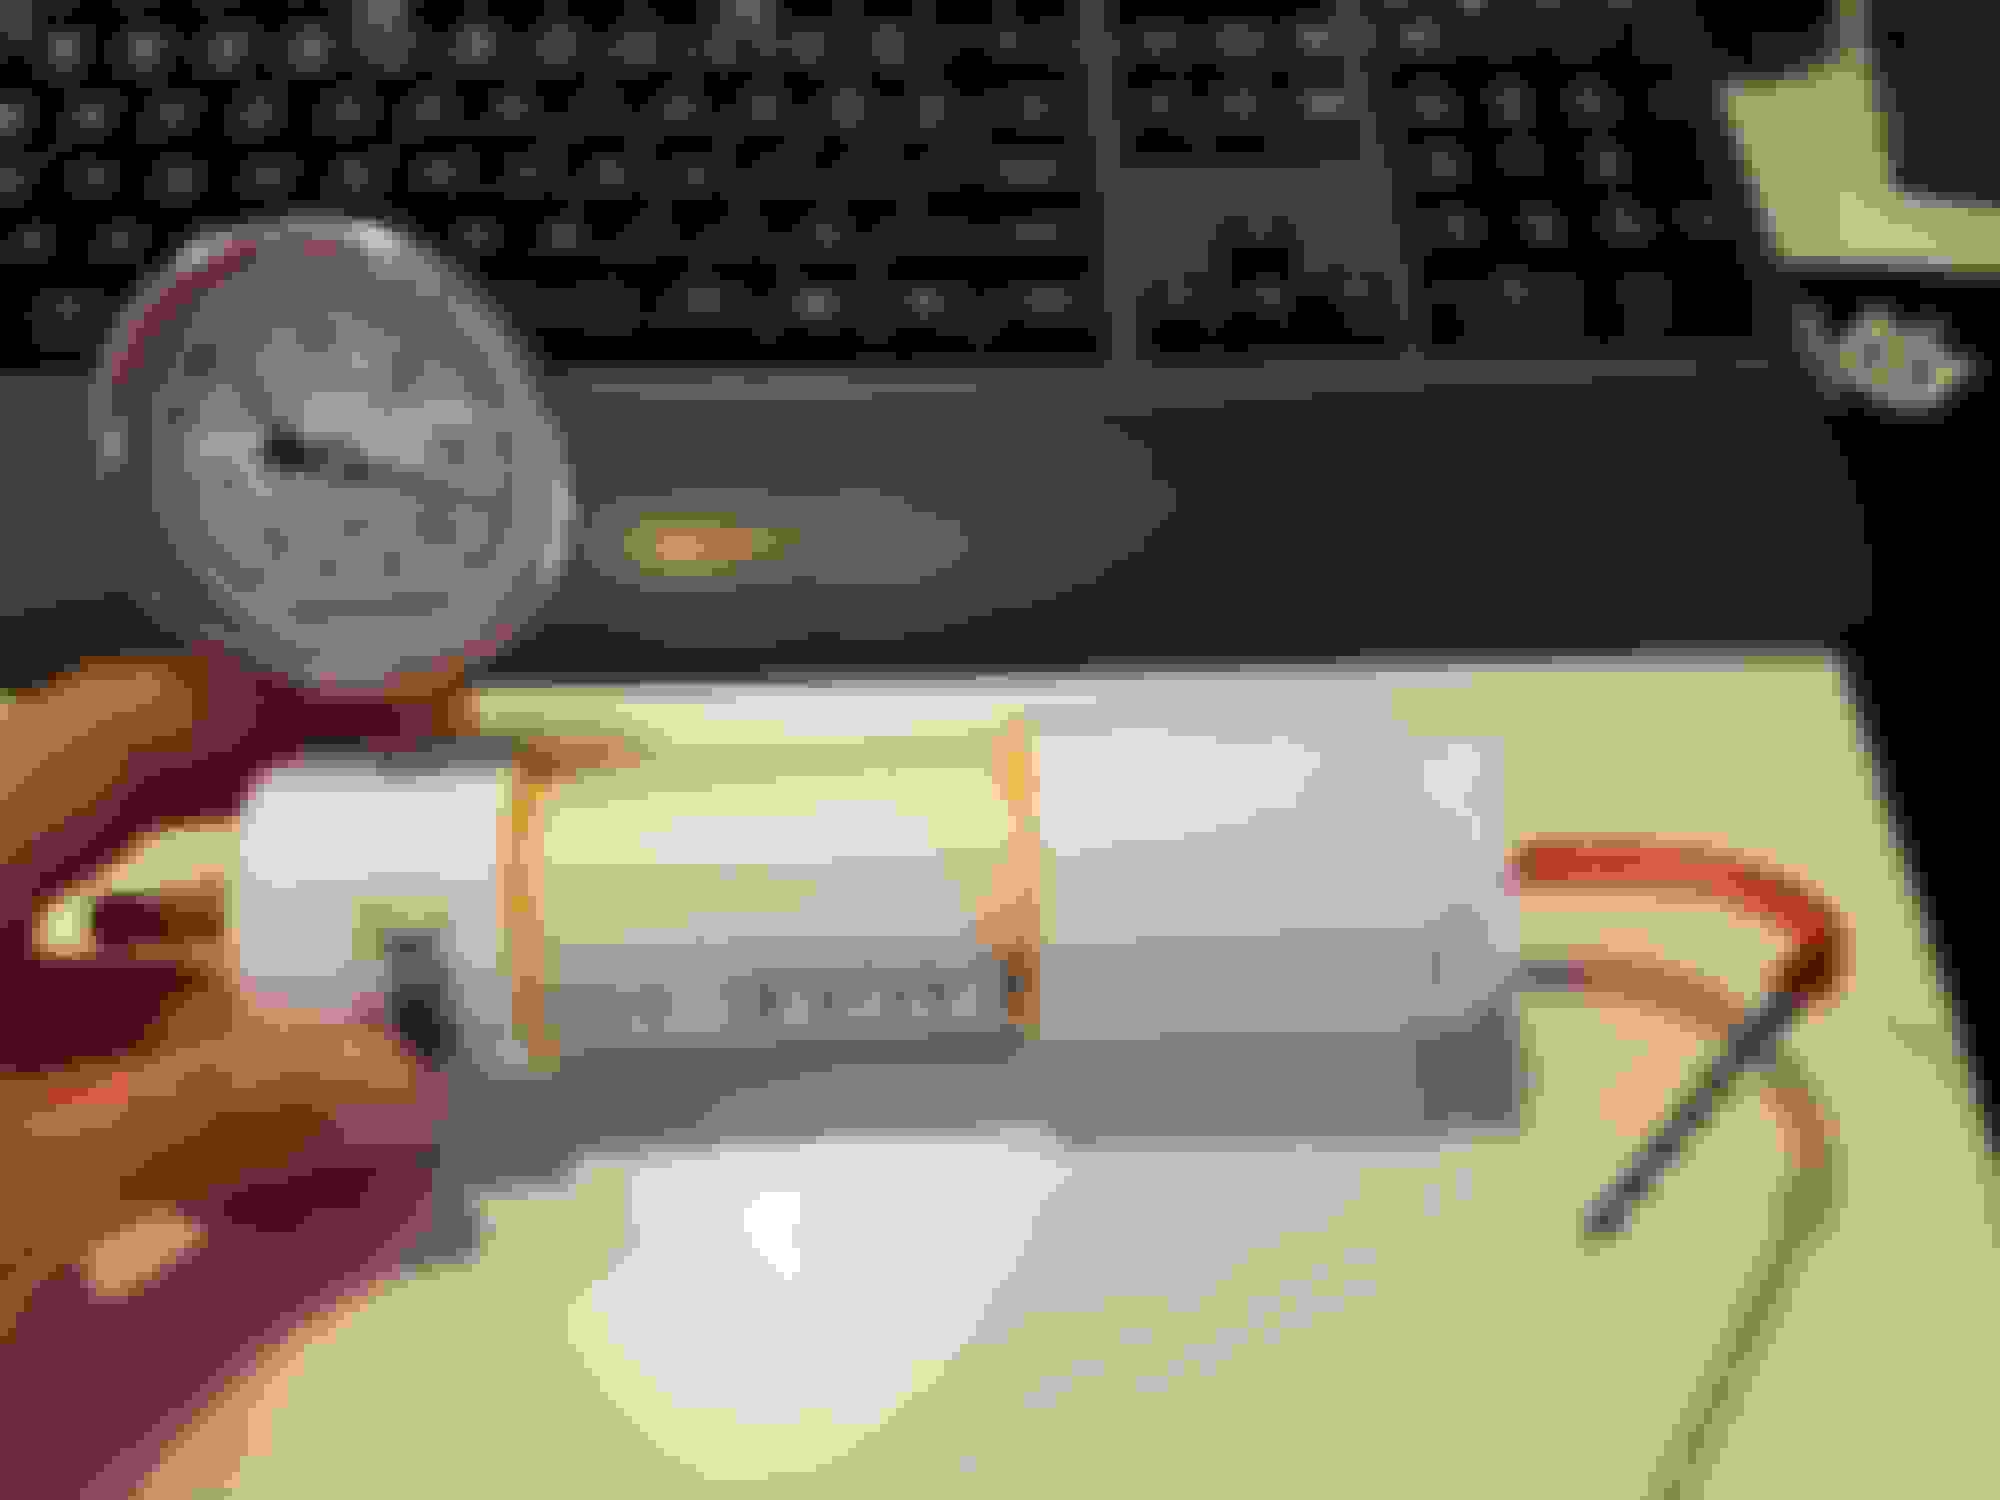
First off, things have been happening a little out of order from originally planned due to time and availability of some parts. This is primarily referring to the OMP system which was originally first on the list but has gotten pushed back a little for various reasons. While I'm still waiting on a couple parts that should arrive next week, I have built the majority of the test apparatus to see how much boost is too much (for the OMP) and whether flow decreases significantly under backpressure. Below is a photo of the main part. Essentially it's a pressure vessel (ahem, pipe) with a gauge to monitor pressure, a barb for the OMP lines, and a valve stem to pressurize it. I'm using a semi-clear tubing and I'll measure the flowrate by tracking it's travel in the line over time. Not the most elegant solution, but it's what garage engineering has cooked up this round.
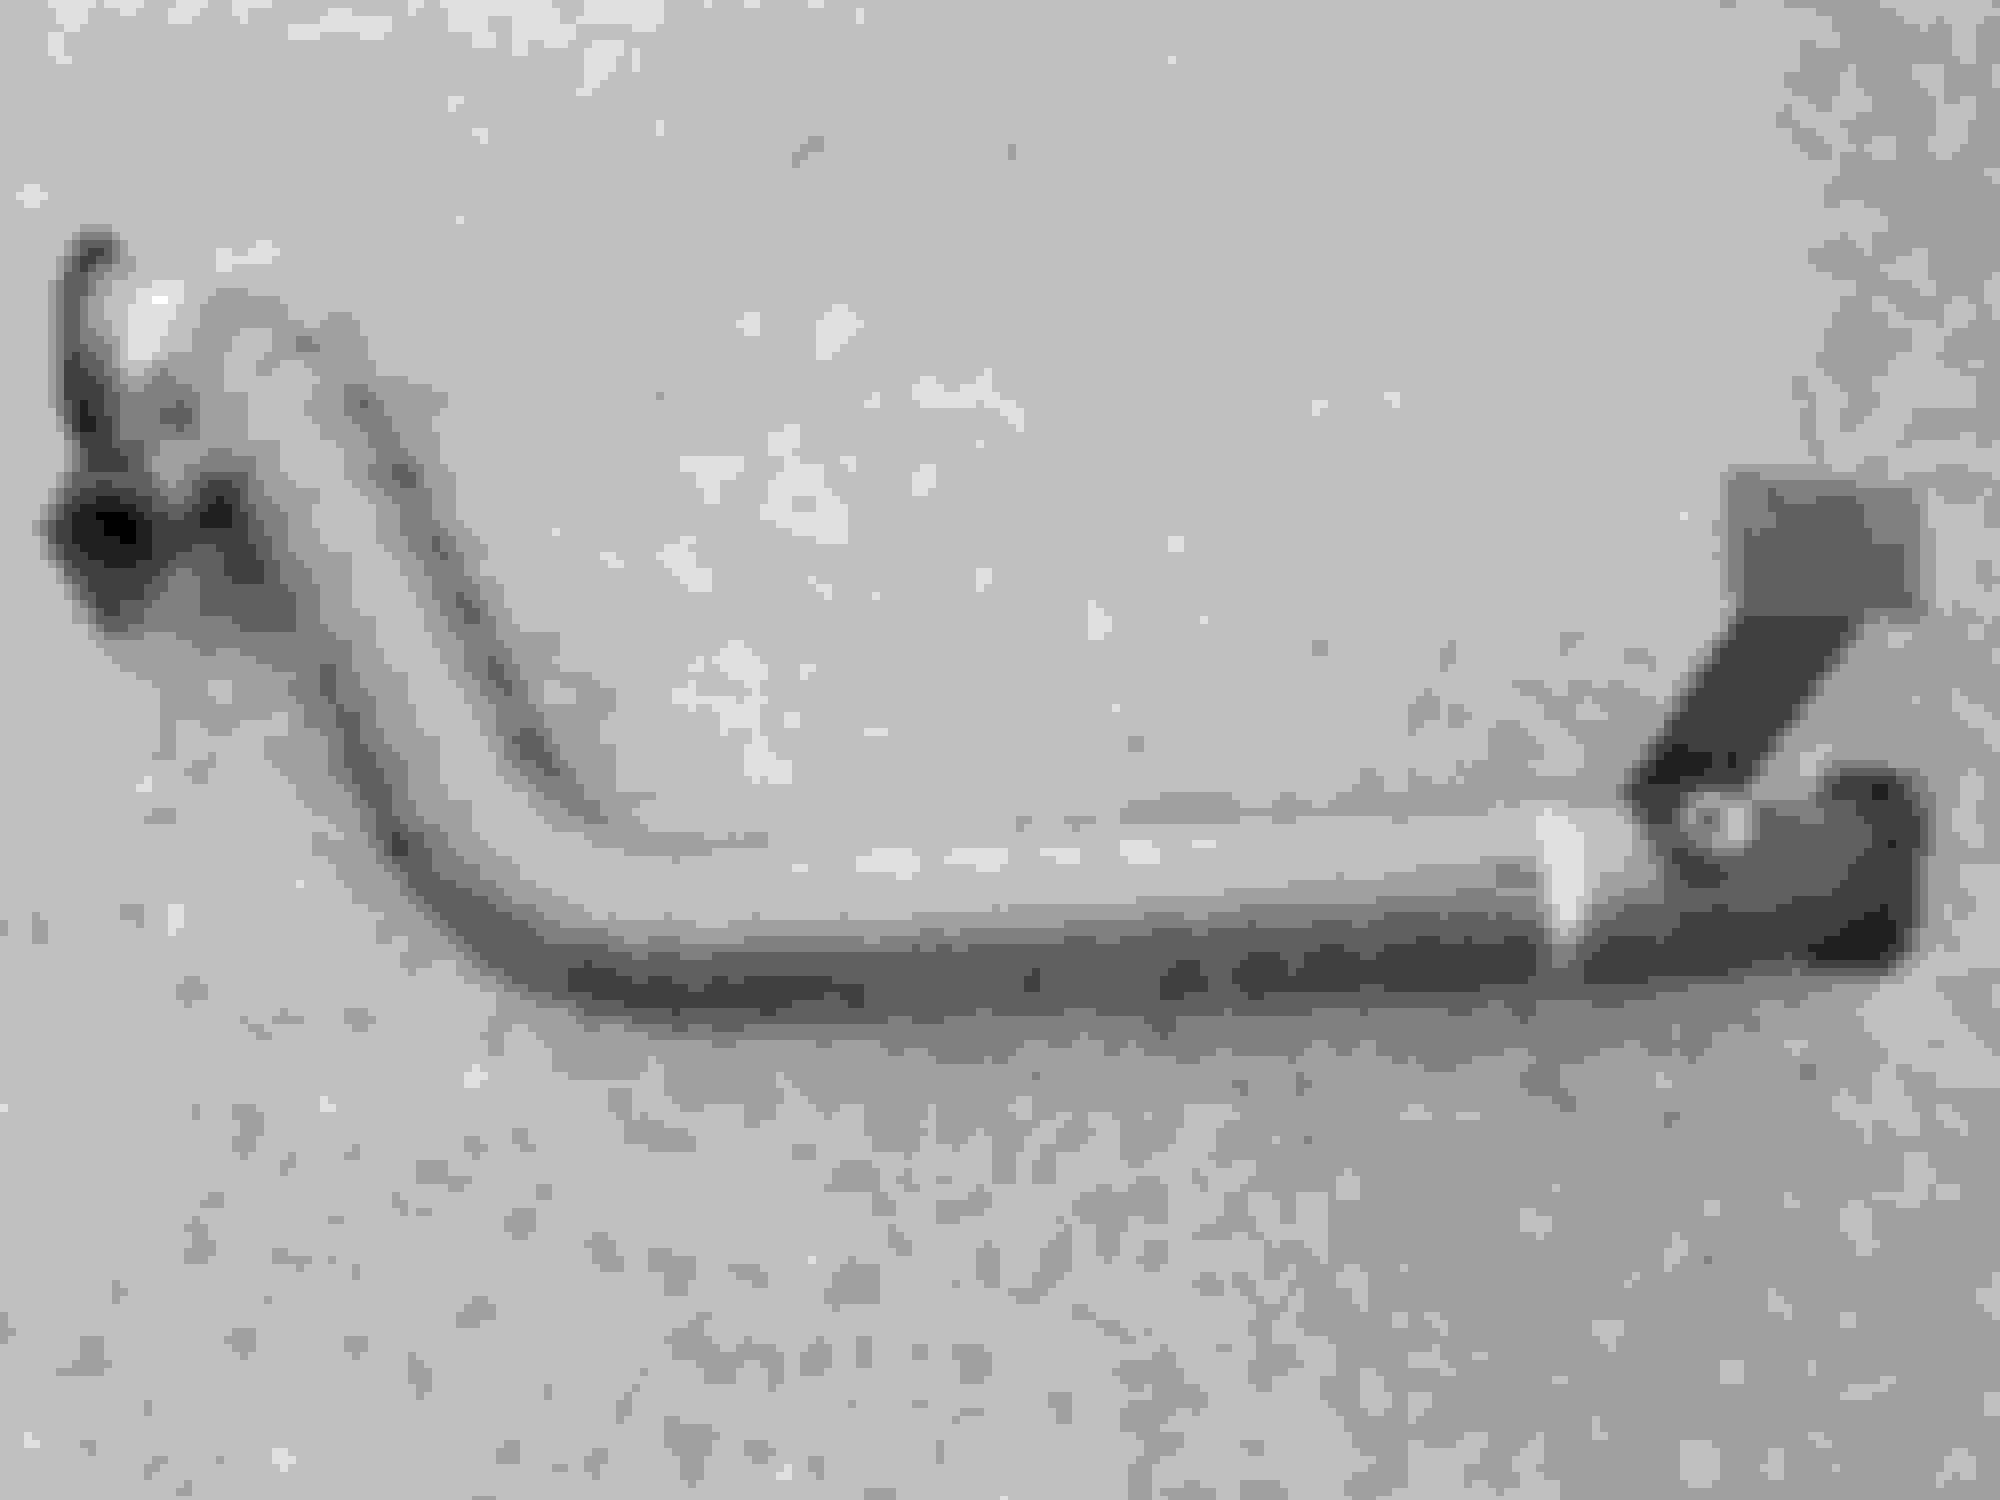
Next up we have the fuel system, and by far my least favorite part was bending the new 3/8" return line. I used some Earl's 3/8 Steel Olive line and while it's great quality stuff, you better know exactly where you want the bends before starting. Thankfully I got pretty close right off the bat, but it still took a bit of finagling to get it to fit up "perfectly". Here's a photo of the old 1/4" return next to the new 3/8" return line. Note that the ends were left long intentionally.
Again, it wasn't perfect, but it's certainly good enough. Here's a shot under the car (this angle was picked intentionally ).
And then the fuel tank. This is/was probably my second least favorite part, not because it was tough, but because who likes cutting into a 99% rust-free, nice and clean OEM fuel tank... Took a while to decide where I was going to put the return, but eventually settled on the location seen below. It's positioned such that it just barely missed the frame rail and yet I can still reach a long wrench through the fuel level sensor port to hold the other side of the bulkhead fitting. It's also far enough away from the level sensor that it will not mess with the readings.
I ended up going with a Vibrant Performance bulk head fitting to do the job. It's a nice part with a 3/8" barb on one end and a -6AN fitting on the other. Truth be told I had originally been planning the system with the fitting backwards, hence the silver fitting since it was all my local parts store had around when I realized I goofed. The fuel hose is a submersible fuel line secured with a permanent crimp clamp. Reason for the short section inside the tank is to reduce noise/frothing, as well as direct flow slightly away from the level sensor. If I were to to this again I'd likely just suck it up and weld a solid tube to the tank because this ended up being a lot more hassle than I'd say it was worth, although this'll still work, so it's staying.
Placing the fuel pump was a little tricky. I wanted it as low as possible without protruding from the bottom of the vehicle, but also still able to fit the stock plates and all since they provide some protection for the fuel lines. The mounting screws are practically under the brake line, although just far enough below that it does not need to be removed in order to pull the pump. Speaking of which, the pump is a Walbro (now TI Automotive) GSL391. Based on prior threads mentioning MSD 2225's and similar, as well as my own figuring, this pump should work well for my power goals. Also it's awesome how quiet it is - makes sense since it's essentially and OEM replacement EFI pump. Far quieter than the Carter P4070 I had on here before, and I am certainly looking forward to driving with it.
The fuel filter managed to fit up on the rail a little ways, just barely. I removed the clip from the stock location and used a self-tapper to mount it where you see below. While the rest of the system is EFI fuel line, the pick-up side of things in this region are actually standard carb hose (30R7) because it seems to handle the tight bends without kinking better than the EFI line does. At some point I'll replace the short factory pick-up line with a more logically routed one (so that the fuel doesn't do a loop to reach the filter) but for now it will suffice. The pre-filter is a Wix 33032, so just your standard metal can filter. For those who didn't know, 33032 is 5/16" and 33033 is 3/8" - comes in handy when you just need a simple filter without application and the parts guy is clueless.
Up in the engine bay the new return style, boost referenced fuel pressure regulator is mounted up. Before entering the fpr, fuel goes through a Russel 40 micron 6AN fuel filter, which is there because the carb no longer has screens above the seats. I used to run a similar Edelbrock one, but I didn't trust the design for higher fuel pressure. Also, perhaps some of you noticed that the micron ratings and placement of the filters is backwards. To that I say oh well, it's going to work just fine (also the Russel doesn't have enough surface area for a main filter IMO).
I'll also add here that the oil filter sandwich plate has been installed as well. I don't have a photo of it, but it's the Mishimoto unit. The RB one just seems a bit overpriced for what it is, but to each there own. One nice thing about the RB is that it has a large and small port. The Mishimoto only has 1/8 NPT, but there are three of them.
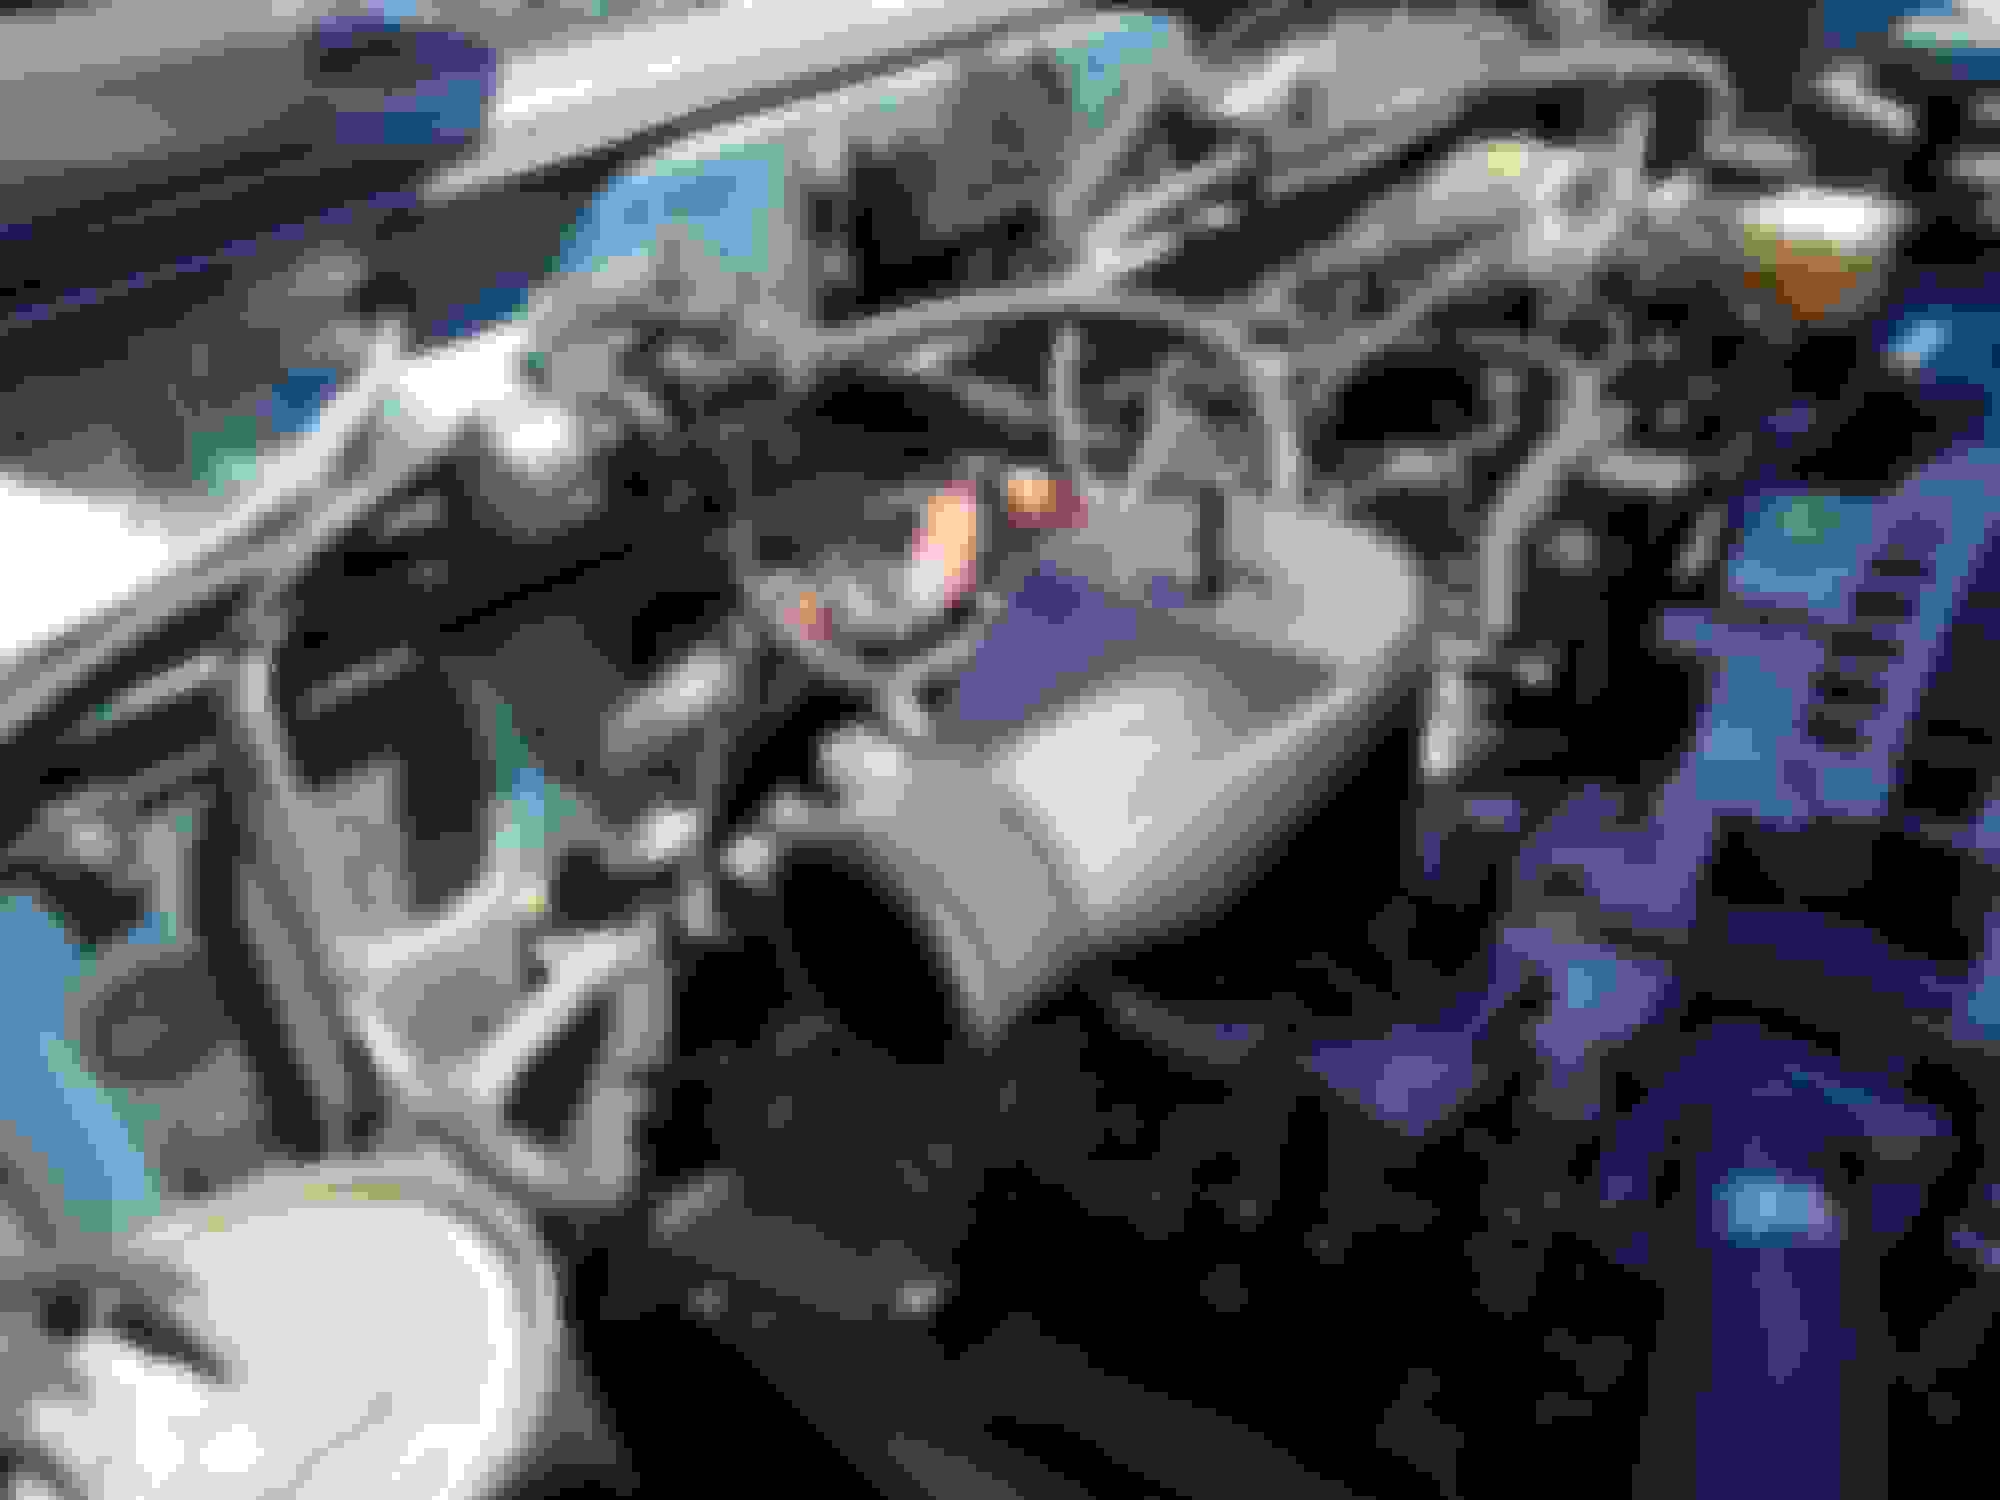
Thankfully the turbo and manifold all fits up well. I had to remove the heater core return line to do so, but otherwise it clears both the intake and the frame rail with ample room (I will be rerouting the heater core line, I'm not living without a heater). A small section of the downpipe can also be seen here. The orange paint is because a local shop is changing inventory and so they sold me the display piece at a discount . I stripped off most of the paint, but hadn't gotten quite all of it; I've since finished cleaning it.
Here's a shot of the downpipe and turbo situation. Yes, the wastegate placement and routing is not ideal in the slightest, however I've got fingers crossed that it's going to work. It was either try this or make a new manifold, and I already had the modified 12AT one so I wanted to at least give it a shot. Good news is that this is 13 gauge pipe, so it shouldn't burn though, at least for a while.... I'm also hoping this wastegate will be sufficient to control boost with and is not undersized, but again, we'll see. This isn't pro-shop stuff by any means. This is a guy at his house trying to make stuff work and learning along the way.
And finally to wrap this post up, here's a photo of the finished down-pipe. It's coated with Rustoleum Grill Paint, which is my go-to for high temp rust prevention (although not necessarily looks). It will be getting wrapped with some DEI exhaust wrap as well as some heat tape being applied around the engine bay in the turbo region to keep heat at bay.
For now that's about all I have. Next up is continuing work on the turbo oil lines, the OMP system, as well as a little carb work. The intercooler and all that fun stuff will likely happen in a couple weeks. Still need to limit advance on the dizzy as well. Fun stuff! If only it wasn't forecasted to be over 110F here this weekend...
OEM on the S4 & S5 the turbo gets pre-oil filter oil.
No, it doesn't. The top oil banjo fitting on the front iron is filtered oil- it is fed through the upper dowel pins from the oil filter. This gallery also feeds the filtered oil to the front stationary gear, the OMP, and becomes part of the gallery that feeds the rotors through the eccentric shaft, combined with the rear stationary gear.
I would never recommend sourcing unfiltered oil to feed turbo bearings.
So after a couple days of being annoyed with tapping NPT threads in things that were not designed for them, I finally have a working OMP, and working great it certainly is. First off, here's a photo of the test setup:
I'm not sure if I had already posted a photo of this or not, but the white tube assembly is just a pressure vessel with a valve stem so I can pressurize it, and a gauge to meter the pressure. Really simple to make if anyone else feels like replicating it.
Now then, I first did a little testing with the OMP with all four fittings connected. I discovered that ports diagonally across from each other (this is an S4 OMP) pump at the same time. Since they are receiving oil from the same source, this means that if you block off one of the ports, the other will still flow and not cause any internal pressure build up. This then translates to you being able to use either the top two or bottom two ports (orientation when installed) - if only two lines are required (12A carb application) - while blocking off the other two with bolts.
Next I hooked it up to the pressure tester and started at ~1 psi. Absolutely no issues, which is good as I didn't expect any. Next I went straight to 10psi; still no issues to speak of. Finally I bumped up to 20psi and once again, there is no noticeable decrease in flow or increase in force required to spin the OMP. Also, this confirms that indeed the OMP is a pump and more than just a metering device - there were some older threads where this had been debated. The pumping action comes from the internal piston which reciprocates due to the "cam lobes" on one of it's ends. Oil is then released by holes in the side of the piston as it spins before it returns to the neutral position via spring pressure and the cycle repeats. The only way I see for it to fail is either the end cap seals begin to leak, or the pressure it is competing against becomes so great it binds. Provided the results of my testing, I would conclude that the pressure at which it would bind is considerably greater than even 20psi and that there should be no concern using it for boost applications. I also believe the end cap seals would fail before this point anyway.
So anyway, I'm happy to finally have this sorted out. I should also note that this testing was done with Lucas TCW3 2-stroke oil with the OMP being spun by a cordless drill. The stock banjo fittings also work wonderfully with 1/8" ID tubing. Additionally, there was essentially zero head pressure in this system. The OMP was at most four inches below the oil level in the reservoir during these tests. The air seen in the lines is because it had not yet purged all the air out of the system.
The last thing I'll add here is that if anyone reading this considers tapping their OMP for an external oil tank, think about using a different fitting than I did - I used a 1/8" NPT fitting and it barely fits in there. I actually had to trim the fitting from the inside of the OMP because portions of it intruded on the path of the internal piston and cam. Hence, I would suggest using a smaller fitting if at all possible. If I recall correctly one person used a brake bleeder screw with the end cut off, but I'm not certain on that. All you need to do is get oil fed to the end with the flow adjustment lever. If oil is reaching there you're good to go. Also keep in mind the angle that the feed fitting exits the OMP - straight or tall fittings will most likely collide with the lower water pump neck.
We're getting pretty close now, in fact it may even touch the ground tomorrow (fingers crossed). But first, here's a little back-track on what's been happening.
First off, I decided to use the factory auto-trans vacuum port for my blow-off valve, gauge, and fuel pressure regulator boost reference. I figure that even though it's connected to the secondary runners, because of the channels in my intake (SA style) it should still see proper boost levels. If not I'll change it, but I don't expect to need to. Here I drilled and tapped for a 1/8 NPT thread to 1/4" barb fitting.
Next, I finally wrapped up (pun intended) my downpipe. I know the whole "don't wrap your header" spiel, but I decided to anyway because heat management is going to be a bit tough with how everything is packed in there. The piping is 13 gauge though, so it is decently thick to deter burn-through. And yes, I know the waste gate position is not optimal, at all... Unfortunately it's all I had to work with, so, it's being worked with. The wrap in question is some DEI Titanium exhaust wrap. You can also see the rear exhaust hanger which hard mounts to the transmission. Up until now my entire mid pipe had been only supported by the four header bolts and the three muffler hangers. Considering it's made of 1/8" wall piping and has the rather large RB universal pre-silencer in it, I was asking a bit much from those few mounting points. With the turbo, I really did not want to leave all that weight sitting on it, so now the transmission is taking some of the load like it does from factory. I even used the factory bolt holes. Also don't mind the absolutely glorious welding.
Here's a shot with the turbo in the car and the wastegate hiding under the downpipe. It's a tight fit, so we'll see how it goes.
The first time I had it all together and fired it up the car sounded like an unhappy tractor - aka exhaust leaks galore. Turns out whoever had "modified" this 12AT log manifold forgot to plug the old bolt holes and so I had exhaust exiting in a total of eight different locations. A little welding later and I got it fixed, but it was an interesting surprise nonetheless.
Finally with some stuff assembled here, you can see some trimming I did on the phenolic spacer to get everything to fit up properly. The oil feed is a -4AN with an inline filter hiding behind the carb as an extra precaution. The oil drain (-10AN) ended up being a little more, err, level than intended, but if smoking is an issue I have a solution lined up. You can also just barely see the new heater core line I ran on the firewall there. I ended up using some 5/8" aluminum fuel line and so far it's doing the trick nicely. Reason for the new heater core line is that the turbo's hot side hit the stock one where it raised off the frame rail. The new one stays level with the frame rail all the way until the firewall where it then comes up. Additionally, the coolant bottle has been relocated to where the sub-zero start assist reservoir would normally reside in order to make room for the charge piping.
The OMP is also all ready to go. I decided that I was not happy with how much volume using 1/8" ID rubber hose all the way up would introduce, so instead I used the stock 12A lines with some of that chemical resistant rubber hose to adapt them to the S4 OMP. The volume of the plastic lines is significantly less, and they also will not expand under boost which would effectively lead to temporary back flow; both good things to be rid of.
And finally nearing the end, here's my intercooler solution. It's not the most optimal (this seems to be becoming a theme with this project), but I could not find a suitable option with the inlet and outlet on the same side so instead one has to wrap around. Even though it is tiny, it's rated higher than what I will require of it so we should be fine. Again, I won't know how well it works until this thing gets rolling.
And finally to wrap this post up, here's a shot of the engine bay as of last night. I have all the charge pipe routing worked out and now I'm just working on a few finishing touches for the intercooler brackets. Once that's wrapped up I only need to install the blow-off valve, run some vacuum lines, and mount the two stroke oil tank. After that we should be ready to start road testing. Speaking of two stroke oil, since I am no longer pulling from the engine oil I have switched to 20W50 full synthetic.
Goal is to be back on the ground by the end of tomorrow. Also my apologies for not going into much detail - as I'm covering a longer time period in one post I'm trying to keep it short, although perhaps I will do a more comprehensive write-up after the fact. I have also been intentionally leaving out some part numbers until I confirm that everything works. Once we're squared away I'll make a full parts lists (or at least of all major parts).
Edit:
Almost forgot about the dizzy. It's now been limited to 12 degrees of mechanical advance, and also has a brand new cap and rotor paired with some 3rd gen spark plugs (BUR7EQP and BUR9EQP, although I may go 9's all around, not sure yet). For the first time in a long time the car idles with no significant misfire glitches, which is really nice when paired with the quieter fuel pump.
Last edited by Benjamin4456; 07-14-21 at 12:22 AM.
Preface: Note that I’ve been intermittently writing this over a week or two now, so the timeline gets a little wonky on occasion. Also, if it wasn’t already evident, wall of text inbound...
Ok, the SA has been on the road for a few weeks now and I ought to get some info up in here.
Starting out of order, it's a lot of fun to drive. First spins, second spins (depending on the boost level), and third takes off. This is of course with cheapo all-seasons though, so I expect my lack of traction to change with some proper tires in the near future (well, they’re on now but I can’t drive it for a little while yet). Fourth gear actually pulls now on the highway; no need to downshift to third to accelerate with any degree of urgency. Boost comes on pretty well. No crazy lag except in first where the gear is over before you know it anyway, not to mention traction.
The turbo is also quite loud. I think this is partially because it spools up some before the boost has reached the intake and so the bov is open hair at part throttle roll-ons (ie, boost escaping from bov being noisy). This could be fixed with increasing the clamping force of the bov (blow off valve) a little, but at the moment I have it adjusted close to nearly as soft as it will go so that it opens as soon as possible when letting off the throttle. Reason being that the bov is a little undersized and I get a very small amount of compressor surge on each shift at wide open throttle, and I’m only at 7-8 psi, whereas 10-12 is my goal.
The car itself has (had?) been running great. I also finally figured out the long-persistent lean idle transition circuit glitch, which was a major relief - turns out my vacuum advance line was oversized, the wrong type of tubing, and leaking (and that took me two years to discover, criminy…). I’ve also cleaned up the idle with a new cap and rotor, although perhaps I mentioned that in a previous post, I don’t remember. Anyway, it idles beautifully now, and with the slightly unequal length log manifold there is a tiny lope or “boxer rumble”-esque sound, or at least that’s what I’m attributing it to for now (could also be a compression issue, but let’s hope not). It’s barely audible anyway, so whichever it is it’s not significant [future me: compression is fine]. That also ties into the fact that the car is quieter, which I’m happy about. It’s not a huge difference, but it’s definitely a little more tame sounding around town, although there is ever so slightly more drone as well. I’m a fan regardless - the turbo and bov are easily heard above the engine/exhaust except above 5k or so. Aside from idle, the car is also smoother sounding, which I like as well. Sounds more refined or something, and yet still nasty up top.
The transmission seems to be holding up okay so far, although the input bearing has gotten a tad noisier. Nothing too concerning, but I do expect it to be a weak point, as well as the differential. Synchros are still in great shape though, and especially for a free transmission, who can complain. When I had the boost turned up to 9 psi or so I was able to spin the clutch in 4th gear (I think), but otherwise the 215mm RB street/strip clutch disk with a stock Exedy plate is holding up pretty well. I don’t expect to make max power with the current clutch setup, although it’s doing well for the time being. The pilot bearing is definitely ticked (as it always seems to be), but that will get replaced here soon [now already replaced].
Overall the car has been running very well. It’s a blast to drive around town, although the bov is still noisier than I would like even with the dual port hooked up (recirculate and vent; using both to limit compressor surge). Originally I had it vent to atmosphere only and while it was quite fun, it was also rather obnoxious. It was essentially impossible to drive around without making loud bov noises, and my goal was to have it be “tame” (sleeper-esque) around town yet a little rowdy when all the way in it.
Unfortunately I’ve had this weird popping sound that I haven’t been able to sort out yet. Perhaps it has something to do with the fact that I cracked my rear iron (probably). Under boost (>6 psi) there is sometimes this “popping sound” from under the hood and I can feel it in the car as well as intermittent, brief drops/glitches in power. I figured it was a boost leak, but I’m not sure where it could be coming from that would make such a unique noise. Unfortunately it’s rather difficult to record, otherwise I would post it here, but it’s essentially a popping sound. Not really a ping, not a backfire, it’s just a pop. Sounds like plastic hitting metal, or a rubber valve popping open briefly, which is why I originally thought it was my carb hat jumping until I put an o-ring on it and the sound didn’t change at all. My next idea is my fuel pressure regulator because the boost reference part had a leak originally which made a similar sound until I fixed it. Alternatively it could be detonation, which may make some sense as to why it seems to happen most when the car is heat soaked. I’m curious if anyone has thoughts on the matter. Unfortunately I haven’t been able to look at the gauges while this is happening, so I don’t know yet if boost dips or AFR’s jump or anything. Funny enough, I was just about to go pick up a friend to watch the gauges for me and try to figure out the popping sound when I noticed the cracked iron.
Anyway, jumping forward about a week here (I haven’t touched this document for a little while), I secured some time to tear down the engine and swap irons for a spare off one of my other engines. Ported it to match the existing engine and all, and painted it as well to match. Upon tearing down the engine I noticed that I have some fairly advanced chrome flake on the housings. I also checked all the seals and we are just barely within spec - given such I do not expect this engine to run more than 20k before compression becomes an issue. Before that time I’ll build a new engine with all new seals and new housings to have ready to swap in. Even with the known issues though, this engine did make 90-100 psi of compression cold after the first* rebuild, so it’s not too bad as of yet.
Now about that astrix… When assembling the engine I was tired and stressed and that bit me in the butt. I skipped audibly checking compression before reinstalling the engine in the car and what would you know, I had one apex seal not doing its job. When cranking the engine to build oil pressure I could easily hear it, and then later I did a compression test (cold) which revealed that the front rotor was down on two faces. Fairly sure I managed to install a spring sideways because I recall while assembling it that one of the springs seemed really easy but since it was midnight and I wasn’t at 100% I didn’t double check it. Honestly I’m lucky that I didn’t mess something up worse.
Anywho, at this point (jumping forward in time once again) I’ve now completed the second rebuild and I’m happy to say that compression is audibly in check. As of today the engine is now in the car and is connected to the rear wheels. Only other thing installed as of now is the turbo. Tomorrow I’m aiming to get it back on the road, but may get rained out so we’ll see. Worst case I finish things up Friday. Before getting it running again I will be making a couple changes to avoid “potential” detonation issues. First I’m switching to running 9 heat range plugs all around rather than 7s and 9s. In addition to that I’m dropping total mechanical advance to ~12 degrees from the ~14 I was running before, as well as making another secondary linkage for the carb so they come in a little sooner. I’m thinking that the secondaries coming in so late is what cracked iron due to a lean bog. Essentially they open so late that I could build ~6psi of boost on just the primaries (controller set for 8psi) and then whip open the secondaries which audibly would cause a brief misfire. I’ll also be doing a little more work on the accelerator pump to help it better cover the secondaries.
So that’s where the SA stands as of now. No photos yet, but I’ll be sure to include some in the next post (hopefully with a car running and back on the ground).
First off, the car is up and running again, although not optimally. As this engine will be coming apart again next summer and being replaced by a new engine, I figured I would give solid corner seals a try (even with all the warnings about eating irons and lowering compression). Suffice to say, I wish I hadn't. I didn't just drop compression by a little, nope... ~30psi all around is what I lost, with the corner seals being the only change between the two rebuilds only a week apart. So that was a fun learning experience... Daily driving a car at ~70psi isn't exactly a cake walk, but it definitely still moves up top thanks to the turbo. Unfortunately I now have to idle at 1200rpm under no load or else it will die, and when both the headlights and cooling fan are on the engine is close to keeling over. But hey, at least it's drivable. I had intended to take it apart one more time to swap back the seals but I'm short on time and it still gets me around just fine.
As for the more interesting things, I've retimed the carburetor secondaries slightly, which has yielded an improvement in the secondary glitch however not completely fixed it (a new change is coming soon for this). I've also dropped timing advance to 12 degrees and may still drop it further, I'm not sure. Leading plugs are now 9's to match trailing and we're still at right about 8psi of boost. The weird popping sound still happens on occasion, although much less frequently. Unfortunately I can't attribute this change to anything in particular due to how many things have be fiddled with.
On the plus side, there are no leaks, it still drives completely fine (except for starts and idle), is reliable for daily transportation, and the externally fed OMP is working flawlessly. Turbo-wise there may not be too many updates for a while unless there's some break through with that popping sound. I have a couple ideas yet, but so far have not had the time to test them.
And as mentioned last time, a few more photos:
Headed to a friends place after the cracked iron was discovered.
 02-07-21, 11:19 AM


 . Then I'd just need to feed the OMP somehow and spin it. Today my two S4 OMP's arrived so whenever I get some free time I can get going on the test. Also I'm glad your enjoying my build. Hopefully you aren't getting Richard Miller and me mixed up - he's got an awesome project going (I'm probably preaching to the choir here) and it just so happens we have the same color and year, and are both working on turbo related things right now
  .
.