
Assistance needed with Watts link & control arms installation

Thread Starter
Full Member
Joined: Nov 2003
Posts: 135
Likes: 0
From: Northern Kentucky
Assistance needed with Watts link & control arms installation
I've been struggling with this for the last 2 hours, and it's got me pretty well worn out, beat up, and ticked off.
I have re-bushed the Watts link, purchased new upper and lower control arms, and am trying to get them all installed. I've found, so far, that I cannot get all six mounting points connected at the same time. The closest I've gotten is both control arms, both sides, and one of the watts link arms (and I can get either side). I've tried jacking the axle up and down, I've taken out the bolts holding the shocks to the axle, I've removed the coil springs, and I've tried the Watts link first, followed by the lower arms, the lower arms and then the Watts link, the upper arms and the Watts link, the Watts link then the upper arms, and so on. No joy. There just seems to be *way* too much tension in the system to be able to get that last connection point, no matter which point I try last.
I'm getting to the end of my rope here! Can anyone offer any sage words? Or at least tell me how you managed to get it all together? It's an '85 -SE, although, I'd guess that the differences between the various years of 1st gens shouldn't amount too that much of a difference in technique.
TIA!
Old [Sch|F]ool


Joined: May 2001
Posts: 12,862
Likes: 569
From: Cleveland, Ohio, USA
I had no problems with mine.  I had to R&R the Watts assembly after one of the links snapped.
You're leaving all the bolts loose, right? They should only be tightened when the suspension is at ride height, and if you tighten them down as you're going along you will have lots of "fun" trying to get everything lined up, not to mention the handling woes.
I had to R&R the Watts assembly after one of the links snapped.You're leaving all the bolts loose, right? They should only be tightened when the suspension is at ride height, and if you tighten them down as you're going along you will have lots of "fun" trying to get everything lined up, not to mention the handling woes.
FD > FB > FC
Joined: Oct 2002
Posts: 3,873
Likes: 3
From: Bothell, WA
When I did mine, it was in there air, but I left everything loose and tightened it on the ground, (alignment rack) You dont want to ruin those new torselastic (sp?) bushings.
Either way, Everything went on no prob, except I hat to use a prybar for the last part of the watts link.
Either way, Everything went on no prob, except I hat to use a prybar for the last part of the watts link.
Thread Starter
Full Member
Joined: Nov 2003
Posts: 135
Likes: 0
From: Northern Kentucky
Ahh, there are two things I love the most about this forum: There's almost always someone around with the answer, and the answer is almost always "use more force". 
I did have all the bolts in, with their lock washers and nuts started, but not anywhere approaching "tight". I read the bit in the FSM that said to wait until the full weight of the car was on the suspension to torque it all down.
My solution to this problem was, as hornbm suggested: Use the force. I put a nylon ratcheting tie-down strap on either side of the Watts bracket, connected the right side link, and jacked up the right side of the axle until the coil spring could compress no more. I used the ratchets to pull the ends of the Watts bracket towards the side of the car. It took a lot of force, but I was able to use this method to twist the watts bracket enough so that the left link reached its hole. I slapped the bolt in there, put the nut on (loosely, of course!), and let the jack down. Mission accomplished!
Thanks much for your help!

It would be easier to just remove the rear I think, it's next to impossible to get the watts back together with the rear attached to it.
Here is my system for rear ends. It may help you.
Removal:
Disconnect drive shaft and break lines of course.
Remove strut's and upper and lower control arms from rear end only.
Unbolt the large stud on the rear, then slide your rear off.
Now do all your bushing/new control arm work.
Then reassemble all the watts and control arms.
Then for installation:
Put the rear end stud back into the watts link, jack rear in center and on each side as needed until you get the struts and upper and lower control arms bolted in.
It's that easy. Less than an hour with air tools and assistance, not including bushing work.
I don't know if this helps or not, but's the easiest way I've found, and I would think most others as well.
Last edited by jorx81@aol.com; Apr 3, 2004 at 05:14 PM.
Trending Topics
Thread Starter
Full Member
Joined: Nov 2003
Posts: 135
Likes: 0
From: Northern Kentucky
As far as assembling everything with the rear end off the car... I pretty much did! Everything had to be replaced, so I tossed the control arms, the watts link, and the shock bushing connector so that the rear end was, essentially, just sitting on a floor-jack, connected to the car only by way of the brake lines and the drive shaft. The difficulty that is present in the re-assembly is that the watts link is, essentially, a really high tension spring -- each arm exerting force towards its side of the car from the pivot point of the watts bracket. Getting it "compressed", or essentially loading the spring by rotating the watts bracket so that the outside ends of both links reach their respective mounting points on the frame was giving me fits.
After loading the suspension and starting to torque everything up, however, I have found either the source of my problem, or a whole new one. It appears that the whole axle is now sitting about an inch-point-five too far to the left. Here's a couple shots so you can see what I mean (click the thumbnails for a bigger version...):
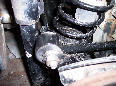
Notice there that the bumpstop is way off center of the coil sping, and, more worrisome, notice the upper control link bushing where it mounts to the axle.
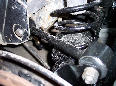
This is the left side of the car. You can't really tell that the bumpstop is off center -- but it is -- although you can, again, witness the upper control arm.
I ran out of juice for today, but I'm going to go back out tomorrow, tear it all apart again, and start from scratch to see if I can't get it aligned properly.
I will say this, though: I put the tires on and lowered it to the ground to make sure nothing was rubbing. That's when I first noticed that things were amiss. On the left side, the tire was sticking out just a wee bit beyond the fender, and I really like how much more agressive the car looks with a little rear tire cleavage showing.
Edit: I gave your system a wee more thought, jorx81, and now I see where you're going with that... Attach all the watts linkage, and then put the stud on teh axle in the bracket's hole, then use the axle as a whole to force it into position to accept the control arms. I think I need a clarification there, though, because I was, essentially, in that position earlier when I had only the Watts link hooked up and could not align the control arms. Although, like I said, I may have been having other problems to begin with...
After loading the suspension and starting to torque everything up, however, I have found either the source of my problem, or a whole new one. It appears that the whole axle is now sitting about an inch-point-five too far to the left. Here's a couple shots so you can see what I mean (click the thumbnails for a bigger version...):
Notice there that the bumpstop is way off center of the coil sping, and, more worrisome, notice the upper control link bushing where it mounts to the axle.
This is the left side of the car. You can't really tell that the bumpstop is off center -- but it is -- although you can, again, witness the upper control arm.
I ran out of juice for today, but I'm going to go back out tomorrow, tear it all apart again, and start from scratch to see if I can't get it aligned properly.
I will say this, though: I put the tires on and lowered it to the ground to make sure nothing was rubbing. That's when I first noticed that things were amiss. On the left side, the tire was sticking out just a wee bit beyond the fender, and I really like how much more agressive the car looks with a little rear tire cleavage showing.
Edit: I gave your system a wee more thought, jorx81, and now I see where you're going with that... Attach all the watts linkage, and then put the stud on teh axle in the bracket's hole, then use the axle as a whole to force it into position to accept the control arms. I think I need a clarification there, though, because I was, essentially, in that position earlier when I had only the Watts link hooked up and could not align the control arms. Although, like I said, I may have been having other problems to begin with...
Last edited by wae; Apr 3, 2004 at 10:17 PM.
I wasn't sure exactly, I though you had taken the watts link apart with rear still mostly intact. In my experience it's very hard to put watts link back together with any load on it/that way.
The alignment/off center thing is strange to me. Back together right? You did lower the car and load the entire suspension right? (actually roll the car a little too)
That's the best I can do for ya.
The alignment/off center thing is strange to me. Back together right? You did lower the car and load the entire suspension right? (actually roll the car a little too)
That's the best I can do for ya.
Thread Starter
Full Member
Joined: Nov 2003
Posts: 135
Likes: 0
From: Northern Kentucky
While I didn't give the car a roll, I did slap the wheels on, lower it to the ground, and give the rear bumper a few good pushes, thinking that some bouncing would see that everything got seated properly.
I'll pull it all apart again later this morning. Most likely, I'll find that having the whole thing off center was, somehow, causing my difficulties.
Updates as they become available... =)
I'll pull it all apart again later this morning. Most likely, I'll find that having the whole thing off center was, somehow, causing my difficulties.
Updates as they become available... =)
I read your email
Joined: Jan 2002
Posts: 2,624
Likes: 1
From: NW New Jersey
The only way for it to be way off-center like you say is if the links are in the wrong way. The links are not straight, they have a bend in them. Make sure the bend is going the right way. There should be no reason at all to use force!!!!!
EDIT- I just looked at those pictures What is causing those bushings to deform so much?!?! If you take the Watts linkage out will the axle center up with the car? The Watt's links are unequal length, are they in right places? Again, do not use force!
EDIT- I just looked at those pictures
What is causing those bushings to deform so much?!?! If you take the Watts linkage out will the axle center up with the car? The Watt's links are unequal length, are they in right places? Again, do not use force!
Last edited by inittab; Apr 4, 2004 at 08:06 AM.
Thread Starter
Full Member
Joined: Nov 2003
Posts: 135
Likes: 0
From: Northern Kentucky
Good news and bad news on this front:
The good news is that I took everything apart, and found that by putting in the lower control arm on one side followed by the upper on the other side, I got the axle aligned properly. The other two control arms then went in without a fuss or a fight, and everything is all lined up correctly. I popped the watts link arms into their respective frame mounting brackets, long on to the left side, and was able to slide the watts bracket right into place. Part of the problem, I think, is that I was attempting to put the watts braket on with the studs pointing to the front of the car. Here's a hint: They should point to the rear.
The bad news: I put the suspension under load and got ready to start putting the lock washers and nuts on and tried to give the brake rotor a turn. "clunk, clang, thud" and it wouldn't turn anymore. Further inspection led me to discover that in all the wiggling with the rear end I managed to pull the diff back far enough to yank the prop shaft out of the transmission.
I pulled the four bolts on the flange at the diff, but it's all rusted together. I think I'm going to have to go ahead and pull the suspension arms off. Again. Again. I'll be able to slide the diff back on the floor jack, then, and push the prop shaft back into the tranny.
Call me Murphy, I guess.
Full Member
Joined: Nov 2003
Posts: 79
Likes: 0
From: Chico
Ok, those new upper and lower control arms that you purchased....why dont you hold them side by side aginst the old ones see if there is a difference in the length.???1983 to 1984 RX-7's have different mounting points thus your 85 rear end mounting points are the same as 84 and different than 83 and earlier. Maybe you were sold a set of control arms that are made to be installed onto 79-83 RX-7's. I believe it is the lower control arm which is different due to its lower mounting position thus possibly its longer in the 83-earlier cars.
Thread Starter
Full Member
Joined: Nov 2003
Posts: 135
Likes: 0
From: Northern Kentucky
I did set them up side-by-side to make sure I got what I really needed. Always a good idea when buying replacement parts, I've found.
I also made sure that the Mazda part number on the new arms matched with what Mazda says I'm supposed to have on the car, but that's not always completely accurate!
I honestly think that a good porition of my alignment difficulties came from having the watts bracket on backwards....
I also made sure that the Mazda part number on the new arms matched with what Mazda says I'm supposed to have on the car, but that's not always completely accurate!
I honestly think that a good porition of my alignment difficulties came from having the watts bracket on backwards....
Thread Starter
Full Member
Joined: Nov 2003
Posts: 135
Likes: 0
From: Northern Kentucky
Final update
Mainly for the benefit of those of you that might use the search function sometime in the future...
I was able to get the driveshaft re-seated in the transmission. It's really a two person job, so I had a friend work the jack under the diff and I peeled back the heat shielding over the main cat. Through a combination of him raising and lowering the diff, the two of us pushing the driveshaft backwards and forwards, and me giving the driveshaft little 5 degree turns back and forth, we finally found its "sweet spot" and got it to slide in.
My best guess is that while there are two key-looking grooves in the driveshaft spline pattern, there are no corresponding keys on the output shaft of the transmission. The best that I can figure is that the driveshaft doesn't need to go on at any particular clock position, the yoke just has to be perfectly aligned with the output shaft, and a little wiggling will get it to slide right in.
Sounds a little perverse.
Anyway, thanks much for all the help from everyone! Once the driveshaft was back in place, we popped the control links into place, everything lined right up, and without having to apply any force that didn't involve careful applications with a torque wrench, my rear end needs only its brakes to be re-attached, and it will be ready to drive.
Thanks again!

Thread
Thread Starter
Forum
Replies
Last Post
fjwheeler
3rd Generation Specific (1993-2002)
22
Jan 9, 2022 01:02 PM
GrossPolluter
Suspension/Wheels/Tires/Brakes
12
Aug 15, 2015 10:32 PM