
What did you do to your FB today?

Thread Starter
Lives on the Forum
Joined: Jun 2004
Posts: 11,359
Likes: 14
From: Grand Rapids Michigan
That's looking awesome DD! I went through all the trouble to do that (engine/tranny/front cover) and then watched it fade over a few days. It looks like you used clearcoat? Let me know how/if it holds up. 
Last night I pulled the headlights and motors, sorted through a bit of obsolete wiring.
I hope I can get to some painting today...
Last night I pulled the headlights and motors, sorted through a bit of obsolete wiring.
I hope I can get to some painting today...
Joined: Feb 2006
Posts: 3,162
Likes: 1
From: London, Ontario, Canada
Pictures of what you painted would be awesome.
I got the second rear lip done to a really nice mirror polish. I would post pictures but my laptop is being an annoying bitch and not recognizing my SD card. Does this every now and then but then it'll work fine for a month. Argghh!
I got the second rear lip done to a really nice mirror polish. I would post pictures but my laptop is being an annoying bitch and not recognizing my SD card. Does this every now and then but then it'll work fine for a month. Argghh!
Joined: Jun 2008
Posts: 8,376
Likes: 30
From: Chino Hills, CA
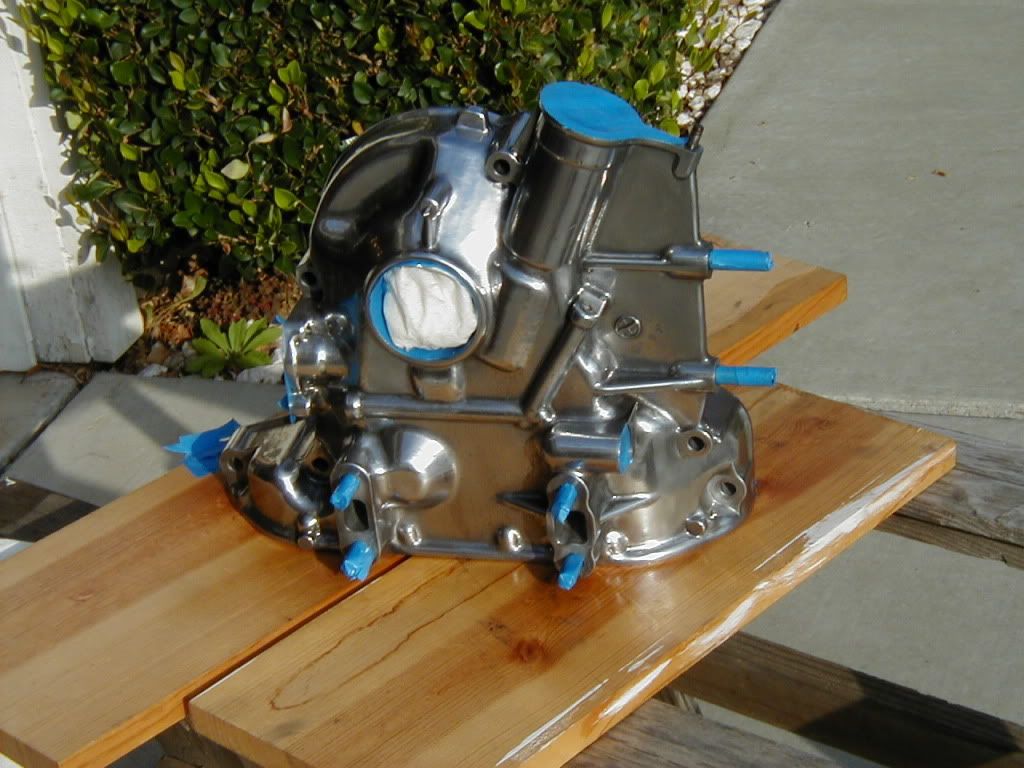
Final polish and clearcoat on the front cover; Also (not pictured as I ran out of light) one of the rotor housings is done.
Changed the rear trans seal, since it's pointing straight up in the air just now while the clearcoat hardens.

Changed the rear trans seal, since it's pointing straight up in the air just now while the clearcoat hardens.
Got a used oil pan I picked up all cleaned and painted for the fb as the one thats on the engine I JUST put in the car seems to have a perforation in it...(not thrilled about changing the pan out with the engine in the car.) How much is this going to suck please let me know. It looks do-able, but those are the jobs that always turn out to be a bear.
It's possible. Take offthe motor mount, jack up the trans till the the clutch lever touches the trans tunnel. One you get the pan bolts out you'll have to let he pan rest on the crossmember and remove the oil pick up, there won't be enoughroom to get it out with the pick up there. Reinstallation is the reverse, make sure ya re seal the pick up and tighten it down and slap the pan back on. PITA, did it that way to reseal my pan a month or so ago.


Joined: Apr 2006
Posts: 3,740
Likes: 6
From: Las Vegas, NV
cfamilyfix: Or a simple way is taking off the idler arm^^. Then you can move the whole steering bar that is right under the oil pan. Simple. I didnt use a gasket on my oil pan last time either, but this time i'm thinking silicone, gasket, silicone.
Got a used oil pan I picked up all cleaned and painted for the fb as the one thats on the engine I JUST put in the car seems to have a perforation in it...(not thrilled about changing the pan out with the engine in the car.) How much is this going to suck please let me know. It looks do-able, but those are the jobs that always turn out to be a bear.
twinkletoes: thanks! I wasn't sure if the steering linkage or the crossmember was gonna be the bigger pain in the neck. All that steering stuff down there is in need of some "love" anyway so now might be the time.
rwatson...crankcase vent not hooked up at this time so I don't think that could be it unless not having it hooked up can cause pressure?
rwatson...crankcase vent not hooked up at this time so I don't think that could be it unless not having it hooked up can cause pressure?
Last edited by cfamilyfix; Feb 19, 2012 at 08:54 PM.
It could if you have the nipples on the oil filler tube and the center iron sealed up ( I foolishly had mine covered with vacuum covers). If they are not open then the pressure will build up and force the oil out.
Joined: Feb 2006
Posts: 3,162
Likes: 1
From: London, Ontario, Canada
Finally got some pics. The two finished lips involved somewhere between 10 and 16 hours of work. Had to redo the first one which I did tonight. Glad I did because it came out much better. Gave it a good waxing to help it keep its shine a little longer. Need to pick up more polishing cloths before I can wax the other one and do any more polishing.
Joined: Jun 2008
Posts: 8,376
Likes: 30
From: Chino Hills, CA
Jamie, this has been my first real attempt at polishing metal, so I've kind of been making it up as I go.
The current sequence is:
Get the part clean: I use Gunk Engine Brite to clean and degrease,then clean water, then acetone.
If it's been painted like the trans was, I use Aircraft Remover, then water again.
For surface prep, I use Merit stripping wheels in vfine grit. Tough spots I use either blue nylabrushes or a very light touch with a brass brush, then smooth it with the other prep wheels. All on an ancient Black & Decker 3/4hp power drill.
Polishing is with a stitched cotton wheel and felt bobs for the small places. First pass is with black Emory compound, then clean it with acetone, then another set of wheels and bobs with white diamond compound. Final cleaning with acetone, mask and clearcoat asap to stop oxidation.
It's not mirror-perfect up close, but it looks great from a couple feet. I was going for sort of an 'antiqued' look, rather than trying to clear every single nick and ding.
Thread Starter
Lives on the Forum
Joined: Jun 2004
Posts: 11,359
Likes: 14
From: Grand Rapids Michigan
Jamie, this has been my first real attempt at polishing metal, so I've kind of been making it up as I go.
The current sequence is:
Get the part clean: I use Gunk Engine Brite to clean and degrease,then clean water, then acetone.
If it's been painted like the trans was, I use Aircraft Remover, then water again.
For surface prep, I use Merit stripping wheels in vfine grit. Tough spots I use either blue nylabrushes or a very light touch with a brass brush, then smooth it with the other prep wheels. All on an ancient Black & Decker 3/4hp power drill.
Polishing is with a stitched cotton wheel and felt bobs for the small places. First pass is with black Emory compound, then clean it with acetone, then another set of wheels and bobs with white diamond compound. Final cleaning with acetone, mask and clearcoat asap to stop oxidation.
It's not mirror-perfect up close, but it looks great from a couple feet. I was going for sort of an 'antiqued' look, rather than trying to clear every single nick and ding.
The current sequence is:
Get the part clean: I use Gunk Engine Brite to clean and degrease,then clean water, then acetone.
If it's been painted like the trans was, I use Aircraft Remover, then water again.
For surface prep, I use Merit stripping wheels in vfine grit. Tough spots I use either blue nylabrushes or a very light touch with a brass brush, then smooth it with the other prep wheels. All on an ancient Black & Decker 3/4hp power drill.
Polishing is with a stitched cotton wheel and felt bobs for the small places. First pass is with black Emory compound, then clean it with acetone, then another set of wheels and bobs with white diamond compound. Final cleaning with acetone, mask and clearcoat asap to stop oxidation.
It's not mirror-perfect up close, but it looks great from a couple feet. I was going for sort of an 'antiqued' look, rather than trying to clear every single nick and ding.
By using just the brass wire brush, I was able to get probably 90% of the shine you've got on yours. Getting to that point (which is still very pretty) is actually pretty fast and simple with the setup I used. I think I'll probably repeat that process, and then clearcoat it.
The added work to reach the point of true "bling" like you have achieved would be a bit much for a "work horse" type of car like mine.
Again, beautiful work!
P.S. What type of clear did you go with?
Sin City Rotary
Joined: Sep 2009
Posts: 1,707
Likes: 2
From: Las Vegas
If there isn't we should start a "polishing thread" to see how everyone is doing it I am sure we could all learn something.
I started with sandpaper progressively getting finer then a aluminum polishing kit using a drill then back at it by
hand with polish.
This is what I did for my SA a few months ago


I started with sandpaper progressively getting finer then a aluminum polishing kit using a drill then back at it by
hand with polish.
This is what I did for my SA a few months ago
Last edited by 13x; Feb 20, 2012 at 02:51 PM.

Finished installing the clutch master cylinder, the studs from the new one were diff then the original so had to take them out and just use some long bolts that fit, works better then before but now cant find a way to bleed the system as i cant reach the bleed nipple and i cant figure out how to do it...