What did you do to your FB today?


 01-17-15, 07:59 PM
#5552
Took these pix for DIR... & anyone else who ever needs them:
Dizzy rotor orientation @ TDC (I always preferred the brass contacts over Aluminum. Aluminum is more conductive, but corrodes quicker, & the oxide is much more resistive. Brass lasts longer and can be re-cleaned easily without losing as much metal.
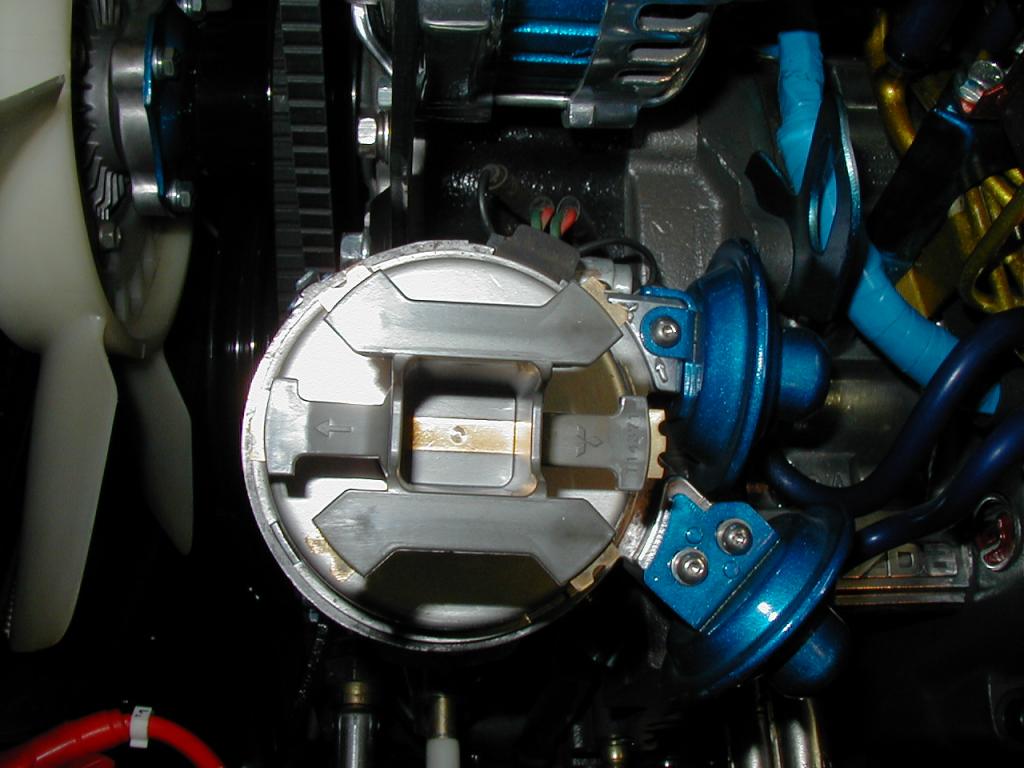
Rotor mounting details (to compare to the strange one you had) Zero slop when installed.

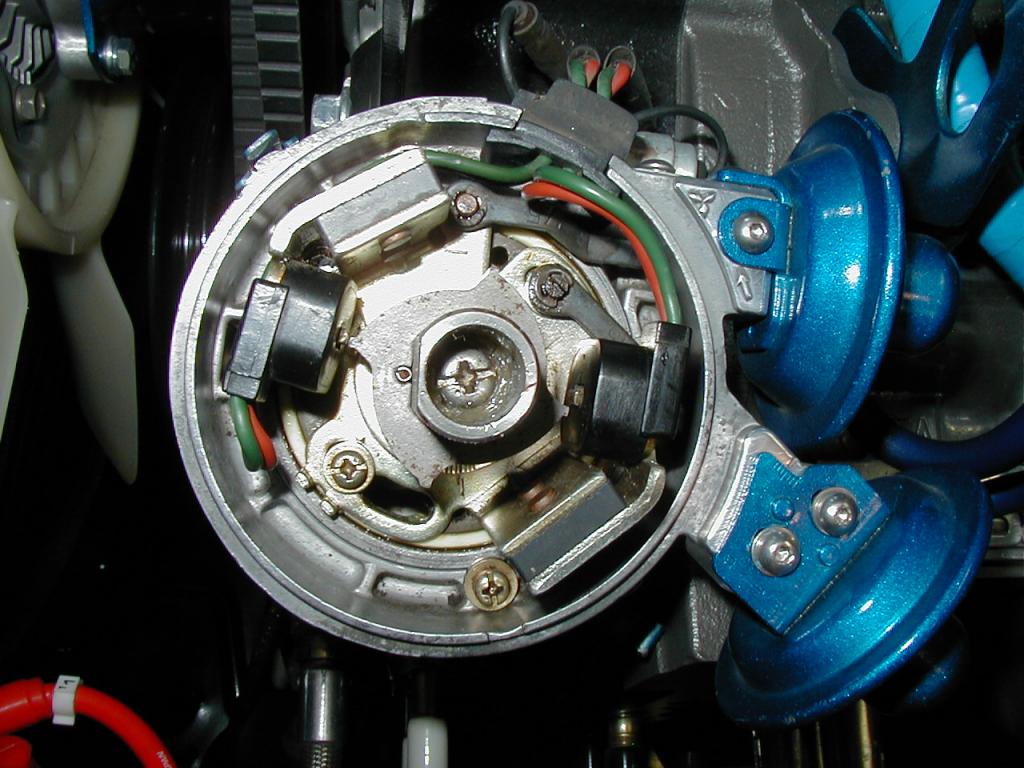
Reluctor position @ TDC. Note that this is an '80 dizzy - reluctor side curves are reversed, and no ignitors on the dizzy hoursing. But the timing of the reluctor tip to the coil is unchanged.
Dizzy rotor orientation @ TDC (I always preferred the brass contacts over Aluminum. Aluminum is more conductive, but corrodes quicker, & the oxide is much more resistive. Brass lasts longer and can be re-cleaned easily without losing as much metal.
Rotor mounting details (to compare to the strange one you had) Zero slop when installed.
Reluctor position @ TDC. Note that this is an '80 dizzy - reluctor side curves are reversed, and no ignitors on the dizzy hoursing. But the timing of the reluctor tip to the coil is unchanged.
01-18-15, 07:47 PM
#5553
Senior Member
Are any of you guys using solid motor mounts on your daily driven cars? One of mines just went out I'm trying to replace it. I'm wondering how solid mounts would feel.
01-18-15, 09:50 PM
#5555
Senior Member
01-18-15, 10:01 PM
#5556
Yesterday: j9fd3s came over in the morning and we pulled apart the 13B PP to replace some seals that were causing some binding when turning over the engine. He noticed that the NEW oil control rings had a lip on all of them, which didn't seem right. We replaced the new rings with old ones that looked correct, and put new seals on them. The engine's back together now. Here's how she sounds while being turned over manually:
fm
01-19-15, 05:24 PM
#5557
Thanks a bunch man! I'll be saving those onto my computer for when the motor gets dropped back into this car. Which will hopefully be in the near future, but only time will tell.
I would think that it would cause some serious felt vibrations into the chassis. There is someone who's running some aluminum hockey-puck looking blocks for motor mounts but I can't remember who it is.
That engine looks awesome! Love the car behind you there too, that thing is turning out great. Good luck with the PP engine!
I would think that it would cause some serious felt vibrations into the chassis. There is someone who's running some aluminum hockey-puck looking blocks for motor mounts but I can't remember who it is.
Yesterday: j9fd3s came over in the morning and we pulled apart the 13B PP to replace some seals that were causing some binding when turning over the engine. He noticed that the NEW oil control rings had a lip on all of them, which didn't seem right. We replaced the new rings with old ones that looked correct, and put new seals on them. The engine's back together now. Here's how she sounds while being turned over manually: fm
01-19-15, 06:51 PM
#5558
Back to the issue of too-low operating temps.
So I finally found time to fiddle with this some more.
I took some very high-tech pieces of cardboard from a beer case and blocked off the front of the FMOC while leaving the radiator fully exposed.
I then started the car & let it warm up normally until the choke dropped out, then held the engine at 3500 rpm in neutral for about 3 minutes.
End result:
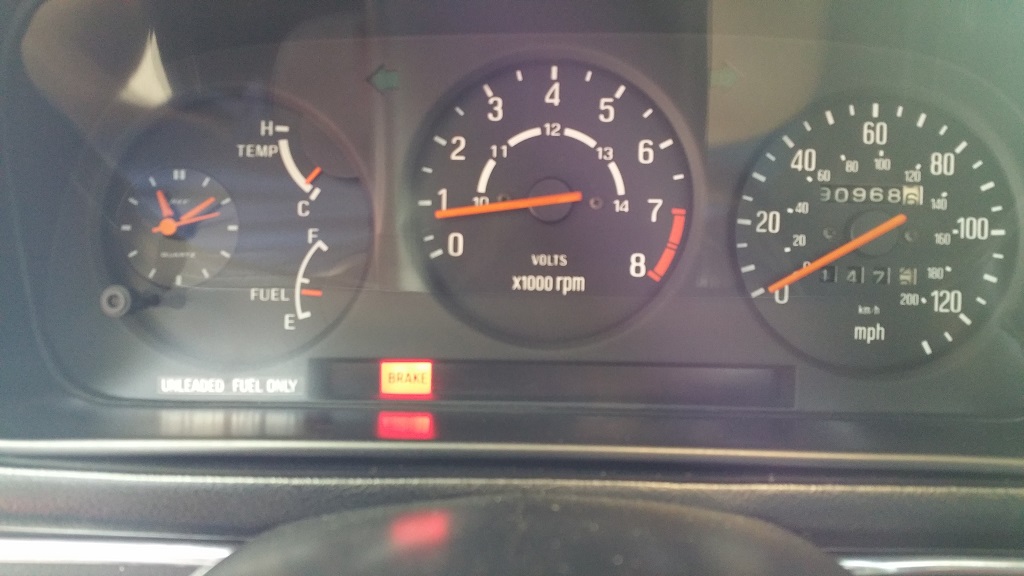
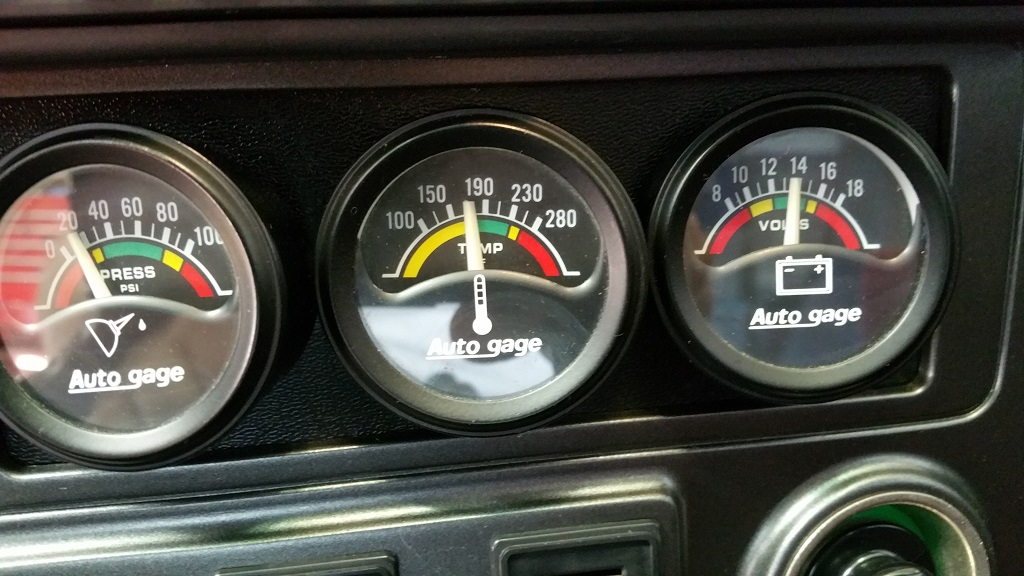
Quite noticeably higher reading in both temp gauges, & a water temp reading that's much closer to what was normal to the car for years. At least into the "normal" bracket.
Which means the FMOC was accounting for the added cooling, and thus the thermovalve must not be bypassing the cooler at low temperatures.
Sounds like I've got a part to buy this week. Time to change oil anyway, so it's a good time to get 'er done.


I took some very high-tech pieces of cardboard from a beer case and blocked off the front of the FMOC while leaving the radiator fully exposed.
I then started the car & let it warm up normally until the choke dropped out, then held the engine at 3500 rpm in neutral for about 3 minutes.
End result:
Quite noticeably higher reading in both temp gauges, & a water temp reading that's much closer to what was normal to the car for years. At least into the "normal" bracket.
Which means the FMOC was accounting for the added cooling, and thus the thermovalve must not be bypassing the cooler at low temperatures.
Sounds like I've got a part to buy this week. Time to change oil anyway, so it's a good time to get 'er done.

 01-19-15, 07:35 PM
#5560
Back to the issue of too-low operating temps.
So I finally found time to fiddle with this some more.
I took some very high-tech pieces of cardboard from a beer case and blocked off the front of the FMOC while leaving the radiator fully exposed.
I then started the car & let it warm up normally until the choke dropped out, then held the engine at 3500 rpm in neutral for about 3 minutes.
End result:
Quite noticeably higher reading in both temp gauges, & a water temp reading that's much closer to what was normal to the car for years. At least into the "normal" bracket.
Which means the FMOC was accounting for the added cooling, and thus the thermovalve must not be bypassing the cooler at low temperatures.
Sounds like I've got a part to buy this week. Time to change oil anyway, so it's a good time to get 'er done.
01-19-15, 08:18 PM
#5563
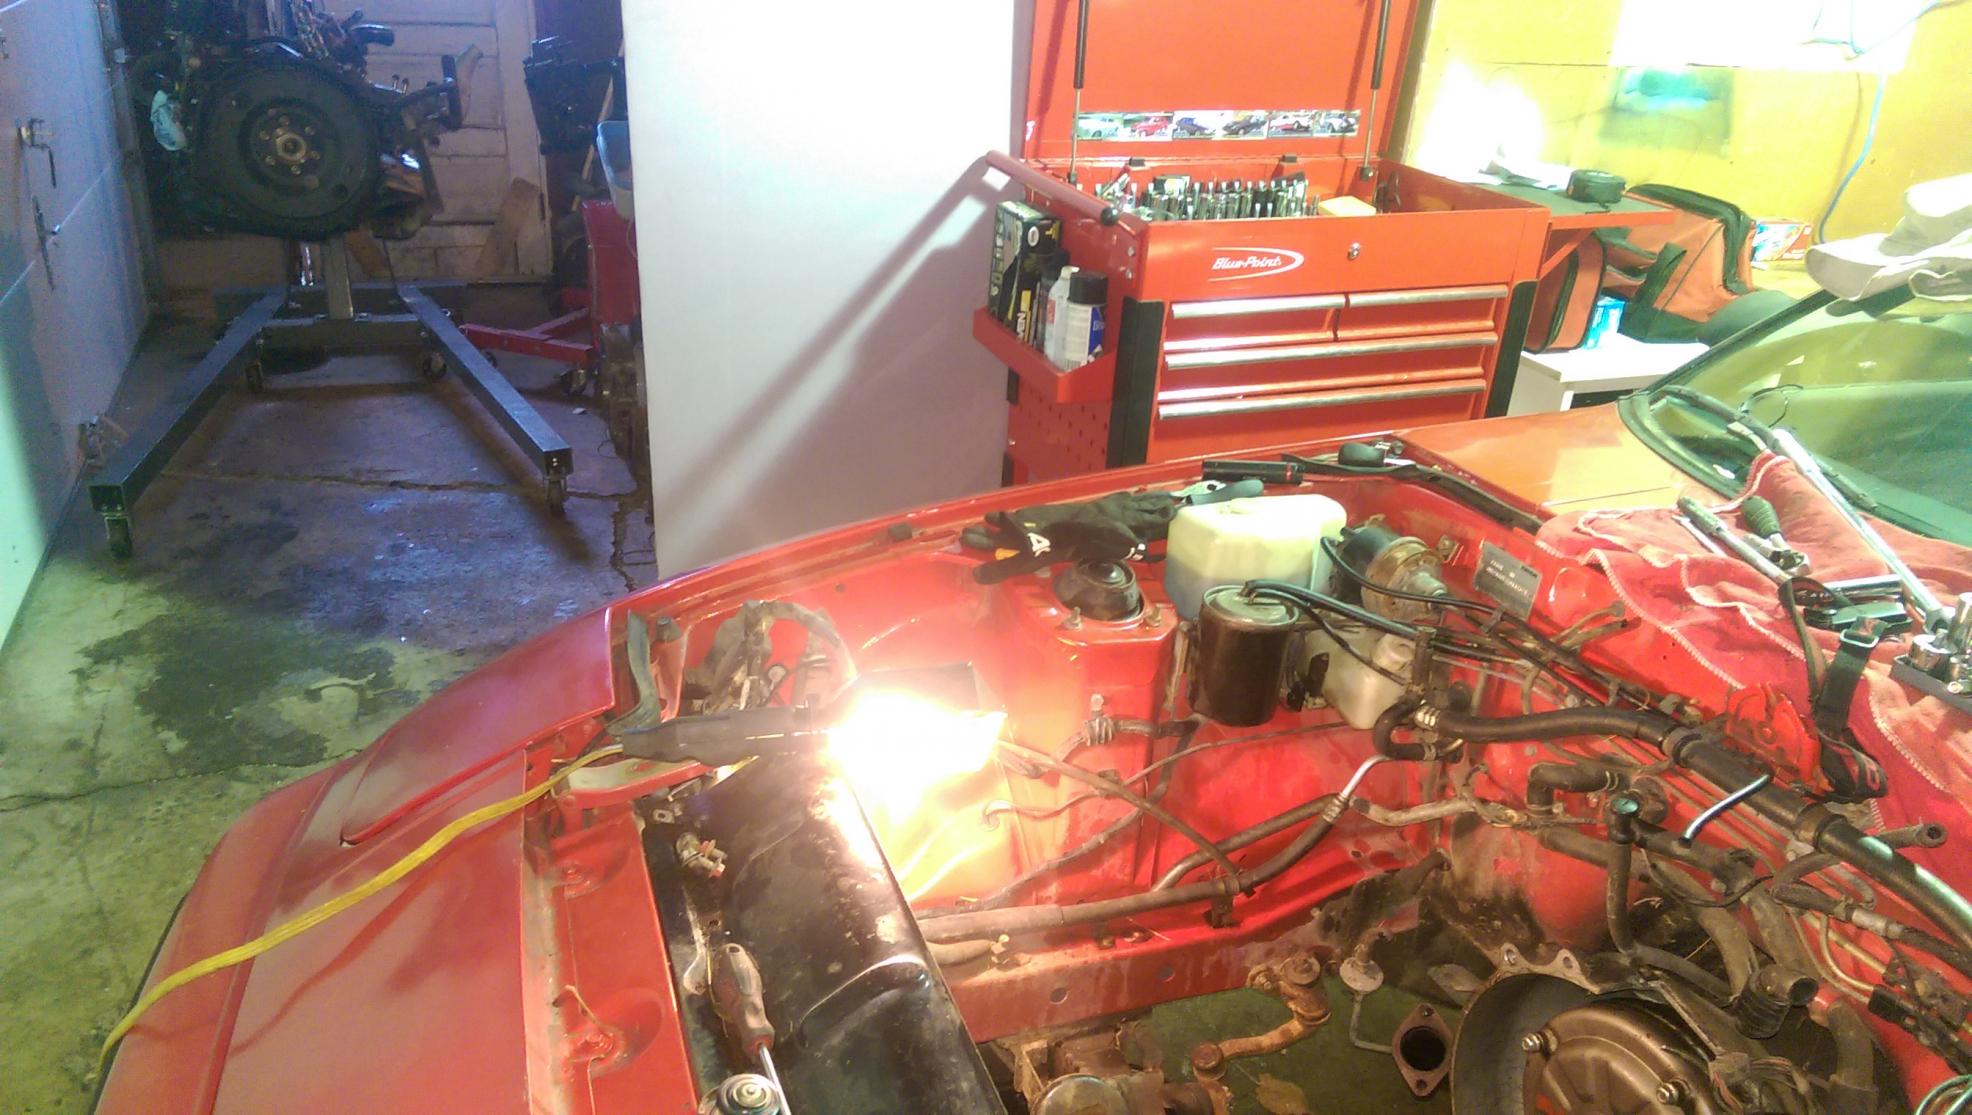
On Friday morning I was able to get the engine torn down and got it ready to be removed.
Engine brought down to a keg as much as possible.
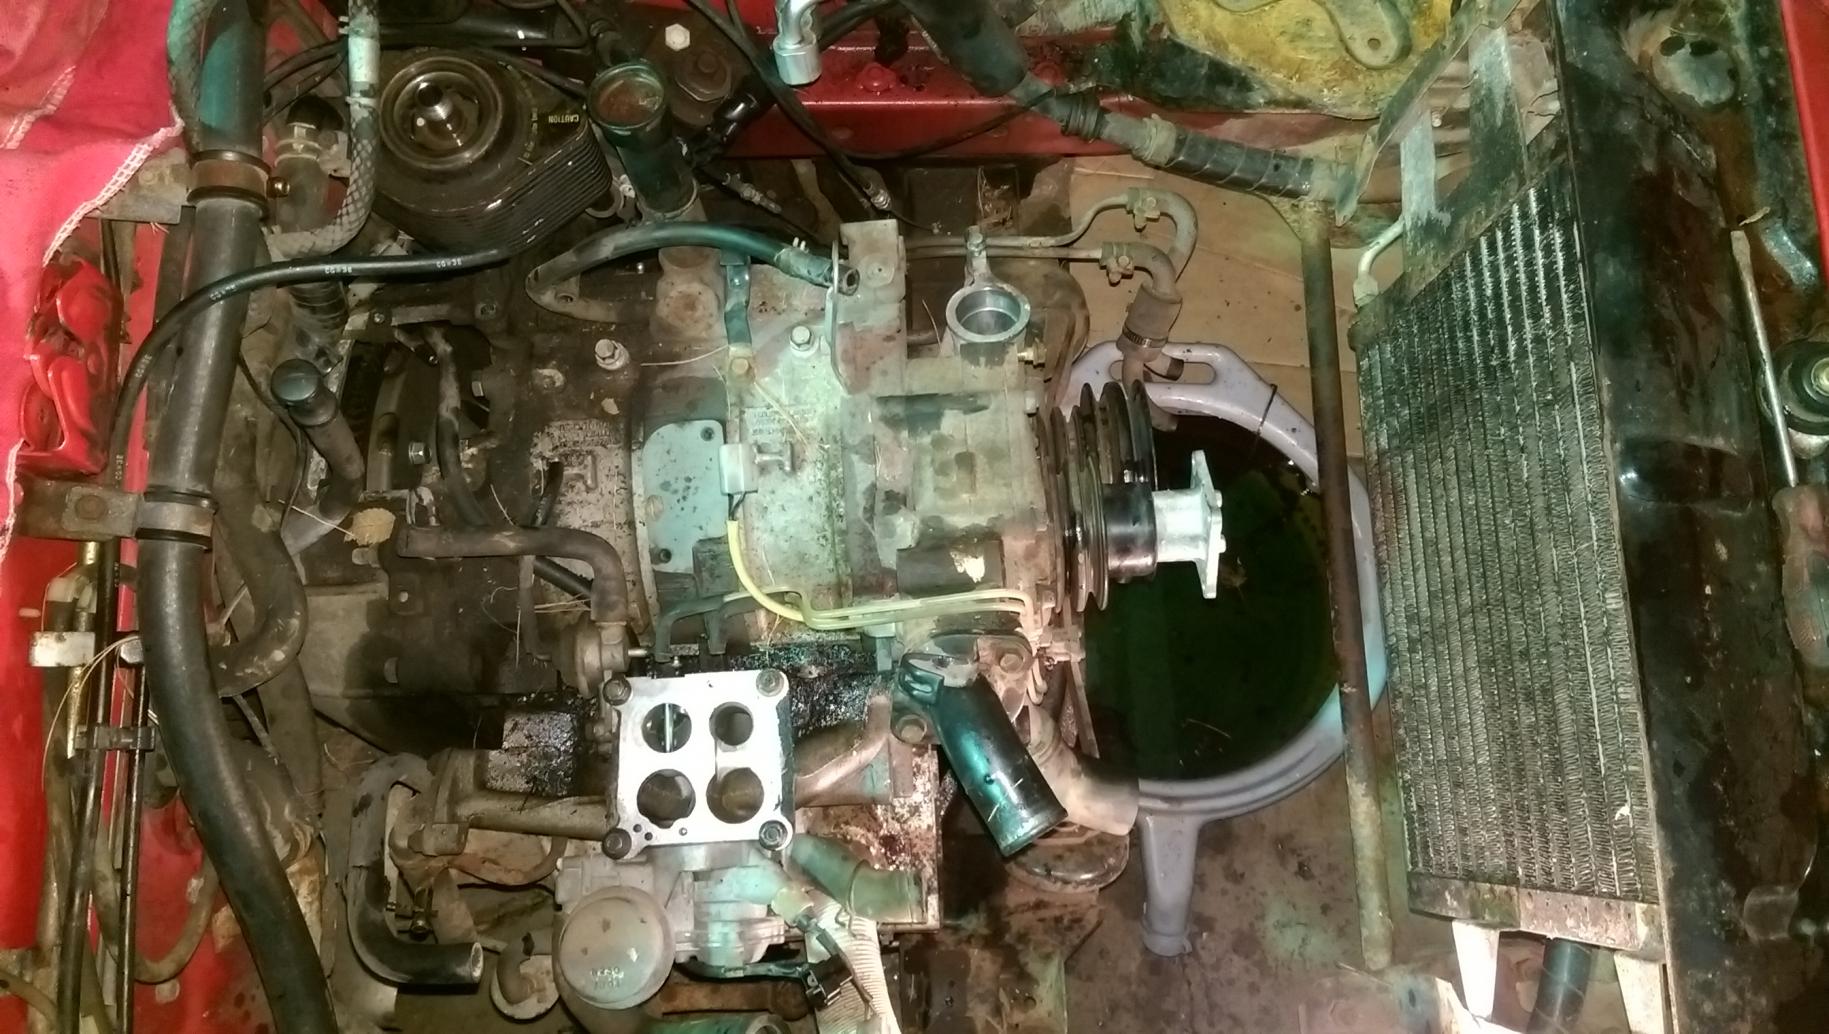
Cabinet full of 12a parts.

Then I got this done today. I was able to get the engine removed and got it ready to be torn down.
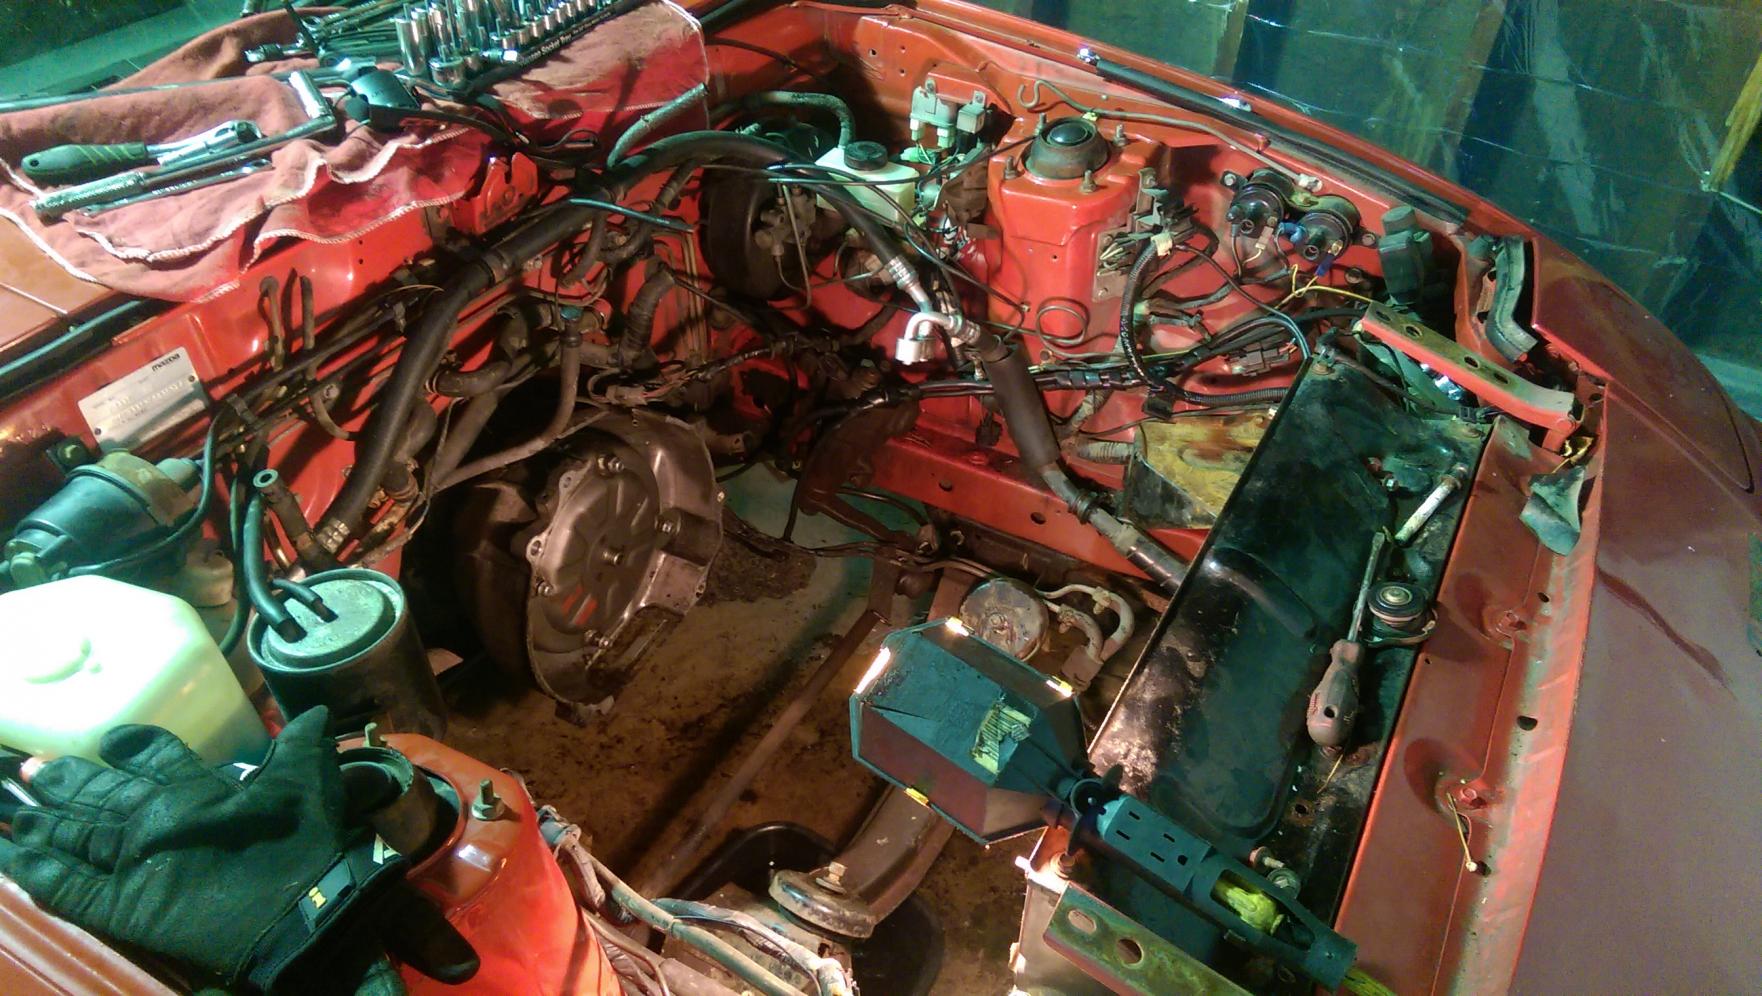
Empty engine bay with engine in the back section.
Engine on the lift, getting it ready to attach to a stand.

So I'm just waiting on tearing down the engine and cleaning the bay while the engine is out. It's a little
grimy in the bay and I think it'll look much better if all cleaned up and detailed before I put an engine
back in the car. Hopefully it's a manual when the new engine goes in, and may have some aftermarket
goodies installed as well. Should be a fun little 12a car when it's all done. Hopefully I can get that widebody
sometime this week and see if the engine is usable in that car or not. If it isn't I was able to find someone
who's potentially parting out a GSL in my area with a 12a that runs as-is. I may go that route and purchase
that engine and transmission from him if the widebody engine doesn't check out.
I also start up university classes again tomorrow so the amount of work getting accomplished will slow down
considerably, just as a heads up.
Engine brought down to a keg as much as possible.
Cabinet full of 12a parts.
Then I got this done today. I was able to get the engine removed and got it ready to be torn down.
Empty engine bay with engine in the back section.
Engine on the lift, getting it ready to attach to a stand.
So I'm just waiting on tearing down the engine and cleaning the bay while the engine is out. It's a little
grimy in the bay and I think it'll look much better if all cleaned up and detailed before I put an engine
back in the car. Hopefully it's a manual when the new engine goes in, and may have some aftermarket
goodies installed as well. Should be a fun little 12a car when it's all done. Hopefully I can get that widebody
sometime this week and see if the engine is usable in that car or not. If it isn't I was able to find someone
who's potentially parting out a GSL in my area with a 12a that runs as-is. I may go that route and purchase
that engine and transmission from him if the widebody engine doesn't check out.
I also start up university classes again tomorrow so the amount of work getting accomplished will slow down
considerably, just as a heads up.
01-20-15, 04:20 AM
#5564
Took these pix for DIR... & anyone else who ever needs them:
Dizzy rotor orientation @ TDC (I always preferred the brass contacts over Aluminum. Aluminum is more conductive, but corrodes quicker, & the oxide is much more resistive. Brass lasts longer and can be re-cleaned easily without losing as much metal.
Reluctor position @ TDC. Note that this is an '80 dizzy - reluctor side curves are reversed, and no ignitors on the dizzy hoursing. But the timing of the reluctor tip to the coil is unchanged.
"orientation" meaning the rotary position of the whole assembly should mimic this first photo in relation to the engine block to represent TDC?
Reluctor: the round plate-with-points in the middle?
I have a rebuild that will need to have the dizzy aligned correctly on install, so fishing for info here. Thanks
Stu Aull
80GS
Alaska
01-20-15, 07:56 AM
#5565
01-20-15, 02:09 PM
#5567
The 80 eccentric shaft does not have the thermopellet used in later years.
Can I ask a couple of Qs here DD?
"orientation" meaning the rotary position of the whole assembly should mimic this first photo in relation to the engine block to represent TDC?
Reluctor: the round plate-with-points in the middle?
I have a rebuild that will need to have the dizzy aligned correctly on install, so fishing for info here.
Reluctor: also known as the "star wheel". Four-pointed dingus on the dizzy shaft right below the aluminum dust cover. Took the place of the cam used in points-style ignitions. The 80 reluctor looks "upside down" in comparison to the FB units, as the curved parts are on the other side of the tips.
@ TDC when dizzy is stabbed and adjusted proper, the tip of the reluctor closest to the flat side of the dizzy shaft will point pretty much exactly at the leading coil's metal core, as shown in the pic.
The reluctor tip lining up with the coil core is what sends the "fire!" signal to the ignitor.
01-21-15, 09:07 AM
#5568
Waffles - hmmm good
iTrader: (1)
Back to the issue of too-low operating temps.
So I finally found time to fiddle with this some more.
I took some very high-tech pieces of cardboard from a beer case and blocked off the front of the FMOC while leaving the radiator fully exposed.
I then started the car & let it warm up normally until the choke dropped out, then held the engine at 3500 rpm in neutral for about 3 minutes.
End result:

Quite noticeably higher reading in both temp gauges, & a water temp reading that's much closer to what was normal to the car for years. At least into the "normal" bracket.
Which means the FMOC was accounting for the added cooling, and thus the thermovalve must not be bypassing the cooler at low temperatures.
Sounds like I've got a part to buy this week. Time to change oil anyway, so it's a good time to get 'er done.
So I finally found time to fiddle with this some more.
I took some very high-tech pieces of cardboard from a beer case and blocked off the front of the FMOC while leaving the radiator fully exposed.
I then started the car & let it warm up normally until the choke dropped out, then held the engine at 3500 rpm in neutral for about 3 minutes.
End result:
Quite noticeably higher reading in both temp gauges, & a water temp reading that's much closer to what was normal to the car for years. At least into the "normal" bracket.
Which means the FMOC was accounting for the added cooling, and thus the thermovalve must not be bypassing the cooler at low temperatures.
Sounds like I've got a part to buy this week. Time to change oil anyway, so it's a good time to get 'er done.
You could try putting some ATF or SeaFoam in your oil to see if it unsticks the
thermovalve. Might save you some $$ and time.
01-21-15, 01:57 PM
#5569
I joined NEDRA which is the National Electric Drag Racing Association. From my goofing around last summer I found that I was about 0.7 second off of the existing 1/8th mile record so my goal is to break that record this year. I can probably do that now since I added a cooling system for my motor controller but I want to set a decent record, one that won't be easily broken on a whim. And with that in mind the car needs to lose a little weight. I had it on the scales last summer and the weight is 2424 lbs without me in it. Here is the weight on each wheel.
FL 596 FR 578
RL 621 RR 629
Weight is up a little in the nose because I added a vacuum pump in the right front corner and put the 85 GSL-SE oil cooler back in the car to cool the motor controller. Removing the charger will remove about 20 lbs from the rear, most of that from the right rear. I expect it to be a little over 600 lbs on each wheel now.
To stay in the SC class (Street Conversion) the car must be pretty much standard with the only allowed change being the electric drive train. Still has to have carpets and all interior pieces. No fiberglass parts like hood or fenders. So my only real approach is to remove the battery charger and build a lighter battery pack. The battery consists of 52 cells each weighing about 7.5 lbs for a total of 390 lbs. 33 of these are in the rear and 19 are under the hood. And about another 20 lbs of copper straps to connect the cells together. Without the battery the car would be just over 2000 lbs. It looks like I might be able to build a small battery using the Radio Control LiPo type cells. Perhaps as light as 30 lbs but certainly less than 100 lbs. The best place to put these electrically is under the hood but from a traction standpoint the rear would be better. This small pack would give me a range of only 4 to 8 miles which would be somewhere between 8 and 16 runs down the 1/8th mile track without recharging.
So I ordered a few packs to experiment with and see if this is practical.
01-21-15, 11:25 PM
#5570
Sin City Rotary
I joined NEDRA which is the National Electric Drag Racing Association. From my goofing around last summer I found that I was about 0.7 second off of the existing 1/8th mile record so my goal is to break that record this year. I can probably do that now since I added a cooling system for my motor controller but I want to set a decent record, one that won't be easily broken on a whim. And with that in mind the car needs to lose a little weight. I had it on the scales last summer and the weight is 2424 lbs without me in it. Here is the weight on each wheel.
FL 596 FR 578
RL 621 RR 629
Weight is up a little in the nose because I added a vacuum pump in the right front corner and put the 85 GSL-SE oil cooler back in the car to cool the motor controller. Removing the charger will remove about 20 lbs from the rear, most of that from the right rear. I expect it to be a little over 600 lbs on each wheel now.
To stay in the SC class (Street Conversion) the car must be pretty much standard with the only allowed change being the electric drive train. Still has to have carpets and all interior pieces. No fiberglass parts like hood or fenders. So my only real approach is to remove the battery charger and build a lighter battery pack. The battery consists of 52 cells each weighing about 7.5 lbs for a total of 390 lbs. 33 of these are in the rear and 19 are under the hood. And about another 20 lbs of copper straps to connect the cells together. Without the battery the car would be just over 2000 lbs. It looks like I might be able to build a small battery using the Radio Control LiPo type cells. Perhaps as light as 30 lbs but certainly less than 100 lbs. The best place to put these electrically is under the hood but from a traction standpoint the rear would be better. This small pack would give me a range of only 4 to 8 miles which would be somewhere between 8 and 16 runs down the 1/8th mile track without recharging.
So I ordered a few packs to experiment with and see if this is practical.
FL 596 FR 578
RL 621 RR 629
Weight is up a little in the nose because I added a vacuum pump in the right front corner and put the 85 GSL-SE oil cooler back in the car to cool the motor controller. Removing the charger will remove about 20 lbs from the rear, most of that from the right rear. I expect it to be a little over 600 lbs on each wheel now.
To stay in the SC class (Street Conversion) the car must be pretty much standard with the only allowed change being the electric drive train. Still has to have carpets and all interior pieces. No fiberglass parts like hood or fenders. So my only real approach is to remove the battery charger and build a lighter battery pack. The battery consists of 52 cells each weighing about 7.5 lbs for a total of 390 lbs. 33 of these are in the rear and 19 are under the hood. And about another 20 lbs of copper straps to connect the cells together. Without the battery the car would be just over 2000 lbs. It looks like I might be able to build a small battery using the Radio Control LiPo type cells. Perhaps as light as 30 lbs but certainly less than 100 lbs. The best place to put these electrically is under the hood but from a traction standpoint the rear would be better. This small pack would give me a range of only 4 to 8 miles which would be somewhere between 8 and 16 runs down the 1/8th mile track without recharging.
So I ordered a few packs to experiment with and see if this is practical.
go go go get em Doug, what about lightening such as hole saw inner doors, fender and etc to shave weight? May not net a whole bunch but every bit will help
01-22-15, 02:10 AM
#5571
I joined NEDRA which is the National Electric Drag Racing Association. From my goofing around last summer I found that I was about 0.7 second off of the existing 1/8th mile record so my goal is to break that record this year. I can probably do that now since I added a cooling system for my motor controller but I want to set a decent record, one that won't be easily broken on a whim.

I hope that this summer you're able to break that record by at least a few tenths of a second - if not a half second or more. Good luck to you and your build, we all look forward to your progress!
01-22-15, 10:03 AM
#5572
If it's become prone to stickiness I'd rather replace it now while a new one is still available. One less worry point in the future.
Apparently the crush washer is NLA from Mazda, so I'll need to hunt one up if I don't have any that will suit. I'll need to measure it once I have the access port open.
Refilling oil after draining the FMOC will require some extra attention at first, I'll bet; since the valve is normally closed, it may take a while for oil to displace all the air in the core.
01-22-15, 04:09 PM
#5573
Moderator
iTrader: (3)
Join Date: Mar 2001
Location: https://www2.mazda.com/en/100th/
Posts: 30,826
Received 2,592 Likes
on
1,841 Posts
I'd already ordered the valve & it's waiting for pickup today. Got a pretty good deal on it, too - - less than $70.
If it's become prone to stickiness I'd rather replace it now while a new one is still available. One less worry point in the future.
Apparently the crush washer is NLA from Mazda, so I'll need to hunt one up if I don't have any that will suit. I'll need to measure it once I have the access port open.
Refilling oil after draining the FMOC will require some extra attention at first, I'll bet; since the valve is normally closed, it may take a while for oil to displace all the air in the core.
01-22-15, 04:22 PM
#5575
Moderator
iTrader: (3)
Join Date: Mar 2001
Location: https://www2.mazda.com/en/100th/
Posts: 30,826
Received 2,592 Likes
on
1,841 Posts
i am one step closer to working on a 1st gen, the MGB, which had been sitting since before 2008, pretty much fired right up.
obviously step one was a battery, as the old one was knackered.
i then pulled the plugs, which look new, and cranked until it had oil pressure. i put the plugs back, and forgot to put the HT leads back on, cranked it again, no start, but i could hear that i had ignition.
next step was fuel, filter was empty. so i checked the pump voltage, as thats the easiest thing to do. finding none, i went to go look at the wiring diagram, and found that there is an inertia switch. it is supposed to shut the fuel pump off if you are upside down, but in an upside down convertible, maybe you want the fire?
anyways, i cycled the switch a couple of times (its a switch with a little plunger, so if you roll, the plunger comes out....) and viola! i had voltage at the pump. still no fuel.
so then i pulled the fuel pump, which is mounted in the dumbest place, its halfway through the trunk floor. its also quite a silly design, it is a diaphragm pump, like a mechanical pump, but they drive the diaphragm with an electric solenoid, which is of course driven by a set of breaker points. its like they took the worst parts of each fuel pump design (electric, and mechanical) and combined them. its not a Lucas part either, its an SU.
a quick clean of the points, pump ran, and the car started on the first crank.