What did you do to your FB today?
 10-19-13, 11:00 AM
#3876
Senior Member
iTrader: (3)
Join Date: May 2013
Location: Kelowna, BC
Posts: 434
Likes: 0
Received 0 Likes
on
0 Posts
FungusMungus the engine is a half bridgeport 13b (older 4 port). I know that the Nikki even when rejetted is not supplying sufficient fuel to the engine so that's why I'm going for the Holley.
I ran 87 octane (cheapest gas here at $1.29/l) and need to adjust my timing. There's a lot more to squeeze out of this engine in its NA form and I intend to push the limits with it.
Any advice or comments?
I ran 87 octane (cheapest gas here at $1.29/l) and need to adjust my timing. There's a lot more to squeeze out of this engine in its NA form and I intend to push the limits with it.
Any advice or comments?
 10-19-13, 07:50 PM
#3877
Jibaro_12a - i forgot to mention - just as general info, if you do play around with the ignition (read: anything electrical) always always ALWAYS disconnect the battery first! please and thank you save yourself the jolt and melted ignition components. i post assuming thats understood, but on teh internets we can't assume such things.
I bought a battery quick disconnect off Amazon and use it every day (i tinker a LOT) plus it makes it easier to store the car for longer periods and not drain the battery. Worth the $15
I bought a battery quick disconnect off Amazon and use it every day (i tinker a LOT) plus it makes it easier to store the car for longer periods and not drain the battery. Worth the $15
10-20-13, 02:31 PM
#3878
carb whisperer
Here's the pic along with a shot of Rexy on the dyno at Classified Motorsports in Kelowna, BC. She turned out 187hp at the flywheel and 168 rwhp/146 lb/ft TQ @ 6800 rpm. Not too shabby for a Nikki carb with mechanical secondaries. Will move over to a RB Holley streetport kit during the winter
Also, post dyno sheets.


 10-23-13, 12:38 AM
#3883
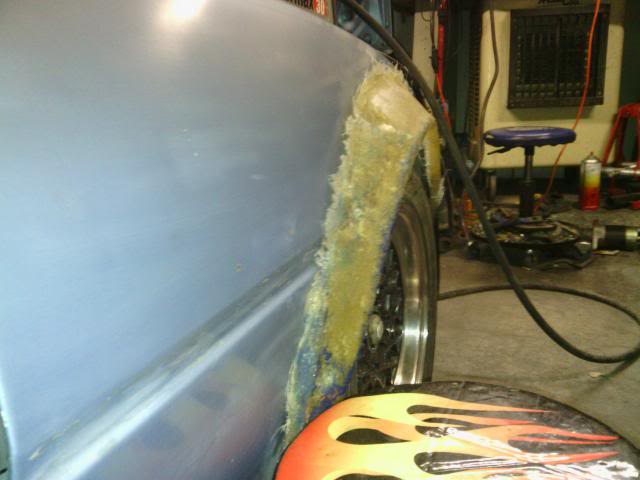
I took out a gross aftermarket muffler. Some sort of 6.5 x 11 x 19.75" that looks/fits kinda like stock but is way off. The hardware was all rusted solid but I was able to free everything up. The PO chopped off the flange for no reason at all, so I pulled the muffler for easier welding back together. Then it's just a center section with a Magnapack and an RB header. I hope it sounds ok with this crappy muffler. Of course a Magnaflow back there is another option...
I do so much rotary stuff every day but it's not really on "my" FB, so I have't posted in here much lately. But I figured you people would like to know about the crappy muffler, at least. Maybe once it's running I'll post a video or something.
I do so much rotary stuff every day but it's not really on "my" FB, so I have't posted in here much lately. But I figured you people would like to know about the crappy muffler, at least. Maybe once it's running I'll post a video or something.
10-23-13, 12:24 PM
#3884
On the GSL-EV I continued working on the high voltage board. I added the DC-DC converter (equivalent of the alternator) last night. Over the last weekend I redid it to fix some fitment issues. Used a heavier 1/8" plywood and reinforced and sealed it with fiberglass. Still needs paint.
Last week I drove the GSL-SE into work and smelled gas again but again could not find a source. It was lots worse when I drove it home and I looked but it was too dark to see anything. Last Monday I grabbed the fire extinguisher and started it up in the driveway. After idling a couple of minutes I was able to see that yes indeed the pulsation dampener was dripping. Yesterday I ordered one. Supposed to arrive tomorrow. Looking forward to the drive to SevenStock. It is about 1300 miles via the most direct route. I haven't driven an FB to the west coast since 1986. Hoping to find someone to caravan with. The most convenient would be joining up with someone in Salt Lake City or Las Vegas since they are along the shortest route. This will be the first time I get to drive one of these legally at 80mph since there is a posted stretch of I-15 in Utah.
Last week I drove the GSL-SE into work and smelled gas again but again could not find a source. It was lots worse when I drove it home and I looked but it was too dark to see anything. Last Monday I grabbed the fire extinguisher and started it up in the driveway. After idling a couple of minutes I was able to see that yes indeed the pulsation dampener was dripping. Yesterday I ordered one. Supposed to arrive tomorrow. Looking forward to the drive to SevenStock. It is about 1300 miles via the most direct route. I haven't driven an FB to the west coast since 1986. Hoping to find someone to caravan with. The most convenient would be joining up with someone in Salt Lake City or Las Vegas since they are along the shortest route. This will be the first time I get to drive one of these legally at 80mph since there is a posted stretch of I-15 in Utah.
 10-24-13, 11:14 AM
#3888
FungusMungus the engine is a half bridgeport 13b (older 4 port). I know that the Nikki even when rejetted is not supplying sufficient fuel to the engine so that's why I'm going for the Holley.
I ran 87 octane (cheapest gas here at $1.29/l) and need to adjust my timing. There's a lot more to squeeze out of this engine in its NA form and I intend to push the limits with it.
Any advice or comments?
I ran 87 octane (cheapest gas here at $1.29/l) and need to adjust my timing. There's a lot more to squeeze out of this engine in its NA form and I intend to push the limits with it.
Any advice or comments?
fm

 10-25-13, 09:51 AM
#3890
85 GSL-SE:
As hoped for the pulsation damper and both crush washers showed up (Thanks Mazdatrix!) Read the FSM to see if it detailed any procedure and it didn't. There is actually a pretty terrible video on youtube showing the replacement. This turned out to be straightforward. I was worried I would need to take a lot of stuff off to get at it but a 22mm box wrench fits in the small space. I think this must have been replaced before because the fuel rail side crush washer was missing. The guy who did the video didn't install one either that I could see. I think to do this you need a third hand. The fuel rail side washer is the only thing difficult to get in place. A friend suggested we put a thread around the washer and he would hold that while I fitted everything in place. Once in place just pull the thread out and tighten it up. The first attempt everything just fell into place but it was difficult to see and I didn't believe it was that easy. So I took a hand off the damper to move the light it all moved and I had to start over. Second attempt was frustrating because the first try was so easy. Started right up but ran rough for a few seconds probably until the air was purged from the fuel system. Took it for a 15 minute drive when I was sure the fuel leak was gone. No problems and runs great!
After I got it all replaced I inspected the leaking damper. There is a plastic cover on the end and when I removed this I found a little screw with a rubber gasket around the head flopping around. I suppose vibration backed this out and then fuel leaked out the hole. Not going to assume this is usable. I wish I had taken some pictures to post here.
This is a straightforward replacement and all you need for it is a 22mm box end wrench and a friend with a thread to hold the fuel rail side crush washer. Now that I have done this once I could do it again in 20 minutes.
 10-26-13, 08:59 PM
#3892
85 GSL-SE:
Replaced the brake and backup lights with LED's. Reset the passenger door strike plate. Removed the paint and rust off of the muffler (Power pulse?) I got for the 85 GSL sometime around 2000 from Mazdatrix. It has been sitting on the floor of the garage for 2 years now after I started converting that car to electric. There was some surface rust. I put a coat of the 2000 degree Rustoleum primer on it and just after sunset I hit it with a coat of the 2000 degree flat black. Looks fantastic. I will take a pic tomorrow and post. The muffler on the GSL-SE has a hole in the front next to the pipe so it is a bit louder than it should be.
Felt like I got a lot done in getting her ready for the drive to Seven Stock.
10-27-13, 01:05 AM
#3893
It sucks man, I hear ya. I've been 7less for 2 months and am already itching to get back in the game. But I'm in a better financial and mental place for school now - amazing how much you don't think about a project when you don't have it anymore...makes sense.
It's a sad couple days for sure though.
It's a sad couple days for sure though.
10-27-13, 10:55 AM
#3894
Ready or not...
Join Date: Dec 2009
Location: Taos, NM
Posts: 261
Likes: 0
Received 0 Likes
on
0 Posts
I got new door panels!!! and installed one of them
I really need to be working and not playing with my car... But HOW COULD I RESIST?
I decided that ANYTHING was better than the door panels I HAD...

And got me some new (better... MUCH better USED panels in just 3 easy payments... thanks fm) SO, I broke up the classic black interior and risked mixing reds... I think it's quite tolerable with my Renaissance Red! While I was at it I lubed all the workings while they were exposed... BIG difference on the window action!

I decided that ANYTHING was better than the door panels I HAD...
And got me some new (better... MUCH better USED panels in just 3 easy payments... thanks fm) SO, I broke up the classic black interior and risked mixing reds... I think it's quite tolerable with my Renaissance Red! While I was at it I lubed all the workings while they were exposed... BIG difference on the window action!
Last edited by Ms. DIY; 10-27-13 at 11:02 AM.
10-28-13, 02:11 PM
#3896
Ms. DIY,
Good to see those door panels put to good use! Congrats!
Yesterday, I took her out for another autoX run. Unfortunately, the battery on my GoPro sh*t the bed before my first run, so I have no "on car" footage. A friend of mine took some out-of-the-car footage on my last run (as he was riding shotgun with me for the first 2 runs and I didn't think to take outside vids until after my 3rd run). Of course, this was my worst run, wiping out a cone, stalling the car, and having to get the thing restarted and back on the track. I ran a 68+ second time that run. My best run was a 58.6-something. I was shooting for mid-low 50s.
fm
10-28-13, 08:29 PM
#3897
Ms. DYI, if you don't want your old door cards, I'll take 'em off your hands. I'm contemplating a project for next year and really need the guts (the metal top rail, the plastic map pocket 'bones', and the fiberboard inside) for a pattern.
Current vinyl condition is not important. Will pay a fair price and shipping if you're interested.
Current vinyl condition is not important. Will pay a fair price and shipping if you're interested.
10-29-13, 04:20 PM
#3900
I mentioned that on Saturday I repainted my old muffler from the EV conversion car. Here are the photos:
You can see the rust around the center, probably this has to do with the baffles being welded on the inside here and either oxidizing the metal before painting or the extra heat killed the paint. I removed all the paint around the outside and got rid of most of the surface rust and then applied 2000 degree primer. Picture four shows it after the 2000 degree flat black had dried overnight. I think it turned out looking good. Now if I could only get the old one off the car this would just bolt in.
You can see the rust around the center, probably this has to do with the baffles being welded on the inside here and either oxidizing the metal before painting or the extra heat killed the paint. I removed all the paint around the outside and got rid of most of the surface rust and then applied 2000 degree primer. Picture four shows it after the 2000 degree flat black had dried overnight. I think it turned out looking good. Now if I could only get the old one off the car this would just bolt in.