What did you do to your FB today?
 07-26-13, 10:07 PM
#3401
Not enough time.....

Join Date: Feb 2007
Location: Colorado Springs
Posts: 9
Likes: 0
Received 0 Likes
on
0 Posts
That's pretty much all I have except for the odd 6 port here and there. None of mine have cooling issues and I can fit stock thermostats in mine correctly. Not sure what your issue is but maybe you have a bad waterpump or a crappy aftermarket stant thermostat. Clogged radiator?

 07-27-13, 12:11 AM
#3402
Today, I tried to install EFI :(
... and failed.
Got the fancy schmancy modified, ceramic coated lower intake manifold bolted on. Got the Oil Injectors seated in the engine. Chased one of the bungs for the oil injector on the intake aaaaand.....
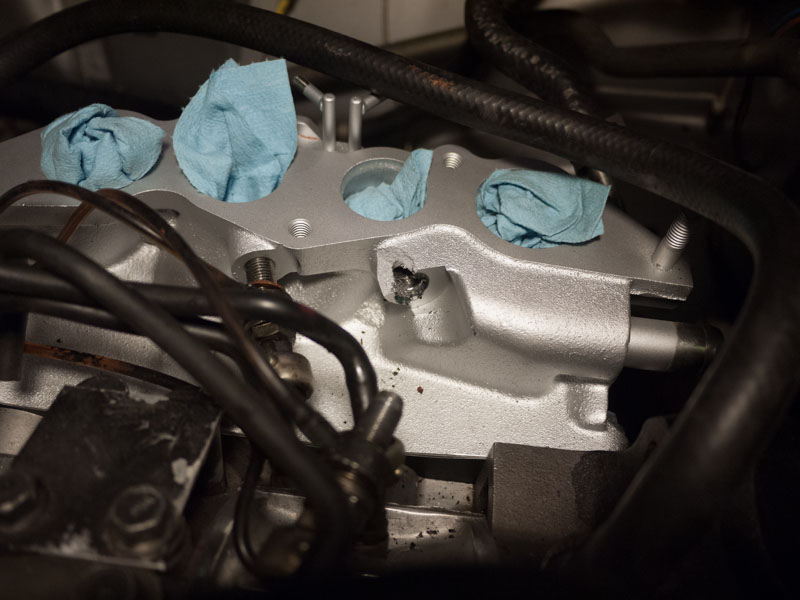
Cracked the oil injector bung clean off the manifold. (See right bung vs. left bung)
My question is, exactly how f#*!ed am I? Pre-mix is not an option for me, unless its short-term just to get the beezy running. But then what do i do with the working oil injectors?
It seems to me this basically means i need a new lower intake manifold. Which means I"ll need to get it ceramic coated. And that takes time and $.
*sigh* she's making me earn this one, thats for damned sure!
Got the fancy schmancy modified, ceramic coated lower intake manifold bolted on. Got the Oil Injectors seated in the engine. Chased one of the bungs for the oil injector on the intake aaaaand.....
Cracked the oil injector bung clean off the manifold. (See right bung vs. left bung)
My question is, exactly how f#*!ed am I? Pre-mix is not an option for me, unless its short-term just to get the beezy running. But then what do i do with the working oil injectors?
It seems to me this basically means i need a new lower intake manifold. Which means I"ll need to get it ceramic coated. And that takes time and $.
*sigh* she's making me earn this one, thats for damned sure!
07-27-13, 12:14 AM
#3403
Originally Posted by ioTus
Jeff the 4309 is return-style IIRC, right?
I ran the aeromotive 13301 (return style) with the stock GSL-SE fuel pump and fuel filter, connected to the Dellorto. Ran like a champ! The -SE pump is almost SILENT in comparison to the 12a one that i had on there before.
The previous setup had a mallory non-return regulator (as per RB instructions for the Dellorto) and the low pressure fuel pump - but still used the metal EFI fuel filter. I had no problems with spiking or floating fuel pressures.
The aeromotive had no problems dropping me to a steady 2.25-2.5 psi, and NEVER peaks like you described.
Perhaps the pressure spring is not seated right? And if i read correctly - you're keeping the vacuum tube on the regulator open to atmosphere, right?
Ah, glad you kept the metal EFI fuel filter like I did.
Yeah, the walbro peak problem was interesting but probably not healthy for the fpr diaphragm.
I tried taking the adjusting stud all the way out and watched the spring move as I'd temporarliy connect the power to the fuel pump. Then I'd install the stud as far out as possible while still enough threads in to allow the jamb nut to "jamb" and lock the stud in place. It behaved the same (around 2.25 psi) so I thiought I was ok. Then when I let it run for a bit, the pressure went up as described.
It's open. Next I'll try blowing some compressed air in it to see how well the fpr reacts.
Just a question: do Grose jets work with boost? I have a race prepped Nikki that is basically already boost prepped. It has the glass ball jet things that supposedly don't get stuck. Do they handle boost the same way a common rubber needle and seat do?
07-27-13, 12:15 AM
#3404
Ouch^. Why did you need to chase it? Ceramic material in the threads?
Just a note. It's probably a good idea to remove the injector block offs from the intermediate plate and install some diffusers before the LIM goes on.
Remind me which ECU are you using?
Just a note. It's probably a good idea to remove the injector block offs from the intermediate plate and install some diffusers before the LIM goes on.
Remind me which ECU are you using?
07-27-13, 12:29 AM
#3405
Ouch, what a heart-breaker! Such a clean looking LIM too. How did it crack off like that? Were you just chasing the threads with a tap when it did this? You might be able to use two-part metal repair epoxy like JB Weld to build that area up and re-chase the threads. It won't look nearly as clean, but IIRC, that second of the manifold isn't terribly visible. I know it'll bug you but...
I've started doing my work on the car in the early mornings the past couple of days. It's easier to motivate myself when I'm fresh, plus I make fewer mistakes. This morning, I pulled the rear side interior panel in order to get at a small ding in the sheet metal in the rear quarter. Try as I might, I just couldn't burnish out that ding with the tools had, so I guess I'll leave it to a paintless dent removal guy to deal with later. I figured I'd give it a shot while I had the rest of the interior apart.
I put that back on and went to work pulling off the rear bumper. The bumper cover is warped from a parking lot bump. I'm hoping to pull the skin off, carefully use a heat gun to coax it back into shape and cool it. We'll see how that goes after I borrow a heat gun.
The manual went into pretty good detail describing which nuts to take off near the muffler. I figured the other side would be the same. A couple of tugs told me that there was another bolt the manual neglected to mention. A good luck under the driver's side bumper confirmed that the tow hook needed to come off. You'd think the manual would mention this. :p
Anyway, but bumper is off. I'll pull the skin off tomorrow morning and see what I'm up against. I couldn't get a heat gun today. Hoping to borrow one tomorrow.
fm
07-27-13, 11:47 AM
#3407
Moderator
iTrader: (3)
Join Date: Mar 2001
Location: https://www2.mazda.com/en/100th/
Posts: 30,884
Received 2,635 Likes
on
1,865 Posts
since its aluminum, you could weld the piece back on. it'll ruin the coating right there, but aside from being ugly, i doubt it would have any other problem
07-27-13, 04:25 PM
#3408
There was a little bit of ceramic material in there - but not enough to rip threads off stuff.
I was planning on doing the diffusers after, but at this point i'll be needing to take of the LIM anyways so there we go
I"m assuming those diffusers need to be angled inwards right? like this, if you're looking through the intake holes: / \Haltech F9 for computer.
Worth a shot - the biggest loss is honestly time - I was hoping to have this all done and tuned before I move in September. Ceramic coating takes 1-2 weeks if i need to get another one done.
07-27-13, 04:38 PM
#3409
Sin City Rotary
07-27-13, 09:30 PM
#3410
I started just by threading the oil injectors in - and when it started getting hard to do I backed it out and decided it needed chasing. I grabbed a bolt of the same thread pitch and screwed it in a little bit at a time, backed it out a bit, then further in, etc. At the end, when it was almost through, it jammed. Ripped the threads OFF the bolt.
There was a little bit of ceramic material in there - but not enough to rip threads off stuff.
There was a little bit of ceramic material in there - but not enough to rip threads off stuff.
you cant see that part of the manifold anyways, so i'm not too worried about it. Perhaps take it to the fab shop and see what they say - maybe they can fix it. Weld that beezy back on and then tap the threads back out.
Worth a shot - the biggest loss is honestly time - I was hoping to have this all done and tuned before I move in September. Ceramic coating takes 1-2 weeks if i need to get another one done.
fm
07-27-13, 09:35 PM
#3411
Today I pulled the rear bumper skin off and used a hair dryer to heat it enough to reshape it. I didn't think it would have enough oomph to do it, but it got it soft enough to allow me to burnish the sag in the top center flat using a 1x4 piece of wood. I'm very pleased with how that came out. The bumper, truth be told, needs help...chips and stress cracks in the paint galore from previous parking lot adventures, but it'll have to do until I can either buy a new skin or find a good, used condition skin in white. The warpage was really bugging the most, and now I think I've got that sorted out. I'll be putting the bumper back on tonight or tomorrow morning. I hope to have before and after pics tomorrow.
fm
fm
07-28-13, 12:32 AM
#3412
Took her for a drive this AM; hoping to find time to wash off the rain/dust residue from last weekend.
She's pulling a bit to the right, and not feeling well-coordinated in steeper turns. Also not doing a clean return-to-center past about a 20-deg turn. I'm thinking caster - - currently left side strut tops set in position A, and right side in C, so the right's got all the factory-designed caster and camber dialled in while the left is zeroed. Gonna mess with that a bit tomorrow, as I can't recall if that was how the last alignment shop left it or not. It could possibly be an issue with torque on the tension rods not being quite equal - - I don't have a big-enough crow'sfoot to get a torque wrench on that big rear nut on the tension rod.
She's pulling a bit to the right, and not feeling well-coordinated in steeper turns. Also not doing a clean return-to-center past about a 20-deg turn. I'm thinking caster - - currently left side strut tops set in position A, and right side in C, so the right's got all the factory-designed caster and camber dialled in while the left is zeroed. Gonna mess with that a bit tomorrow, as I can't recall if that was how the last alignment shop left it or not. It could possibly be an issue with torque on the tension rods not being quite equal - - I don't have a big-enough crow'sfoot to get a torque wrench on that big rear nut on the tension rod.
07-28-13, 10:50 AM
#3413
Full Blown 1.1
Join Date: Jan 2013
Location: Seattle
Posts: 213
Likes: 0
Received 0 Likes
on
0 Posts
I got her running for the first time since I bought an Atkins Racing Street Port 12A for her. She's a scary one braap braap !!!! Down the block scaring all the uptight neighbors.
07-28-13, 10:53 AM
#3414
ioTus, yep, like the fungus amoung us said, should have installed bolts in them before coating. Or should have at least used a tap to clean out the threads.
But then I have to ask why get it ceramic coated in the first place? Most folks don't bother filling the ACV ports which leads to a hot manifold regardless of whether it's coated or not. You probably didn't fill the ACV ports in the engine, right? I like quicksteel. But check to make sure the S5 doesn't need them open and flowing for whatever reason. I know the S4s don't need 'em.
But then I have to ask why get it ceramic coated in the first place? Most folks don't bother filling the ACV ports which leads to a hot manifold regardless of whether it's coated or not. You probably didn't fill the ACV ports in the engine, right? I like quicksteel. But check to make sure the S5 doesn't need them open and flowing for whatever reason. I know the S4s don't need 'em.
07-28-13, 01:31 PM
#3415
still working on the GSL-SE, cranks but no start despite I bypassed the ignition coils and fuel pump and drained 5 gallons of old gas which is now a varnish. also, found dated clifford alarm from 06/84.. since the remote was lost and prior owner has no know how, Im currently racing the wires
07-28-13, 03:37 PM
#3416
Moderator
iTrader: (3)
Join Date: Mar 2001
Location: https://www2.mazda.com/en/100th/
Posts: 30,884
Received 2,635 Likes
on
1,865 Posts
Took her for a drive this AM; hoping to find time to wash off the rain/dust residue from last weekend.
She's pulling a bit to the right, and not feeling well-coordinated in steeper turns. Also not doing a clean return-to-center past about a 20-deg turn. I'm thinking caster - - currently left side strut tops set in position A, and right side in C, so the right's got all the factory-designed caster and camber dialled in while the left is zeroed. Gonna mess with that a bit tomorrow, as I can't recall if that was how the last alignment shop left it or not. It could possibly be an issue with torque on the tension rods not being quite equal - - I don't have a big-enough crow'sfoot to get a torque wrench on that big rear nut on the tension rod.
She's pulling a bit to the right, and not feeling well-coordinated in steeper turns. Also not doing a clean return-to-center past about a 20-deg turn. I'm thinking caster - - currently left side strut tops set in position A, and right side in C, so the right's got all the factory-designed caster and camber dialled in while the left is zeroed. Gonna mess with that a bit tomorrow, as I can't recall if that was how the last alignment shop left it or not. It could possibly be an issue with torque on the tension rods not being quite equal - - I don't have a big-enough crow'sfoot to get a torque wrench on that big rear nut on the tension rod.
07-28-13, 05:17 PM
#3417
Pic from the FSM:
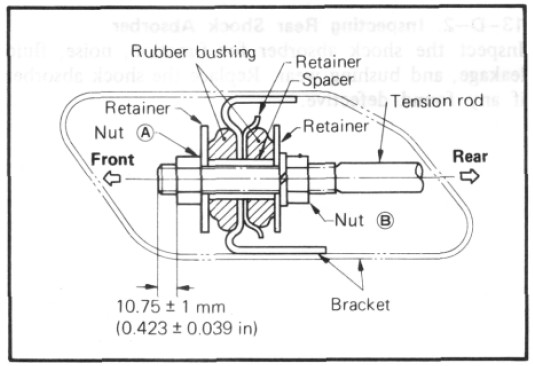
You set up up in it's mount by 1) setting the front nut (A) to proper position from the tip, then 2) tightening the rear nut (B) to a specific torque, which squeezes the bushings while also pulling the rod rearward.
The spacer in between the two retainers SHOULD precisely limit travel & so get accurate position of the tension rod; but considering the age/mileage of my chassis & the limited caster adjustment on these cars (essentially, you have the choice of two positions; 0 or +28'), it may be that a little fudging is needed on one side to get the caster angle in-trim.
28' (minutes) of angle projected the length of our strut assemblies is not a lot of distance of change; since it's set at the top of the strut housing, if the body has flexed at all over the years & miles it may not be enough adjustment to get things equal.
But I don't have tools to measure caster accurately, since all the alignment places these days want to sell you a 4-wheel alignment for serious coin, it's not something I can do over and over. Minimum tools needed to measure caster are a 1) pivot plate with a degree indicator, 2) an accurate level with 3) an adaptor to fit it to your wheel rim, and 4) a calculator. I have two of the four. Oh, and a flat surface.
Add to that, most "alignment shops" I've found no longer understand what they are actually doing - they just push the buttons on the Hunter machine and make the changes it gives them, which does not include any info about adjusting the tension rods. Monkeys being instructed by robots.
07-28-13, 07:10 PM
#3418
Sin City Rotary
nothing on mine or the wifes ... but brought this one home .... it is a project that will be geared towards community service (will share more details as we go along)
Honestly my pet peeve of FB wheels on a SA is getting me so may swap waffles on for now, as they will not be part of the finished product
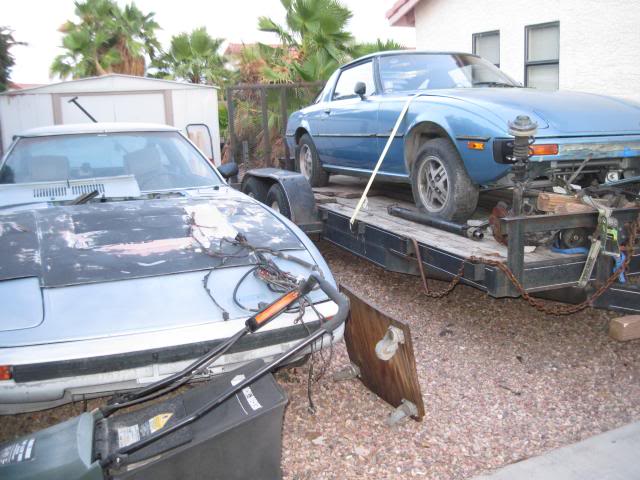
Honestly my pet peeve of FB wheels on a SA is getting me so may swap waffles on for now, as they will not be part of the finished product
07-28-13, 09:54 PM
#3419
... and failed.
Got the fancy schmancy modified, ceramic coated lower intake manifold bolted on. Got the Oil Injectors seated in the engine. Chased one of the bungs for the oil injector on the intake aaaaand.....
Cracked the oil injector bung clean off the manifold. (See right bung vs. left bung)
My question is, exactly how f#*!ed am I? Pre-mix is not an option for me, unless its short-term just to get the beezy running. But then what do i do with the working oil injectors?
It seems to me this basically means i need a new lower intake manifold. Which means I"ll need to get it ceramic coated. And that takes time and $.
*sigh* she's making me earn this one, thats for damned sure!
 07-29-13, 12:45 AM
#3421
This morning, disgusted with the untidiness of my rear bumper that I was going to bolt back on, I lost my mind and mixed up a batch of body filler and went to work patching the big chunks missing out of my bumper. I'd pretty much committed to repainting the whole thing, so I wet sanded and figured out a way I would support the bumper while I sprayed it.
Then I went shopping in SJ and stopped at Pick-n-Pull in San Jose on a whim. I didn't even have any tools with me. But I found a GSL-SE at Pick-n-Pull and scored a nice clock to replace the one in mine that just went out. I ended up asking a guy picking a part a Camry nearby for a Philips for a few minutes, and he obliged. $8 plus the $2 entrance fee, with a dash of humility = this:

There were a few other bits I would have liked to have gotten, but it would have meant imposing a lot more than borrowing a screwdriver, so I left them. It will probably be gone the next time I'm up there. Oh well.
After I got home with my spoils, I started refinishing the bumper. First, a wipe down with alcohol to get the greeblies off. Then a couple of coats of adhesion promoter/primer. I didn't have plastic primer...just etching primer, so I just went on with the Dover White color coat. I'm done with the color coat now, and I'll wait until tomorrow eve to put the clear on.
This isn't a perfect repair, nor was it meant to be. There is still a crack inside where the license plate sits which would have been a time consuming repair and I doubt it would have been effective. This repair is just to make the car presentable until I can do the whole car properly. I do believe, based on what I'm seeing now, it will look a lot better than before. The spider cracks will be gone and that ghastly chunk of plastic out of the corner where the license plate housing is will be patched up.
Here are a few progress pics...matte paint now until the clear coat goes on tomorrow.
Just starting with the first coat of color coat

Color coat done:


fm
Then I went shopping in SJ and stopped at Pick-n-Pull in San Jose on a whim. I didn't even have any tools with me. But I found a GSL-SE at Pick-n-Pull and scored a nice clock to replace the one in mine that just went out. I ended up asking a guy picking a part a Camry nearby for a Philips for a few minutes, and he obliged. $8 plus the $2 entrance fee, with a dash of humility = this:
There were a few other bits I would have liked to have gotten, but it would have meant imposing a lot more than borrowing a screwdriver, so I left them. It will probably be gone the next time I'm up there. Oh well.
After I got home with my spoils, I started refinishing the bumper. First, a wipe down with alcohol to get the greeblies off. Then a couple of coats of adhesion promoter/primer. I didn't have plastic primer...just etching primer, so I just went on with the Dover White color coat. I'm done with the color coat now, and I'll wait until tomorrow eve to put the clear on.
This isn't a perfect repair, nor was it meant to be. There is still a crack inside where the license plate sits which would have been a time consuming repair and I doubt it would have been effective. This repair is just to make the car presentable until I can do the whole car properly. I do believe, based on what I'm seeing now, it will look a lot better than before. The spider cracks will be gone and that ghastly chunk of plastic out of the corner where the license plate housing is will be patched up.
Here are a few progress pics...matte paint now until the clear coat goes on tomorrow.
Just starting with the first coat of color coat
Color coat done:
fm
Last edited by Fungus Mungus; 07-29-13 at 12:48 AM.
07-29-13, 11:32 AM
#3422
Moderator
iTrader: (3)
Join Date: Mar 2001
Location: https://www2.mazda.com/en/100th/
Posts: 30,884
Received 2,635 Likes
on
1,865 Posts
Thing with the tension rod setup is that the front end (and therefore the position fore-aft) is in a resilient bushing 'sandwich' mount that allows it to pivot a limited amount.
Pic from the FSM:
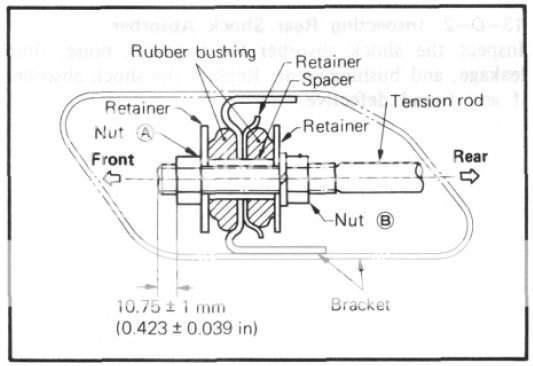
You set up up in it's mount by 1) setting the front nut (A) to proper position from the tip, then 2) tightening the rear nut (B) to a specific torque, which squeezes the bushings while also pulling the rod rearward.
The spacer in between the two retainers SHOULD precisely limit travel & so get accurate position of the tension rod; but considering the age/mileage of my chassis & the limited caster adjustment on these cars (essentially, you have the choice of two positions; 0 or +28'), it may be that a little fudging is needed on one side to get the caster angle in-trim.
28' (minutes) of angle projected the length of our strut assemblies is not a lot of distance of change; since it's set at the top of the strut housing, if the body has flexed at all over the years & miles it may not be enough adjustment to get things equal.
But I don't have tools to measure caster accurately, since all the alignment places these days want to sell you a 4-wheel alignment for serious coin, it's not something I can do over and over. Minimum tools needed to measure caster are a 1) pivot plate with a degree indicator, 2) an accurate level with 3) an adaptor to fit it to your wheel rim, and 4) a calculator. I have two of the four. Oh, and a flat surface.
Add to that, most "alignment shops" I've found no longer understand what they are actually doing - they just push the buttons on the Hunter machine and make the changes it gives them, which does not include any info about adjusting the tension rods. Monkeys being instructed by robots.
Pic from the FSM:
You set up up in it's mount by 1) setting the front nut (A) to proper position from the tip, then 2) tightening the rear nut (B) to a specific torque, which squeezes the bushings while also pulling the rod rearward.
The spacer in between the two retainers SHOULD precisely limit travel & so get accurate position of the tension rod; but considering the age/mileage of my chassis & the limited caster adjustment on these cars (essentially, you have the choice of two positions; 0 or +28'), it may be that a little fudging is needed on one side to get the caster angle in-trim.
28' (minutes) of angle projected the length of our strut assemblies is not a lot of distance of change; since it's set at the top of the strut housing, if the body has flexed at all over the years & miles it may not be enough adjustment to get things equal.
But I don't have tools to measure caster accurately, since all the alignment places these days want to sell you a 4-wheel alignment for serious coin, it's not something I can do over and over. Minimum tools needed to measure caster are a 1) pivot plate with a degree indicator, 2) an accurate level with 3) an adaptor to fit it to your wheel rim, and 4) a calculator. I have two of the four. Oh, and a flat surface.
Add to that, most "alignment shops" I've found no longer understand what they are actually doing - they just push the buttons on the Hunter machine and make the changes it gives them, which does not include any info about adjusting the tension rods. Monkeys being instructed by robots.
off the top i think you'd start with the tension rods set like the FSM, but equal on both sides. set the strut tops equal and see where that ends up? i agree castor is the one you can't do at home easily, with the race car we usually put it on the alignment rack once a year, mostly to center the rear toe, and such, and then we can tweak from there.
i also agree that setting up castor on the tension rods on the rack would take forever, its iterative...
07-29-13, 03:53 PM
#3423
Took the manifold in to have it repaired. $80 was the estimate. Ouch. I already paid $70 to have the ACV inlet blocked off (which it turns out I didnt need) and $70 for ceramic coating (which will now be destroyed on the inner side of the manifold). PO said this was an S5 block - but that center plate only has a large round indendation (like the one next to the base of the oil filler neck) - and no ACV port..... odd... and a waste of $70.
Oh well I dont care any more I just want to get it installed. I do need to figure out what concoction this engine is, though, before I start special ordering parts for it and find out they're mismatch.
When I sent the manifold in to be coated - i said very specifically to block off all hoses, inlets, holes, bolts, etc. They failed to do so on 50% of them (the ones that mattered).
Jeff- the ceramic coating is to prevent heat soak from the engine and exhaust manifold. I had the gasket surfaces coated to reduce heat soak from component to component.
It's a tight squeeze under those 6 port manifolds, so nobody makes heat shields for them. So, either wrap it or ceramic! I chose ceramic for longevity and aesthetic.
Che's - the LIM is an S5 and requires the S5 VDI and Dynamic Chamber, but will bolt up to an -SE block. It may become available down the road - using it for now.
07-29-13, 08:38 PM
#3424
Senior Member
iTrader: (8)

Join Date: May 2013
Location: 94086
Posts: 280
Likes: 0
Received 0 Likes
on
0 Posts
This morning, disgusted with the untidiness of my rear bumper that I was going to bolt back on, I lost my mind and mixed up a batch of body filler and went to work patching the big chunks missing out of my bumper. I'd pretty much committed to repainting the whole thing, so I wet sanded and figured out a way I would support the bumper while I sprayed it.
Then I went shopping in SJ and stopped at Pick-n-Pull in San Jose on a whim. I didn't even have any tools with me. But I found a GSL-SE at Pick-n-Pull and scored a nice clock to replace the one in mine that just went out. I ended up asking a guy picking a part a Camry nearby for a Philips for a few minutes, and he obliged. $8 plus the $2 entrance fee, with a dash of humility = this:
There were a few other bits I would have liked to have gotten, but it would have meant imposing a lot more than borrowing a screwdriver, so I left them. It will probably be gone the next time I'm up there. Oh well.
After I got home with my spoils, I started refinishing the bumper. First, a wipe down with alcohol to get the greeblies off. Then a couple of coats of adhesion promoter/primer. I didn't have plastic primer...just etching primer, so I just went on with the Dover White color coat. I'm done with the color coat now, and I'll wait until tomorrow eve to put the clear on.
This isn't a perfect repair, nor was it meant to be. There is still a crack inside where the license plate sits which would have been a time consuming repair and I doubt it would have been effective. This repair is just to make the car presentable until I can do the whole car properly. I do believe, based on what I'm seeing now, it will look a lot better than before. The spider cracks will be gone and that ghastly chunk of plastic out of the corner where the license plate housing is will be patched up.
fm
07-29-13, 08:45 PM
#3425
still working on the GSL-SE, cranks but no start despite I bypassed the ignition coils and fuel pump and drained 5 gallons of old gas which is now a varnish. also, found dated clifford alarm from 06/84.. since the remote was lost and prior owner has no know how, Im currently racing the wires