Making old parts look new again :)


 12-08-09, 05:49 PM
#152
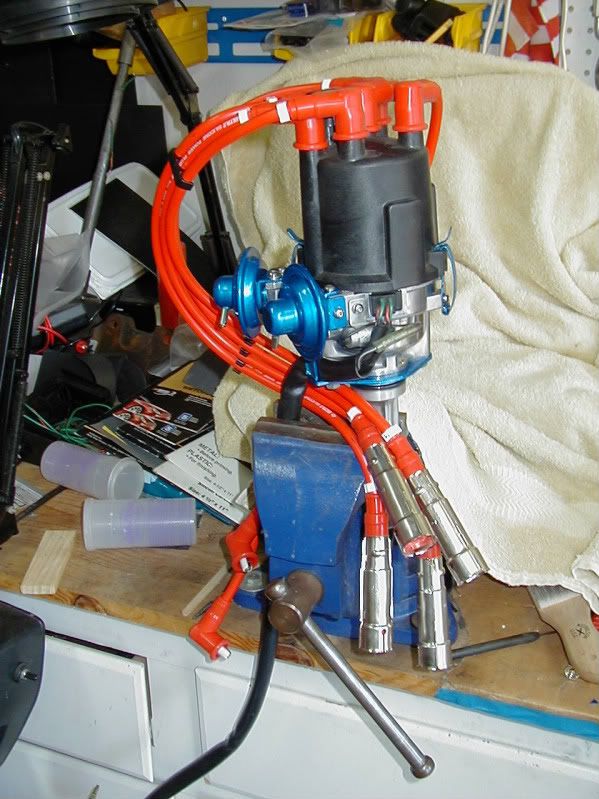
Time for some pictures! I finished the headlight motor and have it "rough" installed in the car right now. Shined up the bolts/nuts, and shined up the clamp (can't see the clamp in the picture). It looks snazzy, but the camera I use sucks. Maybe because it is set on some 3000x3000 pixels?

Got my X-01 connector down to 5 wires, took out the #2 temp switch that is in the back of the waterpump housing. Since it is used for the choke, and I have none, then no need for it!

Got it slimmed down enough. I will keep the X-01 connector if I ever have to go back in and add anything. I was planning on removing it and soldering it, but figured it would be handy since it would be in the FSM.
Pulled out the ol' taurus fan today. Notice the cut on the lower right of the shroud, that is all that is needed to run this on a 7, in case anyone was wondering. Cleaned it up and got all of the dirt and grime off. The fan is sharp, so you will probably end up cutting you self like I do. Just a word of caution. Hold it from the shroud, not IN the shroud.
Cleaned up:

Layer of gloss black. Not going to do the other side since it is on the radiator
I will be rerouting the wiring for the fan as well to hide it. Probably will bring it inside the shroud and run along the edge and out of sight. It's kind of fun hiding everything from view, makes me feel like a kid again.

Crappy camera makes it look blemished
Got my X-01 connector down to 5 wires, took out the #2 temp switch that is in the back of the waterpump housing. Since it is used for the choke, and I have none, then no need for it!
Got it slimmed down enough. I will keep the X-01 connector if I ever have to go back in and add anything. I was planning on removing it and soldering it, but figured it would be handy since it would be in the FSM.
Pulled out the ol' taurus fan today. Notice the cut on the lower right of the shroud, that is all that is needed to run this on a 7, in case anyone was wondering. Cleaned it up and got all of the dirt and grime off. The fan is sharp, so you will probably end up cutting you self like I do. Just a word of caution. Hold it from the shroud, not IN the shroud.
Cleaned up:
Layer of gloss black. Not going to do the other side since it is on the radiator
I will be rerouting the wiring for the fan as well to hide it. Probably will bring it inside the shroud and run along the edge and out of sight. It's kind of fun hiding everything from view, makes me feel like a kid again.
Crappy camera makes it look blemished
 12-11-09, 04:28 PM
#156
Cleaned up more wires today. This is a neverending mess! Cleaned up the electric fan wiring, and moved the MSD wiring. All this will be ran inside the radiator shroud, along the edge of the side panels. I am thinking about turning the Taurus fan into a pusher fan instead of pulling. If I get a pusher it will clean up the front of the engine and not seem cramped. I would assume I could just flip the positive and negative on the fan around to get it to spin the other way?
Made up my mind, I will be removing the X01 connection and running the 4 wires left in with the main bundle. I need to go get some more lower gauge wiring for the alternator lead and MSD positive and negative.
Got a bracket made for the DCOE. Not the prettiest thing, but if it holds up I will trim it and make it perty.
12-12-09, 06:12 AM
#157
Hey Stu -
Sgt Fox just posted a site for OEM style wire harness connectors
https://www.rx7club.com/forum/showthread.php?t=877734
would make your re-wire completely OEM-looking...
Stu Aull
80GS
Alaska
Sgt Fox just posted a site for OEM style wire harness connectors
https://www.rx7club.com/forum/showthread.php?t=877734
would make your re-wire completely OEM-looking...
Stu Aull
80GS
Alaska
01-21-10, 08:55 AM
#158
Sorry for the major lack of updates. Not much new to report. I have started school so it is destroying my free time
I got the fan cut up for mounting on the front of the radiator. I used my new dremel, and it burned up once again halfway through. This is the 2nd one that has done that. Went back to home depot to exchange it, but they would only give me half price (new it was $90+), and they had NO dremels there for that price. Had to settle for a cut off wheel. The lower right corner is where I finished up with the wheel, so that is why it looks horrible. Stupid home depot.

I got the fan cut up for mounting on the front of the radiator. I used my new dremel, and it burned up once again halfway through. This is the 2nd one that has done that. Went back to home depot to exchange it, but they would only give me half price (new it was $90+), and they had NO dremels there for that price. Had to settle for a cut off wheel. The lower right corner is where I finished up with the wheel, so that is why it looks horrible. Stupid home depot.
01-21-10, 11:13 AM
#159
Not too bad Stu  I have never used the Taurus e-fan as a pusher. Typically you would just reverse the wiring to make it turn in the opposite direction. Good news is your only a few minutes from Pull-A-Part! You gonna make it to the next meet?
I have never used the Taurus e-fan as a pusher. Typically you would just reverse the wiring to make it turn in the opposite direction. Good news is your only a few minutes from Pull-A-Part! You gonna make it to the next meet?
01-21-10, 12:19 PM
#161
Got it on the car and made the bracket for it. Haven't started it since I began the whole ordeal. I did however put my battery on the cables and attempted to turn it over, but I believe the battery is dead.
I wish school didn't clean me out, or it would be done
I wish school didn't clean me out, or it would be done
02-09-10, 04:47 PM
#162
Hey Jeezus, whats up? Thats a neat job you have accomplished by cleaning your engine bay
I wonder if you can show me a picture of the tool you use as grinder ? I would like to buy one to start cleaning my stuff just like you.
If you can provide more info on model or advice on which grinder I should get please also let me know.
Thanks
Emir-
I wonder if you can show me a picture of the tool you use as grinder ? I would like to buy one to start cleaning my stuff just like you.
If you can provide more info on model or advice on which grinder I should get please also let me know.
Thanks
Emir-
02-10-10, 07:37 PM
#163
Hey Jeezus, whats up? Thats a neat job you have accomplished by cleaning your engine bay
I wonder if you can show me a picture of the tool you use as grinder ? I would like to buy one to start cleaning my stuff just like you.
If you can provide more info on model or advice on which grinder I should get
please also let me know.
Thanks
Emir-
I wonder if you can show me a picture of the tool you use as grinder ? I would like to buy one to start cleaning my stuff just like you.
If you can provide more info on model or advice on which grinder I should get
please also let me know.
Thanks
Emir-

I got it at home depot for a little less than $50. They have some without the
sideways handle, but get the one with it; much easier to guide it as you cut.
Mine came with a pretty thick blade on it, I think it is 3/8ths inch thick. That is
for grinding, I also spent a dollar more and got a thin blade for cutting. Works
awesome.

 03-22-10, 03:35 AM
#165
Knucklehead
iTrader: (2)
Join Date: Nov 2002
Location: Fife, WA
Posts: 920
Likes: 0
Received 0 Likes
on
0 Posts
I dont mean to steal your thread here, but I'm curious. I'd like to know whats the most efficient way of stripping off paint? I was starting on the battery tray yesterday it took me like an hour, and then I just gave up.
03-22-10, 10:44 AM
#166
Aircraft paint stripper works dandy for most paint; it's very slow on some items like the baked-on enamel used on the air cleaners. Biggest trick is to make sure you get ALL of it out of any seams or folds, before you repaint. It'll wick into a sheetmetal seam and then wreck your new paint. You also don't want it on your hands.
Wirebrush and power sanding / power buffing pads also are big helps, though they can add up costs as some of them (like the buffing pads) don't last very long.
Sandpaper and elbow grease is sometimes the only way.
Wirebrush and power sanding / power buffing pads also are big helps, though they can add up costs as some of them (like the buffing pads) don't last very long.
Sandpaper and elbow grease is sometimes the only way.
 03-24-10, 06:00 PM
#170
The stamped black-on-white wire tags read "T1, T2, L1, L2" as well.
03-24-10, 06:08 PM
#171
Hey guys I have a question:
In the engine bay on the drivers side (main harness) there is a yellow wire with a female
plug on it. Looks like it just slides on a male tab or something. I can't find out where this
thing goes! I looked in the haynes and FSM and there is no discription of a single female plug
with a Y. The only solid Y wires in the whole wiring diagram are for the Fuel gauge tank unit
(Part C in the 1982 wiring diagram FSM) or the rear window defroster switch (Part G-18,
same FSM). Neither plug looks like the one I have. Any ideas? I could snap a picture if that
helps.
03-24-10, 08:27 PM
#172
Found it, apparently it was the water temp gauge unit, a yellow with white stripe
wire. Hard to see it after 25+ years of fading. Also found out I do not need the
BrY wire/connector that goes to the oil pressure gauge unit for 2 reasons:
1. I have aftermarket oil gauges.
2. It looks like I have an SA rear iron with no oil pressure sensor.
Another wire bites the dust!
Also, can someone be a dear and tell me if the horns have blue wires? It doesn't
say in the FSM, but I could have sworn I pulled off these 2 blue wires. They are
taped together from the factory and one end of them have 90* female connectors
on them.
wire. Hard to see it after 25+ years of fading
. Also found out I do not need theBrY wire/connector that goes to the oil pressure gauge unit for 2 reasons:
1. I have aftermarket oil gauges.
2. It looks like I have an SA rear iron with no oil pressure sensor.
Another wire bites the dust!
Also, can someone be a dear and tell me if the horns have blue wires? It doesn't
say in the FSM, but I could have sworn I pulled off these 2 blue wires. They are
taped together from the factory and one end of them have 90* female connectors
on them.
03-25-10, 07:04 AM
#173
Funny this thread came back up. Im currently looking into some of this for my car now. My engine bay went through a few "changes" in its life...
From this:


To this after the car was stolen/stripped:


Most recently however, its looked like this:

Then this (epoxy "rust cure" primer:


And finally onto this (factory Formula White):


Its glossy because its still wet, and will dry matte - it still needs its clear coat. The wet gloss does however give you a pretty good idea of how it will look clear coated, and overall looks pretty good IMO.
Im going to be cleaning and detailing everything up that gets bolted back in as I remember where it all goes. Its been 7 years since its motor blew, it got stolen, stripped, recovered and parked. I figure, the clean new engine bay is the best place to start. Once I get that right, I will be repainting the exterior the factory color to match.
There is a link in my sig with a more "detailed" version of whats going on also that I update for those who are curious
~T.J.
From this:
To this after the car was stolen/stripped:
Most recently however, its looked like this:
Then this (epoxy "rust cure" primer:
And finally onto this (factory Formula White):
Its glossy because its still wet, and will dry matte - it still needs its clear coat. The wet gloss does however give you a pretty good idea of how it will look clear coated, and overall looks pretty good IMO.
Im going to be cleaning and detailing everything up that gets bolted back in as I remember where it all goes. Its been 7 years since its motor blew, it got stolen, stripped, recovered and parked. I figure, the clean new engine bay is the best place to start. Once I get that right, I will be repainting the exterior the factory color to match.
There is a link in my sig with a more "detailed" version of whats going on also that I update for those who are curious
~T.J.