
Intimidated by Nikki rebuild. Winter project.

Intimidated by Nikki rebuild. Winter project.
I have an all original 83 GSL in fair to good condition.
It has a nasty off idle stutter & like to stall rolling to a stop. Basically, I believe the accelerator pump is faulty.
I have the Autozone rebuild kit & am a bit intimidated getting started. The carb w/ all the original crap (ratsnest) is still on the car.
I'm not so much worried about rebuilding the carb (a lil' bit) , more getting the carb off the motor & getting it back on correctly.
I've read the Haynes manual section a couple times, tips would be great.
Need a little encouragement... Tell me it's as easy as boiling an egg!
Joined: Aug 2010
Posts: 1,416
Likes: 5
From: East Palestine, Oh
its basically as easy as cracking an egg and not getting pieces of shell in it haha Dont be afraid to get the carb back on the car properly, you really cant mess it up too bad. If you are nervous take pics of the vac line routing first. Same with the carb rebuild, dont be intimidated, its not hard. Just take your time, have a CLEAN work space, and have the FSM for the carb printed out. No problems.
Joined: Jun 2008
Posts: 8,376
Likes: 30
From: Chino Hills, CA
It's not all that hard to remove the carb; some tips:
You want to be careful with what may be old brittle wiring or plastic parts, especially the OMP feed lines. Just handle things carefully - sucks to break what is otherwise still functional.
Take detailed pix of all hose & wire connections and routing so you can reconnect properly
The throttle and choke cables are easier to disconnect once you can lift and rotate the carb off it's base, but make it a bit harder to get to the mounting nuts.
The rear left (driver side) mounting nut is the toughest to reach; a "stubby" combo wrench is real handy. The front left is second-hardest, and you have to be careful not to damage the wiring for the water temp sensor on the back of the water pump.
Don't forget to disconnect (and later reconnect!) the control rod for the OMP.
Do NOT try to remove/replace the "gaskets" from the plastic carb spacer - - even though the kit looks to contain replacements. The sealing surfaces of that spacer are permanent, and if you try to remove/replace them you will ruin your spacer and have to replace it.
Don't let anything fall down the intake manifold once the carb is off; make a cardboard cover for it, or stuff rags in the openings. A nut lost down the intake can mean an engine teardown to retrieve it, or a wrecked engine if you try to start the car not knowing something went down there.
Just be methodical and you'll have no problems.

Sin City Rotary
Joined: Sep 2009
Posts: 1,707
Likes: 2
From: Las Vegas
Pics are always great but if you still unsure a peice of masking tape to label during removal may prove helpful when putting it back together examaple cables, vacuum lines etc ... like DD said handle things with care and you should be alright
DD,
To be clear...
You're saying remove the carb from the spacer it sits upon
& do not clean the area up or use a new base gasket ??
Just remove the carb, then put it back when I'm done ??
Thanks for the tips & encouragement.
Chris
Joined: Jun 2008
Posts: 8,376
Likes: 30
From: Chino Hills, CA
Clarification:
Between the carb and the aluminum manifold is a black plastic spacer which has permanent 'gasket' faces glued to both sides of it. Several of the ratsnest vacuum hoses connect to nipples on this spacer
It's OK to remove the carb from the spacer, and to remove the spacer from the manifold. It's OK to clean all three parts.
It's NOT OK to try to get the permanent black gasket material off of the spacer. It feels stiff but it is actually slightly flexible under pressure, & it's all the gasket that is wanted or needed between the carb base bottom and the manifold top.
People see those extra fiber gaskets in the carb kit (which are for other applications) and they try to use them. Causes all manner of leakages.
Pictures:
This is the spacer, with the black sealing surfaces in place:
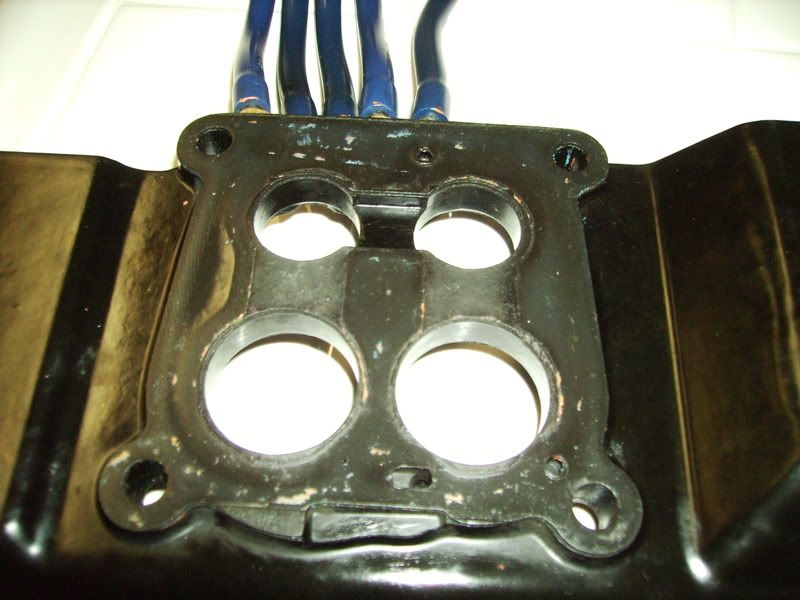

You do not want to try to remove those black 'gaskets' from the spacer, & you don't need to use any other gaskets between the carb/spacer/manifold.
Between the carb and the aluminum manifold is a black plastic spacer which has permanent 'gasket' faces glued to both sides of it. Several of the ratsnest vacuum hoses connect to nipples on this spacer
It's OK to remove the carb from the spacer, and to remove the spacer from the manifold. It's OK to clean all three parts.
It's NOT OK to try to get the permanent black gasket material off of the spacer. It feels stiff but it is actually slightly flexible under pressure, & it's all the gasket that is wanted or needed between the carb base bottom and the manifold top.
People see those extra fiber gaskets in the carb kit (which are for other applications) and they try to use them. Causes all manner of leakages.
Pictures:
This is the spacer, with the black sealing surfaces in place:
You do not want to try to remove those black 'gaskets' from the spacer, & you don't need to use any other gaskets between the carb/spacer/manifold.
Trending Topics
PICTURES PICTURES PICTURES. i think i took over 300.
and like others have said, place parts in cupcake tins and label, or do something or organizations sake, that isnt easily disturbed. just keep everything in order and its like building a LEGO set. easy peasy.
good luck.
and like others have said, place parts in cupcake tins and label, or do something or organizations sake, that isnt easily disturbed. just keep everything in order and its like building a LEGO set. easy peasy.
good luck.
Joined: Aug 2010
Posts: 1,416
Likes: 5
From: East Palestine, Oh
i think the best thing to do during a carb rebuild, especially your first time, is to get a cheap white sheet to lay on the table before hand. The sheet makes everything easy to see, you can draw on it with a sharpie to label things, it makes it harder for small parts to roll off and get lost, and the best part is there is hardly any mess when you are done.
Joined: Jun 2008
Posts: 8,376
Likes: 30
From: Chino Hills, CA
The 99c Stores have stacks of those cheap clear Glad snap-lid plastic tubs, various sizes; you get like 6 for a buck. 3 or 4 bucks gets you clean, snap-tight, sharpie-labellable, disposable storage for all the small parts; and you can easily see what's in them. They stack.
I also collect old medicine bottles for the same purpose. Got a box full of them in the workbench.
I also collect old medicine bottles for the same purpose. Got a box full of them in the workbench.


The rebuild kit I had came with 3 different sets of those gaskets for the area you speak of DD. I eyeballed up which two were the proper fit (meaning every little hole was exactly right) and re-installed them. I didn't remove the the ones that appeared factory like u mentioned, just added the ones that came w/the rebuild kit. My car no longer has a sight miss at idle and will hold much better even though I have it set at 600. No gasket maker or anything of the sort, just the paper gaskets that came with the kit.
I can't actually make the assumption that the gaskets alone did the trick, however, before it would stall when coming to a stop even after the car was fully warmed up. I refused to up the idle until I sorted out the problem (hopefully w/a few things I had in mind). After new gaskets* at the engine to intake manifod (*plate adapter for 12A intake to a 13B engine) new gaskets above and below the carb spacer, full tune-up (new 10mm wires, new cap/rotor, new plugs, new fuel filter, cleaned K&N air) and a half a tank of super mixed w/two gallons of cam2 (testing out a 100 shot of n20)... The car has never felt better.
I can't actually make the assumption that the gaskets alone did the trick, however, before it would stall when coming to a stop even after the car was fully warmed up. I refused to up the idle until I sorted out the problem (hopefully w/a few things I had in mind). After new gaskets* at the engine to intake manifod (*plate adapter for 12A intake to a 13B engine) new gaskets above and below the carb spacer, full tune-up (new 10mm wires, new cap/rotor, new plugs, new fuel filter, cleaned K&N air) and a half a tank of super mixed w/two gallons of cam2 (testing out a 100 shot of n20)... The car has never felt better.
Joined: Aug 2011
Posts: 3,078
Likes: 42
From: Cambridge, Minnesota
I am also looking at doing this for a winter project for myself, I will definitely keep up on this thread. Thanks for the tips from you experienced guys, new rotary owners like myself really appreciate it!

Team SR
Joined: Sep 2005
Posts: 202
Likes: 0
From: Loxahatchee, FL
Another tip/trick is to be careful not to strip the heads of the screws. Also not to over tighten them when putting it back together.
One trick I do when taking the carb. apart is to place the screw driver on the screw, give it a decent smack with a hammer, then back the screw out. That usually works to break the 30+ year seal. Also make sure you use the right size screw driver.
One trick I do when taking the carb. apart is to place the screw driver on the screw, give it a decent smack with a hammer, then back the screw out. That usually works to break the 30+ year seal. Also make sure you use the right size screw driver.
Joined: Jun 2008
Posts: 8,376
Likes: 30
From: Chino Hills, CA
I went to the trouble of replacing all the Philips screws on my carb with stainless hex-socket cap screws. Stripping screws no longer a concern, and I'm a lot less likely to drop them, too.
Team SR
Joined: Sep 2005
Posts: 202
Likes: 0
From: Loxahatchee, FL
I like to remove the intake/carb/rats nest as a unit and put it back on the engine this way. Of course, it takes a new intake gasket. Take lots of pictures before removing any of the vacuum hoses.

Thread
Thread Starter
Forum
Replies
Last Post
eplusz
General Rotary Tech Support
15
Oct 7, 2015 04:04 PM