
(BODY) How To: Modify wheel wells for fender flares

Thread Starter
Joined: Apr 2004
Posts: 15,145
Likes: 8
From: St Joe MO
(BODY) How To: Modify wheel wells for fender flares
This 'How To' will show you how to trim the rear fenders in order to install wider wheels and be able to cover them with either fender flares or wider overfenders.
The process is relatively simple with a few tools. It does take a bit of skill/practice with metal forming for a neater looking job. Since the work will be covered by flares/overfenders, sealing against rust is more critical than neatness of the finished job.
Tool list:
Die grinder, air powered
1/8X4" metal cutting discs
Body hammers: 1 curve face, 1 flat face
Hammering dolly
Body seam sealer
Sealer/Primer
Heavy blaket or welding blanket
Options, pick either or both:
Mig/tig welder
Pop rivets and gun
Safety notes:
I always wear eye and ear protection during this type of work. Eye protection is a MUST, going deaf is your business. The blanket is to protect the glass and paint. Sparks can and will melt into the glass, ask my winshield. A decent set of gloves helps too. I often wear them using the die grinder simply because it gets cold from the air passing through it.
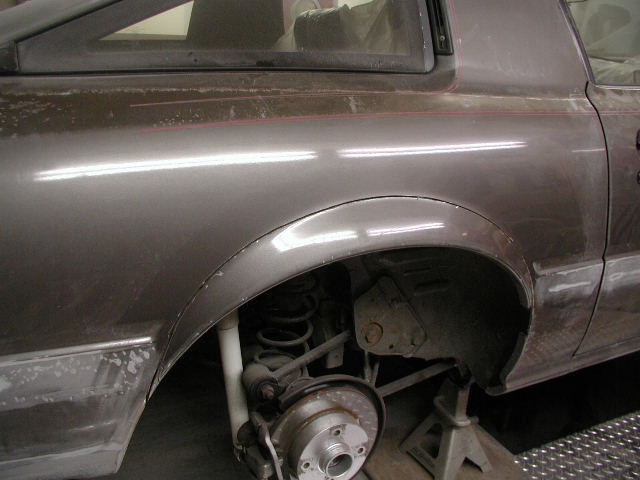
The first series of pics show the 3 cuts needed with the die grinder. The first cut is the critical one. Path of cut is already laid out for you. Simply follow the crease between the rear quater panel and the current sheet metal flare. The critical part is to not cut into the inner fender directly underneath it. Once you look through the pics it becomes evident why.
First 2 pics are different views of the first cut, keep this cut shallow, but through the outer skin. When you get to the bottom of the cut at the front and rear ends, cut through both layers the last 1/2" and the flange that is bent into the wheel well.


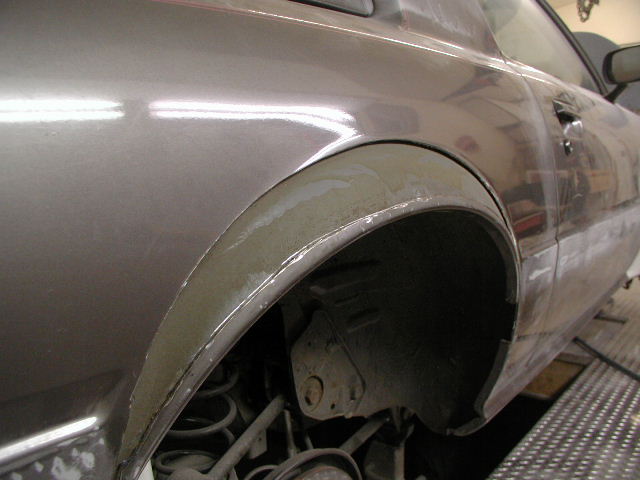
This is your second cut. It doesn't need to be as tidy as mine since this cut is merely to provide access for the third cut. It doesn't matter if both layers are cut here, but it's less work to cut only the outer sheet metal. Cut is about 1/2" up from the fender lip. This will leave a nice edge on which one can rest thier hands for the third cut.

This is the finished third cut. The flange about 1/2" wide, that's all one needs to make a fold that's simple to work with. A wider or narrower lip will make the folding more difficult, especially for 1st timers. While the pic doesn't show it well, the ends of the flange are square cut. Later pics will show that.

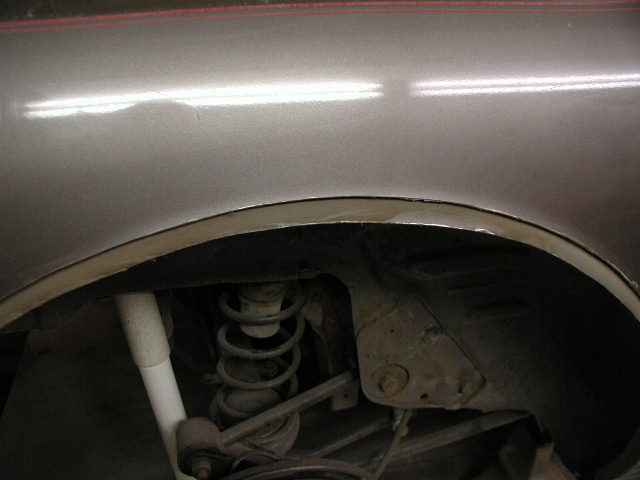
Note the gap between the inner and outer fenders. This is why the first cut is so critical. Not only does the inner layer need to be intact, the edge of the outer layer needs to be neat and smooth. It is that outer edge the you will be using as a guide for your folding. Now is the time to do any face smoothing or edge cleanup that's needed. This applies to both cuts. The smoother both arc's cut edges and faces are the easier the folding and the neater the work.

Folding will be covered in my next post. Please don't post until I've finished the next post, then I'll answer any questions. I also ask that you only ask tech questions about this 'How To', as it will soon be archived. Save the praise or thank yous for yourself when you accomplish this mod on your own. I'm simply here to share my work, not to recieve gratification. I have that already from my work.
Scott.
.
The process is relatively simple with a few tools. It does take a bit of skill/practice with metal forming for a neater looking job. Since the work will be covered by flares/overfenders, sealing against rust is more critical than neatness of the finished job.
Tool list:
Die grinder, air powered
1/8X4" metal cutting discs
Body hammers: 1 curve face, 1 flat face
Hammering dolly
Body seam sealer
Sealer/Primer
Heavy blaket or welding blanket
Options, pick either or both:
Mig/tig welder
Pop rivets and gun
Safety notes:
I always wear eye and ear protection during this type of work. Eye protection is a MUST, going deaf is your business. The blanket is to protect the glass and paint. Sparks can and will melt into the glass, ask my winshield. A decent set of gloves helps too. I often wear them using the die grinder simply because it gets cold from the air passing through it.
The first series of pics show the 3 cuts needed with the die grinder. The first cut is the critical one. Path of cut is already laid out for you. Simply follow the crease between the rear quater panel and the current sheet metal flare. The critical part is to not cut into the inner fender directly underneath it. Once you look through the pics it becomes evident why.
First 2 pics are different views of the first cut, keep this cut shallow, but through the outer skin. When you get to the bottom of the cut at the front and rear ends, cut through both layers the last 1/2" and the flange that is bent into the wheel well.
This is your second cut. It doesn't need to be as tidy as mine since this cut is merely to provide access for the third cut. It doesn't matter if both layers are cut here, but it's less work to cut only the outer sheet metal. Cut is about 1/2" up from the fender lip. This will leave a nice edge on which one can rest thier hands for the third cut.
This is the finished third cut. The flange about 1/2" wide, that's all one needs to make a fold that's simple to work with. A wider or narrower lip will make the folding more difficult, especially for 1st timers. While the pic doesn't show it well, the ends of the flange are square cut. Later pics will show that.
Note the gap between the inner and outer fenders. This is why the first cut is so critical. Not only does the inner layer need to be intact, the edge of the outer layer needs to be neat and smooth. It is that outer edge the you will be using as a guide for your folding. Now is the time to do any face smoothing or edge cleanup that's needed. This applies to both cuts. The smoother both arc's cut edges and faces are the easier the folding and the neater the work.
Folding will be covered in my next post. Please don't post until I've finished the next post, then I'll answer any questions. I also ask that you only ask tech questions about this 'How To', as it will soon be archived. Save the praise or thank yous for yourself when you accomplish this mod on your own. I'm simply here to share my work, not to recieve gratification. I have that already from my work.
Scott.
.

Thread Starter
Joined: Apr 2004
Posts: 15,145
Likes: 8
From: St Joe MO
Folding the Flange
Unfortunately, I never expected to be writeing a 'How To' on how I prepped the fender cutouts for the widebody kit install. As such, I don't have detailed pics of the folding in progress. I will however do my best to walk you through it.
Patience=Neatness
Very simple, the more time you take making the fold, the neater it will be. When metal is bent, it streches. Once streched, it doesn't like to return to it's former shape. It tends to be stubborn, like me, but I usually win.
A word about tools before I start. I bought a very cheap body hammer kit at the traveling tool sale a few years back. Not a great kit, but I'm not a great bodyman either. You can pick up a similiar basic kit from Habor Freight for 20-25 bucks. It can be easily worth the price, not only now but later on too. This is where one gets both the curved and flat faced hammers, along with the dolly.
Before one begins folding, there's a little body prep to do. In a later pic you'll see where the fender is sanded at the fold. There are 2 different ways to do this, depending on how you decide to secure the fold. If welding, sand down to bare metal, then paint with a weld through primer before folding. If you are only going to tack weld/pop rivet, then you simply need to rough up the paint so the seam sealer has something to bite to.
The Folding.
Here is where patience pays off. This is where you get to play Maxwell Dinglehammer and go tap tap tap. Take the curve faced hammer, not the round one if you bought the kit, and start at one end of the flange. Tap the flange and bend no more than 1/8-3/16". Do this for the entire length, then start again.
The smaller the movement for each pass through the arc, the less stretching of the metal. You want to hammer from the backside of the flange, using the outer arc as a guide for your folded edge. If you hammer too hard, you will bend the outer fender. Once the flange is pointing out horizontal, this is your chance to make any last adjustments in the arc proifle. Use the outer fender's arc as a guide and hammer stright up against it's edge to set the crease in your fold. This crease should already be showing, if not, it needs to be. Once the flange is past horizontal, it will be very difficult to make any adjustments.
Continue this slow bending until you have the flange pointing near vertical. Now is the time to switch to the flat faced hammer. The curved faced, as hard as you tried not to, has stretched the sheet metal. Using the dolly to back up the inner fender, tap the flange until there is a little more than a 1/8" gap between it and the outer fender. Keeping an eye of the bottom edge of the fold will guide you as to how well your folding is going. If that edge doesn't retain a smooth arc in all axis, then you're a little off on the fold and it will need correcting.
Now is the time for seam sealer, if using it. Since you have some practice in hammering, it time to pick up the pace. As soon as you lay a bead of seam sealer as deep in the gap as you can, close the fold tight. This will force the sealer both down inside and out onto the fender. As soon as the fold is flat and seated against the fender, run your finger along the edge to smooth out the sealer. If needed, run a 2nd bead along the seam and smooth with a finger tip.
Attaching the flange to the fender.
As you can see from the last pic, I don't recommend welding, unless very experienced at sheet metal welding Nearly 3 decades ago, I was a decent structural steel welder. To the point I could even knock the flux off of a welding rod and still lay a decent bead. Sheet metal is a very diferent animal.
This is where a few tack welds and pop rivets will do. As long as there is a tack weld or pop rivet every 4-6" along the fold, it's not going any where. Keep in mind, the unibody is spot welded at a similiar interval. If you use pop rivets, make sure they are short aluminum or stainless steel ones. Try not to drill through the inner layer when running pilot holes. If you do, make sure they are sealed to prevent rust intrusion.
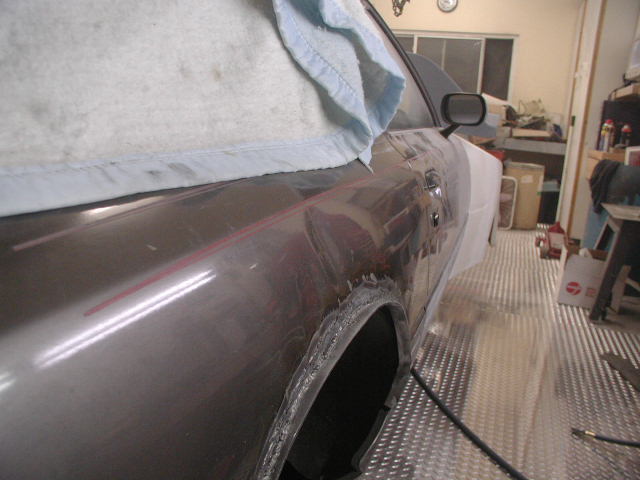
As you can see in the first 2 pics, patience pays off. Just a couple of notes here. You will see there is no seam sealer or signs of sanding. Both of those are after thoughts after doing this for the first time. In the 2nd pic, note the cut at the end of the flange in the lower right.


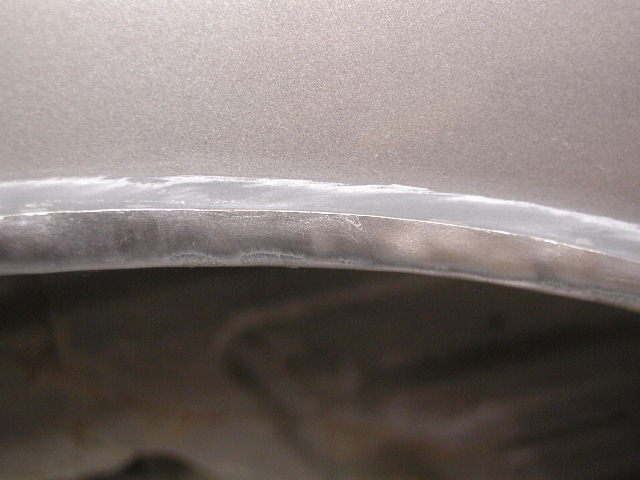
Nice, neat looking close up. Yes, you can get the seam this tight throught the entire arc with patinece. This is all the sanding I did in prep for welding.
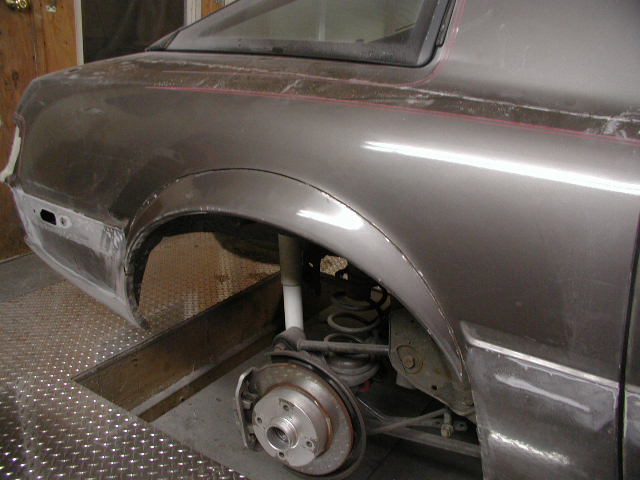
This pic needs a bit of expaining. It's easy to see how badly the fenders warped from the heat. There are a couple of other things that aren't as obvious. First, the fender warped all the way up to the 1/4 glass, ouch. Second is the reason why. IF you look closely at the wheel arch, you will see a lip. This is a piece of flat stock that I had to weld on to my nice neat work in order to have some where to attach a fender liner. After test fitting the fiberglass over fenders, I realised that there would be a large gap between the old outer body and the fiberglass over fender that's a perfect place to collect all kinds of crap that the tires throw up from the road. As such, I ran a second weld bead to attach that piece and warped the fender even worse than before. Had I simply tack welded it every couple of inches and used seam sealer, the fender would not have warped as badly.
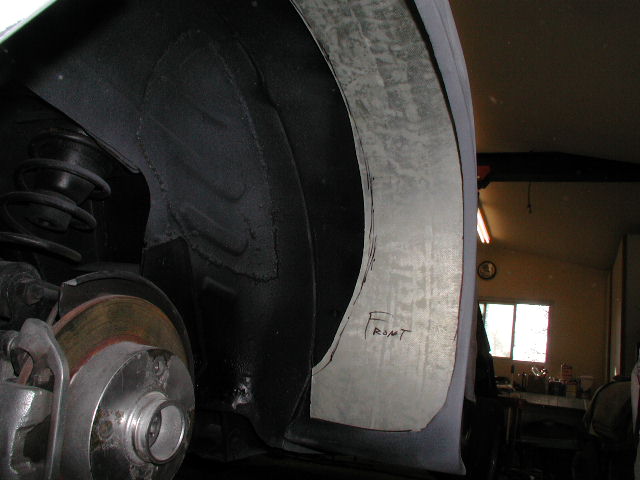
This is the new fender liner in progress. Thin alunimum sheet that was eventually held by pop rivets and sealed with seam sealer.
Hopefully this 'How To' shows enough to get you guys started on your fender flare projects. Had I known that the Z ones could be made to work, I may have gone that route instead, but then I would simply have flares and not a widebody.
Scott.
Patience=Neatness
Very simple, the more time you take making the fold, the neater it will be. When metal is bent, it streches. Once streched, it doesn't like to return to it's former shape. It tends to be stubborn, like me, but I usually win.
A word about tools before I start. I bought a very cheap body hammer kit at the traveling tool sale a few years back. Not a great kit, but I'm not a great bodyman either. You can pick up a similiar basic kit from Habor Freight for 20-25 bucks. It can be easily worth the price, not only now but later on too. This is where one gets both the curved and flat faced hammers, along with the dolly.
Before one begins folding, there's a little body prep to do. In a later pic you'll see where the fender is sanded at the fold. There are 2 different ways to do this, depending on how you decide to secure the fold. If welding, sand down to bare metal, then paint with a weld through primer before folding. If you are only going to tack weld/pop rivet, then you simply need to rough up the paint so the seam sealer has something to bite to.
The Folding.
Here is where patience pays off. This is where you get to play Maxwell Dinglehammer and go tap tap tap. Take the curve faced hammer, not the round one if you bought the kit, and start at one end of the flange. Tap the flange and bend no more than 1/8-3/16". Do this for the entire length, then start again.
The smaller the movement for each pass through the arc, the less stretching of the metal. You want to hammer from the backside of the flange, using the outer arc as a guide for your folded edge. If you hammer too hard, you will bend the outer fender. Once the flange is pointing out horizontal, this is your chance to make any last adjustments in the arc proifle. Use the outer fender's arc as a guide and hammer stright up against it's edge to set the crease in your fold. This crease should already be showing, if not, it needs to be. Once the flange is past horizontal, it will be very difficult to make any adjustments.
Continue this slow bending until you have the flange pointing near vertical. Now is the time to switch to the flat faced hammer. The curved faced, as hard as you tried not to, has stretched the sheet metal. Using the dolly to back up the inner fender, tap the flange until there is a little more than a 1/8" gap between it and the outer fender. Keeping an eye of the bottom edge of the fold will guide you as to how well your folding is going. If that edge doesn't retain a smooth arc in all axis, then you're a little off on the fold and it will need correcting.
Now is the time for seam sealer, if using it. Since you have some practice in hammering, it time to pick up the pace. As soon as you lay a bead of seam sealer as deep in the gap as you can, close the fold tight. This will force the sealer both down inside and out onto the fender. As soon as the fold is flat and seated against the fender, run your finger along the edge to smooth out the sealer. If needed, run a 2nd bead along the seam and smooth with a finger tip.
Attaching the flange to the fender.
As you can see from the last pic, I don't recommend welding, unless very experienced at sheet metal welding Nearly 3 decades ago, I was a decent structural steel welder. To the point I could even knock the flux off of a welding rod and still lay a decent bead. Sheet metal is a very diferent animal.
This is where a few tack welds and pop rivets will do. As long as there is a tack weld or pop rivet every 4-6" along the fold, it's not going any where. Keep in mind, the unibody is spot welded at a similiar interval. If you use pop rivets, make sure they are short aluminum or stainless steel ones. Try not to drill through the inner layer when running pilot holes. If you do, make sure they are sealed to prevent rust intrusion.
As you can see in the first 2 pics, patience pays off. Just a couple of notes here. You will see there is no seam sealer or signs of sanding. Both of those are after thoughts after doing this for the first time. In the 2nd pic, note the cut at the end of the flange in the lower right.
Nice, neat looking close up. Yes, you can get the seam this tight throught the entire arc with patinece. This is all the sanding I did in prep for welding.
This pic needs a bit of expaining. It's easy to see how badly the fenders warped from the heat. There are a couple of other things that aren't as obvious. First, the fender warped all the way up to the 1/4 glass, ouch. Second is the reason why. IF you look closely at the wheel arch, you will see a lip. This is a piece of flat stock that I had to weld on to my nice neat work in order to have some where to attach a fender liner. After test fitting the fiberglass over fenders, I realised that there would be a large gap between the old outer body and the fiberglass over fender that's a perfect place to collect all kinds of crap that the tires throw up from the road. As such, I ran a second weld bead to attach that piece and warped the fender even worse than before. Had I simply tack welded it every couple of inches and used seam sealer, the fender would not have warped as badly.
This is the new fender liner in progress. Thin alunimum sheet that was eventually held by pop rivets and sealed with seam sealer.
Hopefully this 'How To' shows enough to get you guys started on your fender flare projects. Had I known that the Z ones could be made to work, I may have gone that route instead, but then I would simply have flares and not a widebody.
Scott.
Trending Topics

Pics aren't coming through on the first post for me as well. I looked at the page source and I see you made attachments but when I try to load one it gives an invalid link error to the forum. I don't think your pics got picked up by the forum. Might want to have a forum jockey look at it and try to fix it up.

Thread Starter
Joined: Apr 2004
Posts: 15,145
Likes: 8
From: St Joe MO
I don't know what happened with the first set of pics. They worked for me the night I posted, now they don't even show up at the bottom as they should.
I"ll dig them back out and post them.


Thanks for posting that for everyone Trochoid.
The person who hung my IMSA Mk-1 rear fenders did not make the inner fender liner like you did, and it started gather crud just like you said. 14 years ago, I had to make some inner fenders to fill that gap too (yours look nicer than mine did.)
The person who hung my IMSA Mk-1 rear fenders did not make the inner fender liner like you did, and it started gather crud just like you said. 14 years ago, I had to make some inner fenders to fill that gap too (yours look nicer than mine did.)
Thread Starter
Joined: Apr 2004
Posts: 15,145
Likes: 8
From: St Joe MO
Now the fun part is I need to make liners for the front. I was driving in the slush one day and without liners, it packed in agaist the door hinges. Damn near had to crawl out the window cause the door wouldn't open far enough.
Thread Starter
Joined: Apr 2004
Posts: 15,145
Likes: 8
From: St Joe MO
This is my final bump before I ask that this 'How To' be archived. If anyone has any questions, ask them now. I'm suprised there's been so few follow up questions.
As an additional side note for those who are installing front flares:
Don't make your cut in the fender crease like the rear outer fender is cut. Make the cut in the same place as the rear inner fender is cut. This will leave a 1/2" lip that can then be folded out and up like the rear fold was done. This will soften the edge and protect the tire from beng sliced by the sharp edge. Bending/folding proceedure is the same as was done in the rear, except you will need to use the dolly from the beginning. The front fender has no support and it will easily distort without using the dolly.
The flange does not need to be folded all the way back onto the fender, nor does it need to tack welded/pop riveted. As long as the flange is bent up past the horizontal plane, that's far enough. This will make the fender lip stronger and hold it's shape better than folding flange back onto the fender.
Be sure to apply the proper sealing/rust protection. The gap between the flare and the fender, along with the flange makes for a good place to catch all sorts of debris. I recommend spraying a coat of undercoating, or my favorite, DupliColor Truck Bed Liner, before installing the flares. The truck bed liner can be purchased in spray cans, or for bigger jobs, by the gallon. If bought by the gallon, you need their sprayer and a compressor to apply it. Spray cans leave a smoother finish, sprayer is quicker, thicker and a more textured.
Th first pic is the rear fender well of the shell I sold dj55b. Sandblasted, epoxy coated and seam sealed, ready to be shot with truck bed liner. Note where it has been seam sealed. That's where moisture migrates into the body and starts rusting out the wheel wells. What doesn't show well in the pic is the seam sealer around the stiffening plate for the lower control arm, you know, the one that always rusts out. The bracket needs to be sealed around the edge and the small holes that are punched through it.
The second pic is the rest of the underbody masked off for spraying. Make sure anything you don't want sprayed is protected. Once the truck bed liner flashes, it's very hard to remove, even with acetone.
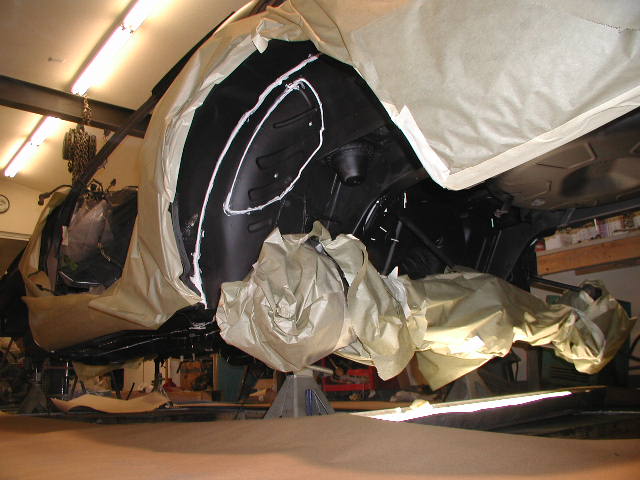
Note what looks like white sticks, stuck in the body. Those are Q-Tips stuck in the bolt holes so I don't have to go back with a tap to clean the liner out of the threads. Cut the Q-Tips in half, stick the fuzzy end in the holes.

Scott.
As an additional side note for those who are installing front flares:
Don't make your cut in the fender crease like the rear outer fender is cut. Make the cut in the same place as the rear inner fender is cut. This will leave a 1/2" lip that can then be folded out and up like the rear fold was done. This will soften the edge and protect the tire from beng sliced by the sharp edge. Bending/folding proceedure is the same as was done in the rear, except you will need to use the dolly from the beginning. The front fender has no support and it will easily distort without using the dolly.
The flange does not need to be folded all the way back onto the fender, nor does it need to tack welded/pop riveted. As long as the flange is bent up past the horizontal plane, that's far enough. This will make the fender lip stronger and hold it's shape better than folding flange back onto the fender.
Be sure to apply the proper sealing/rust protection. The gap between the flare and the fender, along with the flange makes for a good place to catch all sorts of debris. I recommend spraying a coat of undercoating, or my favorite, DupliColor Truck Bed Liner, before installing the flares. The truck bed liner can be purchased in spray cans, or for bigger jobs, by the gallon. If bought by the gallon, you need their sprayer and a compressor to apply it. Spray cans leave a smoother finish, sprayer is quicker, thicker and a more textured.
Th first pic is the rear fender well of the shell I sold dj55b. Sandblasted, epoxy coated and seam sealed, ready to be shot with truck bed liner. Note where it has been seam sealed. That's where moisture migrates into the body and starts rusting out the wheel wells. What doesn't show well in the pic is the seam sealer around the stiffening plate for the lower control arm, you know, the one that always rusts out.
The bracket needs to be sealed around the edge and the small holes that are punched through it.The second pic is the rest of the underbody masked off for spraying. Make sure anything you don't want sprayed is protected. Once the truck bed liner flashes, it's very hard to remove, even with acetone.
Note what looks like white sticks, stuck in the body. Those are Q-Tips stuck in the bolt holes so I don't have to go back with a tap to clean the liner out of the threads. Cut the Q-Tips in half, stick the fuzzy end in the holes.
Scott.
You never answered my question 
It was, when you begin the roll the inner lip up with the curved hammer, are you just using the hammer with no dolly? I have little experience with body hammers and dolly's, and am trying to learn
It was, when you begin the roll the inner lip up with the curved hammer, are you just using the hammer with no dolly? I have little experience with body hammers and dolly's, and am trying to learn
Thread Starter
Joined: Apr 2004
Posts: 15,145
Likes: 8
From: St Joe MO
Sorry, I could have sworn I had answered your question. As long as you tap slow and even and don't get waves, you don't need the dolly. As soon as waves start showing, dolly then back flat. Very small waves are unavoidable, it's the taller ones, the ones that are taller than each pass, that one needs to worry about.
Thread Starter
Joined: Apr 2004
Posts: 15,145
Likes: 8
From: St Joe MO