When you click on links to various merchants on this site and make a purchase, this can result in this site earning a commission. Affiliate programs and affiliations include, but are not limited to, the eBay Partner Network.
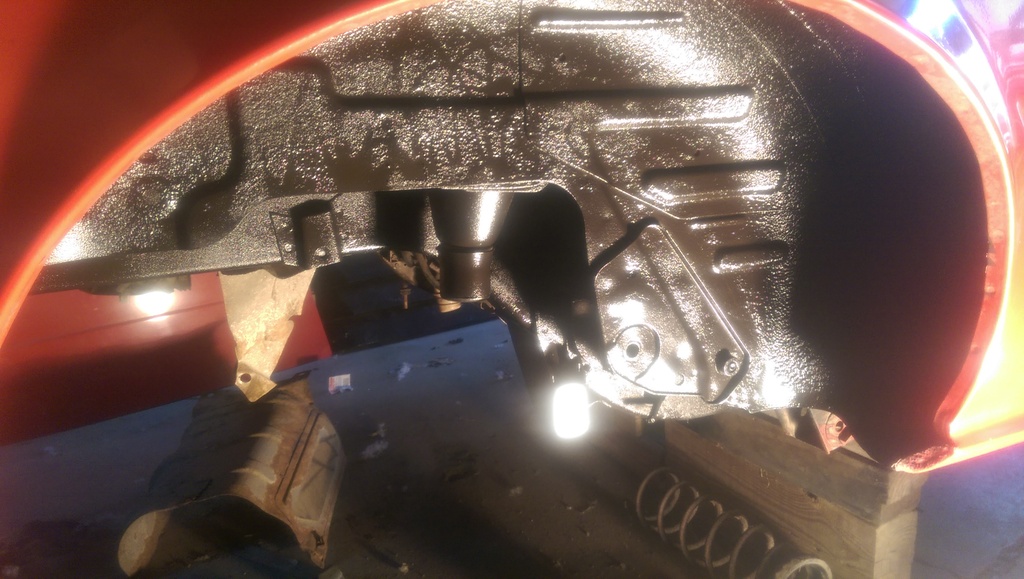
Isn't it great when you don't have to worry about rust? Looks GREAT Austin. 1000% better.
I do still have to weld in small patch panels in the bins where they all rust, but when I do that I'll just re-apply the undercoating to the outside in order to seal it up. Other than that it's totally rust free, which is a very nice thing.
Originally Posted by Broke_A_Baller
You'll still need to worry about rust. If for some reason water gets trapped under that coating it'll be rust haven.
Just saying :-p.
That's why I painted it with low humidity on a dry day
Believe it or not that's only two full cans of the undercoating to get to that point. I'll use the last can I have to do the spots where you can still see red and touch it all up under there. Needless to say I'm pretty stoked about it - she'll look like a new car with fresh undercoating and a fresh coat of paint for sure
Examining and evaluating how to get the rear axle out somewhat safely
4x4 status, trying to get the rear axle out
Dad and grandpa helping strap down the car on the way to the scrapper
The shell weighed in at 1,200lb after weighing the truck and trailer at 9,540lbs with it on, 8,340lbs unloaded with just the bare half ton Chevy truck and car hauler.
So the front SE struts, front brake calipers, front wheels, rear wheels, rear brake calipers, and the rear axle assembly (complete) were all removed from the car before it was scrapped.
Current plans are as follows:
Undercoat the rear of the car so the axle can be installed
Rebuild the entire rear axle and its components
Repaint the rear axle
Install the polyurethane bushings in the suspension arms
Install the complete axle
Refinish/reseal inside of gas tank with $80 POR-15 kit
Install gas tank with new soft fuel lines
Be happy since the whole underside of the rear end of the car is essentially done for the mean time
ahhhhhh...u never saved me the tops of those strut towers. oh well.
DANGIT! Ugh, I'm sorry man - totally my bad. I was trying to cut out the whole suspension on the trailer and completely forgot to. That's my bad, I apologize about that.
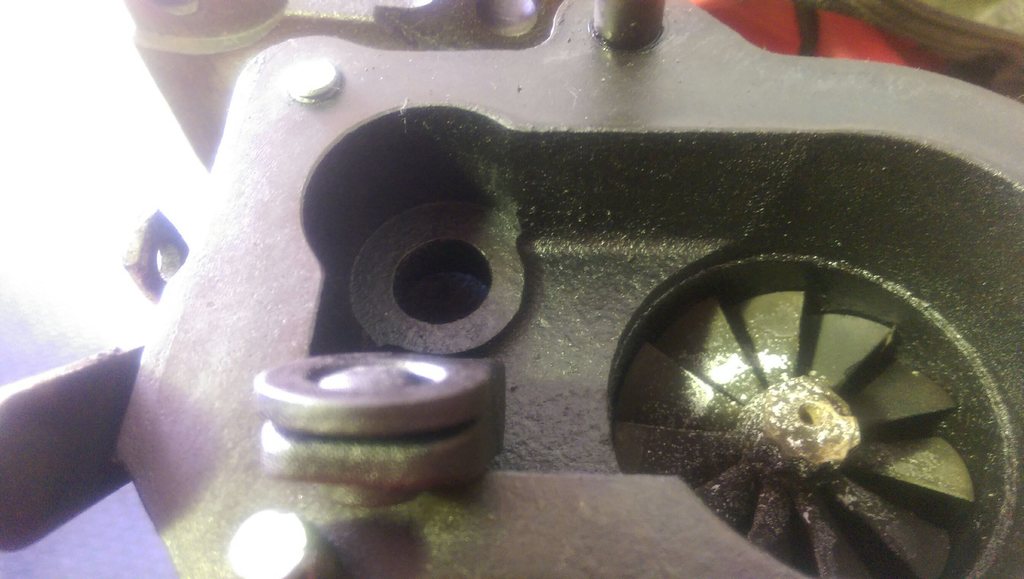
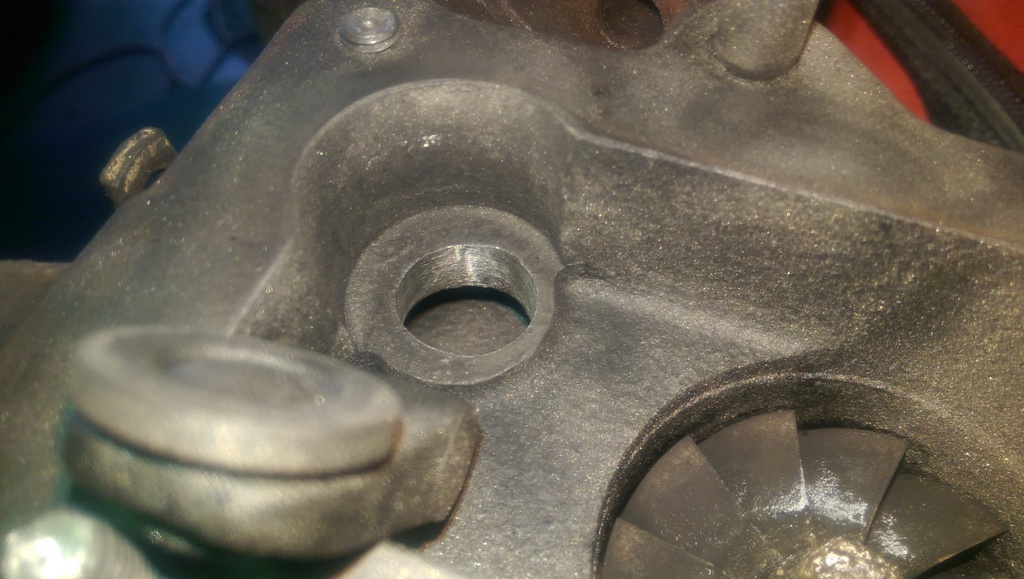
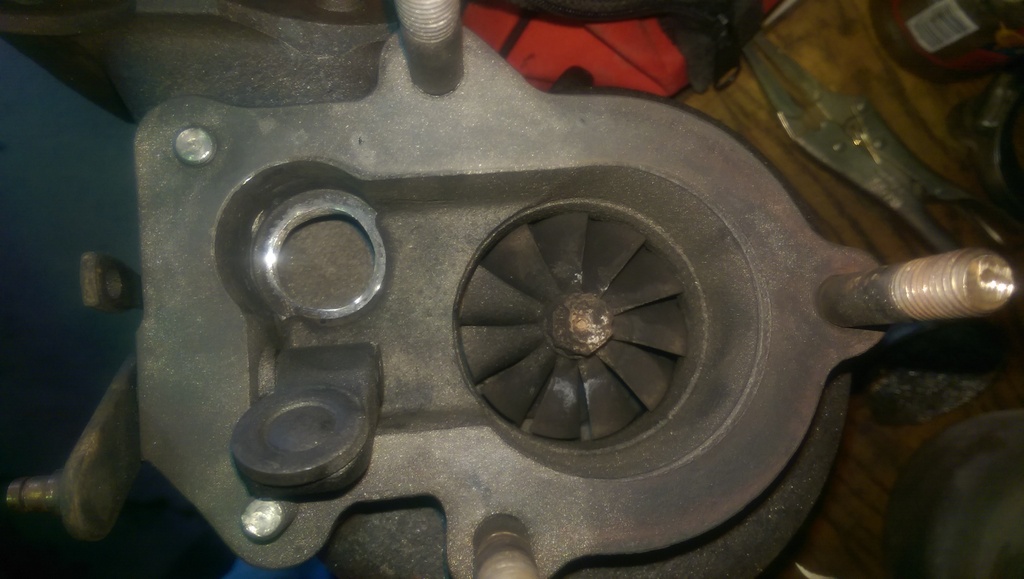
Oil Pressure Regulator before hammer treatment - went from ~8.1mm to ~6.1mm diameter hole which should raise the oil pressure
Oil Pressure Regulator after hammer treatment - went from ~8.1mm to ~6.1mm diameter hole which should raise the oil pressure
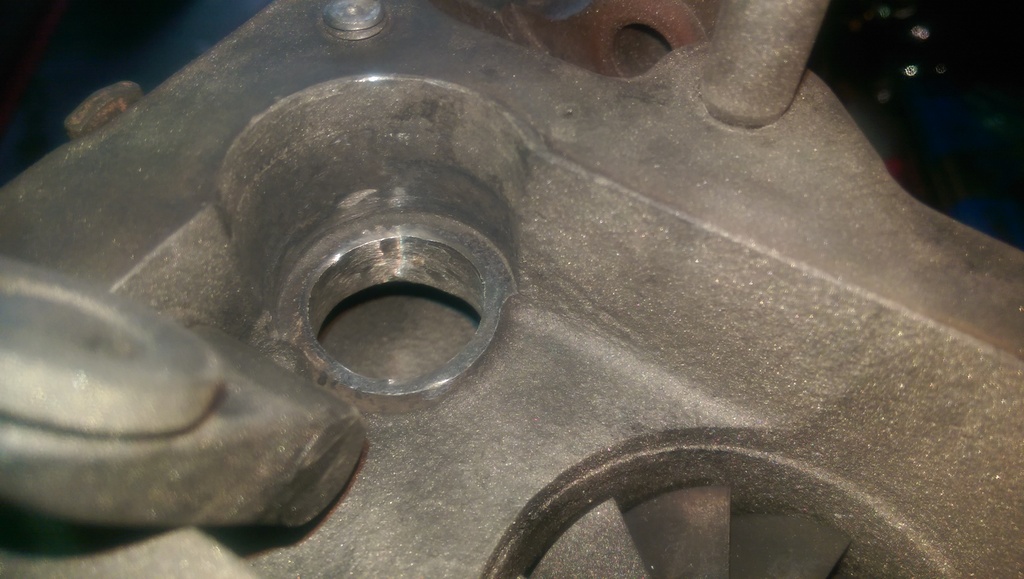
Corrosion on the center iron, it's porous like a sponge from where coolant must have sat and ate through the nitride coating and rusted the metal away. Time for a new center iron I guess!
Corrosion on the center iron, it's porous like a sponge from where coolant must have sat and ate through the nitride coating and rusted the metal away. Time for a new center iron I guess!
Engine cleaned with a toothbrush-sized wire brush to double check all the components
Stock suspension bolt collection for the FB
Stock suspension bolt collection for the FB with new lock nuts and flat washers in place of the standard hex nuts and lock washers. This should help eliminate binding in the suspension components since there won't be as much pressure pinching the mounts together on the bushings.
FB rear axle control arms and Watts linkage all painted and cleaned up
FB rear axle control arms and Watts linkage getting ready for new bushings
FB rear axle control arms and Watts linkage with new Energy Suspension graphite-impregnated polyurethane bushings
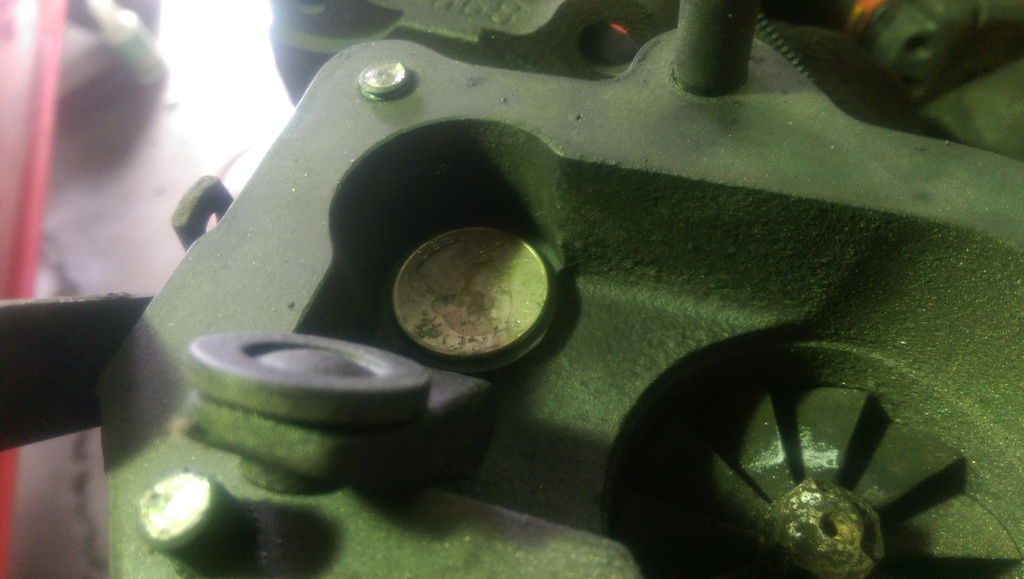
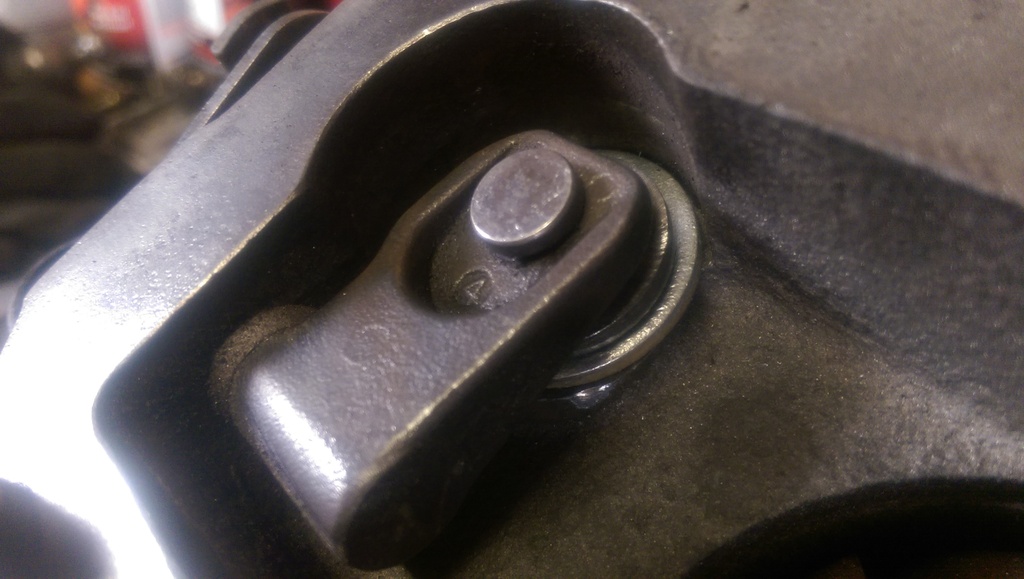
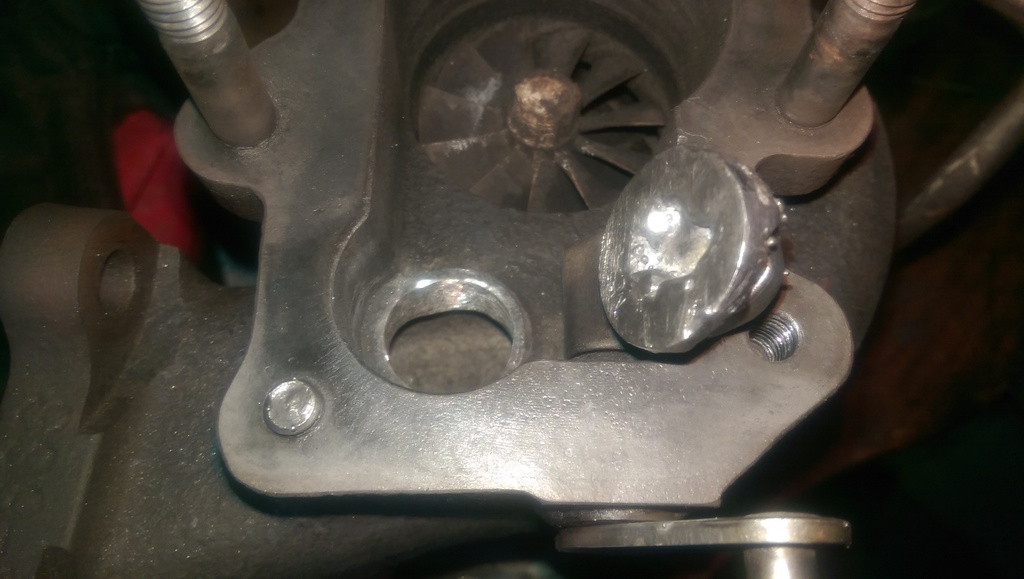
A quarter seemed to be a perfect representation of the size of the waste gate that I wanted to port in this turbo (well, the washer size at least).
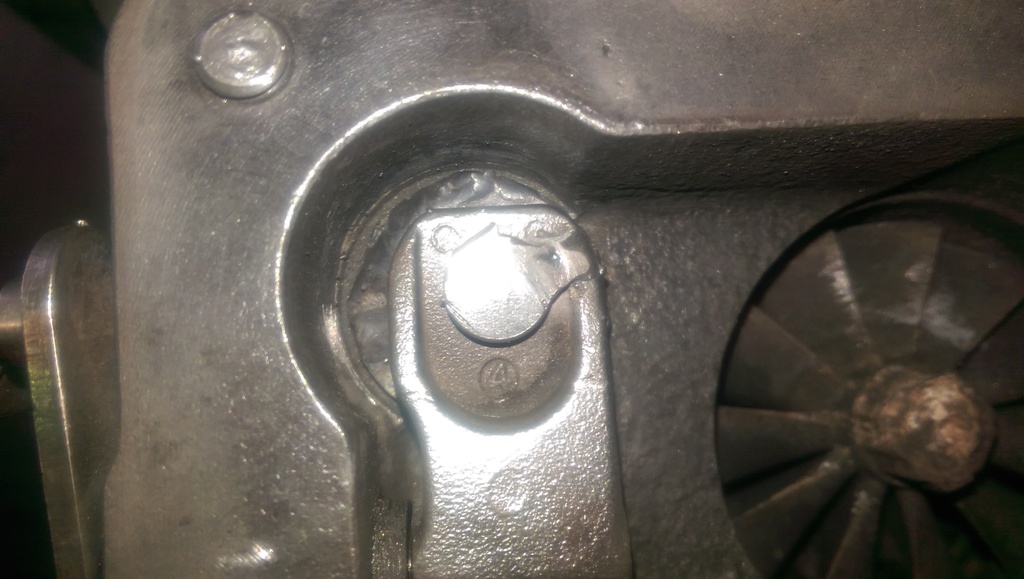
Actual size of the port job when it was completed:
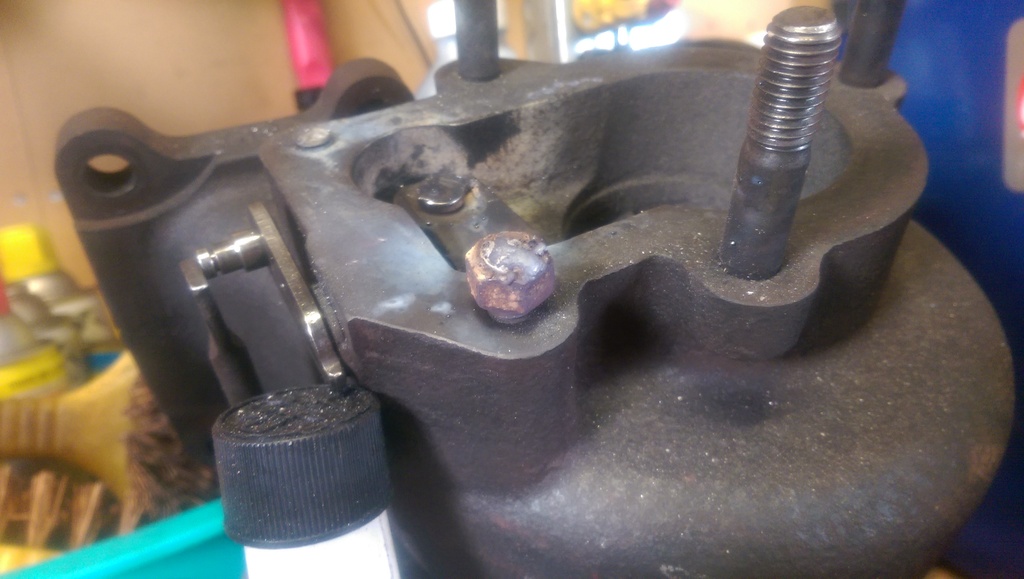
Hardened 1/2" washer fit the bill perfectly.
Fitment of the washer under the flapper, I made sure to remove the coating from the washer to make it easier to weld on.
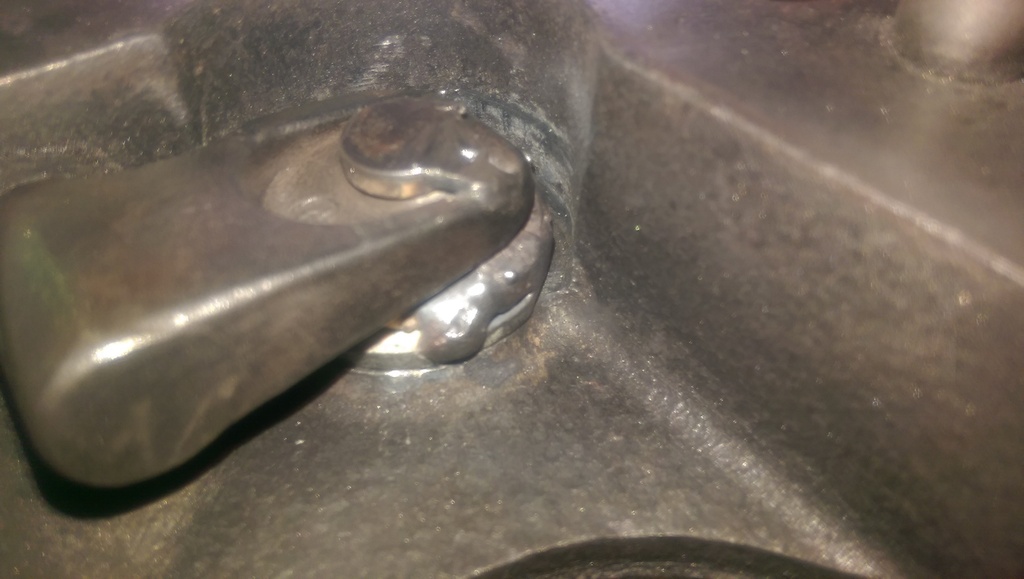
After welding the washer to the flapper, and the flapper pin was welded to the body so it wouldn't rotate and expose part of the waste gate hole.
I welded the inside of the washer to the flapper as well in order to eliminate any potential small exhaust leaks through the bottom of the flapper to washer since I couldn't weld the exterior down there.
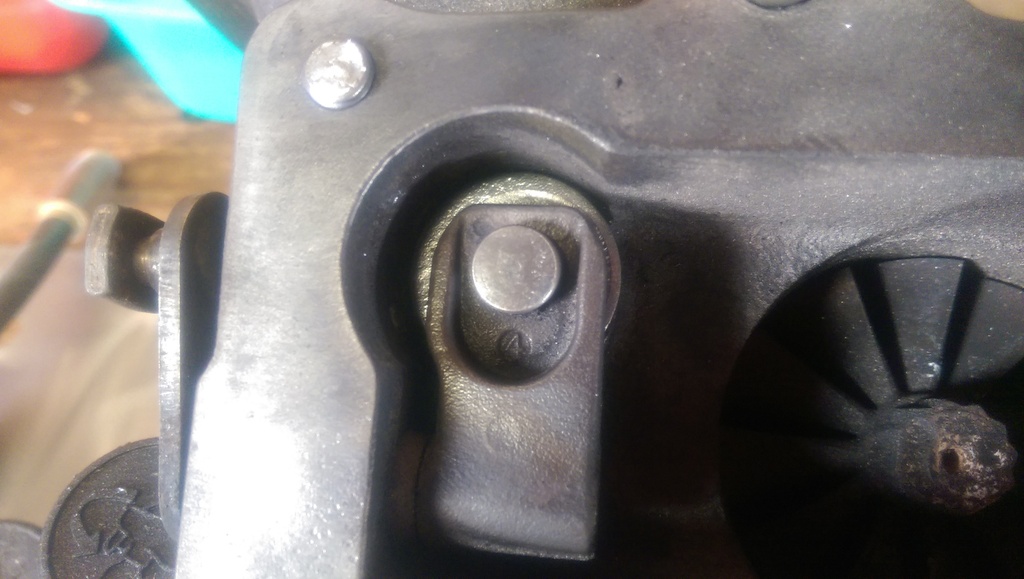
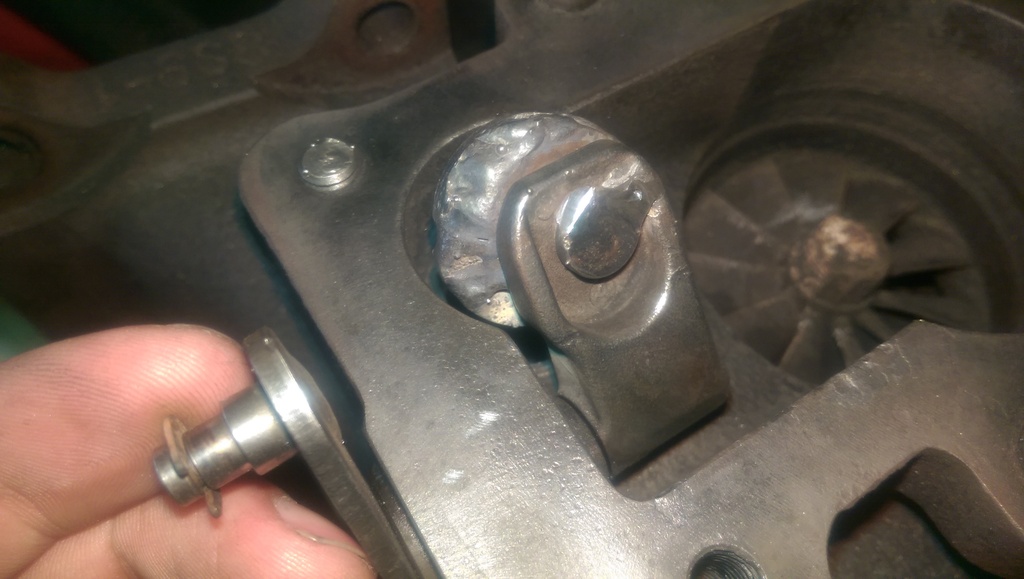
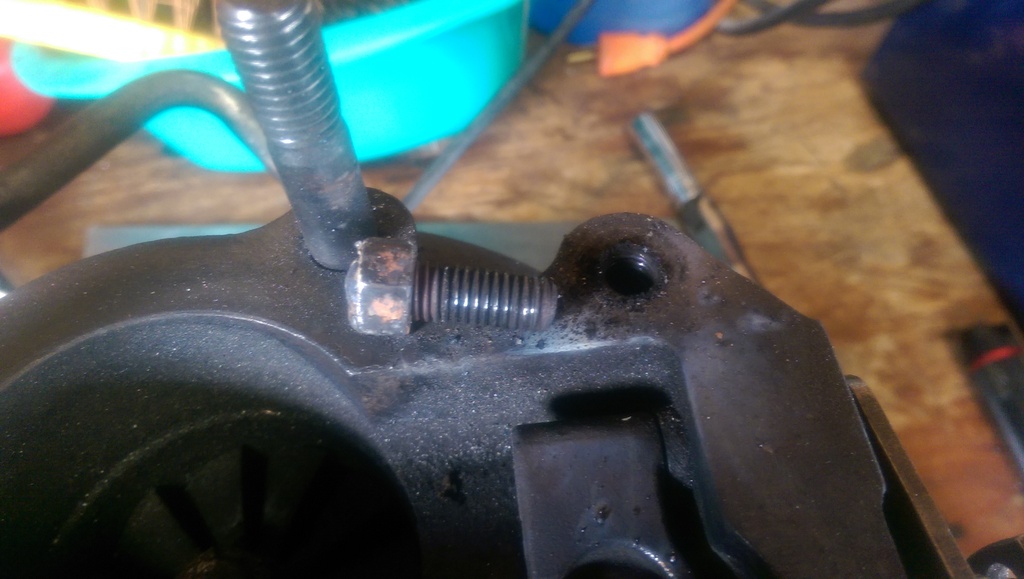
A trick I did to remove the rear cover bolt (since they all seem to break) where I just welded on a nut and used it like a bolt head. It's still orange/purple appearing in this picture because it's still extremely hot from the welding.
She came out just fine!
Note that this was all done for a local buddy on an S4 turbo. He wanted to have someone experienced do it for him in a timely manner so I said I'd help him out. It turned out really well and should be right at home in his car! It gave me some really good practice at it for whatever route I go with my turbo in my car.
np austin. was just something i would tried to use for a project i had in mind...i'm sure i can find some later on.
interesting mod welding a washer to the flapper on the wastegate to increase the size. i've never seen that done before and researched quite a bit on the FD forum. i've ported the wastegate as much as i felt comfortable but i'm sure it could have been bigger. thanks for the idea...will have to keep that in mind if i have boost creep issues.
So are YOU going to use a stock turbo on your build?
Good question, I don't know If I find an aftermarket manifold and turbo that I like I'll go that route, it's hard to find an S5 turbo and manifold in good condition for cheap. Then the cost of getting another turbo to make it a hybrid is another added cost. When I finished it I could almost have bought a different aftermarket setup for a similar cost. Nick actually set me onto a killer deal for a GT45, Greddy manifold and an external wastegate on eBay right now:
http://www.ebay.com/itm/Mazda-RX7-GT45-turbo-setup-/281698984495?vxp=mtrIf I can find something like that when I'm shopping for turbos I'll for sure snag it up.
Originally Posted by craaaazzy
np austin. was just something i would tried to use for a project i had in mind...i'm sure i can find some later on.
interesting mod welding a washer to the flapper on the wastegate to increase the size. i've never seen that done before and researched quite a bit on the FD forum. i've ported the wastegate as much as i felt comfortable but i'm sure it could have been bigger. thanks for the idea...will have to keep that in mind if i have boost creep issues.
I saw someone else do it to an FC one, and this is the third time I've done it to date. My last build has this done to the turbo and has held up well so far.
Originally Posted by Broke_A_Baller
Got that stud removal from Gas money huh... Lol
Good luck getting that other broken stud off though.
Also, looks like the washer got a little hot when welding and melted.
What material is that washer?
Gas Monkey (I assume what you meant) does that? I love that show - must not have seen that episode though. Yeah, the other broken one is pretty screwed (haha get it, screwed ). This is Bailey's turbo actually, in case you didn't know that.
It's a "Hardened" washer from the hardware store, must be steel of some sort. I had the welder cranked up to get good penetration and as soon as I saw that edge melt I let off the trigger. It was done with a flux-cored MIG setup (no gas, shielded wire) and turned out better than I expected.
The metal in the bushings all welded to the bolts through them, so I had to cut each bolt at least twice to get it removed from the axle carrier - annoying!
After getting the first axle out, had to cut the brake line there since it was so rusted into the soft line union.
SE axles are finally free from their carrier!
Going to have to cut these buggers off, should be entertaining to say the least
C1M090 is stamped on the pinion and ring gears of the LSD rear differnetial
C1M090 is stamped on the ring gear of the LSD rear differnetial
C1M090 is stamped on the pinion gear of the LSD rear differnetial
Axle seal and wheel bearings are the right size, always a good day when you don't have to order more parts
Made my own OMP block off plate with some flat steel and shears - came out pretty well! Sealed it up with some Black RTV and she'll be good!
It sucks that I have to reflare my hard brake lines, but it's not that huge of a deal. I have yet to check to see if the differential is a true SE diff or not yet. I need to count the ring gear teeth and divide it by the pinion gear teeth to find out. Hopefully it's a GSL big bearing diff (the best one) but an SE one would be nice too. Someone has been in there before because it's been resealed so I'm not sure what the diff is at this moment - I'll find out tomorrow! I'm thinking I'll just check the backlash and throw it back in if it's good. If not then I'll consider doing a full rebuild of the differential while I'm back there already.
Tomorrow I can hopefully get my tires dismounted from the wheels so I can start the rebuilding process - yay!
Looks good! Are you refurbing the rear end housing like I did or do you have another not-so-rusty one that you're using?
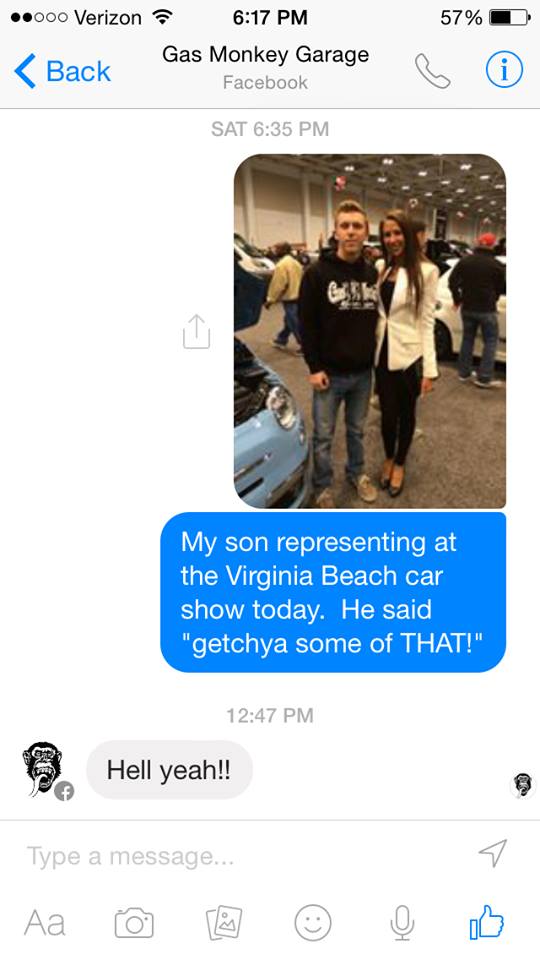
I have a picture of my oldest son in his Gas Monkey sweatshirt posing with a flaming hot model at the car show this past winter. I took it with my phone and sent it to Gas Monkey via messenger and got a reply from Richard! Pretty sweet moment.
It sucks that I have to reflare my hard brake lines, but it's not that huge of a deal. I have yet to check to see if the differential is a true SE diff or not yet. I need to count the ring gear teeth and divide it by the pinion gear teeth to find out. Hopefully it's a GSL big bearing diff (the best one) but an SE one would be nice too. Someone has been in there before because it's been resealed so I'm not sure what the diff is at this moment - I'll find out tomorrow! I'm thinking I'll just check the backlash and throw it back in if it's good. If not then I'll consider doing a full rebuild of the differential while I'm back there already.
Tomorrow I can hopefully get my tires dismounted from the wheels so I can start the rebuilding process - yay!
M090 is the 4.076 ring and pinion part number, so its a GSL-SE, from the start of the 84 model year to 11/84, after that they went to the 3.9 in the gsl-se
have you ever driven with the poly watts link bushings? I have the factory rubber in my gsl-se and I really like how they handle. It seems to me that the poly would be way to stiff
Looks good! Are you refurbing the rear end housing like I did or do you have another not-so-rusty one that you're using?
I'll be using this rear end housing to refurbish and install in the car. I wish I had a less rusty one to fix up, but I don't have that possibility right now. It'll clean up alright I believe though, mostly surface rust and dust on the housing.
Originally Posted by woodmv
I have a picture of my oldest son in his Gas Monkey sweatshirt posing with a flaming hot model at the car show this past winter. I took it with my phone and sent it to Gas Monkey via messenger and got a reply from Richard! Pretty sweet moment.
That's an awesome story! Feel free to post the pic up here - I'd love to see it! I just saw an interview with Richard lately and found out that he was a Fireman, EMT and Police Officer by the age of 21. Then he decided that he didn't want to work in that field so he left it and invested in an advertising business. After that he sold the business to fund his garage enterprise now. Pretty cool guy and an awesome success story in my opinion.
Originally Posted by j9fd3s
M090 is the 4.076 ring and pinion part number, so its a GSL-SE, from the start of the 84 model year to 11/84, after that they went to the 3.9 in the gsl-se
Thanks for checking that out for me! I assumed that it was an SE rear end, and I'm glad that it's confirmed now.
have you ever driven with the poly watts link bushings? I have the factory rubber in my gsl-se and I really like how they handle. It seems to me that the poly would be way to stiff
I had the polyurethane Watts Linkage bushings in the last turbo swap that I did and I liked them. I beat on that car pretty good and never had an issue with it so I was happy with it, yes. I never got to use it in auto-x events and really dial it in though, this car will hopefully get that chance.
I picked my secondary color for the motor! It'll be that color gold for the front cover and rotor housings, with black irons. Kind of a pun on how much the rotor housings cost - their weight in gold almost.
That's an awesome story! Feel free to post the pic up here - I'd love to see it! I just saw an interview with Richard lately and found out that he was a Fireman, EMT and Police Officer by the age of 21. Then he decided that he didn't want to work in that field so he left it and invested in an advertising business. After that he sold the business to fund his garage enterprise now. Pretty cool guy and an awesome success story in my opinion.
Not the best quality after transferring from my phone, but here it is... My son absolutely fell in LOVE with this girl. I love the fact that I got a response from them too.
Not the best quality after transferring from my phone, but here it is... My son absolutely fell in LOVE with this girl. I love the fact that I got a response from them too.
That's awesome! I bet you guys were stoked about that, I know I would be. She's a looker for sure!
Originally Posted by needspartsnow
Looks like you've been kicking ***. Any new updates? I need mah fix!
Well, because of your comment I decided to get some stuff done to the car today! Pics to follow of course.
Originally Posted by Jager
FWIW.
I'll have a clutch type GXL rear end for sale here soon. 50K miles. Works raven as ****.
GXL? I'd need a big bearing GSL LSD rear end from an FB to make it worthwhile.
I got the bearings and collars off easily enough, without scarring the axles at all.
I took this as a good sign! This is the bearing spacer that has a few grinding spots in it from previous owners - so the bearings were done a few times.
Right side bin rust
Left side bin rust - that's a hole all the way through it!
Cutting away the right side, I'll be welding in new sheet metal there.
Painting the axle carrier - that brown spot is a cardboard cover for the axle hole.
So, I got a whole lot of work done on the car today. I'm going to keep painting the axle and getting that completely done here soon. I want to be able to throw the rear end in with everything attached in a few weeks. So the next few things to do will be:
Cut out bin rust
Weld in new metal for repairs
POR-15 metal repairs
Finish up rear axle
Install rear axle
Test fit rear wheels
Start on front end work
I'm thinking of staying with the FB front end just for test driving and getting everything all set up. All I'd need would be brake rotors, calipers, bearings and struts to run the SE front end. Going to an FC would be a lot more money and more fabrication work = more down time.
 05-13-15, 07:10 PM


 If I find an aftermarket manifold and turbo that I like I'll go that route, it's hard to find an S5 turbo and manifold in good condition for cheap. Then the cost of getting another turbo to make it a hybrid is another added cost. When I finished it I could almost have bought a different aftermarket setup for a similar cost. Nick actually set me onto a killer deal for a GT45, Greddy manifold and an external wastegate on eBay right now:
 ). This is Bailey's turbo actually, in case you didn't know that.