
porting bevel questions

Thread Starter

Joined: May 2004
Posts: 3,514
Likes: 10
From: NEW YORK CITY
porting bevel questions
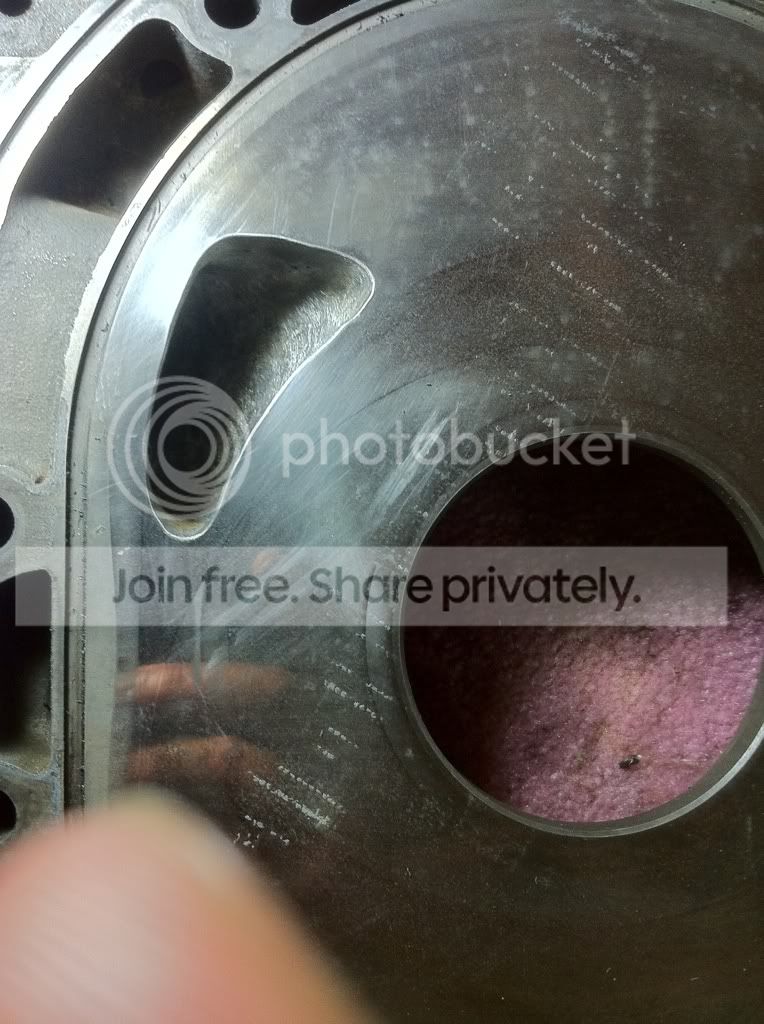
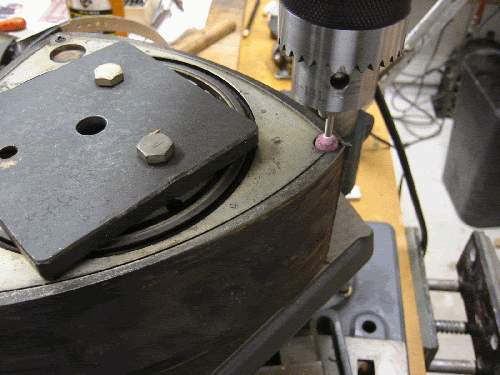
I have a question on beveling the edge of the port, I did a bevel on it already but it is very minor, I would like to know how much of a bevel should I give it. Also what do you guys do besides a (super steady hand) to straighten out the edges of the port?... as you can see its a bit wavey..
Pic of your ports would be awesome
Pic of your ports would be awesome
Joined: May 2005
Posts: 2,745
Likes: 0
From: North Bay, Ontario
A steady hand with a less aggressive porting stone, flapwheel or something similar will help straighten out the edges, just turn the rpm down on the dremel or regulator in the die grinder and take your time.
I personally would go with a smoother (less steep) closing edge, especially where the trailing edge of the side seal will contact the closing edge of the port. Check out Judge Ito's porting threads on NoPistons forum or Lynn Hanover's posts on porting the closing edge.
I personally would go with a smoother (less steep) closing edge, especially where the trailing edge of the side seal will contact the closing edge of the port. Check out Judge Ito's porting threads on NoPistons forum or Lynn Hanover's posts on porting the closing edge.


I'd use a dremel with a medium grit stone (orange, garnet), spun at a medium to slow speed. Too fast a speed can cause the uneveness you've got there. I'd run it back and forth over the area concentrating slightly more pressure on the low spots until they're all up to the same height. Then I'd make sure the other port matches this one's closing timing. Compare against your template or make a paper template so they both match.
Then to create a nice bevel, I like to use a very small round file. Concentrate most of your effort near the opening edge as this is where the side seal rides. Break the sharp edge down and then check it with a razor blade. Make sure it can't catch on the edge.
Hopefully this info will help you. I've just done a run of four sets of side plates, three sets were 12A/R5 plates ported to 74 spec, the last set was S4 NA with just the casting flash cleaned up (left actual port timing alone as there is a ton of port area on these already, ask Aaron Cake).
I'll tackle the closing edges on the S4 NA today because I saw evidence of side seal hit/bounce and one of the side seals had a rounded edge (eek!) from not having enough clearance from the factory. Now it's swapped to one with more like .002" - .003".
RX-7 Old Timer
Joined: Jul 2004
Posts: 321
Likes: 10
From: Ann Arbor, MI
I have no experience in porting, but I'd guess that the slight waviness along the edge of your port doesn't matter very much, and is mostly visual. The ridges would be going along in the direction of the gas flow. Does the gas care that it doesn't look straight when you look at it head on?
Like Jeff20B said, I'd want the ports to match.
Like Jeff20B said, I'd want the ports to match.
Idk man..hard to tell from pics. looks like the closing edge might eat/ wear down the tip on the side seal. Make sure its beveled nicely. Go to nopistons and look at ito/lynns ports. very good images and reference's
Trending Topics
Just keep doing it. The more time you spend the better it gets. You will develop your own system. This is why it is called an art.
My avatar has one of my FD primary ports in it.
My avatar has one of my FD primary ports in it.

"Elusive, not deceptive!�
Joined: May 2007
Posts: 930
Likes: 13
From: Slidell, LA
The most important part is the closing side.
It's shape should allow the trailing side of the side seal to scissor back in and not catch the tip and the leading end of the side seal should not drop into the port.
Smooth the top edge to about 1mm of the trace line. Bevel the closing side well with a rubberized polishing wheel.
It's shape should allow the trailing side of the side seal to scissor back in and not catch the tip and the leading end of the side seal should not drop into the port.
Smooth the top edge to about 1mm of the trace line. Bevel the closing side well with a rubberized polishing wheel.
Thread Starter
Joined: May 2004
Posts: 3,514
Likes: 10
From: NEW YORK CITY
I did my primaries and again I am a bit concerned with the bevel part. I read Itos and some of Lynns threads. Barry do you guys just make a giant notch on the center of the tip rotor to make that? I have a trash rotor that would be perfect to hack up..
Rich, I can deff bring the irons over.
I know it's alot less of a hassle to have someone who has tons of experience do this for me but I enjoy the learning process.

Rich, I can deff bring the irons over.
I know it's alot less of a hassle to have someone who has tons of experience do this for me but I enjoy the learning process.
Thread Starter
Joined: May 2004
Posts: 3,514
Likes: 10
From: NEW YORK CITY
Pineapple medium street port, Aspec GT35R kit,550pri 1300sec,550cc water injection,pump gas and all supporting mods.
The Red lines on this picture represent your stock port.
From the top of the stock port you will want to angle/ ramp the port into the chamber. This creates a later closing, which will make more top end power. You will have to reach one of your fingers into the water passage and feel w/ that finger and your thumb how much you can go as each set of plates are slightly different and have some casting flaws. Also the port is not exactly in the same spot on every plate so mock up w/ the plate rotor and E-shaft is very helpful if you are getting aggressive. If you are using a set of templates purchases from one of the big shops then you should not have to worry about this, but mock it up to see the opening and closing of the port.
The white line is the most important area you are looking at for the bevel. Especially in the top corner where the white line is rounded. If you open the port too early (creates more mid range power and torque) the side seal can fall here and catch on the closing end of the port. When this happens the side seal edge gets chipped off and it will diminish compression, which means less power and can lead to larger problems if it is too bad.
While everyone rebuilding a motor likes to learn to port I would recommend taking it to an experienced builder for port work. I am not telling you not to learn, but I would grab several sets of irons and keep practicing and asking questions to those around you more knowledgeable. Once you have a set that you are confident in then build a motor w/ them. Because You can spend a lot of time in this area and sometimes make the engine less fun to drive. While it can be part of the learning experience it does not necessarily have to be that way.
Good luck and keep us posted.
Last edited by rotaryinspired; May 4, 2011 at 10:07 PM. Reason: grammar
"Elusive, not deceptive!�
Joined: May 2007
Posts: 930
Likes: 13
From: Slidell, LA
I did my primaries and again I am a bit concerned with the bevel part. I read Itos and some of Lynns threads. Barry do you guys just make a giant notch on the center of the tip rotor to make that? I have a trash rotor that would be perfect to hack up..
Rich, I can deff bring the irons over.
I know it's alot less of a hassle to have someone who has tons of experience do this for me but I enjoy the learning process.
Rich, I can deff bring the irons over.
I know it's alot less of a hassle to have someone who has tons of experience do this for me but I enjoy the learning process.
And yes , I use a junk rotor for tracing the paths of the sides seals. It can also be used for cutting the seal ends and sizing used seals for length.
Barry
.
Thread Starter
Joined: May 2004
Posts: 3,514
Likes: 10
From: NEW YORK CITY
I cut open my trash rotor,I just gotta grind down a little bit off the inside to completely see the side seal grooves... I am going to run it across the ports to see how its done. I going to stick some velcro on the rotor face so it wont scratch the iron.

"Elusive, not deceptive!�
Joined: May 2007
Posts: 930
Likes: 13
From: Slidell, LA
The most important part is the closing side.
It's shape should allow the trailing side of the side seal to scissor back in and not catch the tip and the leading end of the side seal should not drop into the port.
Smooth the top edge to about 1mm of the trace line. Bevel the closing side well with a rubberized polishing wheel.
It's shape should allow the trailing side of the side seal to scissor back in and not catch the tip and the leading end of the side seal should not drop into the port.
Smooth the top edge to about 1mm of the trace line. Bevel the closing side well with a rubberized polishing wheel.
Notice that the side seal trace has seal completely back on the plate before the radius starts. Very important.
Barry
Thread Starter
Joined: May 2004
Posts: 3,514
Likes: 10
From: NEW YORK CITY
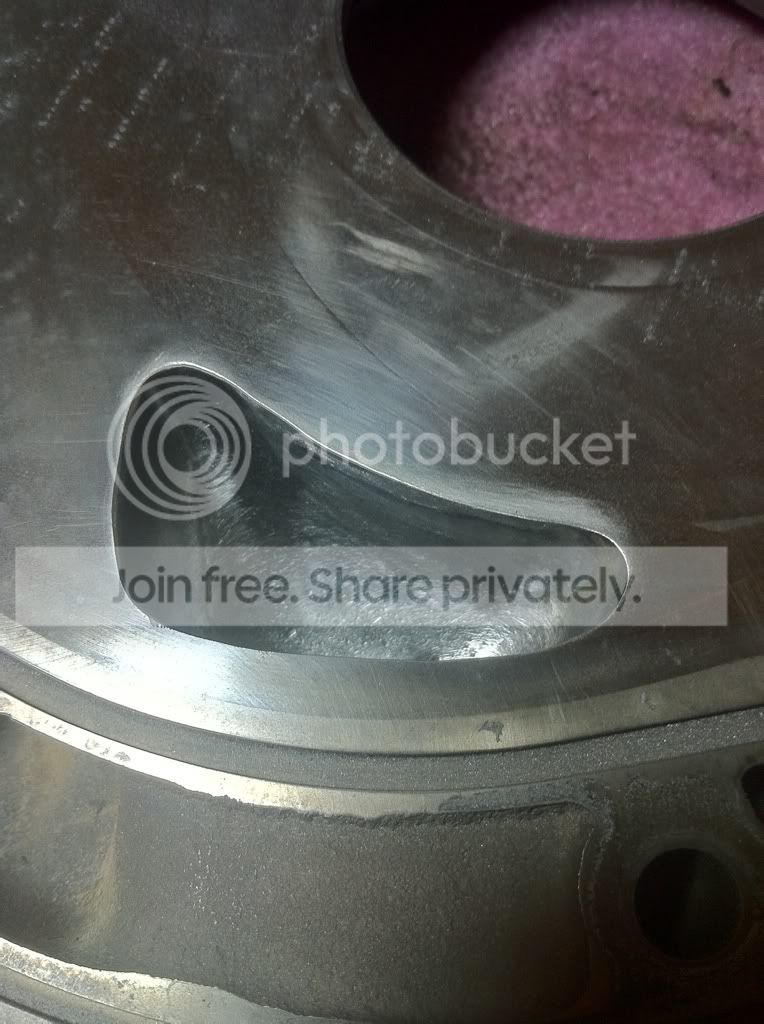
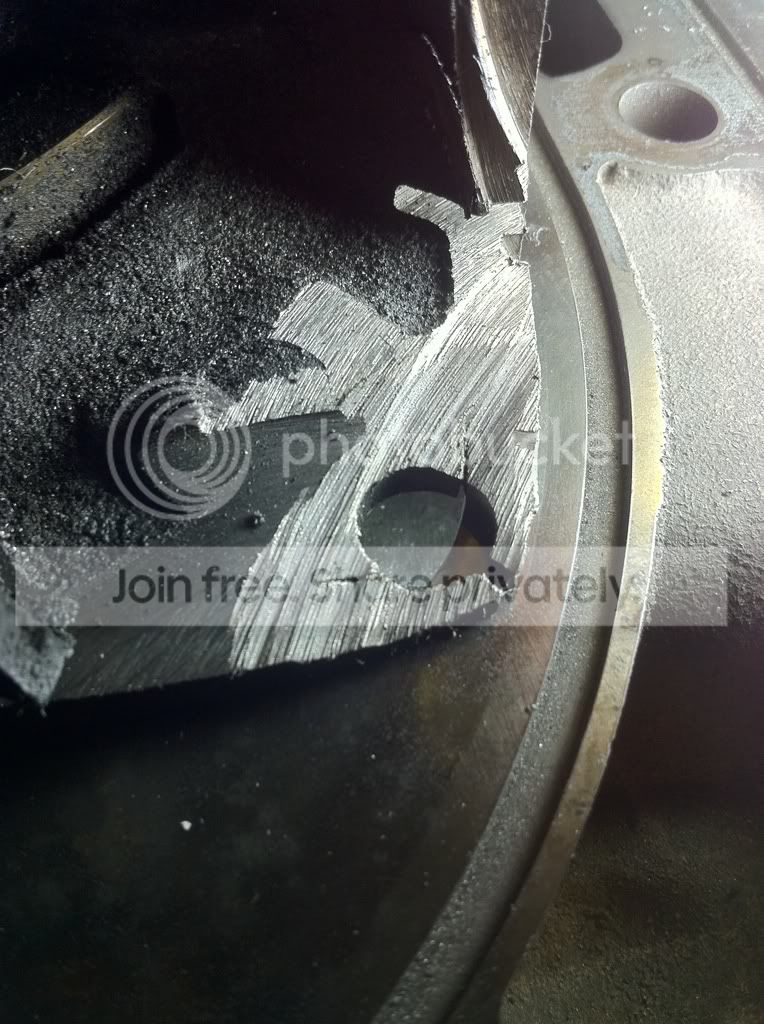
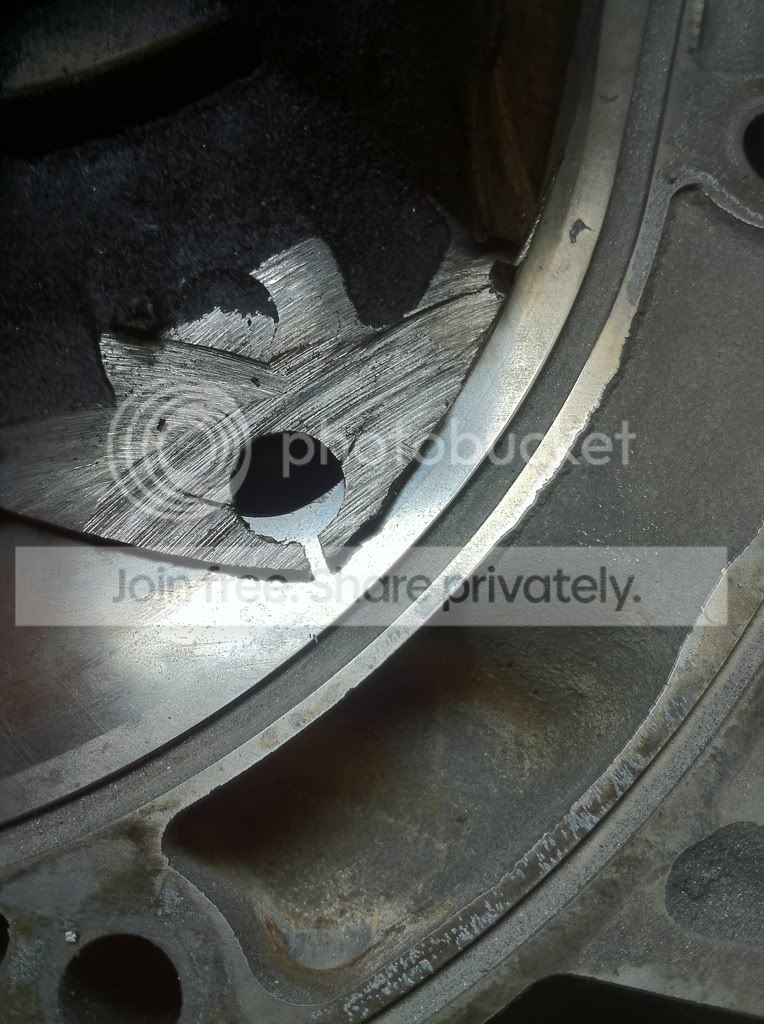
Ok I did my own test and I see where the crucial part of where the bevel should be. I have med templates and I must have gone a little bit too much up top causing the side seal to come off the plate a bit. I now see where the bevel should be most important. I ran the rotor with the spring and side seal, at first the seal was hitting the edge, I then smooth out the lip of the port and it slides smooth.
Is this a proper bevel?
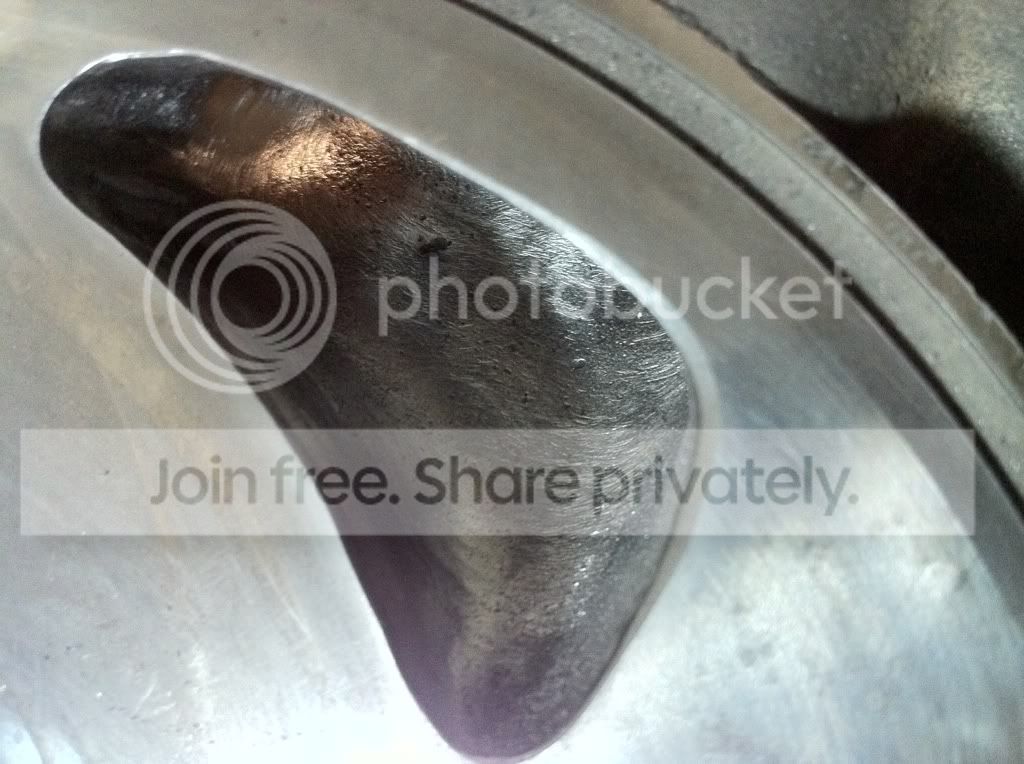
Is this a proper bevel?
"Elusive, not deceptive!�
Joined: May 2007
Posts: 930
Likes: 13
From: Slidell, LA
The bevel will help but you cut too much off the opening side of the port.
This leading edge of the side seal should remain on the side plate... and the trailing end should scissor its way back onto the plate.
Barry
This leading edge of the side seal should remain on the side plate... and the trailing end should scissor its way back onto the plate.
Barry
Thread Starter
Joined: May 2004
Posts: 3,514
Likes: 10
From: NEW YORK CITY
What are the options here? should i scrap the iron or lightly bevel the 3 side seal leading tips?
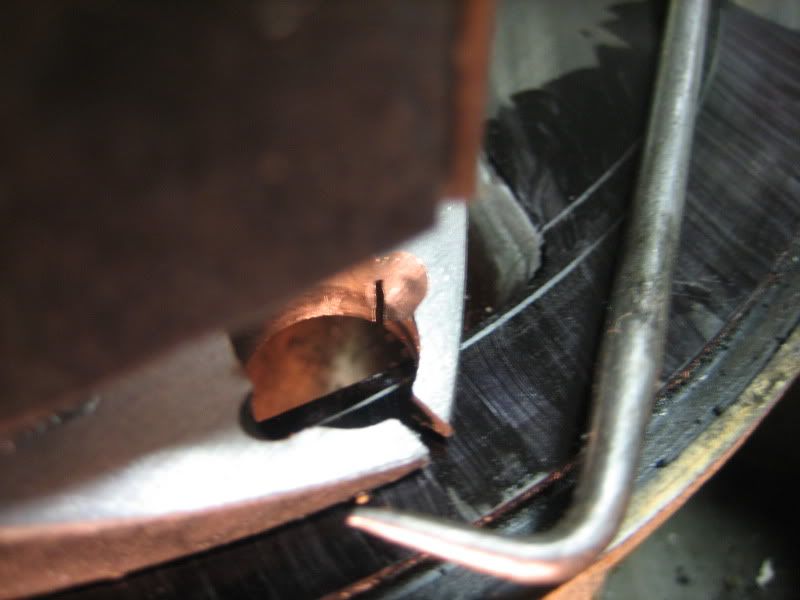
Don't bevel the seals, it will cause you to loose compression. The only thing you could do is put a very flat bevel on the closing side of the port onto the face of the iron. That will help push the leading edge of the seal back into the rotor. The bigger the port the more of the seal is going to dangle into it and the more the tip is going to wear, the bevel will help that but it's still going to slowly wear it down. IIRC on ITO's monster street port where the leading edge is unsupported he recommended running a Hurley duplex seal because they were more rigid. As for the closing edge remember a couple things. Keep the closing edge as flat as possible and the radius at the outer corner as tight as possible. When i port my motors there actually is no radius and the corner of the opening edge and closing edge meet at a very sharp point. Also as the closing edge of the port goes up you need to increase the angle (e-shaft edge lower than the intake manifold edge) to maintain the proper scissor effect. Here is a pic of the seal tracks on a factory untouched port. My advise would be if you want the motor to last a while start over with a fresh iron and don't port the opening edge where the leading edge of the seal can fall in.

 The bevel is more important on the intermdiate(primary) ports when opening up the ports. Some make the mistake of not extending the port far enough up in the corner where the opening and closing edges meet(top corner near the coolant seal groove). The factory took the "scissoring" effect(keep your minds out of the gutter, by gutter I mean happy place
  ) into consideration on the secondary ports and you really never see an issue when porting with the trailing side of the side seal getting broken off on the closing edge of the seconday port. This is usually only an issue on the intermediate(primary) ports.
Hopefully that was clear. If you search my username in the single turbo section from a few years back you will find more discussion about this topic that I am explaining above. I had a "debate" with a couple forum members who didnt quite grasp why an engine failed
After typing this out I will look at your pics again as of first glance I saw no real problems with the ports other than them looking a little sloppy on the closing edge and no angle on the opening edge to help with air flow. All of that is just minor and makes little/no difference in the grand scheme of things.
For a tip for those who want to learn about porting, go look at the pics of ErnieT's housings from his CYM car that are being sold in the 3rd gen parts section by Allrotor93. STOCK exhaust ports and the car made over 750rwhp and 150mph traps in the 1/4. Sometimes less is more.
Ok I did my own test and I see where the crucial part of where the bevel should be. I have med templates and I must have gone a little bit too much up top causing the side seal to come off the plate a bit. I now see where the bevel should be most important. I ran the rotor with the spring and side seal, at first the seal was hitting the edge, I then smooth out the lip of the port and it slides smooth.
