
My Big single 13BT First gen

Thread Starter
Joined: Jan 2002
Posts: 2,397
Likes: 1
From: Mound, MN
My Big single 13BT First gen
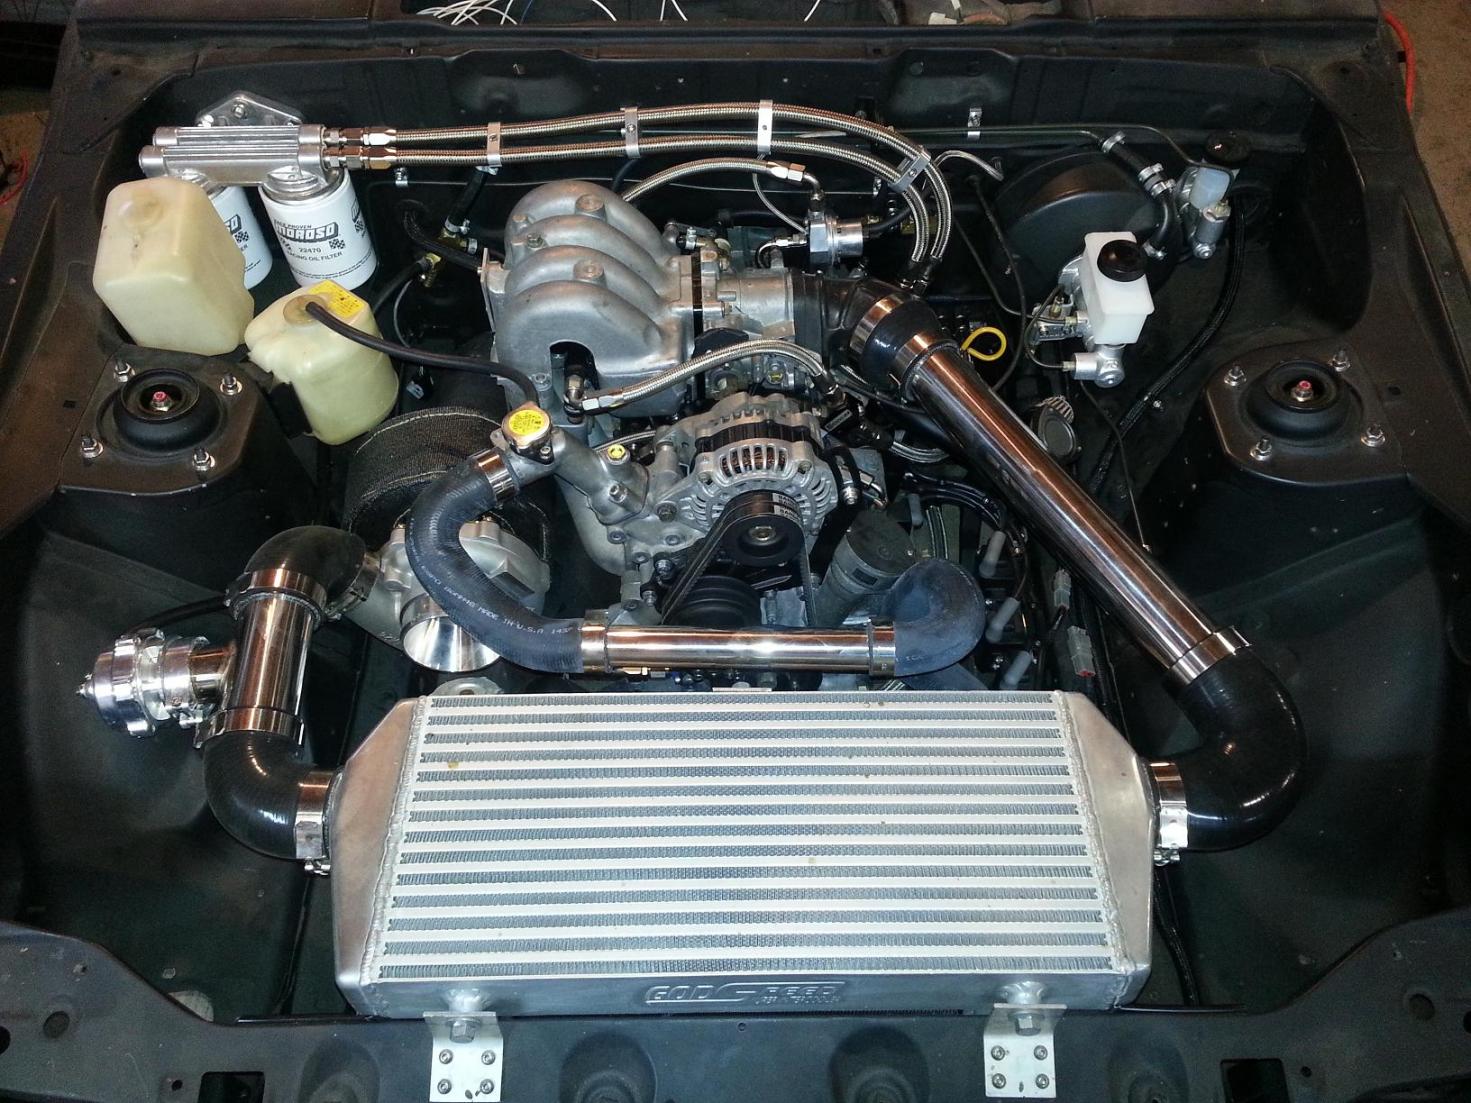
Finished the engine tonight for the most part. Still need to add a boost controller and run the 4an lines for the Guages on the cowl and the air filter.
Basic Rundown of vehicle.
82, Model S (base)
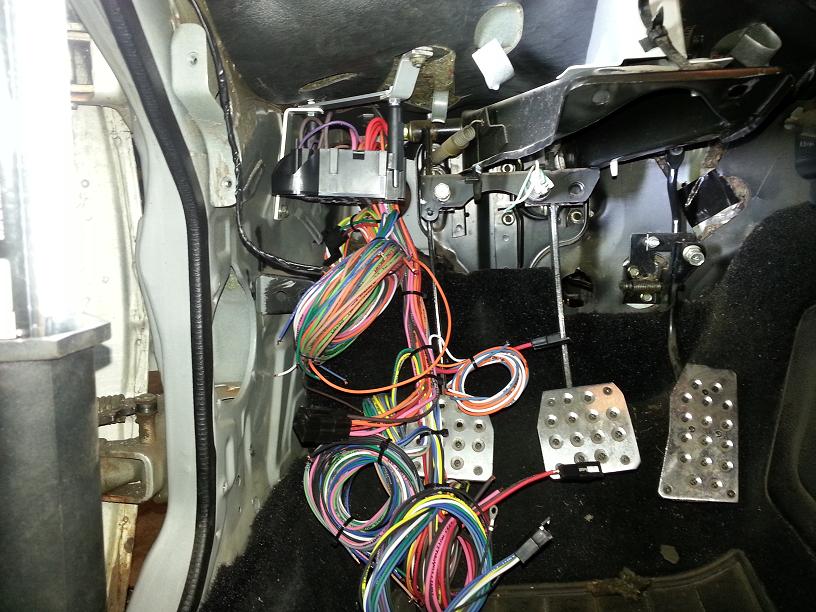
Compete custom electrical harness built from American Autowire kit. Multifunction, ignition switch and running lights are only factory electrical parts.
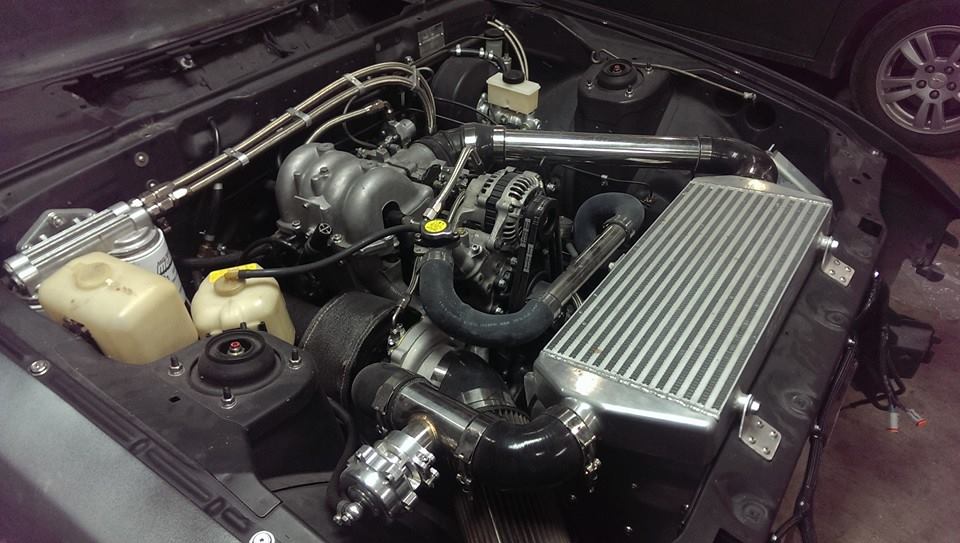
JDM 13bTurbo block (stockport).
Intake is stripped to bare essentials. No oil injection, air bleeds, idle control, air pump etc.
Borg warner T04b tubro, turbonetics 1.15 divided turbine housing, ptrim. Garret 60-1 compressor assm. Rebuilt and upgraded by Turbochargers.com (recommended)
Stainless divided manifold with HKS clone 50mm wastegate. Black wrap with silicone sealer.
3in turbo back exhaust, first section wrapped. 2 magnaflow race series mufflers.
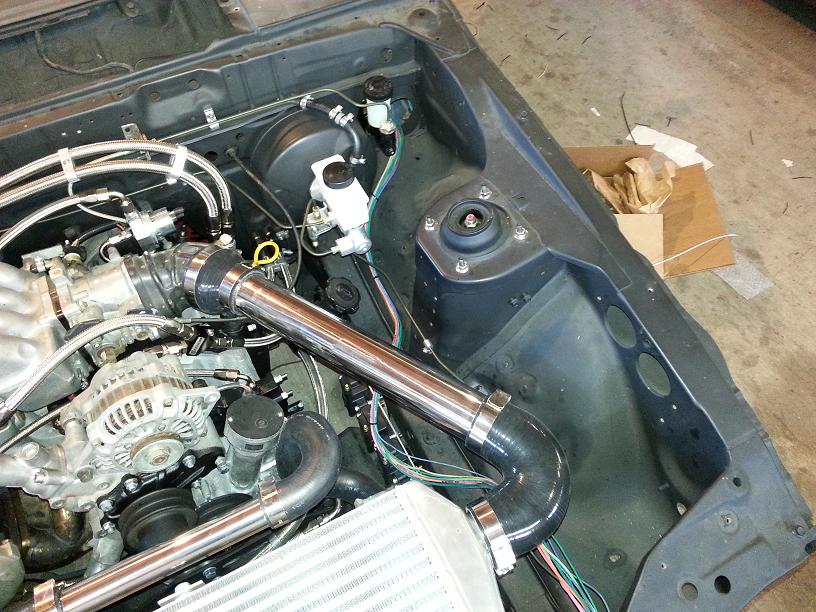
Godspeed intercooler and generic chevy radiator in a v-mount configuration.
Haltech SprintRE engine management system.
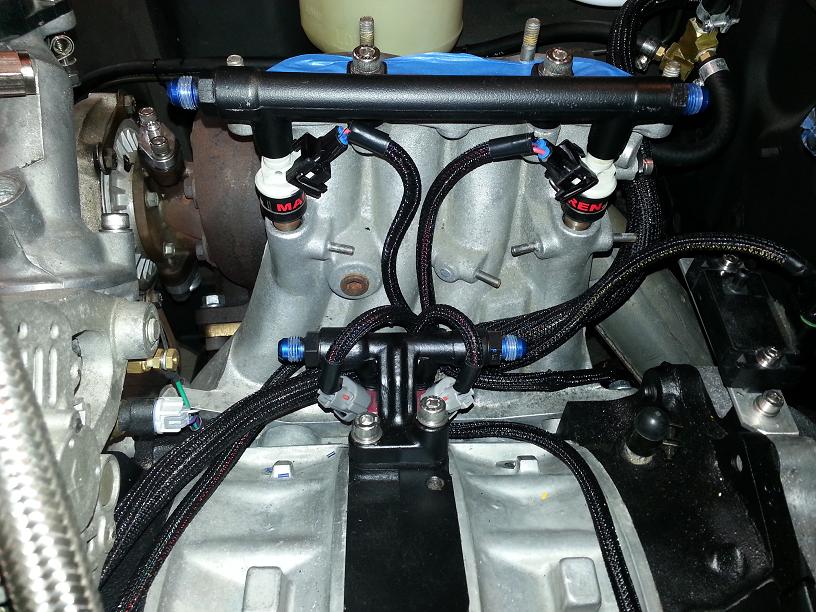
Full AN fuel system, Aeromotive A700 fuel pump, summit Racing fuel cell, billet regulator.
550/1680 fuel injectors,
10 Autometer gauges covering everything.
87 TurboII transmission, modded for FB shifter assm. custom mount.
Driveshaft shop driveshaft with 700hp joints
85 Gsl-SE suspension, axle and brakes. BG springs, Tokico Illumina shocks. All poly suspension bushings.
Complete custom brake hydralic lines and stainless hoses. Wilwood valve.


Basic Rundown of vehicle.
82, Model S (base)
Compete custom electrical harness built from American Autowire kit. Multifunction, ignition switch and running lights are only factory electrical parts.
JDM 13bTurbo block (stockport).
Intake is stripped to bare essentials. No oil injection, air bleeds, idle control, air pump etc.
Borg warner T04b tubro, turbonetics 1.15 divided turbine housing, ptrim. Garret 60-1 compressor assm. Rebuilt and upgraded by Turbochargers.com (recommended)
Stainless divided manifold with HKS clone 50mm wastegate. Black wrap with silicone sealer.
3in turbo back exhaust, first section wrapped. 2 magnaflow race series mufflers.
Godspeed intercooler and generic chevy radiator in a v-mount configuration.
Haltech SprintRE engine management system.
Full AN fuel system, Aeromotive A700 fuel pump, summit Racing fuel cell, billet regulator.
550/1680 fuel injectors,
10 Autometer gauges covering everything.
87 TurboII transmission, modded for FB shifter assm. custom mount.
Driveshaft shop driveshaft with 700hp joints
85 Gsl-SE suspension, axle and brakes. BG springs, Tokico Illumina shocks. All poly suspension bushings.
Complete custom brake hydralic lines and stainless hoses. Wilwood valve.

Thread Starter
Joined: Jan 2002
Posts: 2,397
Likes: 1
From: Mound, MN
Had the stuff laying around. Also couldn't pass up an opportunity to increase the oil capacity and increase the number of AN fittings lol. Should add at least 2qts to system capacity.
So by American Auto wire kit, you mean you bought a wiring kit from them and then configured it to work for the FB ? I ask because I DESPISE the stock harness and basically want to destroy it. Any other option would be sweet.
Trending Topics
Thread Starter
Joined: Jan 2002
Posts: 2,397
Likes: 1
From: Mound, MN
Yes, it is a power plus 20 channel. Its GM based, meaning a seperate headlight switch and a floor dimmer. Took a bit of thinking to set it up for a combo switch that the FB has.
It was A LOT of work, but I just could to stand having 20 or 30 dead, unused circuits. And its not tucked, its just so minimal you don't notice the wiring. I'm also doing custom headlight motors, which are not in the engine bay, which cleans things up.
It was A LOT of work, but I just could to stand having 20 or 30 dead, unused circuits. And its not tucked, its just so minimal you don't notice the wiring. I'm also doing custom headlight motors, which are not in the engine bay, which cleans things up.
Thread Starter
Joined: Jan 2002
Posts: 2,397
Likes: 1
From: Mound, MN
A LOT OF ******* WORK. just warning you.
if your going straight racecar (no turn signals, interior ect) It can be quite simple. But integrating to the factory switches and dash design is daunting. I specialize in this work and do it professionally. Even then it was very time consuming.


if your going straight racecar (no turn signals, interior ect) It can be quite simple. But integrating to the factory switches and dash design is daunting. I specialize in this work and do it professionally. Even then it was very time consuming.
Thread Starter
Joined: Jan 2002
Posts: 2,397
Likes: 1
From: Mound, MN
Gauges were a big part of this electrical job, the wideband gauge is the controller, so it had to be wired to the chassis and to haltech inputs and outputs (WOT switch). It was a good chunk of the job.
In the first pic you can see my original, I originally did this swap when I was 17, over a decade ago. It was made of steel and rusted.


In the first pic you can see my original, I originally did this swap when I was 17, over a decade ago. It was made of steel and rusted.
Oh I believe you on the professional part. You have done some extremely clean wiring. I have been procrastinating like crazy on the wiring. I also love your coil bracketing and placement. Super clean !
Thread Starter
Joined: Jan 2002
Posts: 2,397
Likes: 1
From: Mound, MN
By professional, I mean that Im a GM Mechanic by profession, and specialize in electrical repair. Modern GM cars have an average of 25-40 computers on board, and 4 different kinds of LAN systems to let them talk to each other.
And Im going to be pulling that coil bracket to trim the bolts and add capped nuts for a cleaner look. I might have gone a bit overboard on a few things; for instance, the front coils are grounded to the front housing and the rear ones to the rear housings. Necessary? probably not, but Im **** like that.
And Im going to be pulling that coil bracket to trim the bolts and add capped nuts for a cleaner look. I might have gone a bit overboard on a few things; for instance, the front coils are grounded to the front housing and the rear ones to the rear housings. Necessary? probably not, but Im **** like that.
Thread Starter
Joined: Jan 2002
Posts: 2,397
Likes: 1
From: Mound, MN
It is a lot of work, but its not difficult, its just very time consuming. I probably went through 500 small zip-ties getting it organized.
Intall is basically; find location of fuse block, locate and seperate "engine/front", "dashboard", and rear harnesses and sort of place them where you think they need to be. Then slowly seperate individual circuits to where they sort of need to be, keeping them organized by constantly zip-tieing, cutting and re-zip-tieing until you have a basic harness.
Then you need to install things that are going to be wired. For me this was mostly the column stuff; the multifunction and ignition. And a major change I made is that the harness is now on the body (so to speak) and not attached to the dash in any way. THe factory setup has a "dashboard" harness with connectors for removal, but this was not possible. The steering column (without gear) can be sort of bolted up without the dash in place, and this made things possible. But you have to constantly install and remove things as you go to check for clearances, as there are a LOT of things going on behind the dash.
The kit was designed for a GM type install (dashboard mounted headlamp switch, with courtesy control built in and the headlight dimmer mounted to the floor). The kit came with a custom headlight switch and a floor dimmer, but I made it work with the factory switch. This was not difficult, just a matter of working out the "logic" of the kit vs the car. Luckily the factory Mazda wiring diagrams show the internal logic of most of the switches.
In retrospec, I should have left the washer control circuits untouched. I cut it all out when I started only to realize that all the kit supplied was a key-on power source for the system. I had to rewire a lot of that by scratch, and as a result, I have no "intermitent" and washer is now manual (it doesnt trigger the wipers automatically anymore).
I also prewired the car for a radio headunit, 5channel system amp and all speaker wire, but have no plans to install a audio system at this time, just didnt want to have to go back in later.
THe dashboard was 50% of the work. The rear fuse/relay center I built was probably %20 haltech was about 15%, the engine and front lights were 10% and the rear lights were about 5%.
I can attest to the quality of the American Autowire kit. It was cheaper than the painless kit, and quality was excellent. The only thing I would have liked was a rear "grid" type diagram. The instructions are pretty basic; installing it on a old camaro would have been a no brainer, but fitting it to a FB was a bit of work.

Junior Member
Joined: Oct 2013
Posts: 9
Likes: 0
From: Newyork
Finished the engine tonight for the most part. Still need to add a boost controller and run the 4an lines for the Guages on the cowl and the air filter.
Basic Rundown of vehicle.
82, Model S (base)
Compete custom electrical harness built from American Autowire kit. Multifunction, ignition switch and running lights are only factory electrical parts.
JDM 13bTurbo block (stockport).
Intake is stripped to bare essentials. No oil injection, air bleeds, idle control, air pump etc.
Borg warner T04b tubro, turbonetics 1.15 divided turbine housing, ptrim. Garret 60-1 compressor assm. Rebuilt and upgraded by Turbochargers.com (recommended)
Stainless divided manifold with HKS clone 50mm wastegate. Black wrap with silicone sealer.
3in turbo back exhaust, first section wrapped. 2 magnaflow race series mufflers.
Godspeed intercooler and generic chevy radiator in a v-mount configuration.
Haltech SprintRE engine management system.
Full AN fuel system, Aeromotive A700 fuel pump, summit Racing fuel cell, billet regulator.
550/1680 fuel injectors,
10 Autometer gauges covering everything.
87 TurboII transmission, modded for FB shifter assm. custom mount.
Driveshaft shop driveshaft with 700hp joints
85 Gsl-SE suspension, axle and brakes. BG springs, Tokico Illumina shocks. All poly suspension bushings.
Complete custom brake hydralic lines and stainless hoses. Wilwood valve.
WOW your cars engine and set up is really clean
 good job dude!
Thread Starter
Joined: Jan 2002
Posts: 2,397
Likes: 1
From: Mound, MN
Since most of you probably dont peruse the First gen forum, heres a quick update on my progress.
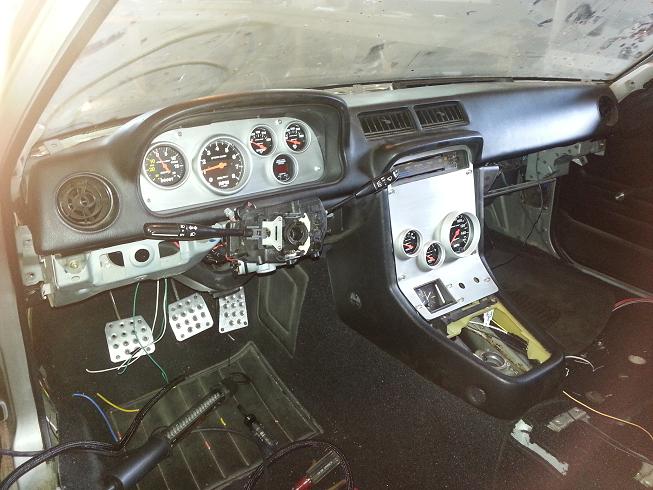
Got the dash and cowl gauges finished, I am super happy with how it turned out.


I'm 90% finished with the electrical, and have also refinished the steering wheel to match the dash. Im waiting on a 200amp breaker for my remote battery cable, once I get that in and test the electrical, ill post another update.
Got the dash and cowl gauges finished, I am super happy with how it turned out.
I'm 90% finished with the electrical, and have also refinished the steering wheel to match the dash. Im waiting on a 200amp breaker for my remote battery cable, once I get that in and test the electrical, ill post another update.


Thread Starter
Joined: Jan 2002
Posts: 2,397
Likes: 1
From: Mound, MN
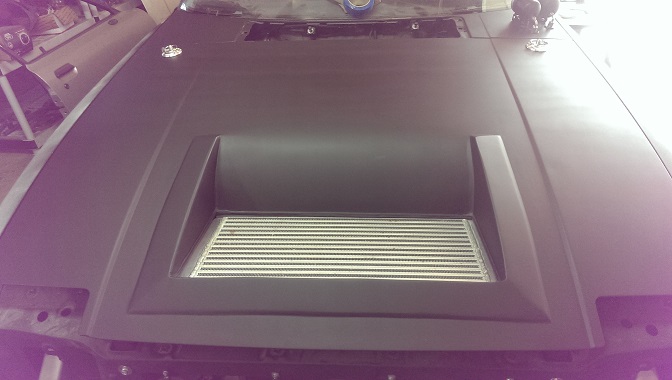
Yikes, this hood project was a pain in the ***. Not looking forward to fitting the bodykit, the side skirts in particular.
Paint turned out OK. Rattle canning a space that big is tricky to get even, but its OK. It will eventually be professionally repainted, but so far, so good
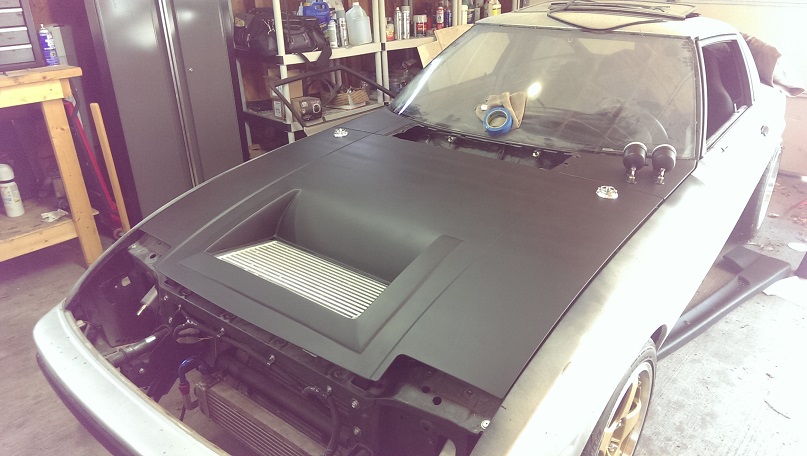
Some background threads on this project.
https://www.rx7club.com/1st-generati...inter-1074556/
https://www.rx7club.com/1st-generati...stuff-1011612/
https://www.rx7club.com/1st-generati...assis-1033770/
Paint turned out OK. Rattle canning a space that big is tricky to get even, but its OK. It will eventually be professionally repainted, but so far, so good
Some background threads on this project.
https://www.rx7club.com/1st-generati...inter-1074556/
https://www.rx7club.com/1st-generati...stuff-1011612/
https://www.rx7club.com/1st-generati...assis-1033770/
Joined: Feb 2001
Posts: 29,798
Likes: 128
From: London, Ontario, Canada
If you put the air bleeds back, at least on the primaries, you will be able to drop your idle PWM a little for a fuel savings and achieve a more consistent idle AFR.
Thread Starter
Joined: Jan 2002
Posts: 2,397
Likes: 1
From: Mound, MN
Engine has no idle control. Idle has to be managed (gas pedal) until the engine is up to temp.
It will idle when cold, but poorly unless some throttle is applied. I keep it as low as possible, mainly because it sounds cooler.
It will idle when cold, but poorly unless some throttle is applied. I keep it as low as possible, mainly because it sounds cooler.
Joined: Feb 2001
Posts: 29,798
Likes: 128
From: London, Ontario, Canada
Well, you know what I'm going to say.  Put an idle valve on it to avoid all that hassle.
But you will see significant improvements with the air bleeds installed and working.
Put an idle valve on it to avoid all that hassle. But you will see significant improvements with the air bleeds installed and working.

Thread
Thread Starter
Forum
Replies
Last Post