
Tips on Suspension Bushings

Tips on Suspension Bushings
For what it is worth, here is the technique I used to remove the old rear control arm bushings: I burned the bushings on both sides until they went out. Then I pressed the bushing out with a gear puller. Chipped out as much of the old rubber as I could with a big screw driver. Then used a barrel sanding attachment on my dremel to clean out the remaining rubber. This worked out pretty well.
I am planning to take on the front bushings in week or so. I am replacing all of the dust covers on the steering linkage, the control arm bushings, the sway bar bushings, the end links and bushings, and the control rod bushings.
Does anyone have any tips or tricks to suggest when doing the front end bushings?

You may want to have a cutoff wheel handy when doing the front arm bushings, the ones that are inboard where the arm pivots. These sometimes get pretty frozen with the tube in the arm and can be hard to remove. Using the cutoff tool on each side will dropit out faster. I was lucky with mine in that I was able to pop it out with a hammer and socket but it was touch and go for awhile.
Wankelbator
Joined: Aug 2006
Posts: 388
Likes: 0
From: Wentzville, MO
I just did mine yesterday... I took pics  I left them home
  I'll post in an hour after I get them. I took a medium size vice, 2 deep sockets 1 small socket, tightened with breaker bar and blew it out with minimal effort... most effort was getting the sockets to stay put long enough to get it tightened down Did it all by my lonesome.
I left them home I'll post in an hour after I get them. I took a medium size vice, 2 deep sockets 1 small socket, tightened with breaker bar and blew it out with minimal effort... most effort was getting the sockets to stay put long enough to get it tightened down Did it all by my lonesome.
Wankelbator
Joined: Aug 2006
Posts: 388
Likes: 0
From: Wentzville, MO
Here are some pictures and tips for dealing with the suspension arms
This is of my suspension arm still on the car

This is while letting that bolt sit in PB blaster for 10 minutes, reblasting, little tap tap etc.


This is after I hit my thumb with the mallet, screamed like a girl, got angry and decided it was time to use the "FU Nut" wand.

Kicked his ***... who's the bitch now bolt.

This is my rig to get that bushing out of the suspension arm. It involved 2 deep sockets and 1 smaller socket to press the bushing out from back to front and a cheap vice from Lowes.
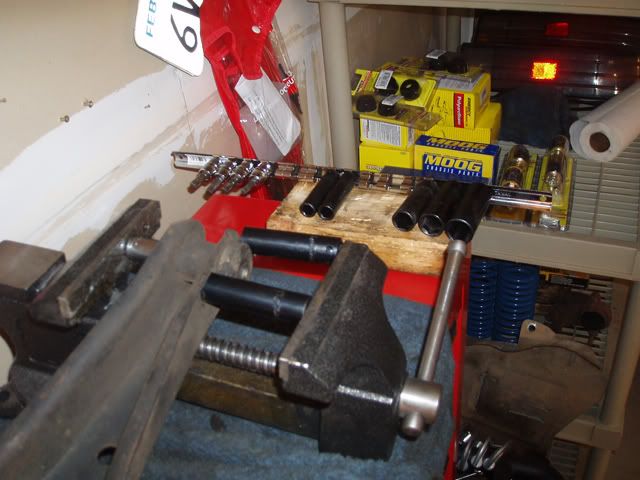


You'll need some sort of puller to get the tie rod ends off, I bought the one in this picture for 10 bucks from Autozone. It actually sucks, just barely fits but... it did work. To get the arms off the main ball joints on the suspension arm I used a pretty big 3 arm gear puller... I wrapped on that sucker for like 10 minutes while doing quarter inch turns, went in for dinner and came back to a puller on the ground and an arm detached from the ball joint... sometimes its best just to get it really tight and leave it... over time it will pull it off if tight enough, don't break the puller like I did with 1 trying.

This is of my suspension arm still on the car
This is while letting that bolt sit in PB blaster for 10 minutes, reblasting, little tap tap etc.
This is after I hit my thumb with the mallet, screamed like a girl, got angry and decided it was time to use the "FU Nut" wand.
Kicked his ***... who's the bitch now bolt.
This is my rig to get that bushing out of the suspension arm. It involved 2 deep sockets and 1 smaller socket to press the bushing out from back to front and a cheap vice from Lowes.
You'll need some sort of puller to get the tie rod ends off, I bought the one in this picture for 10 bucks from Autozone. It actually sucks, just barely fits but... it did work. To get the arms off the main ball joints on the suspension arm I used a pretty big 3 arm gear puller... I wrapped on that sucker for like 10 minutes while doing quarter inch turns, went in for dinner and came back to a puller on the ground and an arm detached from the ball joint... sometimes its best just to get it really tight and leave it... over time it will pull it off if tight enough, don't break the puller like I did with 1 trying.

Trending Topics
Wankelbator
Joined: Aug 2006
Posts: 388
Likes: 0
From: Wentzville, MO
Originally Posted by ultimatejay
^^ Now that's what I call some serious shade tree action going on there. hehe
I had to quit for a few days since I realized I didn't have a 27 mm wrench or socket to pull the tension rods and because of where I live I had to order the damn things.
Lives on the Forum
Joined: Jun 2004
Posts: 11,359
Likes: 14
From: Grand Rapids Michigan
I tried everything to get the bushings out on my parts car. Tried pressing the bushings out, but ended up pressing the metal of the arm until it bulged outward noticeably. PB Blaster, torch, and everything else I could think of made no difference.
Went and picked up a reciprocating saw with metal blades, and worked with that for a couple of hours with no observable progress.
Went and picked up a 4 1/2" angle grinder with a cutoff wheel. Finished the job in about five minutes....
Went and picked up a reciprocating saw with metal blades, and worked with that for a couple of hours with no observable progress.
Went and picked up a 4 1/2" angle grinder with a cutoff wheel. Finished the job in about five minutes....

Thread
Thread Starter
Forum
Replies
Last Post