
just got done figuring out how to fix an FD odometer


More weird odometer dope. Brief history recapped from above threads...odo went blank. Performed repair (replaced all capacitors). Odo worked great for months and then began not coming on at first start in the morning. After driving 20 minutes or so...odo would come on and continue to work until parked over night and then above scenario would play out again.
I found if I removed the pos. battery cable, waited a few seconds and hooked it up again, the odo would come on. As the next few months progressed, the odo took longer and longer to come on (while driving) and my "pos. cable" trick no longer jump started the odo to life...then it started staying blank for days with intermittent working. When it came on, it would work correctly until parked for the night. Next morning, dead odo read out.
Note: the cruise control would not work properly (surging) when odo was out.
Now comes the odd part. I was starting the car and engaged the ignition WITHOUT pressing the clutch in...laughing at myself and without thinking...I stepped on the clutch WHILE CONTINUING to hold the key forward (did not recycle key). The engine immediately cooked off of course (don't they all?)...but then...the odometer did something strange...it came on (when it had been off for days), blinked once and the mileage disappeared...then the trip mileage reset itself to "0.0"...the odo. blinked again, and the mileage returned along with the zeroed out trip mileage...and the s.o.b. has been working flawlessly for the last 4 days (just poxed myself).
I'm sure it is just a fluke...I looked at the wiring diagram and see all this stuff is connected but electrons are a mystery to me. Just thought maybe someone else who has repaired their odo and had it go south...could try the same drill and see what happens? I would also like to know if someone with a working odo would try holding the key and then stepping of the clutch and see if the odo does the blinky-reset-trip-mileage thingy. I am too chicken **** to tempt the Mazda Gods again...
Surely to God...it can't be that simple...can it?

Passenger
Posts: n/a
I think I found out what Diodes can be used to replace the ones on the board. I replaced some of mine after not having a tach, Speedo and ODO.
Now I get the tach, but everything else is still dead. I am going to try to replace some more Caps and see what happens.
Now I get the tach, but everything else is still dead. I am going to try to replace some more Caps and see what happens.
Passenger
Posts: n/a
The diodes i used are part # IN914 and I also got others that were different part # IN4148 that I have not tried on the car yet.
Before I started I had no Tach and no speed and ODO. Now I only have a tach and I replaced most of the Caps on the board and the diodes.
I do not know the value of the Diodes.
Before I started I had no Tach and no speed and ODO. Now I only have a tach and I replaced most of the Caps on the board and the diodes.
I do not know the value of the Diodes.

Full Member
Joined: Jul 2002
Posts: 85
Likes: 0
From: OC CA
The diodes i used are part # IN914 and I also got others that were different part # IN4148 that I have not tried on the car yet.
Before I started I had no Tach and no speed and ODO. Now I only have a tach and I replaced most of the Caps on the board and the diodes.
I do not know the value of the Diodes.
Before I started I had no Tach and no speed and ODO. Now I only have a tach and I replaced most of the Caps on the board and the diodes.
I do not know the value of the Diodes.
http://www.radioshack.com/product/in...uctId=2049726#
http://ezinearticles.com/?How-to-Rea...-Code&id=40081


Full Member
Joined: Dec 2006
Posts: 221
Likes: 0
From: Oahu
My brother-in-law owns a copying company and has serviced for many years, Panasonic, Xerox, HP, Brother and others very rarely did the Panasonic capacitors fail as do the others which out sources their parts to 3rd world countries who produce capacitors.
I swear the front page of the 3rd gen section is cursed. I read the thread titles one day, failure of discussed item or items shortly follows. This thread was resurrected not long ago and I remember reading it last week and thinking....."at least I don't have to deal with THAT, what a beeotch THAT would be!" Well, now.... I OWN that beeotch - wtf!? First full tank of petro in a long time and looking forward to getting a solid uninterrupted trip reading from it. There goes that.....odometer just went out somewhere after 52 miles. Amazing. Simply amazing.....just when you think you're out, it pulls you back in! Everytime.
Just a rant. But I am thankful for this website and this thread......salvation lies within. Back to page one.
Just a rant. But I am thankful for this website and this thread......salvation lies within. Back to page one.

Gonna be attempting the fix myself today but I don't know which capacitor is what.. I know there is a list on page 2 of the thread .. Also is there a specific direction the cap needs to be soldered? ( as in , a pos and neg direction).. My diodes also look like they are burnt.. Has anyone replaced those? They have dcv readings, but they look burnt.. Thanks!
I did it.. the fix.. i changed the 1000mF first and the 50 mf that causes the most problems.. ODO was fixed.. but the tach was still jumping up and down..so i decided to change all the Caps.. except the 2.2 mf cap.. and the tach no longer works.. period.. any tips or tricks? thanks
tach is now fixed.. but the speedometer isn't moving.. thus not counting miles.. it worked for a little but now not functional.. Please advise. I have NOT replaced the diodes yet.. what do i need to order? please help! no one seems to be checking this thread anymore...
For those of you who replaced the capacitors and still had problems
For those of you who replaced the capacitors and still had problems; I may have found a solution.
I replaced all the capacitors and my odometer was still screwed up. Upon inspection of the board, I could find nothing wrong with my polarities, etc.
What I noticed was this: the capacitors appear to have traces that they need to be soldered to on BOTH sides of the board. I noticed this looking at the caps that were still mounted. Look at the attached pic and you can see there are solder blobs on the cap leads on the front of the PCB too.
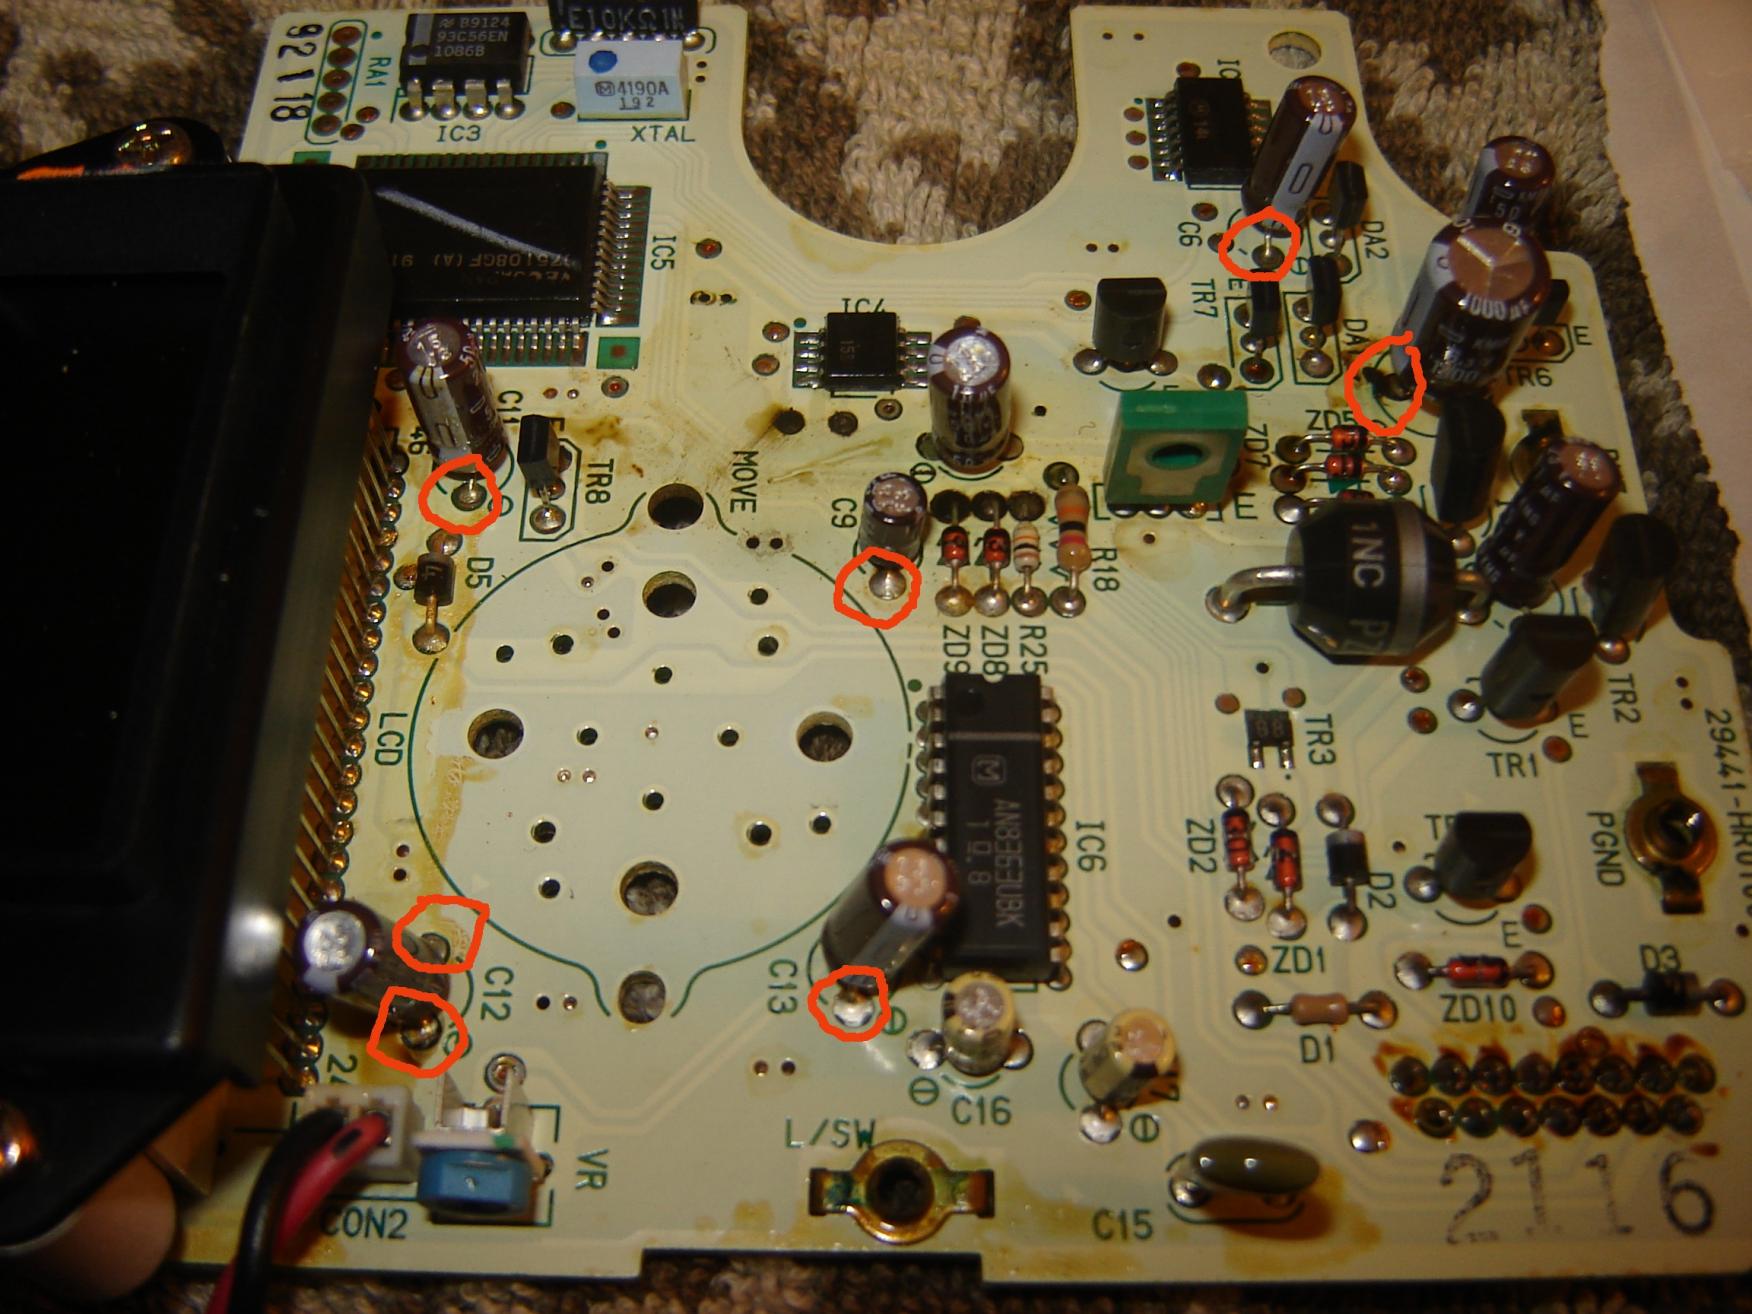
This probably explains why they are so hard to de-solder too. Hope this helps some of you.
I replaced all the capacitors and my odometer was still screwed up. Upon inspection of the board, I could find nothing wrong with my polarities, etc.
What I noticed was this: the capacitors appear to have traces that they need to be soldered to on BOTH sides of the board. I noticed this looking at the caps that were still mounted. Look at the attached pic and you can see there are solder blobs on the cap leads on the front of the PCB too.
This probably explains why they are so hard to de-solder too. Hope this helps some of you.
So you went back and re-soldered the top part also? And did it finally make your odometer work again?
I replaced all my capacitors also, but when it didnt fix it, I bought a used cluster with the same mileage. I always wondered what I would do when the new one goes bad.
Hopefully this will help, thanks for posting the new info! No one has brought up this point until now.
I replaced all my capacitors also, but when it didnt fix it, I bought a used cluster with the same mileage. I always wondered what I would do when the new one goes bad.
Hopefully this will help, thanks for posting the new info! No one has brought up this point until now.
I put in new caps and the odometer still didn't work. I took it back apart and noticed the beads on both sides of the remaining capacitors and my picture. Added some solder there and it worked. Some extra room would have helped to get the tip in there (TWSS), but I had already cut the cap leads.
Interested to see if this helps others or if I'm just crazy/lucky. Good luck.

Yep, that's what I did. I wasn't very clear about that. My fault.
I put in new caps and the odometer still didn't work. I took it back apart and noticed the beads on both sides of the remaining capacitors and my picture. Added some solder there and it worked. Some extra room would have helped to get the tip in there (TWSS), but I had already cut the cap leads.
Interested to see if this helps others or if I'm just crazy/lucky. Good luck.
Yea , sorry the quantities are in there, they just formatted weird after copying from excel. They are listed right after the "C" and before the part number.
Heres a clearer version
1x 1000 micro farad 6.3 volt 105 degree C 1 P10199-ND
2x 10 micro farad 50 volt 105 degree C 2 P11250-ND
1x 47 micro f*** 25V* 105 degree C 1 P10267-ND
3x 1uf (micro f) * 50v* 105 degree C 3 P10312-ND
Heres a clearer version
1x 1000 micro farad 6.3 volt 105 degree C 1 P10199-ND
2x 10 micro farad 50 volt 105 degree C 2 P11250-ND
1x 47 micro f*** 25V* 105 degree C 1 P10267-ND
3x 1uf (micro f) * 50v* 105 degree C 3 P10312-ND
Something is going on because when I take it out and re-soldered the caps one more time it works now. Hopefully for good this time.
Since I have had my cluster back in, the ODO has gone out for a few miles, then come back on indefinitely.
I talked to an electrician, described the problem and the solder points (how some of them were difficult to heat up quickly) and got some advice I wanted to share with others having issues with this.
I was told that the problem could be caused by my 35 watt max soldering iron. It was suggested that I use a 50 watt iron to create reliable solder joints, not enough heat can cause a poor solder. Also, the more quickly you heat up the local area being soldered, the less time there is for heat transfer to the capacitor; less likely to damage cap.
Now, I won't be doing this unless it goes out again but it's something to consider for someone doing it the first time around. Also, I would only replace the two caps initially suggested early in this thread if I did it again. Less chance to screw something up.
Just replaced the following with no luck:
1x 1000 micro farad 6.3 volt 105 degree C 1 P10199-ND
2x 10 micro farad 50 volt 105 degree C 2 P11250-ND
1x 47 micro f*** 25V* 105 degree C 1 P10267-ND
3x 1uf (micro f) * 50v* 105 degree C 3 P10312-ND
Anyone consider the LCD controller going bad? As long its a separate controller from the ROM/speedo driver, it may be replaceable. That's my next step at least...
