
My 1991 RX7 Build...Ford 2.3T swap, with a little twist.


Thread Starter
Full Member
Joined: Aug 2015
Posts: 86
Likes: 0
From: Columbia TN
My 1991 RX7 Build...Ford 2.3T swap, with a little twist.


Here are a few shots of the car itself, picked it up as a roller with no drivetrain in trade for parts and a little cash.
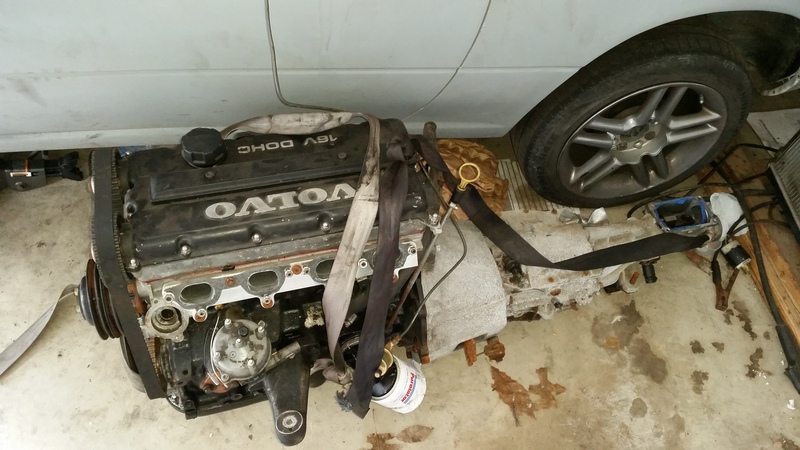
The plan is of course to swap in a Ford 2.3T I had sitting around, the engine is 90% finished at this point...but I will go through a few pictures for the background of the build.


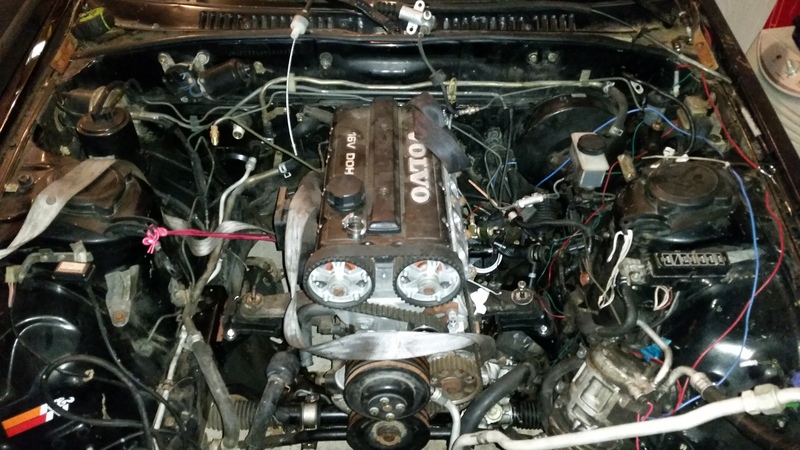
This covers the head....The Volvo B234f cylinder head for whatever reason shares almost identical bore spacing and head bolt locations as the Ford 2.3T head....but whereas the Ford 2.3T head is cast iron, SOHC, and 8 valves...this beauty is 16v DOHC aluminum. the pictures show the necessary modification required to fit this to the Ford block...it has to be extended a bit at the back, and slightly on the side(not strictly necessary, but makes for a nicer finish) the front water port for the volvo pump needs to go, and an external oil feed line for the head needs to be installed. of course it needs to be milled down once all this is done for a flat surface for the MLS head gasket(using a cometic as opposed to the original graphite Ford gasket, this gasket is just for illustration.
Thread Starter
Full Member
Joined: Aug 2015
Posts: 86
Likes: 0
From: Columbia TN

For valvesprings, this pic shows the factory Volvo valvespring to the right, to the left is a Ford 4.6L spring...what I chose to use for this build.

but thats not all....the assembled head with..BMW ITBs? why not? a simple adapter plate makes it possible.
my xr4ti was the development car for this engine...but I have decided in my infinite wisdom the XR is better suited to my Ford 3.7L Duratec V6, so it frees up this engine to be used in the RX7


so that is exactly what I did
On the exhaust side...


A big Holset HE351VE VGT turbo and a 44mm external wastegate, its anyone's guess whether I can make the VGT work correctly, its rather complex with my setup.
of course 8v pistons dont work so well with a 16v head...so custom pistons are required...and if pistons, why not throw in some crower rods for good measure?


Thread Starter
Full Member
Joined: Aug 2015
Posts: 86
Likes: 0
From: Columbia TN
And that brings us up to today....all I did today was pull the engine from the XR, next week I plan on ordering Granny's mount kit for the Ford 2.3T and dropping this thing right into the XR7 to finish up the build.
A year of sitting hasnt done it much favor in the appearance department, needs minor cleaning and paint touch up before I swap it...along with installing my valve cover with the LS1 coils mounted

A year of sitting hasnt done it much favor in the appearance department, needs minor cleaning and paint touch up before I swap it...along with installing my valve cover with the LS1 coils mounted

Thread Starter
Full Member
Joined: Aug 2015
Posts: 86
Likes: 0
From: Columbia TN
Nothing much to share picture wise today...but at least I did order the 2.3t mount kit from Granny's today. They should be here in a couple weeks. I do need to rent a pressure washer though sometime soon to clean the engine bay(or just have some mobile detailing service do it for me for roughly the same cost). After that I can really get this project rolling.

Trending Topics
Thread Starter
Full Member
Joined: Aug 2015
Posts: 86
Likes: 0
From: Columbia TN
well, just a little progress while waiting for mounts(should have just made them, but Granny's kit was cheap enough that it made it worth it to me not to)
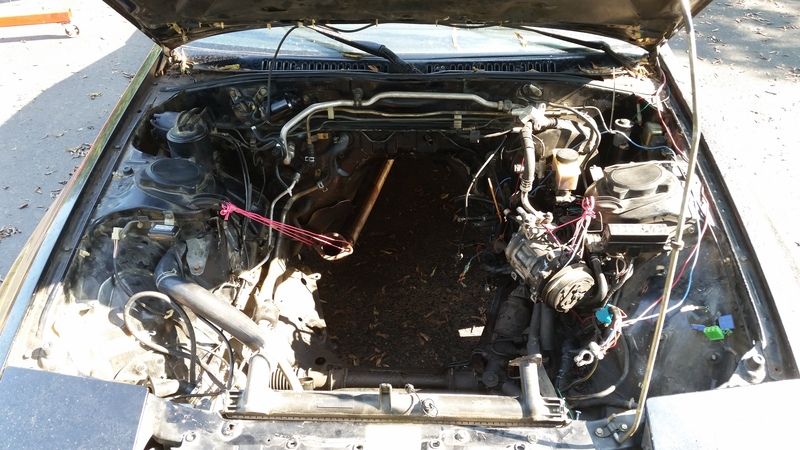
The dirty engine bay, before cleaning.
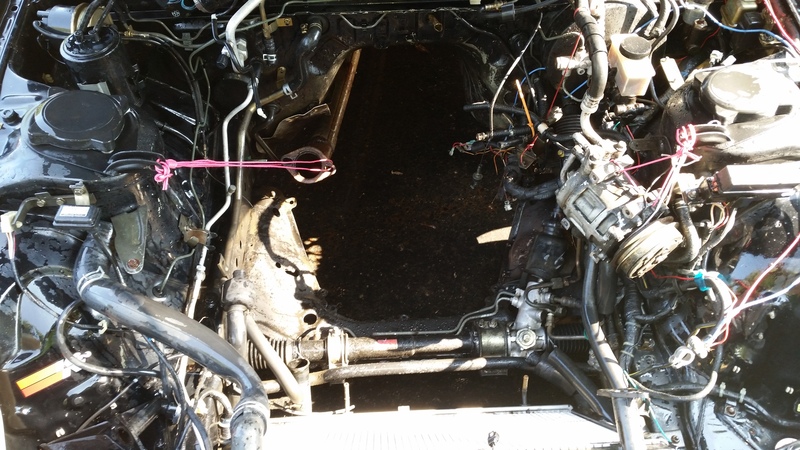
After pressure washing with some simple green. the paint is still in sad condition...but at least all the oil is gone.
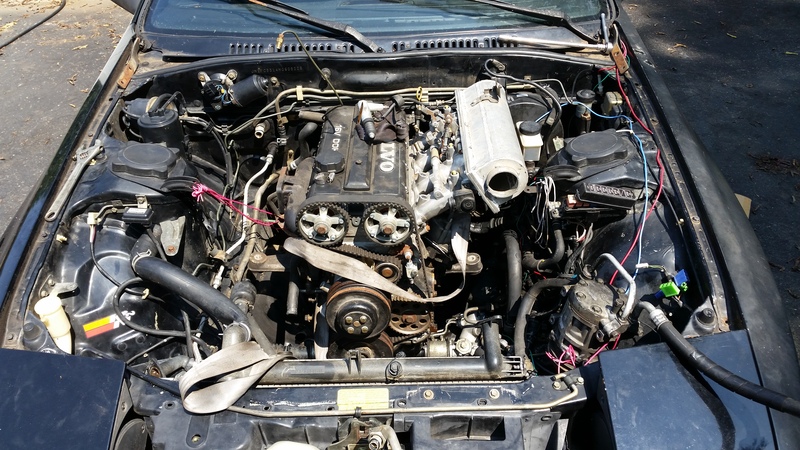
I couldn't resist...with a clean bay I had to test fit the engine, aside from my crazy ITB air box setup(and the turbo, which wouldn't fit because the engine is currently offset to the passenger side(stupid huge exhaust housing) the engine fits like it was made for the chasis. From my measurements, I should have roughly 1/2" hood clearance at the cam gears because the factory hood bows up roughly 1.5" in the middle...the ITB air box on the other hand will protrude somewhere around 2" above the hood in front(though it should clear in the back) If I had some measurements from a turbo II hood I would be able to tell if the scoop will clear the airbox(plenum), but being offset to the driver side like it is...it would be really close. Most likely I will have to revisit the plenum and change the adapter flange angle to drop the top lower, or just redo the airbox design to be lower profile, or chop the ITB runners down somewhat....or some combination of all 3. I will be happy if I can get the thing to fit under a turbo II hood.
I am presumably getting a shifter extension for the T5 from Granny's with the mount kit, obviously the T5 fitment leaves something to be desired, we will see how the shifter extension works, if I dont like it I can always build my own. with any luck I will still be able to use my steeda short shifter base.

The dirty engine bay, before cleaning.

After pressure washing with some simple green. the paint is still in sad condition...but at least all the oil is gone.


I couldn't resist...with a clean bay I had to test fit the engine, aside from my crazy ITB air box setup(and the turbo, which wouldn't fit because the engine is currently offset to the passenger side(stupid huge exhaust housing) the engine fits like it was made for the chasis. From my measurements, I should have roughly 1/2" hood clearance at the cam gears because the factory hood bows up roughly 1.5" in the middle...the ITB air box on the other hand will protrude somewhere around 2" above the hood in front(though it should clear in the back) If I had some measurements from a turbo II hood I would be able to tell if the scoop will clear the airbox(plenum), but being offset to the driver side like it is...it would be really close. Most likely I will have to revisit the plenum and change the adapter flange angle to drop the top lower, or just redo the airbox design to be lower profile, or chop the ITB runners down somewhat....or some combination of all 3. I will be happy if I can get the thing to fit under a turbo II hood.
I am presumably getting a shifter extension for the T5 from Granny's with the mount kit, obviously the T5 fitment leaves something to be desired, we will see how the shifter extension works, if I dont like it I can always build my own. with any luck I will still be able to use my steeda short shifter base.
Last edited by Wicked93gs; Sep 5, 2015 at 01:04 PM.
Thread Starter
Full Member
Joined: Aug 2015
Posts: 86
Likes: 0
From: Columbia TN

This is the factory b234f intake manifold...I decided to test fit it. Its a bad design with poor TB location and the runners have a small cross section. I test fit it(just laying there...not properly lined up or attached all the way) to see how changing the angle the runners attach to the flange will affect plenum height. As you can see, this is a much more favorable angle in getting the hood to close. I should be able to duplicate this angle with a few changes to the current ITB design...namely by cutting off the BMW ITB flange and welding on a B234F flange in its place...at the correct angle. Doing this will also allow me to shorten the overall length by roughly 1". Combined with angling the back of the plenum roof for better brake booster clearance this should solve my issues nicely.

Thread Starter
Full Member
Joined: Aug 2015
Posts: 86
Likes: 0
From: Columbia TN
Well, thats a good question...it really depends on whether I can get the HE351VE working as it should...its a 560HP capable turbo...the engine is capable of that...but there is no way I would run a normal 500HP turbo on the street...but I will run this if I can get the VGT working to some decent degree.
Thread Starter
Full Member
Joined: Aug 2015
Posts: 86
Likes: 0
From: Columbia TN

Just a pic of the airbox mods...had to flushmount and angle the back wall to clear the booster....may still have to dent the booster or use a smaller one when all is said and done.(the XR has a smaller diameter booster that may work if I need to go that route. The brake distribution block will need to be relocated and the bend on the line coming out the passenger side of the master cylinder will likely need a more severe bend.
Thread Starter
Full Member
Joined: Aug 2015
Posts: 86
Likes: 0
From: Columbia TN
Megasquirt...have a plug and play Ford 2.3t ...ms2 sitting on the shelf, with mods to run LS1 coil packs...if I can find a place to mount them. I have another Valve cover that I have them mounted on now...but I doubt I can use it unless I find a turbo ii hood to clear the packs. I have run megasquirt on half a dozen different cars and am always happy with the results. I run MS3 on my SRT4 powered 77 Celica right now, its reliable enough for a daily driver. For this setup though it looks as if I will have to run a MAF sensor...it will make the ITB setup work much better...along with the VGT turbo(that would be a real pain to tune on speed density with the engine VE constantly changing based on turbo vane position, not a problem with MAF since it measures actual airflow...I dont much care for other issues with MAF, but its better than the tuning nightmare speed density would offer with this setup.
Last edited by Wicked93gs; Sep 8, 2015 at 12:13 PM.
Thread Starter
Full Member
Joined: Aug 2015
Posts: 86
Likes: 0
From: Columbia TN
Several reasons..the Volvo block is far weaker.(after all, a Ford 302 block splits at 500HP, but the 2.3t is good to 550HP before you even start doing things like adding straps and/or partially filling the block). Also...Volvo Redblocks use a different transmission...whereas you can bolt up a T5 to a 2.3L, and while the T5 isnt the strongest transmission, it has other advatages....weight to start with...it only weighs 75lbs, plenty of aftermarket support, and they are fairly cheap, come with a wide variety of gear ratios, etc. They do survive behind 500HP mustangs for quite awhile if driven reasonably. I am sure there are other reasons too...such as a head is a lot cheaper than an entire engine...and the reason I did it...its fun to build a hybrid engine.
Thread Starter
Full Member
Joined: Aug 2015
Posts: 86
Likes: 0
From: Columbia TN

What do you guys think? This is my spare valve cover, modified to mount LS1 coils. The idea behind this is the shortest path between coil and plug. A lot of LS1 guys dont like the coils on the valvecovers...I kinda like it though...it shows a priority on go rather than show. These coils make the engine a total of 2 inches taller, however it seems I will be picking up a turbo ii hood next week, so the 2 inches mean nothing since its all under the scoop...not to mention the first coil sits farther back than the cam gears.
Thread Starter
Full Member
Joined: Aug 2015
Posts: 86
Likes: 0
From: Columbia TN
Another no picture update. Granny's shipped my mounts Monday, so with any luck I will have them by the end of the week. Tomorrow I am picking up a turbo II hood and we shall see if the engine will fit under it. I suspect that even with the LS1 coils that the engine will clear the scoop. Also, this weekend I pulled the engine wiring harness from the XR4ti, I will strip it down to bare necesseties and use the turboford plug and play megasquirt 2 I have sitting around to run this thing. I ordered a wiring bundle from diyautone.com to rebuild the harness for this application. I will be set to go if I can find a decently priced milspec bulkhead connector for the firewall(makes pulling the engine when needed far easier)
Thread Starter
Full Member
Joined: Aug 2015
Posts: 86
Likes: 0
From: Columbia TN

Well, today my Granny's mount kit. I got the basic kit, it just includes the left and right mounts and brackets, the trans crossmember and a t5 extension bracket...which I promptly installed on my steeda tri ax shifter....with this shifter at least and the bracket the shifter should come up in the stock location from what I can see. Tomorrow evening or this weekend I will see if I can get these mounts installed and get the engine and trans sitting where it needs to be, then the fun can start. In other news I finally found a mil spec connector and crimping tool at a decent price...next weekend should be wiring.
Thread Starter
Full Member
Joined: Aug 2015
Posts: 86
Likes: 0
From: Columbia TN
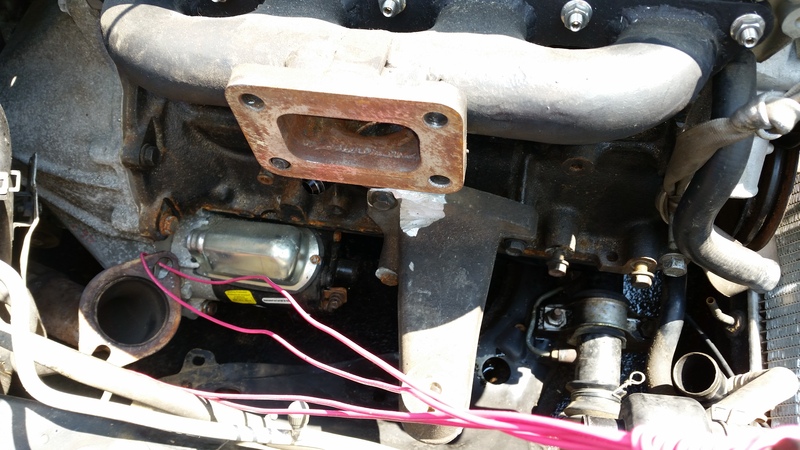
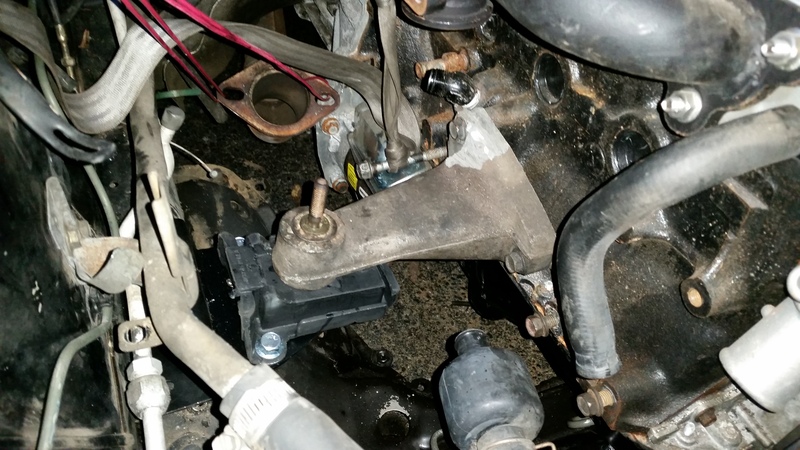
Well, tonight, I had just enough time to bolt the motor mounts in place...I still need to mark the spot weld locations for the brackets and weld them in place...also still have yet to install the trans crossmember and get the shifter installed(which will require a bit of cutting at the top of the trans tunnel). Engine fitment is great, though I do have to trim the Driver side steering rack bracket somewhat for clearance at the oil pan, very minor fabrication with this kit. I also found my huge Holset HE351VE turbo will indeed fit, with a whopping 1/4" to spare at the shock tower, its a good thing with these mounts that there wont be that much side to side movement. The problem is that the exhaust housing has maybe 1/2"-3/4" clearance. Any ideas on how to shield the paint from 1400 degree temps? All in all the engine fitment looks to be great for my needs.


Thread Starter
Full Member
Joined: Aug 2015
Posts: 86
Likes: 0
From: Columbia TN
Not working on the car much today(10 hour work day) but I couldnt resist test fitting the turbo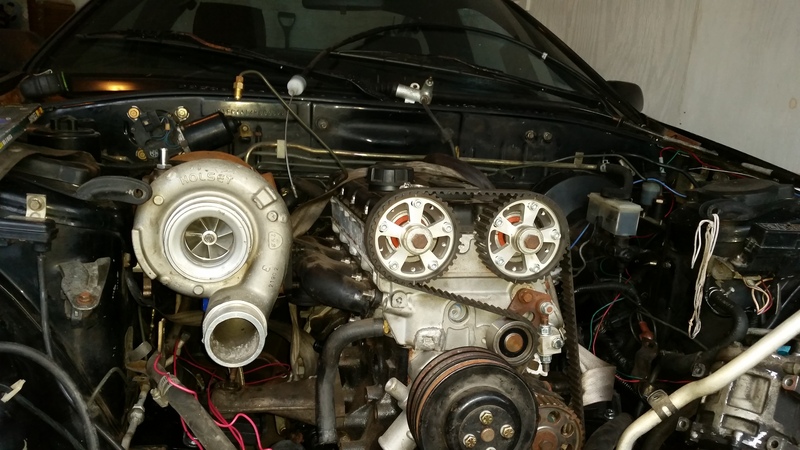
Aside from the 1/4" clearance it looks like it belongs on an engine this size right?

Aside from the 1/4" clearance it looks like it belongs on an engine this size right?
Thread Starter
Full Member
Joined: Aug 2015
Posts: 86
Likes: 0
From: Columbia TN


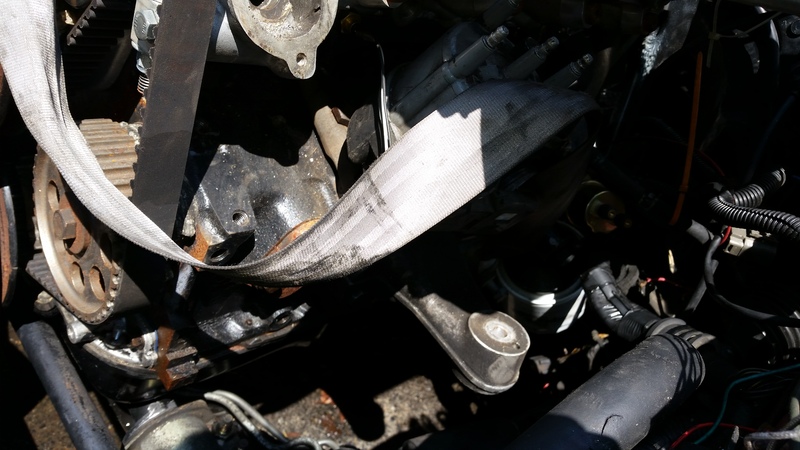
Finished installing the engine mounts today...it was mainly a process of spot welding them in after using the one bolt to hold them in place

I also notched the steering rack bracket and the boss of the steering rack itself that holds the rack in place. This is because I didn't want to dent my oil pan. I found I liked this solution better.


Had to cut a section of the top of the trans tunnel away inside the car to clear the shifter stub on the t5, after I installed the shifter extension bracket, the shifter seems to come up in a close to stock location, however I couldn't finish installing the trans since the trans crossmember granny's sent me seems to be wrong. It doesnt have the same bolt spread as the t5 trans mount to begin with, the offset from where it bolts to the body to the mount on the trans is wrong, and most importantly, it wont bolt to the body since one side is an angled mount and the other is flat. I am guessing they sent me a crossmember for a FB or FD, I dont know.
Last edited by Wicked93gs; Sep 20, 2015 at 05:22 PM.
Thread Starter
Full Member
Joined: Aug 2015
Posts: 86
Likes: 0
From: Columbia TN
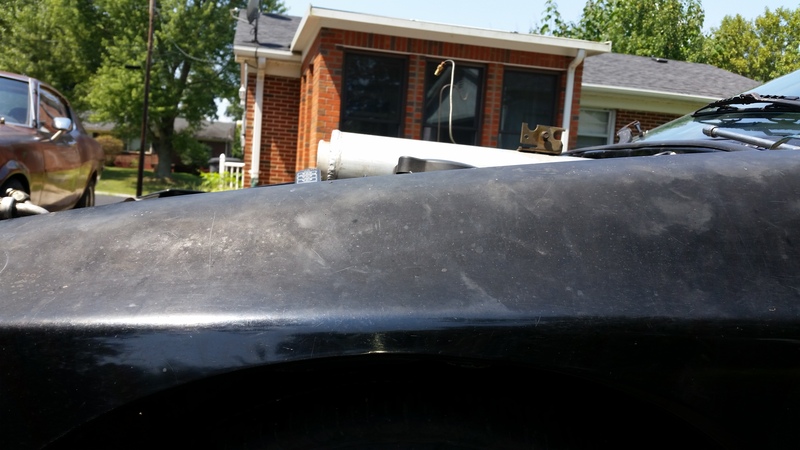
Also went ahead and test fit the stock NA hood, it wont quite close. I will have to trim just a little hood bracing to make it work. The turbo II hood will work a lot better for this particular swap.
Thread Starter
Full Member
Joined: Aug 2015
Posts: 86
Likes: 0
From: Columbia TN

The finished ITB setup. Adapter plate you bought from someone doesnt work for you? Solution? Use it as a flange and weld it to the ITBs themselves. Of course there is the downside that to take the linkage apart I will have to cut the middle of the flange with a bandsaw and make it a 2 part flange....though thats neither here nor there considering that a large washer can span the distance just fine.