
FC3S with a 12V VR6

FC3S with a 12V VR6
I got the car when I was 16, then the clutch went out and I had big plans for it. It sat for 5 years, then I got started on it again. This was about a week after it started for the first time.

First autox after getting it running. I stayed up all night fixing all the small things to get it ready. On street tires too. Car was NA with a half bridgeport.


Next autox I had the wing on, Rcomps mounted, and raised the front up 20mm to avoid pinching the tire on the chassis.


Then I finally felt like throwing in the 160lb secondaries and replacing the header with something a bit more functional- Greddy 20G turbo kit.


Somewhere along the way I got some S5 tails and cut the donkey dong off the exhaust.

Then I needed a bit more traction, so I got some mickey's on yet another set of mustang wheels.

I had some fun at our yearly Ice Cream Cruise
And a bit of street action in �Mexico�
Datalogging the engine blowing on the dyno. :thumbsdown:

Drove the car home after blowing, then over to my buddy's garage where it currently sits. My dumbass forgot the hood pins, not a big deal on my old steel hood, the aluminum turbo hood it's a big problem. Luckily all damage was to the hood, and the passenger side mirror.

First autox after getting it running. I stayed up all night fixing all the small things to get it ready. On street tires too. Car was NA with a half bridgeport.
Next autox I had the wing on, Rcomps mounted, and raised the front up 20mm to avoid pinching the tire on the chassis.
Then I finally felt like throwing in the 160lb secondaries and replacing the header with something a bit more functional- Greddy 20G turbo kit.
Somewhere along the way I got some S5 tails and cut the donkey dong off the exhaust.
Then I needed a bit more traction, so I got some mickey's on yet another set of mustang wheels.
I had some fun at our yearly Ice Cream Cruise
And a bit of street action in �Mexico�
Datalogging the engine blowing on the dyno. :thumbsdown:
Drove the car home after blowing, then over to my buddy's garage where it currently sits. My dumbass forgot the hood pins, not a big deal on my old steel hood, the aluminum turbo hood it's a big problem. Luckily all damage was to the hood, and the passenger side mirror.
Now you're up to speed, here's the new stuff:
So I decided to put a VR6 into the car, don't ask why (I don't know either). Plans for the car are to drag, drift, and do trackdays at MidAmerica Motorplex. And of course bruise a few ego's in the process, I just hope my own isn't a victim too.
So details on the motor:
Junkyard block with excessive cylinder taper (according to machine shop, I never checked myself)
ARP headstuds, main studs, rod bolts
C2 8.5:1 head spacer
Stock head/ cams currently
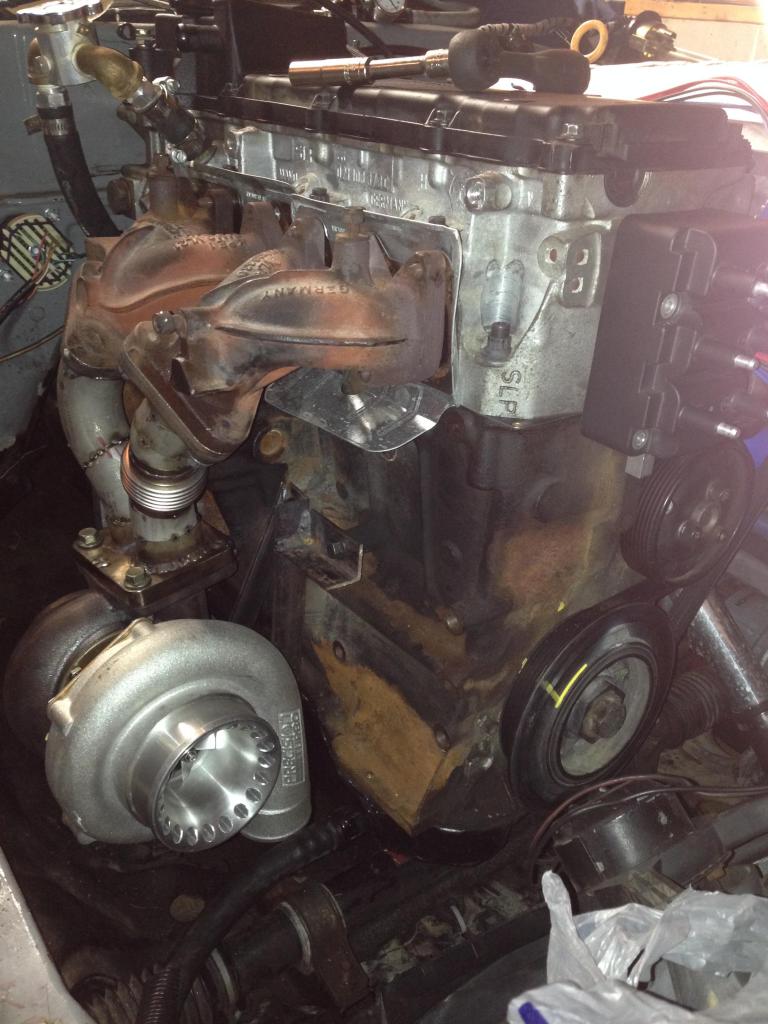
PT6266 w/ .84 divided hotside
Twin Tial wastegates
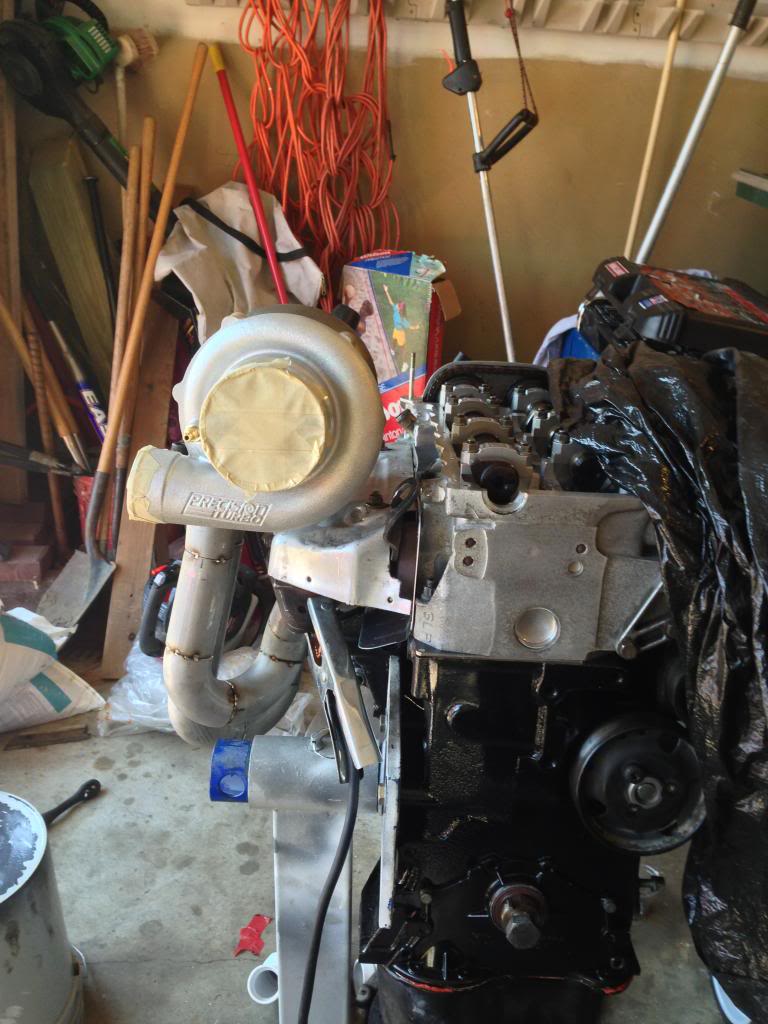
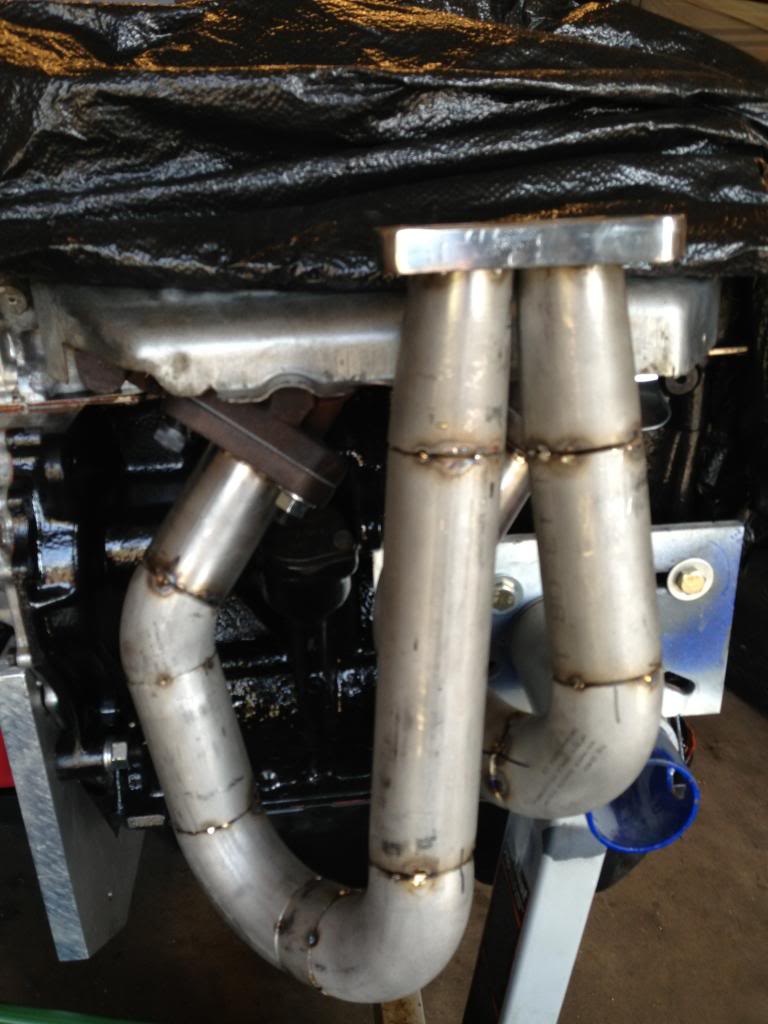
Custom stainless divided turbo manifold
Custom intake manifold
034 fuel rail
034 filter setup
Modified oil pan
Stock FC3S oil cooler
Walbro �485� fuel pump
Treadstone intercooler
Transmission and Drivetrain:
S4T2 trans and diff
ACT steel flywheel
ACT pressure plate
Stock FC clutch disc
Custom crank adapter and bellhousing adapter
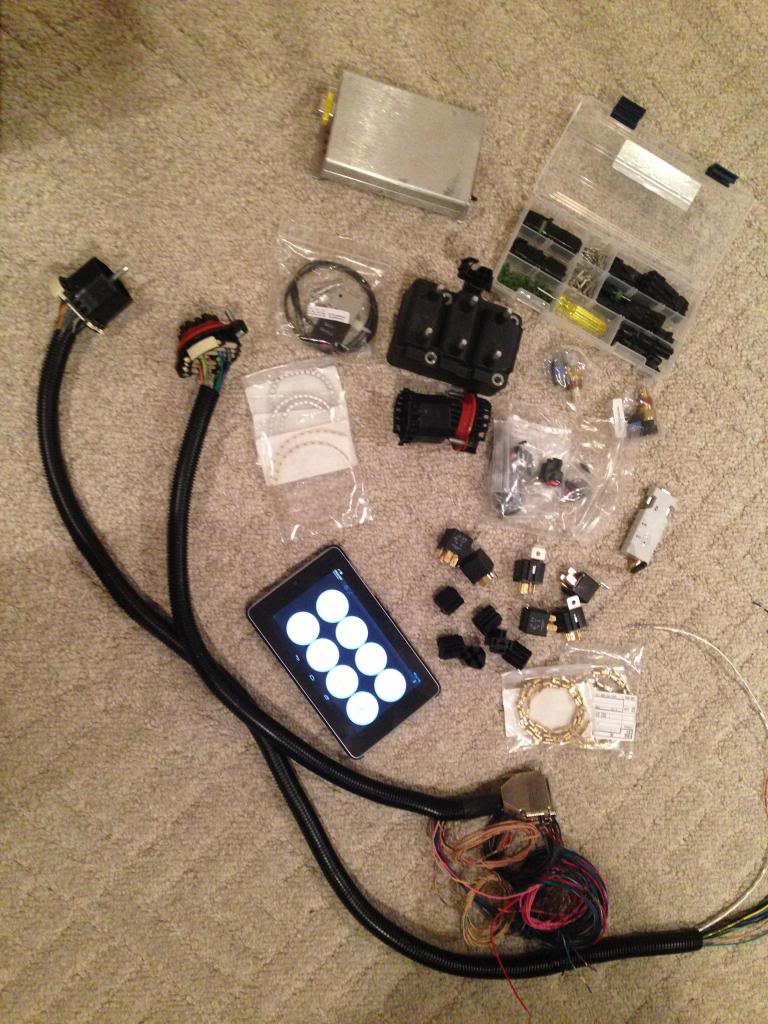
Engine management:
Megasquirt 2 v3.0 board
Mapdaddy 4bar w/ constant baro correction
Megasquirt boost control
Google Nexus 7 tablet running via bluetooth and mounted in dash
DIYAutotune IGN-6 ignition coil
72lb Bosch EV14 injectors
Other previously installed mods on the chassis:
KTS coilovers
Energy Suspension bushings
Delrin differential mounts
Camber link
Manual brake conversion
SS brake/clutch hose
Speedway brake bias adjuster
Momo wheel/ NRG quick release
Sparco Torino 2 seat
Complete HVAC removal
Carbon fiber wing
Wheels:
Pink '99 Mustang GT wheels- Advan A048 rubber (getting pretty old)
Silver '99 Mustang GT wheels- street tires
V6 stang wheels- drag radials on rear, street tires front
Stock FC wheels- tiny street tires
Now more pretty pictures.
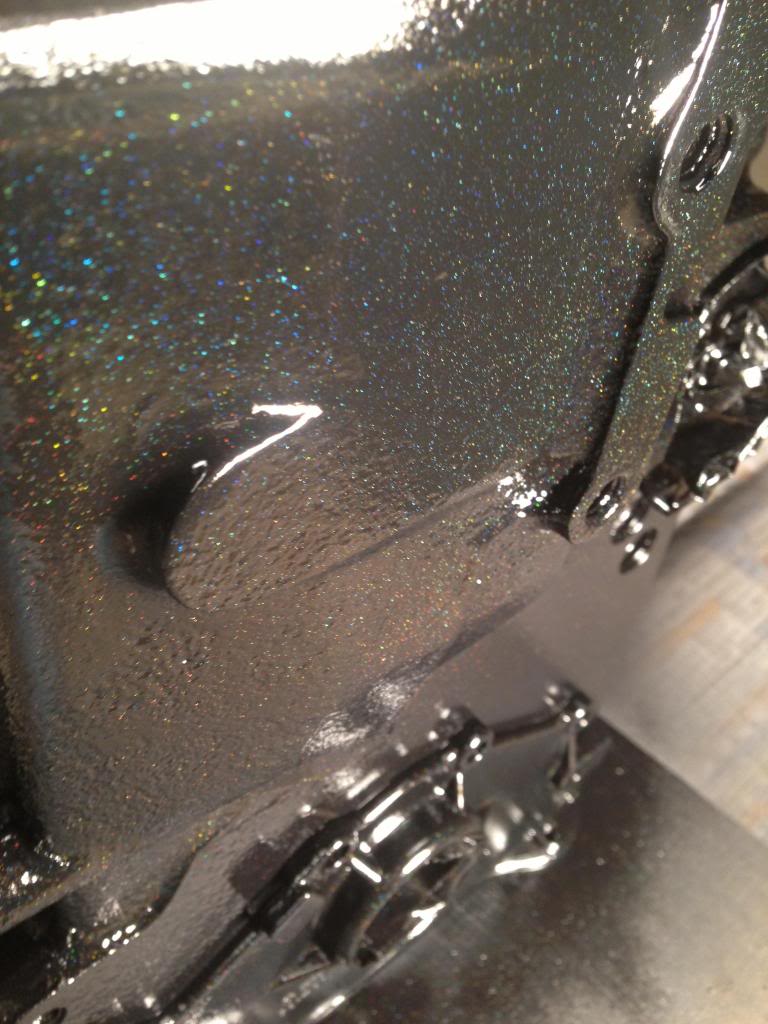
I gave the block a paint job. You've gotta have the stripper dust.
I then started mocking up an adapter plate and figuring out thickness I'd need.
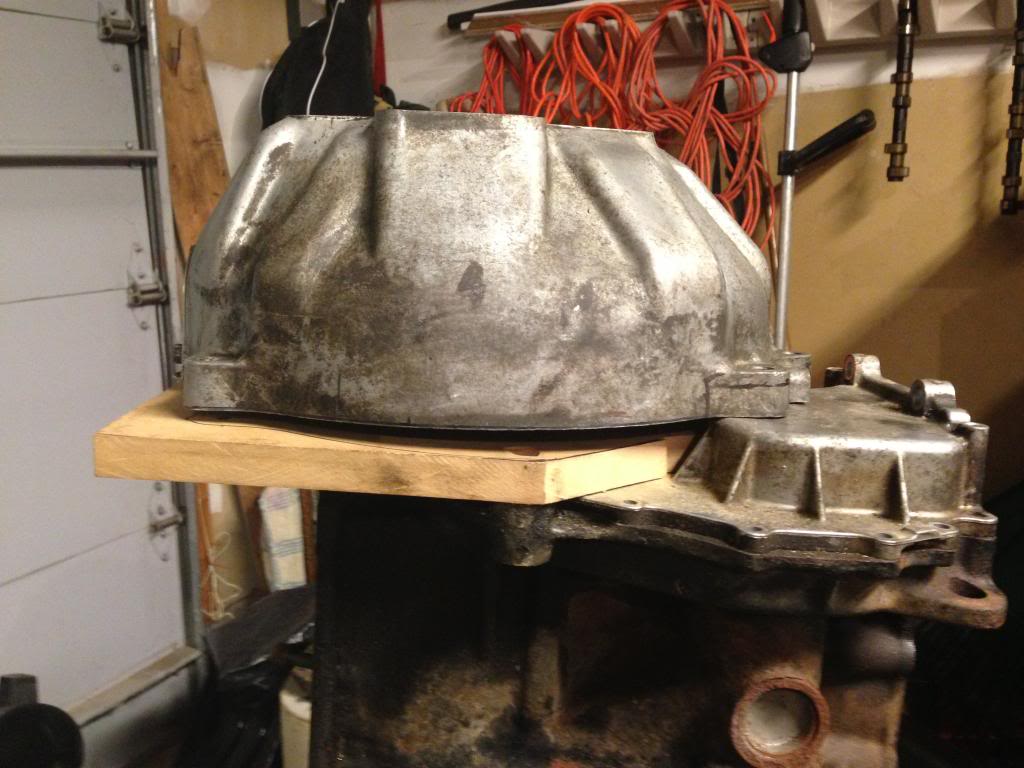
I then made the expensive purchase:

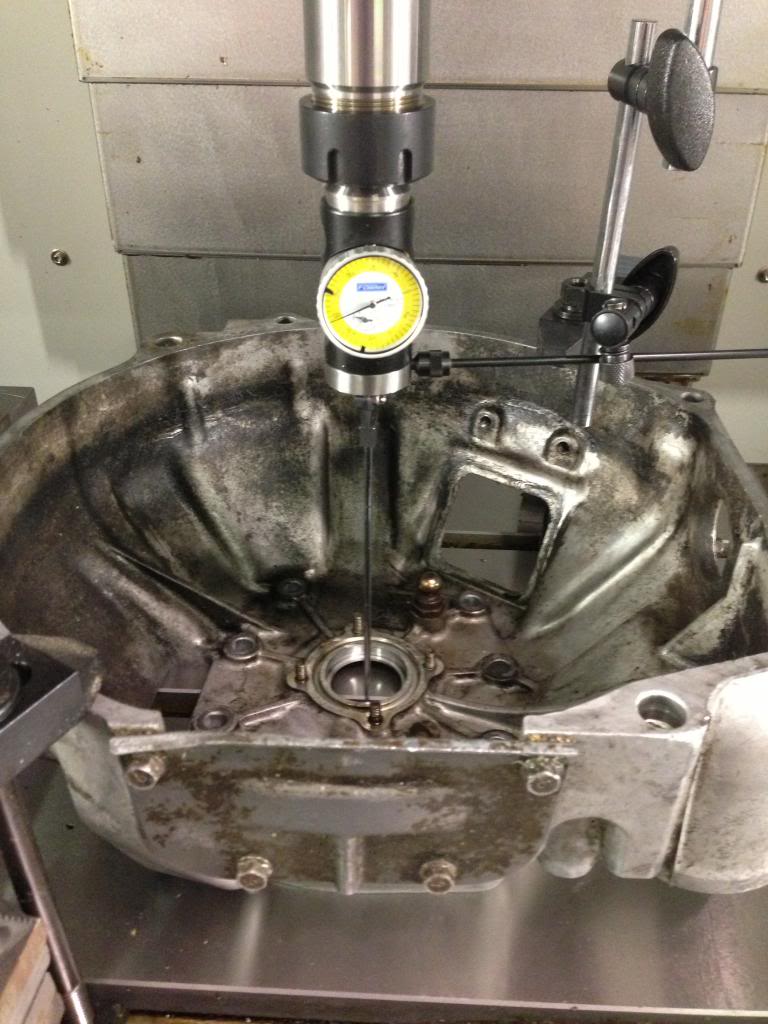
I clamped the bellhousings in our Hardinge GX1000 OSP at work to get measurements
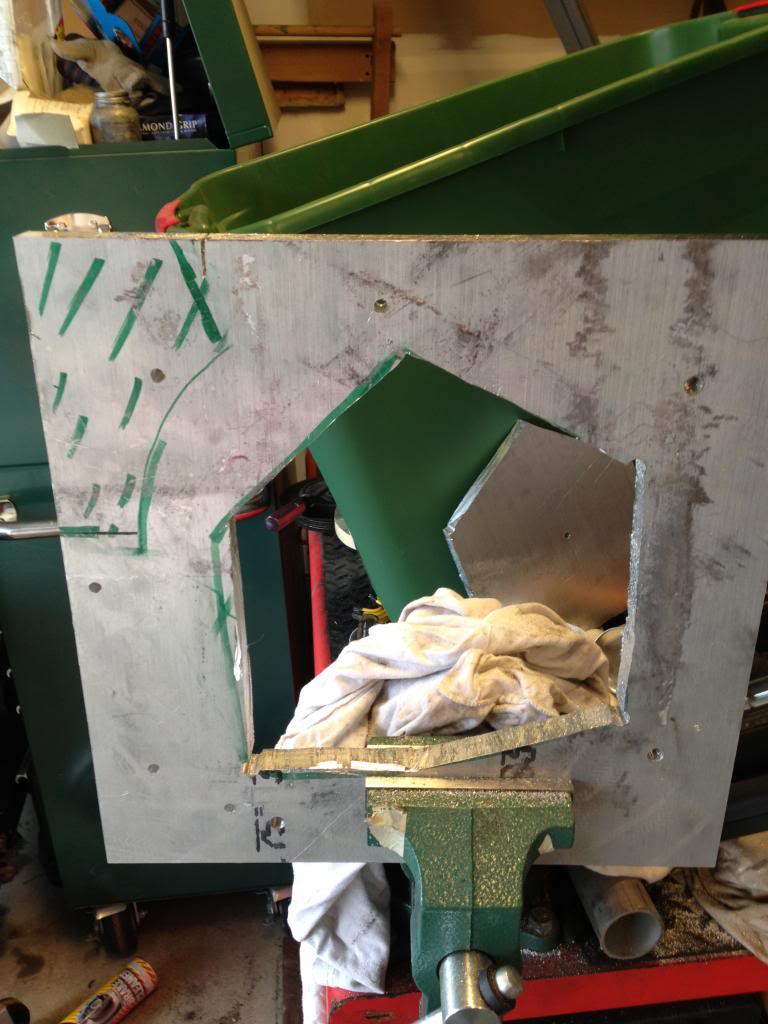
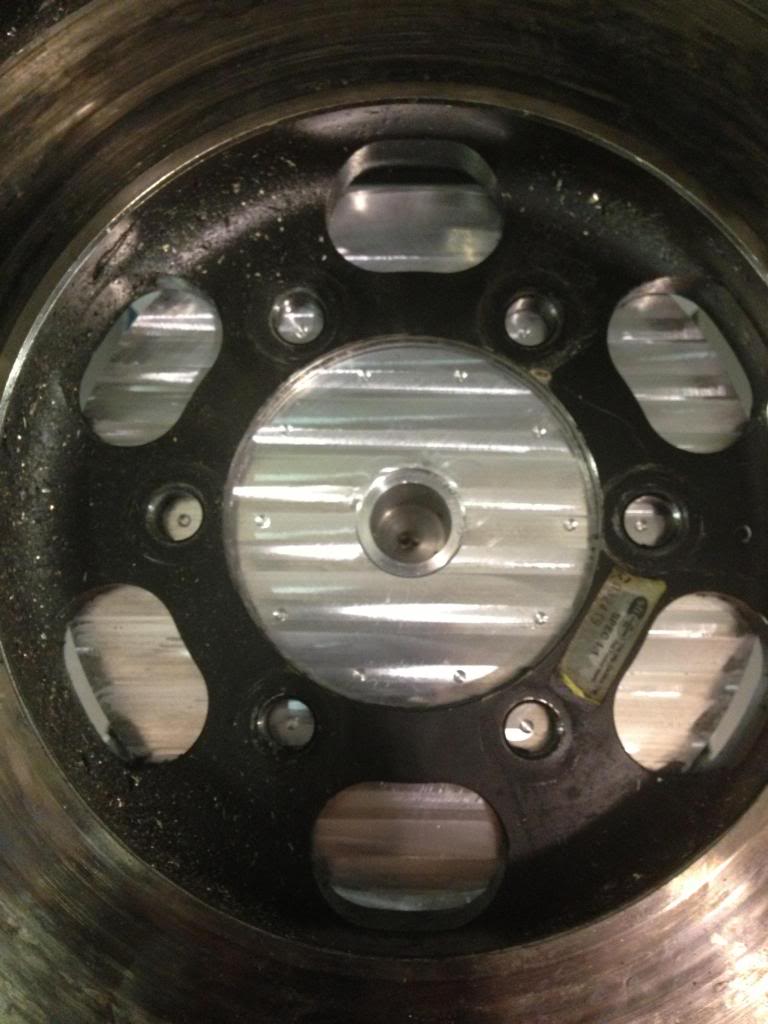
I then, for some inexplicable reason hand cut the hole with power tools. Here's 4 hours of work.
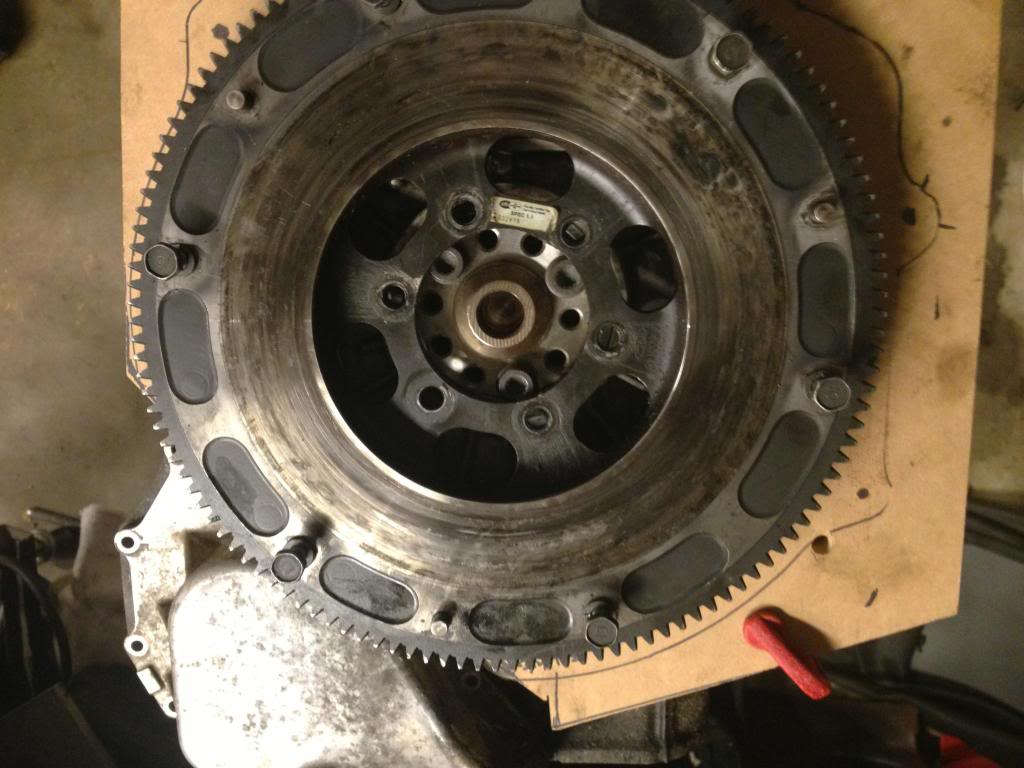
It bolts up! (I later trimmed a ton off the outside)

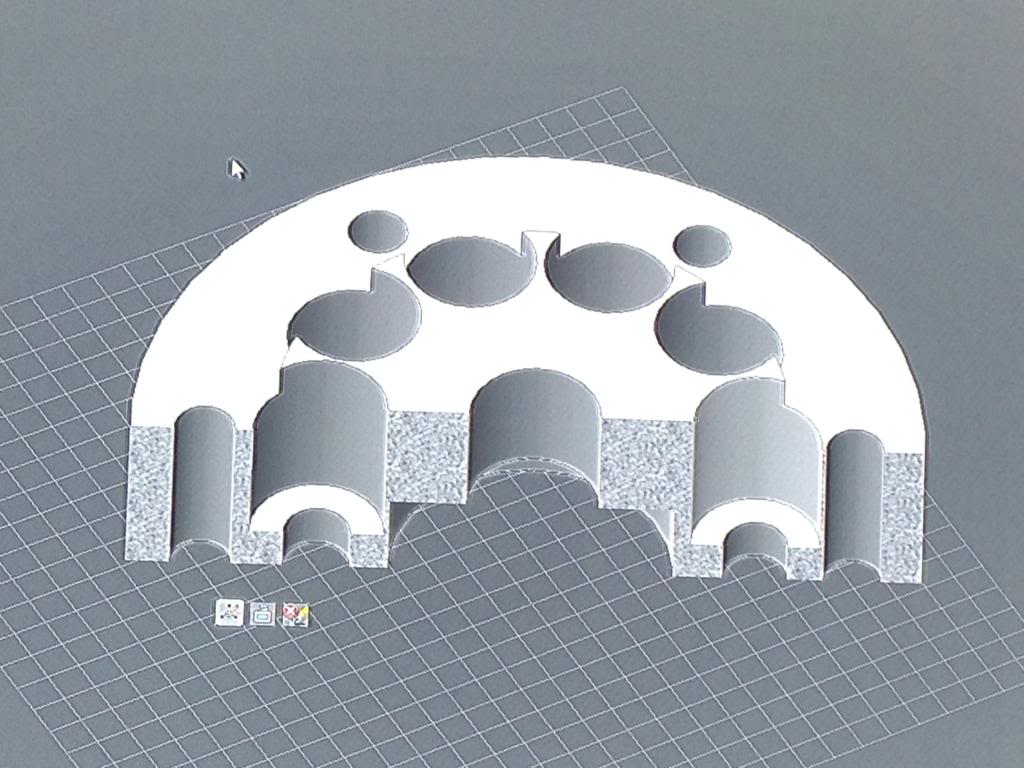
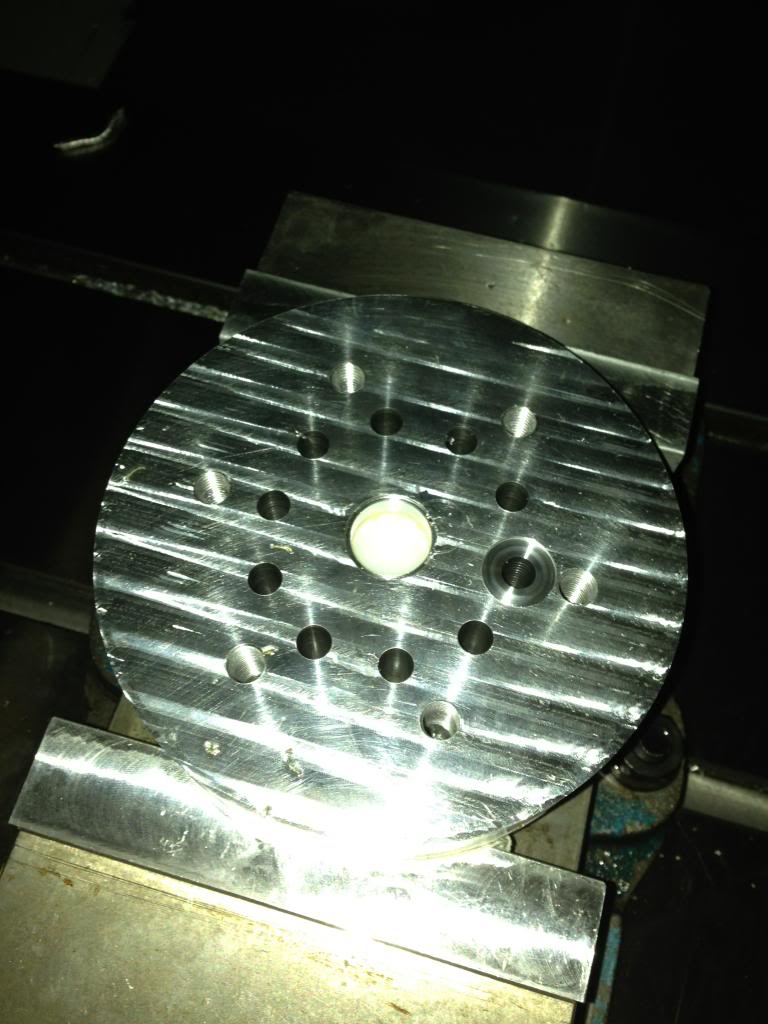
I then drew up the crank adapter
And recruited the Applications Engineer to give me a hand with programming
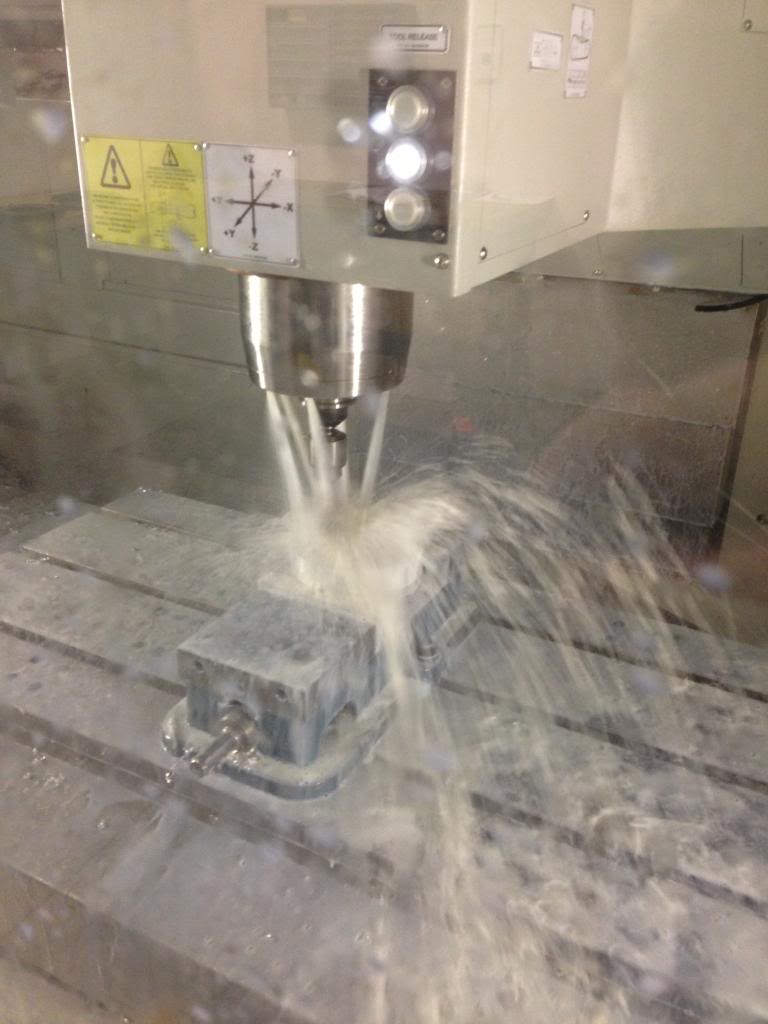
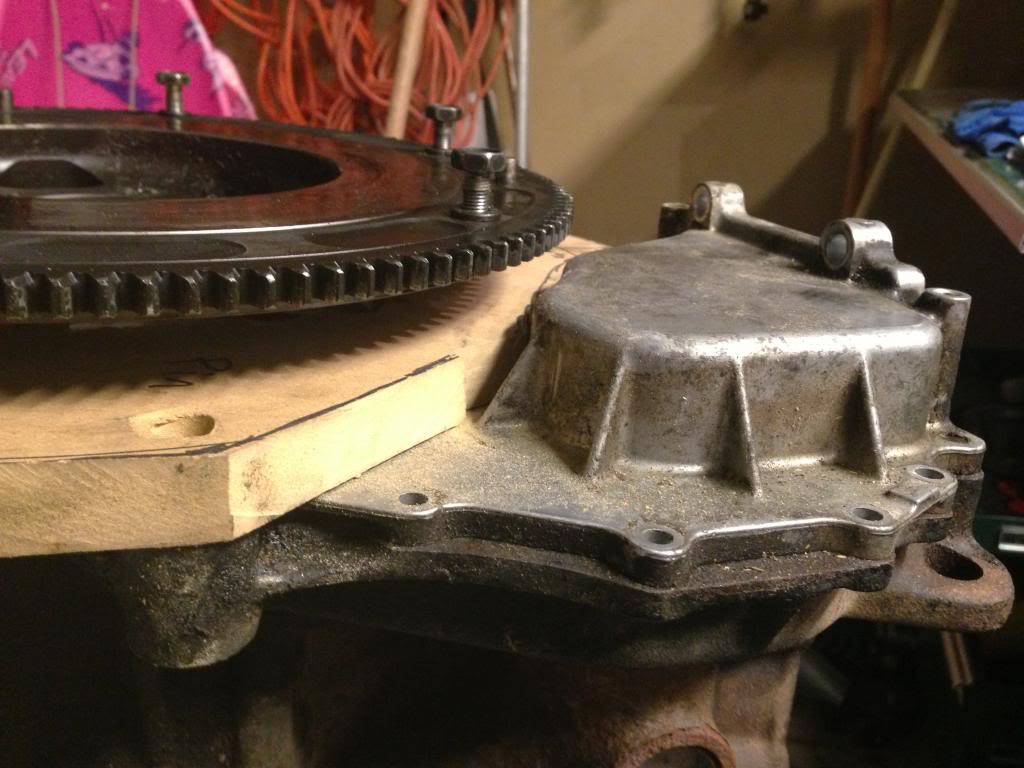
Starting to take shape
So I decided to put a VR6 into the car, don't ask why (I don't know either). Plans for the car are to drag, drift, and do trackdays at MidAmerica Motorplex. And of course bruise a few ego's in the process, I just hope my own isn't a victim too.
So details on the motor:
Junkyard block with excessive cylinder taper (according to machine shop, I never checked myself)
ARP headstuds, main studs, rod bolts
C2 8.5:1 head spacer
Stock head/ cams currently
PT6266 w/ .84 divided hotside
Twin Tial wastegates
Custom stainless divided turbo manifold
Custom intake manifold
034 fuel rail
034 filter setup
Modified oil pan
Stock FC3S oil cooler
Walbro �485� fuel pump
Treadstone intercooler
Transmission and Drivetrain:
S4T2 trans and diff
ACT steel flywheel
ACT pressure plate
Stock FC clutch disc
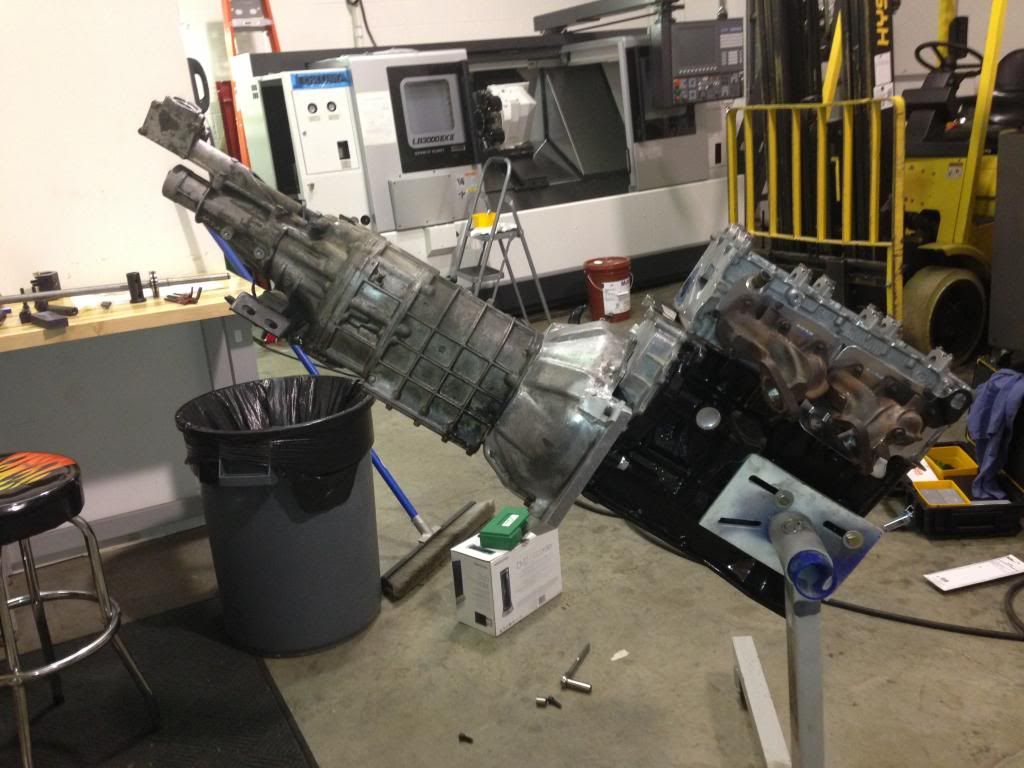
Custom crank adapter and bellhousing adapter
Engine management:
Megasquirt 2 v3.0 board
Mapdaddy 4bar w/ constant baro correction
Megasquirt boost control
Google Nexus 7 tablet running via bluetooth and mounted in dash
DIYAutotune IGN-6 ignition coil
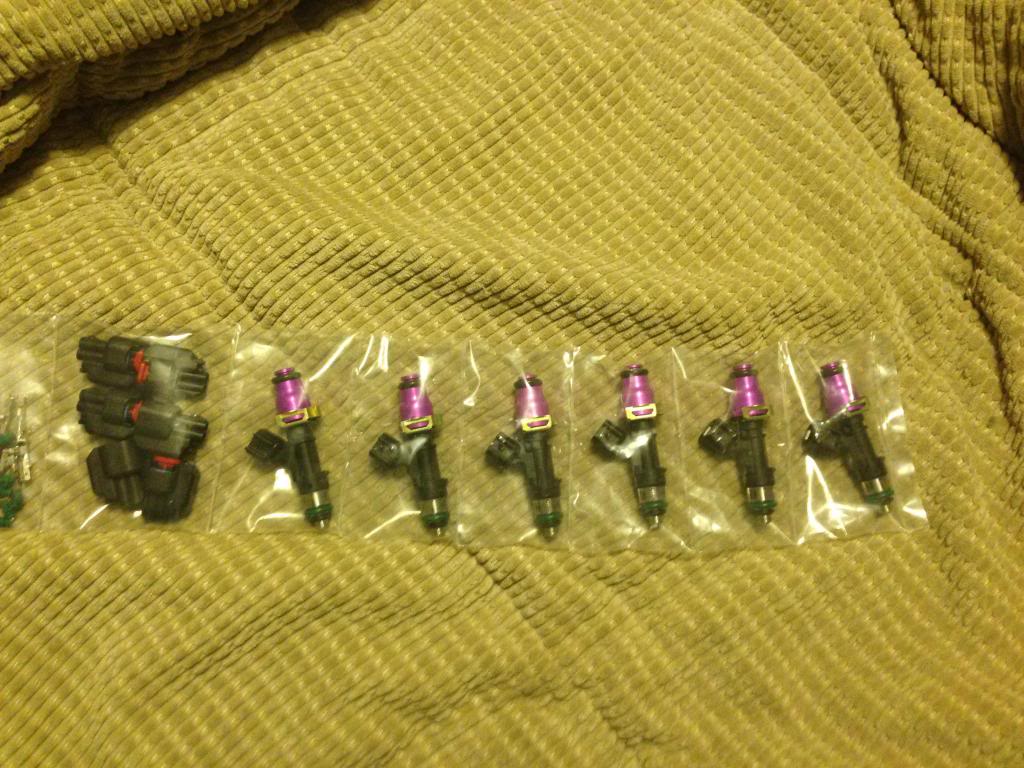
72lb Bosch EV14 injectors
Other previously installed mods on the chassis:
KTS coilovers
Energy Suspension bushings
Delrin differential mounts
Camber link
Manual brake conversion
SS brake/clutch hose
Speedway brake bias adjuster
Momo wheel/ NRG quick release
Sparco Torino 2 seat
Complete HVAC removal
Carbon fiber wing
Wheels:
Pink '99 Mustang GT wheels- Advan A048 rubber (getting pretty old)
Silver '99 Mustang GT wheels- street tires
V6 stang wheels- drag radials on rear, street tires front
Stock FC wheels- tiny street tires
Now more pretty pictures.
I gave the block a paint job. You've gotta have the stripper dust.

I then started mocking up an adapter plate and figuring out thickness I'd need.


I then made the expensive purchase:

I clamped the bellhousings in our Hardinge GX1000 OSP at work to get measurements

I then, for some inexplicable reason hand cut the hole with power tools. Here's 4 hours of work.

It bolts up! (I later trimmed a ton off the outside)

I then drew up the crank adapter

And recruited the Applications Engineer to give me a hand with programming

Starting to take shape

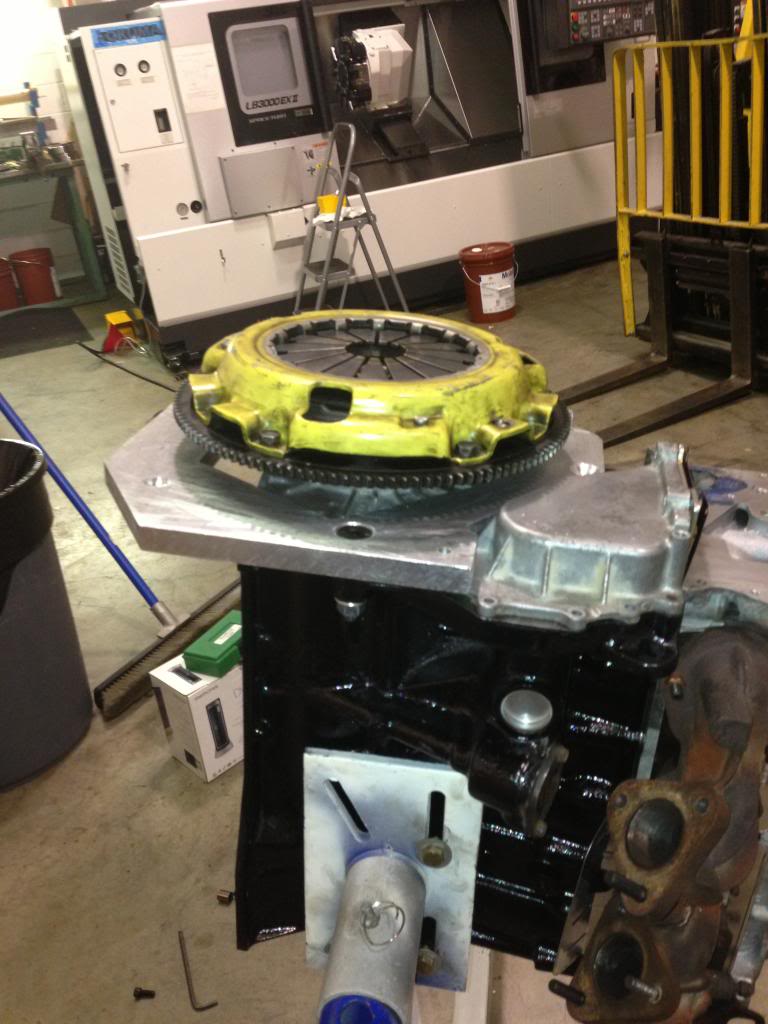
A little more work
And it all bolts together!
I still needed a pilot bearing, lo and behold a 1.8t bearing fits perfectly
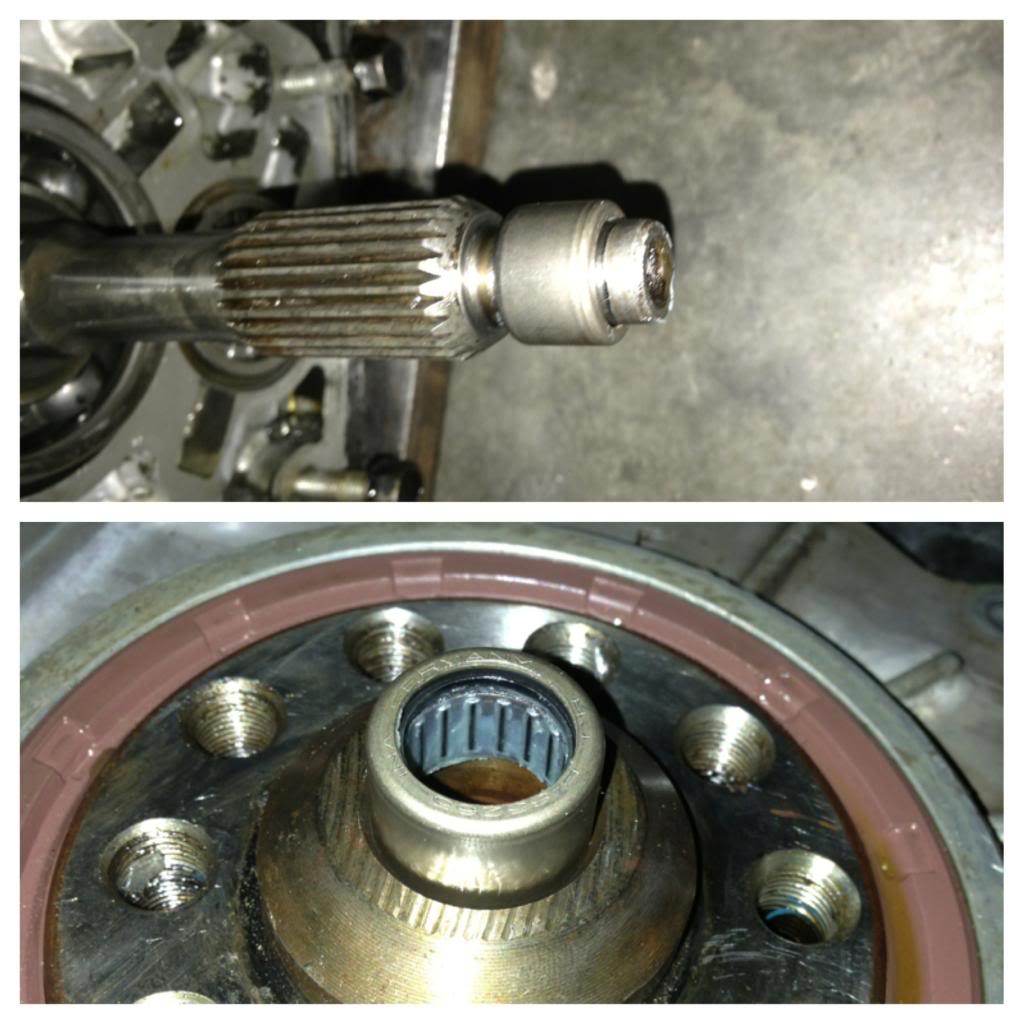
A small victory and a step in the right direction
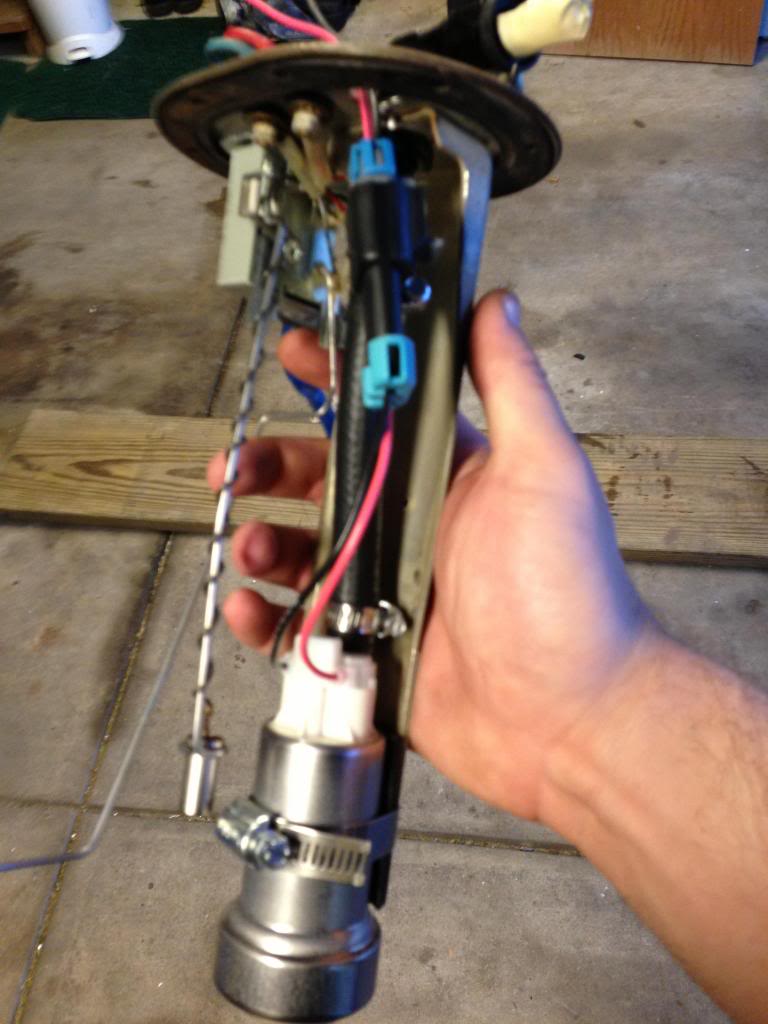
Slapped the Walbro in. I hope this is enough fuel
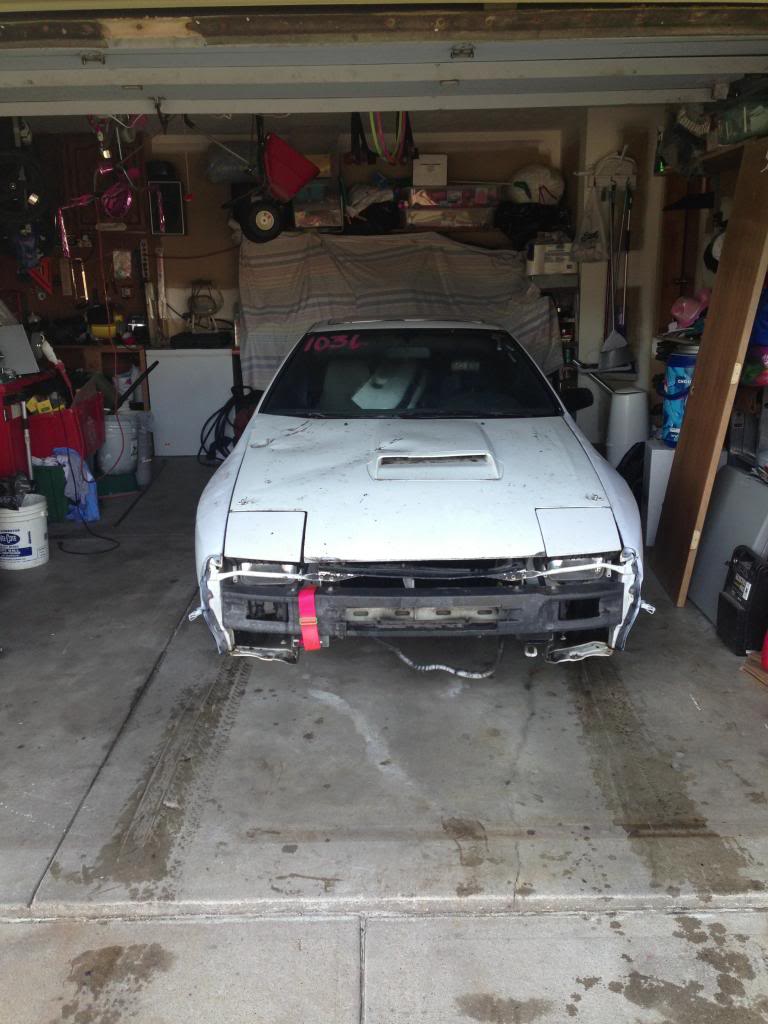
Got the car back at home. She's looking pretty pathetic these days
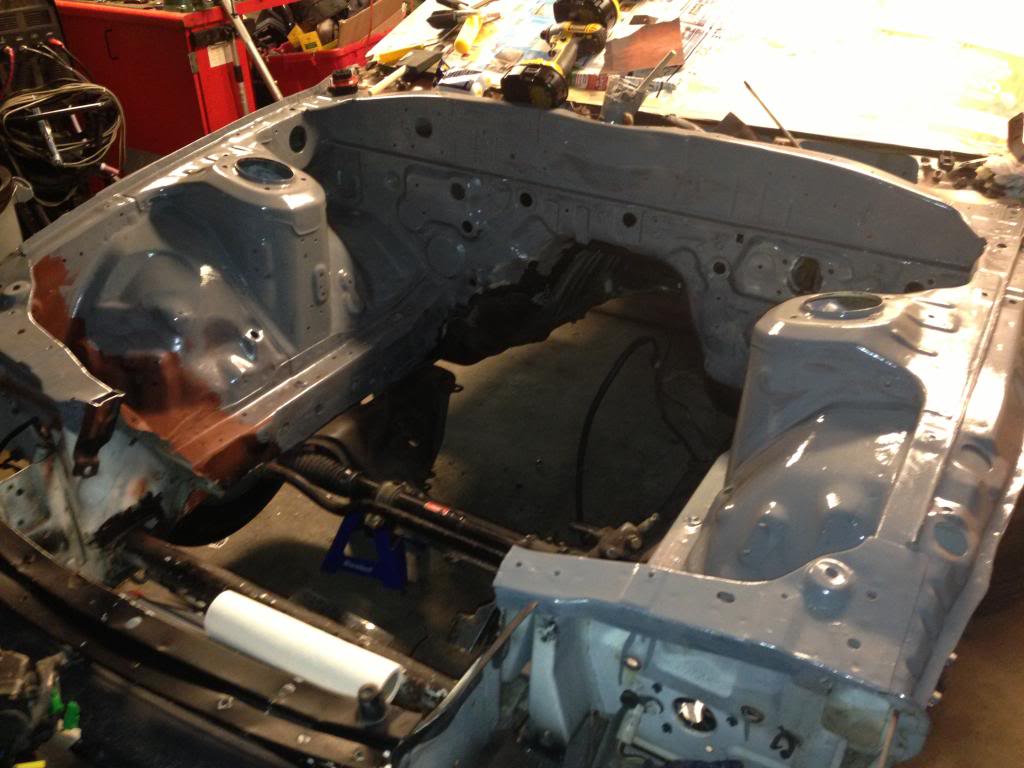
Started putting some paint in the bay
Mocking it up
Version 1.0 beta (I later significantly shortened the rear runner)
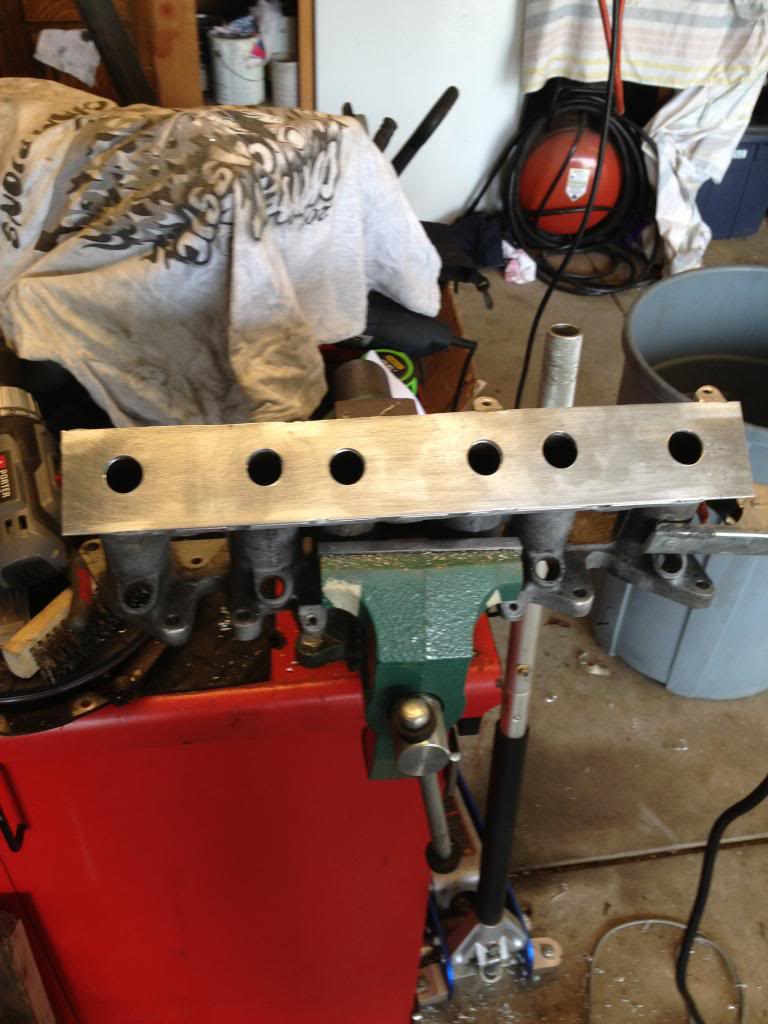
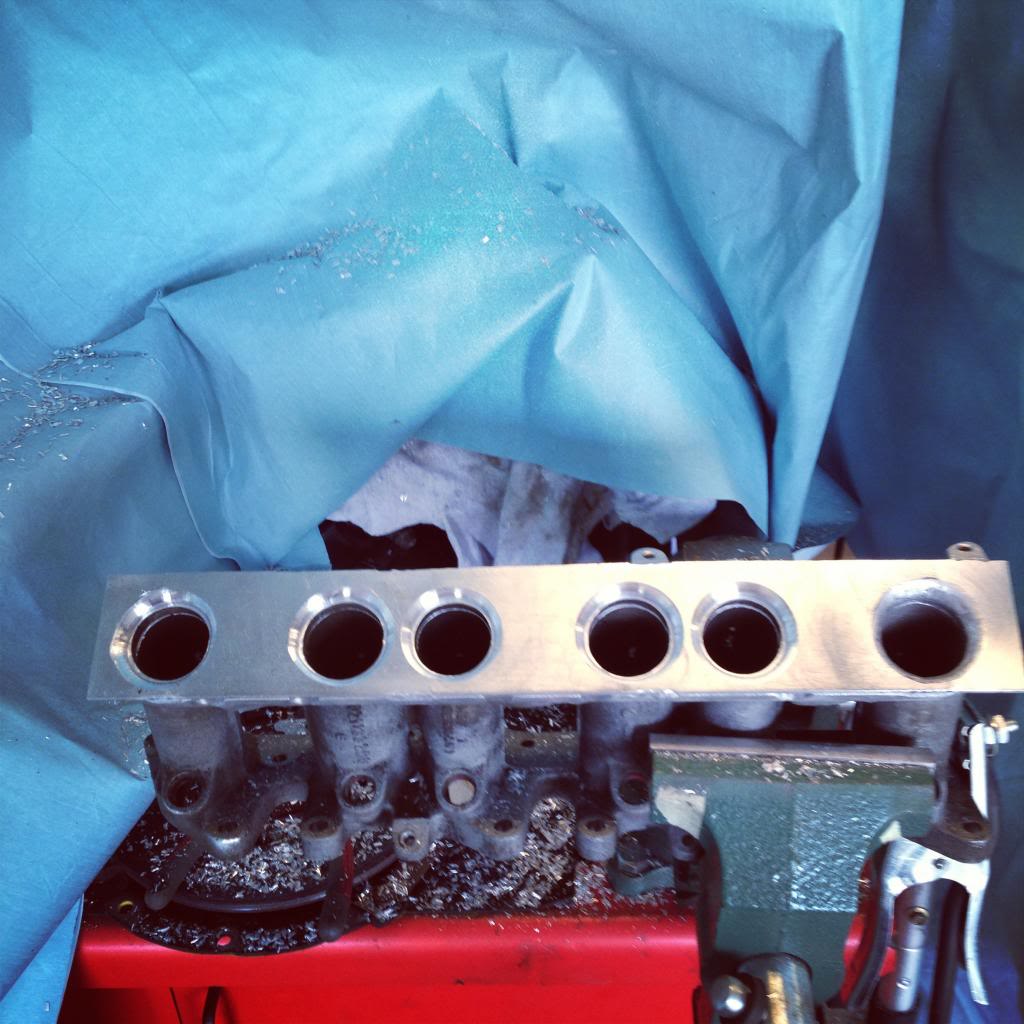
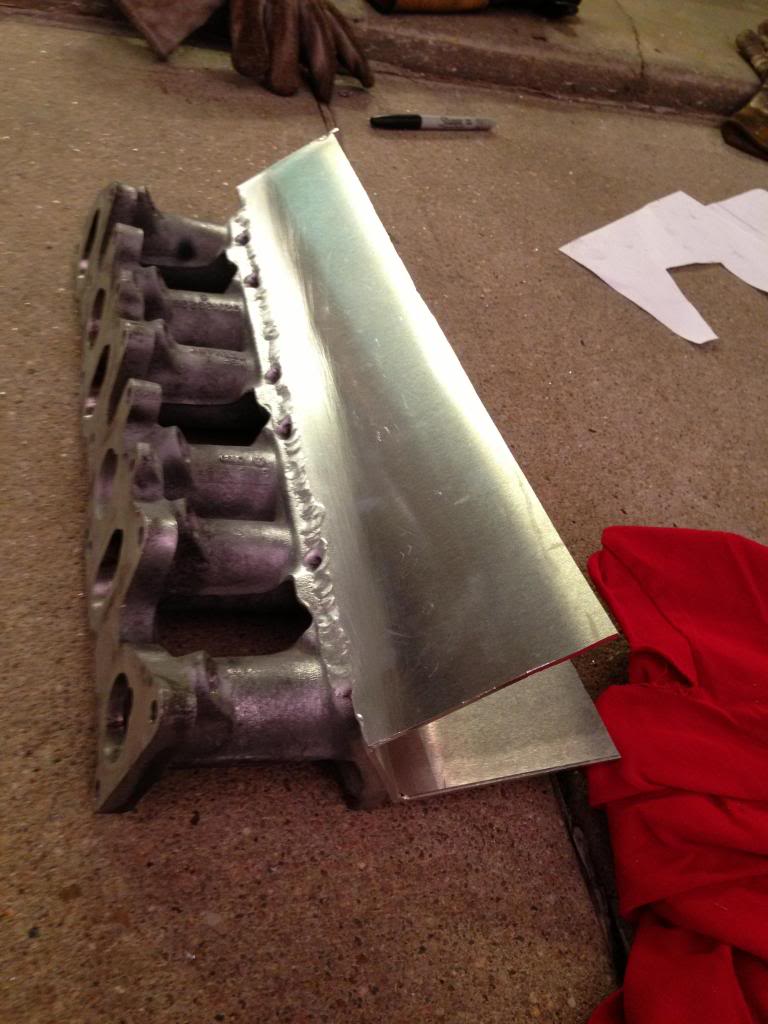
I started making the intake manifold
I used a router with a roundover bit to shape the runner entrances

And it all bolts together!

I still needed a pilot bearing, lo and behold a 1.8t bearing fits perfectly

A small victory and a step in the right direction

Slapped the Walbro in. I hope this is enough fuel

Got the car back at home. She's looking pretty pathetic these days

Started putting some paint in the bay

Mocking it up

Version 1.0 beta (I later significantly shortened the rear runner)

I started making the intake manifold

I used a router with a roundover bit to shape the runner entrances

Then filled and smoothed them with weld, which seals the manifold internally, external welding was all just extra
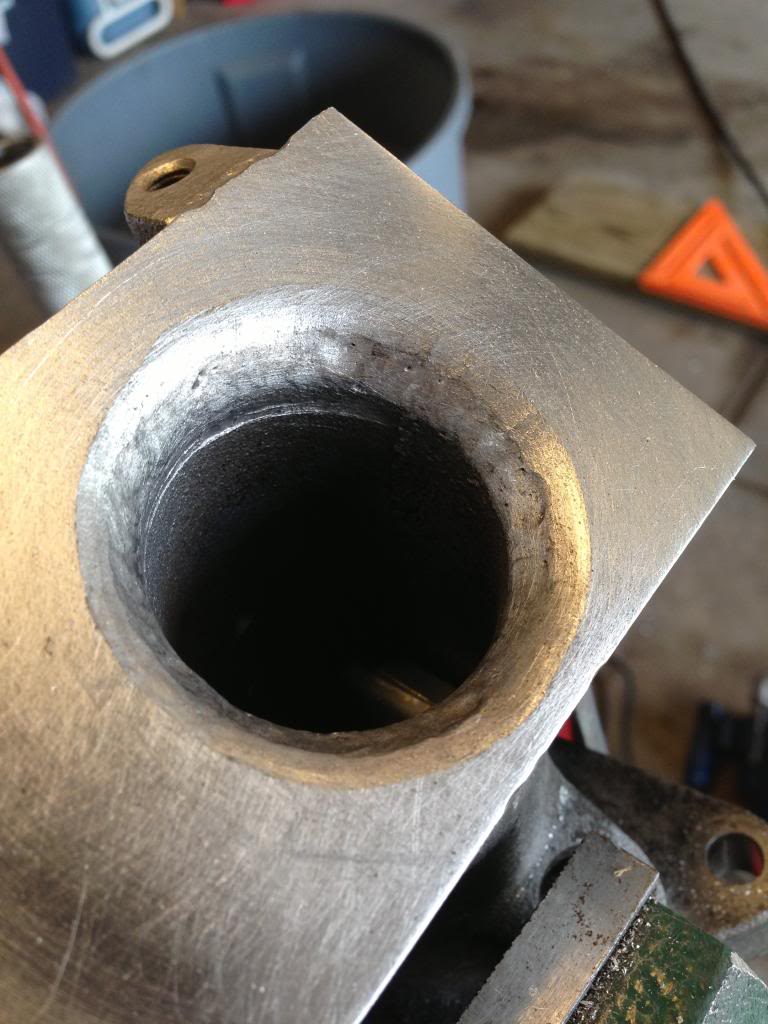
Slightly tapered plenum
I got some wiring junk in
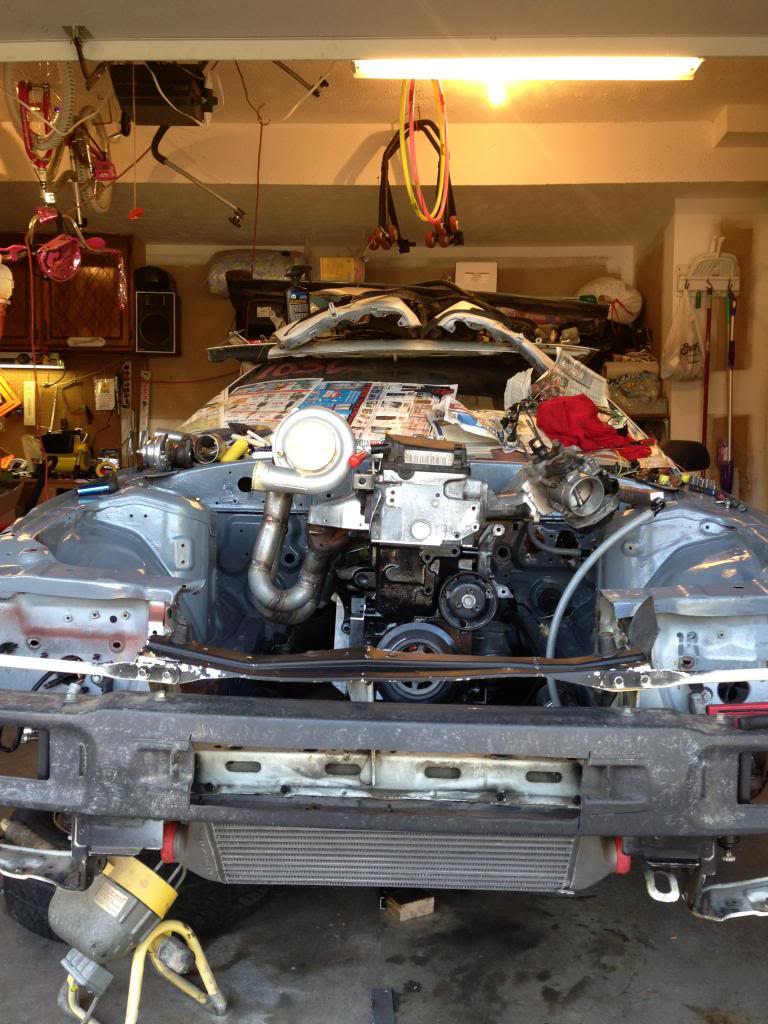
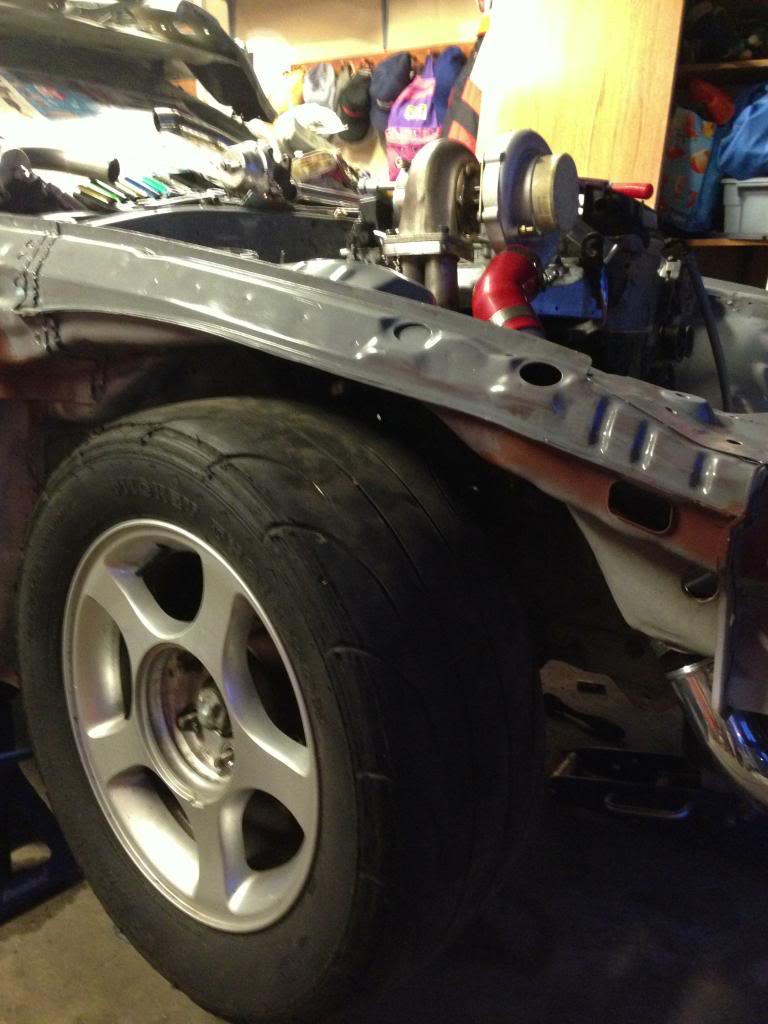
I set the engine in, and found out she's a big betch. I'll leave it at this height currently to simplify the install. Later I hope to lower it 3 inches or so.
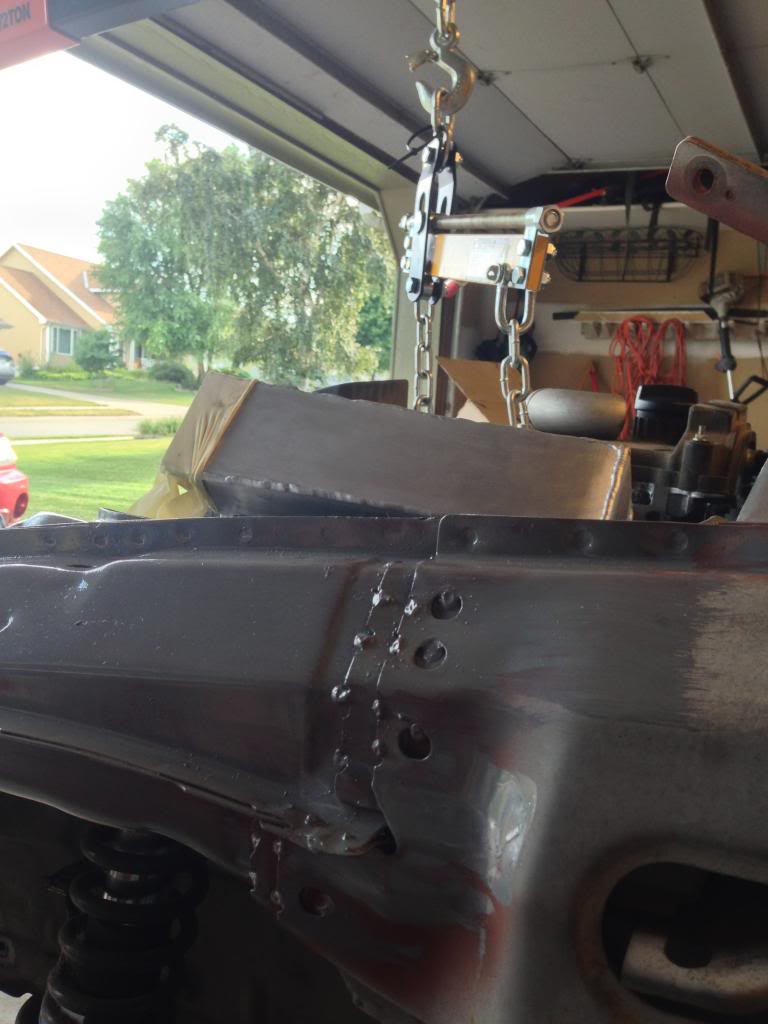
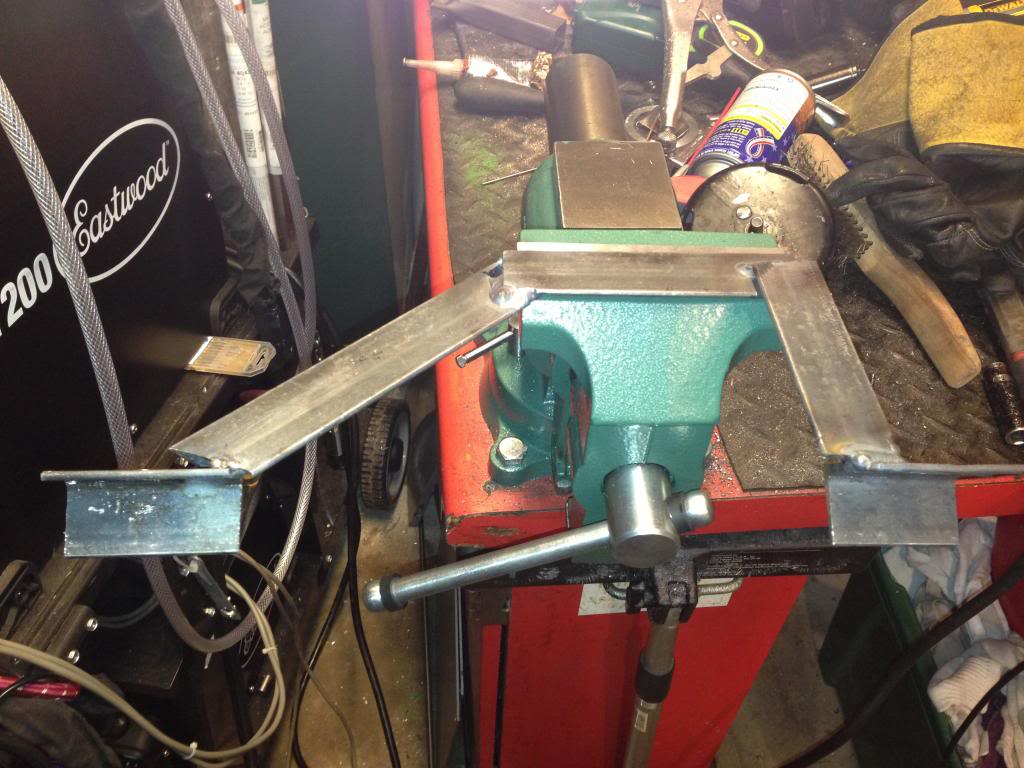
Threw together some mount brackets, these are NOT finished products, they need a lot of work to be strong enough.
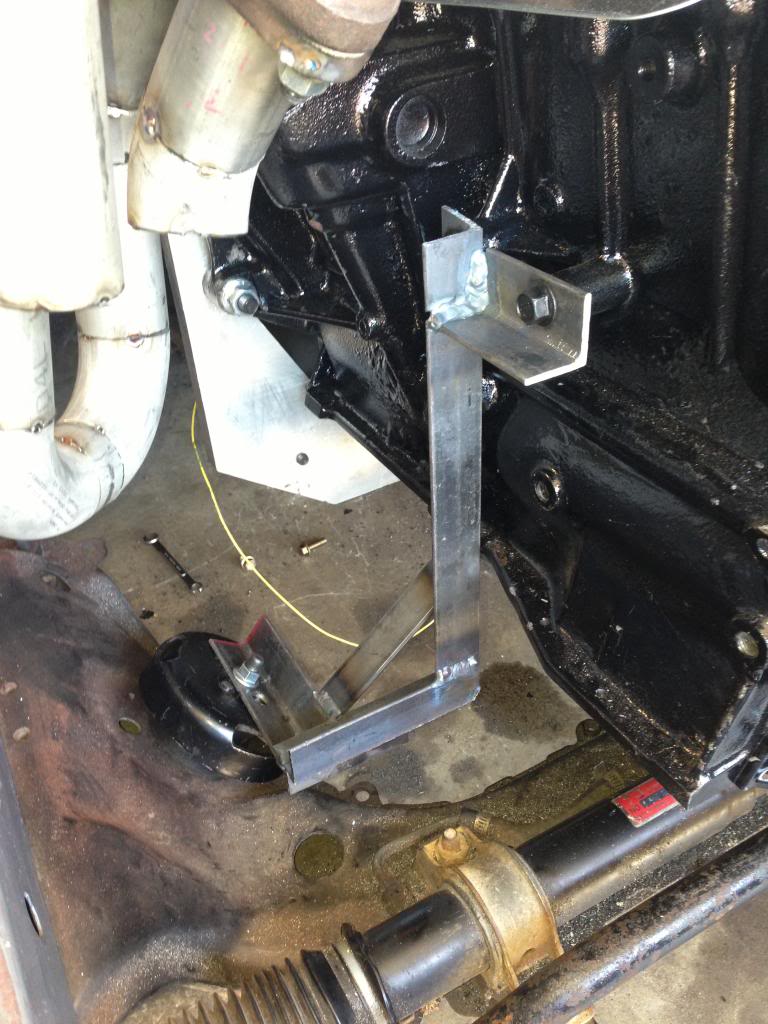
As it currently sits

Slightly tapered plenum

I got some wiring junk in

I set the engine in, and found out she's a big betch. I'll leave it at this height currently to simplify the install. Later I hope to lower it 3 inches or so.

Threw together some mount brackets, these are NOT finished products, they need a lot of work to be strong enough.


As it currently sits

More progress:
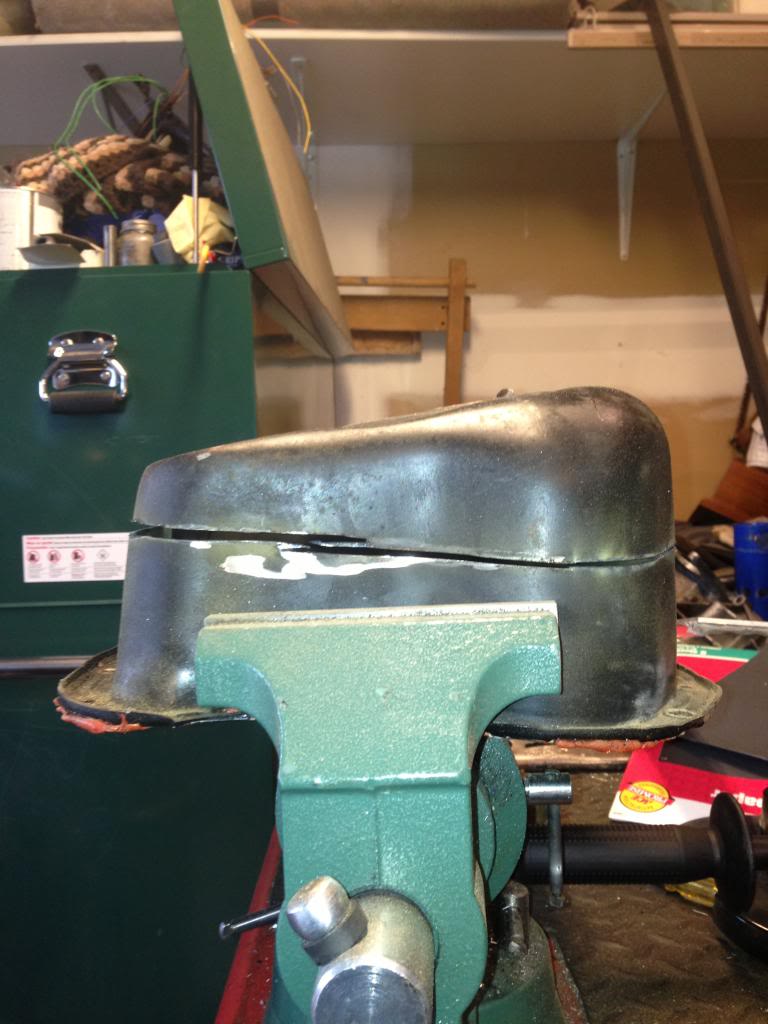
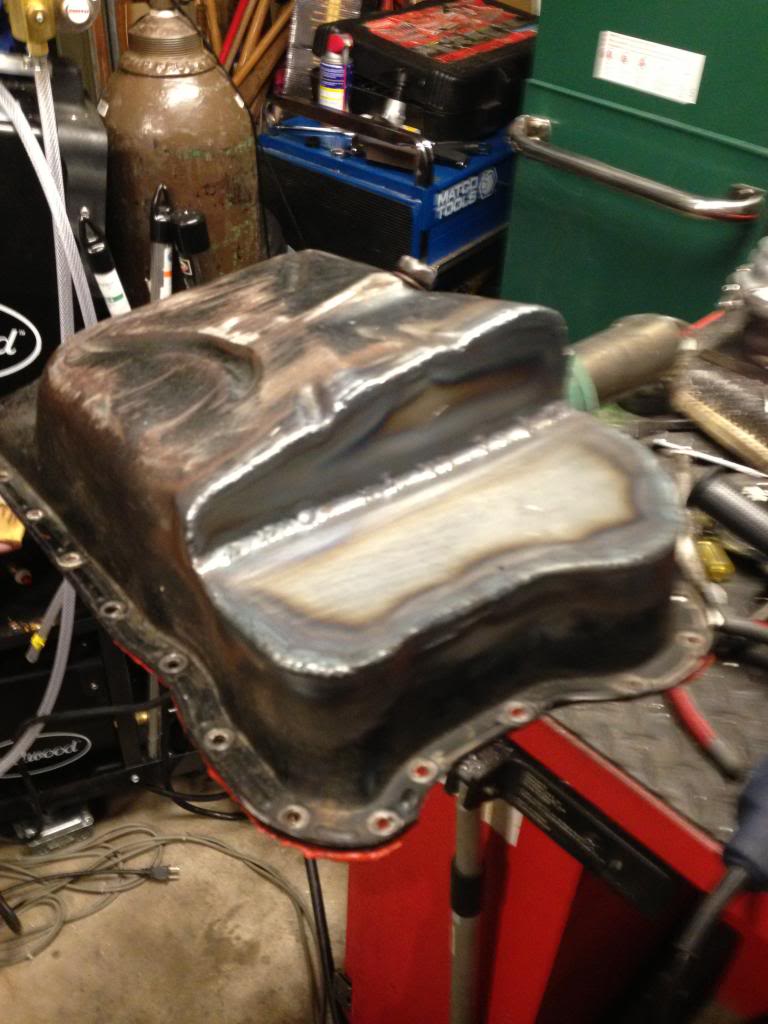
Worked on modifying the oil pan. Basically just cut the front out to clear the rack. I estimate it lost about a quart from doing this, which shouldn't be a big deal since factory took 6.
Just checking the clearances. I forgot to get a pic of the oil feed tube, as that's actually what inhibits lowering the engine down more.
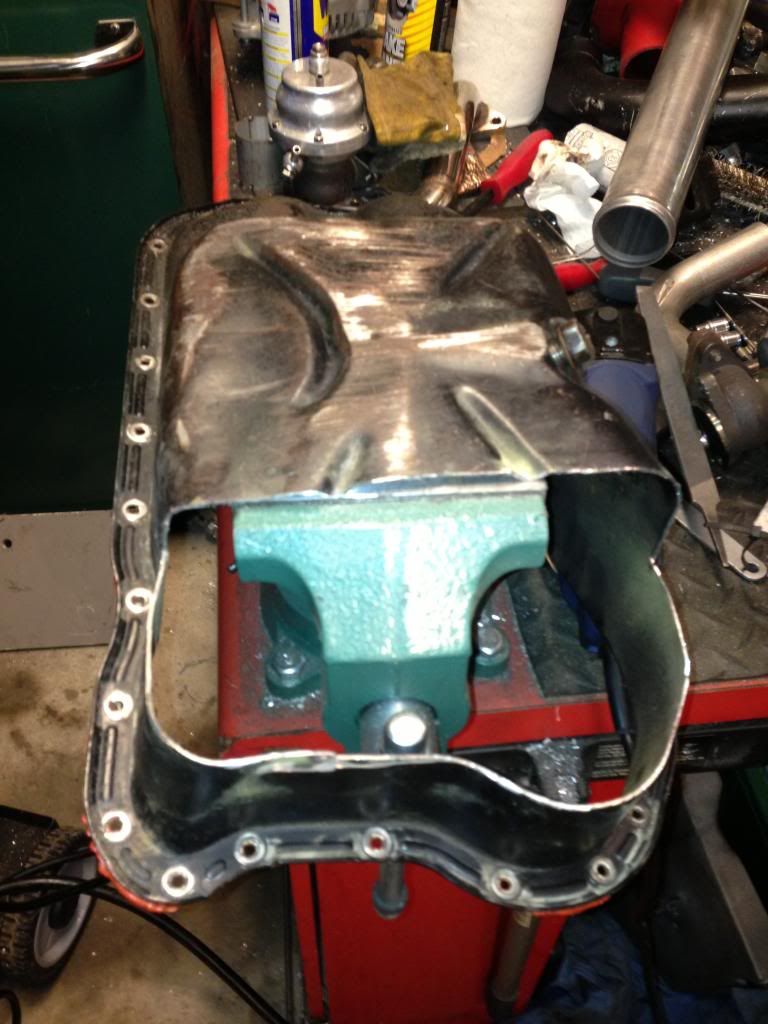
Cut the pan
Grind it a bit more straight
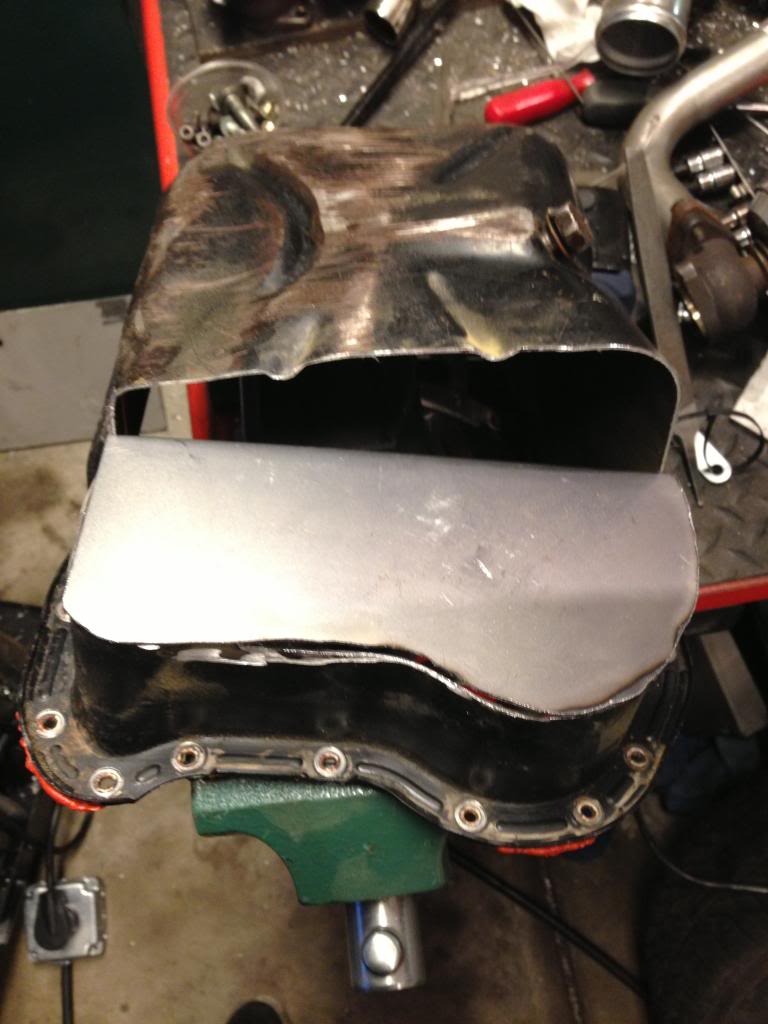
I finally got to use my plasma cutter. I should probably start using it more often. Makes cake work of the 16 ga sheet.
Tacked it on, then ground to fit
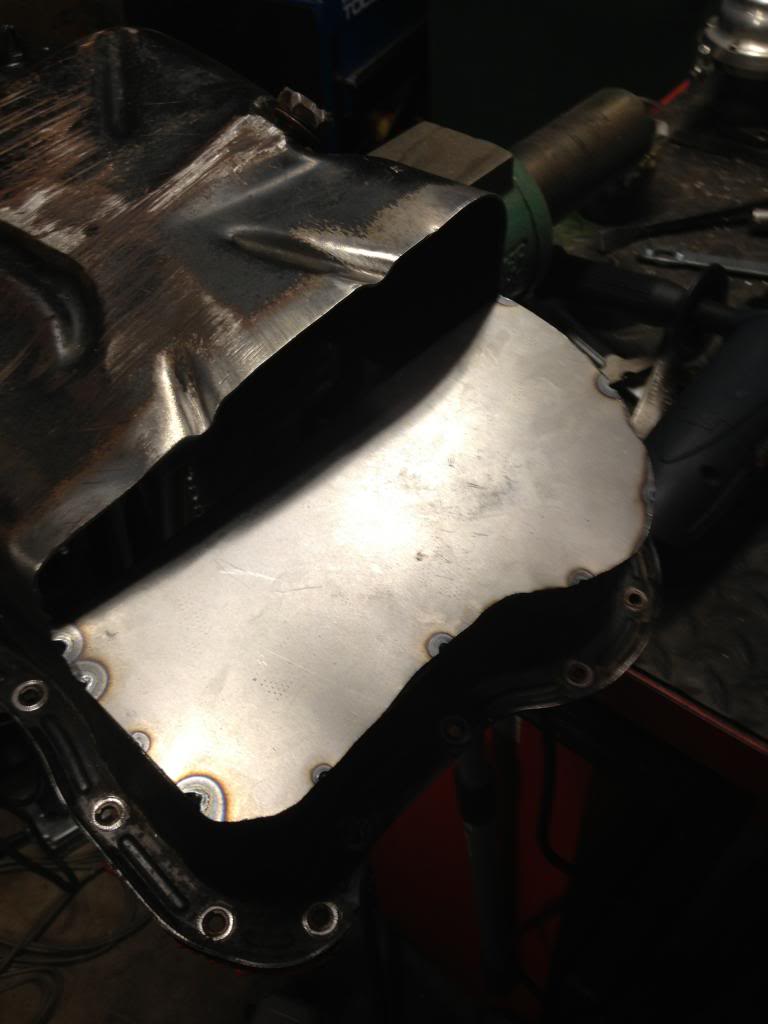
Cut the second piece and ground to fit
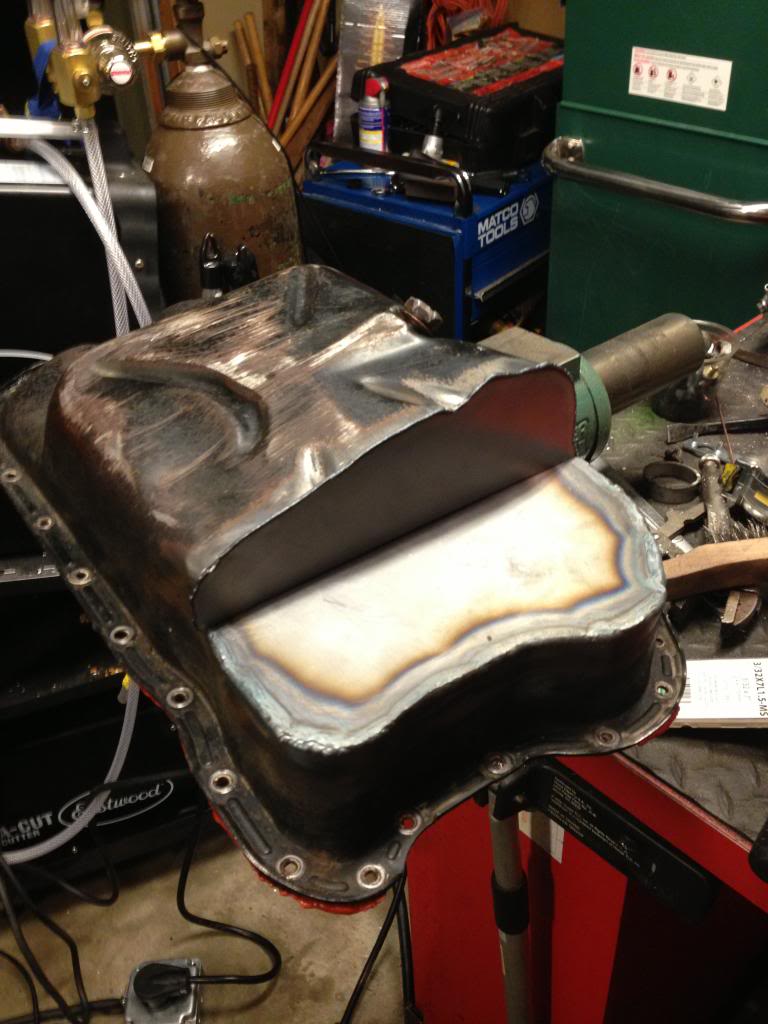
And fully welded and ready for paint. I really should have just used my wirefeed, but the TIG is a ton easier to access. I'm terrible at tigging while standing up though.
Worked on modifying the oil pan. Basically just cut the front out to clear the rack. I estimate it lost about a quart from doing this, which shouldn't be a big deal since factory took 6.
Just checking the clearances. I forgot to get a pic of the oil feed tube, as that's actually what inhibits lowering the engine down more.

Cut the pan

Grind it a bit more straight

I finally got to use my plasma cutter. I should probably start using it more often.
Makes cake work of the 16 ga sheet.
Tacked it on, then ground to fit

Cut the second piece and ground to fit

And fully welded and ready for paint. I really should have just used my wirefeed, but the TIG is a ton easier to access. I'm terrible at tigging while standing up though.

I had a few people swing over through ought the day, which means the day was extremely unproductive. 
Got the motor dropped back in by myself, then realized my oil pan has to come back off because I forgot the turbo oil drain fitting.
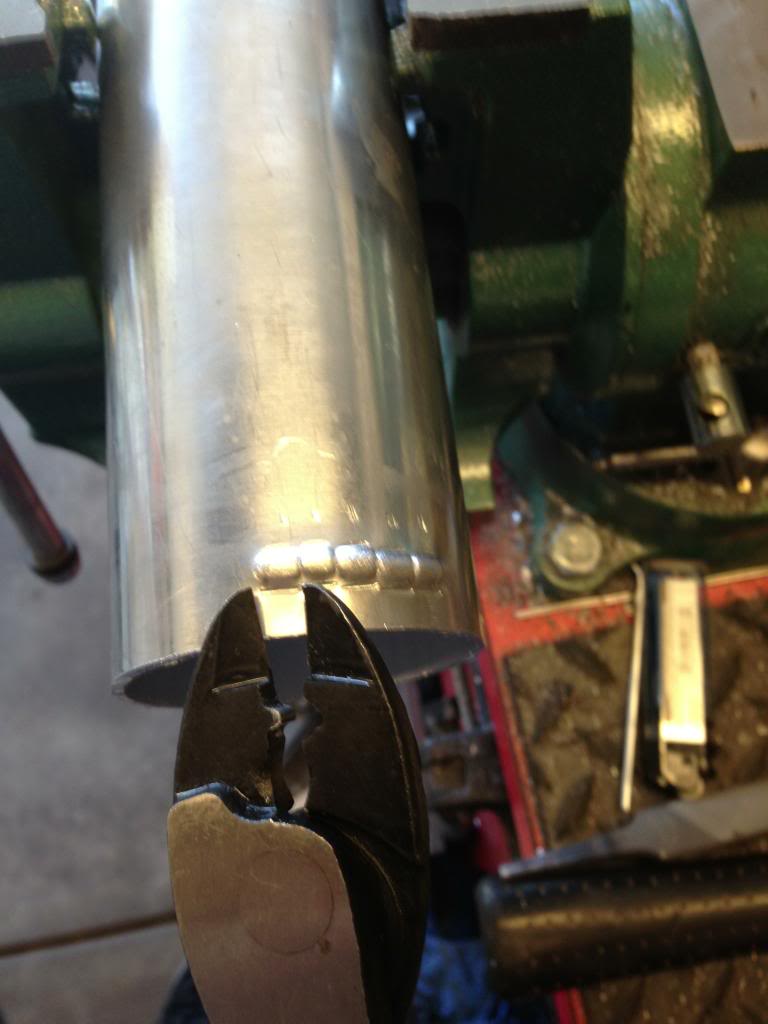
Got my intercooler tubing sorted, broke out the plasma. :laugh: I found my wire crimpers make decent beads. This pic was the first attempt, subsequent attempts looked much better and didn't crack the tube.
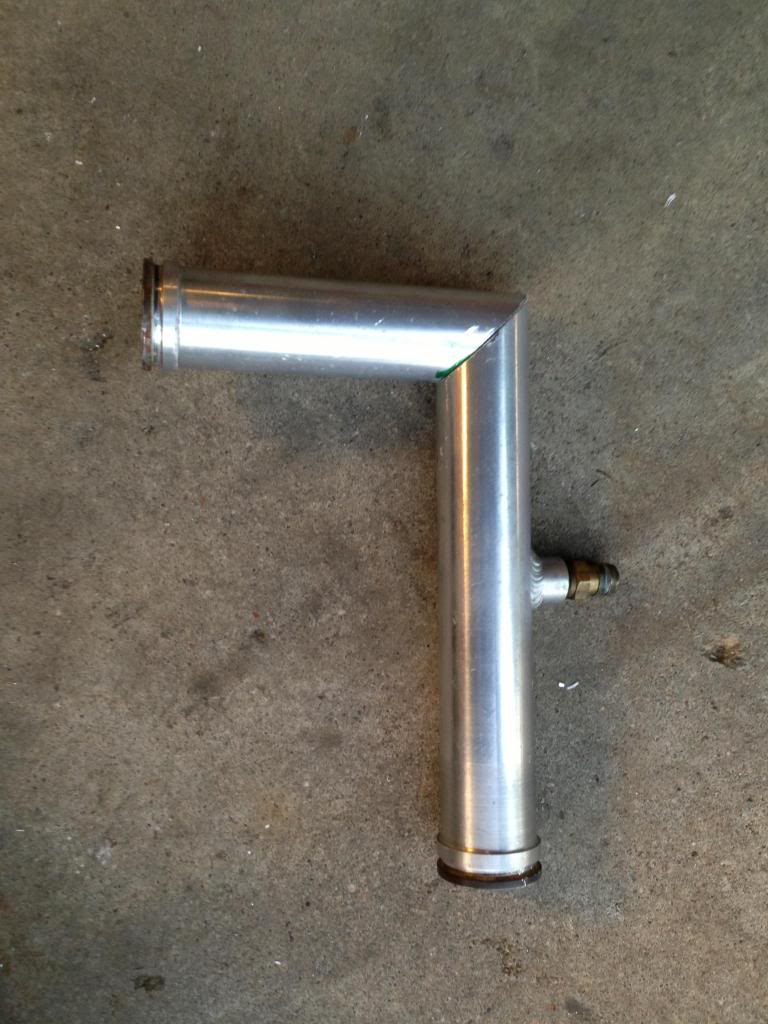
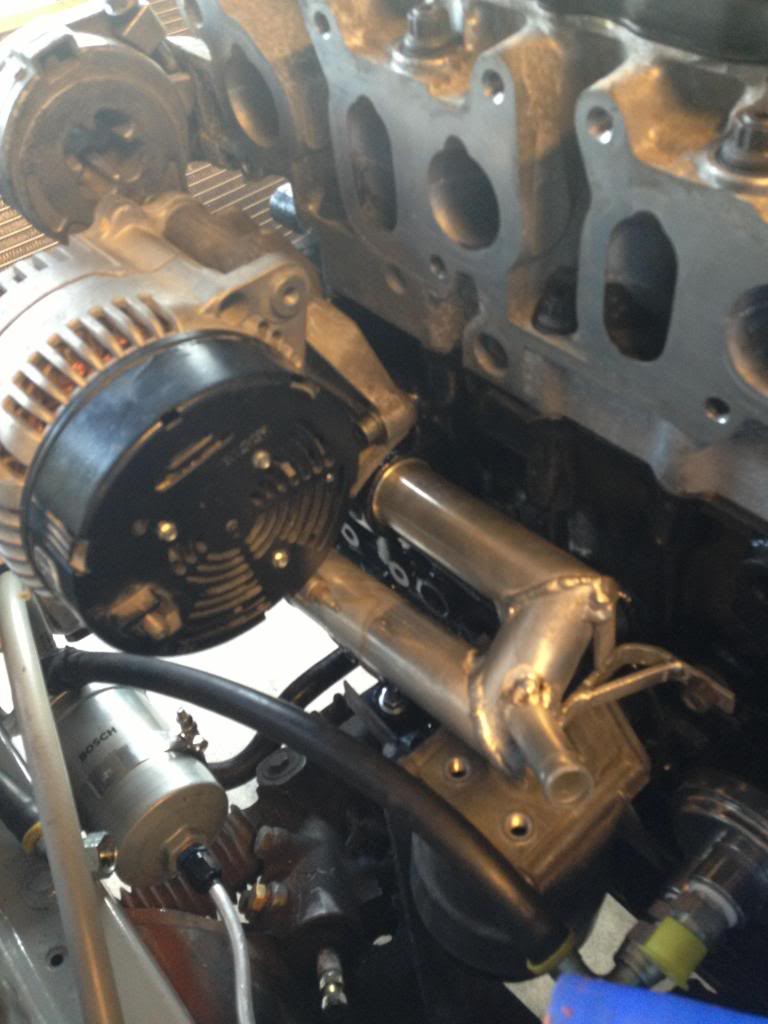
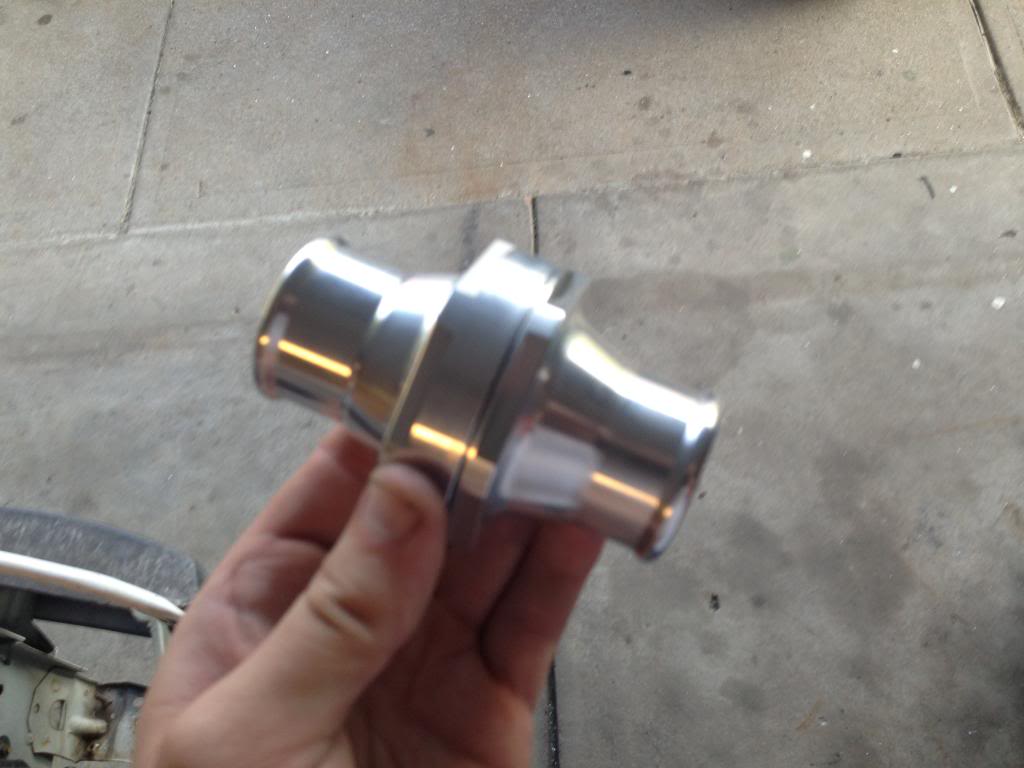
Then I started on my crack pipe and thermostat setup.
Then a VW guy came over and tried to help. He knew I was putting a VR6 in it, so he figured the Mickeys should go on the front.
Okay, the real reason for that was to check exhaust and intercooler tubing fitment with the largest diameter tires I have to make sure everything clears.
Got the motor dropped back in by myself, then realized my oil pan has to come back off because I forgot the turbo oil drain fitting.
Got my intercooler tubing sorted, broke out the plasma. :laugh: I found my wire crimpers make decent beads. This pic was the first attempt, subsequent attempts looked much better and didn't crack the tube.

Then I started on my crack pipe and thermostat setup.


Then a VW guy came over and tried to help. He knew I was putting a VR6 in it, so he figured the Mickeys should go on the front.

Okay, the real reason for that was to check exhaust and intercooler tubing fitment with the largest diameter tires I have to make sure everything clears.
Trackday is quickly approaching and I'm starting to worry whether or not I'll make it.  If I do not get the car running by Saturday the 24th, The RX7 is a nogo for the track and I'll have to take the Forester.
  So, I decided to make tuning easier, I will run without a turbo for the event. It'll be strange driving the car with a torquey 160ish HP, but worth it for reliability sake.
After the last update, I realized I hadn't installed the oil drain bung for the turbo. That meant the motor had to come back out. Took 12 minutes by myself to pull it, and I wasn't exactly straining myself. So I yanked the pan, welded the bung, reinstalled the pan and looked at a couple other items.
First was my slave cylinder hose. With the engine in the car, it looked like I'd have to do something strange. Thankfully that was not the case, and the hose fits beautifully next to my coolant adapter. Speaking of the coolant adapter, I final mounted that after making sure the surface was smooth and applying a coat of silicone.
After the engine was back in place, I mounted the radiator. The mounts aren't the most elegant, but they should work. I slid rubber washers between the mounts and rad to allow some movement should it be needed.
I also finished up the modified crack pipe.
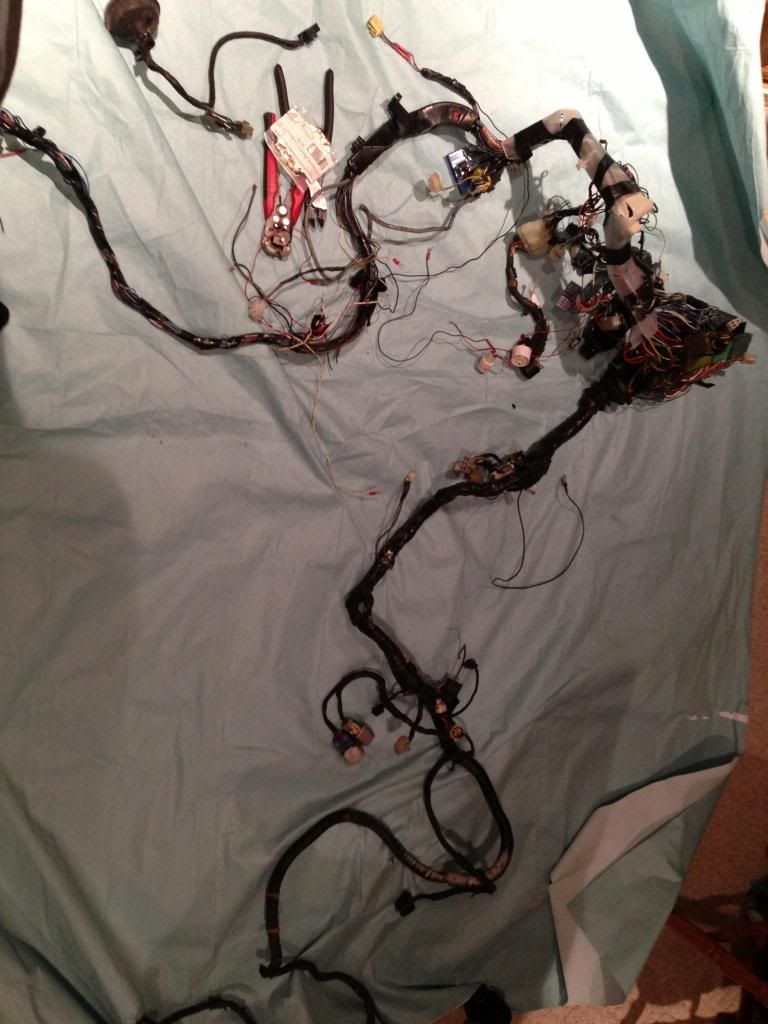
I then worked on the wiring a bit, as it was a huge mess from some "accidents" while pruning the harness before.
After I got that all sorted, I reinstalled and this is how the bay currently sits.
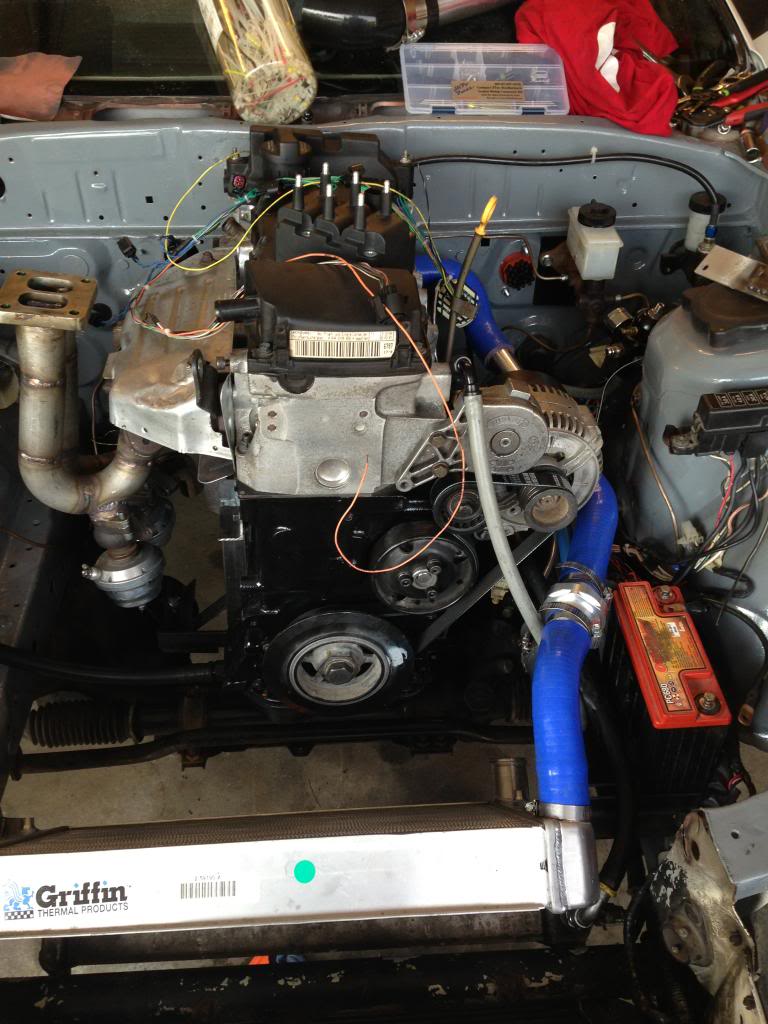
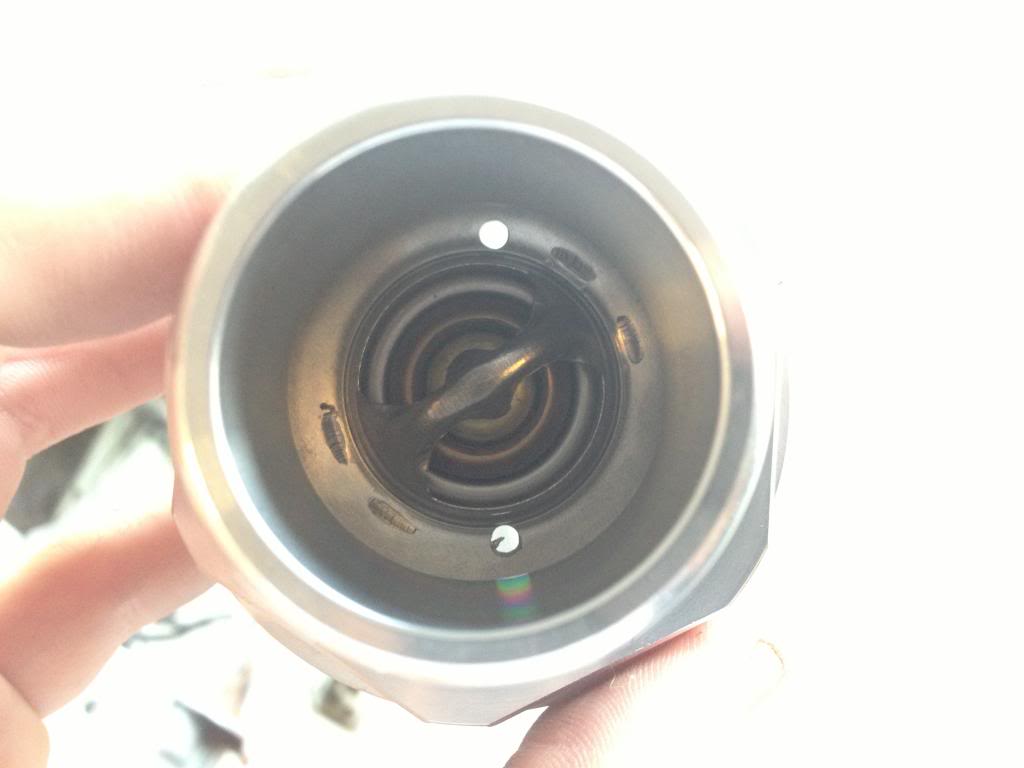
Then there's the thermostat housing. Sometimes it's a very good thing to have friends stop by. I was trying to think of ways to get a small amount of coolant to flow next to the thermostat to allow heated coolant to get to the stat.
If I do not get the car running by Saturday the 24th, The RX7 is a nogo for the track and I'll have to take the Forester. So, I decided to make tuning easier, I will run without a turbo for the event. It'll be strange driving the car with a torquey 160ish HP, but worth it for reliability sake.After the last update, I realized I hadn't installed the oil drain bung for the turbo. That meant the motor had to come back out. Took 12 minutes by myself to pull it, and I wasn't exactly straining myself. So I yanked the pan, welded the bung, reinstalled the pan and looked at a couple other items.
First was my slave cylinder hose. With the engine in the car, it looked like I'd have to do something strange. Thankfully that was not the case, and the hose fits beautifully next to my coolant adapter. Speaking of the coolant adapter, I final mounted that after making sure the surface was smooth and applying a coat of silicone.
After the engine was back in place, I mounted the radiator. The mounts aren't the most elegant, but they should work. I slid rubber washers between the mounts and rad to allow some movement should it be needed.
I also finished up the modified crack pipe.

I then worked on the wiring a bit, as it was a huge mess from some "accidents" while pruning the harness before.

After I got that all sorted, I reinstalled and this is how the bay currently sits.

Then there's the thermostat housing. Sometimes it's a very good thing to have friends stop by. I was trying to think of ways to get a small amount of coolant to flow next to the thermostat to allow heated coolant to get to the stat.

Trending Topics
My idea involved 1/4" nipples being welded on and extra hoses. One of my friends looked at me dumbfounded when I explained such and said "just drill a hole or two in the thermostat"
So I did. :laugh:
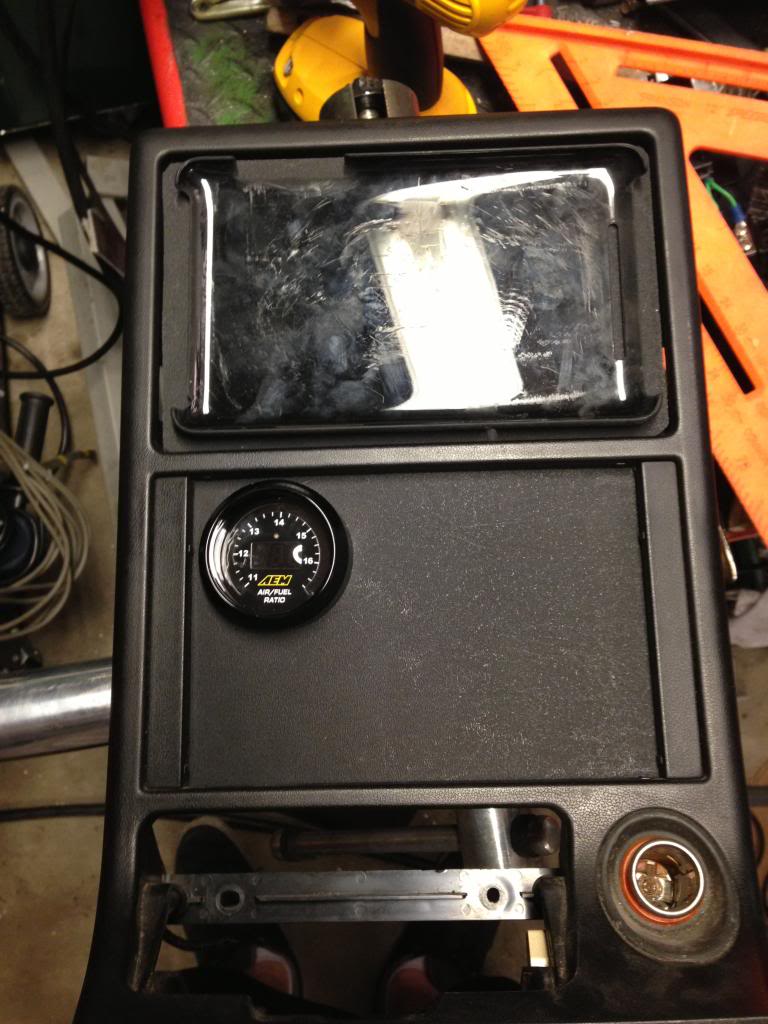
Tonight I just worked on some wiring and prepped the interior to get the dash back in. Then towards the end of the night I got bored and started working on my tablet mount and gauge mount. It's a billion times cleaner than the zipties I was using previously. :thumbup:
Been busy and I forgot to cross post some updates, so here's a copy from the local board...
In addition to those, my valve cover breather was putting a nice cloud out, I believe because of excess oil. I installed a temporary catch can to avoid a messy windshield. Something I forgot to mention is the fact my IAT sensor bung was very poorly placed (Oops) and will allow either the installation of the sensor, or the belt tensioner. I chose the tensioner, so for the meantime the IAT is ziptied to the harness, close enough.
I also experienced an issue with overheating on even short trips. I had just a generic garbage 12" fan that put out nothing for CFM that was temporarily installed and wired. I took that off and installed my ~16" fan I had on the car last year. This required a bit of creativity for mounting, as the radiator is only 12" tall. but some zipties and ABS plastic, and it is shrouded to the core. I also used some ABS to make a duct to the rad from the top of the bumper inlet. I removed the intercooler as well as installing the stock belly pan. I hope I have no more cooling issues now. :Thumb:
I've also had a few minor leaks. The two oil galley plugs at the front of the block started leaking. I replaced them with plugs from oreillys, one is now sealed, the other leaked still. So I ran to Harbor Freight, picked up a 3/8" NPT tap and solved that problem.
Next leak was the coolant freeze plug at the front of the head. Nobody in town had the proper plug, so in went an expandable rubber job. But it works, so screw it.
And, it turns out I had the 3 and 5 plug wires backwards. It runs, starts, and drives significantly better now. :Thumb:
As far as the tune is concerned, I was sitting at low 11's at WOT, so I need to lean it out a bit up there, and it should pick up significant power. I plan on giving it a few more degrees of timing as well to liven it up a bit.
So I did. :laugh:

Tonight I just worked on some wiring and prepped the interior to get the dash back in. Then towards the end of the night I got bored and started working on my tablet mount and gauge mount. It's a billion times cleaner than the zipties I was using previously. :thumbup:

Been busy and I forgot to cross post some updates, so here's a copy from the local board...
In addition to those, my valve cover breather was putting a nice cloud out, I believe because of excess oil. I installed a temporary catch can to avoid a messy windshield. Something I forgot to mention is the fact my IAT sensor bung was very poorly placed (Oops) and will allow either the installation of the sensor, or the belt tensioner. I chose the tensioner, so for the meantime the IAT is ziptied to the harness, close enough.
I also experienced an issue with overheating on even short trips. I had just a generic garbage 12" fan that put out nothing for CFM that was temporarily installed and wired. I took that off and installed my ~16" fan I had on the car last year. This required a bit of creativity for mounting, as the radiator is only 12" tall. but some zipties and ABS plastic, and it is shrouded to the core. I also used some ABS to make a duct to the rad from the top of the bumper inlet. I removed the intercooler as well as installing the stock belly pan. I hope I have no more cooling issues now. :Thumb:
I've also had a few minor leaks. The two oil galley plugs at the front of the block started leaking. I replaced them with plugs from oreillys, one is now sealed, the other leaked still. So I ran to Harbor Freight, picked up a 3/8" NPT tap and solved that problem.
Next leak was the coolant freeze plug at the front of the head. Nobody in town had the proper plug, so in went an expandable rubber job.
But it works, so screw it.And, it turns out I had the 3 and 5 plug wires backwards.
It runs, starts, and drives significantly better now. :Thumb:As far as the tune is concerned, I was sitting at low 11's at WOT, so I need to lean it out a bit up there, and it should pick up significant power. I plan on giving it a few more degrees of timing as well to liven it up a bit.
So I unfortunately did not make it to the track day. Blew it up the Wednesday before. Was running great, tune was getting better and better, then I started hearing a knocking. I pushed in the clutch and felt it in the pedal.
In case you were wondering, a VR6 will last exactly 22.4 miles in an RX-7. :thumbdown:

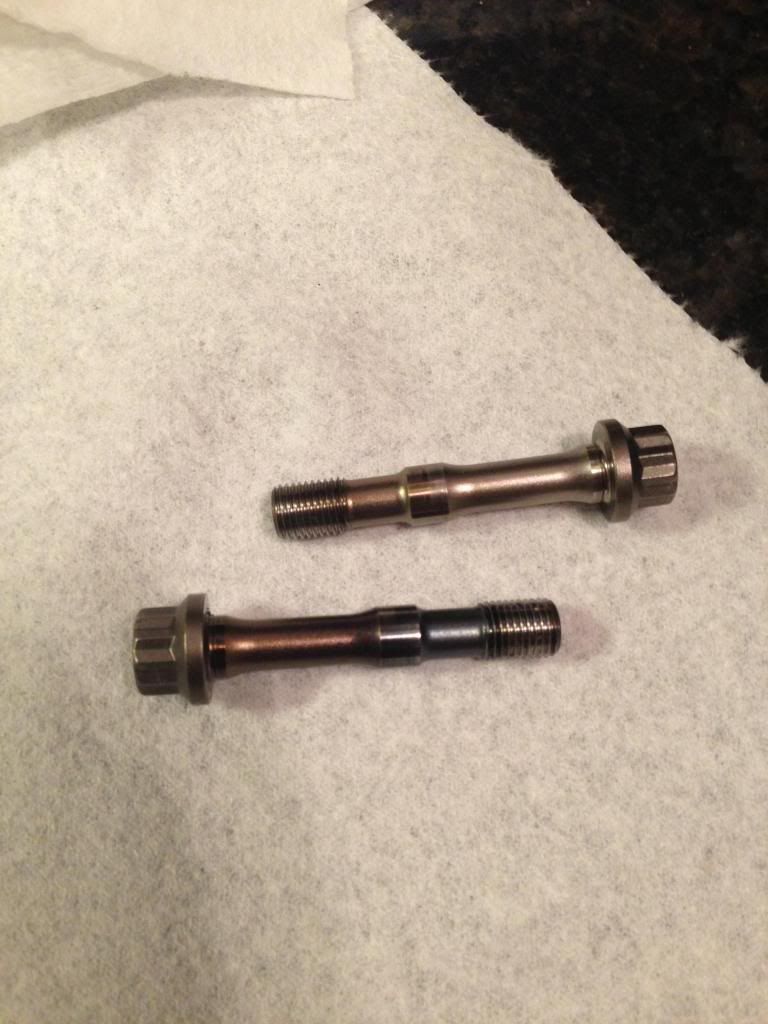
Yanked the pistons out tonight. I didn't go in any order, but what was easy to access. #1 ended up being the last. The first 5 looked gravy. Bearings had no wear to speak of, bores looked good. Then came #1...
The crank was hard to turn, even with just the one piston. Then I put the ratchet on the 1st rod bolt. *ting*
Uhhhhh, what? I reached in and tapped the rod end again. *ting*
There was a sold 1/8" of free play in the rod end. The bearing disintegrated and was nowhere to be found.
One rod bolt was discolored, as well as one side of the rod.
From the look of the oil filter housing, no debris made it past the filter. I'm still going to flush the oil cooler to be sure. I'm still not positive would take out only the #1 rod bearing, but I also need to pull the mains out to see how they look.
In case you were wondering, a VR6 will last exactly 22.4 miles in an RX-7. :thumbdown:
Yanked the pistons out tonight. I didn't go in any order, but what was easy to access. #1 ended up being the last. The first 5 looked gravy. Bearings had no wear to speak of, bores looked good. Then came #1...
The crank was hard to turn, even with just the one piston. Then I put the ratchet on the 1st rod bolt. *ting*
Uhhhhh, what? I reached in and tapped the rod end again. *ting*
There was a sold 1/8" of free play in the rod end.
The bearing disintegrated and was nowhere to be found.One rod bolt was discolored, as well as one side of the rod.


From the look of the oil filter housing, no debris made it past the filter. I'm still going to flush the oil cooler to be sure. I'm still not positive would take out only the #1 rod bearing, but I also need to pull the mains out to see how they look.


sorry to hear of your setback, but given your talent, I doubt it will be long-term.
you've taken two of my favorite things in the automobile world and put them together. I really dig your project.
too funny. seriously ... one of the best lines EVER!
you've taken two of my favorite things in the automobile world and put them together. I really dig your project.
too funny. seriously ... one of the best lines EVER!
Thanks for the support guys!
Good news/ Bad news in this post.
Good news: figured out what the cause of just ONE rod bearing failing was.
Bad news: My rushed ignorance caused it. :what:
For reference,
By solving this problem, I directly caused the engine to fail.
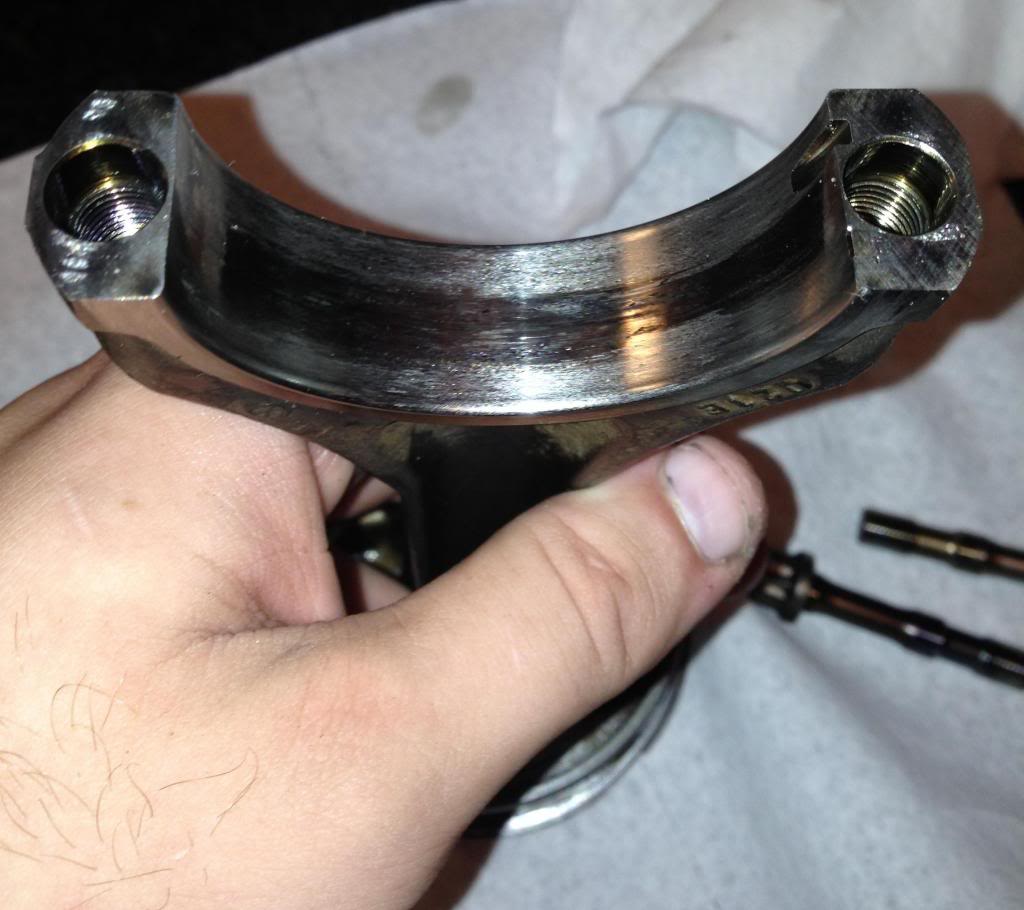
It's a bit blurry, but this is looking up the oil feed from the #1 main bearing. The plug I screwed into the block is the silver in the bore. it is blocking more than 80% of the oil. This bearing had only MINOR wear, because it was still getting SOME oil. The rod bearing got NONE.
I'm glad I figured out the root cause of the problem. I can feel better putting in a new engine without having to worry about it. I did, however find a few small issues dealing with the oiling system I will fix before I drive again.
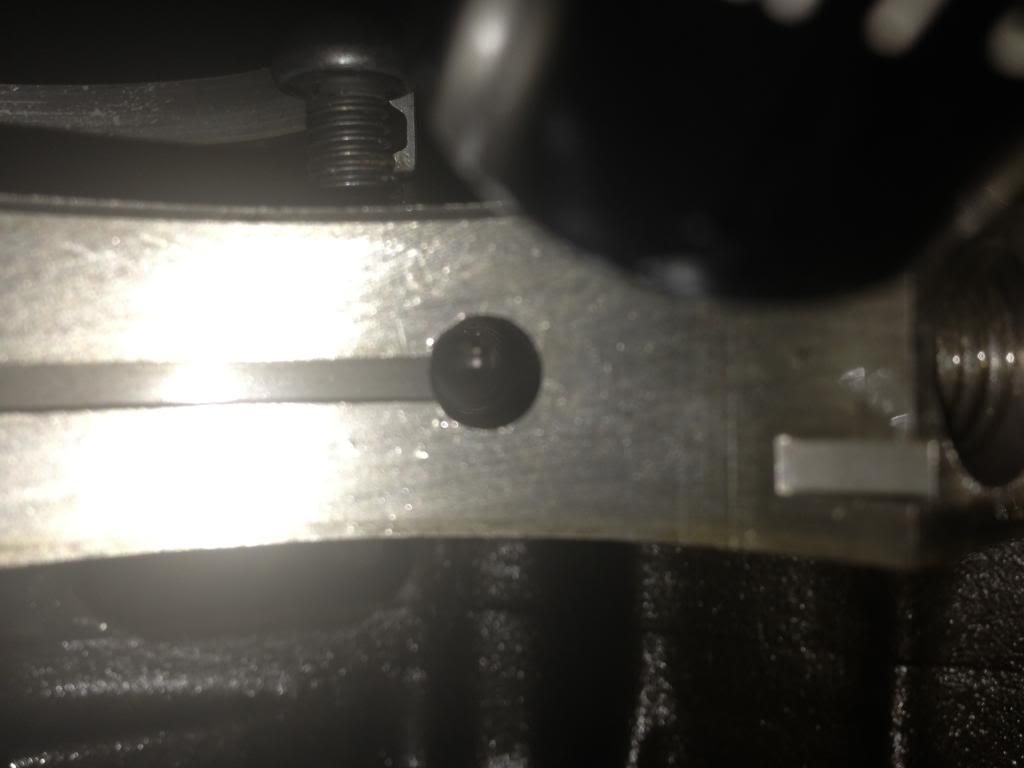
1. Oil pump to pan clearance on driver side is 1.5mm. This is caused by the dent in the pan you can see above. Solution: pound out bottom of oil pan to gain clearance.
2. I should install an oil pressure gauge. It would not have helped with this problem, but it never hurts.
3. Oil feed for the turbo is unfiltered. I know this is common on every VRT, but I don't like it.
4. I have to remove the motor mount or the oil filter housing to change the filter. Solutions: a.) Remove factory oil filter housing and install remote filter. b.) deal with it c.)?????
5. I feel oil capacity may not be enough. Also, in case anyone was wondering, the oil level is supposed to be approximately 10mm below the block when full. Solution: a.) Accusump b.) enlarge oil pan, but this would cause it's own issues.
6. The driver side motor mount bracket needs to be trimmed down some where it mounts to the block. Not a big deal, but it can interfere with the oil pan like it was before, so a bit of grinder will help ease headaches.
Good news/ Bad news in this post.
Good news: figured out what the cause of just ONE rod bearing failing was.
Bad news: My rushed ignorance caused it. :what:
For reference,
By solving this problem, I directly caused the engine to fail.
It's a bit blurry, but this is looking up the oil feed from the #1 main bearing. The plug I screwed into the block is the silver in the bore. it is blocking more than 80% of the oil. This bearing had only MINOR wear, because it was still getting SOME oil. The rod bearing got NONE.

I'm glad I figured out the root cause of the problem. I can feel better putting in a new engine without having to worry about it. I did, however find a few small issues dealing with the oiling system I will fix before I drive again.
1. Oil pump to pan clearance on driver side is 1.5mm. This is caused by the dent in the pan you can see above. Solution: pound out bottom of oil pan to gain clearance.
2. I should install an oil pressure gauge. It would not have helped with this problem, but it never hurts.
3. Oil feed for the turbo is unfiltered. I know this is common on every VRT, but I don't like it.
4. I have to remove the motor mount or the oil filter housing to change the filter. Solutions: a.) Remove factory oil filter housing and install remote filter. b.) deal with it c.)?????
5. I feel oil capacity may not be enough. Also, in case anyone was wondering, the oil level is supposed to be approximately 10mm below the block when full. Solution: a.) Accusump b.) enlarge oil pan, but this would cause it's own issues.
6. The driver side motor mount bracket needs to be trimmed down some where it mounts to the block. Not a big deal, but it can interfere with the oil pan like it was before, so a bit of grinder will help ease headaches.
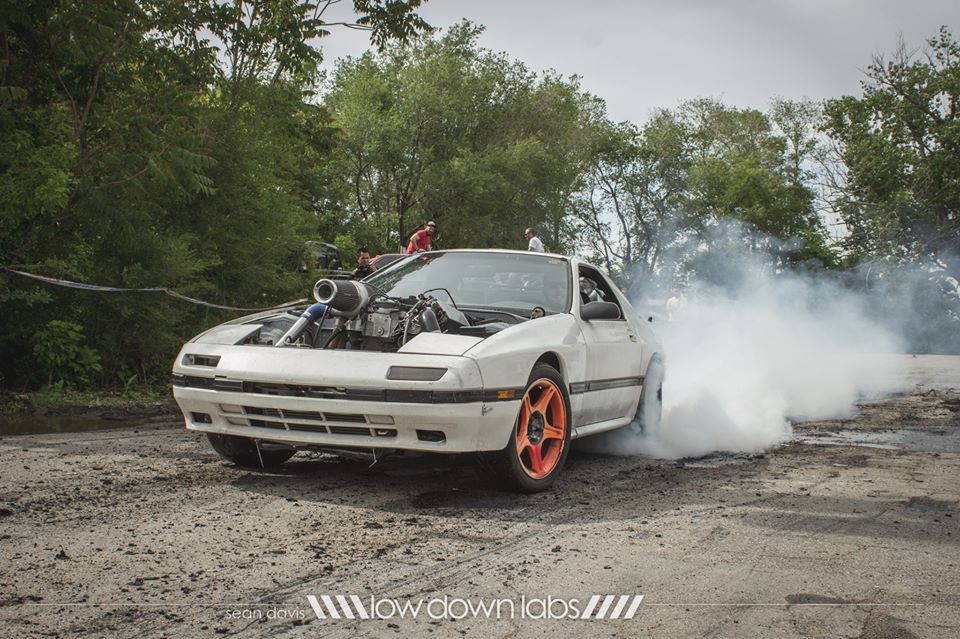
I've been a bit slacking with updates myself. Car is running good. I have the turbo on now as well.

VRX7 vs 5.7 GTO - YouTube
VRX7 vs 5.7 GTO - YouTube

Forgot to keep up on updates over here. Reason for turbo placement: I built the manifold before the engine was in the car. lol
Car has been running GREAT!
I took it on a 120 mile cruise Saturday. Probably the last nice day of the year. 70* weather on some winding roads through the Loess hills. :thumbup:
The only flaw I've found was that temps started to creep up on the interstate going 75-80. I'm guessing it is because my belly pan is off, so air is getting pushed under the radiator rather than through it. At least, I'm hoping this is the case, because otherwise I wasted $250 on a radiator and will have to buy one about twice that price.
I had a slight issue with how the crank sensor was setup in the Megasquirt, but I got that resolved and now I can Idle at 800 RPM without issue.
Car will probably be going into storage shortly, so I likely won't have many updates till spring.
Finally got around to turning up the boost.
11 psi feels great, minus the wheel spin (I took off the Mickeys)
14 psi is where I found the limits of the clutch. ACT rates it at 330 ft-lbs, and it has taken a lot of slipping and other abuse in the past. I drove it home almost 20 miles with a blown rotary that required excessive clutch slippage to get moving.
Also, I'll need injectors sooner rather than later, they're close to topped out and I'm on winter blend E85.
Haha. The cruise I did was entirely older guys with their domestic V8's and then me. I think they were most surprised the car made the journey.
I ran a newer GT500 last night that put down just over 500, and ran a 7.5@97 in the 1/8 mile. We were both on street tires, so I launched really easy. He pulled a couple cars on launch and then gained about another car by the time we shut down. Return trip was a 45 roll, he slowly inched away from me and had me by about a full car by 120ish. :thumbup:
I did a virtual dyno log last night as well, needs to be leaned out a fair amount yet. At 13 psi, the clutch is just barely hanging on for life.


Oops, forgot about this thread.  I'll dump the last years worth of posts on I guess. lol
https://www.facebook.com/photo.php?v=10152408381822112
Had lunch with some friends.
I found out my fuel pump isn't getting enough voltage, even though it is rewired. I'm going to re-rewire it and then I'll probably need to work on the tune some more since it will hopefully need less fuel (currently hitting ~90% duty cycle).
I drove it over 120 miles round trip to a dyno day and got these runs, and one more in:
First, first gen rx7 with a 5.3/auto swap. My first time digging it since the new cams/clutch. I spun hard on the launch, and short-shifted second. Pulled hard past him in 3rd though.
https://www.facebook.com/photo.php?v=703727123019805
Then ran my buddy's 5.3 auto malibu. He dead hooks consistently, I spun a bit and bogged hard into second. I don't think I used flatshift for some reason. He pulled out on me and stayed well ahead.
https://www.facebook.com/photo.php?v=703936899665494
Things I have learned tonight: (5-21-14)
1. It's faster than a stock ZL1
2. It's almost as fast as a lightly modded ZR1
3. Hooning with under a 1/4 tank isn't recommended
4. 24v relays don't have enough pull to activate with 12v
5. I love my car
6. My car is too loud.
7. It loves timing.
More videos from the other day:
Did some burnouts yesterday. (5-25-14)
https://www.facebook.com/photo.php?v=10152456009312112'
And one of my friends showed up with his American spirit dialed back a bit.

(5-27-14)
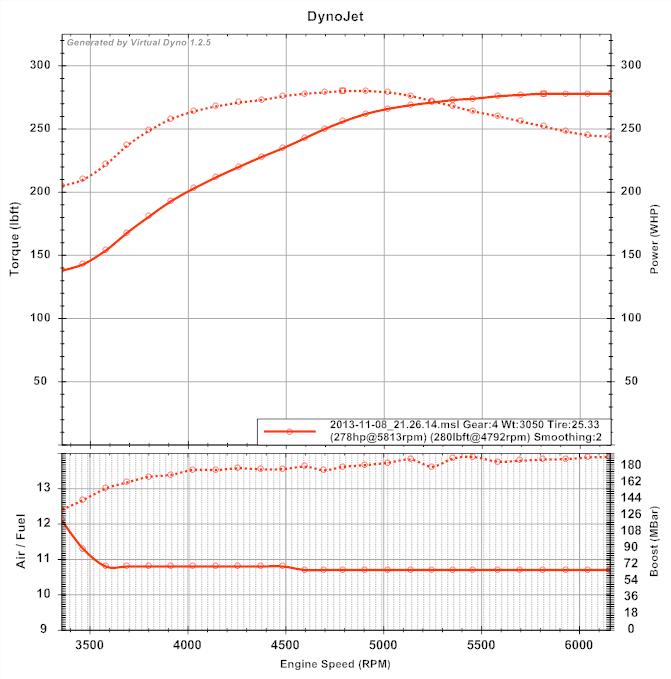
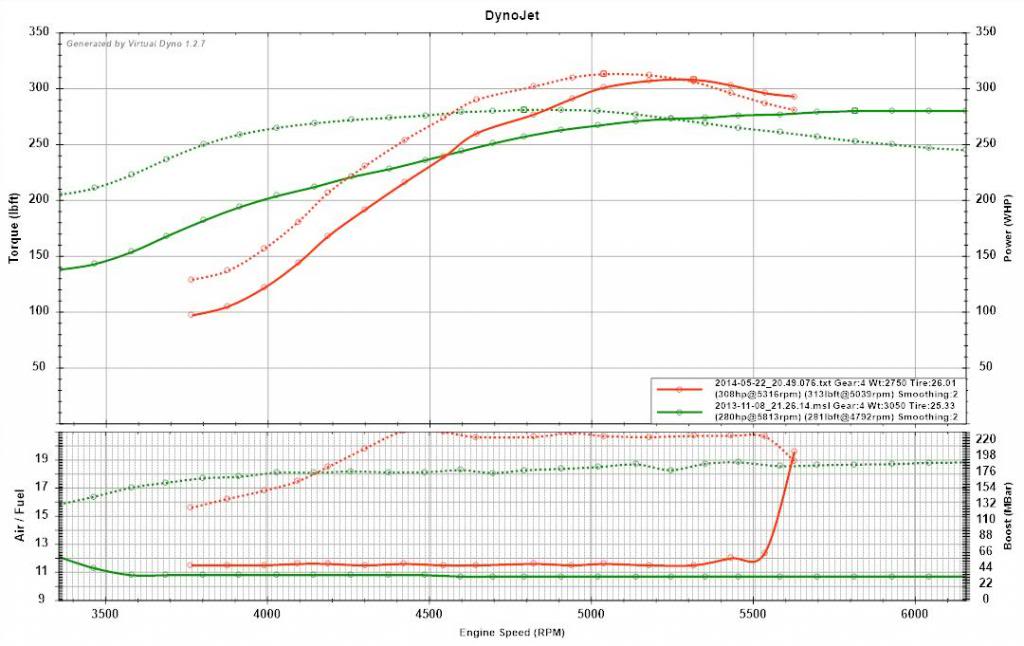
I may be downsizing on the cams a bit. It's just not very fun with this turbo waiting till 5000 for the fun to begin. Especially when you drop out of power on the 1-2 shift.
This shows stock cams at ~13psi vs the 288's at 19psi. (I let out early on the 288 graph, it holds torque past 7500)
(7-2-14)
Broke a ringland due to running low on gas while beating on it, motor is almost back together. While it was down I ordered a new Megasquirt 3x, a Nitrous Express kit, and decided to redo the intake and turbo manifolds.

Also, the car has a facebook page, https://www.facebook.com/TheRatchetRX7 I tend to keep it a bit more up to date.
(8-1-14)
Stripped 3rd gear out last night at ~20 psi.
(8-7-14)
New transmission in.
(8-26-14)
Cracked another piston, ran cyl 1&2 too lean, didn't realize individual trims were -5 and -4% on those cyl.
I'll dump the last years worth of posts on I guess. lolhttps://www.facebook.com/photo.php?v=10152408381822112
Had lunch with some friends.
I found out my fuel pump isn't getting enough voltage, even though it is rewired. I'm going to re-rewire it and then I'll probably need to work on the tune some more since it will hopefully need less fuel (currently hitting ~90% duty cycle).
I drove it over 120 miles round trip to a dyno day and got these runs, and one more in:
First, first gen rx7 with a 5.3/auto swap. My first time digging it since the new cams/clutch. I spun hard on the launch, and short-shifted second. Pulled hard past him in 3rd though.
https://www.facebook.com/photo.php?v=703727123019805
Then ran my buddy's 5.3 auto malibu. He dead hooks consistently, I spun a bit and bogged hard into second. I don't think I used flatshift for some reason. He pulled out on me and stayed well ahead.
https://www.facebook.com/photo.php?v=703936899665494
Things I have learned tonight: (5-21-14)
1. It's faster than a stock ZL1
2. It's almost as fast as a lightly modded ZR1
3. Hooning with under a 1/4 tank isn't recommended
4. 24v relays don't have enough pull to activate with 12v
5. I love my car
6. My car is too loud.
7. It loves timing.
More videos from the other day:
Did some burnouts yesterday. (5-25-14)
https://www.facebook.com/photo.php?v=10152456009312112'

And one of my friends showed up with his American spirit dialed back a bit.

(5-27-14)
I may be downsizing on the cams a bit. It's just not very fun with this turbo waiting till 5000 for the fun to begin. Especially when you drop out of power on the 1-2 shift.
This shows stock cams at ~13psi vs the 288's at 19psi. (I let out early on the 288 graph, it holds torque past 7500)

(7-2-14)
Broke a ringland due to running low on gas while beating on it, motor is almost back together. While it was down I ordered a new Megasquirt 3x, a Nitrous Express kit, and decided to redo the intake and turbo manifolds.


Also, the car has a facebook page, https://www.facebook.com/TheRatchetRX7 I tend to keep it a bit more up to date.
(8-1-14)
Stripped 3rd gear out last night at ~20 psi.
(8-7-14)
New transmission in.
(8-26-14)
Cracked another piston, ran cyl 1&2 too lean, didn't realize individual trims were -5 and -4% on those cyl.

Full Member
Joined: Aug 2015
Posts: 86
Likes: 0
From: Columbia TN
Pretty awesome, I love swaps no one does, they are always more interesting, keep up the good work. I will say though that I hate changing timing change guides on those engines. MS3X works very well...in one of my swaps, you will like it...though standalones in general and MS in particular have a steep learning curve.
Last edited by Wicked93gs; Aug 23, 2015 at 01:29 PM.

Thread
Thread Starter
Forum
Replies
Last Post
DocHoliday89
3rd Generation Specific (1993-2002)
5
Oct 12, 2015 07:42 PM
rotor_veux
2nd Generation Specific (1986-1992)
7
Sep 19, 2015 07:13 PM