
Video Log Of The Restomodding Of My '76 RX-5 Cosmo (New Vid New Vid Jul 10/2024)


Rotary Enthusiast

Joined: Jan 2002
Posts: 845
Likes: 38
From: Oscoda, MI
The inlet/outlet o-rings on the compressor can easily be changed for the compatible green ones. Typically, a standard o-ring kit includes a variety of sizes and more than enough for the job.
I'm not sure if the pink oil is R-134a compatible or not. You can change the oil in the compressor for PAG if you need to. Check with the manufacturuer of the compressor to see what oil is in there first.
I'm not sure if the pink oil is R-134a compatible or not. You can change the oil in the compressor for PAG if you need to. Check with the manufacturuer of the compressor to see what oil is in there first.
Thread Starter
Joined: Feb 2001
Posts: 29,798
Likes: 128
From: London, Ontario, Canada
Yeah, not worried about the o-rings as those are easy off the shelf items at the auto parts store. As for the oil, it may be a matter of simply draining and refilling because the included instructions are generic.
As a random bit of info, there's a sticker on the evaporator that says it will run with R-12 or R-134A.
As a random bit of info, there's a sticker on the evaporator that says it will run with R-12 or R-134A.
Rotary Enthusiast
Joined: Jan 2002
Posts: 845
Likes: 38
From: Oscoda, MI
Yeah, not worried about the o-rings as those are easy off the shelf items at the auto parts store. As for the oil, it may be a matter of simply draining and refilling because the included instructions are generic.
As a random bit of info, there's a sticker on the evaporator that says it will run with R-12 or R-134A.
As a random bit of info, there's a sticker on the evaporator that says it will run with R-12 or R-134A.
I'm a bit confused, are you using a brand new Sanden SD7 or an SD-708 for an FC RX7?


Thread Starter
Joined: Feb 2001
Posts: 29,798
Likes: 128
From: London, Ontario, Canada
I have been working hard on the car over the last 2 months at every opportunity. But, progress has been sporadic due to a few setbacks. Twice I have accidentally destroyed parts which I could only get from Vintage Air, so acquiring new ones created a delay.
Additionally I decided to take on another project at the end of September. Some collision damage was being repaired on my 2000 Insight and I figured that since I've always wanted to paint it, now was the time.

So that took some time to prep, disassemble and bring to the body shop as well as coordinate replacement parts and such. Then another few days to reassemble once back.
There have been some social engagements. As well, the black FD seen in the background of the shop needed some tuning after a boost controller was installed (interestingly the turbo blew during this tuning). The silver FC needed more tuning to refine the map as the weather became colder (it will be a year around daily driver) and as boost was raised after breakin.
Oh, and the fact that my FC was damaged by a negligent roofer next door sapped some time and a good amount of energy. Can't talk about that one as it will likely be a legal battle. Speaking to my lawyer also took up most of yesterday. Losing a weekend day is like losing 3 week evenings.
That said, progress is progressing. I'll be late to the shop this afternoon but do intend to finish up a stage of the current job. Will still be a little while before a new video but hopefully by the end of the month.
Additionally I decided to take on another project at the end of September. Some collision damage was being repaired on my 2000 Insight and I figured that since I've always wanted to paint it, now was the time.
So that took some time to prep, disassemble and bring to the body shop as well as coordinate replacement parts and such. Then another few days to reassemble once back.
There have been some social engagements. As well, the black FD seen in the background of the shop needed some tuning after a boost controller was installed (interestingly the turbo blew during this tuning). The silver FC needed more tuning to refine the map as the weather became colder (it will be a year around daily driver) and as boost was raised after breakin.
Oh, and the fact that my FC was damaged by a negligent roofer next door sapped some time and a good amount of energy. Can't talk about that one as it will likely be a legal battle. Speaking to my lawyer also took up most of yesterday. Losing a weekend day is like losing 3 week evenings.
That said, progress is progressing. I'll be late to the shop this afternoon but do intend to finish up a stage of the current job. Will still be a little while before a new video but hopefully by the end of the month.
I dont sleep
Joined: Feb 2005
Posts: 159
Likes: 0
From: Smyrna, Georgia (Cumberland)
Love the color of the insight. Every true car guy needs a fuel efficient DD/parts runner.
My handle on Youtube is FCguy7. I had suggested that you do a shop tour video. If you find some parts wait time maybe you could do that. I would honestly be very excited to see such a video. A POV walkthru would really give people a sense of how you don't need a massive shop to build a car (including projects like your restomod and project Tina!)
My handle on Youtube is FCguy7. I had suggested that you do a shop tour video. If you find some parts wait time maybe you could do that. I would honestly be very excited to see such a video. A POV walkthru would really give people a sense of how you don't need a massive shop to build a car (including projects like your restomod and project Tina!)

Thread Starter
Joined: Feb 2001
Posts: 29,798
Likes: 128
From: London, Ontario, Canada
My handle on Youtube is FCguy7. I had suggested that you do a shop tour video. If you find some parts wait time maybe you could do that. I would honestly be very excited to see such a video. A POV walkthru would really give people a sense of how you don't need a massive shop to build a car (including projects like your restomod and project Tina!)

Hey Thanks for your video they have truly help me in my journey , I finally finally got almost everything I need to start and finish my sheet metal. ( The welding Parts) NOw I need a Metal Brake and I start welding finally I fabricated lots of pieces I need it, My lincoln HD180 with Gas is working great . Thanks again for great videos.
I dont sleep
Joined: Feb 2005
Posts: 159
Likes: 0
From: Smyrna, Georgia (Cumberland)
Thread Starter
Joined: Feb 2001
Posts: 29,798
Likes: 128
From: London, Ontario, Canada
Part 29: Vintage Air Gen II Compac HVAC Install, Part 1
It's been a few months, so I am proud to present Part 29 of my '76 Mazda RX-5 Cosmo restoration. In episode 29 I begin the task of installing a Vintage Air Gen II Compac HVAC system. This is a universal system, so it's up to me to make everything fit in, lets face it, an application that Vintage Air has never considered. In this first part of a two part episode I mount the major mechanical parts including the compressor, condenser, drier and HVAC unit itself. As this install is turning out to be considerably more work than I had thought, and I'm not as far along as I'd like due to interruptions, I decided to split this into two parts instead of one hour long episode. Part 2 of this install will consist of all the plumbing, wiring and under-dash ducting. For now, enjoy! Included in this episode: mounting the condenser, making and welding mounting brackets, creating a mount system for the drier, clearancing the transmission tunnel to fit the HVAC unit, modifying the sheet metal, making mounting brackets for the evaporator, mounting the evaporator, welding, grinding, cutting and all that good stuff.
Rotary Enthusiast
Joined: Jan 2002
Posts: 845
Likes: 38
From: Oscoda, MI
Very good work.
A couple of things.
I went back in the video to check how the fittings on the condenser were oriented and it looks correct with the Low Side fitting (large pipe) oriented to the top and the high side fitting (smaller pipe) toward the bottom.
Depending on the type of fitting, it may or may not be necessary to apply compressor oil or sealant to the fitting threads. I didn't apply lubricant or sealant to any threads except the ones for the schrader valves (I was doing a conversion/restoration on an FC).
I'd say more, but a Vintage air HVAC couldn't be more different from an FC HVAC with Sanden compressor so I'm going to hold my peace until the part 2 of the HVAC install.
Thread Starter
Joined: Feb 2001
Posts: 29,798
Likes: 128
From: London, Ontario, Canada
I went back in the video to check how the fittings on the condenser were oriented and it looks correct with the Low Side fitting (large pipe) oriented to the top and the high side fitting (smaller pipe) toward the bottom.
Depending on the type of fitting, it may or may not be necessary to apply compressor oil or sealant to the fitting threads. I didn't apply lubricant or sealant to any threads except the ones for the schrader valves (I was doing a conversion/restoration on an FC).
Depending on the type of fitting, it may or may not be necessary to apply compressor oil or sealant to the fitting threads. I didn't apply lubricant or sealant to any threads except the ones for the schrader valves (I was doing a conversion/restoration on an FC).
I'd say more, but a Vintage air HVAC couldn't be more different from an FC HVAC with Sanden compressor so I'm going to hold my peace until the part 2 of the HVAC install.
Thread Starter
Joined: Feb 2001
Posts: 29,798
Likes: 128
From: London, Ontario, Canada
For those with BlackBerrys and the newest version of BBM, I've created a BBM channel about the project. PIN:C004C4ABA
Last edited by Aaron Cake; Nov 28, 2013 at 10:59 AM.
Rotary Enthusiast
Joined: Jan 2002
Posts: 845
Likes: 38
From: Oscoda, MI
Actually, the, layout, plumbing and components for any AC is basically the same, the difference is actually in the details. The compressor, the size of the condenser, refrigerant, pressure switch (low/high cut-off in this case) and fittings. Those details will be the difference in having a working system or deaing with leaks or a blown compressor from too-high pressures.
Thread Starter
Joined: Feb 2001
Posts: 29,798
Likes: 128
From: London, Ontario, Canada
Part 30: Vintage Air Gen II Compac HVAC Install, Part 2
Happy Festivus everyone! Part 30 of my '76 Mazda Cosmo restoration continues the Vintage Air Gen II Compac HVAC installation. In this episode I concentrate primarily on plumbing the system. I know I promised last episode that this half would finish off the install but it has been a lot of work. More than I first anticipated so you'll need to wait until episode 31 for the finishing touches (wiring and ducting). There certainly is a lot of plumbing in an HVAC system, especially when it all has to be figured out from scratch in a custom installation. But the plumbing is one of the most important parts of the install so it makes sense to pay attention to the details. Line placement in an engine bay can make or break the system. I've tried to make use of as many hard lines as possible for both the hot and cold side, which will go a long way in terms of reliability. Included in this episode: measuring and cutting high and low side hoses, installing fittings, installing firewall bulkheads, tricks for hand bending aluminium tube, the cut-and-weld method of tube bending, making brackets, silicone hoes, TIG welding.
Thread Starter
Joined: Feb 2001
Posts: 29,798
Likes: 128
From: London, Ontario, Canada
Part 31: Vintage Air Gen II Compac HVAC Install, Part 3
It's time for the conclusion of the Vintage Air installation on my '76 Mazda Cosmo. Yep, it's episode 31! Part 1 and part 2 covered the mechanical components and plumbing. Part 3 concentrates on wiring up the system, installing the ducting after adapting the stock Cosmo dash vents, and then powering up the system for electrical testing. I also explain a bit about how the MegaSquirt MS3-Pro handles the A/C system. It sure feels good to have it all done and I'm happy with how well I was able to integrate it into the car. Of course the final testing will have to wait until the system is charged and the car is running. Included in this episode: wiring the Vintage Air system, modifying Vintage Air harness to work with EFI/MegaSquirt, WeatherPack connectors, modifying Cosmo dash vents using Vintage Air adapters, cutting/bending/forming aluminium, electrical checks and testing.
I had fallen far behind the restoration as I got caught up with finishing school, trying to work on my restoration and oh yeah, the wife and kids. That being said, I caught up a few weeks ago and actually watched Episode 31 today shortly after my email notification for this thread. Lots of people say they are amazed at my level of detail in my restoration, but you blow me out of the water. I'm always in awe at the lengths to which you go to get things how you want them.
Will you be grafting the controls into the dash where the stock sliders were?
Will you be grafting the controls into the dash where the stock sliders were?
Thread Starter
Joined: Feb 2001
Posts: 29,798
Likes: 128
From: London, Ontario, Canada
Well as they say, it's all about the details. Perhaps it's because I'm such an *** when it comes to details on any car. I'm the jerk you see at AutoRama kneeling down to look at the welds inside the exhaust on the Riddler winners.
I'm still working on my final plans for the dash because there is a slight space crisis. I'd love to run a full DIN radio however there isn't room in the middle of the dash. I'd need to move the bottom vents down an inch or so, which looks like it would cause significant reworking of the area. So at the moment my plan is to use the rotary HVAC controls below the bottom vents, in the spot the old stereo was mounted. Then maybe I can find a "DIN and a half" (if it exists) head unit which will fit above the vents. Another option is to just stick the Vintage Air sliding controls in roughly the same spot as the stock controls were. That is going to make the area very busy and they aren't the same width as a stereo, so it will look odd.
I'm still working on my final plans for the dash because there is a slight space crisis. I'd love to run a full DIN radio however there isn't room in the middle of the dash. I'd need to move the bottom vents down an inch or so, which looks like it would cause significant reworking of the area. So at the moment my plan is to use the rotary HVAC controls below the bottom vents, in the spot the old stereo was mounted. Then maybe I can find a "DIN and a half" (if it exists) head unit which will fit above the vents. Another option is to just stick the Vintage Air sliding controls in roughly the same spot as the stock controls were. That is going to make the area very busy and they aren't the same width as a stereo, so it will look odd.
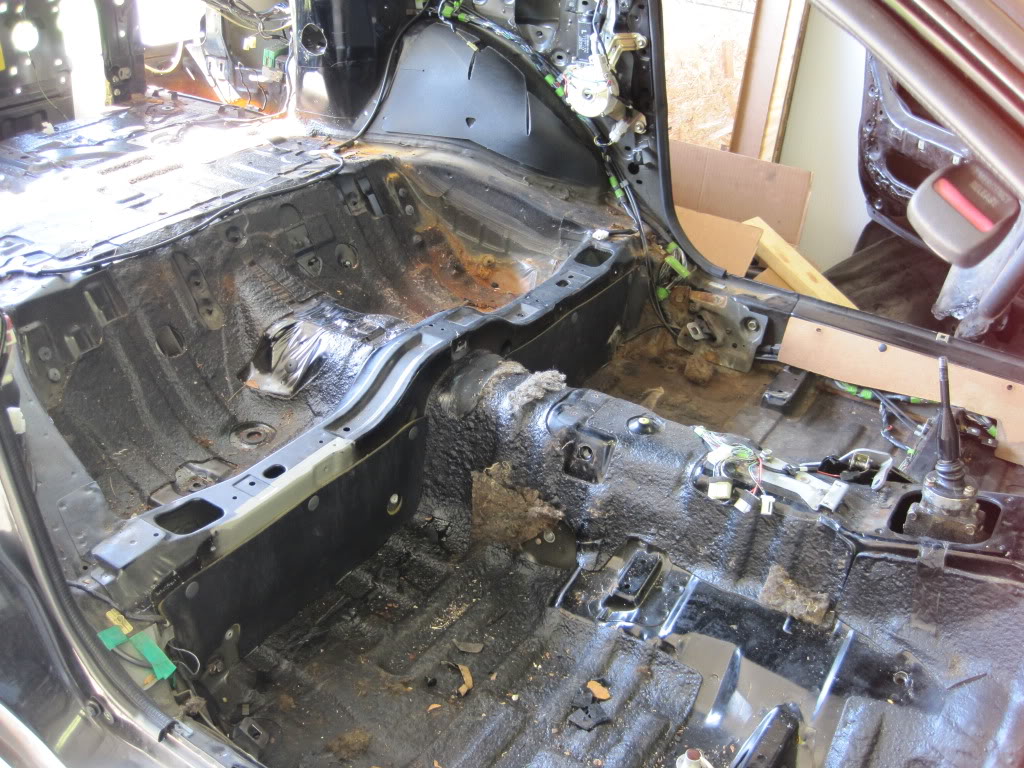
Going back to part 6 - did removal of the sound deadening tar reveal anymore surface rust by itself? I have some major issues with surface rust all along the driver's side of my FC and I'm thinking I need to play it safe and pull up the tar to make sure I address any issues that may be lurking.
You can see it in this picture - it goes all along the shock tower, storage bin and down to the driver's left.
You can see it in this picture - it goes all along the shock tower, storage bin and down to the driver's left.