Stredrotors RX4 Coupe "Project 20b"
 01-10-13, 01:54 AM
#126
Full Member
Thread Starter
Join Date: Nov 2009
Location: Tasmania, Australia
Posts: 99
Likes: 0
Received 0 Likes
on
0 Posts
I found a bit of time to get some welding done this morning.
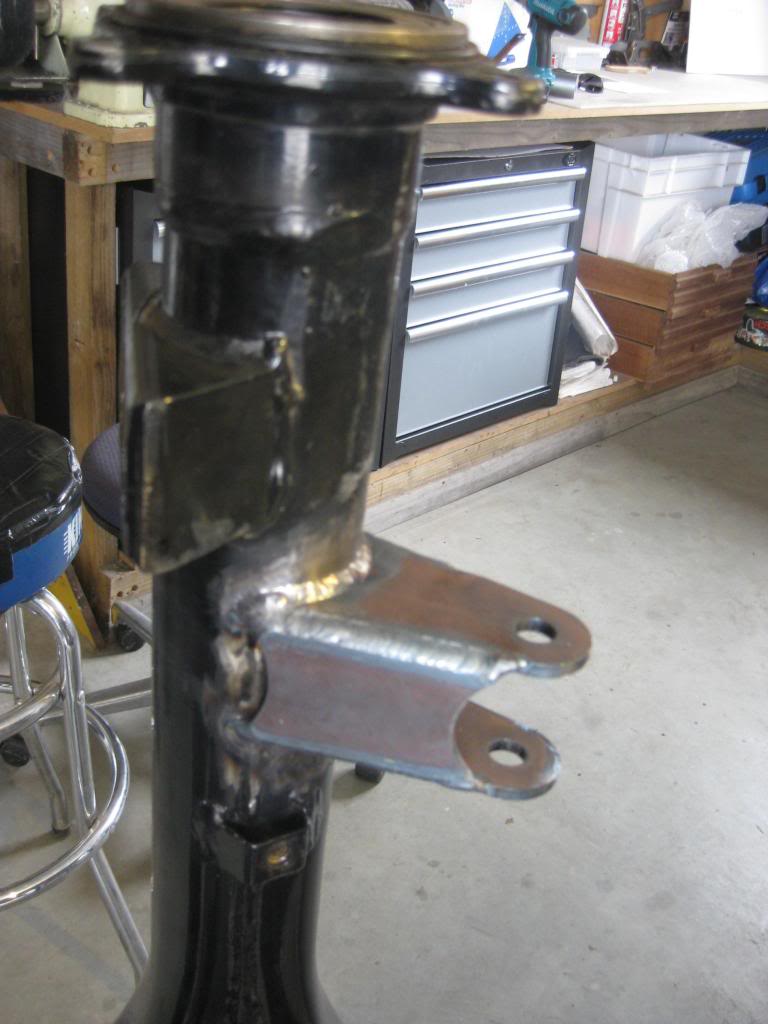
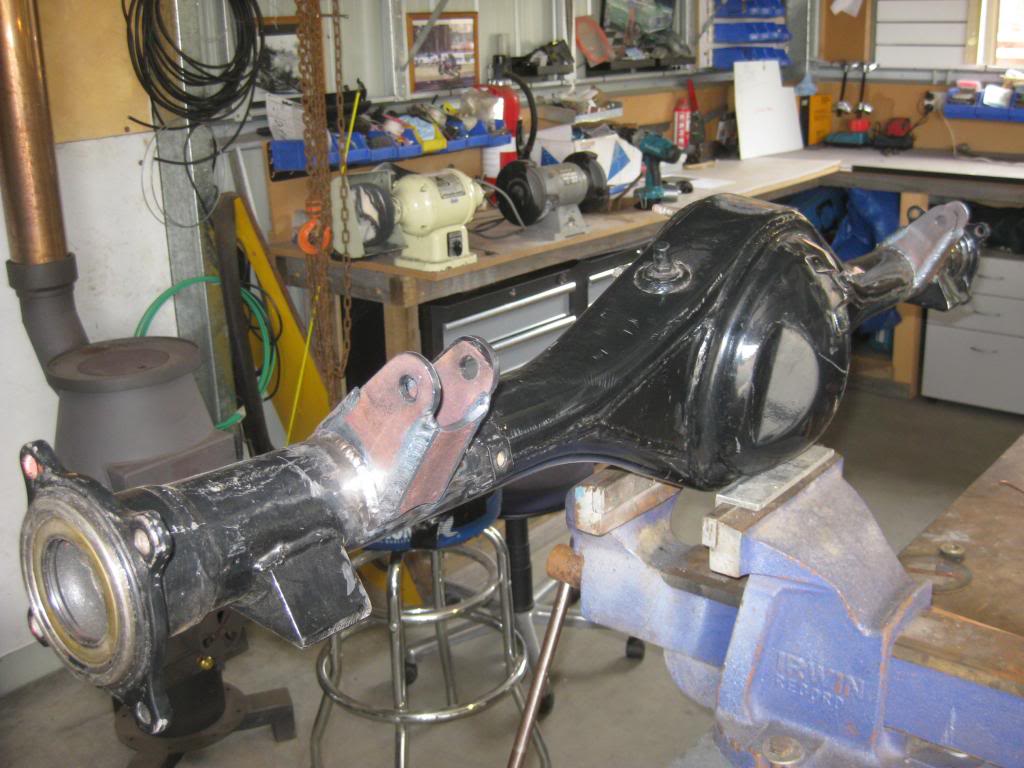
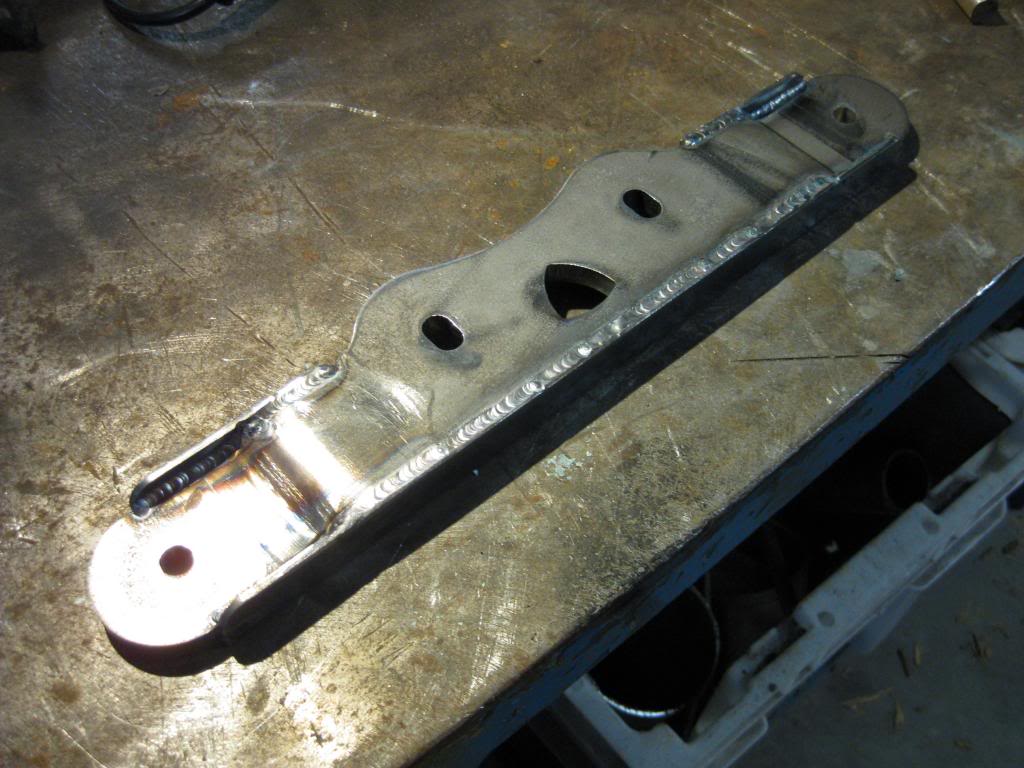
Welded up the two link diff mounts.
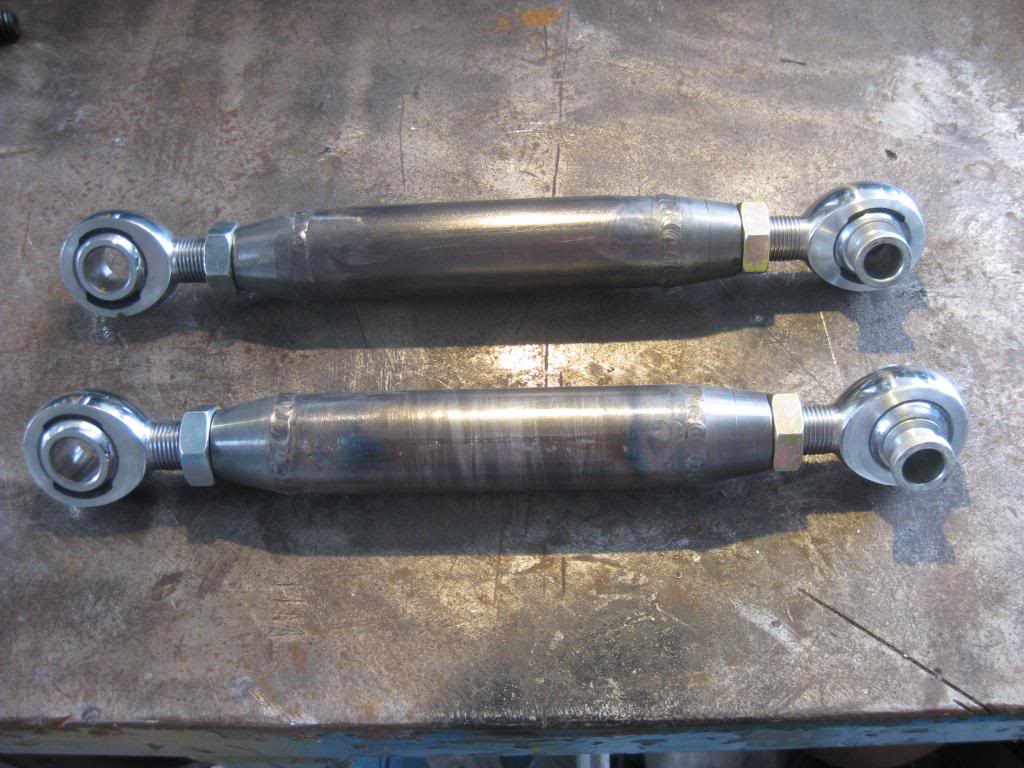
...and the links themselves.
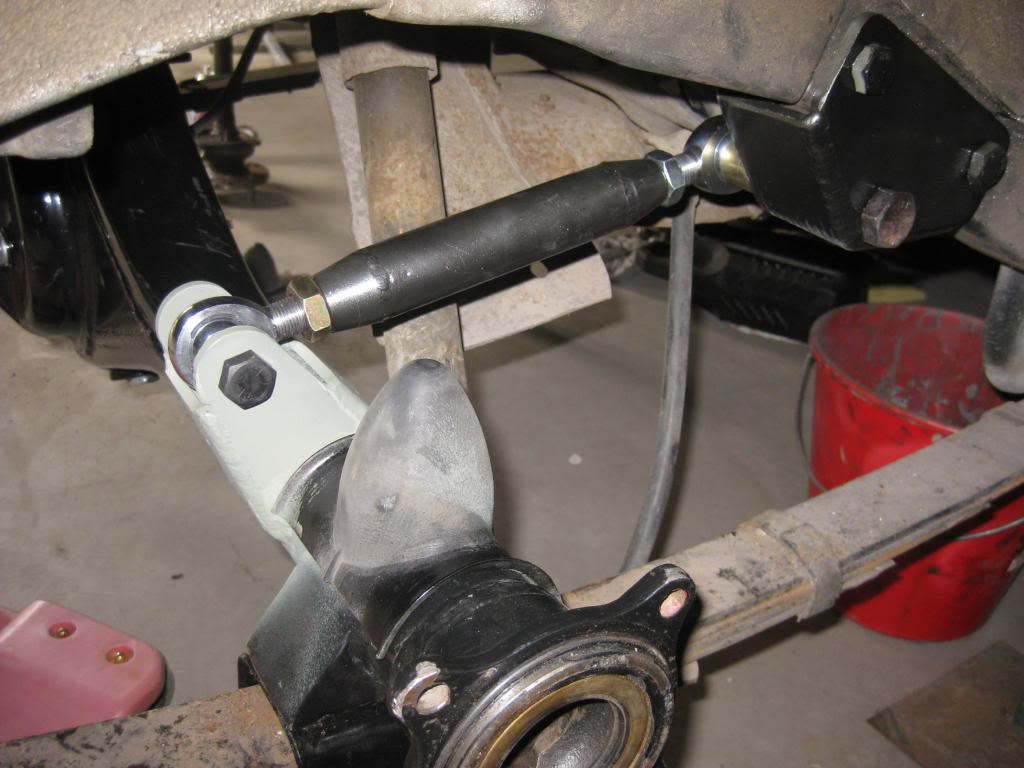
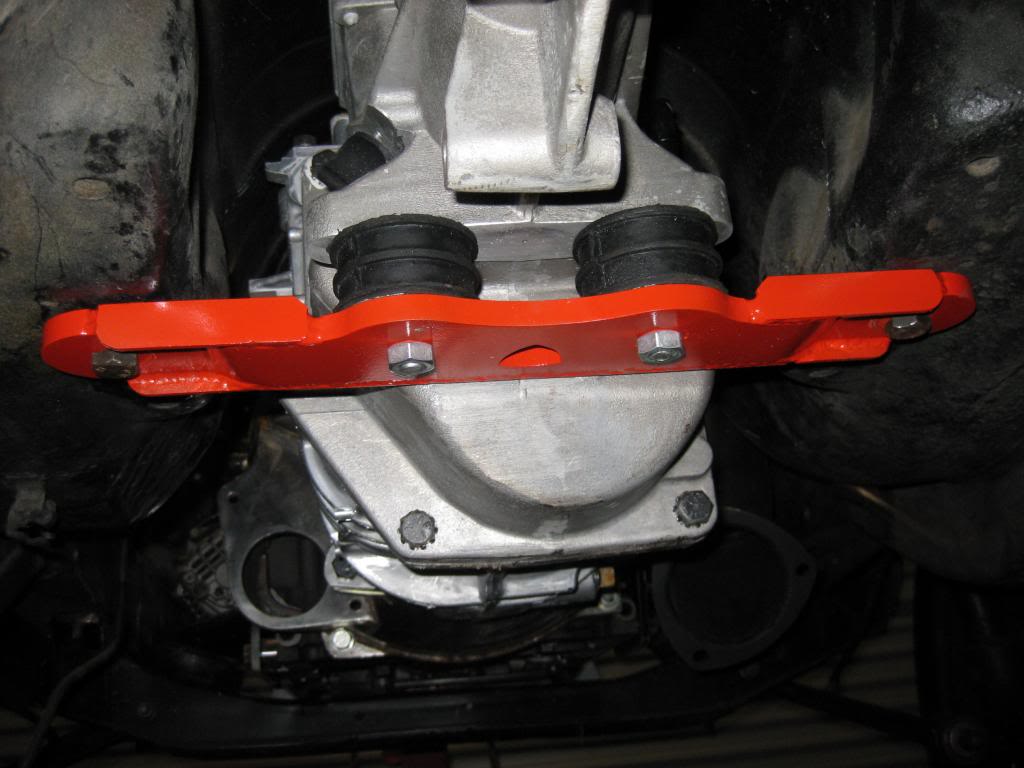
Painted and fitted.
When I am happy that I have finished with the diff I'm getting it powercoated.
Welded up the two link diff mounts.
...and the links themselves.
Painted and fitted.
When I am happy that I have finished with the diff I'm getting it powercoated.


 06-14-13, 02:25 AM
#133
Full Member
Thread Starter
Join Date: Nov 2009
Location: Tasmania, Australia
Posts: 99
Likes: 0
Received 0 Likes
on
0 Posts
Ok a bit of an update!
Here's my latest investment...
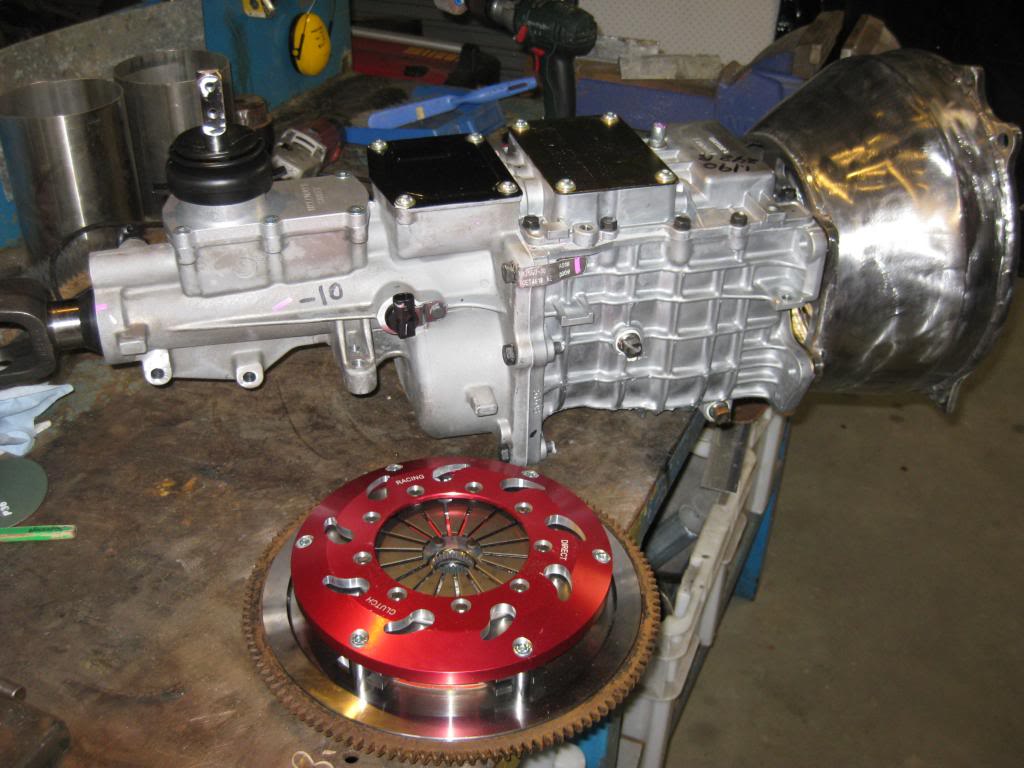
Tremec TKO 600 5 speed with Carbon Syncros, Brass fork pads and with an Ultimate Street short throw shifter, Quarter Master Hydraulic bearing, slip yoke for the tailshaft, a Direct Clutch twin plate, and a Green Brothers steel bell housing.
I have to do a little mod to the box to suit the RX7 turbo starter and fabricate a gearbox cross member, I will detail this later.
06-16-13, 01:29 AM
#134
Full Member
Thread Starter
Join Date: Nov 2009
Location: Tasmania, Australia
Posts: 99
Likes: 0
Received 0 Likes
on
0 Posts
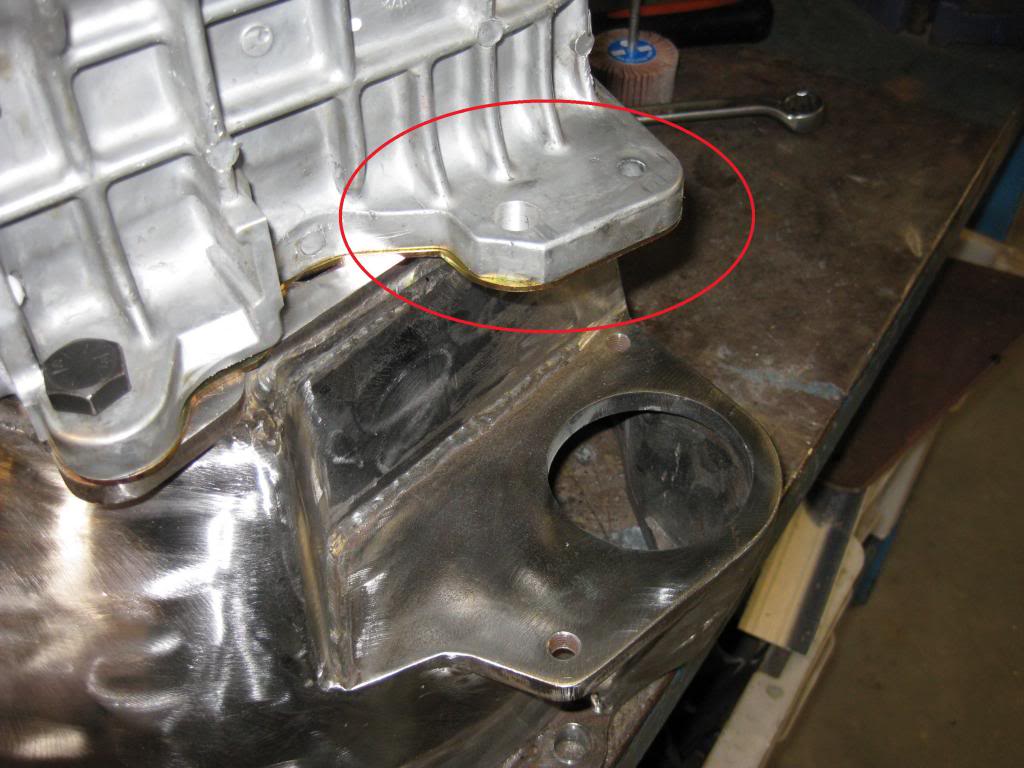
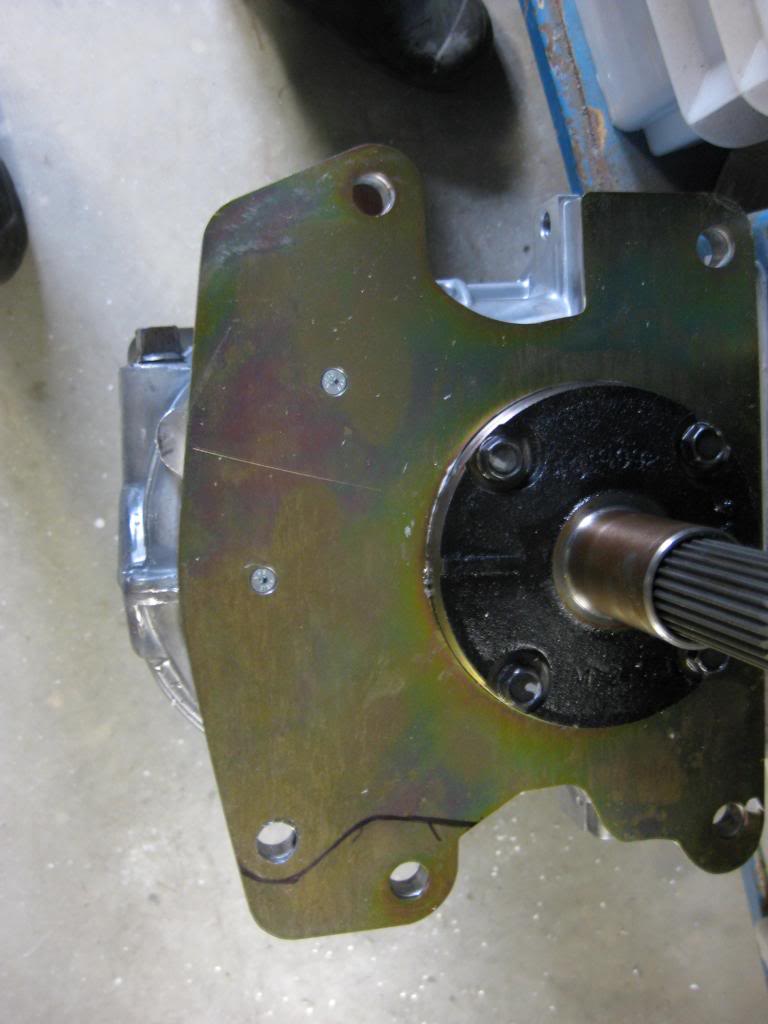
Had to make a mod to the TKO to clear the starter for Green Brothers bellhousing.
Some of this area has to be removed and a new hole drilled.
Marked out the material to be removed and drilled new hole.
Chopped! A bit un-nerving on a brand new gearbox
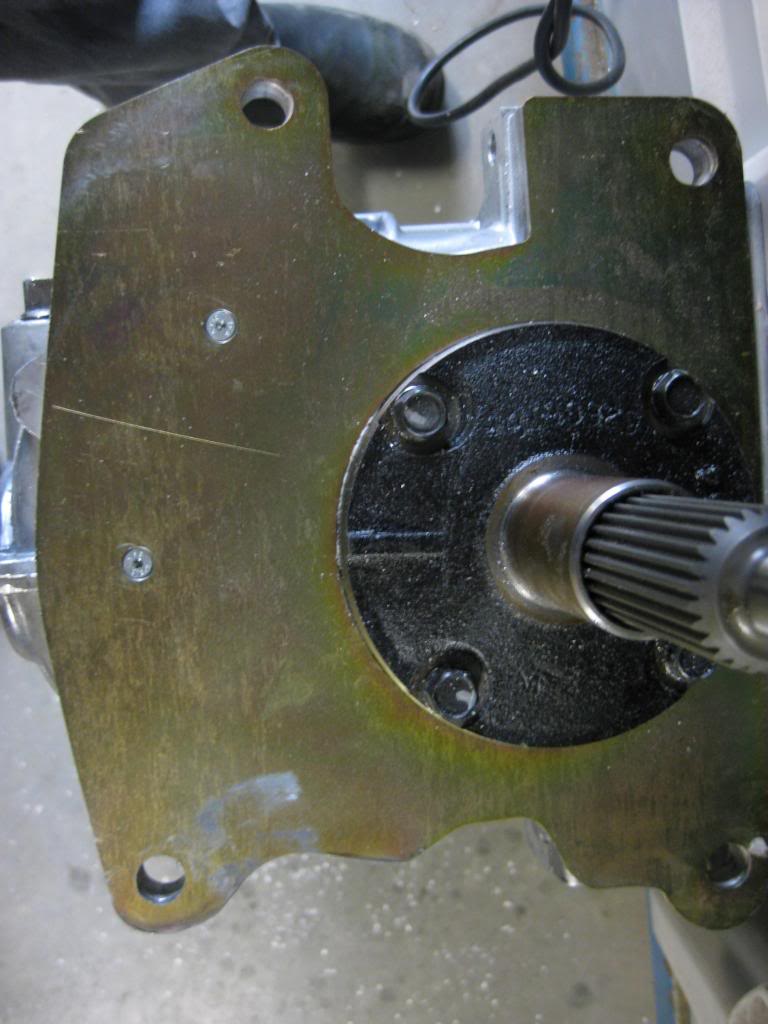
Bellhousing back on. Just need to get hold of a turbo RX7 starter to double check clearance.
Some of this area has to be removed and a new hole drilled.

Marked out the material to be removed and drilled new hole.

Chopped! A bit un-nerving on a brand new gearbox

Bellhousing back on.
 06-16-13, 01:38 AM
#135
Full Member
Thread Starter
Join Date: Nov 2009
Location: Tasmania, Australia
Posts: 99
Likes: 0
Received 0 Likes
on
0 Posts
Just for interest, this is the difference between my old SV RX7 box and the TKO.
670mm Vs 730mm from belhousing face to shifter position. The RX7 box I had already done the shortened shifter housing mod.
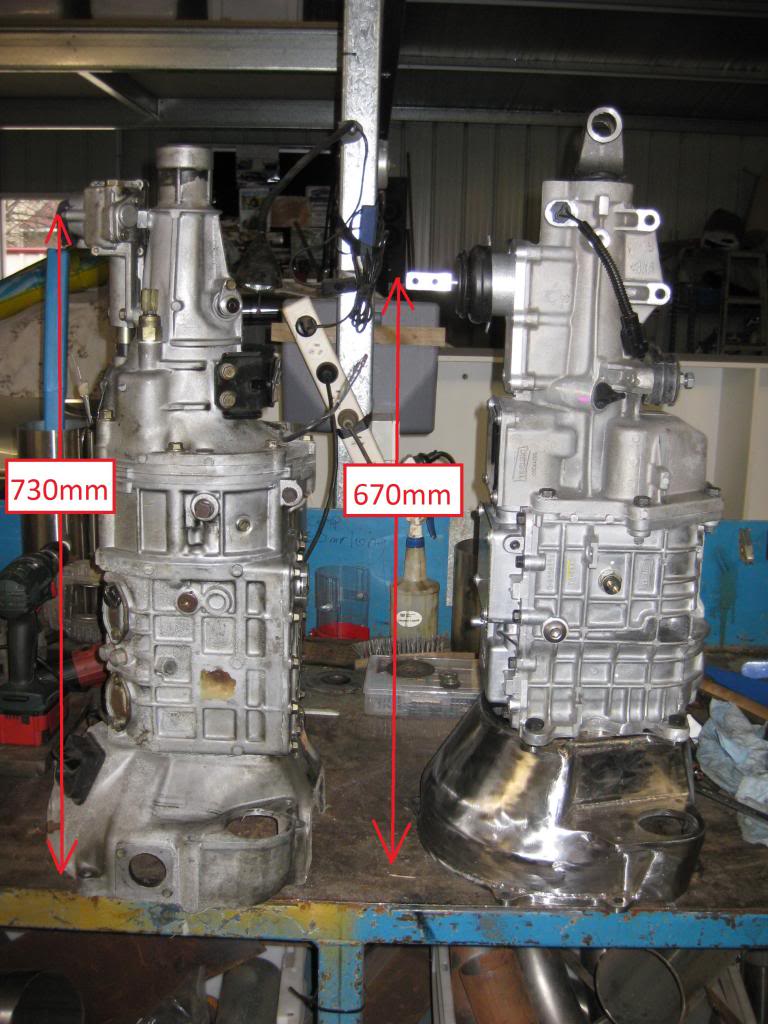
670mm Vs 730mm from belhousing face to shifter position. The RX7 box I had already done the shortened shifter housing mod.
 06-30-13, 05:24 AM
#136
Full Member
Thread Starter
Join Date: Nov 2009
Location: Tasmania, Australia
Posts: 99
Likes: 0
Received 0 Likes
on
0 Posts
I put the TKO on the back of the 20B today and dropped them into the engine bay to measure up the gearbox cross member.
Sorry I don't have any pics at the moment as the missus is away and she took the camera and my phone is no better than a potato.
The TKO fits the RX4 transmission tunnel very well and shouldn't need any "clearancing".
I have measured up and modeled the gearbox cross member.
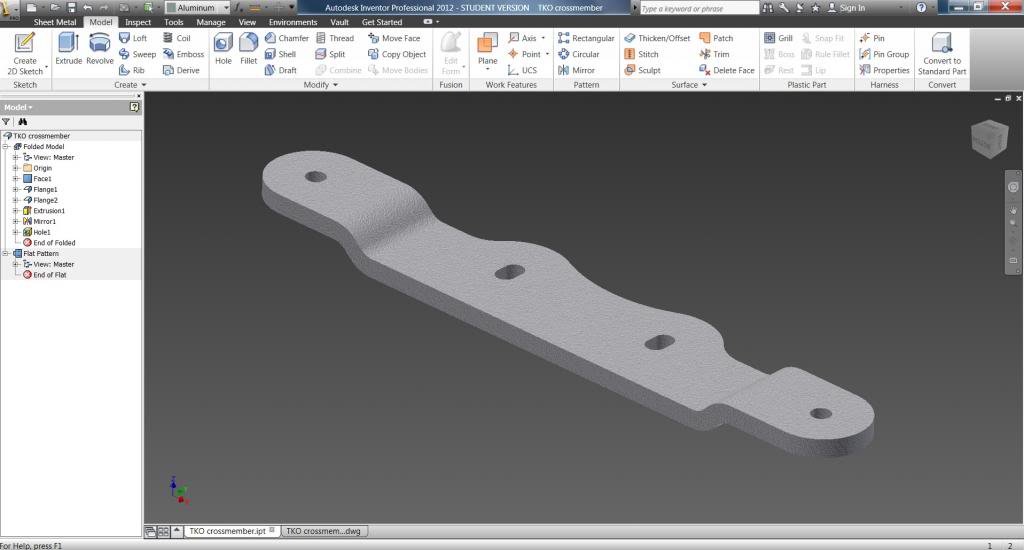
Turns out to only need a very simple design .
.
Sorry I don't have any pics at the moment as the missus is away and she took the camera and my phone is no better than a potato.
The TKO fits the RX4 transmission tunnel very well and shouldn't need any "clearancing".
I have measured up and modeled the gearbox cross member.

Turns out to only need a very simple design
.
06-30-13, 11:34 AM
#137
Full Member
iTrader: (2)

Join Date: Jun 2002
Location: Camano Island, WA
Posts: 191
Likes: 0
Received 0 Likes
on
0 Posts
Been lurking in the shadows, watching your project since the start. Let me pile-on with the usual "WOW! Great work" compliments.
The (sadly) few Rx4 projects are great for me, since my GTR is a long way from getting its turn. Seeing what does and does not work is valuable info when the time comes. I will say I'm jealous of your rust 'problems'. If you saw my Fred Flinstone floors, rockers, window frame, etc, you'd jump for joy at how nice your car is.
Always happy to see a new post. Cheers!
P.S. On a side note, I work for Boeing as an AOG mechanic, so I travel the planet fixing airplanes that get damaged (running into things, hard landings, etc). I hope to someday get to Australia, and if I do get close enough, I'd love to meet up with you and/or your friends and toss a few back.
07-02-13, 02:44 AM
#138
Full Member
Thread Starter
Join Date: Nov 2009
Location: Tasmania, Australia
Posts: 99
Likes: 0
Received 0 Likes
on
0 Posts
The (sadly) few Rx4 projects are great for me, since my GTR is a long way from getting its turn. Seeing what does and does not work is valuable info when the time comes. I will say I'm jealous of your rust 'problems'. If you saw my Fred Flinstone floors, rockers, window frame, etc, you'd jump for joy at how nice your car is.

P.S. On a side note, I work for Boeing as an AOG mechanic, so I travel the planet fixing airplanes that get damaged (running into things, hard landings, etc). I hope to someday get to Australia, and if I do get close enough, I'd love to meet up with you and/or your friends and toss a few back.
07-05-13, 10:33 PM
#139
Full Member
Thread Starter
Join Date: Nov 2009
Location: Tasmania, Australia
Posts: 99
Likes: 0
Received 0 Likes
on
0 Posts
Here's the photos of the fit up...
The shifter comes out pretty close to the factory hole. (Already butchered for the early RX7 box when I bought it ) The engine is 50mm further back than factory so normally would be spot on.
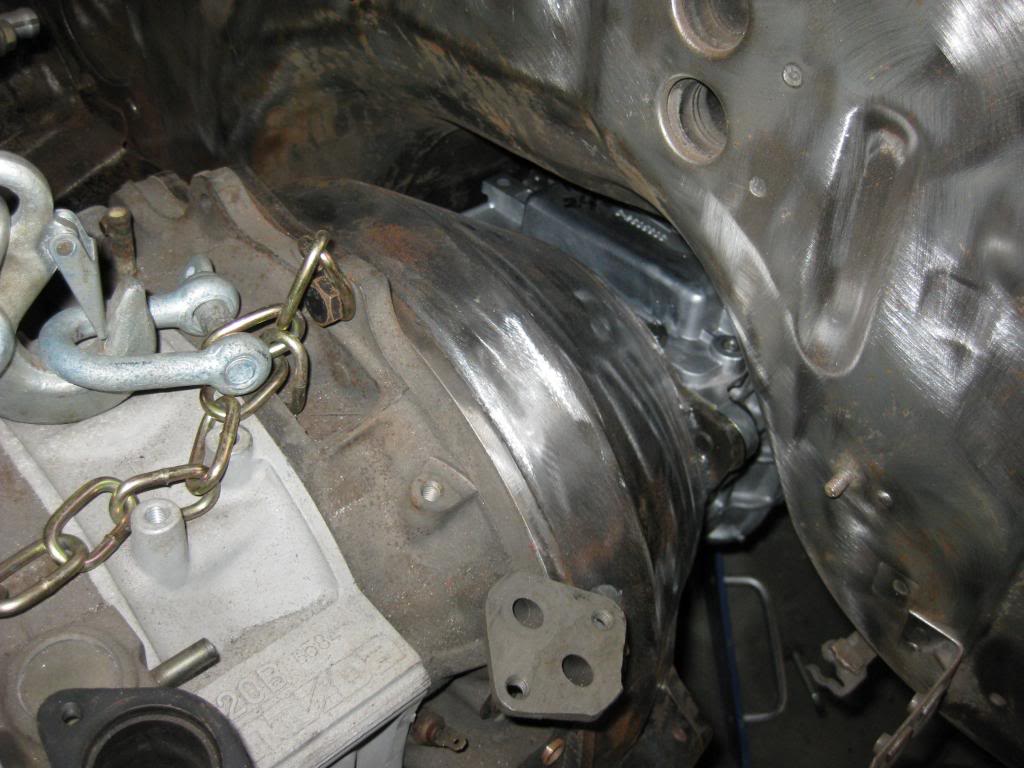
Good clearance around the firewall.
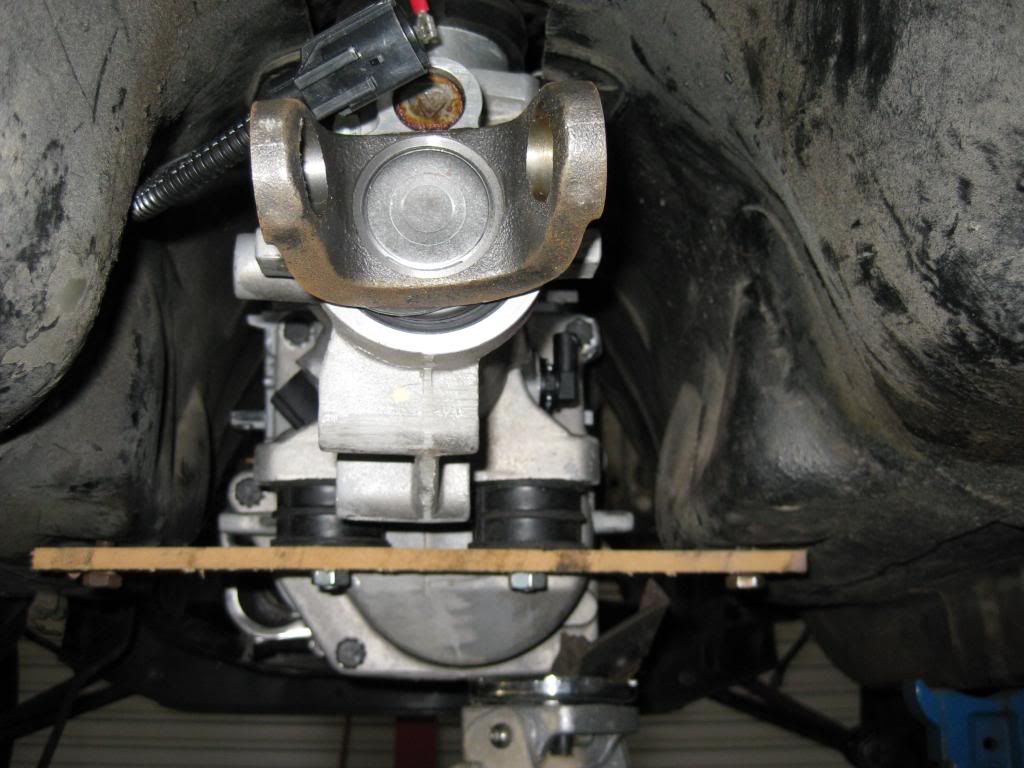
Not bad around the trans tunnel either.
As soon as I get the laser cut parts back I'll fab up the cross member.
Last edited by Stredrotor; 07-05-13 at 10:36 PM.
07-18-13, 04:20 AM
#140
Full Member
Thread Starter
Join Date: Nov 2009
Location: Tasmania, Australia
Posts: 99
Likes: 0
Received 0 Likes
on
0 Posts
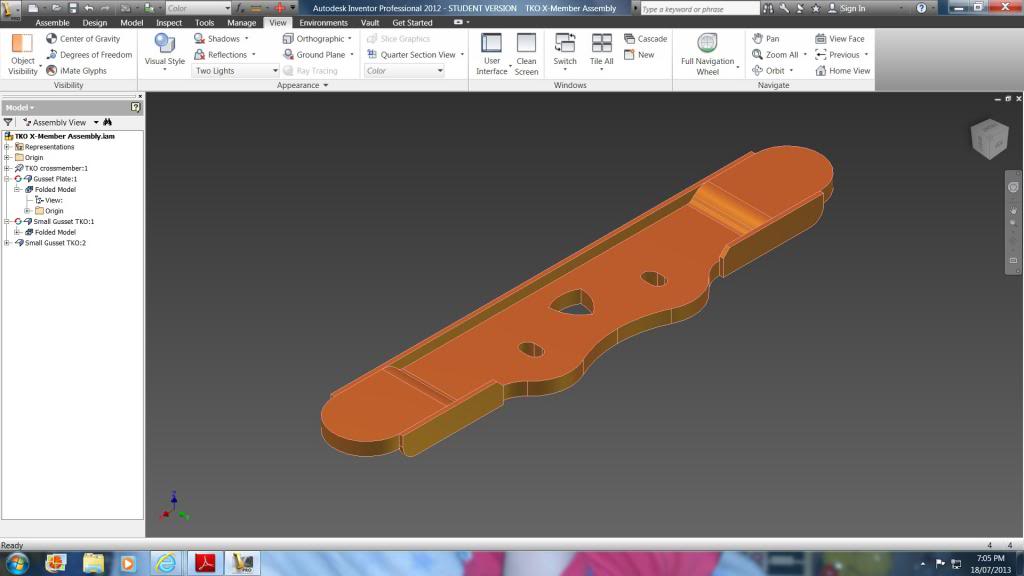
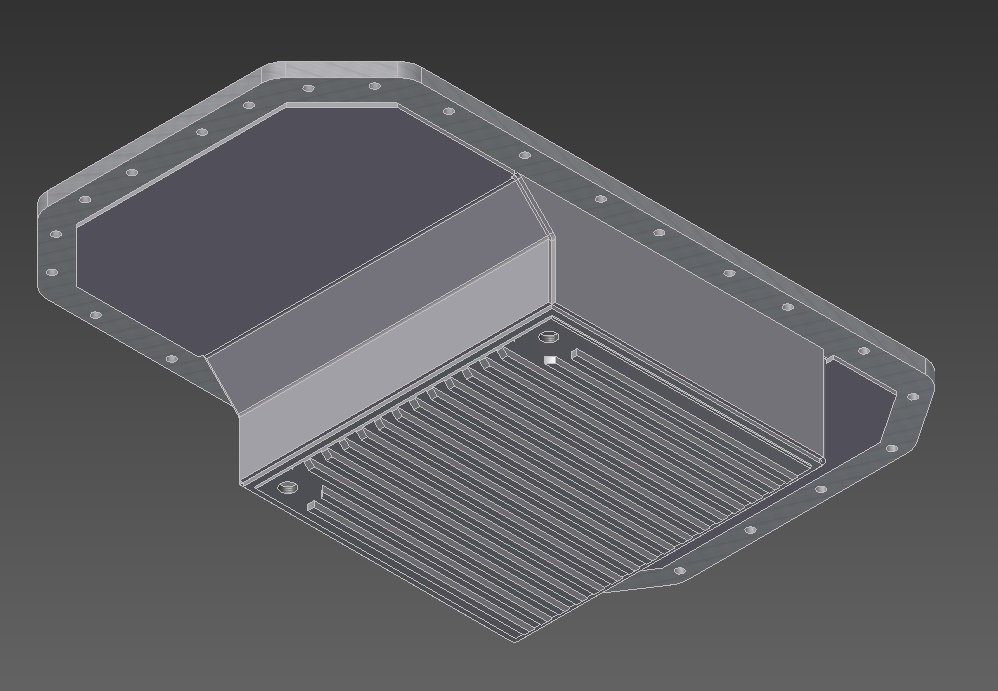
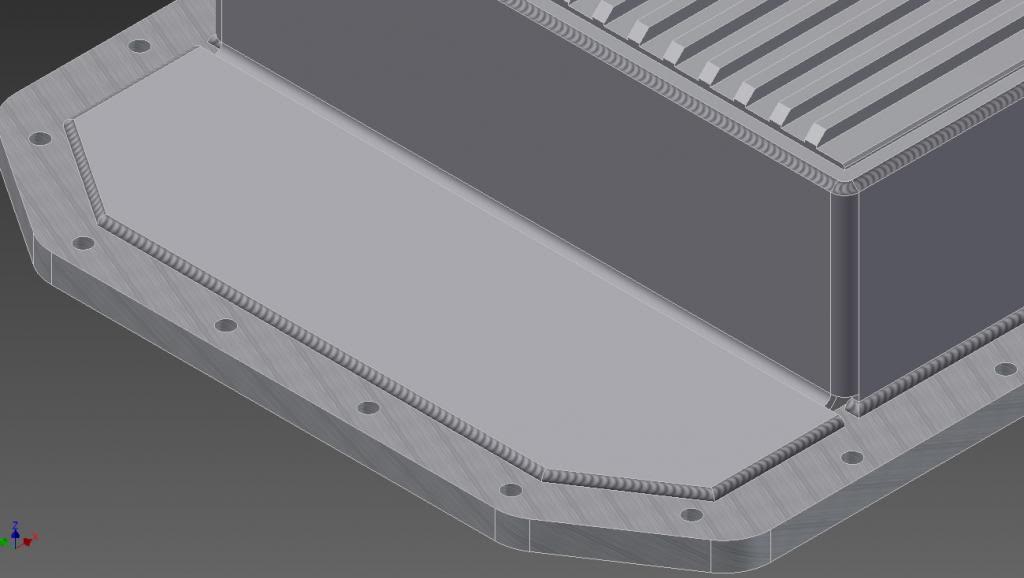
I added some gussets to my CAD model just to stiffen things up.
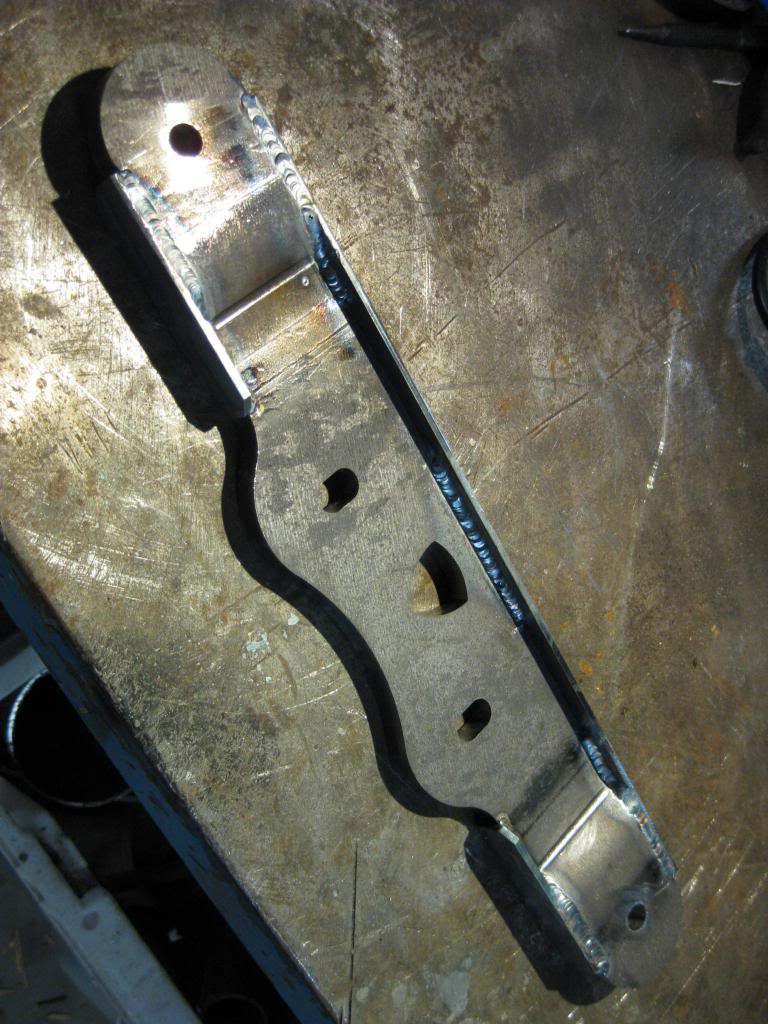
Got my laser cut parts back so welded it all together.
Bolted in place.
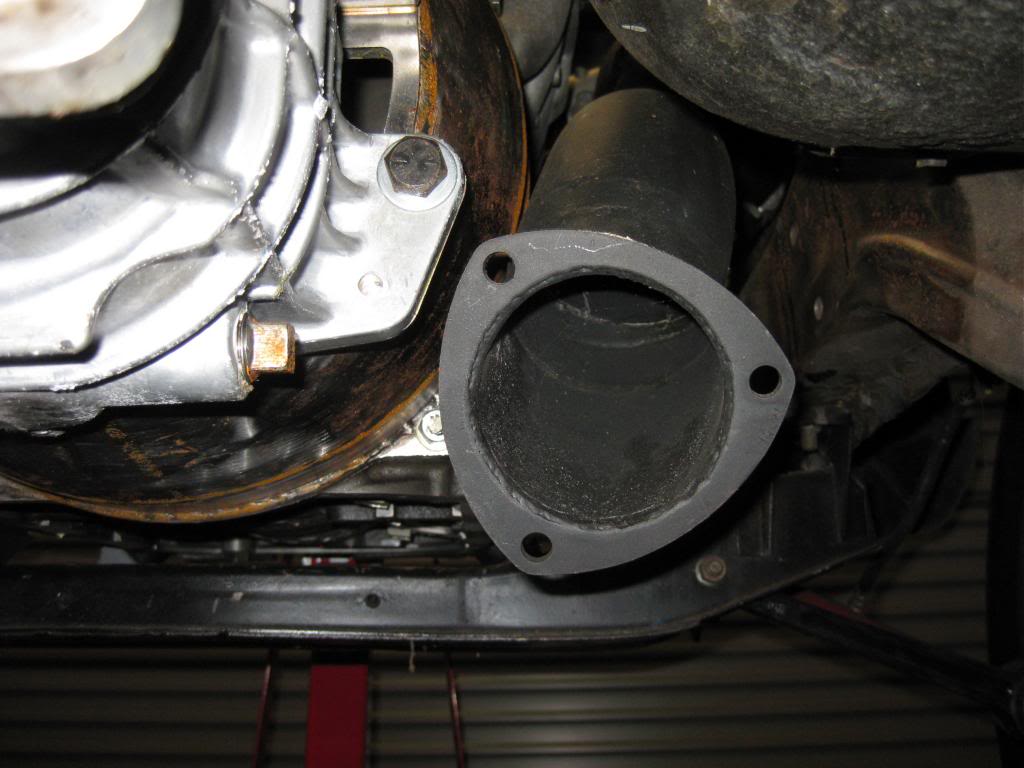
Checked the dump pipe for clearance as well. All looks sweet!

Got my laser cut parts back so welded it all together.


Bolted in place.

Checked the dump pipe for clearance as well. All looks sweet!


 08-25-13, 04:30 PM
#143
Full Member
iTrader: (2)
Join Date: Jun 2002
Location: Camano Island, WA
Posts: 191
Likes: 0
Received 0 Likes
on
0 Posts
I just returned from a job in Jakarta, so that's as close as I've been so far. I'll get there someday, hopefully. I'm afraid I won't want to leave once it get there.
I'm working on a donor car for sheet metal. Tough to find locally, but I'm sure there is one hiding somewhere.
Go man, go!
I'm working on a donor car for sheet metal. Tough to find locally, but I'm sure there is one hiding somewhere.
Go man, go!
08-31-13, 05:33 AM
#146
Full Member
Thread Starter
Join Date: Nov 2009
Location: Tasmania, Australia
Posts: 99
Likes: 0
Received 0 Likes
on
0 Posts
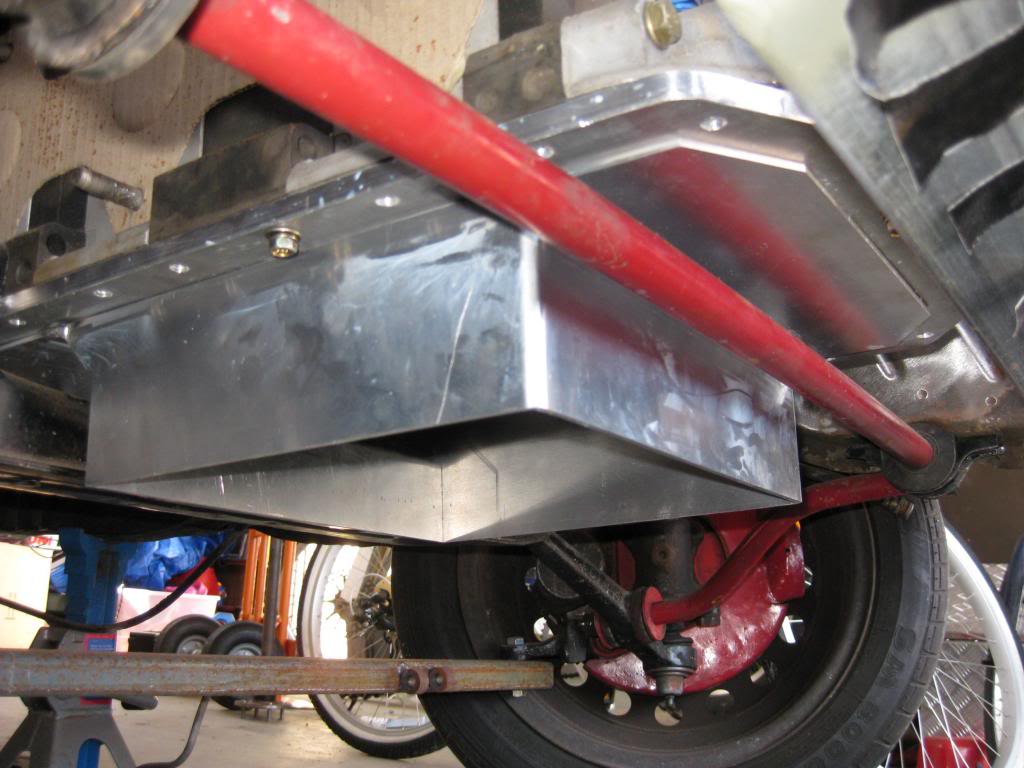
Started work on the sump as the custom one that come with the motor won't fit. I had the flange cut then started working on how much room I have.
I removed the old front engine mount cross member as I need a bit more clearance.


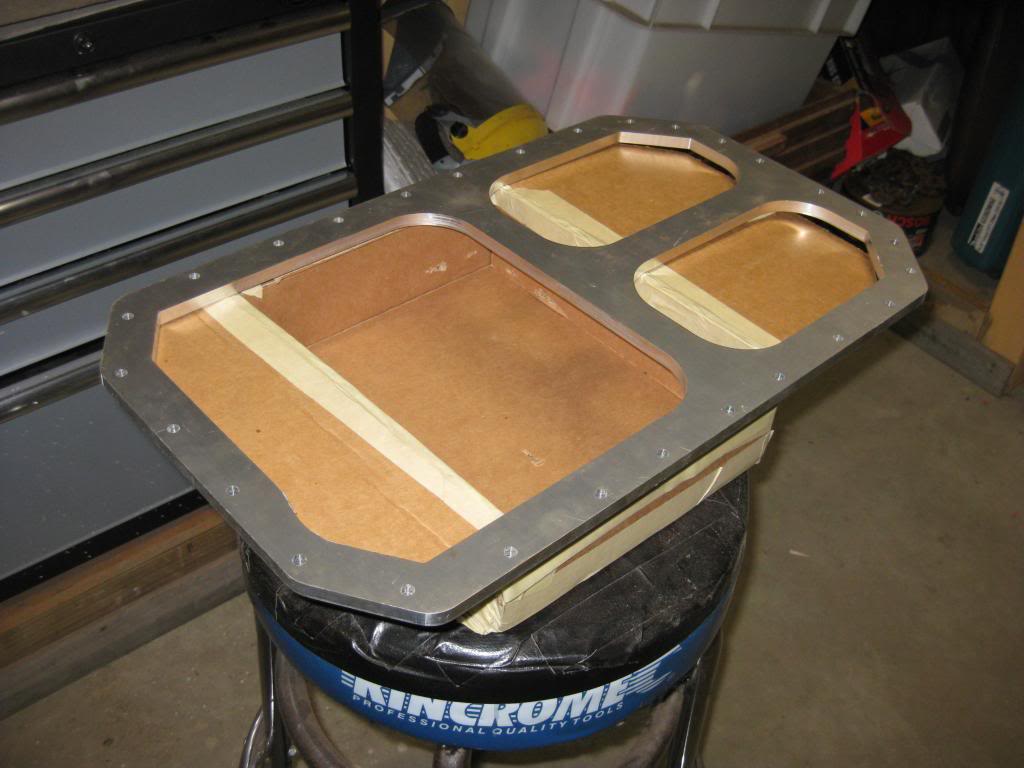
Then I mocked up the lower half in cardboard.

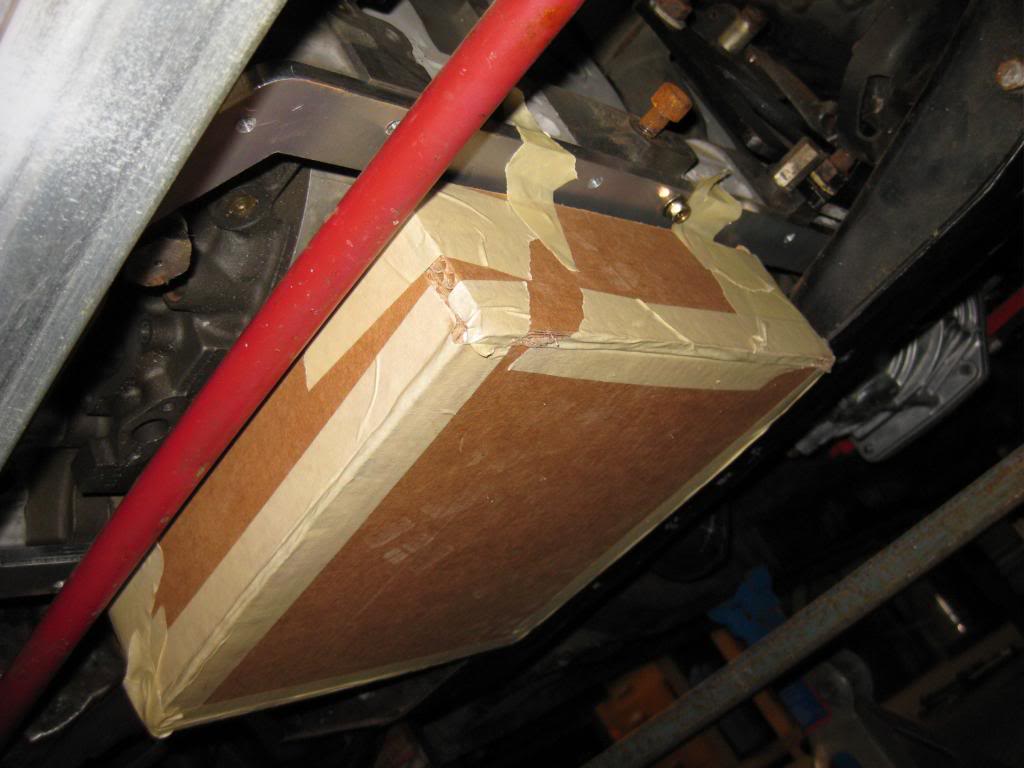
Next to the old custom sump.
After that I modelled it up in Inventor.
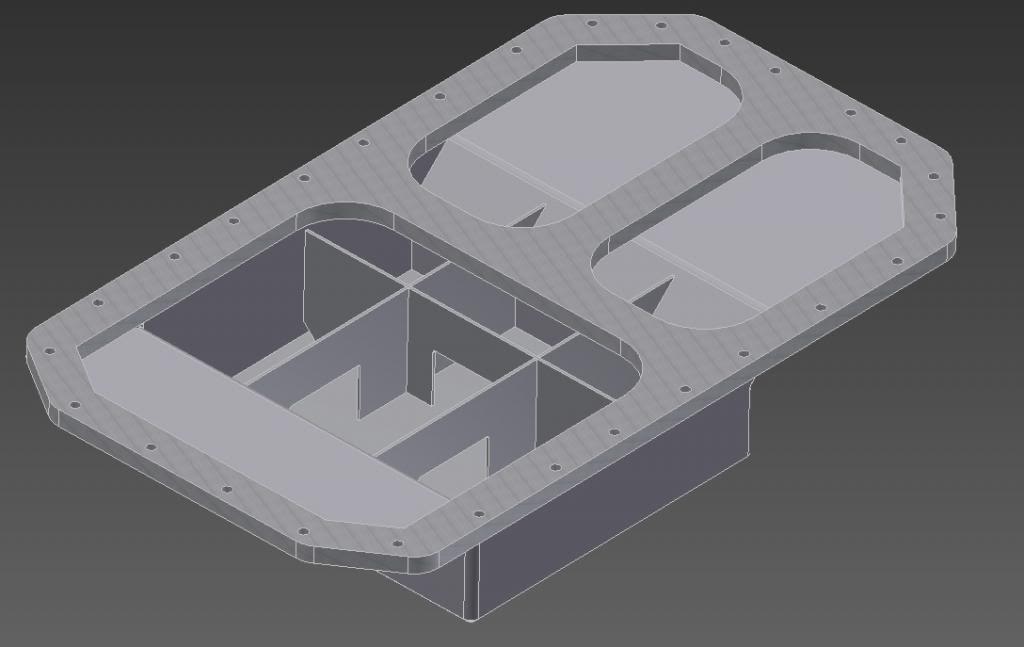
Even welded it!
Should give me a bit over 5 litres capacity.
Now I just need get the lower half cut.
I had the flange cut then started working on how much room I have.I removed the old front engine mount cross member as I need a bit more clearance.


Then I mocked up the lower half in cardboard.


Next to the old custom sump.

After that I modelled it up in Inventor.


Even welded it!

Should give me a bit over 5 litres capacity.
Now I just need get the lower half cut.

 10-23-13, 04:38 AM
#148
Full Member
Thread Starter
Join Date: Nov 2009
Location: Tasmania, Australia
Posts: 99
Likes: 0
Received 0 Likes
on
0 Posts
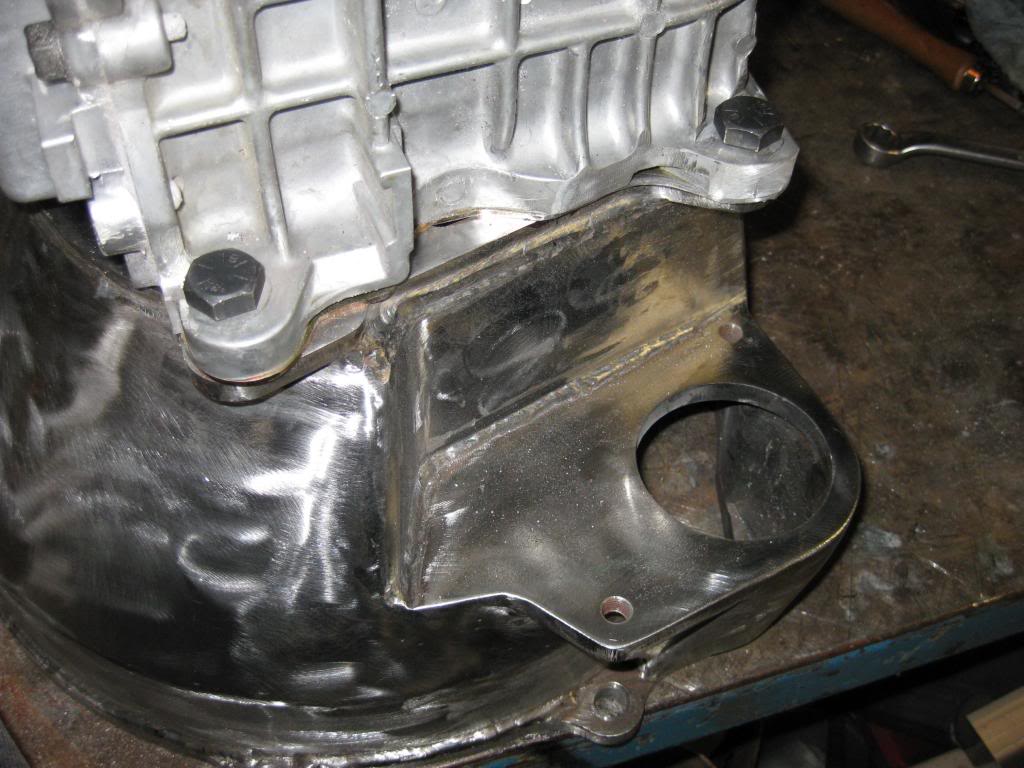
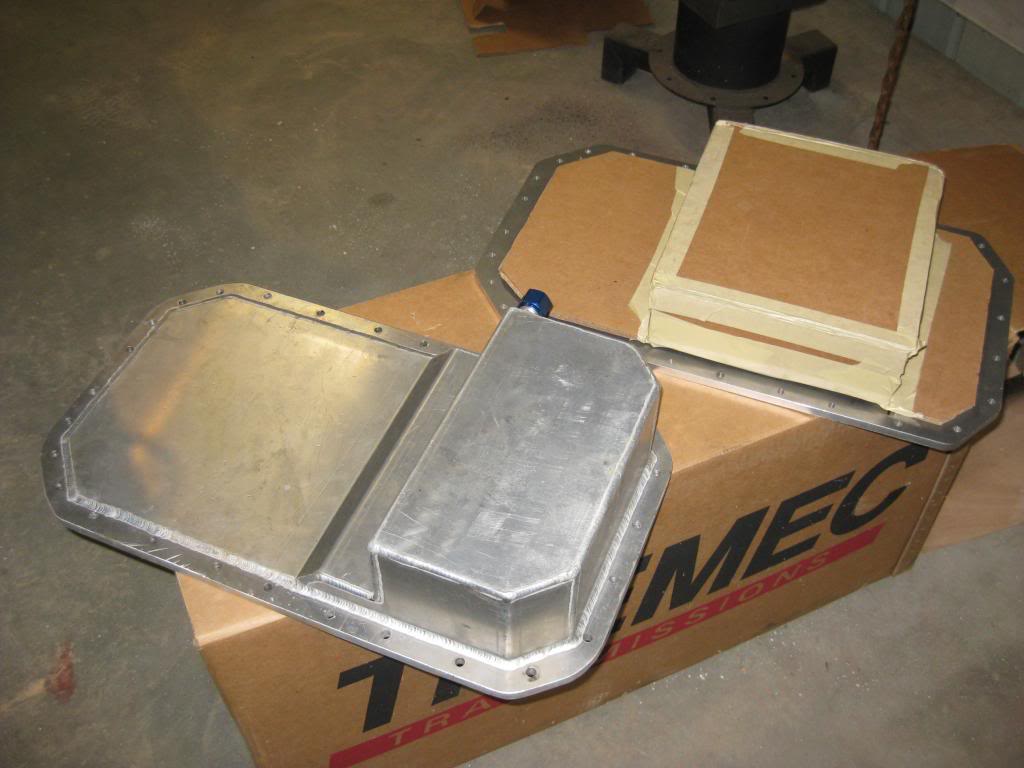
Had a little bit more progress.
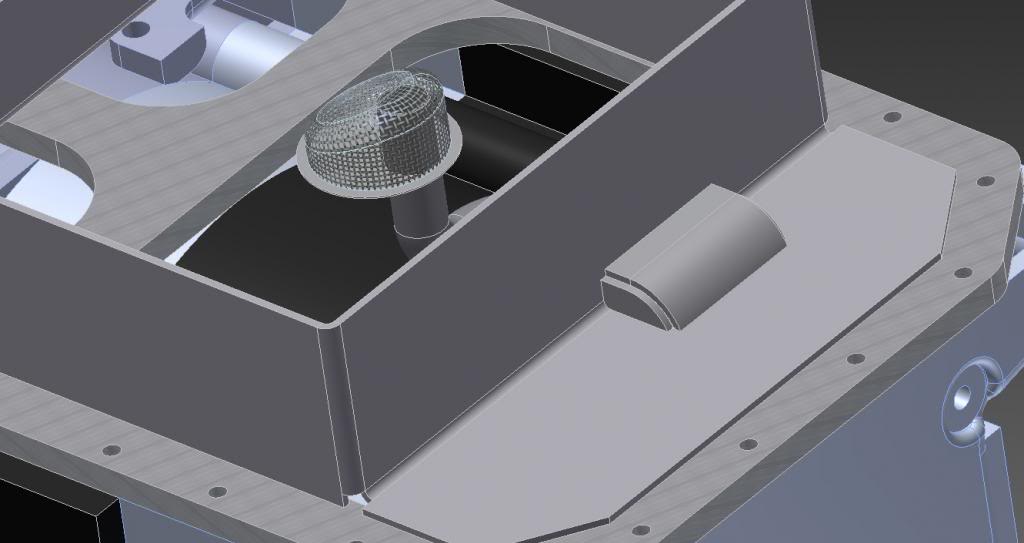
I got back the laser cut parts for the sump and tack them together for a trial fit up.
Good clearance on the crossmember.
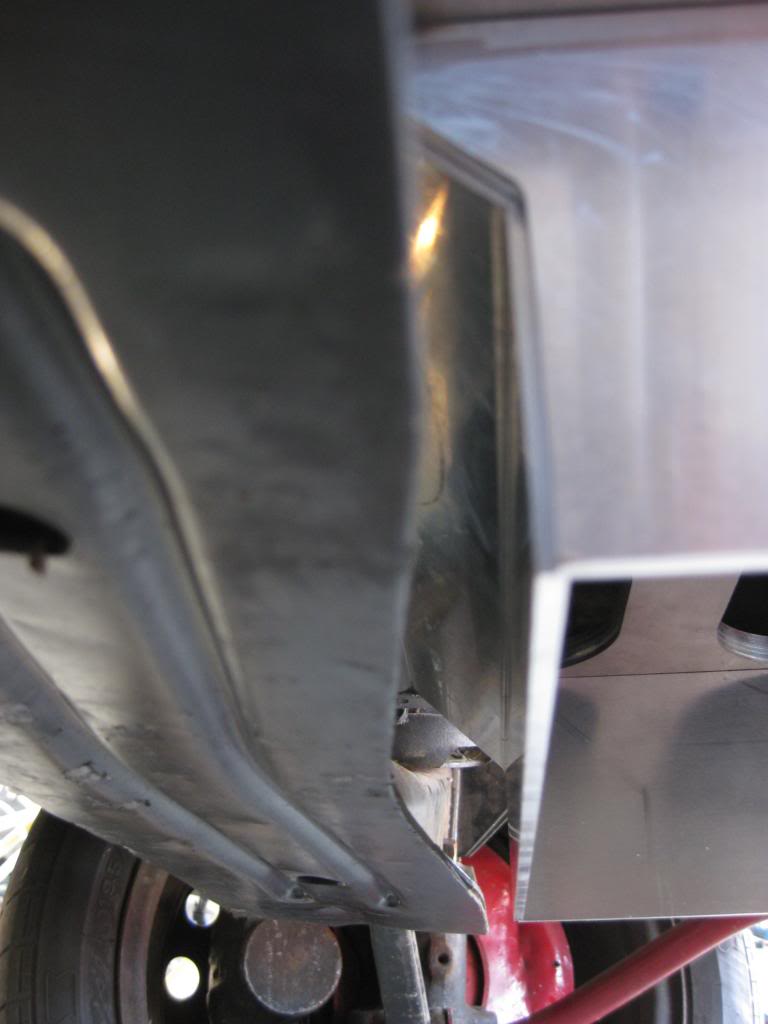
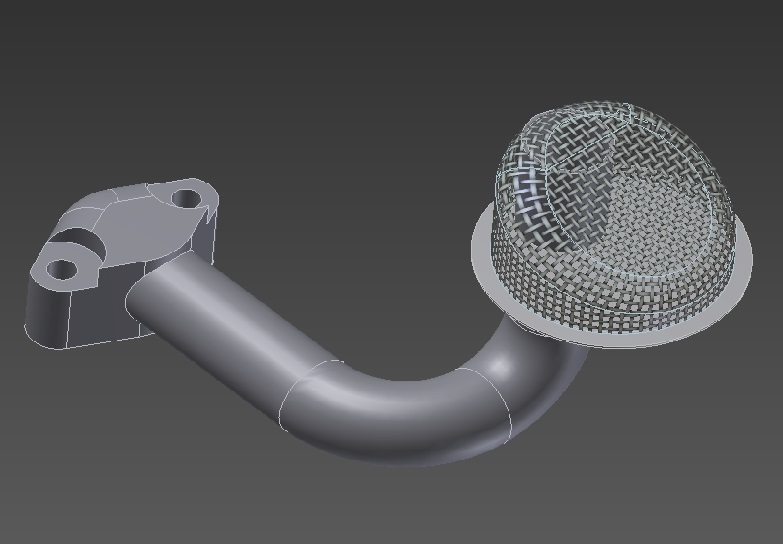
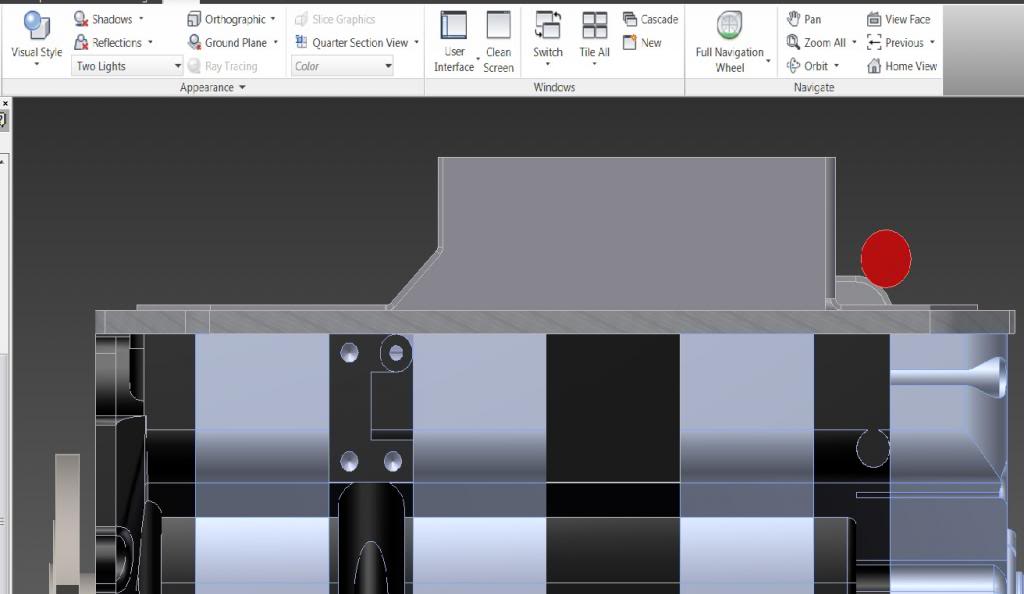
But after checking clearance on the oil pickup I knew I had a problem.
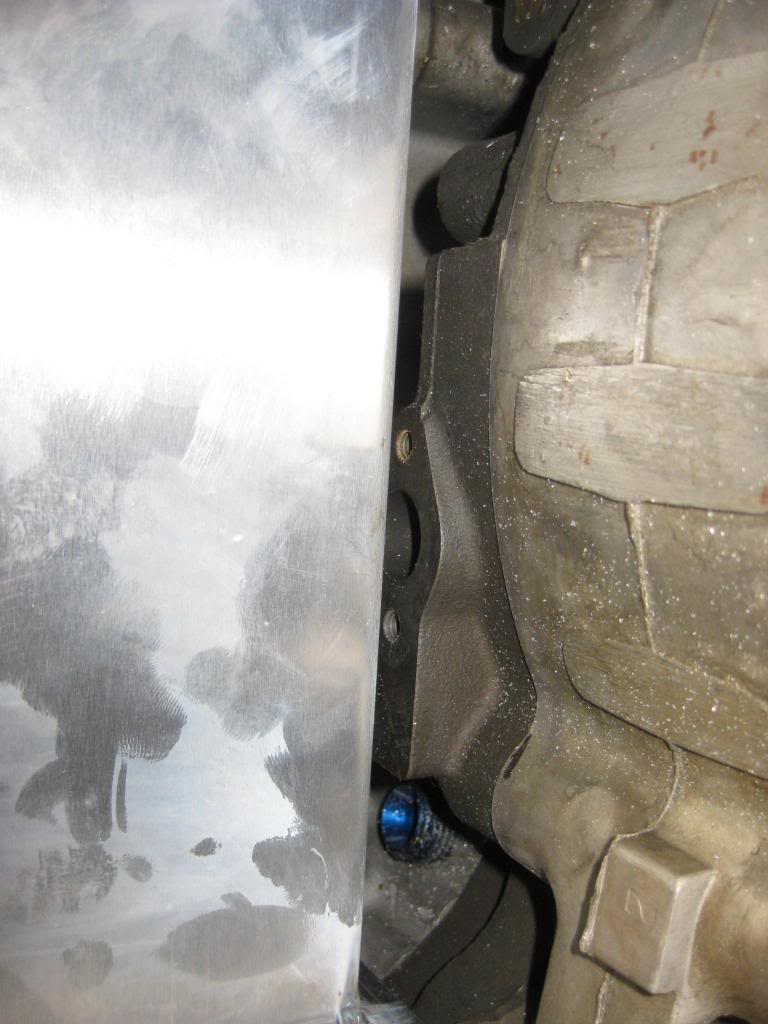
This is a 13B turbo pickup.
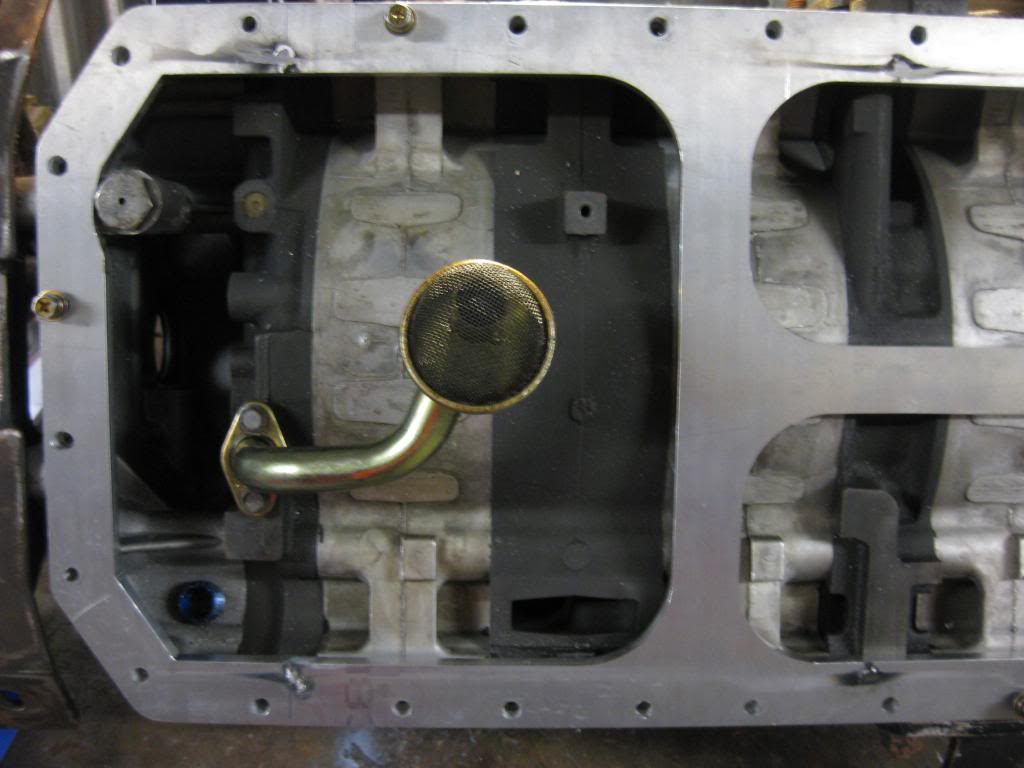
Started to design a lower profile pickup.
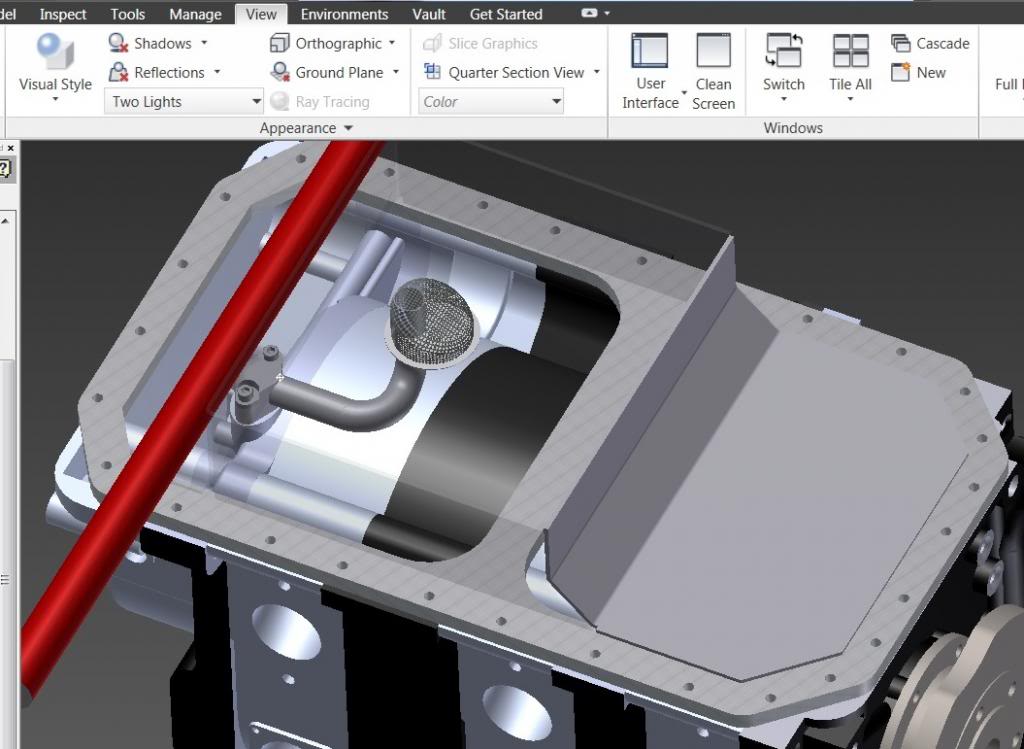
The sump will have to be modified.
And even then I will have to lower the swaybar. Might have a look at some of those anti-dive spacers.
I got back the laser cut parts for the sump and tack them together for a trial fit up.

Good clearance on the crossmember.

But after checking clearance on the oil pickup I knew I had a problem.

This is a 13B turbo pickup.

Started to design a lower profile pickup.


The sump will have to be modified.

And even then I will have to lower the swaybar. Might have a look at some of those anti-dive spacers.


 11-22-13, 08:05 PM
#150
Full Member
Thread Starter
Join Date: Nov 2009
Location: Tasmania, Australia
Posts: 99
Likes: 0
Received 0 Likes
on
0 Posts
Parts for my sump are made ready for welding!
The flange is screwed to a piece of 8mm steel plate to help with distortion, here with the sump pickup in place.
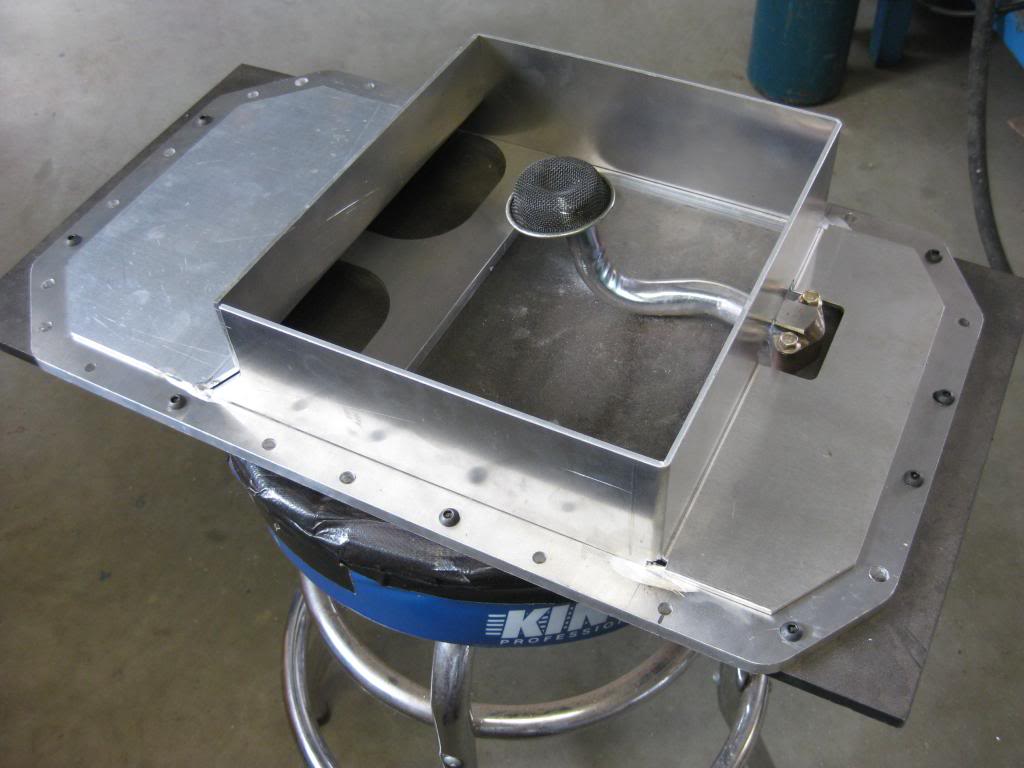
Here with the sump base and pickup cover plates.
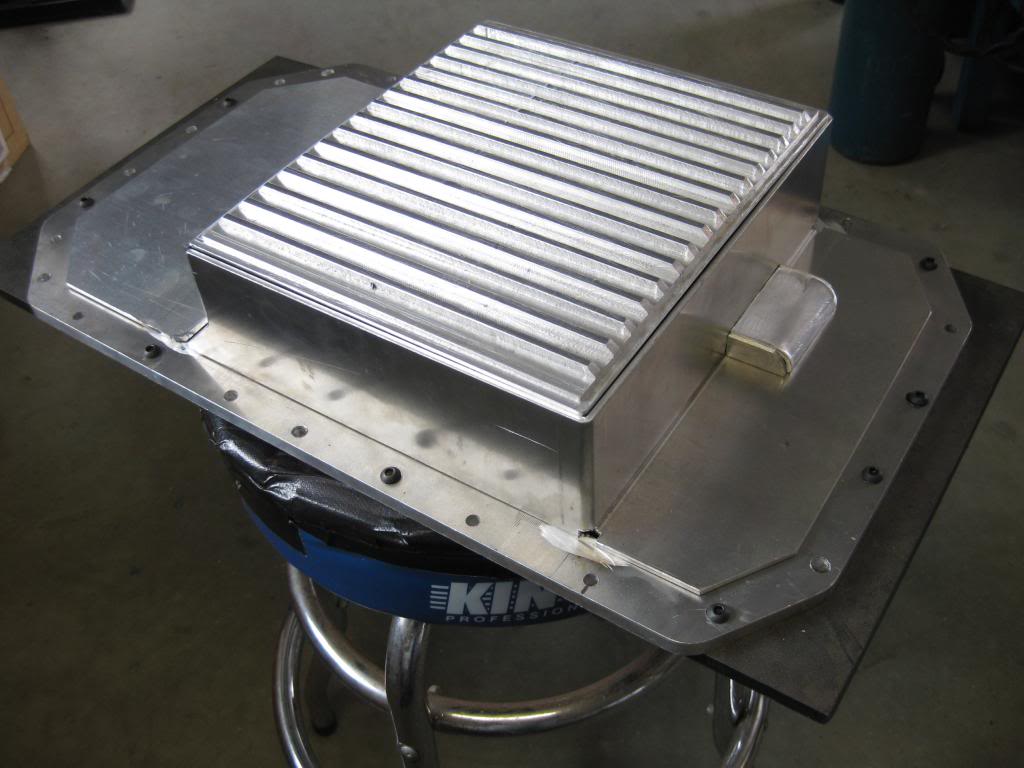
Hopefully organising the welding next week as I don't have an AC TIG to weld alloy.
The flange is screwed to a piece of 8mm steel plate to help with distortion, here with the sump pickup in place.

Here with the sump base and pickup cover plates.

Hopefully organising the welding next week as I don't have an AC TIG to weld alloy.