
Bike for dirt drags with 13B NA

Joined: Feb 2001
Posts: 29,798
Likes: 128
From: London, Ontario, Canada
Or, just pump it up by hand for a bend or two.  I've never had much luck with mine using it on tube, of course. I figure with the correct dies and perhaps something like tar or ice in the tube, it could make some nice bends.
I've never had much luck with mine using it on tube, of course. I figure with the correct dies and perhaps something like tar or ice in the tube, it could make some nice bends.
Thread Starter
Dragons' Breath
Joined: Sep 2010
Posts: 1,129
Likes: 2
From: Pump Handle, SK. Canada
I think you will find that sand is the best thing you could use for inside the pipe to help keep the kinks out fill it full and cap the ends somehow . It's no problem to move my compressor it is just a little piece of crap My big one is in my foam rig ( 3 piston 25 GPM ) but the little one in my shack should be in the land fill but I guess it is better than nothing..
Thread Starter
Dragons' Breath
Joined: Sep 2010
Posts: 1,129
Likes: 2
From: Pump Handle, SK. Canada
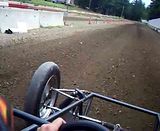
Video #6 Motorcycle for dirt drags with a 13b rotary engine
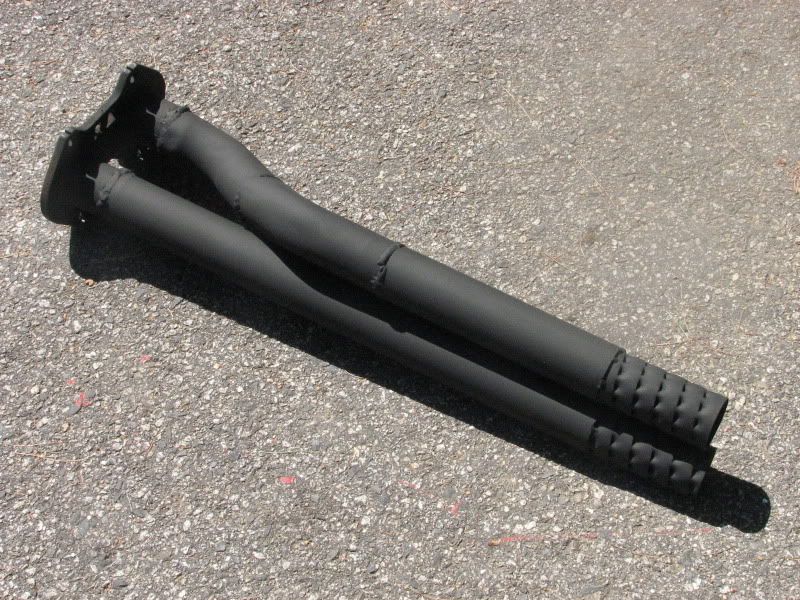
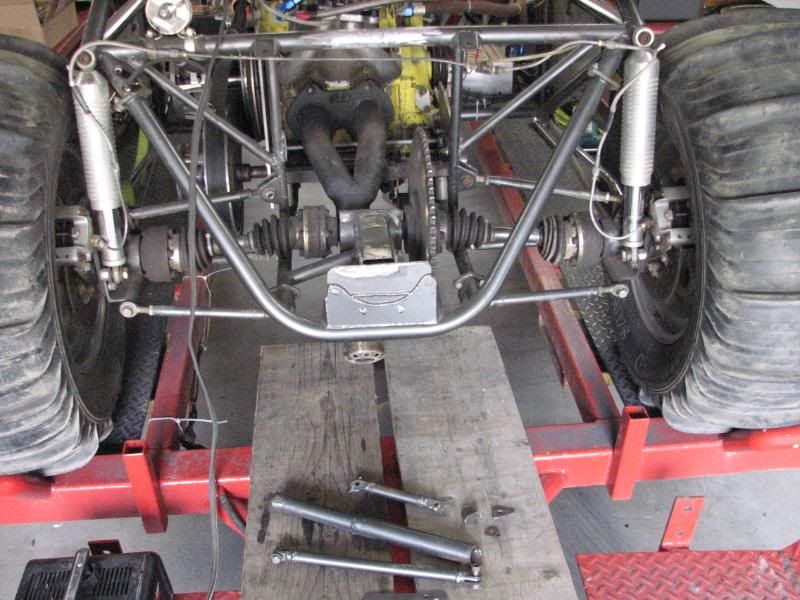
Here is a short video of extending the front frame tubes so the frame will reach over the engine package .. Missed the air box by about 1 inch ( just slipped by the side of it so that worked out better than I thought ).. I finally did get some pipe bent for the upper frame rails without any kinks ( that will be the next video ) ,So that worked out better than I thought ,, Also got my rad mounted and the oil cooler mounted vertically behind the rad ( very tight fit )so it should drain back into the oil pan on shutdown, that should be good for doing oil changes.. Rear mono shock is gone and solid struts added. Every thing on this machine has either been modified or made special .. http://www.youtube.com/watch?v=kvIT4...er_profilepage
http://www.youtube.com/watch?v=kvIT4...er_profilepage

Full Member
Joined: Apr 2011
Posts: 113
Likes: 1
From: Maine
If you take a couple of minutes to follow through my project build from last summer, you may find alot of what I did will help you out. Been there, done that!
http://www.sanddragcentral.net/viewt...hp?f=19&t=2085
http://www.sanddragcentral.net/viewt...hp?f=19&t=2085
Thread Starter
Dragons' Breath
Joined: Sep 2010
Posts: 1,129
Likes: 2
From: Pump Handle, SK. Canada
Thanks for the tip chain but I can't seem to find anything that is relevant to my build . I did take out a membership as anything related to sand racing is of interest to me .
Full Member
Joined: Apr 2011
Posts: 113
Likes: 1
From: Maine
If you go forward with the sno-mo-clutch setup:
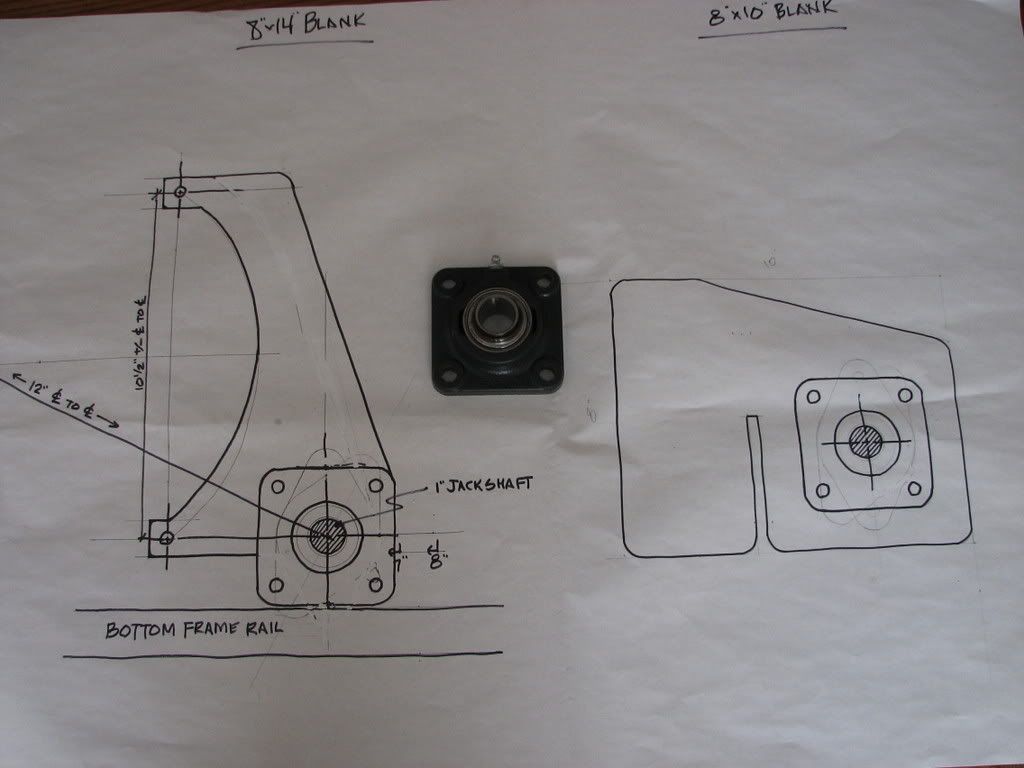
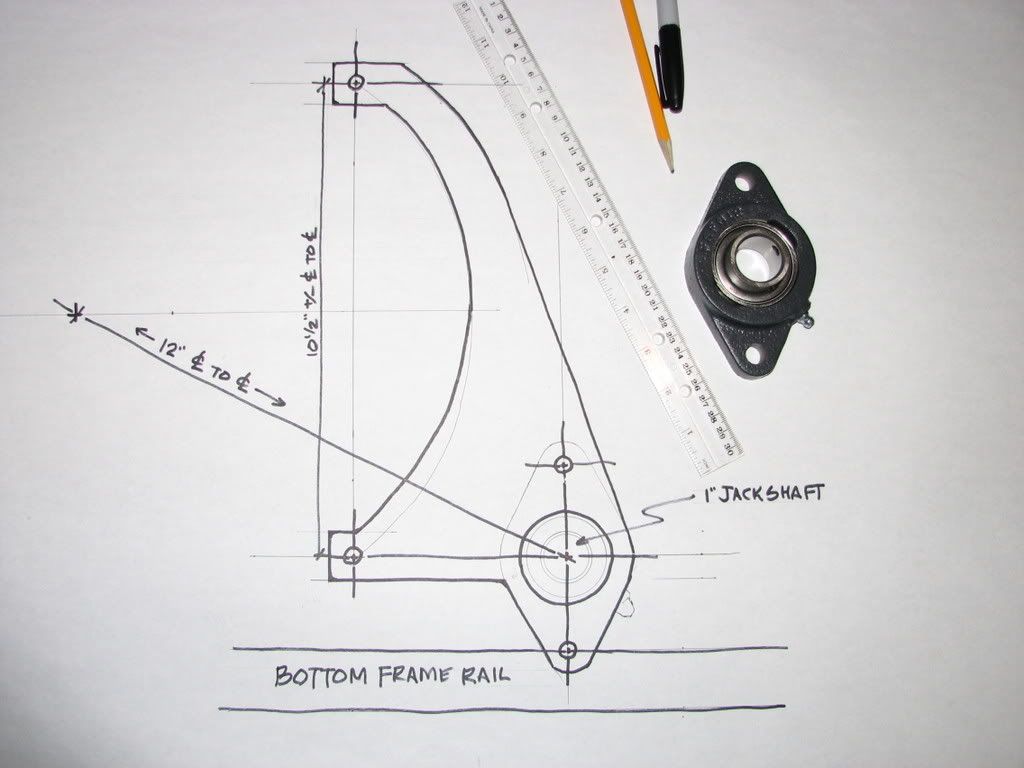
jackshaft setup
chain tensioner
header
you'll probably go with a straight axle, but if you try IRS or something (I was almost 2 years figuring this part out to work on my car!)
the clutch mount
motor /jack-shaft plates
jackshaft setup
chain tensioner
header
you'll probably go with a straight axle, but if you try IRS or something (I was almost 2 years figuring this part out to work on my car!)
the clutch mount
motor /jack-shaft plates
Thread Starter
Dragons' Breath
Joined: Sep 2010
Posts: 1,129
Likes: 2
From: Pump Handle, SK. Canada
sno clutch
Thanks for the time chain that is pretty much what was on my mind .. How did that system work out for you ?? some of the guys from around here ride some powerful sleds ( 200 to 250 hp ) and they claim that when they come back from the mountains sometimes the clutch and secondary drive is pretty much all that is left .. they figure that my 130 or so hp would be easy to handle .. I have also been thinking of running the Mazda clutch on the engine with a chain back to a jack shaft and then straight back to the rear wheel .. I saw one set up like that with a big block engine but the wheel would need to be really turning when I come out of the hole and be very hard to control the machine.. I know with the sno clutch things can really happen fast .. Your thoughts and input are welcome ..
Full Member
Joined: Apr 2011
Posts: 113
Likes: 1
From: Maine
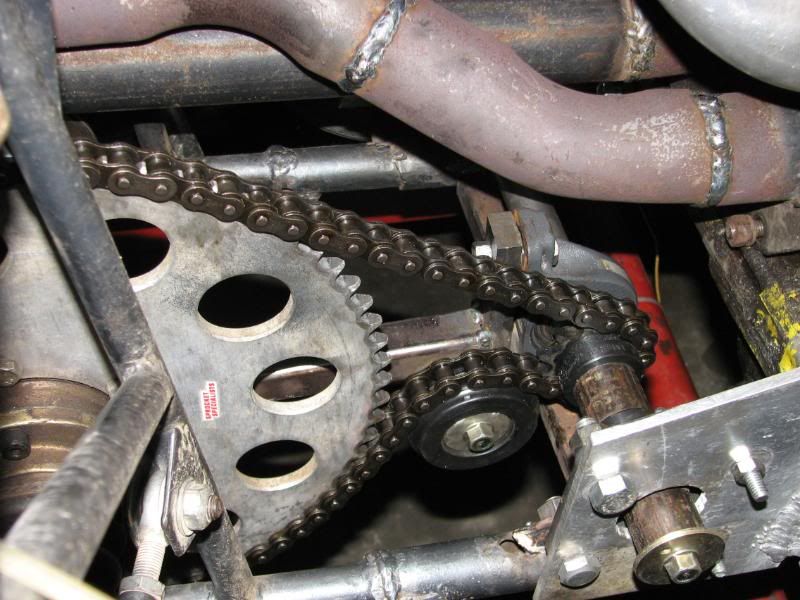
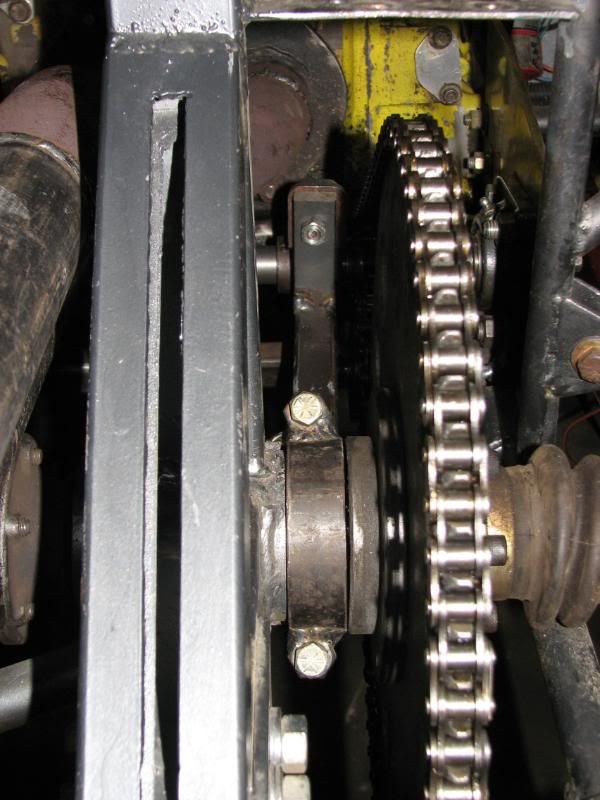
I'm guessing my motor is making around 180 hp Na and around 250 on the 100 hp hit of NOS. (and it loves the NOS!) My weak link for now is the rear axles. I ended up going with the sno-mo clutch since it worked well with the Hp and torque curve of the rotary. The hardest part initially was finding the right tune up , including proper set of springs and weights for the clutch. I ended up with the heaviest ones that would fit in the clutch. I fought for years to get the jack shaft to not flex and kick the drive chain off. Adding the 3rd bearing in the middle of the shaft and getting one as close to the secondary clutch as possible fixed that. The secondary clutch must free float on the jack shaft as well or it will get hot and toast the belt. It allows it to self align. I ran the same belt for 6 races last year and it still looks like new. I do have to blow the dust out of the clutch after every pass, not a big deal. Would be an easy fix if I had a proper clutch enclosure.
My final drive is roughly 6.33:1 at this point (12 tooth front gear and 72 tooth rear gear) it needs more. I am getting ready to order a 86 tooth rear gear. The whole key to getting the small front gear to work is keeping the chain wrapped around it as much as possible. Otherwise you end up with a gear with no teeth! Only a $14 fix to replace, but it got frustrating. I run a #50 roller chain and gears available at most conveyor type equipment stores. (motion industries locally, around $40 for a 20' chain)
My final drive is roughly 6.33:1 at this point (12 tooth front gear and 72 tooth rear gear) it needs more. I am getting ready to order a 86 tooth rear gear. The whole key to getting the small front gear to work is keeping the chain wrapped around it as much as possible. Otherwise you end up with a gear with no teeth! Only a $14 fix to replace, but it got frustrating. I run a #50 roller chain and gears available at most conveyor type equipment stores. (motion industries locally, around $40 for a 20' chain)
Joined: Feb 2001
Posts: 29,798
Likes: 128
From: London, Ontario, Canada
Here is a short video of extending the front frame tubes so the frame will reach over the engine package .. Missed the air box by about 1 inch ( just slipped by the side of it so that worked out better than I thought ).. I finally did get some pipe bent for the upper frame rails without any kinks ( that will be the next video ) ,So that worked out better than I thought
The rad also seems very small. I guess it doesn't really matter when it is only running for a minute or so.
Also got my rad mounted and the oil cooler mounted vertically behind the rad ( very tight fit )so it should drain back into the oil pan on shutdown, that should be good for doing oil changes..
Thread Starter
Dragons' Breath
Joined: Sep 2010
Posts: 1,129
Likes: 2
From: Pump Handle, SK. Canada
I'm guessing my motor is making around 180 hp Na and around 250 on the 100 hp hit of NOS. (and it loves the NOS!) My weak link for now is the rear axles. I ended up going with the sno-mo clutch since it worked well with the Hp and torque curve of the rotary. The hardest part initially was finding the right tune up , including proper set of springs and weights for the clutch. I ended up with the heaviest ones that would fit in the clutch. I fought for years to get the jack shaft to not flex and kick the drive chain off. Adding the 3rd bearing in the middle of the shaft and getting one as close to the secondary clutch as possible fixed that. The secondary clutch must free float on the jack shaft as well or it will get hot and toast the belt. It allows it to self align. I ran the same belt for 6 races last year and it still looks like new. I do have to blow the dust out of the clutch after every pass, not a big deal. Would be an easy fix if I had a proper clutch enclosure.
My final drive is roughly 6.33:1 at this point (12 tooth front gear and 72 tooth rear gear) it needs more. I am getting ready to order a 86 tooth rear gear. The whole key to getting the small front gear to work is keeping the chain wrapped around it as much as possible. Otherwise you end up with a gear with no teeth! Only a $14 fix to replace, but it got frustrating. I run a #50 roller chain and gears available at most conveyor type equipment stores. (motion industries locally, around $40 for a 20' chain)
My final drive is roughly 6.33:1 at this point (12 tooth front gear and 72 tooth rear gear) it needs more. I am getting ready to order a 86 tooth rear gear. The whole key to getting the small front gear to work is keeping the chain wrapped around it as much as possible. Otherwise you end up with a gear with no teeth! Only a $14 fix to replace, but it got frustrating. I run a #50 roller chain and gears available at most conveyor type equipment stores. (motion industries locally, around $40 for a 20' chain)
Thread Starter
Dragons' Breath
Joined: Sep 2010
Posts: 1,129
Likes: 2
From: Pump Handle, SK. Canada
The front section is non-removable then? Will this make it difficult to access components at the front of the engine?
The rad also seems very small. I guess it doesn't really matter when it is only running for a minute or so.
Since the cooler is fed by the oil pump directly through the front cover and then feeds the oil passage in the rear iron, it probably won't drain very much. What about welding a drain bung onto the bottom of the cooler?
 , But it is kinda fun

Thread Starter
Dragons' Breath
Joined: Sep 2010
Posts: 1,129
Likes: 2
From: Pump Handle, SK. Canada
Joined: Feb 2001
Posts: 29,798
Likes: 128
From: London, Ontario, Canada
If the engine is only running for a few minutes that rad will likely be OK. After a few minutes though I'd expect that it wouldn't handle the heat load at much more than idle. The factory rads on the RX-7s are quite large.
It takes a way longer to figure things out than to actually do the work same with these videos they also absorb a lot of time .. I don't know about you Aaron but by the time I get 15 minutes edited I am really tired of listening to myself , But it is kinda fun
, But it is kinda fun
Full Member
Joined: Apr 2011
Posts: 113
Likes: 1
From: Maine
I run a JEGS VW Scirocco radiator on my buggy. Takes quite a while to warm the engine up. I start it up 30-40 seconds before I have to pull into staging, make my pass and drive the entire return road back to staging. It will gain 30-40 degrees on a hot day. Once I get heat in it, it cools down within 4-5 minutes between passes. I am actually going to a much smaller but thicker aluminum radiator out of a Polaris ATV this spring. I started out with a large aluminum oil cooler (out of a wrecked Cessna airplane) and did away with it as the car took forever to warm up.
Thread Starter
Dragons' Breath
Joined: Sep 2010
Posts: 1,129
Likes: 2
From: Pump Handle, SK. Canada
My little rad is from the Honda I think a 750 cc Sabre.. The bike I think was around 86 hp. engine , it came with the frame when I bought it .. .. I personally don't have a problem with a bigger rad but if it sticks out past the frame and I go down I'm done for the day ... The little one is between the frame rails and is pretty safe there .. It is a double tube and is about i/2 the size of the stock one maybe a little less.. One thing that might be a problem is, it is only 7/8 inlet and outlet . On the plus side the e fan has a huge pitch to it and runs much faster than stock I think it needs to run right from start up .. I left enough room to go larger if need be but I really like what I got so I hope it does the job .. What do you do for a thermostat or do you run without ? I was thinking of running without buy the time it is average temp like you said everything should be over .. I am also using the stock oil cooler, that should keep the oil temp down to help keep the bottom end cool .. When I get fire in the holes I guess I will soon find out what it will need for sure .
Joined: Feb 2001
Posts: 29,798
Likes: 128
From: London, Ontario, Canada
What do you do for a thermostat or do you run without ? I was thinking of running without buy the time it is average temp like you said everything should be over .. I am also using the stock oil cooler, that should keep the oil temp down to help keep the bottom end cool .. When I get fire in the holes I guess I will soon find out what it will need for sure .
Thread Starter
Dragons' Breath
Joined: Sep 2010
Posts: 1,129
Likes: 2
From: Pump Handle, SK. Canada
I have always preached of having the thermo in place on every engine, so the rad gets a chance to do it's job so maybe I should practice what I preach .. I think everyone knows how that works so I'm not going to get into it .. Getting to the bypass hose, as near as I can see it keeps coolant going past the thermo area so that it opens when it reaches temp and helps stop temp spikes in the engine and keeps the temp gauge reading true, or am I missing the point of the bypass .. I might set an extra temp gauge up on the rad outlet side or just install a double pole switch to change it from one to the other to see how effective the rad actually is .. There is a sensor in the outlet side but I think it is intended to operate the e fan, but I am using the thermo housing from the bike as it has a metal pipe instead of hose ( it just makes it easier and neater to run from bottom rad back to engine ) It has a temp gauge sensor for the original bike system . That will be all the gauges I use besides a mechanical oil pressure .. This has been the hardest of all to decide what to do with the cooling system and I am sure it will haunt me right to the end ..
Full Member
Joined: Apr 2011
Posts: 113
Likes: 1
From: Maine
When I was putting my car together, I was focused on doing everything I could to get the car as close to 600# as I could. When I picked up a stock water pump and found it weighed in the range of 30#'s. I quickly decided it needed to go. I went with a Meziere drag race pump, a bit on the expensive side but has worked flawlessly for 6 years now. I do not run a thermostat but do run 10an Nascar style radiator hoses. They actually came of a Hendrick's car... the hoses serve to restrict the flow to and from the radiator. For temp sensor, I use a Jeggs screw in dial gauge that's mounted in one of the water jacket bungs just below the oil filter. I know it reads low but at least it's consistent. I warm it up till it shows around 120 before I pull into staging, when I get back from a pass it shows around 150-155. If I have my 5-point harness loose I can look over my shoulder to see the gauge, but I usually don't bother. Water pump and fan are on separate switches, that way I can circulate water with the fan trying to cool it off. I've done that on every sand racer I've run for the past 30 years and liked the results.
Full Member
Joined: Apr 2011
Posts: 113
Likes: 1
From: Maine
Oh yeah, one more thing for you to consider if and when you decide to turn the motor and go sno-mo-clutch. With a conventional, front to back mounted motor, the motors torque will want to lean your bike over. In a race car it twists the chassis. In the sideways mounted setup the torque tries to drive the front end down, offsetting the rear tires attempt to lift the front end. Learned this after talking with Jeff Mamer who runs a 1000 hp sideways mounted chain driven VW dragster in the sand.
http://www.dragracingonline.com/live..._9-sand-1.html
http://www.dragracingonline.com/live..._9-sand-1.html
Thread Starter
Dragons' Breath
Joined: Sep 2010
Posts: 1,129
Likes: 2
From: Pump Handle, SK. Canada
Thank-you for your support chainreaction
Tried and true knowledge is priceless chain and I appreciate every bit of input ,, I have thought about every thing your talking about about but it 's nice to know before i get to that point .. As far as the bike leaning I expect that I just hope it's not to extreme . What I'm wondering is it going to torque like an electric motor on start up and then back off when the wheel comes up to speed or is it going to be like momma and just keep right on twisting, I'm thinking that the twist of the engine will lessen as I gain rpm's and get easier to control as I go down the track . It's a good thought anyway As far as the cross mount goes I think it will for sure be the best .. It's good to know about the secondary pulley needing to be able to float on the shaft . With say 150 hp. driving a good sno clutch set up to jack shaft from jack shaft to rear wheel with a 12 or 14 inch sand tire that is what I want ,maybe a little sniff of the go juice , ( Man that Larry Minor has got a huge bottle of go juice  ).. I have a question for you that is a little off subject but say a person wanted to go as fast as he possibly could with 4 wheels in a reasonable distance I don't know say 3 or 4 miles with say 200 hp. would a higher end sno clutch with the proper ratios on 1 or more jack shafts etc stay together long enough to do the job or would it self destruct ?? Anyway thanks again for your help now tell me more about the nox and don't hold back Buy the way I'm sure you are up on your rotary tuning etc. but the knowledge about rotary's on this forum is unbelievable ,if you need any help there is a wealth of info here and I am sure someone will be able to help you . Have a good one .
As far as the cross mount goes I think it will for sure be the best .. It's good to know about the secondary pulley needing to be able to float on the shaft . With say 150 hp. driving a good sno clutch set up to jack shaft from jack shaft to rear wheel with a 12 or 14 inch sand tire that is what I want ,maybe a little sniff of the go juice , ( Man that Larry Minor has got a huge bottle of go juice ).. I have a question for you that is a little off subject but say a person wanted to go as fast as he possibly could with 4 wheels in a reasonable distance I don't know say 3 or 4 miles with say 200 hp. would a higher end sno clutch with the proper ratios on 1 or more jack shafts etc stay together long enough to do the job or would it self destruct ?? Anyway thanks again for your help now tell me more about the nox and don't hold back Buy the way I'm sure you are up on your rotary tuning etc. but the knowledge about rotary's on this forum is unbelievable ,if you need any help there is a wealth of info here and I am sure someone will be able to help you . Have a good one .
Full Member
Joined: Apr 2011
Posts: 113
Likes: 1
From: Maine
We have atv racers running with us that are running 200-230 hp on stock clutches, mostly Polaris and Arctic Cat. I spent the $1800 on a Micro-Belmont clutch because at the I wanted to have the option of putting the 12a peripheral port motor I have in the garage in the car and putting NOS to it. Micro-Belmont has put this same clutch on a 500 hp turbo drag sled and it held together.
As for turning a sno-mo-clutch hard or fast. I have read that you should not turn them much more than 9,000 rpm's as they can scatter, but the stories i heard were mostly from sno-x racers who tend to really heat up their clutches. I have turned mine as high as 10,800 rpm's but for only 2-3 seconds at a time. The nice thing is you can tune the clutch to the rpm's you want it to run at with weights and springs. With my current tune it hits around 7,800 rpm's within about .5 seconds of hitting the throttle and just stays there the entire track. It only fluctuates when i loose traction (Ie: bumps and ruts on the track) When I lift at the finish line, the clutch momentarily goes to full lock up prior to back shifting and the car actually squirts ahead. Once it back shifts, I have to feather the throttle to make it to the end of the shutdown. BTW, I use a stock Arctic Cat Bearcat secondary clutch and only shift about 70% through it. Thats why I'm looking at going to a bigger rear gear. That change will help my 60' time alot.
As for turning a sno-mo-clutch hard or fast. I have read that you should not turn them much more than 9,000 rpm's as they can scatter, but the stories i heard were mostly from sno-x racers who tend to really heat up their clutches. I have turned mine as high as 10,800 rpm's but for only 2-3 seconds at a time. The nice thing is you can tune the clutch to the rpm's you want it to run at with weights and springs. With my current tune it hits around 7,800 rpm's within about .5 seconds of hitting the throttle and just stays there the entire track. It only fluctuates when i loose traction (Ie: bumps and ruts on the track) When I lift at the finish line, the clutch momentarily goes to full lock up prior to back shifting and the car actually squirts ahead. Once it back shifts, I have to feather the throttle to make it to the end of the shutdown. BTW, I use a stock Arctic Cat Bearcat secondary clutch and only shift about 70% through it. Thats why I'm looking at going to a bigger rear gear. That change will help my 60' time alot.
Last edited by chainreaction; Apr 9, 2011 at 05:51 AM.
Joined: Feb 2001
Posts: 29,798
Likes: 128
From: London, Ontario, Canada
I'm actually referring to the bypass hole in the water pump housing. It's at the bottom of the thermostat neck. The thermostat closes it as it opens up. Generally that hole gets tapped and plugged when eliminating the thermostat or a big bolt gets installed. If it is left open, about 30% of coolant bypasses the rad.
Thread Starter
Dragons' Breath
Joined: Sep 2010
Posts: 1,129
Likes: 2
From: Pump Handle, SK. Canada
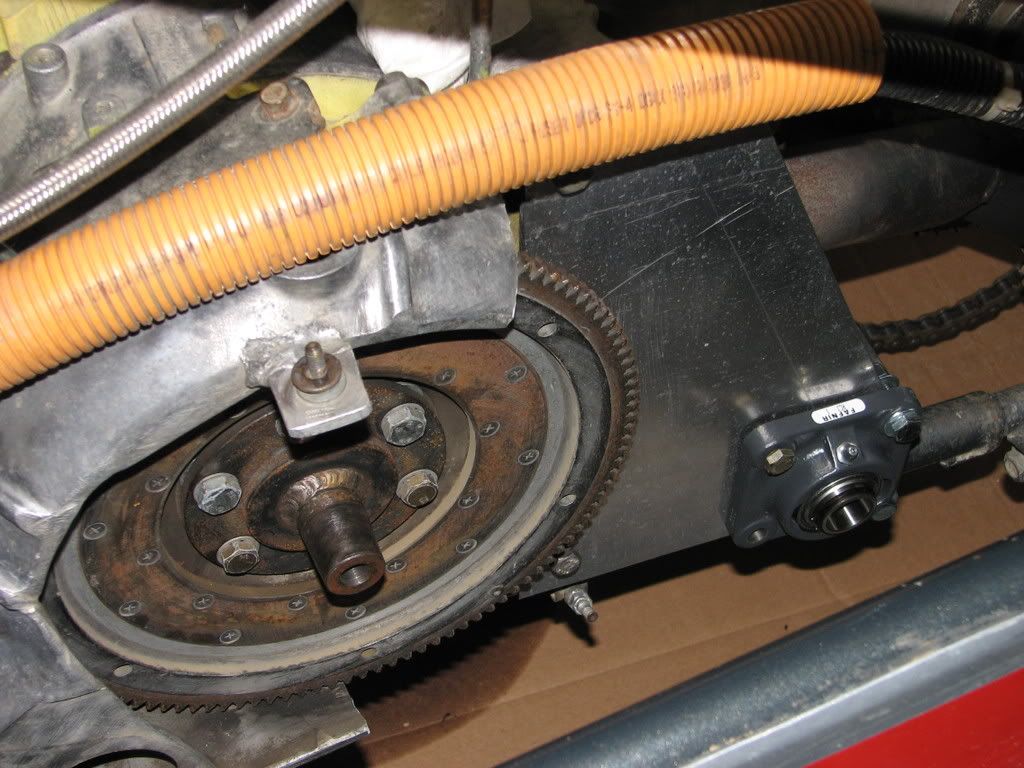
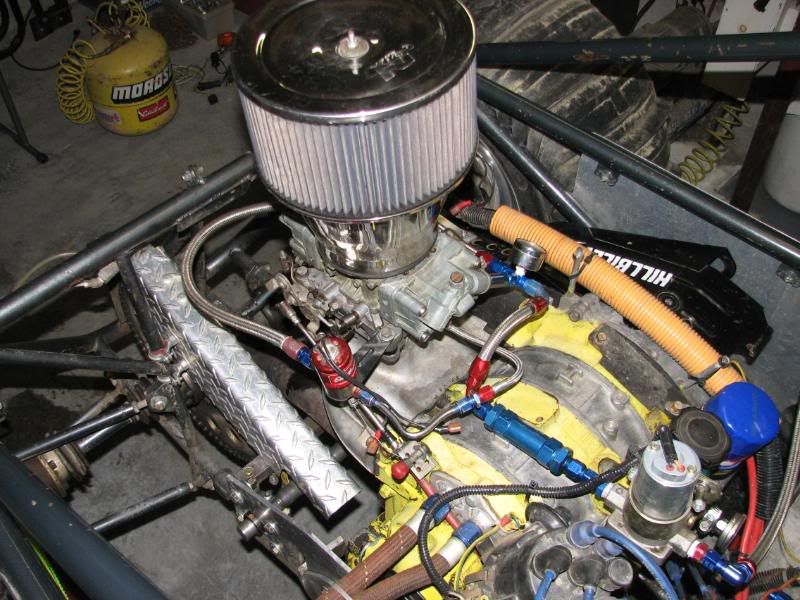
That is interesting so in reality I shouldn't need a real elaborate braking system just the stock bike brakes should be more than adequate .. I thought I would use a knobby on the front wheel to try to keep it stable in the sand and of course some kind of sand tire on the rear .. The cross mount will need the total frame built and I really think it will be easier than working with bike pieces .. It's a hard road when you start with nothing . Right now I am trying to figure out where the coils should go , I need to find out for sure if the stock 2nd gen coils can lay down flat or if they need to stay vertical .. My final drive still needs some attention ,It's hard to end up with a pad for my pillow blocks that is level as the bike frame is not exactly the same on each side but I will get it .. Is that your son running the little car ? I see you have a good inventory of rotary parts, that doesn't happen over night either ..
Thread Starter
Dragons' Breath
Joined: Sep 2010
Posts: 1,129
Likes: 2
From: Pump Handle, SK. Canada
video #7 motorcycle for dirt drags with a 13b rotary engine
Just a short video on my pneumatic pipe bender set up to try to put out some nice pieces for the frame ,not an easy thing but it is possible if there is enough time taken .. To do even better I think the two top rollers should also have a cushion pad on them to keep the pipe nice with no dents especially on lighter stuff .. ..http://www.youtube.com/watch?v=1zZY1...yer_detailpage