FD interior remodling project
 03-22-10, 06:52 AM
#76
That is a lot of work, nice job. After looking at the pics, I do have a recommendation - relocate the PLX display units from under the seat forward so they will be accessible if something goes wrong.
From the pics, it looks like you mounted the display unit (and AFR?) under the seat and then wired thru the tunnel to the other units. If so, what happens if something doesn't work? Do you have to remove the seat to get to the units?
I would recommend you think thru this and put all the devices forward of the seat so you can easily lift up the carpet if something goes wrong. I'd also put them as close to the left of the footwell as possible. This will make them easier to get to.
Food for thought.
Question - how did the length of the AIT cable work out? Is the AIT sensor one of the two between the pedals?
 03-22-10, 07:19 AM
#77
good suggestion, but i'm not sure that moving them forward would help, my carpet is all one piece so even if they were in front of the seat i still wouldn't be able to lift up the carpet. Any chance you could take my pic and make a circle where all of your modules are? I plan on testing them without the seat in, and if i have a problem in the future i'll just have to take the seat out.
my module locations:
Pedals: boost, AIT
Front of seat: AFR (left of center), fluid pressure & fluid temperature (right of center)
Under seat: DM 100 modules
The AIT probe isn't hooked up yet, but the wire has been run. the module is under the pedals, it deffinitely wouldn't have reached if I put it with the rest of them. The boost module is also under the pedals, i wanted the boost line as short as possible.
One thing with the AIT probe, you will want to buy 2 more of those yellow thermo cupplers, 1 male and 1 female. Then cut the wire just after the probe itself and install them. This way you can unhook them, screw the probe into whatever hole you make, and then hook them back up, if you don't do this and ever want to take the probe out after you have the wire in the loom and into the car, the wire will get twisted like crazy.
03-22-10, 08:03 AM
#78
I have one piece carpet also. I think you need to relocate the units within the oval section I have drawn:

To access them then, all you would need to do is remove the door sill plate and lift up the left section of the carpet. This works well for me.
With what you have now, you'll need to remove the seat to gain access and then also lift up a lot of carpet to get to the ones on the right.
To access them then, all you would need to do is remove the door sill plate and lift up the left section of the carpet. This works well for me.
With what you have now, you'll need to remove the seat to gain access and then also lift up a lot of carpet to get to the ones on the right.
03-25-10, 11:25 PM
#79
Thanks for showing me. I had forgotten how forward the seat actually is and I was paranoid about stepping on them and breaking the wires off the back, which is the reason why i positioned them as far back as possible.
I think for now, since everything is wired in already, I'll leave them. I'll be testing them this weekend to make sure I've got them hooked up right. I'm sure someday something will go wrong and i'll kick myself, but then again the seat is only 5 bolts to get out.
Just received my braided line and fittings for my meth relocation to the washer resevoir and moving the pump to the tow hook in front. I'm going with black nylon braided hose and black fittings, but they sent the standard red/blue AN fittings another delay haha. Luckily i've got enough other work to keep me busy on the car haha. Still got time to meet the deadline I think.
I think for now, since everything is wired in already, I'll leave them. I'll be testing them this weekend to make sure I've got them hooked up right. I'm sure someday something will go wrong and i'll kick myself, but then again the seat is only 5 bolts to get out.
Just received my braided line and fittings for my meth relocation to the washer resevoir and moving the pump to the tow hook in front. I'm going with black nylon braided hose and black fittings, but they sent the standard red/blue AN fittings
another delay haha. Luckily i've got enough other work to keep me busy on the car haha. Still got time to meet the deadline I think.
03-26-10, 05:17 AM
#80
Thanks for showing me. I had forgotten how forward the seat actually is and I was paranoid about stepping on them and breaking the wires off the back, which is the reason why i positioned them as far back as possible.
I think for now, since everything is wired in already, I'll leave them. I'll be testing them this weekend to make sure I've got them hooked up right. I'm sure someday something will go wrong and i'll kick myself, but then again the seat is only 5 bolts to get out.
Just received my braided line and fittings for my meth relocation to the washer resevoir and moving the pump to the tow hook in front. I'm going with black nylon braided hose and black fittings, but they sent the standard red/blue AN fittings another delay haha. Luckily i've got enough other work to keep me busy on the car haha. Still got time to meet the deadline I think.
I think for now, since everything is wired in already, I'll leave them. I'll be testing them this weekend to make sure I've got them hooked up right. I'm sure someday something will go wrong and i'll kick myself, but then again the seat is only 5 bolts to get out.
Just received my braided line and fittings for my meth relocation to the washer resevoir and moving the pump to the tow hook in front. I'm going with black nylon braided hose and black fittings, but they sent the standard red/blue AN fittings
another delay haha. Luckily i've got enough other work to keep me busy on the car haha. Still got time to meet the deadline I think.Regarding the meth injection and pump location, where is your battery located? I ask this because as I recall the pump should be no further than 5 feet from the battery so technically my pump is located too far as it is in the right front bumper and my battery is in the back. I think I read this on one of Howard Coleman's posts so I was going to relocate my system once I reactivate it. For now, it's a nice paperweight as I wanted to ensure everything else was correct first
 03-26-10, 03:08 PM
#81
My battery is in the back as well, but the controller is in the front. I've been running for a year with no problems with a wire going from the relay box by the power steering to the front of the car where the contoller is, then a wire all the way back to the rear axle where the pump is.
So moving the pump to the front will result in a much shorter wire, but still far away from the battery. I'm using 10 guage wire though so I think that helps. I really don't want the methanol inside of the car anymore. I'll admit, it can be done and look way better than the way I had it, but now that i have an amp, and will have a sub, I won't have much room for a small fuel cell in the rear and still have any trunk space.
How much hp are you aiming for once you put the meth in? 800 or so?
And will you be running 3 625ml/min nozzles because of the extra rotor? That would look pretty cool.
03-28-10, 07:50 PM
#82
A few updates from the weekend:
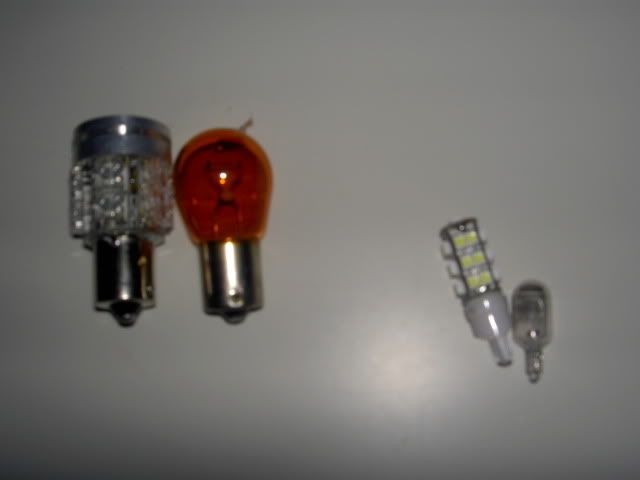
new LED lights for my combo lights came. Thanks to David for showing me where to get them.
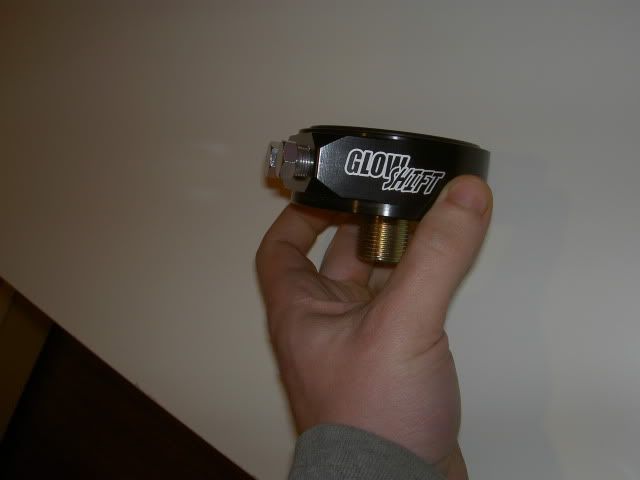
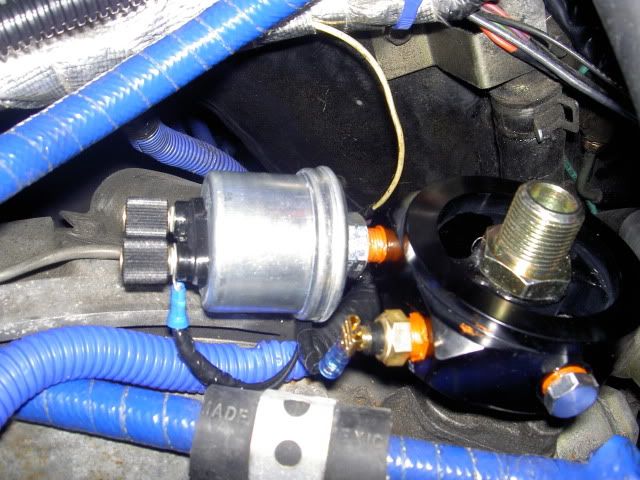
Glowshift Oil Filter Spacer with 1/8npt ports for oil pressure and temperature sensors:

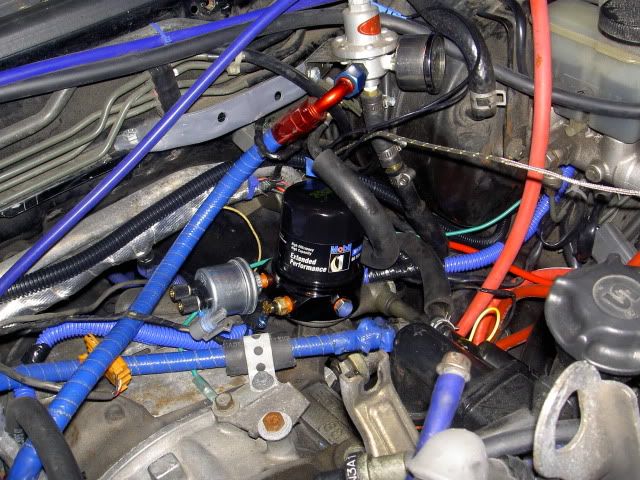
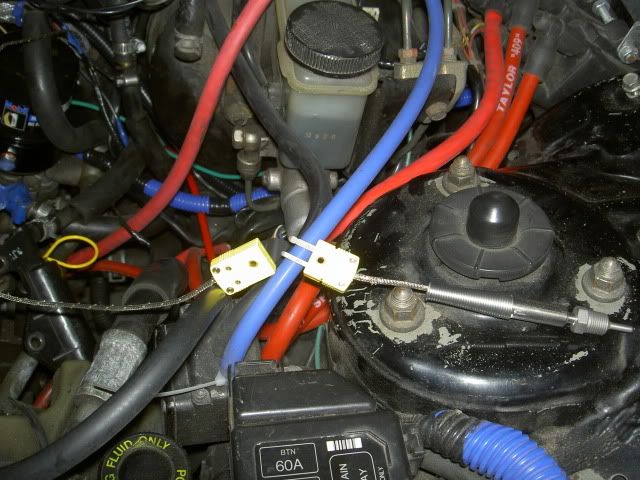
wiring is nice and tidy:
Water Temp sensor, last wire in the loom:
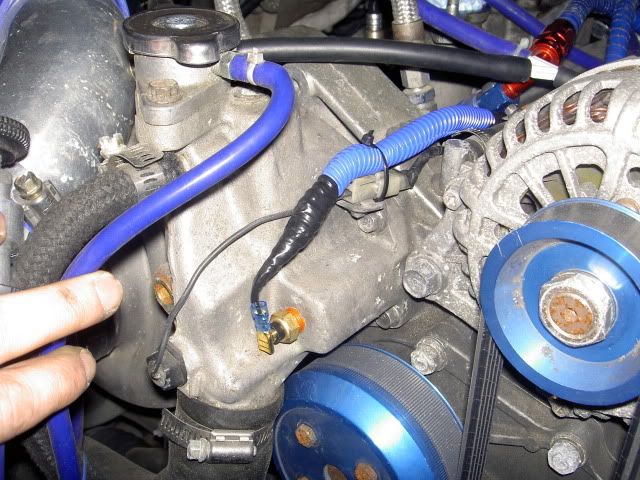
Intake Air Temp sensor thermocouplers and sensor, I still have to drill and tap the greddy elbow for the sensor itself, but the wiring is all set:
I finished connecting the power and ground wires and serial cables for the DM100 gauges as well, now everything has power, and i also installed two led's in the gauge pod, a green one to tell me when the meth pump is working, and a red one for the meth fluid level sensor, the are just above the lower gauge (the two white/dots):

And if you look back to the beginning where i showed the wiring mess, take a look at this, its about 100 times better:

new LED lights for my combo lights came. Thanks to David for showing me where to get them.
Glowshift Oil Filter Spacer with 1/8npt ports for oil pressure and temperature sensors:
wiring is nice and tidy:
Water Temp sensor, last wire in the loom:
Intake Air Temp sensor thermocouplers and sensor, I still have to drill and tap the greddy elbow for the sensor itself, but the wiring is all set:
I finished connecting the power and ground wires and serial cables for the DM100 gauges as well, now everything has power, and i also installed two led's in the gauge pod, a green one to tell me when the meth pump is working, and a red one for the meth fluid level sensor, the are just above the lower gauge (the two white/dots):
And if you look back to the beginning where i showed the wiring mess, take a look at this, its about 100 times better:
Last edited by TwinCharged RX7; 03-28-10 at 07:53 PM.
03-28-10, 07:59 PM
#83
I've got the bin area pretty much finished up as well. I installed some "FatMat" (supposed to be better than Dynomat). Now I realize that I already have Quiet Car, but this is more for protective reasons than sound dampening. Both of my bins have been cut out, so anything in them sits directly on the floor of the car. My battery goes in the passenger bin. And I keep my extra meth and 2 stroke oil in the drivers bin.
I've also added the component speaker boxes (not sure what they are called) to the battery bin. You'll notice two yellow wires on the far left. These will be for the fuel pumps. I only have one big pump right now (Aeromotive Tsunami), but eventually I'll install another pump, and then switch over to these wires.


I've also added the component speaker boxes (not sure what they are called) to the battery bin. You'll notice two yellow wires on the far left. These will be for the fuel pumps. I only have one big pump right now (Aeromotive Tsunami), but eventually I'll install another pump, and then switch over to these wires.
03-28-10, 08:12 PM
#84
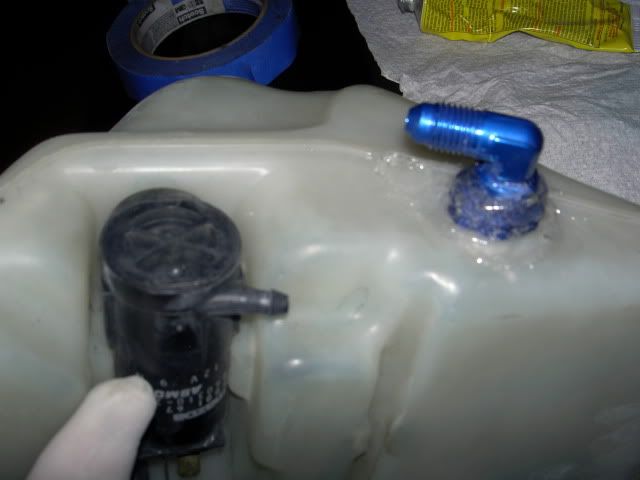
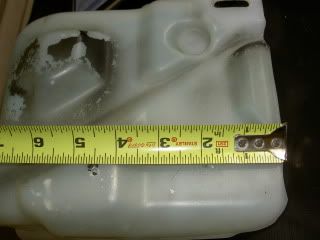
Now the last thing i have to do before I can finish putting the engine bay together is get the meth kit relocated. I'm going to use the windshield washer tank and mount the pump by the tow hook.
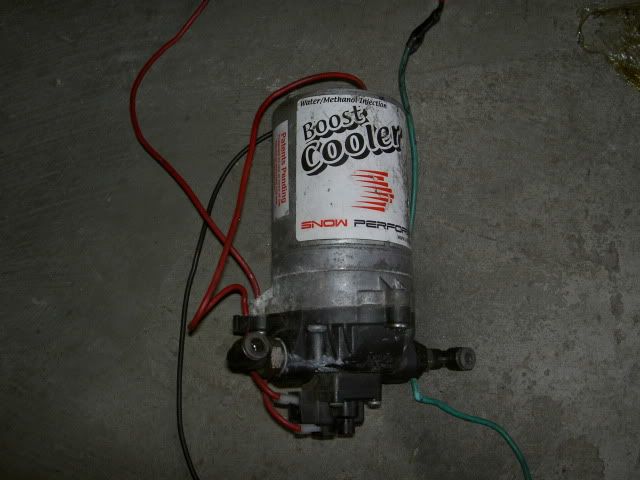
Here is the pump (shurflo 150lb from and old snow performance kit):
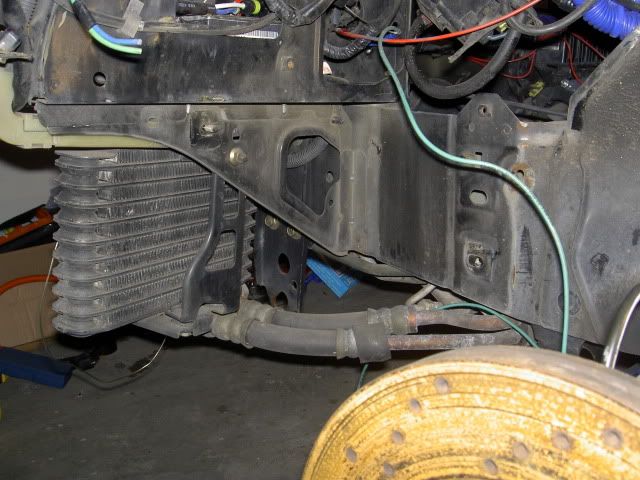
Where it will soon reside:
Modifying the washer tank:
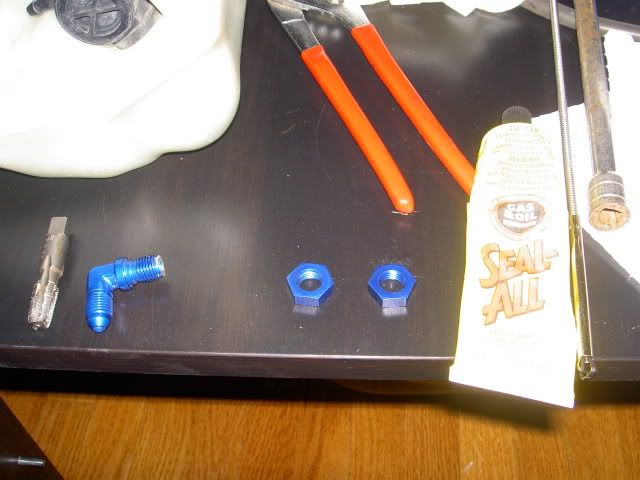
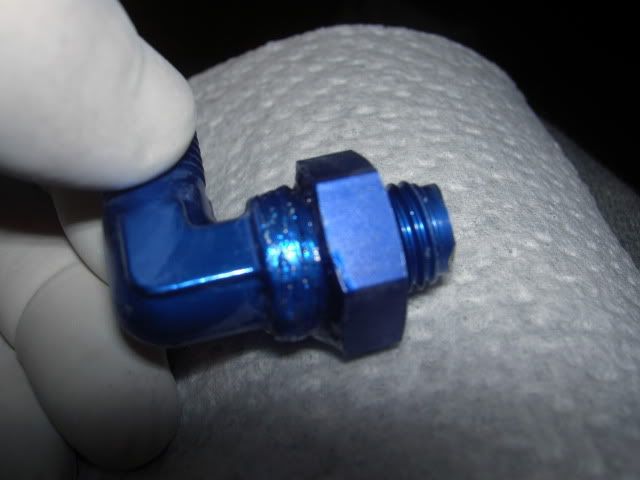
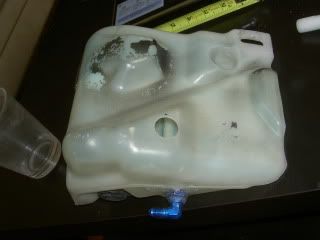
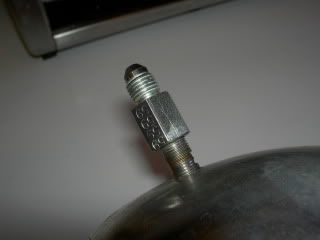
Buy a bulkhead with at least one side being -4AN: its too long so I cut it:

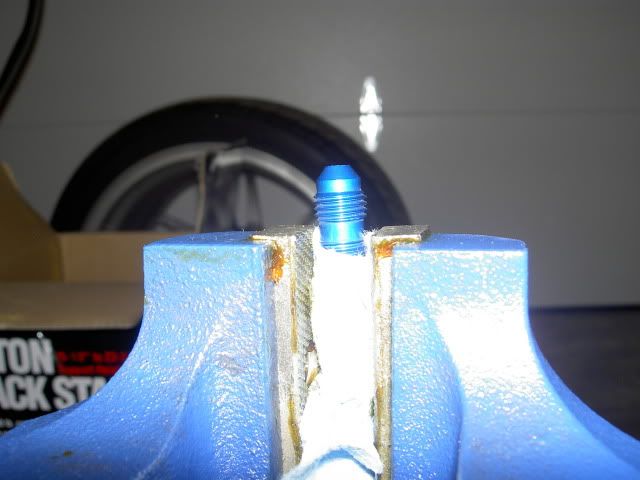

Parts (90 degree bulkhead, 2 bulkhead washers, 1/8NPT tap, fuel/alcohol safe sealant:
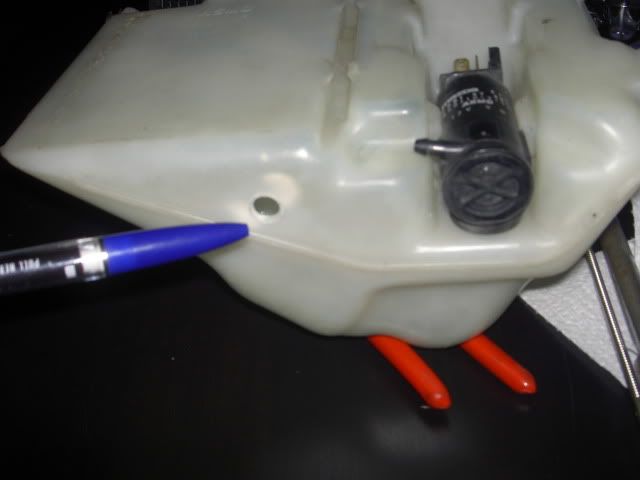
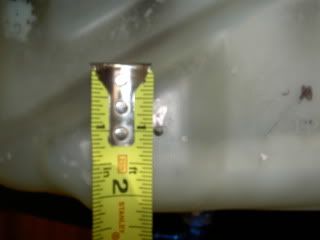
Drill a hole in the bottom (rear of tank, directly under the filling hole at the top of the tank so you have a straight shot to put a nut on the bulkhead inside of the tank:
Clean everything really well:
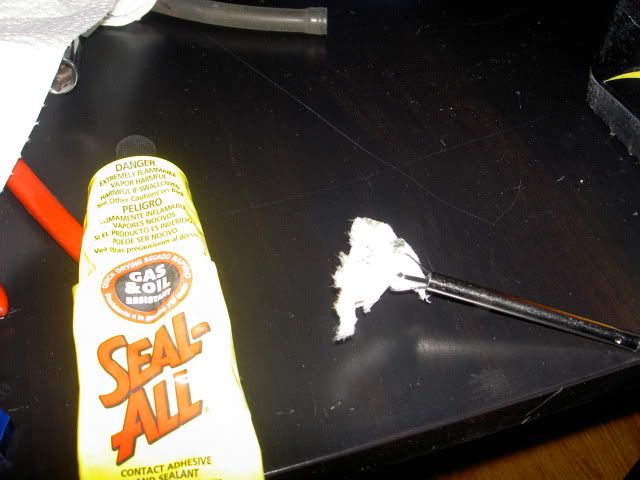
Put first nut on (on a standard fuel tank application you wouldnt have to do this, but because the wall of the tank is so thin i needed a spacer between the bottom of the bulhead and the tank, note that i put sealant on threads before i screwed down the nut:
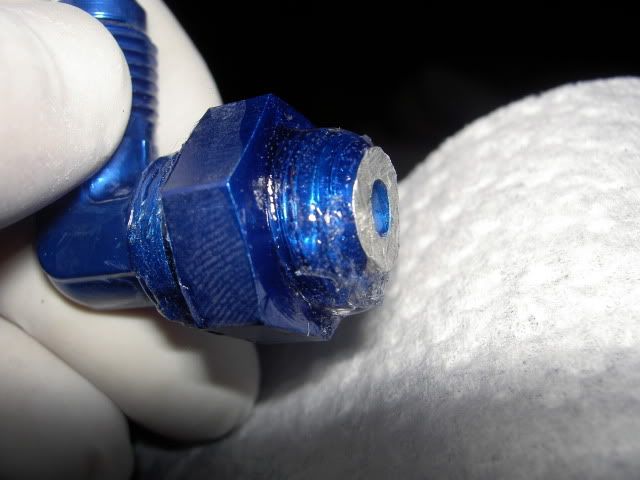
Prep nut for the inside of the tank with sealant:

Tapped the hole i drilled, then screwed in the bulkhead with sealant on it (it was really tight and tightened down really nicely.
I then put a nut on the inside of the tank, unfortunately i couldnt really tighten it that well (couldnt get a big enough socket into the tank, but I think between the really tight fit of screwing the bulkhead into the tank itself and all of the sealant I should be safe.
Here is the pump (shurflo 150lb from and old snow performance kit):
Where it will soon reside:
Modifying the washer tank:
Buy a bulkhead with at least one side being -4AN: its too long so I cut it:
Parts (90 degree bulkhead, 2 bulkhead washers, 1/8NPT tap, fuel/alcohol safe sealant:
Drill a hole in the bottom (rear of tank, directly under the filling hole at the top of the tank so you have a straight shot to put a nut on the bulkhead inside of the tank:
Clean everything really well:
Put first nut on (on a standard fuel tank application you wouldnt have to do this, but because the wall of the tank is so thin i needed a spacer between the bottom of the bulhead and the tank, note that i put sealant on threads before i screwed down the nut:
Prep nut for the inside of the tank with sealant:
Tapped the hole i drilled, then screwed in the bulkhead with sealant on it (it was really tight and tightened down really nicely.
I then put a nut on the inside of the tank, unfortunately i couldnt really tighten it that well (couldnt get a big enough socket into the tank, but I think between the really tight fit of screwing the bulkhead into the tank itself and all of the sealant I should be safe.
 03-29-10, 12:47 PM
#89
Its universal but the sales guys at Glowshift know which ones are needed. there are 2 metric options, the FD takes the 20mm 1.5 pitch option.
You can also get an oil cooler spacer as well, which has much bigger ports for oil cooler lines instead of just the 1/8npt ports.
http://www.glowshiftdirect.com/Oil-F...-Adapters.aspx
You can also get an oil cooler spacer as well, which has much bigger ports for oil cooler lines instead of just the 1/8npt ports.
http://www.glowshiftdirect.com/Oil-F...-Adapters.aspx
04-02-10, 04:33 PM
#90
My level sensor finally came. I got it from Snow Performance ($40)
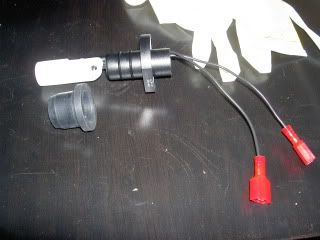
Here is how you install it:
The only place it would really fit and clear the brackets that hold the tank is here:
Drilled a pilot hole, then a 13/16" hole:

Insert the rubber gromet:
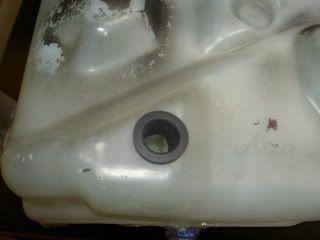
I then added a little sealant to the flange on the sensor to seal against the rubber grommet just in case:

Insert sensor into grommet (make sure you have it orientated in the correct direction.
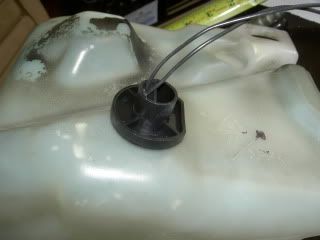
Now I just have to make the lines and mount everything.
Here is how you install it:
The only place it would really fit and clear the brackets that hold the tank is here:
Drilled a pilot hole, then a 13/16" hole:
Insert the rubber gromet:
I then added a little sealant to the flange on the sensor to seal against the rubber grommet just in case:
Insert sensor into grommet (make sure you have it orientated in the correct direction.
Now I just have to make the lines and mount everything.
04-04-10, 09:07 PM
#91
So I finally finished it today. There were a few unexpected events that came up but now it all works.
I was planning on using the 625ml/min nozzles that i already have. They are 1/8npt fittings, but they have screens on the backs of them, so I needed a long adapter to the -4 AN fittings.

Doesn't work:
I couldn't find one anywhere. I was just going to take the screens off, but after taking them off i found that there is a spring and what must be something that helps to atomize the meth, all held in by the back for the screen
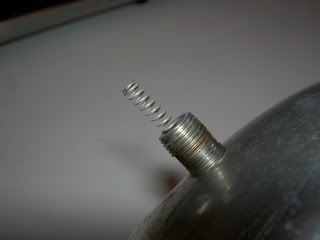
And as you can see here, the adapter for the AN lines lets the spring go right through:
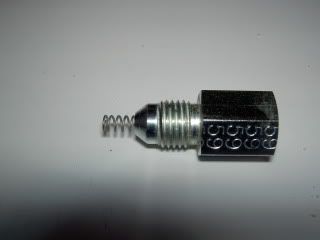
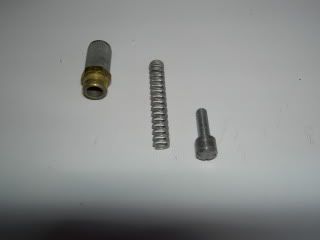
So i go to the hardware store looking for other adapters, no luck at all. I'm just about to leave and check the compression fitting drawer. And look what i found, a sleeve, its the perfect size, slides into the adapter but not through, and the spring cant go through it.
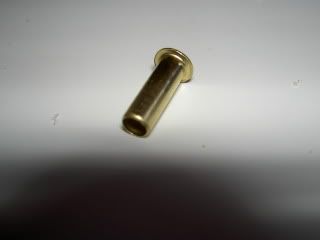
Here's an illustration of how it won't go through the adapter (i installed it in the other end, this is just so you can see the fit:

So I trimmed the spring down a little so that it was compressed the same distance as it originally was (the adapter and sleeve caused the spring to be compressed more than when the screen was being used to keep it all together)
And now I'm all set for AN lines:

Clamps installed on the pump:

I was getting worried about how to attach it to the tow hook because i couldnt get straight on with a drill due to the oil cooler. Then I stopped being stupid and saw that I could just unbolt the tow hook haha:
And installed:


I was planning on using the 625ml/min nozzles that i already have. They are 1/8npt fittings, but they have screens on the backs of them, so I needed a long adapter to the -4 AN fittings.
Doesn't work:
I couldn't find one anywhere. I was just going to take the screens off, but after taking them off i found that there is a spring and what must be something that helps to atomize the meth, all held in by the back for the screen
And as you can see here, the adapter for the AN lines lets the spring go right through:
So i go to the hardware store looking for other adapters, no luck at all. I'm just about to leave and check the compression fitting drawer. And look what i found, a sleeve, its the perfect size, slides into the adapter but not through, and the spring cant go through it.
Here's an illustration of how it won't go through the adapter (i installed it in the other end, this is just so you can see the fit:
So I trimmed the spring down a little so that it was compressed the same distance as it originally was (the adapter and sleeve caused the spring to be compressed more than when the screen was being used to keep it all together)
And now I'm all set for AN lines:
Clamps installed on the pump:
I was getting worried about how to attach it to the tow hook because i couldnt get straight on with a drill due to the oil cooler. Then I stopped being stupid and saw that I could just unbolt the tow hook haha:
And installed:
04-04-10, 09:08 PM
#92
Then I made all my AN lines. It was my first time, but I found it really easy to do, and definitely worth the effort.
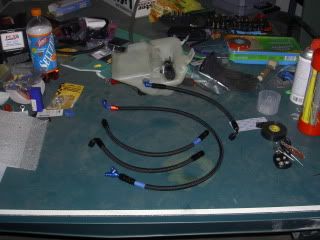
(And yes I know there is one red&blue fitting, but i broke one of the black ones, it was my first try and i didn't reallize you can't tighten them with all your might haha, but its on the bottom of the car so it isn't seen anyways)
Here they are, too bad my engine bay is disgusting

Finished:

(And yes I know there is one red&blue fitting, but i broke one of the black ones, it was my first try and i didn't reallize you can't tighten them with all your might haha, but its on the bottom of the car so it isn't seen anyways)
Here they are, too bad my engine bay is disgusting
Finished:
Last edited by TwinCharged RX7; 04-04-10 at 09:12 PM.
04-04-10, 09:18 PM
#93
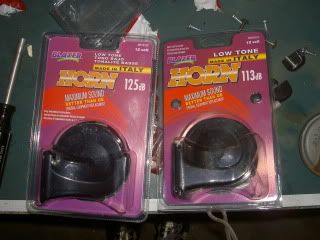
My horns barely made any noise, so new ones (a total of $35 from autozone), both low tone horns but different sizes and make a cool sound due to the 2 frequencies.
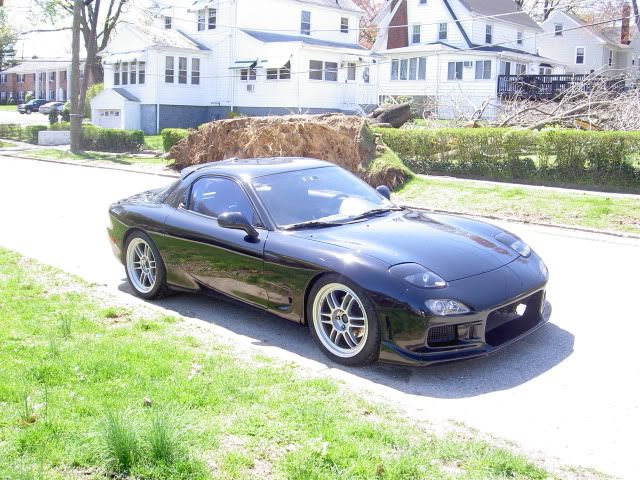
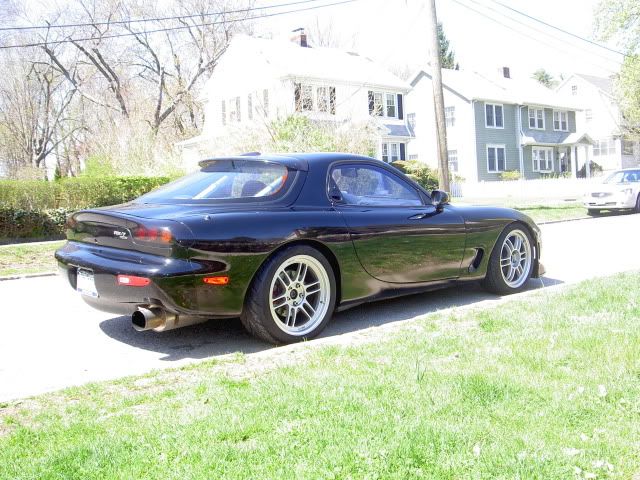
Fit perfect in the stock locations:
I also tapped the elbow for the intake temp sensor:

Today I got the entire interior back together, even the seats. The gauges work, the LED's show low level and when the meth is on. I still have to buy a sub and then mount that and the amp before I can connect the amp to all the speakers, but all the wires are sitting in the back for it.
I also started it today, started right up (after not starting due to the cold when i started the project in january) Looks like I didn't mess up when I cut all of the wiring out haha.
Now I just have to go to the body shop this week and get a quote on getting my cwest bumper repaired and painted and the R-Magic fenders painted. I'm also going to have the holes for the spoiler filled in, I love the wingless look.
My headlights still suck, but i'm not sure if I'll have that resolved prior to deal gap
Fit perfect in the stock locations:
I also tapped the elbow for the intake temp sensor:
Today I got the entire interior back together, even the seats. The gauges work, the LED's show low level and when the meth is on. I still have to buy a sub and then mount that and the amp before I can connect the amp to all the speakers, but all the wires are sitting in the back for it.
I also started it today, started right up (after not starting due to the cold when i started the project in january) Looks like I didn't mess up when I cut all of the wiring out haha.
Now I just have to go to the body shop this week and get a quote on getting my cwest bumper repaired and painted and the R-Magic fenders painted. I'm also going to have the holes for the spoiler filled in, I love the wingless look.
My headlights still suck, but i'm not sure if I'll have that resolved prior to deal gap
04-11-10, 10:52 AM
#95
Got a few new parts from Malloy Mazda:

Took it for a drive yesterday, everything is great. Chipped my new fender, but other than that its great. Still waiting on the sub and box to come in the mail, once that comes i can mount the amp and see if all the speakers work.
The GPS works great.
The car is much more enjoyable to ride in now, noticably more quiet, and just more solid, the doors feel 10 times better when you close them now. No more rattles either. The gauges work great, but I need to go get my A/C system filled up, it was hot in there yesterday.
 04-11-10, 08:25 PM
#98
Thanks, and yeah it feels pretty good.
I just got in from repairing my freshly cracked fender lip. A few sessions with bondo and then some black nail polish and some spray can clear coat. It's not perfect, but its better than a big white crack with a chunk of fiber glass missing.
I also got my rear view camera working today. I had wired it like so:
1. signal wire from pioneer unit run all the way to the rear to the back up light wire harness
2. I ran the power wire from the camera to the middle of the car where the tranny tunnel cover and shifter are, spliced it into the wire in #1 above.
nothing was working, I used a test light, and had power at the rear on the main wire right next to where i spliced it in. but no power up by where i spliced #1 and #2.
I look back at where i was spliced into the back up light harness, and i notice a small pastic piece on wire #1, it was a cover for a small resistor. I checked power immediately after the resistor, and my light would turn on, but it would if i tested before it.
So I'm guessing this resistor is to reduce the 12V power to something very small just to tell the receiver that I'm in reverse and to change the screen to the backup camera RCA input.
So i cut the resistor out, butt connected that wire back together, then wired the resistor back in, but on the receiver side of the splice that connects #1 and #2. This way, #2 gets 12V to give to the camera, and the receiver still gets the voltage reduced to the proper amount.
Now hopefully i explained that well enough for you all to understand haha.
I also swapped back to the stock front suspension, it gave me another inch of clearance in front, so now my wheels won't be damaging my fenders anymore, it'll also be nicer for just driving around, before i really had to be careful on every driveway I turned into.
As far as the quiet car goes, i can't tell if it was worth it yet, its deffinitely not as loud inside. But its still a loud car haha, no getting around that. I think once i get my sub in the mail and i can here music from all the speakers that will be the true test. if it sounds good then it will have been worth it. Right now i've got no music because im waiting for the sub to come so i can mount my amp (which powers every speaker in the car).
What I like best about the project:
1. the best is deffinitely knowing that my Meth System is not leaking, and the low level and activation LED's in the A-pillar.
2. modifications to the roll cage to allow for a passenger, and the sweet new paint on the cage.
3. Double din, GPS, and rear-view camera (and if the speakers work when its all hooked up they will be included here as well)
4. PLX gauges - way better than before
5. Quiet Car - this will probably move up when i here how good the speakers sound, and i love how solid the doors are now, and fewer rattles.
6. r-magic fenders, rear hatch visor, and R2 spoiler delete
7. clean carpet and new floor matts (i havent taken pictures yet, but they are sick) I got them from Jason, a vendor on here.
8. no more messy wiring under the dash, i never had problems with it, and i was very scared of tackling it, but it was a time bomb waiting to go off, and i'm really glad i got rid of it all (and can't believe everything still works in the car haha)
9. I went back to the stock suspension in front in order to stop damaging my fenders, which became critical now that i have freshly painted fiberglass fenders. i think i could drop it down a little bit now to get a better look and still clear, but i love having the clearance under the front bumper, i can go in any driveway i want now haha.
06-09-10, 01:16 PM
#99
^ totally awesome man! excellent work.
I am starting out small myself, working on my passenger door. The sound deadening material I will be using is from Second Skin Audio, and they have multiple products including a mat and a spray on coating. One small difference in my setup, I will be applying the sound mat directly to the metal surfaces, and then spraying the coating on top of the mat.
I noticed you sprayed the Quiet Coat first, then put on the sound deadening mat on top of the Quiet Coat, obviously after it dried. Did the mat stick/adhere to the Quiet Coat well? Did you have to use more spray adhesive to seal it well?
Also, what specs on the front speakers in the doors did you use? size, brand, etc. You used the stock speaker mounts, so were they 5 1/4 size or did you upgrade to 6 1/2 size speakers. Did you put any baffles behind them?
I'm hoping that the thread about someone making 6 1/2 speaker mounts turns into a group buy or something...
06-09-10, 01:40 PM
#100
The mat that I used stuck extremely well to the quiet coat, I didn't use any additional adhesive. But the purpose of the mat wasn't for additional sound dampening, my rear bins are both cut out, one houses the battery and one is where i put my premix and funnel, so I used the mat more to protect the quiet coat, a side effect is the extra sound dampening (I'm not really sure if it did much of that though).
Regarding my speakers, I bought a set of used 6 1/2" speakers from the G35 forum, as those guys change their high quality speakers out like crazy. One of the previous owners had installed 6.5" pioneers, kind of jimmy rigged in the stock location, some cutting was obviously performed, but somehow it worked. I had to cut a bit more to fit these in, and then the screws that hold them in place self tapped into the plastic on the door. There are no baffles behind them.
They sound great though, and you can adjust the angles of the tweeters, so before i put the door cover back on, i aimed them up towards the cabin.
When I get home from work i'll let you know what the specs of the speakers are, I got them for $40 shipped.
When i bought the car i had planned on changing the speakers right away, i had assumed they were stock and bought some pioneer 5.25" speakers (on clearance from circuit city when they were going out of business), I then removed the door panel and realized they would no longer work because, surprise, I already had 6.5" speakers haha. I still have them if you want to stick with 5.25" speakers.