FD interior remodling project
 02-27-10, 09:48 AM
#51
3rd coat is complete. Actually applying the material took about 15 hours of labor, I could probably cut it down a little now as my 3rd coat only took me 3.5 hours. The first coat takes a while because you are covering bare metal.
I used about 2 3/4 gallons to do the entire interior, including about 95% of the insides of the doors.
I should have ordered 4 gallons though, i don't have enough left to do all 3 coats underneath the hood.
The carpet goes back in this weekend
I used about 2 3/4 gallons to do the entire interior, including about 95% of the insides of the doors.
I should have ordered 4 gallons though, i don't have enough left to do all 3 coats underneath the hood.
The carpet goes back in this weekend
You are going to love the sound reduction from this and I think it was time and money well spent. next to this, I got the most sound reduction from installing the RX7store.net Magnaflow midpipe. Totally eliminates the droning sound from a straight pipe.
I also love the way the Pioneer unit looks and will do this myself someday so I'm looking forward to your review of the unit. Had mixed reviews on Amazon regarding the navigation component so I will be curious as to your observations. At one time I was going to install a complete carputer but now that I have PLX gauges, I don't need this so a double DIN unit like yours is on my list.
 02-27-10, 11:31 AM
#52
I also thought about a carputer set up, and now with all the money in PLX devices and the head unit, I probably could have had a killer one haha. I was also originally thinking that I'd just mount my two PLX gauges in the stock water and oil guage locations. But I've reconsidered that, I love having gauges in the a-pillar haha.
Now I'm debating whether to paint the entire interior. I have a 94, so i don't have the problems that the 93's have, and everything on the dash is still in good shape. But there rear plastics could use a refresher, but painting them would mean they wont match the front anymore, so i have to do everything. One upside if I paint it all is that the trim ring that came with the radio will be painted at the same time so everything in the dash will match.
Last edited by TwinCharged RX7; 02-27-10 at 11:35 AM.
02-27-10, 11:44 AM
#53
Metal Refinisher
iTrader: (1)

Join Date: Jan 2005
Location: Texas
Posts: 174
Likes: 0
Received 0 Likes
on
0 Posts
Hay Chudoncoupe, nice project you got going on. I thought I might chime in with some info for you.
One trick we use for killing noise is to take expanding foam and fill in places like A and B pillars. I don’t suggest using triple expanding just the single. Make sure you have a hole on either end for the foam to escape and the trim off the dried excess.
Since your using the paintable stuff consider painting both the exterior panel and the interior panel of the metal door. Generally when I’m doing a door I will strip the door down removing window, regulator and locks then apply mat to areas of the inside of the outside skin then spray areas I can’t reach. Then reassemble door and apply mat to inside door layer then apply door panel. Hope that made sense.
It maybe too late but the firewall area transmits a ton of noise. Pulling the dash and as much of the AC system out to expose this area to cover makes a huge difference.
Multiple layers will yield the best results, when reinstalling your carpet you might consider adding a layer of Jute. This will insulate and add additional deadening.
Tinting the windows will also add some amount of noise reduction. With SPL (Sound Pressure Level) and SQ (Sound Quality) cars we build we will actually apply multiple layers of tint however most of these cars become none street legal and this doesn’t matter but a good tint job will actually decrease the threshold a good percentage. By the way they do make clear tints if you don’t want to darken the windows.
You Pioneer unit is a nice piece however it has some unpublished issues you should be aware of. I unfortunately have a couple of customers with this unit that are pretty mad and Pioneer has decided to ignore them even after I tried working with their engineering staff to resolve these. We were one of the first shops to receive these units and have since quit selling them because of the following issues.
First the MSN direct service that unit offers is scheduled to be deactivated December of this year by MSN so traffic updates and movie time info will not be available. I believe MSN has stopped taking payments for service and has stated publicly that they will refund payments to customers but none of my customers or me has received any reimbursement for our paid lifetime subscriptions.
When using the MSN service that unit has to have the exterior car antenna connected to it to receive proper reception for the service. It looked like you had an amplified windshield antenna you planed to install. This is due to the Doppler (Spelling) effect of a vertical mast.
If you install the HD tuner to the 900 series, the HD box will require you to disconnect the antenna from the back of the radio and attach it to the HD box. This causes a major issue with this headunit when you use the navigation system. When in Navigation mode, the navigation software will look for the traffic info it will not see it if you don’t add an additional antenna to the back of the head unit. We tried using a Y-splice however this now lowers the DB of the antenna and the HD tuner won’t pickup signal. Adding an inside antenna such as your amplified will work fine for the HD but not for the headunit. Now for the double whammy, when the Navigation software makes the traffic info request to MSN the HD unit locks up. You have to now totally disconnect the HD brain and let it sit for the memory to release before reconnecting it.
When plugging in the HD tuner most radios will remove the icons for normal FM/AM and just show you the HD icon. The Pioneer software was not designed to do this on this unit. So if you add the HD brain you have extra radio icons. So unless you add an additional antenna for the headunit the FM/AM won’t tune. If you add an antenna to the headunit then you will be able to use these to receive normal radio not HD. If you touch the FM icon to go to FM radio it won’t give you the HD options. You have to back to source and go to HD icon to get them.
My suggestion to this issue is to not use the HD tuner.
We also don’t know how this unit will work once MSN turns their signal off.
Those PLX gauges were fun to play with on David’s car when Alex wrangled me to install them over at Gotham, I think you were there David forcing me to pose for pictures. LOL. One of these days I need an excuse to get a set to play with.
On a side note I haven’t kept up with your build David but I hope that nothing I did for you (PLX gauges & Coatings) caused you issues down the road and if so I apologize.
Anyway, Great project and I too think you will be extremely pleased with the outcome.
02-27-10, 01:06 PM
#55
Those PLX gauges were fun to play with on David�s car when Alex wrangled me to install them over at Gotham, I think you were there David forcing me to pose for pictures. LOL. One of these days I need an excuse to get a set to play with.
On a side note I haven�t kept up with your build David but I hope that nothing I did for you (PLX gauges & Coatings) caused you issues down the road and if so I apologize.
On a side note I haven�t kept up with your build David but I hope that nothing I did for you (PLX gauges & Coatings) caused you issues down the road and if so I apologize.
02-27-10, 06:41 PM
#56
Thanks Anthony, I've heard of a few issues with the pioneer 900 series, but for my application i think it should be ok. I won't be installing the HD tuner, and I also won't be using the MSN traffic service, it will mostly be just GPS and my Iphone. I've got the version 3 software update, not sure if that has fixed any of the items you are concerned about.
I also just wired in its harness to the dash. If you switch the "mute" wire from socket 1 to socket 4 in the harness, and then ground it to the radio ground, and at the same time ground the e-brake wire to the radio ground, then I'm able to watch dvd's (good for a passenger on a long trip to DGRR, not for me haha), and also adjust nav routes while driving. There is a good write up on it in the AVIC forum for the "F" series if anyone gets this same unit.
I've also heard about putting expanding foam in the open holes of the car, i have 3 cans, so I might go at it tomorrow.
I'll also be using the foam for a top secret project that I'll unveil after the interior is back together.
Thanks for all the info, I appreciate it.
And I blame David for introducing me to the wonderful world of PLX hahaha. Although I never would have bought them if it weren't for a killer deal I found on the Supra forum, it pays off to troll the classifieds on other forums thats for sure.
02-27-10, 08:51 PM
#58
Full Member
iTrader: (3)
Join Date: Feb 2005
Location: Killeen, TX
Posts: 190
Likes: 0
Received 0 Likes
on
0 Posts
I installed the F90BT about a month ago... same thing as the F900BT, but apparently has a couple tweaks and carries a two year warranty... big whoop since Pioneer doesn't like to service its F-series units because of all the complaints. It sounds like you know what you're doing with the install. I did the hardwire bypass as well and upgrade my unit to the 3.0101 using the X-Series firmware upgrade. I'm guessing you already know, but for others who have this unit, if you want to speed up the start time, disabling VR Catalog in the system settings helps a little. If I turn off my car listening to the radio, it only takes about 10 seconds to hear music after starting it up. If I turn it off listening to the SD card... more like 45 seconds.
I didn't buy that trim ring because it said it was for a few select systems only, and the F-series wasn't on there... but after getting hosed by two different ebay auction for "Pioneer Trim Rings" that were way bigger than the unit itself, I just made my own. I'll unveil it in a couple weeks or so as I'm still waiting for some secret supplies.
Good luck with everything... it's looking great. This was pretty much all I did all last summer.
02-27-10, 10:48 PM
#59
Thats too bad about the trim ring. How did you make your own? I've wanted to modify a few plastic things in past projects (trim down gauge bezels so the gauges sit more flush with the surface they are mounted on) but when i dremel to cut the plastic it burns and melts, so it never turns out right. Is there a good way to cut plastic trim pieces nicely?
This trim piece fits perfectly, if anyone is interested, the part number for the kit is in the picture.
^ I sure wish I had a targa top My old roomate always got the attention when we were driving together (97 supra), and i blame it all on the targa.
This trim piece fits perfectly, if anyone is interested, the part number for the kit is in the picture.
^ I sure wish I had a targa top
My old roomate always got the attention when we were driving together (97 supra), and i blame it all on the targa.
02-27-10, 11:26 PM
#60
Full Member
iTrader: (3)
Join Date: Feb 2005
Location: Killeen, TX
Posts: 190
Likes: 0
Received 0 Likes
on
0 Posts
It was a tedious and messy process, but I used Platsil 71-20 to make a mold and EasyFlo 60 to cast the ring http://www.brickintheyard.com/applications.html and http://www.shop.brickintheyard.com/c...c?categoryId=3. This is great stuff. I've used it to replicate a few small pieces here and there to fabricate stuff for my interior. Within the next week I'll also be posting up a thread on a custom upper steering wheel surround I made to integrate my Whistler Pro 3450 radar detector.
But enough hijacking... I use my dremel a lot when it comes to trimming plastic. I usually use a clamp to keep the piece in place and use both hands, stabilizing one on a firm surface and just take off a little at a time. To smooth out cuts (especially when I've ground some plastic down with the sanding drum) and make them straight, a standard file works great, followed by a 3M sanding block. For more precise planing, the dremel router table (or whatever it's called) works great. It's perfect for making precise planes and cuts because you can set guides.
The targa does get some interesting looks... mostly because people have no idea what I'm driving... they know it's too small to be a supra, too big to be a miata... It LOOKS like an RX7... but RX7s don't have targas! I get a lot of people waiting for me in the parking lot to ask me what I'm driving. Tell you the truth, sometimes I wish I had my old hardtop again though... the targa leaks in the rain, rattles over 100mph when it's on and not screwed down tight enough, and makes the door frame look like ***... all things I've been slowly fixing.
But enough hijacking... I use my dremel a lot when it comes to trimming plastic. I usually use a clamp to keep the piece in place and use both hands, stabilizing one on a firm surface and just take off a little at a time. To smooth out cuts (especially when I've ground some plastic down with the sanding drum) and make them straight, a standard file works great, followed by a 3M sanding block. For more precise planing, the dremel router table (or whatever it's called) works great. It's perfect for making precise planes and cuts because you can set guides.
The targa does get some interesting looks... mostly because people have no idea what I'm driving... they know it's too small to be a supra, too big to be a miata... It LOOKS like an RX7... but RX7s don't have targas!
I get a lot of people waiting for me in the parking lot to ask me what I'm driving. Tell you the truth, sometimes I wish I had my old hardtop again though... the targa leaks in the rain, rattles over 100mph when it's on and not screwed down tight enough, and makes the door frame look like ***... all things I've been slowly fixing.
03-11-10, 08:34 PM
#61
Update: It's been a little slow going.
Over the weekend I finished the body filler work on the roll cage and got 4 coats of black paint with metallic flake on, and then 2 coats of clear. It turned out even better than I expected. I'll admit, after seeing David Hayes' powder coated engine parts, I've wanted to do that them on my car as well. So the roll cage is the start of that.
Sanded down:


Covering it up:


Finished:


The pics don't really do it justice, but the clear gave it a killer gloss, and the metal flake is great.
Over the weekend I finished the body filler work on the roll cage and got 4 coats of black paint with metallic flake on, and then 2 coats of clear. It turned out even better than I expected. I'll admit, after seeing David Hayes' powder coated engine parts, I've wanted to do that them on my car as well. So the roll cage is the start of that.
Sanded down:
Covering it up:
Finished:
The pics don't really do it justice, but the clear gave it a killer gloss, and the metal flake is great.
 03-11-10, 08:49 PM
#63
Also began wiring up the PLX gauges. This is taking me longer than any other gauge install that I've done, but then again I've never installed 6 gauges at once before.
The only problem that I've run into is that I don't have a crimp tool for the tiny non-insulated crimp terminals that PLX uses in the plugs that plug into the sensor modules. So for now I'll create a harness for everything and crimp the terminals on once i get my hands on a crimper.

This is the main wiring harness that I have started for the sensors. It will consist of the following when finished:
IAT - not in the harness yet
Oil Temp
Oil Pressure
Water Temp
Fuel Pressure (I have wires in the harness for it, but still need a sensor)
Wideband (has its own loom)
Boost - already have a vacum line in the cabin from the previous gauge


This is all just taped together for now. I'll feed it into the cabin and around the engine bay, mark the locations where the wires need to split off of the bulk of the wiring to their individual sensors, tape them in whatever formation that results in, then wrap a wire loom around everything.
Also, the rear speakers and seat belts are now in.
The only problem that I've run into is that I don't have a crimp tool for the tiny non-insulated crimp terminals that PLX uses in the plugs that plug into the sensor modules. So for now I'll create a harness for everything and crimp the terminals on once i get my hands on a crimper.
This is the main wiring harness that I have started for the sensors. It will consist of the following when finished:
IAT - not in the harness yet
Oil Temp
Oil Pressure
Water Temp
Fuel Pressure (I have wires in the harness for it, but still need a sensor)
Wideband (has its own loom)
Boost - already have a vacum line in the cabin from the previous gauge
This is all just taped together for now. I'll feed it into the cabin and around the engine bay, mark the locations where the wires need to split off of the bulk of the wiring to their individual sensors, tape them in whatever formation that results in, then wrap a wire loom around everything.
Also, the rear speakers and seat belts are now in.


 03-12-10, 07:02 AM
#67
No big deal, it was on my list of tools to get anyways, now it has moved to the top of the list haha.
The PLX are a little more difficult to get the wiring all set, but i think they make up for that quickly once the wiring is done. If you ever want to change the routing of the wiring, all you have to do is unplug it from the unit and move it, which is what's so nice about the plug system they use, once I get past all the crimping it should be a breeze.
The PLX are a little more difficult to get the wiring all set, but i think they make up for that quickly once the wiring is done. If you ever want to change the routing of the wiring, all you have to do is unplug it from the unit and move it, which is what's so nice about the plug system they use, once I get past all the crimping it should be a breeze.
 03-12-10, 03:59 PM
#69
Full Member

Join Date: Oct 2006
Location: Roanoke, VA
Posts: 88
Likes: 0
Received 0 Likes
on
0 Posts
Well, let me say a few things, being the previous owner:
1. I had no part in wiring the fuel pump! haha
2. I told you the wiring was a mess.... props for tackling it because I didn't want any part in it!
3. I knew I left some change in there, I'll get you my paypal account and you can shoot it back to me!
I'm very impressed man, I'm glad to see this car showing its full potential. If you ever decide to sell it, you better give me first dibs... no joke. If I had to do it over again, this car would still be mine. Then again, it probably wouldn't be getting the same treatment that you are giving it, haha!
03-12-10, 04:25 PM
#70
haha, hows it going man? I check every now and then to see if you've been on the site. I actually saw the g35 for sale on another site, I hope you got a good deal for it.
I don't blame you for any of the shotty work from previous owners that has now shown itself, I guess thats just a risk someone takes when they buy a 13yr old car thats had multiple owners, multiple modification packages, and actual track time. It was definitely abused at some point in its life. I remember my drive home from VA in it, i think i burned through like 3 quarts of oil.
There are times when I look back and wish i still had the G, it was great for a daily driver, but one hard pull in the FD and i forget all that.
I think it would have been a pretty fair deal if the engine hadn't of been bad in the FD, but you were up front about that and it just turns out i have bad luck haha. I sold the old block to DJSeven and he said he'd never seen that happen before.
And if I had known how much I like working on it when i put the new engine in I would have gone 20B right then, but now i have to wait till this one blows haha.
So is that my car in your sig or did you get another?
03-13-10, 09:36 AM
#71
Full Member
Join Date: Oct 2006
Location: Roanoke, VA
Posts: 88
Likes: 0
Received 0 Likes
on
0 Posts
haha, hows it going man? I check every now and then to see if you've been on the site. I actually saw the g35 for sale on another site, I hope you got a good deal for it.
I don't blame you for any of the shotty work from previous owners that has now shown itself, I guess thats just a risk someone takes when they buy a 13yr old car thats had multiple owners, multiple modification packages, and actual track time. It was definitely abused at some point in its life. I remember my drive home from VA in it, i think i burned through like 3 quarts of oil.
There are times when I look back and wish i still had the G, it was great for a daily driver, but one hard pull in the FD and i forget all that.
I think it would have been a pretty fair deal if the engine hadn't of been bad in the FD, but you were up front about that and it just turns out i have bad luck haha. I sold the old block to DJSeven and he said he'd never seen that happen before.
And if I had known how much I like working on it when i put the new engine in I would have gone 20B right then, but now i have to wait till this one blows haha.
So is that my car in your sig or did you get another?
I don't blame you for any of the shotty work from previous owners that has now shown itself, I guess thats just a risk someone takes when they buy a 13yr old car thats had multiple owners, multiple modification packages, and actual track time. It was definitely abused at some point in its life. I remember my drive home from VA in it, i think i burned through like 3 quarts of oil.
There are times when I look back and wish i still had the G, it was great for a daily driver, but one hard pull in the FD and i forget all that.
I think it would have been a pretty fair deal if the engine hadn't of been bad in the FD, but you were up front about that and it just turns out i have bad luck haha. I sold the old block to DJSeven and he said he'd never seen that happen before.
And if I had known how much I like working on it when i put the new engine in I would have gone 20B right then, but now i have to wait till this one blows haha.
So is that my car in your sig or did you get another?
I'm doing good. Yeh, I never really get on this site anymore. It leaves me wishing I had kept that FD or have another one. I have gone through several cars since the FD.... I guess I never could find a happy replacement! haha Now, I've settled in a new Evo X. It's been good to me so far. Definately a grocery getter when compared to the FD though! It has the potential for some pep in its step though.... we'll see if I keep it long enough to make it there.
The G was OK. The problem with that car was that it reminded me way too much of my old turbo 350z. And, it wasn't nearly the monster the Z was. It actually threw a rod on the new owner shortly after he got it from me! I suspect that it was abused after our ownership of it.
Anyways, I can't wait to see the FD interior final product. I was very close to taking out the cross member in the cage also per my wife! She hated riding in that thing - but loved driving it.
03-15-10, 09:26 AM
#73
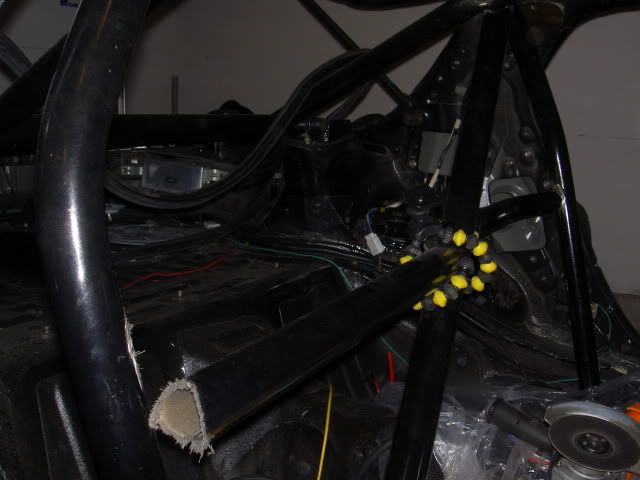
So we had a crazy storm over the weekend. Before this tree took the power out I got quite a bit of speaker wiring done (doesn't look like much progress but it sure was time consuming)
Still out of power because of this :

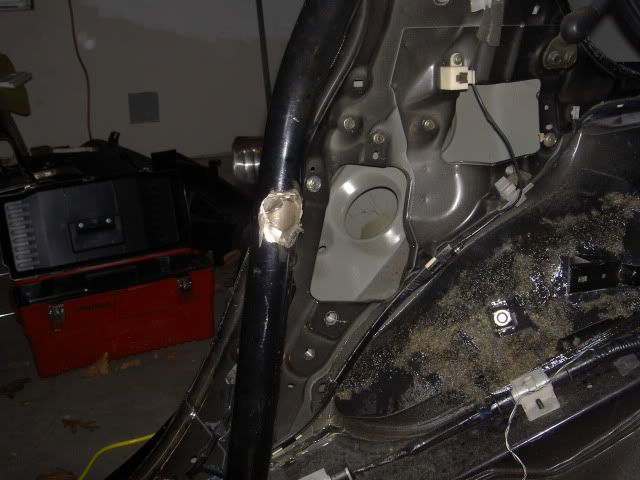
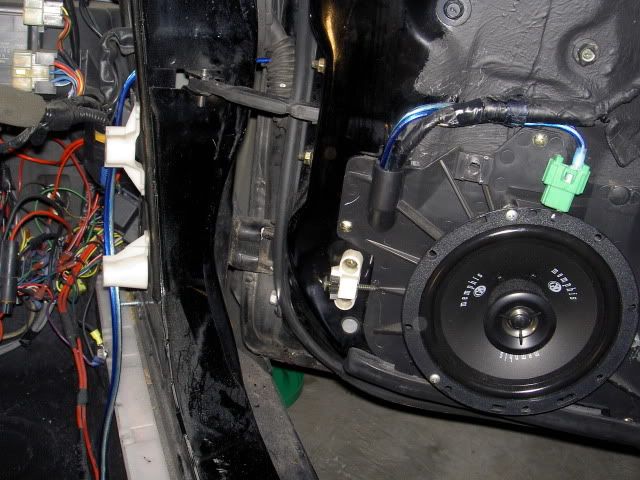
Onto what I got done on Saturday, I managed to figure out how to get new speaker wire into the door without it looking obvious. The grommet on the body presents a problem that I wasn't expecting, you can't run wire's through the hole here, there is a solid plastic connect that takes up the entire hole, it looks the same in the door as well, but once you peel back the rubber, there is room to get wire through.
So, first thing I did was peel back the rubber on both ends of the boot.
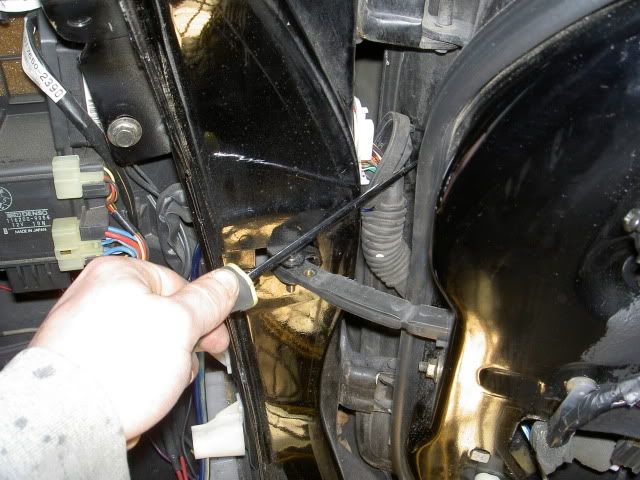
twist the top of the rubber boot, so you can get to the bottom of it, cut a small hole.
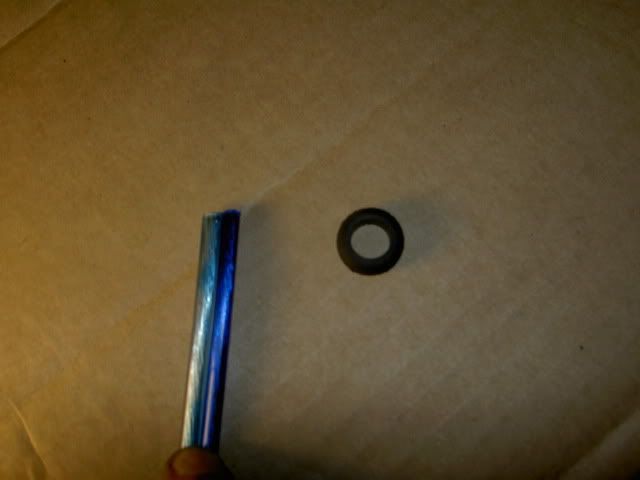
Drill a hole in the body, just below the factor grommet and electrical connector,then spray with primer, install grommet and wire:
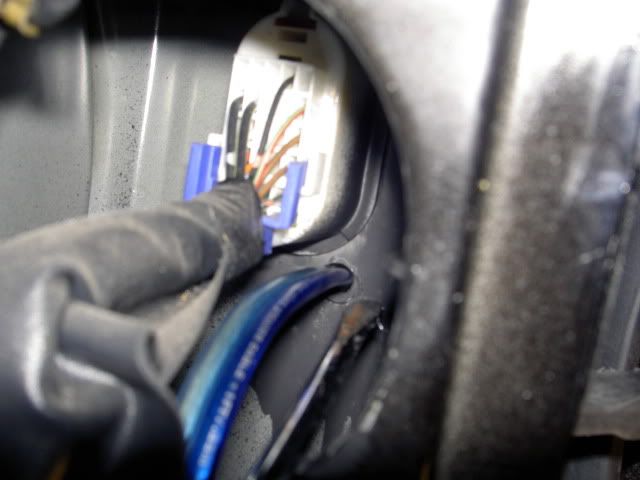
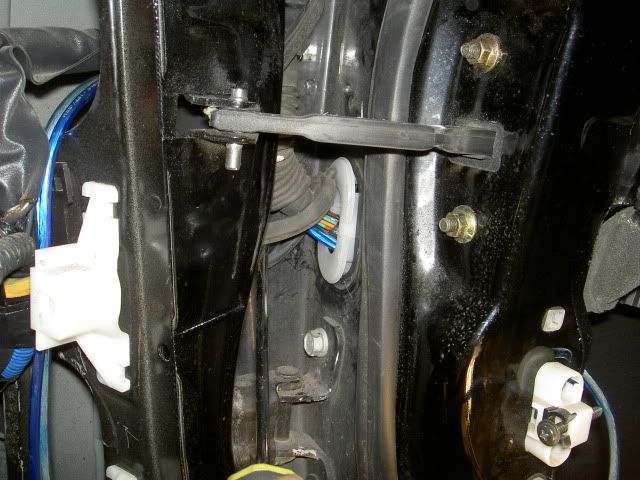
Run wire through the hole you cut in the rubber boot, then down the rubber boot and into the opening in the door:

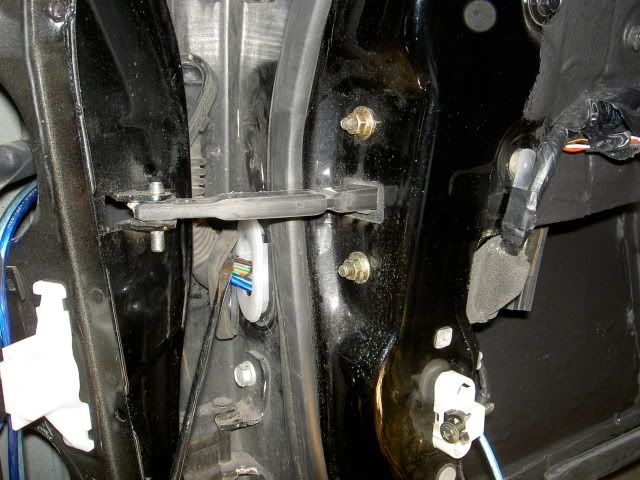
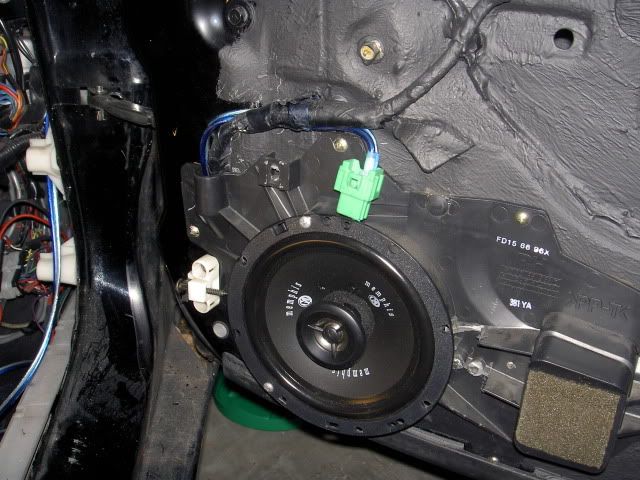
Install big speakers and call it a day, looking pretty much OEM :
Still out of power because of this :
Onto what I got done on Saturday, I managed to figure out how to get new speaker wire into the door without it looking obvious. The grommet on the body presents a problem that I wasn't expecting, you can't run wire's through the hole here, there is a solid plastic connect that takes up the entire hole, it looks the same in the door as well, but once you peel back the rubber, there is room to get wire through.
So, first thing I did was peel back the rubber on both ends of the boot.
twist the top of the rubber boot, so you can get to the bottom of it, cut a small hole.
Drill a hole in the body, just below the factor grommet and electrical connector,then spray with primer, install grommet and wire:
Run wire through the hole you cut in the rubber boot, then down the rubber boot and into the opening in the door:
Install big speakers and call it a day, looking pretty much OEM
:
03-21-10, 10:04 PM
#74
Update time: After a week with no power, which means no light in the garage, i finally got back to work this weekend.
First, I wired in all of the PLX gauges. The crimp tool i purchased still didn't make crimping the non-insulated crimps easy, and I didn't feel that they would hold well enough so I ended up soldering everything. I also soldered all of the power/ground wires together.
here is the main ground wire getting soldered to all of the grounds for the 7 PLX modules:


Getting the daisy chain wires, power wires, and sensor wires through the tunnel on the floor - coat hangers are great:
plugs taped to the coat hanger

coat hanger:

and pull through:

finished:


all tidied up:

First, I wired in all of the PLX gauges. The crimp tool i purchased still didn't make crimping the non-insulated crimps easy, and I didn't feel that they would hold well enough so I ended up soldering everything. I also soldered all of the power/ground wires together.
here is the main ground wire getting soldered to all of the grounds for the 7 PLX modules:
Getting the daisy chain wires, power wires, and sensor wires through the tunnel on the floor - coat hangers are great:
plugs taped to the coat hanger
coat hanger:
and pull through:
finished:
all tidied up:
03-21-10, 10:12 PM
#75
Cut some of the padding from under the carpet to clear the PLX modules and installed it:

then scraped off the old weatherstripping from the heater unit and put new weatherstripping on. The old stuff was pretty much turning to powder every time i touched it:
Old on left, and new on right:


connected the head unit to the dash, and all other wires that go with it:


Dash in the car - finally:

its not all bolted in yet, but i still feel like i got a ton done this weekend.
then scraped off the old weatherstripping from the heater unit and put new weatherstripping on. The old stuff was pretty much turning to powder every time i touched it:
Old on left, and new on right:
connected the head unit to the dash, and all other wires that go with it:
Dash in the car - finally:
its not all bolted in yet, but i still feel like i got a ton done this weekend.