3rd Gen Driver Side Window Switch Repair
 04-28-10, 02:35 AM
#1

Hi everyone other then my introduction this is my first post. Over the past ten years of ownership of my 3rd gen rx7 I have had my driver side window switch assembly go out for a couple different reasons. I searched the forum and archives to see if anyone had posted anything on how to repair it and didn't really find much.
The problem I was having, was that I could take down my window with the switch and then it would not go back up. The first time it was with the driver side window switch then a few years later the passenger side window switch. (All switch reference pertain to the driver side control assembly that has the two switches and lock switch) Both times they were for different reasons and I will be covering both. The first time the actual driver side switch came apart from the inside. The second time it was a internal component that was causing the problem.
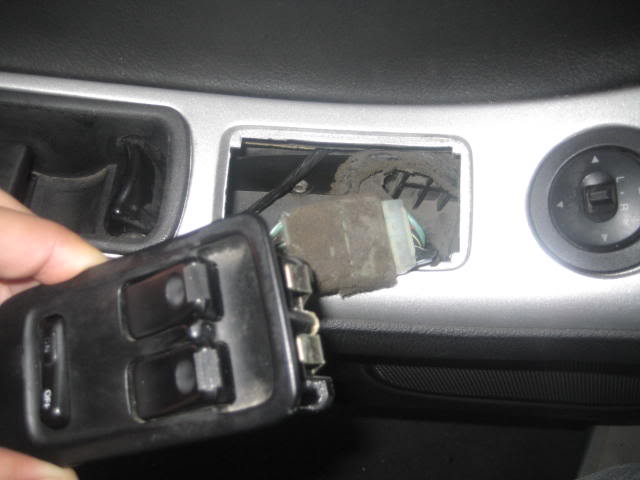
This was a easy fix all you have to do is take out the entire switch assembly which is held in place by two clips. There are two different ways to take out the assembly;
Materials needed for the two different repairs;
-Phillips head screwdriver (Small size)
-Crazy Glue
-Q tips
-Small blade
-Work towel
1st Option
Take the entire door panel off the door (by removing all appropriate screws and panels) and then just push out the the entire switch assembly from behind.
2nd Option
You can pry the switch assembly from the out side (WARNING THIS MIGHT CAUSE DAMAGE TO YOU PANELING IF NOT CAREFUL WHEN PRYING.)
Now to take apart the switch assembly;
1st
Disconnect the wiring harness(As a recommendation work on a towel and NOT a hard surface there are some small parts that can roll away and get lost very easily)
2nd
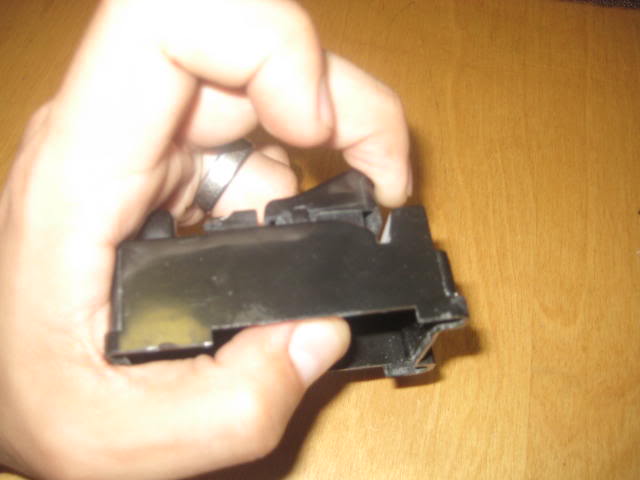
Remove the two screws that hold the clips on, first ones on top second one is on the bottom. This will also allow you to remove the top plastic piece.

3rd
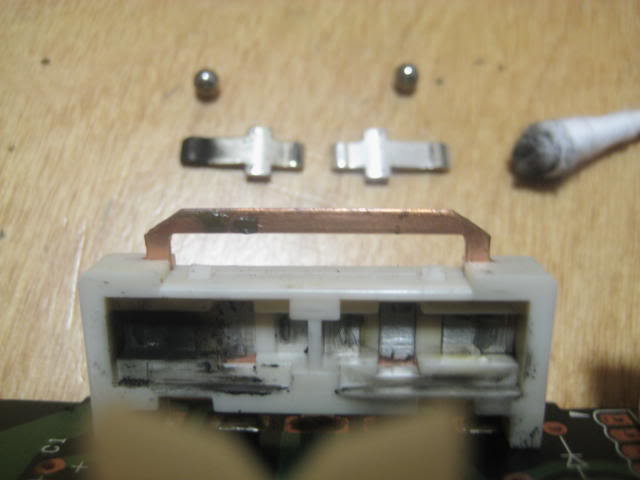
There are four screws on the back that hold the circuit board down one on each corner. Remove each of those screws and take the unit apart.
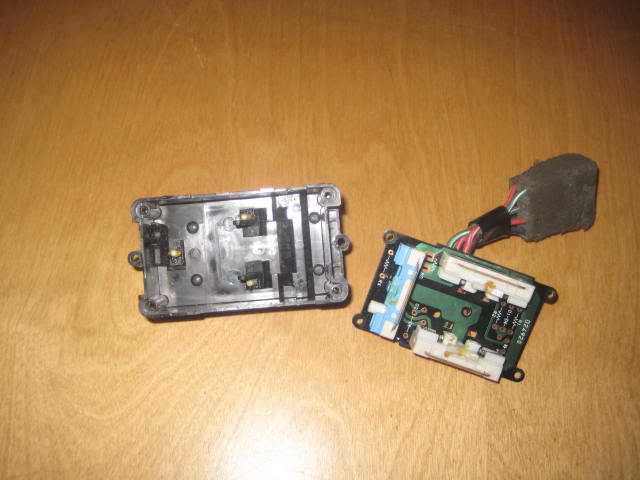
Now this is what the back side of the driver side, passenger, side, and lock switch looks like. (Be careful of those white pieces they have a spring behind them and they can fall out make sure to put them back in when reassembling)
I have removed one of the switches to show how it commonly breaks and what to looks like for you everyone.(You will not need to remove yours from the housing to repair it)
4th
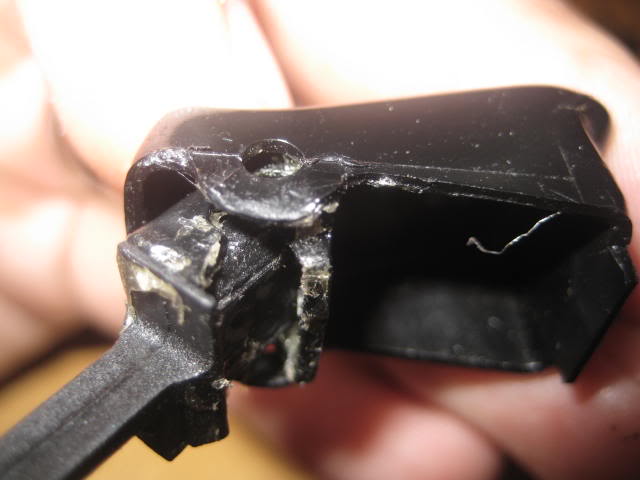
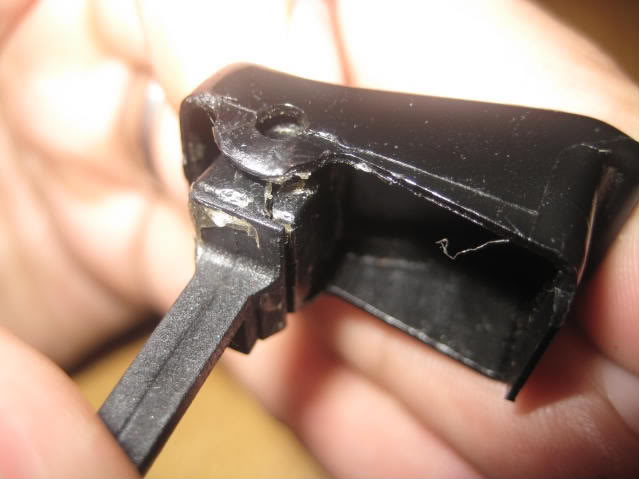
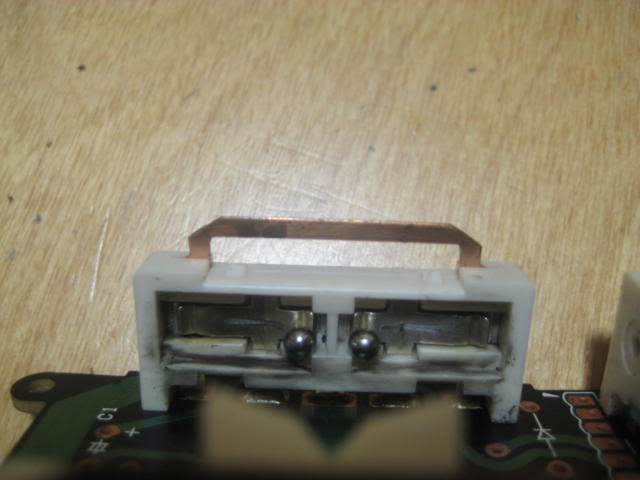
Grab the housing and pull back on the peg inside while simultaneously pulling up on the controller on the outside. This will open up the part of the controller that commonly comes apart and breaks. Just put some crazy glue between the peg and the area that came apart. Then perform the opposite motion as before to push the parts back together. (CAUTION Make sure to only put a small amount of crazy glue in the area that has come apart and then keep pressure on it for about 5 minutes.) While holding pressure on it move the part back and fort to make sure no extra glue got on the sides. If any did this will help prevent it from sticking all together.
Now this is what was wrong with my unit the first time, I was not so lucky the second time. It took me a little while to figure out what was going on, the passenger window would go down with the switch but would not come up all the time. I thought I might have an electrical short since it did not do it all the time. After a little while it just would not respond at all when I tried to make it go up. However I could still hear the motor when I would try to pull it down as it was all the way down. It also went up and down just fine with the switch that was on the passenger door. Once again I took the switch assembly out from the driver door and took it apart. This time I worked on the other half of it with the circuit board.
It gets a bit more technical for this repair there are a few more components. As per the steps before you will need to open your switch assembly unit.
1st
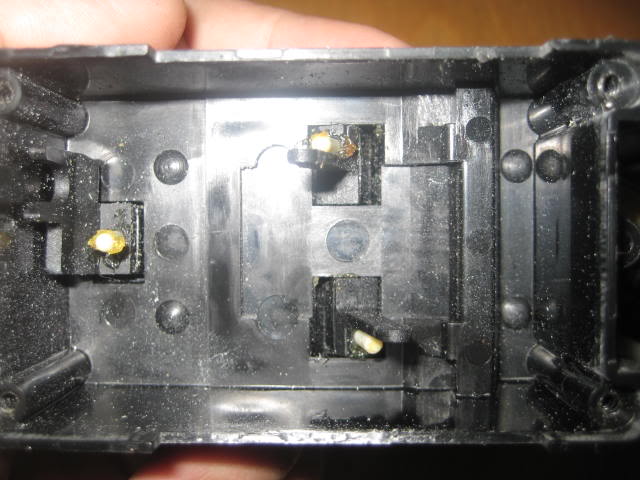
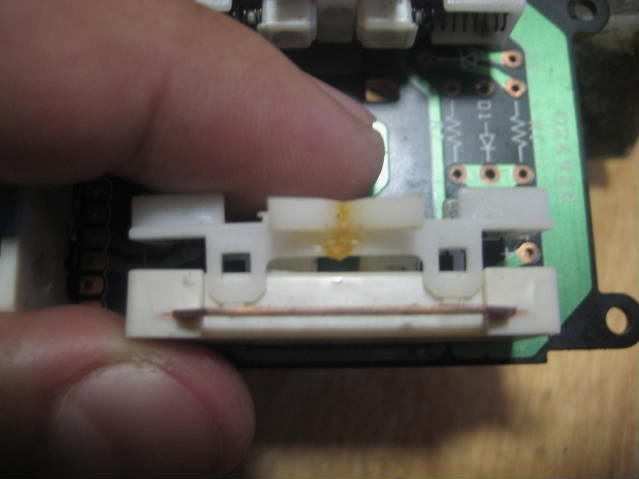
you will need to take apart the internal plastic housing for the switch and clean it(I recommend doing both sides one at a time to save time on repeating this for the other side in the future) There are four plastic tabs two on top and two on the bottom, pry these up with a small blade with CAUTION.(This is the part I recommend having a towel or something underneath it since there are some small parts that can fall out.)
2nd
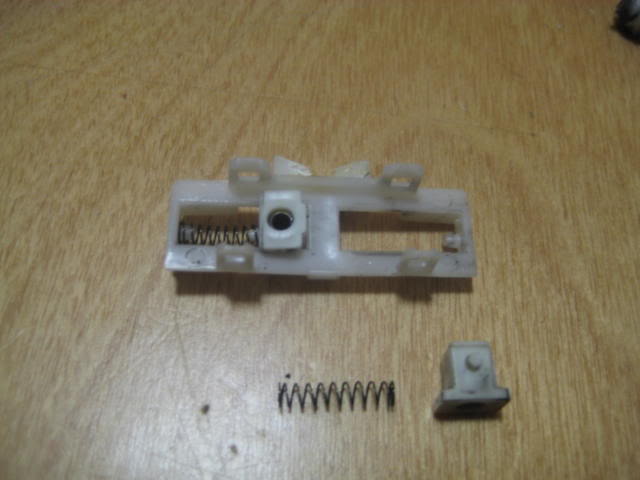
Start removing the components one by one and placing them on your towel.(A trick that works for me is putting them down in the same order I took them off, this way I know how to put it back together) As you can see from the pictures there is quit a bit of build up in the connections from over the years.(NOTE which way the cross shape is with the edges pointing up and make sure you put it back the same way.)
3rd
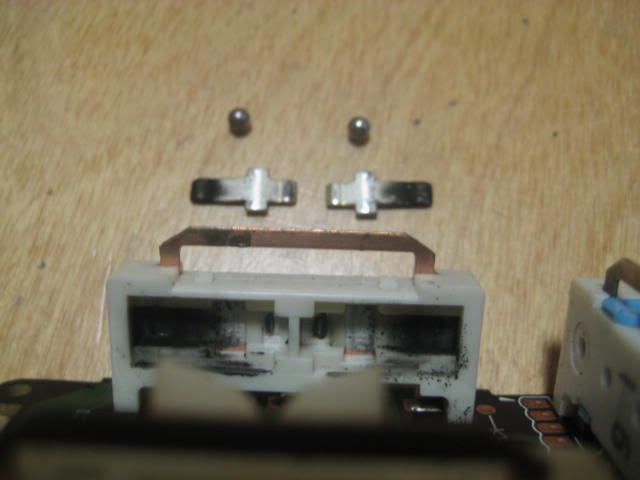
Now take a Q tip or whatever works for you and clean out the inside of the housing, the cross shaped metal pieces, and the ball bearing as well. There are groves inside the housing that you might need to scrap a bit with your blade.(I have cleaned the right side to show how much of a difference it make)
4th
Now when putting it back together make sure to put the cross shaped pieces in with the edges pointing upwards.
5th
Now put back the ball bearings and make sure to wipe them down to. It works best to put them on the inside like the picture, it will make the next step easier.
6th
Most probably the top piece that you took off in the beginning has fallen apart so I have included a picture to help put it back together.
7th
Now putting it back together, your will need to have a little patience since it will most probably fall apart on you a couple times. The reason I said earlier you would want the ball bearings towards the middle was for this part. The square white plastic pieces will go over the ball bearings and cradle them as you push down. They have a little spring in them that the ball bearings will go into. You will need to move it back a fourth a little for it to fall in place
I suggest checking the unit on the car by plugging in the harness before putting it all back together.
If your locking unit is not working it might be dirty and gunked up as well. You will need to take the same steps as above to repair it.
I hope this can help someone and if you have any questions please feel free to ask. I am also very open to recommendations and suggestions on how to better my posts.
Ghoujoumian
The problem I was having, was that I could take down my window with the switch and then it would not go back up. The first time it was with the driver side window switch then a few years later the passenger side window switch. (All switch reference pertain to the driver side control assembly that has the two switches and lock switch) Both times they were for different reasons and I will be covering both. The first time the actual driver side switch came apart from the inside. The second time it was a internal component that was causing the problem.
This was a easy fix all you have to do is take out the entire switch assembly which is held in place by two clips. There are two different ways to take out the assembly;
Materials needed for the two different repairs;
-Phillips head screwdriver (Small size)
-Crazy Glue
-Q tips
-Small blade
-Work towel
1st Option
Take the entire door panel off the door (by removing all appropriate screws and panels) and then just push out the the entire switch assembly from behind.
2nd Option
You can pry the switch assembly from the out side (WARNING THIS MIGHT CAUSE DAMAGE TO YOU PANELING IF NOT CAREFUL WHEN PRYING.)
Now to take apart the switch assembly;
1st
Disconnect the wiring harness(As a recommendation work on a towel and NOT a hard surface there are some small parts that can roll away and get lost very easily)
2nd
Remove the two screws that hold the clips on, first ones on top second one is on the bottom. This will also allow you to remove the top plastic piece.
3rd
There are four screws on the back that hold the circuit board down one on each corner. Remove each of those screws and take the unit apart.
Now this is what the back side of the driver side, passenger, side, and lock switch looks like. (Be careful of those white pieces they have a spring behind them and they can fall out make sure to put them back in when reassembling)
I have removed one of the switches to show how it commonly breaks and what to looks like for you everyone.(You will not need to remove yours from the housing to repair it)
4th
Grab the housing and pull back on the peg inside while simultaneously pulling up on the controller on the outside. This will open up the part of the controller that commonly comes apart and breaks. Just put some crazy glue between the peg and the area that came apart. Then perform the opposite motion as before to push the parts back together. (CAUTION Make sure to only put a small amount of crazy glue in the area that has come apart and then keep pressure on it for about 5 minutes.) While holding pressure on it move the part back and fort to make sure no extra glue got on the sides. If any did this will help prevent it from sticking all together.
Now this is what was wrong with my unit the first time, I was not so lucky the second time. It took me a little while to figure out what was going on, the passenger window would go down with the switch but would not come up all the time. I thought I might have an electrical short since it did not do it all the time. After a little while it just would not respond at all when I tried to make it go up. However I could still hear the motor when I would try to pull it down as it was all the way down. It also went up and down just fine with the switch that was on the passenger door. Once again I took the switch assembly out from the driver door and took it apart. This time I worked on the other half of it with the circuit board.
It gets a bit more technical for this repair there are a few more components. As per the steps before you will need to open your switch assembly unit.
1st
you will need to take apart the internal plastic housing for the switch and clean it(I recommend doing both sides one at a time to save time on repeating this for the other side in the future) There are four plastic tabs two on top and two on the bottom, pry these up with a small blade with CAUTION.(This is the part I recommend having a towel or something underneath it since there are some small parts that can fall out.)
2nd
Start removing the components one by one and placing them on your towel.(A trick that works for me is putting them down in the same order I took them off, this way I know how to put it back together) As you can see from the pictures there is quit a bit of build up in the connections from over the years.(NOTE which way the cross shape is with the edges pointing up and make sure you put it back the same way.)
3rd
Now take a Q tip or whatever works for you and clean out the inside of the housing, the cross shaped metal pieces, and the ball bearing as well. There are groves inside the housing that you might need to scrap a bit with your blade.(I have cleaned the right side to show how much of a difference it make)
4th
Now when putting it back together make sure to put the cross shaped pieces in with the edges pointing upwards.
5th
Now put back the ball bearings and make sure to wipe them down to. It works best to put them on the inside like the picture, it will make the next step easier.
6th
Most probably the top piece that you took off in the beginning has fallen apart so I have included a picture to help put it back together.
7th
Now putting it back together, your will need to have a little patience since it will most probably fall apart on you a couple times. The reason I said earlier you would want the ball bearings towards the middle was for this part. The square white plastic pieces will go over the ball bearings and cradle them as you push down. They have a little spring in them that the ball bearings will go into. You will need to move it back a fourth a little for it to fall in place
I suggest checking the unit on the car by plugging in the harness before putting it all back together.
If your locking unit is not working it might be dirty and gunked up as well. You will need to take the same steps as above to repair it.
I hope this can help someone and if you have any questions please feel free to ask. I am also very open to recommendations and suggestions on how to better my posts.
Ghoujoumian

Trending Topics
 the tabs were broken from both sides and glue didnt do enough lol, so i ended switching wires to use the one for the passenger side, since the car is not that wide i can reach easily to the other door to operate that window lol.
04-21-12, 06:56 AM
the tabs were broken from both sides and glue didnt do enough lol, so i ended switching wires to use the one for the passenger side, since the car is not that wide i can reach easily to the other door to operate that window lol.
04-21-12, 06:56 AM
#10
reciprocating heretic

Just did this (the first part of the write up) on my jdm fd, and it works great so far!
My issue was on the passenger control. The 'enclosure' had cracked and I super glued it together
Just wanted to say thanks for the amazing write up.
Cheers
My issue was on the passenger control. The 'enclosure' had cracked and I super glued it together
Just wanted to say thanks for the amazing write up.
Cheers
04-22-12, 11:33 PM
#11
Eats, Sleeps, Dreams Rotary
iTrader: (4)
This just happened to the passenger side. It'll go down, but not up.
I guess getting a new switch would be difficult?
Thankfully my driver side is still good.
Goes to show you, the car is starting to show signs of age
Great write up!
I guess getting a new switch would be difficult?
Thankfully my driver side is still good.
Goes to show you, the car is starting to show signs of age
Great write up!
03-01-13, 06:48 AM
#14
Just completed the job. The metal tracks that the ball bearings roll in, were filthy black with carbon and arcing black dust, etc. I found a household cotton bud Q-tip fits perfectly in the metal contacts slots and cleans them up great. I then scuffed the contacts lightly with a dental pick, and gingerly put it all back together. Getting the springs and the carriages and ball bearings in there just right required the use of tweezers and a dental pick... Fiddly would be an understatement....
The result: my windows now work like brand new. Oh yeah!!
Very happy
EDIT: Very useful if you remove the block thing in the middle of the board (the square thing with the plunger sliding through it) by unscrewing the phillips screw under the PCB in the center, and then carefully manouvering this item out if the way, taking care not to stress the two tiny red wires its hanging on. This allows better access to the sliding contacts assemblies
Last edited by SA3R; 03-01-13 at 06:51 AM.
 04-20-14, 04:21 PM
#17
Junior Member

Join Date: Jan 2014
Location: east dulwich
Posts: 7
Likes: 0
Received 0 Likes
on
0 Posts
both elec windows have just stoped working
hi all
after not driving my fd3s for around 3 weeks got in to it and for some reason both windows don't work checked all the fuses all ok but replaced any way,
has any one had the same and whats the fix thank mark
after not driving my fd3s for around 3 weeks got in to it and for some reason both windows don't work checked all the fuses all ok but replaced any way,
has any one had the same and whats the fix thank mark
05-02-14, 09:46 PM
#18
Junior Member

Join Date: Jun 2011
Location: Canada, B.C
Posts: 21
Likes: 0
Received 0 Likes
on
0 Posts
Anyone?
05-07-14, 03:53 PM
#19
Junior Member
Join Date: Jan 2014
Location: east dulwich
Posts: 7
Likes: 0
Received 0 Likes
on
0 Posts
hello all had a little look behind door cards all seems fine could the fact the car sat for 3 weeks make window relays get stuck in the off position
thanks mark uk
thanks mark uk
05-07-14, 03:56 PM
#20
Junior Member
Join Date: Jan 2014
Location: east dulwich
Posts: 7
Likes: 0
Received 0 Likes
on
0 Posts
hello mate not sure but im going to bang haha or replace window relays
see if that does the job
thanks mark uk
06-02-14, 01:50 PM
#21
Eats, Sleeps, Dreams Rotary
iTrader: (4)
This is a great write up! And I have no doubt I'll have to do it when I attempt to upgrade my speakers this coming weekend.
As posted awhile ago, I noticed my passenger side window switch wouldn't go up anymore. It'll go down, but wouldn't go up.
I followed the same approach mentioned in this post. Thankfully the passenger side is infinitely easier to deal with than the driver side.
Pop that sucker opened and you wouldn't believe the amount of electrical build up that was on the switch.
Took a good 10-15min's just trying to get all the parts looking new again.
Reassembled everything and tested the switch. Window goes up and down beautifully again.
I know the driver side is going to be more finiky to pull apart and clean, but since I'll be in the door getting new speakers installed, I'm going to take advantage and get the driver side switch cleaned up. Last thing I want to do is deal with the switch knowing I had the whole door panel off just before.
07-30-14, 04:35 PM
#22
2-Rotor Beast
Join Date: Aug 2007
Location: North Carolina
Posts: 107
Likes: 0
Received 0 Likes
on
0 Posts
Hey everyone,
My drivers side window will roll down but not roll up, I can hear the motor letting the window down and get no response when I try to roll it up so I decided to try and clean the contacts the way described in this post.
I was able to clean and reassemble the unit without a problem (they were quite dirty), however when I connected it back to the harness to test it I now get no response rolling the windows up or down on the drivers and passenger side. Also, now there is no response on the passenger window from the switch on the passenger side directly either. I feel like there must be something wrong with the circuit now that no windows in the car are getting power whatsoever, any suggestions as to what I may have done while cleaning/assembling the drivers side switch unit? (note i only cleaned the contacts for the driver window in the unit)
The passenger window worked fine before I cleaned the assembly (with both the drivers and passenger switches).
Thanks for any suggestions!
 07-01-15, 11:56 AM
#24
Junior Member

Join Date: Mar 2015
Location: Dallas
Posts: 14
Likes: 0
Received 0 Likes
on
0 Posts
Great write up! Really appreciate the detailed pictures as well as the gotchas!
One small suggestion I had that made putting the ball bearings back in the switch a LOT EASIER (Step 7) was to put a little di-electric grease (same kind used on battery terminals) on the spring/hole opening on the white square tabs. This keeps the ball bearings in place as you fix the switch back up....remember a little di-electric grease goes a long way. You don't want to grease up the contact points a bunch.
Thanks again!