
Pictures: Dual 90mm Headlights in Stock Location


Thread Starter
Joined: Feb 2002
Posts: 753
Likes: 5
From: Bay Area, CA
Pictures: Dual 90mm Headlights in Stock Location
Hey everyone,
A few years ago I was regularly driving over the Santa Cruz mountains. Anyone who is familiar with Highway 17 knows that it is a very exciting and challenging road, especially at night. The FD was a great car for the trip, except at night. I was dismayed at the performance of the Mazda lighting system, and so I went about fixing the problem.
I gave a lot of consideration to some of the sleek light kits out there. However, I was not impressed with the quality of these kits. Worse, they had a number of common issues such as trim that reflected light up into other drivers' eyes, plastic covers that scratched and yellowed, leaking, lack of adjustability, and worst: the need to cut the unibody to install the kit.
That didn't work for me. Also, there were a number of pop-up conversion kits but none of them used effective (or legal) driving lamps. The light output was often worse than the stock lights; they seemed designed primarily for cosmetic reasons. Also, some of the kits lowered the angle of the headlight (low-rise or sleepy eye) which had a number of other issues including uneven height and significant vibration due to the factory bump stops no longer making contact with the headlight pivot. This is a big problem when you have powerful lights with sharp cutoffs�for you and oncoming traffic.
So, I decided to build a kit that avoided these pitfalls and would accomplish the following goals:
1) Provide a massive improvement in lighting performance
2) Be as durable, adjustable, and serviceable as the OEM lights
3) Require absolutely no cutting into the unibody
I built a prototype of the system and ran it on my car for the past few years. My solution uses two Hella 90mm modules that fit into the factory location without cutting the car's frame. The light output is dramatic; a massive improvement over stock. You can completely (and independently) adjust the lights from the front of the car. The system is weatherproof. The lenses will not scratch or chip. Replacement parts are available here in the US. And you don't have to take a grinder to your FD. No cutting of the wiring harness. The install is completely reversible if you ever want to return the car to stock form.
What's more, I added a wiring harness that allows me to run all four lights simultaneously when the high beam switch is activated. Night driving is no longer an issue�and I got to retain the factory look of the car which I think is quite attractive and well balanced.
I built both halogen and HID versions of the system. I run the HID version now, but to be honest the H9 halogens projectors were outstanding, and better than many reflector-based HID lights.
But that was a few years ago. Over the past few months I've been working on a new version of this system that improves the cosmetic appearance with a carbon fiber trim plate. Below are a few images that you can click on for close-ups:

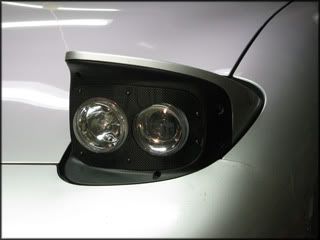
I wanted something that blended a little better with the factory headlight trim, and the carbon fiber achieves this goal.
I think that there are a lot of great lighting options out there for FD owners�that's why being part of this community is so great. I've posted this here because I'm in the process of building some examples of this kit. I'd really like to get some feedback from the RX-7 community on this setup and see if there's anything that can be done to improve it. Please feel free to post here or ask questions. I'm looking forward to your thoughts.
I'll post some pictures tomorrow of the light pattern and comparisons to the stock headlamps.
-ch
A few years ago I was regularly driving over the Santa Cruz mountains. Anyone who is familiar with Highway 17 knows that it is a very exciting and challenging road, especially at night. The FD was a great car for the trip, except at night. I was dismayed at the performance of the Mazda lighting system, and so I went about fixing the problem.
I gave a lot of consideration to some of the sleek light kits out there. However, I was not impressed with the quality of these kits. Worse, they had a number of common issues such as trim that reflected light up into other drivers' eyes, plastic covers that scratched and yellowed, leaking, lack of adjustability, and worst: the need to cut the unibody to install the kit.
That didn't work for me. Also, there were a number of pop-up conversion kits but none of them used effective (or legal) driving lamps. The light output was often worse than the stock lights; they seemed designed primarily for cosmetic reasons. Also, some of the kits lowered the angle of the headlight (low-rise or sleepy eye) which had a number of other issues including uneven height and significant vibration due to the factory bump stops no longer making contact with the headlight pivot. This is a big problem when you have powerful lights with sharp cutoffs�for you and oncoming traffic.
So, I decided to build a kit that avoided these pitfalls and would accomplish the following goals:
1) Provide a massive improvement in lighting performance
2) Be as durable, adjustable, and serviceable as the OEM lights
3) Require absolutely no cutting into the unibody
I built a prototype of the system and ran it on my car for the past few years. My solution uses two Hella 90mm modules that fit into the factory location without cutting the car's frame. The light output is dramatic; a massive improvement over stock. You can completely (and independently) adjust the lights from the front of the car. The system is weatherproof. The lenses will not scratch or chip. Replacement parts are available here in the US. And you don't have to take a grinder to your FD. No cutting of the wiring harness. The install is completely reversible if you ever want to return the car to stock form.
What's more, I added a wiring harness that allows me to run all four lights simultaneously when the high beam switch is activated. Night driving is no longer an issue�and I got to retain the factory look of the car which I think is quite attractive and well balanced.
I built both halogen and HID versions of the system. I run the HID version now, but to be honest the H9 halogens projectors were outstanding, and better than many reflector-based HID lights.
But that was a few years ago. Over the past few months I've been working on a new version of this system that improves the cosmetic appearance with a carbon fiber trim plate. Below are a few images that you can click on for close-ups:
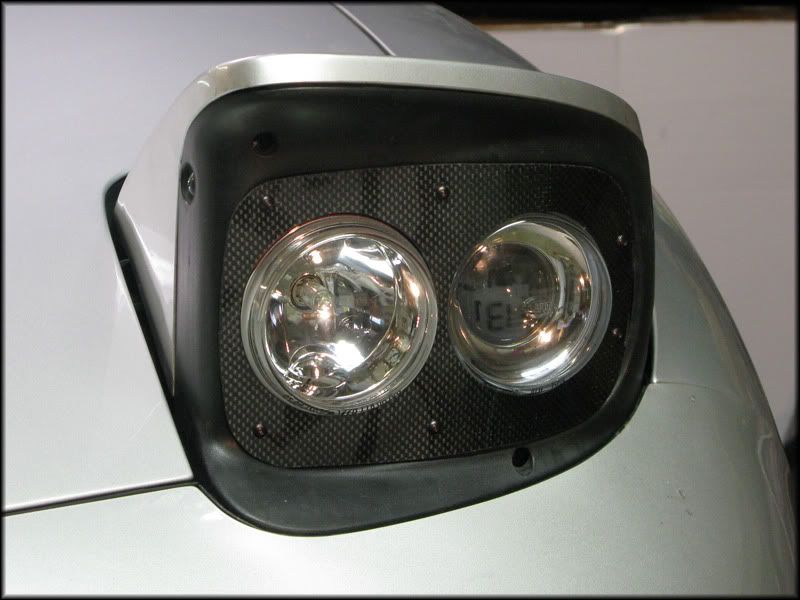
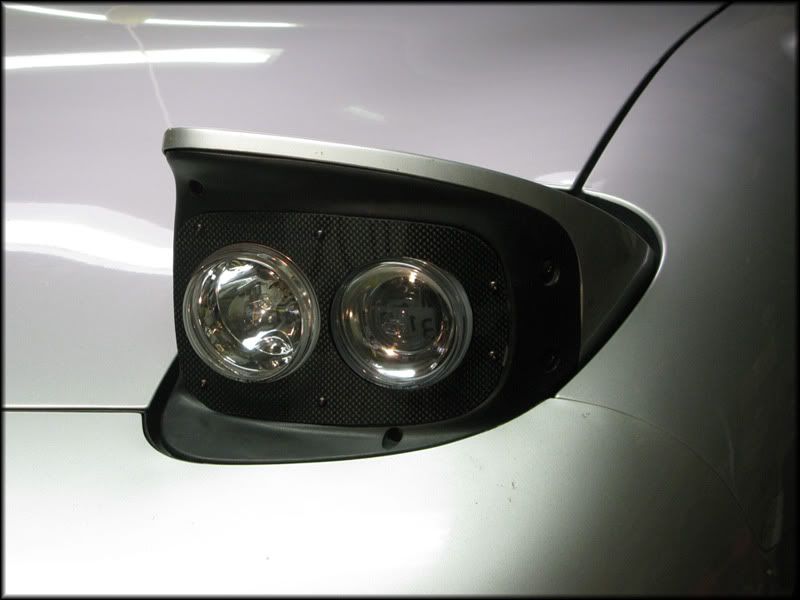
I wanted something that blended a little better with the factory headlight trim, and the carbon fiber achieves this goal.
I think that there are a lot of great lighting options out there for FD owners�that's why being part of this community is so great. I've posted this here because I'm in the process of building some examples of this kit. I'd really like to get some feedback from the RX-7 community on this setup and see if there's anything that can be done to improve it. Please feel free to post here or ask questions. I'm looking forward to your thoughts.
I'll post some pictures tomorrow of the light pattern and comparisons to the stock headlamps.
-ch


Full Member
Joined: Jul 2009
Posts: 181
Likes: 0
From: Markham, ON, Canada
oh, this concept is awesome! I want to see a picture of the entire car with the lights. Kinda hard to imagine how this might look like on the car when the picture is up close. Nevertheless, I really like the design and the CF look of it!
Great job!
Great job!
Thread Starter
Joined: Feb 2002
Posts: 753
Likes: 5
From: Bay Area, CA
Sadly we're getting a patch of rain today--if it clears I'll be out for pictures, if not I'll shoot for tomorrow...
Thanks for all the responses, please keep the feedback coming. Those familiar with me know I'm pretty particular about how things look, but functionality is always the most important requirement. Ever try to drive a winding road at night when your lights are vibrating, too narrow, too weak, or poorly aimed? Not a fun prospect. I remember back in the day with my old 81S Scirocco...one of the first things I did was convert the headlights to run H4 bulbs and dedicated relays. My passengers would react the same way when they rode along: "Wow!" 400 watts and a wide pattern make a huge difference. You can see 10-15 seconds ahead. You can see into the trees and grass to the side of the road. You can see the holes and ruts in the pavement.
I honestly don't know how people live without it. Maybe I just have horrible night vision.
-ch
Trending Topics

Junior Member
Joined: Aug 2009
Posts: 6
Likes: 0
From: Illinois
Looks like a great option. I really like the idea of maintaining the stock look while improving safety. Would be interested in better understanding what is required to install. Looking forward to more pictures!

I totally know what you mean. I went driving on la Honda a month or so ago. I'm not going back until I fix my lighting situation. I was really quite terrible, I couldn't see what was behind the turns, left turns were half blind. It was really bad.
Where are you located in the Bay?
Where are you located in the Bay?
Glad to see you post these up as they are a great option for those that don't want to cut the headlight bucket. These also use Hella 90mm headlamp units so they are SAE/DOT certified which means they are legal! Besides what I have done for myself, I don't think anyone else can claim this. Finally, because they are SAE projectors and not ECE (europe) ones, they will also have the proper, legal cutoff pattern for US driving.
Now, make that wiring harness for me and I'll be a happy camper
Now, make that wiring harness for me and I'll be a happy camper
i love everything except not being able to lower them/ sleepy eye look.. IMO the headlight surface vs the surface the bulbs cover are too big... IMO thats why i like the sleepy eye look cuz it eliminates some of the excess space and makes it look more balanced....
just my opinion... but everything else you mentioned sounds AWESEOME.
just my opinion... but everything else you mentioned sounds AWESEOME.
Thread Starter
Joined: Feb 2002
Posts: 753
Likes: 5
From: Bay Area, CA
Thanks everyone for the continued responses! Some great feedback. The weather is clearing a bit today so I'm hoping I can get some additional photos up tonight.
Let me talk a bit about the install process. The headlight bucket is made of five major parts: a metal frame, a motor/arm assembly, a fiber reinforced plastic (FRP) frame, a body-colored plastic top and a black plastic trim. Of these, you will need to very slightly modify the frame, and you'll need to make some small clearance holes in the FRP frame. These modifications do not affect the functionality of the system, cannot be visually seen from outside (even with the hood open) and do not prevent you from removing the kit and putting the OEM lamps back in place.
Rumors are I operate out of a volcano island a few miles from Google.
This is good feedback, and I want to take the time to address this. For my personal taste, I always liked the headlights at the stock height. The design fits the car, and the higher lights are the better they work at putting light on the road. So for me, I love the functionality and my design goal was to make that functionality look as good as possible.
However, I've definitely had people ask me about the sleepy eye approach and I know that it's a popular look. Let me explain the challenges I see here, which are: getting the lights to raise to the right height, getting them to stay there without vibration, and creating a trim that fills the space and is durable enough for daily driving.
First off, let's start with the three easy ways of getting the lights to raise partially. They are:
Let's look at the first two of these. The pictures below show the motor assembly, and the red arrows show the direction that each needs to move to get the sleepy eye look. You can see that the geometry of the FRP frame doesn't allow you to move the attachment point any farther out unless you did some major modifications. As for the motor arm, you could drill a hole that's closer to the center of rotation. But in either case how do you cut your holes with enough accuracy to ensure that both headlights pop up the same height? If you wanted a repeatable process you'd need to design a replacement motor pivot arm (CNC or jig-welded) which is possible but a challenge.

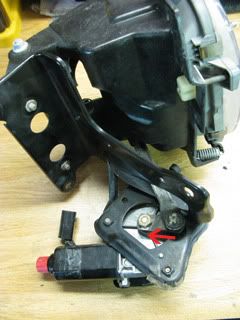
(Click for a close up view.)
So how about limiting the angle that the motor turns? There are a few ways to do this. You can buy a Pivot RHU-M controller that is compatible with the FD electronics. However, if you read the manual carefully you see things like "Angle of cover may be affected by voltage of battery" and "The slight difference of angle between right and left is caused by car and not caused by this unit". It's a clever device, but not particularly serious. The last thing you want is an asymmetrical car that blinds oncoming drivers when the voltage runs a little high.
So instead you could limit the angle by modifying the electrical contact strips inside of the motor encoder. This works--Steve Z did a great writeup of this a few years ago--and I actually have a design to do this that should be a lot more precise and repeatable. However, this takes us to the second major challenge...
The factory light system does not use the electric motor and pivot arm to hold the lights in place. Or, to be more precise, it does not rely on the bi-directional stability of the pivot arm. That's because there is play (that gets worse over time) that would allow the headlights to vibrate, especially on cars with stiff suspensions. This can be a big problem with powerful lights that have sharp cutoffs. You calibrate your system for optimal lighting, and then watch as your lights bounce up into windscreens and rear-view mirrors. Plus, it's very distracting to the driver.
Mazda addresses this issue by using two adjustable rubber bump stops that limit the movement of the FRP frame. (You can see the lower bump stop in the first image above.) The system is designed that when the motor reaches full extension the bump stop is pressing firmly against the FRP frame, which puts significant tension in the pivot arm assembly--and stops the vibration. If you don't believe me, just open up your headlights and back out the adjustment of the top stop so it doesn't touch the FRP. Vibration city! (Ask me how I know. I cut off the stops on one of my prototypes.)
So regardless of which way you get your sleepy eye look, you wind up defeating the Mazda system for steadying the headlights. And even if you could solve this, it means you can't use any rotational limit system (IMHO, the most elegant method) because it means the motor won't have its pivot arm aligned with the rod that connects it to the FRP frame. The pressure on that arm (from weight driven by the bouncing of the car) will back-drive the motor...it will back down a little bit, then hit the electrical contacts which will push it back up. Your sleepy eyes will--wait for it!--look sleepy as they periodically fall down and then snap back up.
Okay. Let's say you've found a clever solution to the first two problems. You've got sleepy eyes that are symmetrical and stay reliably in a fixed position. Now you have to make a trim piece that will not only surround the lights but also fill the gap between them and the bumper/hood (just like the Mazda trim does now.) Unless you're willing to make an ABS mold--and I'm not--it means wet-layup fiberglass or carbon fiber. It's some tricky geometry but it could be done. I think fiberglass is problematic...every single car I've seen with kits like this (e.g., KnightSports) have issues with uneven and chipping/flaking surface, and to be honest haven't seen one yet that even comes close to the OEM level of finish.
I know that David is working on an application for sleepy eyes, and his reputation as a dogged pursuer of perfection is well known. I'm hoping that he can find some solutions where others have failed, and those who strongly prefer the sleepy eye look will be well served by his efforts. As I said before, my decision to go with the OEM height popups was my personal preference. I thought I would get the best functionality, and with some carbon fiber trim work produce something that looks as close to stock look as possible. But this is the fun of belonging to a community of RX-7 enthusiasts--there's a lot of variety!
That said, I did a lot of thinking about the sleepy eye look during my design process, so I thought I'd share my conclusions with the preceding novel. Hope this helps!
-ch
Let me talk a bit about the install process. The headlight bucket is made of five major parts: a metal frame, a motor/arm assembly, a fiber reinforced plastic (FRP) frame, a body-colored plastic top and a black plastic trim. Of these, you will need to very slightly modify the frame, and you'll need to make some small clearance holes in the FRP frame. These modifications do not affect the functionality of the system, cannot be visually seen from outside (even with the hood open) and do not prevent you from removing the kit and putting the OEM lamps back in place.
Rumors are I operate out of a volcano island a few miles from Google.
However, I've definitely had people ask me about the sleepy eye approach and I know that it's a popular look. Let me explain the challenges I see here, which are: getting the lights to raise to the right height, getting them to stay there without vibration, and creating a trim that fills the space and is durable enough for daily driving.
First off, let's start with the three easy ways of getting the lights to raise partially. They are:
- Shorten the pivot arm of the electric motor
- Lengthen the pivot arm of the FRP frame
- Change the angle that the pivot arm moves (i.e., limit it)
Let's look at the first two of these. The pictures below show the motor assembly, and the red arrows show the direction that each needs to move to get the sleepy eye look. You can see that the geometry of the FRP frame doesn't allow you to move the attachment point any farther out unless you did some major modifications. As for the motor arm, you could drill a hole that's closer to the center of rotation. But in either case how do you cut your holes with enough accuracy to ensure that both headlights pop up the same height? If you wanted a repeatable process you'd need to design a replacement motor pivot arm (CNC or jig-welded) which is possible but a challenge.
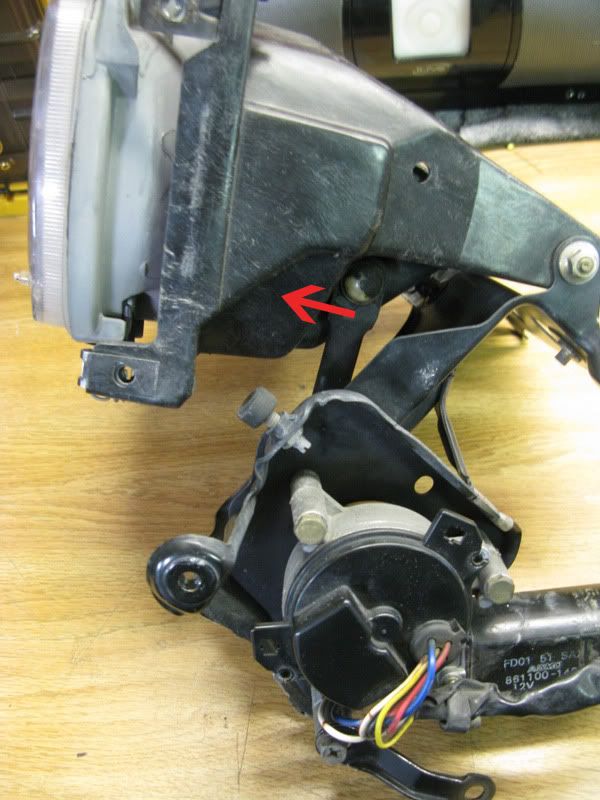

(Click for a close up view.)
So how about limiting the angle that the motor turns? There are a few ways to do this. You can buy a Pivot RHU-M controller that is compatible with the FD electronics. However, if you read the manual carefully you see things like "Angle of cover may be affected by voltage of battery" and "The slight difference of angle between right and left is caused by car and not caused by this unit". It's a clever device, but not particularly serious. The last thing you want is an asymmetrical car that blinds oncoming drivers when the voltage runs a little high.
So instead you could limit the angle by modifying the electrical contact strips inside of the motor encoder. This works--Steve Z did a great writeup of this a few years ago--and I actually have a design to do this that should be a lot more precise and repeatable. However, this takes us to the second major challenge...
The factory light system does not use the electric motor and pivot arm to hold the lights in place. Or, to be more precise, it does not rely on the bi-directional stability of the pivot arm. That's because there is play (that gets worse over time) that would allow the headlights to vibrate, especially on cars with stiff suspensions. This can be a big problem with powerful lights that have sharp cutoffs. You calibrate your system for optimal lighting, and then watch as your lights bounce up into windscreens and rear-view mirrors. Plus, it's very distracting to the driver.
Mazda addresses this issue by using two adjustable rubber bump stops that limit the movement of the FRP frame. (You can see the lower bump stop in the first image above.) The system is designed that when the motor reaches full extension the bump stop is pressing firmly against the FRP frame, which puts significant tension in the pivot arm assembly--and stops the vibration. If you don't believe me, just open up your headlights and back out the adjustment of the top stop so it doesn't touch the FRP. Vibration city! (Ask me how I know. I cut off the stops on one of my prototypes.)
So regardless of which way you get your sleepy eye look, you wind up defeating the Mazda system for steadying the headlights. And even if you could solve this, it means you can't use any rotational limit system (IMHO, the most elegant method) because it means the motor won't have its pivot arm aligned with the rod that connects it to the FRP frame. The pressure on that arm (from weight driven by the bouncing of the car) will back-drive the motor...it will back down a little bit, then hit the electrical contacts which will push it back up. Your sleepy eyes will--wait for it!--look sleepy as they periodically fall down and then snap back up.
Okay. Let's say you've found a clever solution to the first two problems. You've got sleepy eyes that are symmetrical and stay reliably in a fixed position. Now you have to make a trim piece that will not only surround the lights but also fill the gap between them and the bumper/hood (just like the Mazda trim does now.) Unless you're willing to make an ABS mold--and I'm not--it means wet-layup fiberglass or carbon fiber. It's some tricky geometry but it could be done. I think fiberglass is problematic...every single car I've seen with kits like this (e.g., KnightSports) have issues with uneven and chipping/flaking surface, and to be honest haven't seen one yet that even comes close to the OEM level of finish.
I know that David is working on an application for sleepy eyes, and his reputation as a dogged pursuer of perfection is well known. I'm hoping that he can find some solutions where others have failed, and those who strongly prefer the sleepy eye look will be well served by his efforts. As I said before, my decision to go with the OEM height popups was my personal preference. I thought I would get the best functionality, and with some carbon fiber trim work produce something that looks as close to stock look as possible. But this is the fun of belonging to a community of RX-7 enthusiasts--there's a lot of variety!
That said, I did a lot of thinking about the sleepy eye look during my design process, so I thought I'd share my conclusions with the preceding novel. Hope this helps!
-ch

I'd like to see pics of the front of the car as a whole as well...Also some pics of the lighting of HID vs Halogen. Regardless this is something I will buy as soon as it's available, or a nice write up
Looks good!
Looks good!
Thread Starter
Joined: Feb 2002
Posts: 753
Likes: 5
From: Bay Area, CA
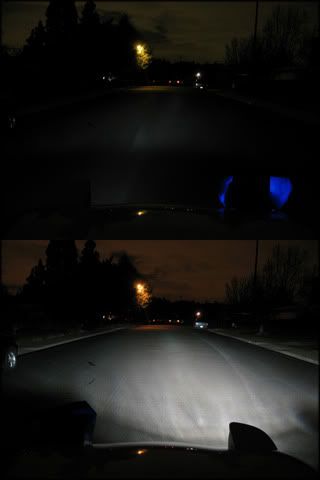
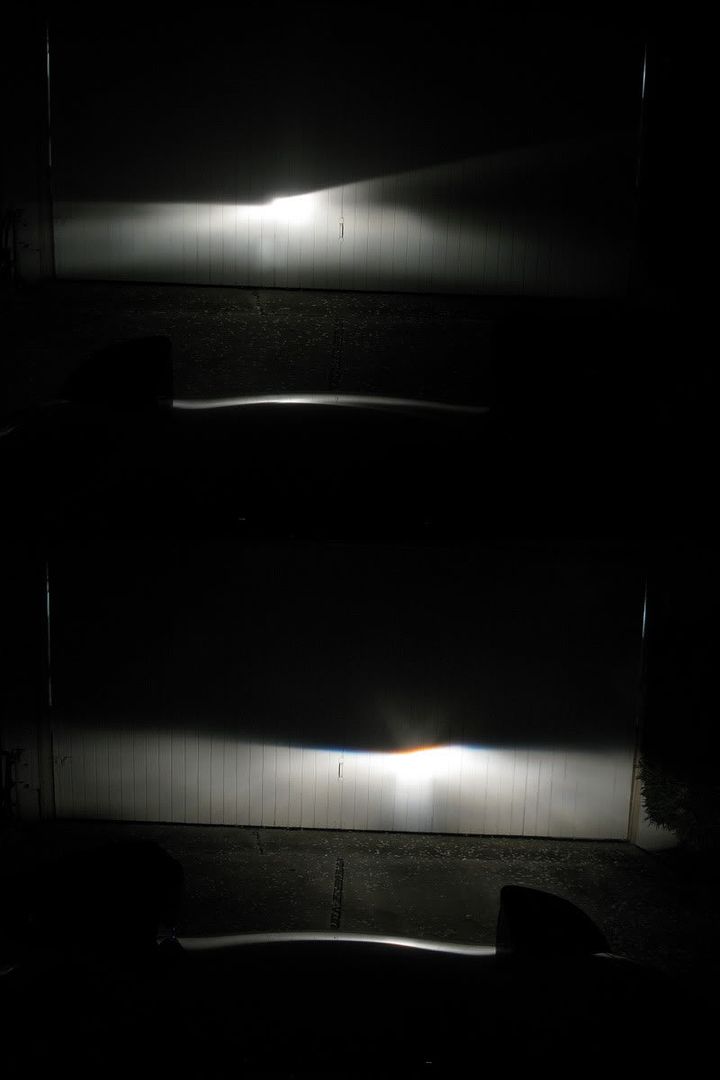
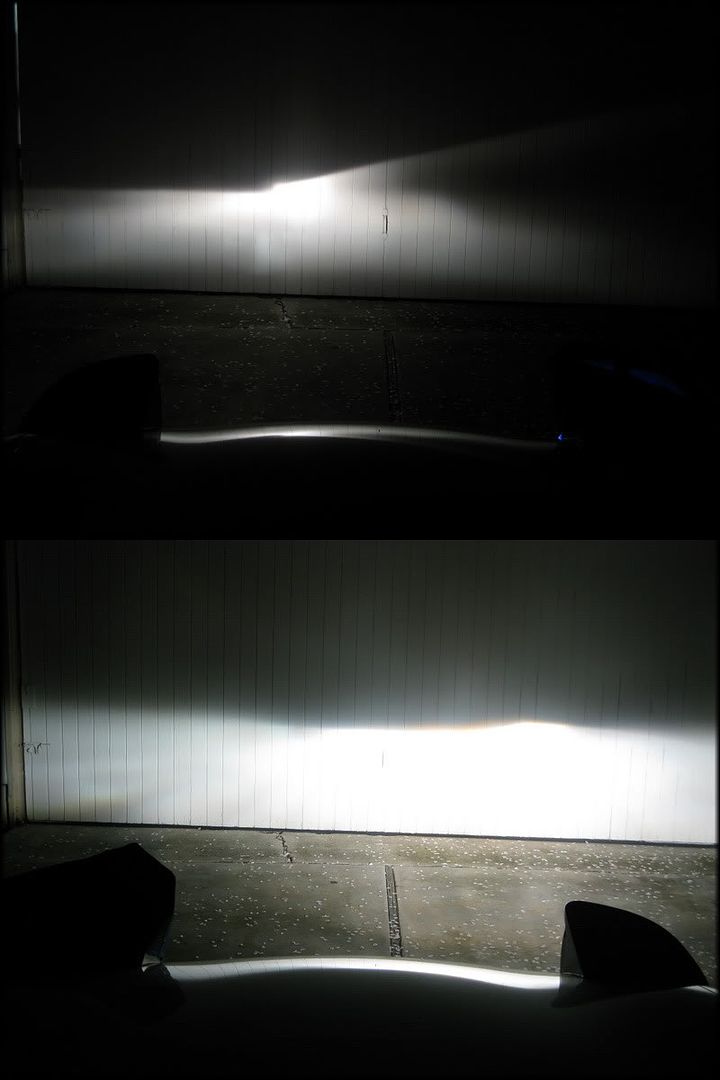
I took some pictures tonight of the light setup. First, a bit about my methodology:
Okay, that's the setup. First off it's the garage shots. The difference here isn't that dramatic because the peak intensity of the lights are about the same. It's the pattern that is of interest. Notice how the OEM headlight has a very fuzzy cutoff and allows a lot of light to leak upwards on the right side. Also, it does a poor job of illuminating the ground in front of the car, and it has a relatively narrow width. On the high beams, the patterns are more similar, but the dual 90mm setup benefits from a better reflector design and the fact that both low and high lamps run simultaneously.
(Click on each photo for a closer view.)
Low beams, top picture is stock (1/15s, f/2.8, ISO 200)
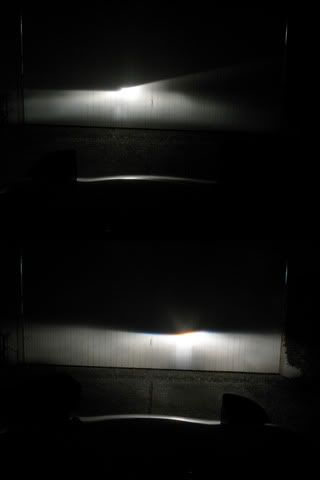
High beams, top picture is stock (1/15s, f/2.8, ISO 200)
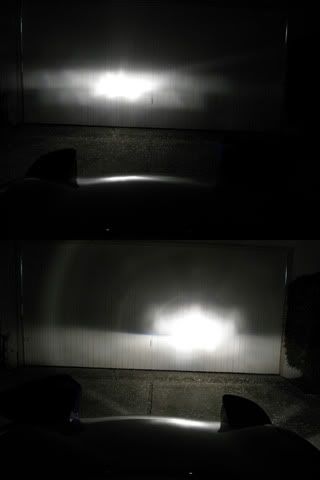
Now on to the street photos. You can see a much bigger difference here. The Hella lamps work a lot better both in the amount of light they produce and the width/depth of the pattern. Notice how much more you can see of the road, the sidewalk, and the cars up ahead. Valuable stuff for night driving. The poor OEM lights are downright scary.
Low beams, top picture is stock (2.5s, f/2.8, ISO 200)

High beams, top picture is stock (2.5s, f/2.8, ISO 200)
Remember, the Hella lights run at almost exactly the same wattage as the OEM ones. The difference here is projector low beams with a sharper pattern, superior reflectors in the high beams, and clear lenses on both lamps. In real driving conditions it's a life saver.
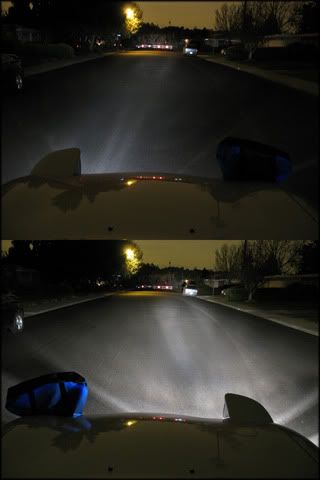
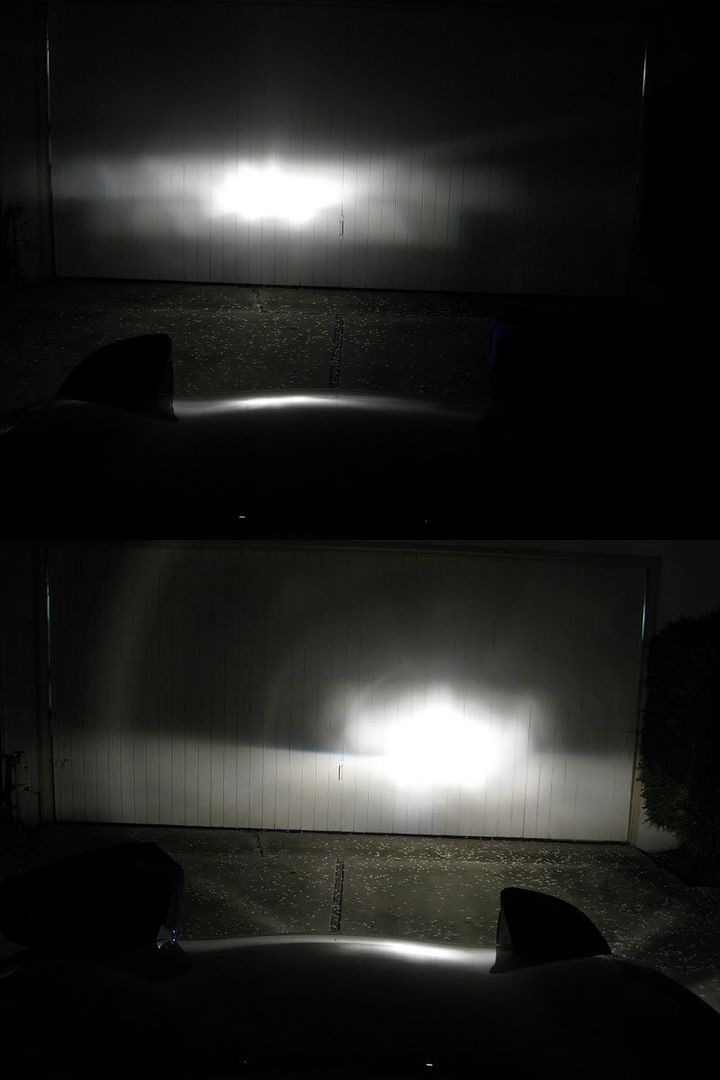
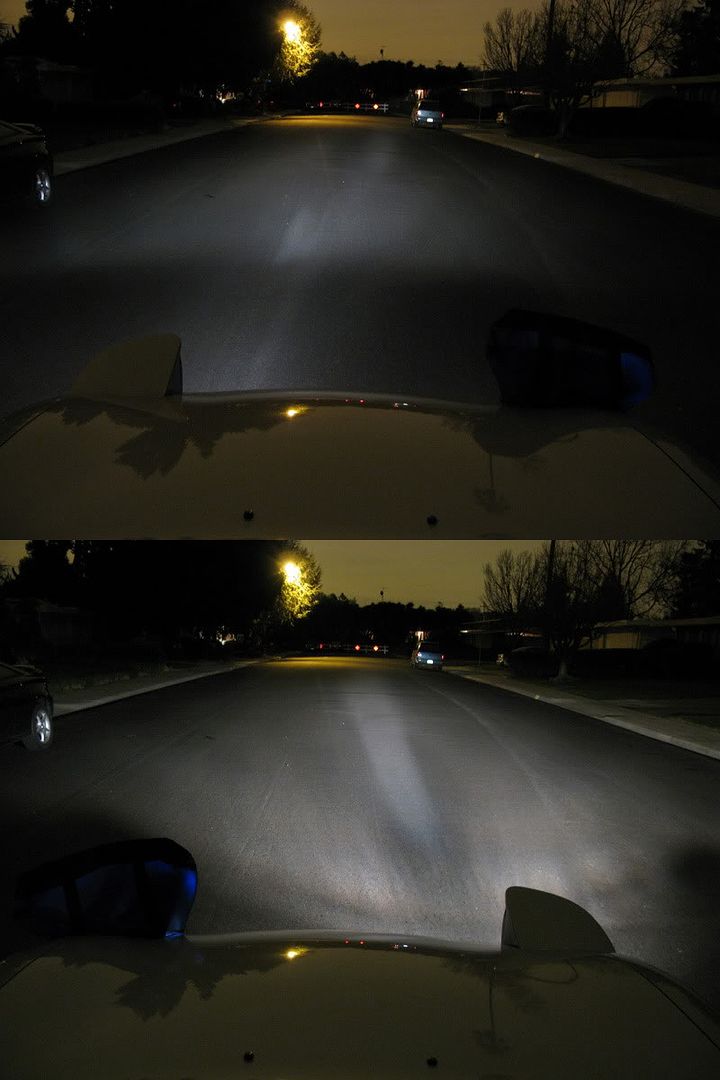
So those are the halogens, and they're great. I hesitate to post the next photos because the HID install is a lot harder to do (although still reversible) and the lights are a lot more expensive. But here's the photos after installing the HID version of the kit on the passenger's side of the car. I had to crank down the exposure on the street shots because the HID was too bright--so no, the OEM light isn't off. It's just very, very dim compared to the HID. (You can tell I did this by comparing with the photos above and looking at the brightness of the streetlight and the detail in the sky. On the HID pics they are significantly darker. This should also show you how easy it is to manipulate images with simple camera settings. Caveat emptor!)
Low beams, top picture is stock (1/4s, f/2.8, ISO 80)

Low beams, top picture is stock (2.0s, f/2.8, ISO 80)
Whoa, HID! Is it worth the extra $1,000? Maybe. But are the Hella halogens a whole lot better than the stock lights? Absolutely.
So there you go. Hope this helps!
-ch
- All pictures are taken with a Canon G9 on full manual mode. I call out the shutter, aperature, and ISO on each set. I chose what I thought gave a good impression of what the lights actually look like, but the most important thing is the comparison between the two. (It's easy to make anything look really bright by overexposing the shot. I'm not doing this.)
- I ran the lights off a fully charged battery so there wouldn't be any variation due to alternator charging modes.
- I shot against a garage (at 1/15s, f/2.8, ISO 200) and down a residential street (at 2.5s, f/2.8, ISO 200). I chose the street because often people show off their lights on some deserted dirt road where even a pocket light can see blinding if you crank up the exposure time and ISO. I wanted something that showed what the lights looked like under normal driving conditions complete with a streetlight.
- The images are not retouched or modified. They were resized to web consumption.
- I installed the original H4 reflector beam in the driver's side and my dual 90mm halogen kit in the passenger's side. I covered one side with a heavy canvas bag while I photographed the other. I wanted to show them back-to-back so that there wasn't any variation due to ambient lighting that would affect the exposure. The entire photograph session took about five minutes.
- For the OEM light I am using a German OSRAM H4 60W/55W bulb which has only a few hours of use on it. I thoroughly cleaned the lens as well.
- I aimed the lights properly so that each of them had appropriate light patterns.
Okay, that's the setup. First off it's the garage shots. The difference here isn't that dramatic because the peak intensity of the lights are about the same. It's the pattern that is of interest. Notice how the OEM headlight has a very fuzzy cutoff and allows a lot of light to leak upwards on the right side. Also, it does a poor job of illuminating the ground in front of the car, and it has a relatively narrow width. On the high beams, the patterns are more similar, but the dual 90mm setup benefits from a better reflector design and the fact that both low and high lamps run simultaneously.
(Click on each photo for a closer view.)
Low beams, top picture is stock (1/15s, f/2.8, ISO 200)
High beams, top picture is stock (1/15s, f/2.8, ISO 200)
Now on to the street photos. You can see a much bigger difference here. The Hella lamps work a lot better both in the amount of light they produce and the width/depth of the pattern. Notice how much more you can see of the road, the sidewalk, and the cars up ahead. Valuable stuff for night driving. The poor OEM lights are downright scary.
Low beams, top picture is stock (2.5s, f/2.8, ISO 200)
High beams, top picture is stock (2.5s, f/2.8, ISO 200)

Remember, the Hella lights run at almost exactly the same wattage as the OEM ones. The difference here is projector low beams with a sharper pattern, superior reflectors in the high beams, and clear lenses on both lamps. In real driving conditions it's a life saver.
So those are the halogens, and they're great. I hesitate to post the next photos because the HID install is a lot harder to do (although still reversible) and the lights are a lot more expensive. But here's the photos after installing the HID version of the kit on the passenger's side of the car. I had to crank down the exposure on the street shots because the HID was too bright--so no, the OEM light isn't off. It's just very, very dim compared to the HID. (You can tell I did this by comparing with the photos above and looking at the brightness of the streetlight and the detail in the sky. On the HID pics they are significantly darker. This should also show you how easy it is to manipulate images with simple camera settings. Caveat emptor!)
Low beams, top picture is stock (1/4s, f/2.8, ISO 80)
Low beams, top picture is stock (2.0s, f/2.8, ISO 80)

Whoa, HID! Is it worth the extra $1,000? Maybe. But are the Hella halogens a whole lot better than the stock lights? Absolutely.
So there you go. Hope this helps!
-ch
First off, let's start with the three easy ways of getting the lights to raise partially. They are:
So how about limiting the angle that the motor turns? There are a few ways to do this. You can buy a Pivot RHU-M controller that is compatible with the FD electronics. However, if you read the manual carefully you see things like "Angle of cover may be affected by voltage of battery" and "The slight difference of angle between right and left is caused by car and not caused by this unit". It's a clever device, but not particularly serious. The last thing you want is an asymmetrical car that blinds oncoming drivers when the voltage runs a little high.
I know that David is working on an application for sleepy eyes, and his reputation as a dogged pursuer of perfection is well known. I'm hoping that he can find some solutions where others have failed, and those who strongly prefer the sleepy eye look will be well served by his efforts. As I said before, my decision to go with the OEM height popups was my personal preference. I thought I would get the best functionality, and with some carbon fiber trim work produce something that looks as close to stock look as possible. But this is the fun of belonging to a community of RX-7 enthusiasts--there's a lot of variety!
That said, I did a lot of thinking about the sleepy eye look during my design process, so I thought I'd share my conclusions with the preceding novel. Hope this helps!
-ch
- Shorten the pivot arm of the electric motor
- Lengthen the pivot arm of the FRP frame
- Change the angle that the pivot arm moves (i.e., limit it)
So how about limiting the angle that the motor turns? There are a few ways to do this. You can buy a Pivot RHU-M controller that is compatible with the FD electronics. However, if you read the manual carefully you see things like "Angle of cover may be affected by voltage of battery" and "The slight difference of angle between right and left is caused by car and not caused by this unit". It's a clever device, but not particularly serious. The last thing you want is an asymmetrical car that blinds oncoming drivers when the voltage runs a little high.
I know that David is working on an application for sleepy eyes, and his reputation as a dogged pursuer of perfection is well known. I'm hoping that he can find some solutions where others have failed, and those who strongly prefer the sleepy eye look will be well served by his efforts. As I said before, my decision to go with the OEM height popups was my personal preference. I thought I would get the best functionality, and with some carbon fiber trim work produce something that looks as close to stock look as possible. But this is the fun of belonging to a community of RX-7 enthusiasts--there's a lot of variety!
That said, I did a lot of thinking about the sleepy eye look during my design process, so I thought I'd share my conclusions with the preceding novel. Hope this helps!
-ch
A few comments. First, the Pivot Controller WILL NOT work at all for an application like this. If you don't believe me, buy the $100 Pivot unit I currently have gathering dust in a box in my closet! I thought this would be an elegant solution for my sleepy eye HID project but the thing is a major pain in the a$$ and requires multiple steps to get it to work. Conclusion: unless you like to spend a lot of time screwing with electronics each time you use your headlights, this is not the option for you! Heck, I'll send the unit to anyone that wants to prove me wrong! Will probably bring it with me to DGRRX and see if any FC owners want it as I have seen a few of them rock'in that sleepy eye look
Regarding your comments with adjusting the height and the bump stop problem, you are exactly right here. The path that we have chosen for my project involved cutting the control arms down. The advantage this gives us versus adjusting the motor is when you turn the headlights off, the motor takes the light assemblies directly down versus popping up to full height and then going down. However, you are spot on with the shaking issue. My headlights currently vibrate and although the light is fantastic, I am a bit of a perfectionist so this must be solved. The car currently is at Kilo Racing and Jesus is working on a solution for this which will most likely entail making a new bump stop device for the current popup height. We have to figure out a way to take the play out of the control arm and the motor and I will post up more as we figure this out.
As I know much about the parts (Hella) Chris has selected for his lights, I can say these are top notch and will work well. I can also state they are SAE legal which means you don't have to worry.
http://www.rs-engineering.com/catalo...ight-p-31.html
Registered User
Joined: Jan 2003
Posts: 1,038
Likes: 0
From: Sterling, VA
Those HID projectors are really nice. I was looking forward to seeing the beam shots, and they definitely look good. That is what real HID projectors are all about - a WIDE beam with a much more even distribution. These will be far superior to any lighting setup you can buy for your FD.
I'm sold!
I'm sold!
Try this: