

corner/side seal clearance


Thread Starter
Full Member
Joined: May 2001
Posts: 83
Likes: 0
From: Kutztown, PA
corner/side seal clearance
I'm building an engine with new side and corner seals. I know what the manual specifies the clearance to be, but when I install them, there is *NO* clearance. The side seals bind on the corner seal. I found that one of the corner seals actually got closed shut at the 'mouth' of it and wound up breaking.
So, I think I saw something about lapping the side seals down to create clearance. Is this correct? And what kind of abrasive is used to grind them off?
Are all the 13B corner seals the same (I know the springs are different on the REW) or did they change at all with the REW?
Finally, has anyone ever built a motor using double side seal springs? Racing Beat suggests it for high HP applications. My understanding is that the soft side seals will just wear faster and I can expect to need a rebuild sooner. My application is a dedicated track car and a rebuild every year or two is not a problem.
Thanks!

Lives on the Forum
Joined: Feb 2001
Posts: 26,664
Likes: 23
From: n
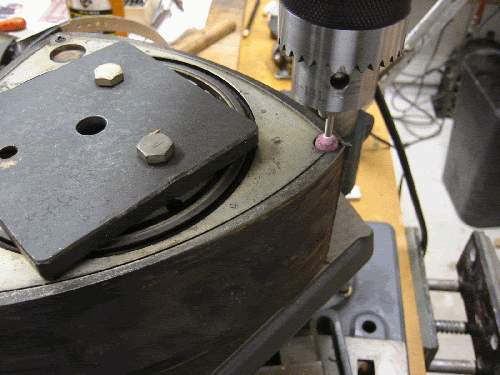
NEW side seals REQUIRE clearancing when installing.  There is no way around it.  If the side seals bind against the corner seals, the motor will have crappy compression.  Most books show fingers sliding the side seal ends on some sand paper - I find this pretty inaccurate.  I use a "dead" rotor and the biggest Dremel cylinder stone that fits into one of the corner seal holes.  I think slide the new side seal into the spinning stone and carefully shave the end.  Remember to remove all burrs at the shaved end for final install.  This takes a bit of practice and a lot of coordination using both hands. 
-Ted
-Ted
Thread Starter
Full Member
Joined: May 2001
Posts: 83
Likes: 0
From: Kutztown, PA
That sounds like a really good idea. Thanks Ted.
One other question, the manual, I think, calls for putting the chamfered side of the corner seal down. The seals I have don't have a chamfered side which makes me wonder if I might have the wrong seals... I don't know if the older engines might have had seals with squared ends.
I like that dremel idea, thanks again.

Hey, where did my $$$ go?
Joined: Feb 2001
Posts: 4,413
Likes: 0
From: Bimingham, AL
How much room should there be between the side seals and corner seals??? I guess you dont really want romm between them do you? Just for the side seal to be flush with the corner seal? I'm glad this came up cause I'm fixing to try building my own motor. Do you just trim in with the dremel till its the exact length as the side seal groove?
Thanks,
STEPHEN
Thanks,
STEPHEN


Joined: Mar 2001
Posts: 31,851
Likes: 3,240
From: https://www2.mazda.com/en/100th/
if you are reusing your rotors you need to set the clearance each side seal to each groove. the dremel works well because it is almost the same diameter as the corner seal, and it will keep the right contour. if you look at the side seal you will see that one end is finished and one is not, you need to grind the unfinished end
mike
mike
Thread Starter
Full Member
Joined: May 2001
Posts: 83
Likes: 0
From: Kutztown, PA
Originally posted by j9fd3s
if you are reusing your rotors you need to set the clearance each side seal to each groove. the dremel works well because it is almost the same diameter as the corner seal, and it will keep the right contour. if you look at the side seal you will see that one end is finished and one is not, you need to grind the unfinished end
mike
Trending Topics
NEW side seals REQUIRE clearancing when installing.  There is no way around it.  If the side seals bind against the corner seals, the motor will have crappy compression.  Most books show fingers sliding the side seal ends on some sand paper - I find this pretty inaccurate.  I use a "dead" rotor and the biggest Dremel cylinder stone that fits into one of the corner seal holes.  I think slide the new side seal into the spinning stone and carefully shave the end.  Remember to remove all burrs at the shaved end for final install.  This takes a bit of practice and a lot of coordination using both hands.
-Ted
-Ted
 I wish I had a dead rotor to use. Yeah, I know this thread is ANCIENT, but I thought this was a good topic, and I'm currently battling mental fatigue clearancing my side seals. I probably need a coarser stone, but it would still take forever. That dead rotor idea could easily cut a 4-6 hour job to 1-2 hours. Grr. So, any other ideas? I'm THIS CLOSE to just marking the seals and using my grinding wheel to get them down to where there's only ~1-2mm left to shape by hand. Not only is it time consuming, it's killing my back.
I am also in this same boat. I have them saved wher I can only get a .002 feeler gauge in there but they seem to stick down if I press down on the sides of them. The center of the seal is all ways higher than the rest of the seal. But if the sides are stuck down and I press the corner seal they pop back up. So I have know idea if thats correct or not. When you tear down your old motor they just fall out. So I am lost with out proper direction.
Well what you talked about with pressing on the center and then on the ends, think about this: when it's all installed there will be pressure applied along the whole length of each seal. I'm going by 'as long as they don't bind', but I think the FSM does tell how much clearance there should be along the long part of the side seals (and apex seals for that matter).
I went ahead and used the grinding wheel. The only problem I ran into was being so tired that I would lose track of what I was doing, a couple times I almost dug way crooked into a seal, but I caught myself before I went too far. I still love the trashed rotor idea, and before finding this thread I thought about doing that, but in my good rotors. Obviously, I quickly decided against that as I could easily ruin a rotor that way. I was focused on doing what I could with what I had, so picking up a spare rotor didn't cross my mind.
I went ahead and used the grinding wheel. The only problem I ran into was being so tired that I would lose track of what I was doing, a couple times I almost dug way crooked into a seal, but I caught myself before I went too far. I still love the trashed rotor idea, and before finding this thread I thought about doing that, but in my good rotors. Obviously, I quickly decided against that as I could easily ruin a rotor that way. I was focused on doing what I could with what I had, so picking up a spare rotor didn't cross my mind.
What was wrong with the old side seals? The reason I ask is that I just finished my rebuild using new corners but the old side seals (87k motor, coolant seal failure). I was careful to mark their positions on both rotors and just reused them. All ended up clearancing fairly tight and motor seems to be making good vacuum for being early in break-in period.
Last edited by Sgtblue; Apr 13, 2008 at 09:47 AM.
One broke during disassembly, but I got an Atkins Master Rebuild kit for a good price. So I though 'Why not use them?' Only deviations from the kit were OEM apex seals and I'm only replacing one rotor bearing, the stat gears and other rotor will stay as-is.

Thread
Thread Starter
Forum
Replies
Last Post