RX7Club.com - Mazda RX7 Forum
  • LOG IN
  • REGISTER
  • Forums
    • New Member Section
      • How to use this Site
      • Introduce yourself
      • New Member RX-7 Technical
      • Website-related Comments, Suggestions and Issues
    • Vendors Forums
      • Private Vendor Forums
      • Vendor Classifieds
    • Generation Specific
      • 3rd Generation Specific (1993-2002)
      • 2nd Generation Specific (1986-1992)
      • 1st Generation Specific (1979-1985)
      • Old School and Other Rotary
    • Tech and Performance
      • General Rotary Tech Support
      • Race Car Tech
      • Single Turbo RX-7's
      • Rotary Car Performance
      • V-8 Powered RX-7's
      • Suspension/Wheels/Tires/Brakes
      • Engine Management Forum
      • Interior / Exterior / Audio
    • Classifieds
      • The NEW RX7 Marketplace
      • New/Old Products Review - Non Vendor parts
    • Regional Forums / Upcoming Events
      • Rotary Owner Events
      • NE RX-7 Forum
      • SE RX-7 Forum
      • Midwest RX-7 Forum
      • Mountain RX-7 Forum
      • South RX-7 Forum
      • NW RX-7 Forum
      • West RX-7 Forum
      • Canadian Forum
      • European Forum
      • Australia and New Zealand Forum
      • Far East Forum
      • Latin America Forum
    • General Topics
      • Racing Kills Lounge
      • RX-7 Audio/Visual Lounge
      • Test Area 51
    • Rotary Archives
  • Marketplace
    • Vendor Directory
    • Become a Vendor
    • Member Marketplace
    • Vendor Marketplace
  • New Posts
  • Tools
    • Car Payment Calculator
    • Tire Rim Calculator
    • Vin Decoder
    • Recalls
    • Technical Service Bulletins (TSBs)
    • Members List
    • Live Feed
  • Gallery
  • View Dark Mode
    • Please register or login to enable Dark Mode.
  • Log In
  • Register
RX7Club.com - Mazda RX7 Forum
    • Threads
      • Advanced
Dark Mode

Please register or login to enable Dark Mode.

Log In

Forgot your Password?

By logging into your account, you agree to our Terms of Use and Privacy Policy, and to the use of cookies as described therein.
or
 
  • Recent
  • Commented
  • Albums
  • My Pictures

Pete_89T2's Photos

View Profile
Sort:
Most Recent
  • Most Recent
  • Most Comments
  • Albums
  • Photos
0 2025/12/27 07:01:36 Pete_89T2
Opposite side of the mounting plate, with added cable management for the MCE18 wiring.
0 2025/12/27 07:01:35 Pete_89T2
This is a shot of the final mounting plate with G5 NEO-4 and MCE18 attached to it
0 2025/12/27 07:01:31 Pete_89T2
0 2025/11/30 09:20:48 Pete_89T2
0 2025/11/30 08:54:34 Pete_89T2
0 2025/11/30 05:35:58 Pete_89T2
0 2025/11/20 15:18:27 Pete_89T2
0 2025/11/20 05:52:44 Pete_89T2
And here's the CANchecked MCE18v3 I/O Expansion box.
0 2025/11/18 16:12:44 Pete_89T2
Box it comes in, with a magnetic catch no less
0 2025/11/18 15:29:21 Pete_89T2
Unpacked - In the middle is the G5 Neo-4 ECU, and in plastic bags the USB tuning cable & GPS antenna with cable. Loose above the GPS antenna bag is the WiFi antenna
0 2025/11/18 15:29:20 Pete_89T2
Business end of the G5 Neo-4 - the 2x 34 pin header connectors, and connectors for GPS & WiFi antennas, one of the 2x CAN bus connections, Ethernet & USB tuning cable
0 2025/11/18 15:29:17 Pete_89T2
0 2025/10/17 08:02:37 Pete_89T2
0 2025/10/02 13:49:09 Pete_89T2
Proof it was made in an EU country
0 2025/10/02 13:49:07 Pete_89T2
0 2025/10/02 05:02:12 Pete_89T2
0 2025/09/21 04:43:59 Pete_89T2
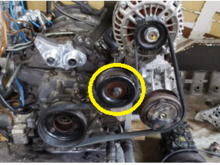
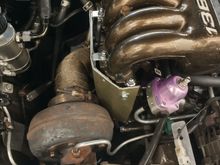
Engine bay shot of my setup. Can't see the IC ducting in this picture, but the IC gets its inlet air from in front of the radiator. Turbo inlet is fully enclosed, and air is ducted in from in front of the radiator as well. Retains full size OEM battery, AC & PS as well
0 2025/09/18 06:58:28 Pete_89T2
Mica heat shield installed before re-installing the PTP Lava turbo blanket
0 2025/09/03 12:36:42 Pete_89T2
Close up of the tight spot by the front LIM runner - this is why I made this with flexible mica sheet laminate vs. a rigid 1/4" or 1/8" thick mica sheet
0 2025/09/03 12:36:39 Pete_89T2
Finished install with the turbo blanket. Unfortunately, manhandling that blanket back in buggered up the turbo's oil supply line, which created a small oil leak....
0 2025/09/03 12:36:37 Pete_89T2
So rather than flaring & fabricating another hard oil supply line, I decided to just buy a pre-fabbed 20 inch Fragola AN-4 line.
0 2025/09/03 12:36:35 Pete_89T2
0 2025/09/03 12:36:32 Pete_89T2
0 2025/08/26 12:06:56 Pete_89T2
And here's the finished mica shield assembly with the 4 layers of mica sheet all bolted up.
0 2025/08/08 12:54:26 Pete_89T2
Close up of the tight front edge - getting that turbo blanket back on will take some persuasion, and it WILL contact the mica shield. Which should be OK since the mica is rated for 1832*F contact temp.
0 2025/08/08 12:54:23 Pete_89T2
Almost done - PTP Turbo "lava" blanket re-installed.
0 2025/08/08 12:54:21 Pete_89T2
And DONE - strut bar back where it belongs
0 2025/08/08 12:54:17 Pete_89T2
And here's another mock-up shot - AFTER bending the frame in more, and with one sheet of mica for testing. That front edge of mica was then bent around the contour of the LIM front runner, and I marked it for where the M6 hole needed to be punched thru to allow me to bolt that edge to the LIM
0 2025/08/08 12:50:41 Pete_89T2
0 2025/08/08 12:50:38 Pete_89T2
Here's a mock-up shot - just the frame installed
0 2025/08/08 12:45:23 Pete_89T2
Here's a tip view of the AL frame fabricated to hold the mica sheets in position
0 2025/08/08 12:45:20 Pete_89T2
And here's a side view of the frame, before trimming off the excess AL (see sharpie marks) that got in the way during the mock-up stage
0 2025/08/08 12:45:16 Pete_89T2
Here's a shot of my turbo AFTER removing the turbo blanket - with the blanket installed, it already brushes against the LIM front runner, leaving no real space for shielding
0 2025/08/08 12:41:47 Pete_89T2
0 2025/07/25 04:03:08 Pete_89T2
0 2025/07/25 03:59:07 Pete_89T2
On the right hand side, you can see the glove box switch & bulb wired in series to ground, with note indicating power is coming from elsewhere - TNS relay, sheet E3
0 2025/07/25 03:55:43 Pete_89T2
0 2025/07/16 04:23:29 Pete_89T2
0 2025/07/16 04:23:00 Pete_89T2
0 2025/07/08 03:55:54 Pete_89T2
First
Page
2 of 4
Last
Go To
Page
  • 1
  • 2
  • 3
  • 4
2 of 4
Go To GO
Go to page of 4 pages
  • 1
  • 2
  • 3
  • 4

Top
RX7Club.com - Mazda RX7 Forum
  • Contact Us
  • FAQ
  • Archive
  • Advertising
  • Cookie Policy
  • Privacy Statement
  • Terms of Service
  • Your Privacy Choices
  • Manage Preferences

© 2026 MH Sub I, LLC dba Internet Brands

Follow Us        


When you click on links to various merchants on this site and make a purchase, this can result in this site earning a commission. Affiliate programs and affiliations include, but are not limited to, the eBay Partner Network.